Here’s an easy recipe for a truly delicious vegan holiday drink that I devised last year for the Parisian specialty shop Vegami. If you’re like me, you have fond memories of drinking the non-alcoholic version around Christmas throughout childhood. This plant-based version is your ticket to travel back in time while keeping a foot firmly in the new millennium.
Fun fact: in French, eggnog is known as lait de poule (chicken milk)!
Note that kala namak is essential for the sulfurous “eggy” flavor of this drink. Although it’s pink in color in its ground form, it’s also known as Indian black salt. It’s usually easy to find at Indian grocery stores or online. Although it might sound strange, it grows upon you quickly. You might soon find yourself putting it on just about all your food!
So easy to mix up a batch!
Delicious with or without alcohol.
Ingredients Makes two servings.
10 oz (300 g) chilled silken tofu
2 cups (475 ml) chilled plant-based milk
4 tablespoons agave or rice syrup
1 teaspoon vanilla extract
1 teaspoon ground nutmeg
1/2 teaspoon ground cinnamon
1/4 teaspoon ground turmeric, for color
1/8 teaspoon ground kala namak (Indian black salt)
1/4 cup (60 ml) rum or cognac (optional)
Plant-based whipped cream (optional)
Directions
Combine all the ingredients except for the optional whipped cream in a blender or food processor and blend at high speed for a few minutes until smooth. Taste and adjust the amounts of sweetener, spices, etc. as needed. The 1/8 teaspoon of salt listed above is a conservative amount; you may with to add a tiny bit more if you find the egg flavor too subtle.
Serve cold in two whisky glasses, topped with whipped cream if you like, plus additional ground nutmeg and/or cinnamon.
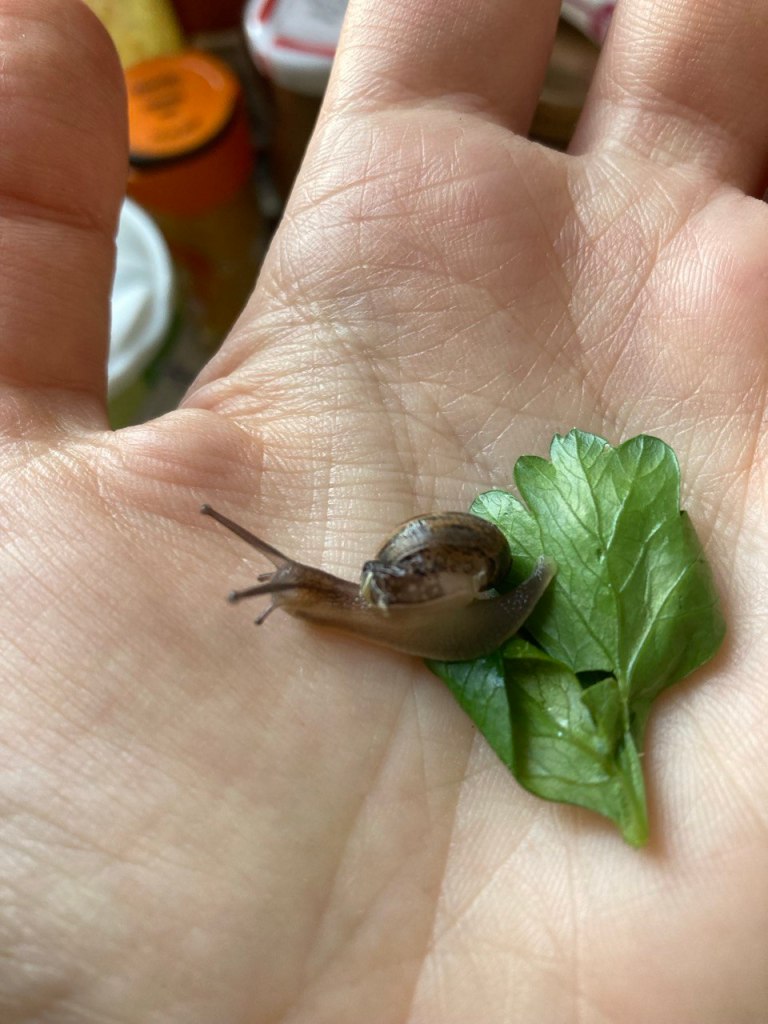
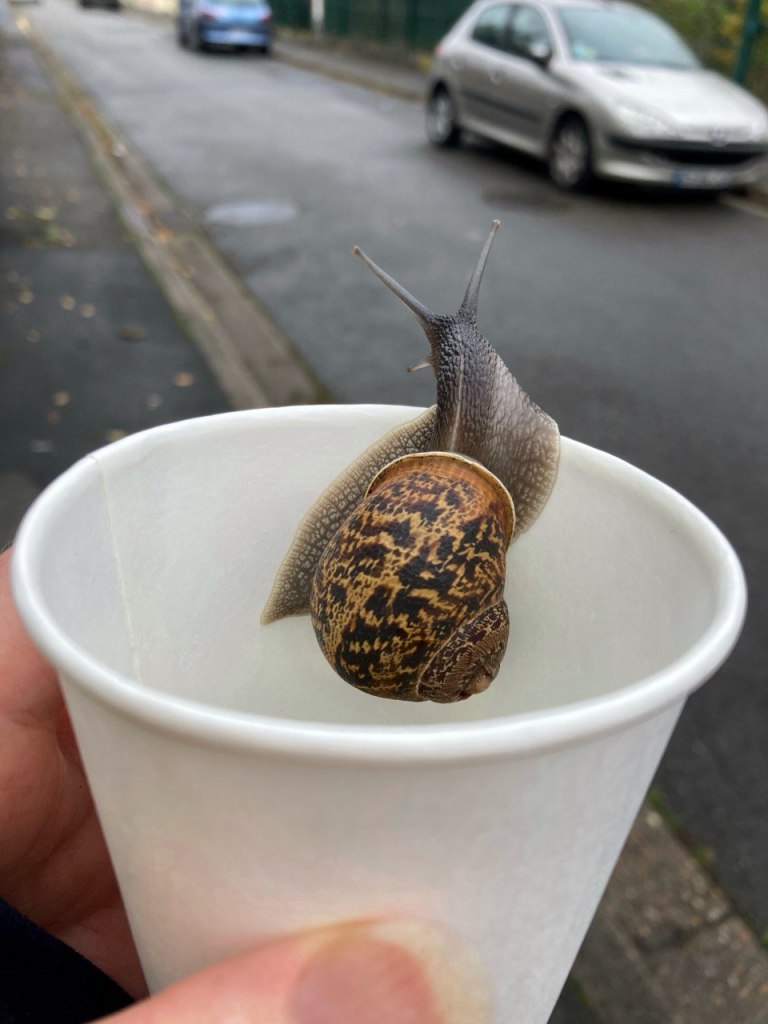
One fine day some months ago, I took some parsley out of my fridge. It was in a thin, flat package made of two rigid plastic panels that fit into each other. I opened it, set it on the counter, then turned around to get something from the table behind me. I turned back to find that a little brown snail had popped up out of the greenery and was crawling along a leaf.
As I looked more closely, I saw that it had a badly broken shell, undoubtedly from being packaged into that flat container that I bought at Carrefour. More than half of its original shell dropped off. Remarkably, it had survived some unknown number of days at the store, and then several more in my fridge before I discovered it.
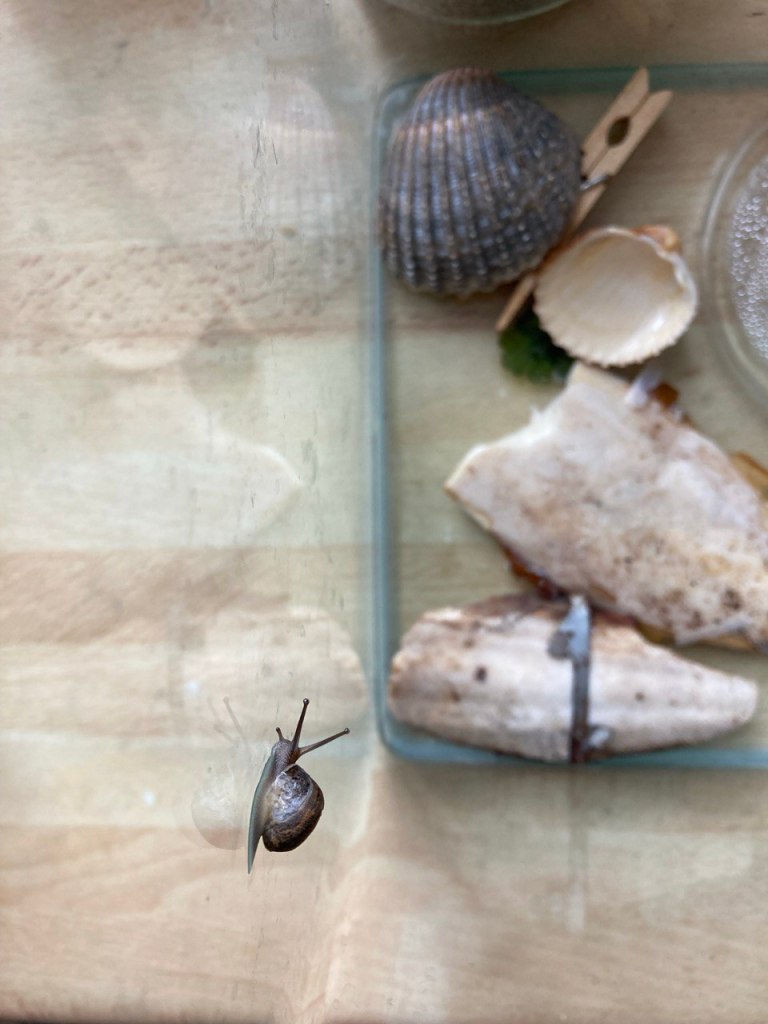
From previous experiences with snails, I knew they could regenerate their shells. So I decided to give this one some rest and relaxation in the aquarium I bought a couple years ago for another snail that I had released awhile earlier. I also still had some pieces of cuttlefish bone (one of them purchased at a pet shop and the rest found on a beach), which snails love because of the calcium they take from it to build their shells.
In quite a short time, the snail not only regenerated its shell but also grew quite a bit! I attribute this mainly to the cuttlefish bone, but the continual supply of fresh organic greens and vegetables must have played a role too. I like to think the happiness made possible by a predator-free living space also counted for something, but who can say?
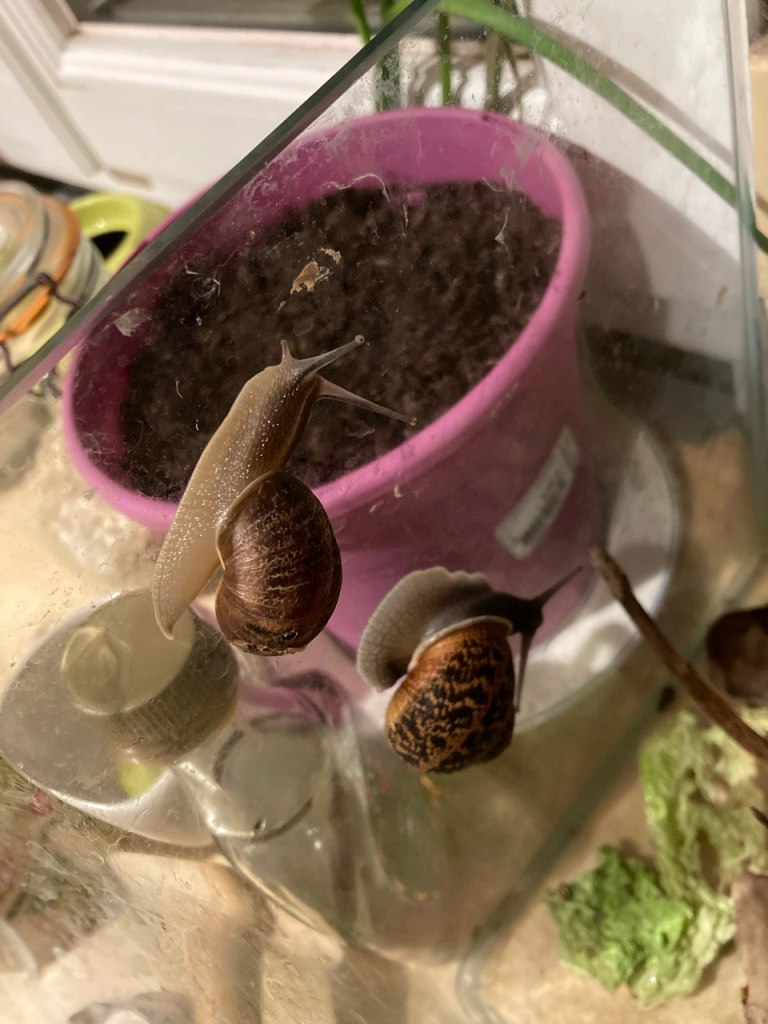
However happy it may have been, I thought it would be even better off with a friend. And not being sure whether its shell was as solid as it could be quite yet, I decided to keep it awhile longer. So the next time I went to my friend’s mother’s house (where lots of snails live in the yard), I looked for a snail that seemed down on its luck. And I found one. As it also had a damaged shell, I figured it too could benefit from a stay at my snail bed and breakfast.
The new one was smaller and kept to itself a lot at first, but it wasn’t long before I would notice them engaging in their favorite activity (clinging to the side of the tank!) alongside each other. They would often gather in one corner, pulling themselves completely inside their respective shells, and just stick there for hours and sometimes days.
I added a dish of dirt to their habitat. They greatly enjoyed burrowing into it and then spreading the dirt everywhere in their tank. Here, they’re sharing a snack of raw carrot. Did you know that snails have tiny little teeth? If you listen closely enough, you can actually hear them crunching.
Every so often, I would take them out to clean their habitat, gently rinsing the dirt off of them on the same occasion. I had to work quickly, because once out of their habitat, they would just begin crawling and never stop. Incidentally, they are not in the process of making more snails in this photo (but more on that in a moment).
Fresh, clean habitat with a new dish of dirt, two shell pools, and a week’s supply of cucumber for each.
Sometime later, thanks to their habitat’s transparent walls (sorry, snails!), I became an eyewitness to a new, more intimate phase of their relationship. This was easy enough because like most things snails do, this activity too is very . . . slow. One morning when I checked on them, it was in progress (the snails motionless throughout) and didn’t end until sometime in the mid-afternoon. How exactly they do it is complex and would take a while to explain, but this video will give you an idea! My impression was that the larger snail, my original little guest, had ended up becoming the mother in this situation and afterwards began searching for a place to bury its eggs. It escaped from the habitat a few times, but I would always easily find it.
It was usually on the countertop, the shelf above it, or one of the items nearby, like this container of turmeric. I added more dirt to the dish in the snail habitat, but something about it must not have been right. It probably wasn’t deep enough. I realized it was time to release the snails back into the wild. Before I could do this, though, the large snail made its most impressive escape yet. One morning it was gone but completely unfindable. A friend and I searched all the likely places, but to no avail. As the days passed I despaired more and more, thinking about how snails in the wild will often cling to a surface waiting for it to rain. If it was in some hidden, inaccessible cranny of my kitchen, where rainfall is admittedly scarce, it could very well dry up and die. I felt quite guilty and continued my fruitless searches.
One day there were a lot of nice items on the local organic shop’s 50% off produce shelf, so I got a bunch of things. Since the weather had already turned cold and my place has no central heating, I left them on the kitchen counter overnight. The next morning, guess who was back? And not only back, but seeming to knock on its habitat’s door. The above photo shows exactly where I found it, on the tank’s not-very-secure top. My theory is that it smelled the fresh cucumber and cabbage and came out from wherever it had lodged itself.
After that I was resolved to release the snails at the next opportunity, which came a few days later when I was invited to lunch with my friend’s family. I brought the snails along in a paper cup with a farewell cucumber gift at the bottom. The small one, who had never showed much personality, stayed on the bottom like a lump but the other one, who was far pluckier and more adventurous, was determined to see where we were going! In reality, snails don’t really see anything more than shadows, but I couldn’t help thinking of a dog excitedly leaning out the car window during a family trip to the beach.
In the yard, we walked around looking for the best spot to release them. Not too close to the compost bin, where there were lots of snails but which presented a crushing risk, and not too near the corner known to be frequented by a hedgehog either. We finally settled on this spacious flowerpot close to the back door. The large snail stayed inside the paper cup for a while, getting its bearings in this strange new world. After lunch, I checked on it and found it had moved to a spot behind the cup. Its friend still sat on the cucumber.
That was the last I saw of them, and I can only hope that they’re living their best snaily lives in that yard. A few days before releasing them, I happened upon a snail that I can keep forever without feeling guilty or worrying about escape attempts. By chance, it’s the same exact size as the larger snail. And almost as cute. It clearly wonders what all the fuss is about with these cucumbers.
The snail from the parsley package was the third to come my way over the past few years, always as a stowaway in some organic vegetable or other. I take that as good proof that the produce really is organic! I’m holding on to the tank and the cuttlefish bones because another one will surely appear before too long.
Goodbye, snail!
After the snails returned to the wide wild world, a thoughtful colleague sent me a surprise gift of this lovely book about another Elisabeth and her snail! It’s full of interesting facts about our slimy little friends but also offers various contemplative musings on life. Highly recommended!
Here’s an easy recipe for some pretty autumnal apple tarts. What I love most about them is the delectable citrusy miso “caramel” between the flaky pastry base and the fruit (a simplified version of the miso sauce from my apple-miso turnovers of a few years ago).
I was inspired to make them upon discovering a wonderful pink color inside the nondescript apples I had bought at an organic shop. They were unlabeled (I found them on the store’s anti-gaspi shelf of discounted produce), but a little research suggests they may be the Pink Pearl variety.
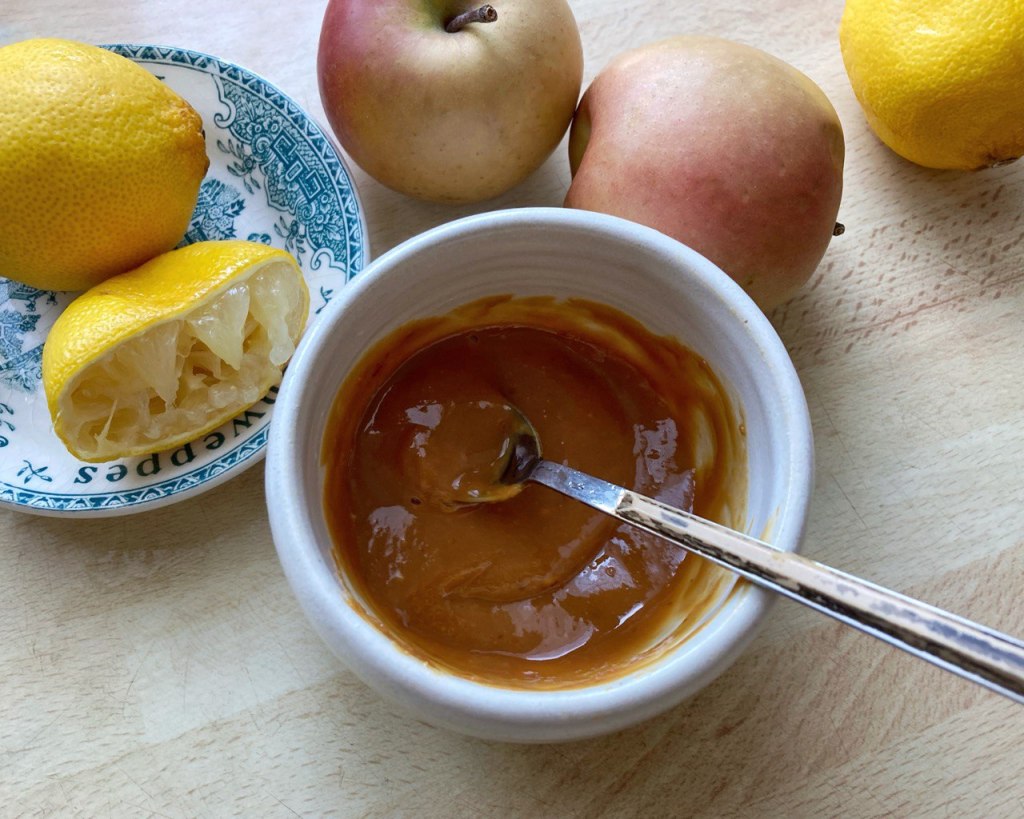
The pink color is beautiful against the orange of the miso caramel, but you can use any tart apple or even pear. If you want pinkness but can’t find the right apples, you could try coloring regular apples with the juice of thawed frozen raspberries (I have not experimented with this myself, but let us know if you try it). The miso caramel is easy and fast to whip up, and if any extra remains you can use it as a fruit dip. Be sure to use a liquid sweetener rather than granulated sugar, which might not incorporate so well.
Here are some behind-the-scenes photos, followed by the recipe.
Miso caramel preparation
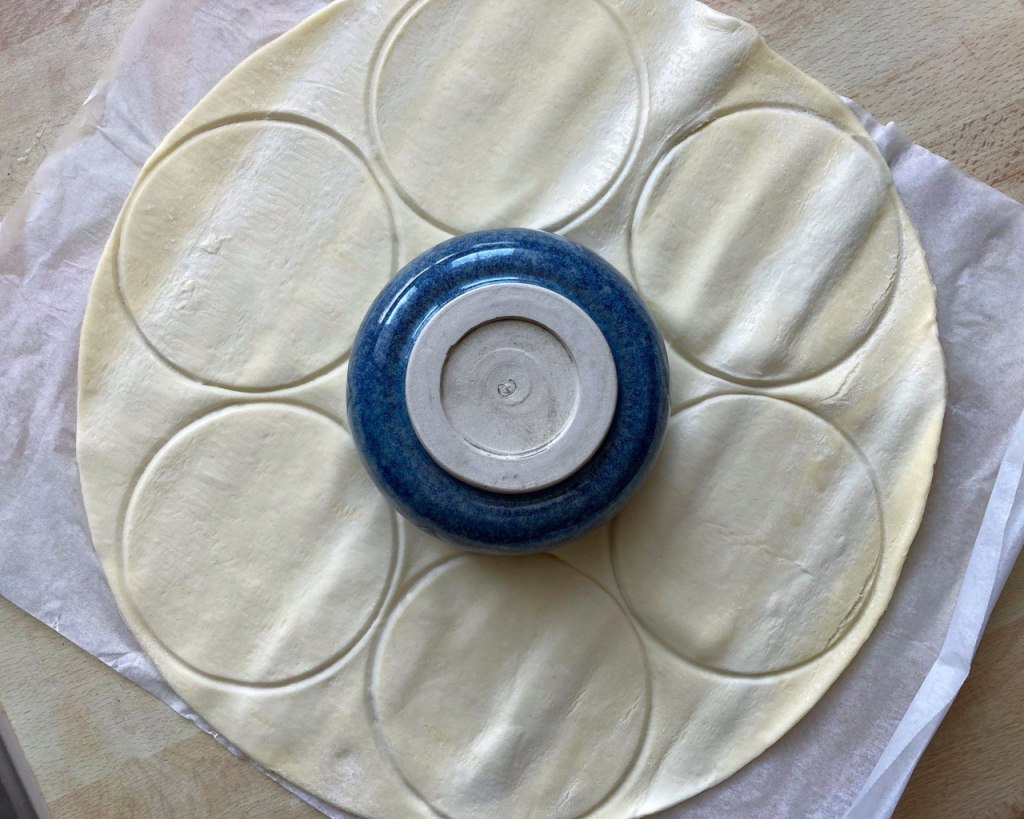
Tracing circles on the flaky pastry dough
I got seven rounds out of mine, so had a few left over for another batch!
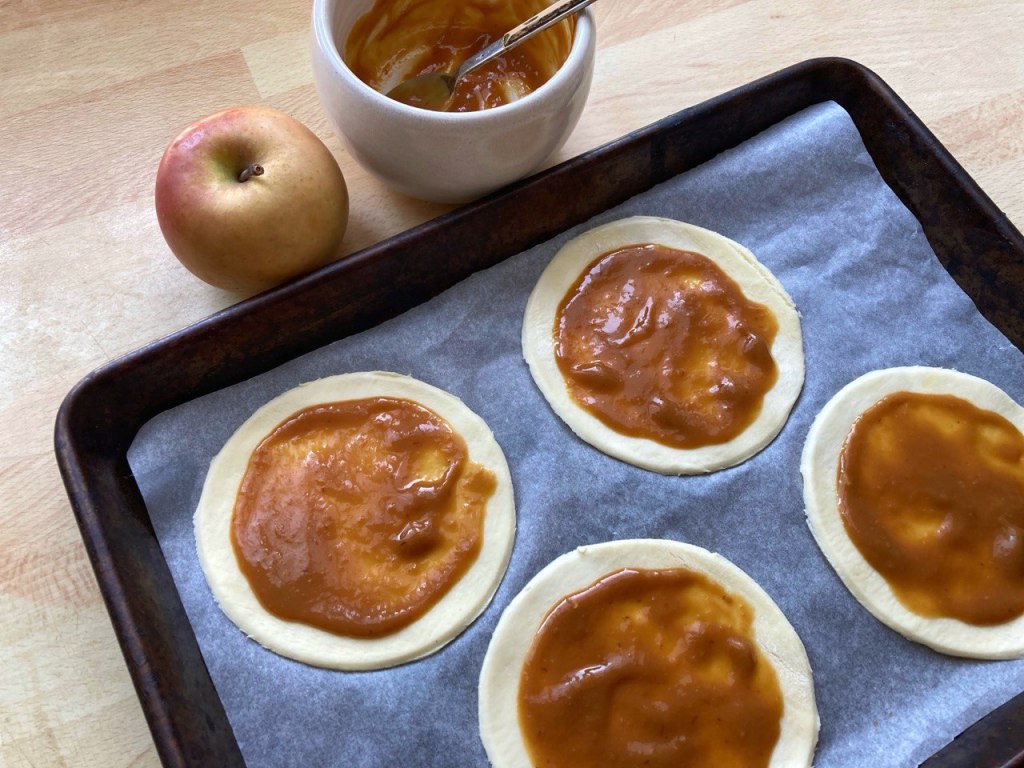
Miso caramel spread on the flaky pastry bases
Apple slices spread out on the pastry rounds
These colors!
The caramel is great with raw fruit too
Fresh from the oven
Apple and miso caramel tarts
Makes four tarts
2 tablespoons shiro (light-colored) miso
2 teaspoons fresh lemon juice
2 teaspoons agave syrup or other neutral-flavored liquid sweetener
1 or 2 tart apples or pears
1 prepared flaky pastry crust (keep in the fridge until the last moment)
Directions
Preheat your oven to 350°F (180°C).
Prepare the miso caramel: stir together the miso, lemon juice and agave syrup (or other sweetener). Taste and adjust the lemon juice and sweetener to your taste if desired.
Take your pastry crust out of the fridge and trace circles onto it by pressing down with a smallish bowl, then cutting along the lines with a butter knife. Transfer the circles to a baking sheet prepared with a sheet of baking paper, taking care not to stretch them.
Spread a teaspoon or two of the miso caramel onto each pastry round, leaving a margin around the edges.
Cut your apple into thin slices of equal thickness and place on top of the pastry rounds in a fan shape. In my case, five slices fit nicely onto each one.
Place the baking sheet in the oven and bake for around 20 minutes, checking occasionally to be sure the pastry isn’t getting too brown around the edges. While the tarts are baking, enjoy the remaining apple with the remaining miso caramel!
Remove from oven and allow to cool. If you like, you can drizzle more liquid sweetener on top of the tarts or dust with some powdered sugar.
And there you have it, your new favorite fall dessert!
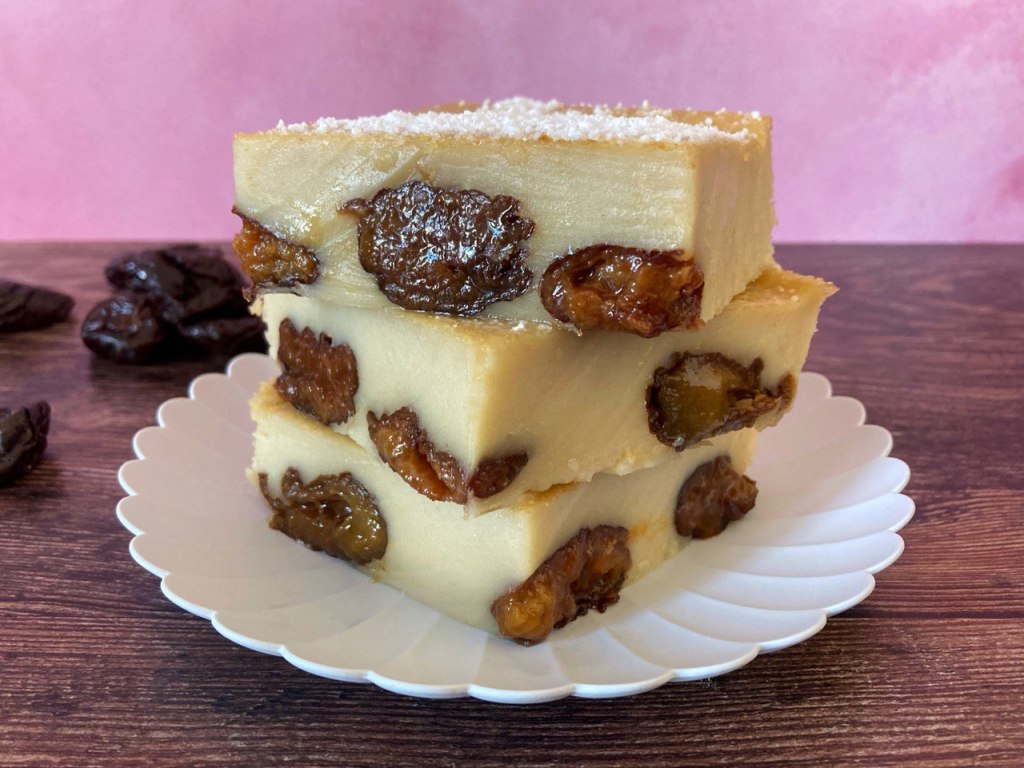
This month, I bring you a vegan version of a traditional dessert from the French region of Brittany. Known as far breton in the local dialect, this delectable flan is packed with sweet liquor-infused prunes that deliver a burst of summertime flavor.
Scroll down past the recipe for behind the scenes photos!
8 oz (225 g) prunes without pits (about 25 prunes)
1/4 cup (60 ml) cognac or rum
Powdered sugar for decoration
Directions:
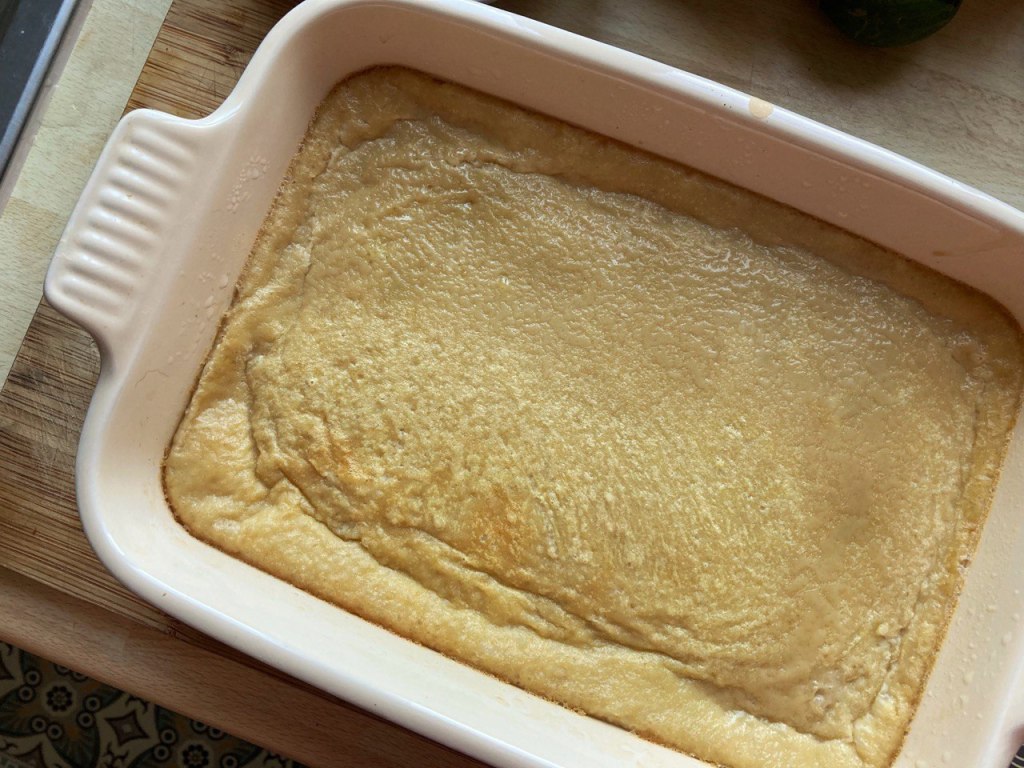
Preheat your oven to 350°F (180°C). Grease the bottom and sides of your baking dish with some solid margarine and dust with flour, tapping out the excess. I used a 1.1 liter rectangular dish measuring 10 x 6 x 2 in. (25 x 15 x 5 cm), but a square or round dish of a similar volume would also work.
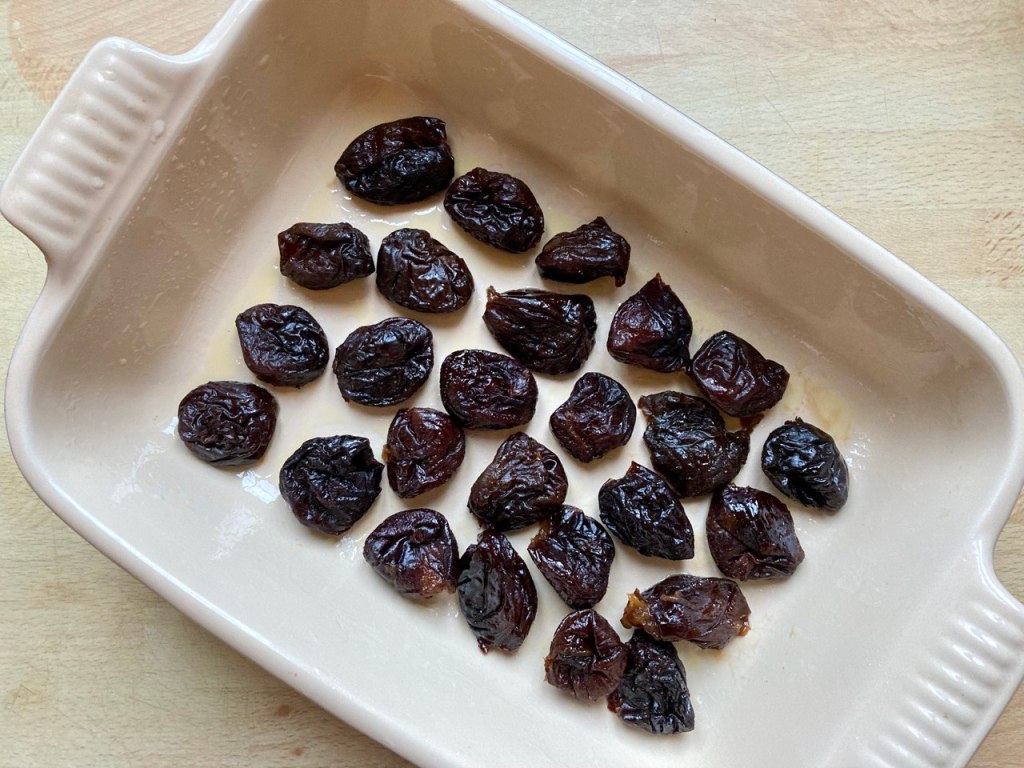
Warm the prunes with the liquor over medium heat, stirring occasionally, until most of the liquid is absorbed. Remove from heat and allow to cool.
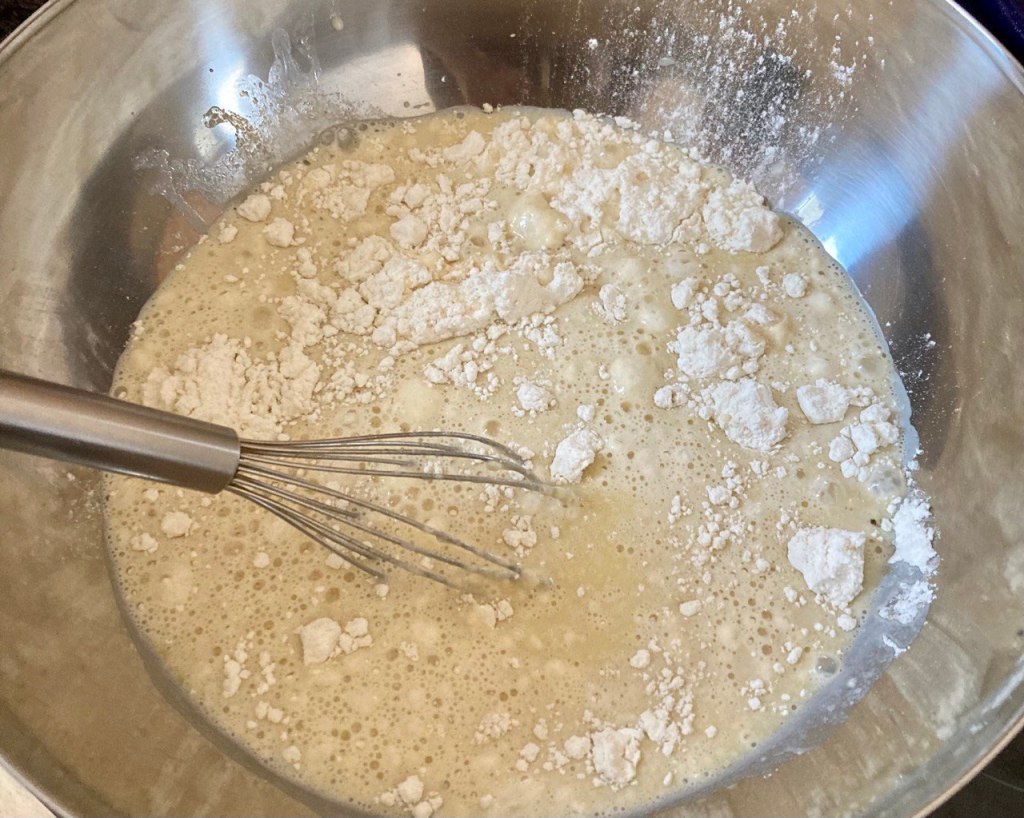
In the meantime, sift the flour, corn starch and salt into a medium-sized mixing bowl. In another mixing bowl, combine the soy milk, melted margarine, sugar and vanilla extract. Slowly incorporate the liquid mixture into the dry ingredients, whisking gently until everything is combined and taking care not to over-mix.
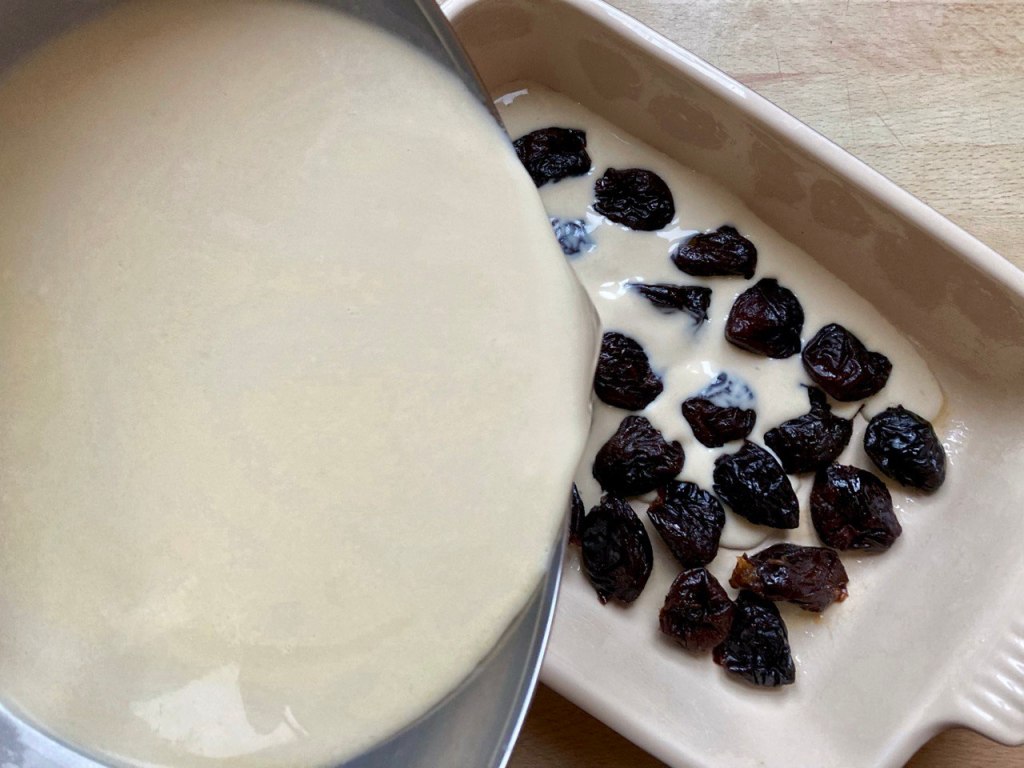
Place the prunes evenly in a single layer in the bottom of the baking dish, then carefully pour the batter over the prunes. Bake in the preheated oven for 40 to 45 minutes. At the end of the baking time, poke a toothpick or a knife into the flan to make sure it’s fully baked (if it isn’t, return it to the oven for a little longer). Remove from oven, let cool to room temperature, then chill for at least two hours before serving to allow the flan to set.
Cut into squares and, right before serving, dust with a bit of powdered sugar. Chill remaining flan and eat within two or three days.
Stewing the prunes in the liquor
Mixing up the batter
Arranging the prunes in the bottom of the baking dish
Pouring the batter over the top
After baking… it doesn’t look exciting now, but will when it’s cut! (chill for two hours first)
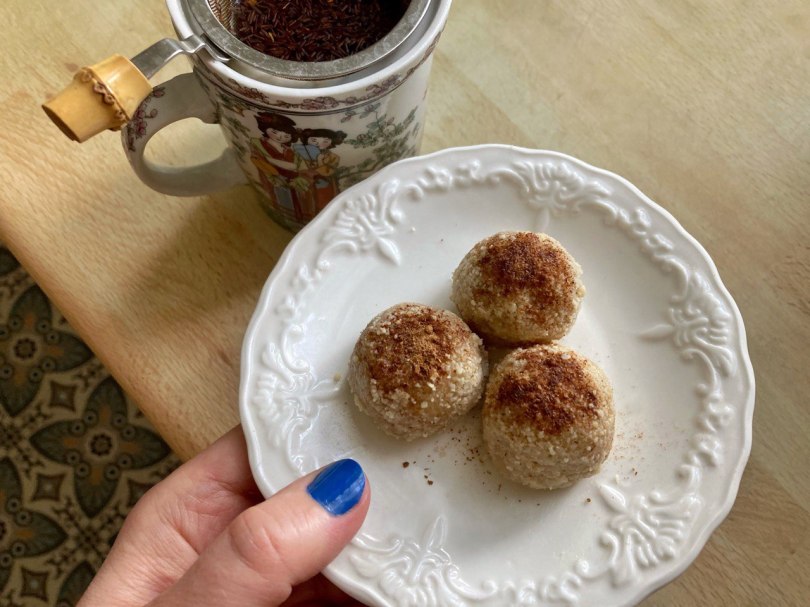
This recipe puts the NUT in doughnut holes. Made from ground almonds, nut butter and a few other ingredients, these no-bake, raw doughnut holes can be whipped up in a flash.
I devised them one day when I wanted just a very small dessert to go with my afternoon tea but didn’t have anything in the house. A package of ground almonds happened to be sitting on my kitchen counter next to a jar of almond butter, and that reminded me of making truffle-like creations with ingredients like those in the early 2010s when raw food was popular. After stirring the almonds and almond butter together with some maple syrup, vanilla and a tiny bit of salt, and then rolling them into balls, I realized they were like a more filling, stick-to-your-ribs version of the doughnut “holes” you can get from doughnut shops. Especially with a dusting of cinnamon.
These doughnut holes are better for you than their traditional counterpart, with their protein content and as a source of vitamin E and minerals such as calcium, phosphorus and magnesium, as well as certain phytonutrients. Almonds furthermore have antioxidant and anti-inflammatory properties, and although calorie-dense, are not associated with weight gain, possibly because the fat and fiber content help promote feelings of satisfaction and fullness.
They’re also nice on a hot summer day when you don’t want to fire up your oven.
Countless variations are possible, since many types of ground nuts and nut (or seed) butters can be used. I like the almond flavor of these, but it would be interesting to try a version with peanut butter, pistachio butter or black tahini. For the doughnut holes pictured here, I used white almond butter.
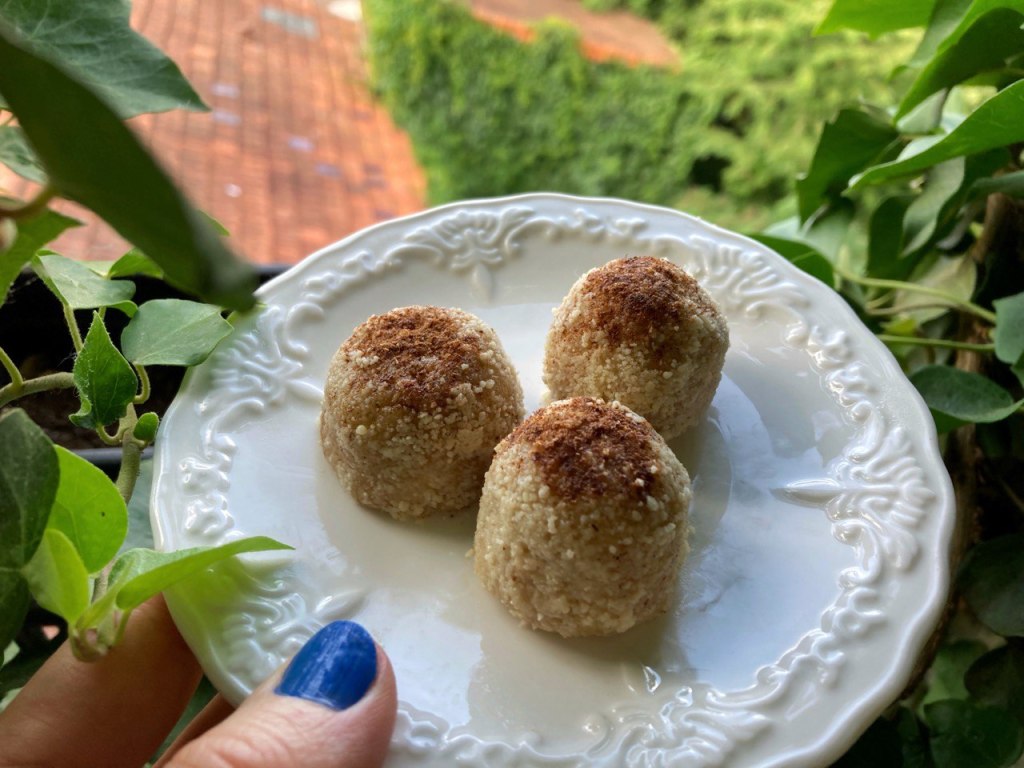
Nutty doughnut holes
Makes three doughnut holes.
6 tablespoons ground almonds, plus extra for coating
3 teaspoons almond butter (the thicker the better)
3 teaspoons maple syrup
1/4 teaspoon vanilla extract
small pinch of salt
1/2 teaspoon ground cinnamon
Directions
Mix all the ingredients except the cinnamon together with a spoon in small, round-bottomed bowl. Adjust the quantities as needed: if your nut butter is on the runny side, or you use more maple syrup for a sweeter result, you may need to add more ground almonds to compensate. Roll the paste into balls with your hands, then coat the balls with extra ground almonds. Finally, dab the tops of the balls in some cinnamon (this helps it to stick better), or dust the cinnamon on top. Serve immediately, as is, or place in the refrigerator for an hour for a firmer result.
Just about any nut or seed butter will work. Try to use one that’s fairly thick (the white almond butter I used was a bit on the runny side and I had to add more ground almonds).
Mise en place. I received the maple syrup, a very nice high-grade, artisanal variety from Williamstown, Massachusetts, as a gift from a thoughtful client who lives in the area.
I often make just one doughnut hole at a time, mixing up the ingredients in a small condiment bowl.
Mash the ingredients together against the bottom of the bowl with a spoon for best results.
Enjoy! Don’t forget to tag me on Instagram if you make these and post them there. 🙂
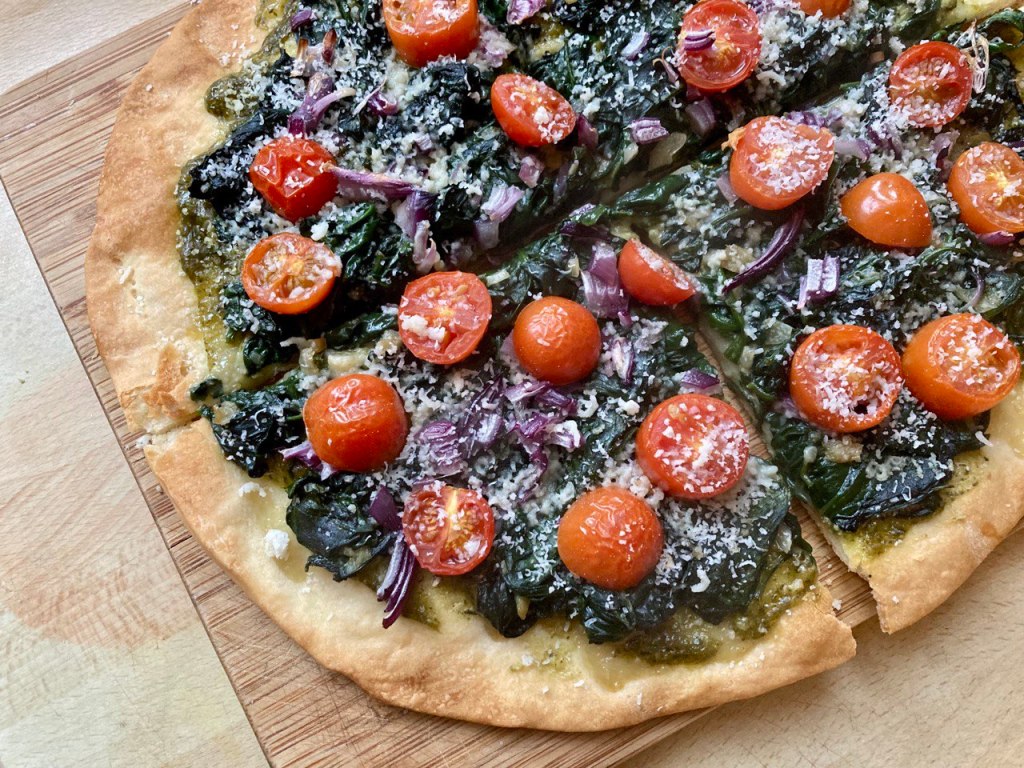
I don’t have a Valentine’s dessert recipe this year, unlike all the other years of this blog’s existence so far, but I do have a great pizza idea for you! It’s packed full of garlic, which not only makes it super delicious but also gives you the perfect chance to test your sweetheart’s true feelings. 😀
The other components of this yummy combination are pesto, spinach, cherry tomatoes, red onion and vegan parmesan.
This post is more inspiration than recipe, since the measurements are all approximate and the quantities you’ll need will depend on the size pizza you want to make.
Ingredients
1 pizza base, whatever size you like
Vegan pesto – I used half a jar of Barilla’s new vegan pesto (find it at Monoprix), but you can alternatively make your own
Garlic cloves, as many as you like – I used four!
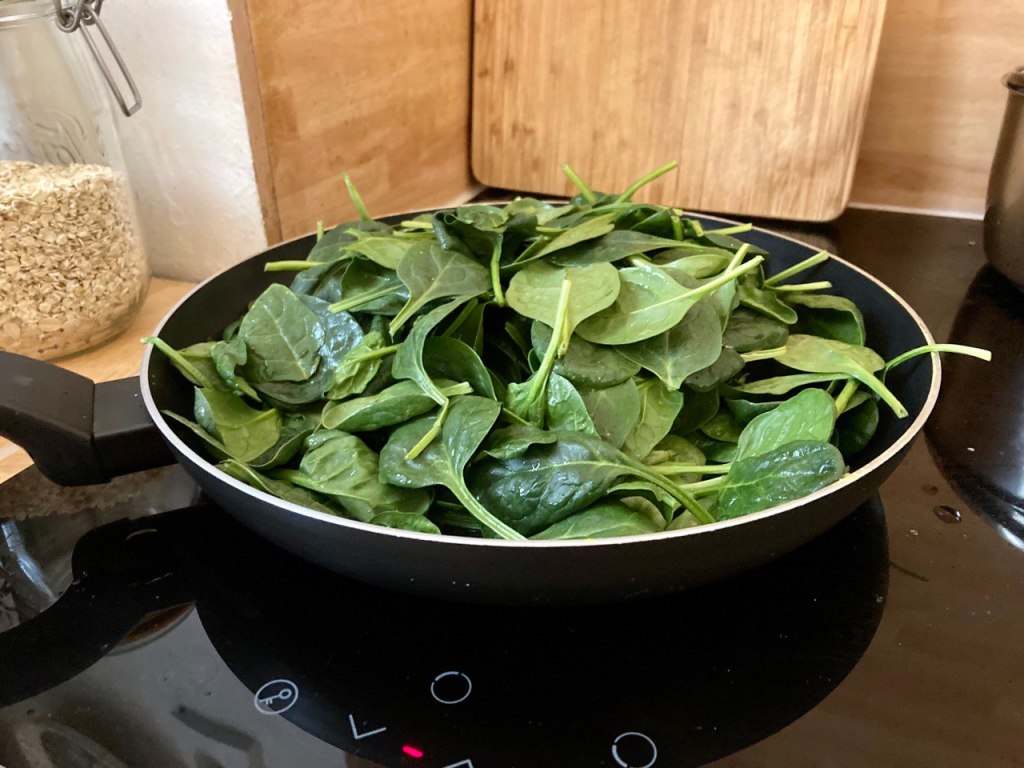
Fresh spinach leaves – I used approximately three or four cups (it cooks way down, so don’t be stingy)
Cherry tomatoes, cut in half
Red onion, diced roughly
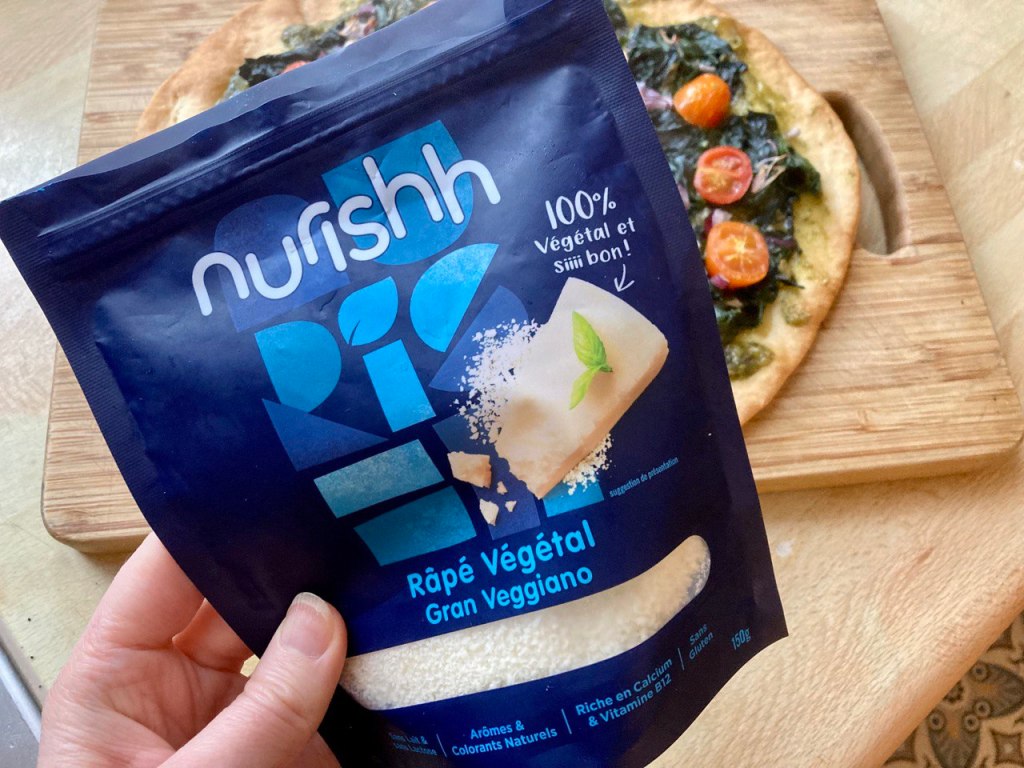
Vegan parmesan to sprinkle on top (I used Nurishh, also from Monoprix)
Directions
Preheat your oven to a pizza-baking temperature (usually 400°F/200°C). You may wish to prebake the pizza base since there’ll be so many thick toppings on it during the main baking.
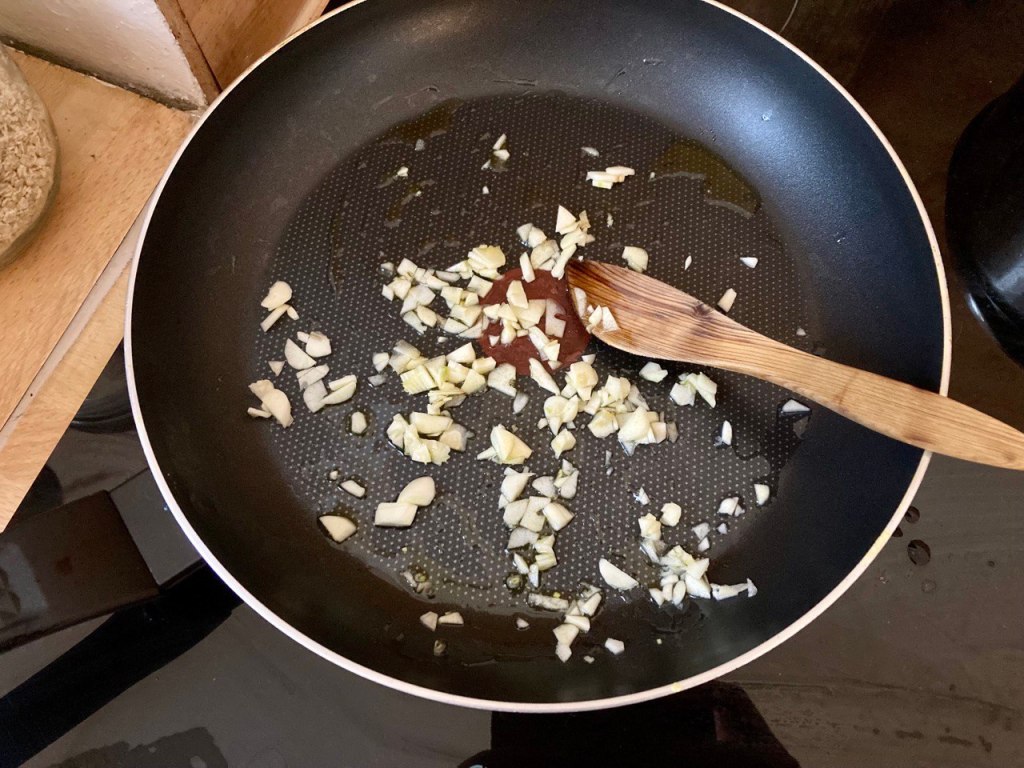
Chop the garlic finely and sautée it in some oil for a minute or two over low to medium heat, stirring frequently.
Add the fresh spinach and stir occasionally until it has cooked down (see photos below).
Spread your pizza base generously with pesto.
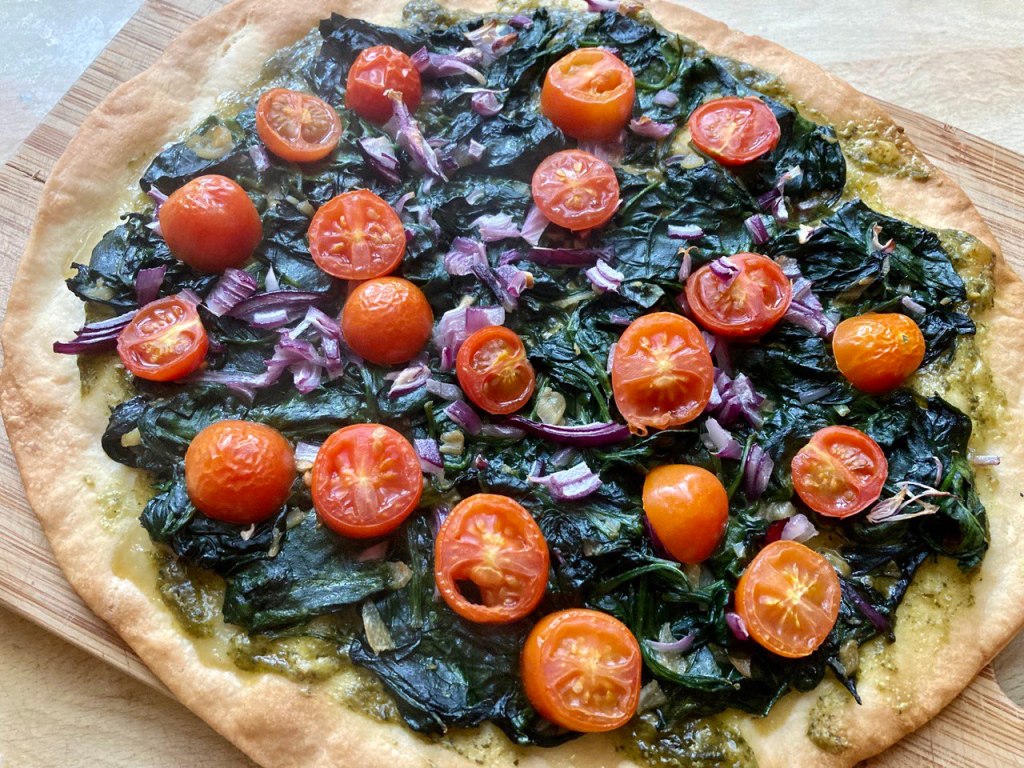
Top that with the cooked spinach plus the (raw) cherry tomatoes and onion.
Bake the pizza for 10 to 15 minutes or more, depending on the thickness of the base.
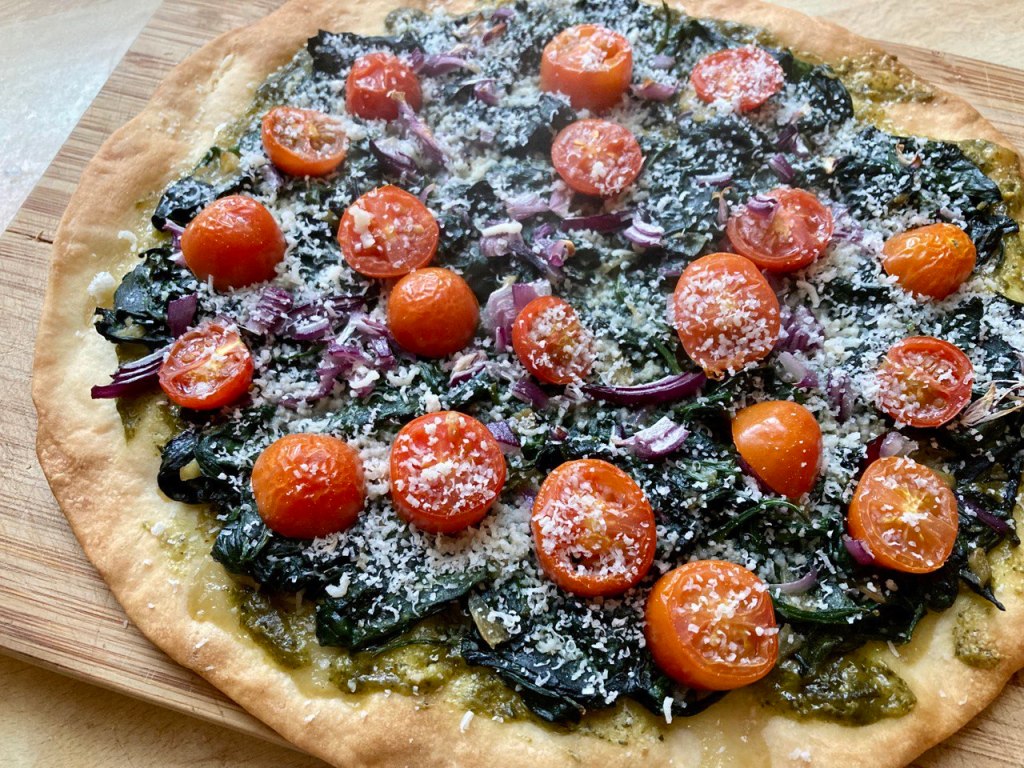
Remove from oven, sprinkle with vegan parmesan, slice and serve!
Sautée the garlic over low to medium heat, stirring frequently and making sure it doesn’t get too brown.
Add the spinach (keep adding more until you think you have enough to cover your pizza base). Stir the mixture occasionally so that the garlic gets mixed in with the spinach rather than resting on the bottom of the pan, where it could burn. The spinach will release moisture as it cooks which should help prevent this also.
When it’s ready, it’ll look something like this.
While the spinach is cooking, prepare your pizza base. You may wish to prebake it a bit first since the spinach topping is so thick. Once it’s ready, spread it generously with the pesto.
Now add the spinach and garlic mixture.
Finally, top all of that with the tomatoes and red onion, and pop it in the oven! 10 to 15 minutes should do the trick, but baking time can vary greatly depending on the thickness of the crust you use and your oven. Keep an eye on the crust to gauge whether it’s done. You may want to move it up to the top rack for a minute at the end to make sure the tomatoes are nicely cooked.
It’ll look something like this.
Top with some vegan parmesan for a nice cheesy and salty final touch. If you can’t find any at a store, a nice homemade alternative is ground almonds + nutritional yeast + salt (and optional garlic powder).
Have you ever seen a more delicious looking pizza? 🙂
So feel free to make this your Valentine’s Day dinner, for yourself and your favorite person, or even just for you!
Earlier this month, I discovered there’s a National German-American Day (October 6th) in my home country. It seems it was created in 1883 but got put on the shelf during World War I, when German descendants wanted to keep their roots on the down-low. Then in 1983, sensing an auspicious anniversary, Ronald Reagan brought it back. I’ve never known this particular day to be celebrated in Wisconsin, which is home to countless people of German ancestry. But it may just be that it doesn’t stand a chance against Oktoberfest, a much bigger deal for the gentle folk of this state.
As my own family is mostly German on both sides, and almost everyone I knew growing up had this same background, Germany never seemed very exotic or interesting to me when I was younger. I half-heartedly studied the language for a semester as an undergrad, but then when a scheduling conflict made the second semester inaccessible, I enrolled in an Arabic class instead. I’ve taken more of an interest in my heritage in recent years though, so when I heard about this little holiday I decided to pay homage to it with this vegan version of a favorite family dish.
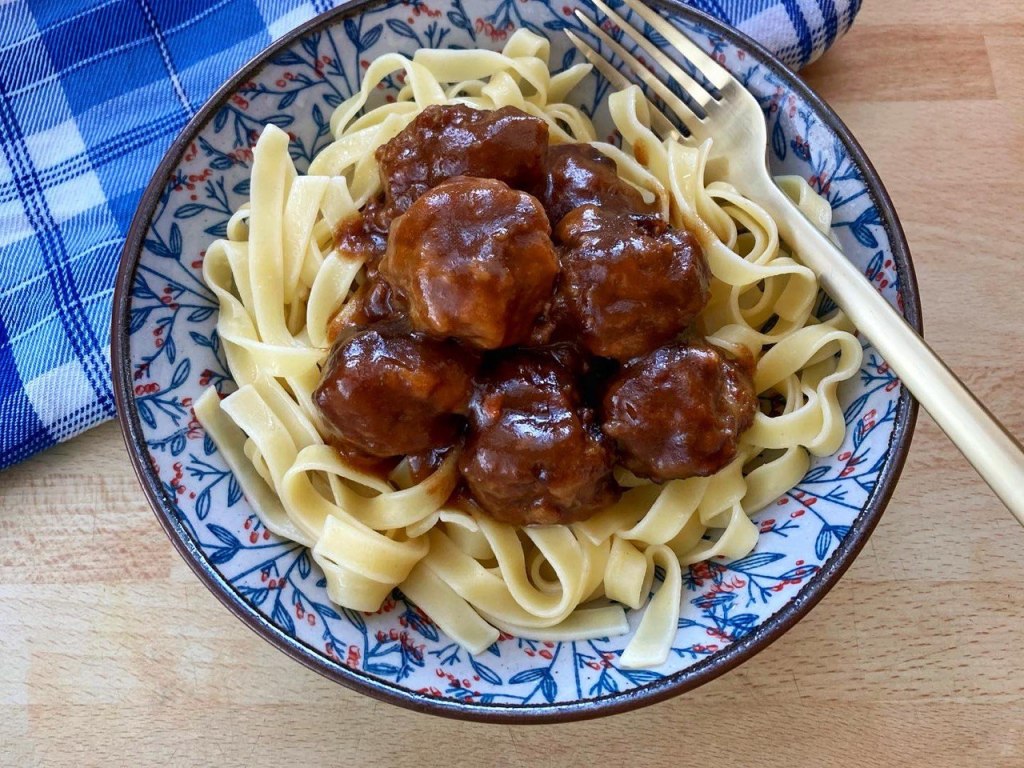
It’s a shortcut version of sauerbraten, a beef pot roast that’s marinated in vinegar over days and days (the name means “sour roast”), although I liked the meatball alternative better in any case. My mom always served the meatballs over a fettucine-type pasta, but they could also be paired with rice or presented on a plate skewered with toothpicks for a buffet dinner.
What sets this recipe apart is its special ingredient. The sauce is made with – hold onto your hats – gingersnap cookies! My mom makes her own gingersnaps, but I used Lotus brand speculoos, which have a similar enough taste. The cookie element makes this dish a bit sweet (there’s some brown sugar in there too!), so to balance out the flavors, consider serving it with a neutral-tasting side dish like green beans, or even something bitter such as arugula/rocket or endives.
Sauerbraten meatballs and sauce
Makes about 23 meatballs (two or three servings)
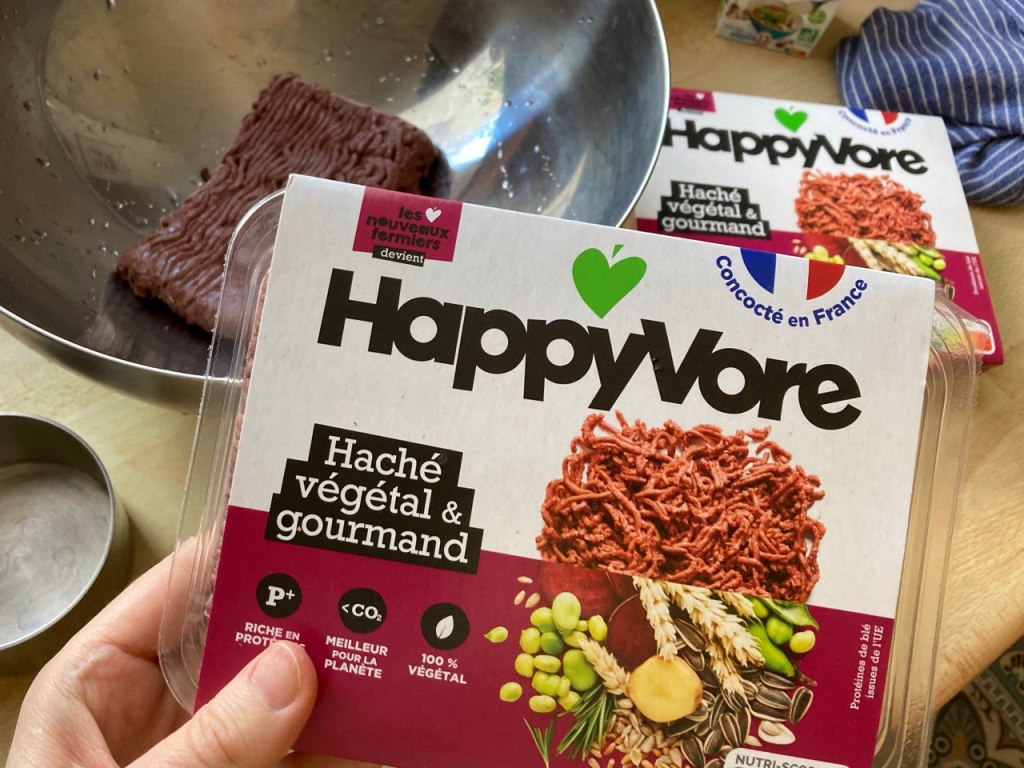
14 oz (400 g) vegan ground “beef” (look for brands like HappyVore, Herta or Beyond Meat)
1 small onion, grated
1 cup breadcrumbs (1 piece of pre-sliced fresh bread)
1/4 cup (60 ml) unsweetened plant-based liquid cream
1/2 teaspoon salt
1/4 teaspoon black pepper
About 6 tablespoons flour, for coating
A few tablespoons vegan butter or margarine, for the frying pan
Fettuccine or similar pasta, prepared according to package instructions
For the sauce:
1 cup (236 ml) vegetable broth
1/3 cup crushed gingersnaps or speculoos/biscoff cookies
3 tablespoons brown sugar
3 tablespoons vinegar (any kind, but I used red wine vinegar)
1/3 cup (80 ml) water
Equipment needed: vegetable grater, large frying pan with cover.
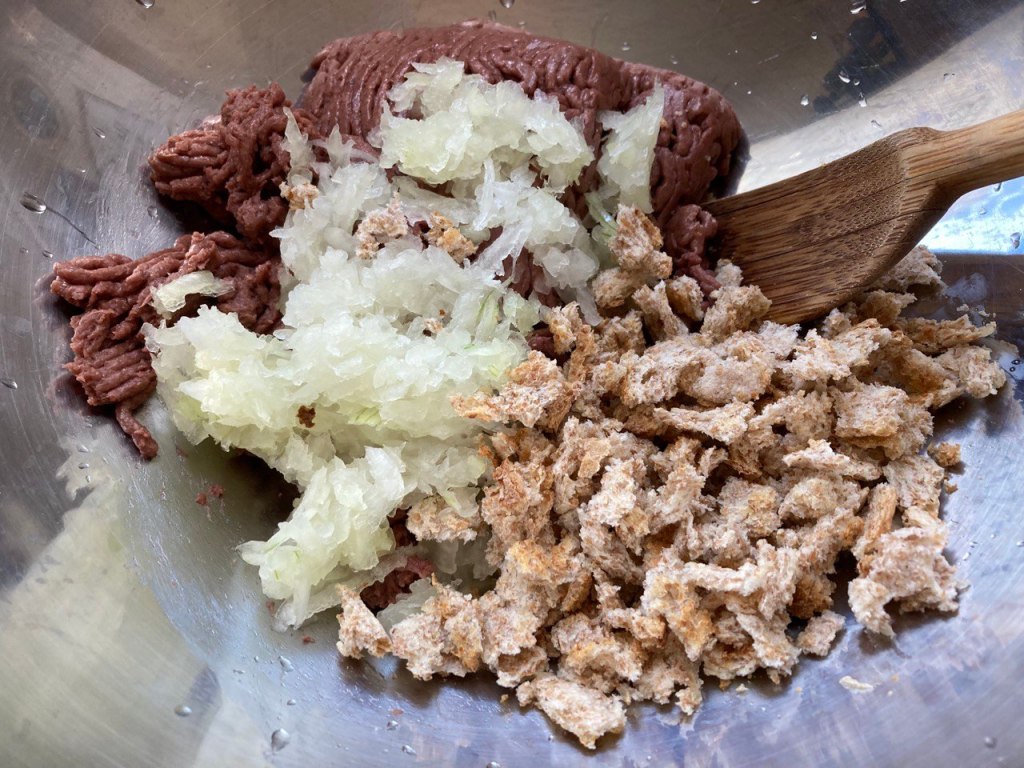
Begin placing the meatball ingredients in a medium mixing bowl.
Using a vegetable grater, grate the onion (alternatively, dice it very, very finely).
Add the breadcrumbs. I just tore up a slice of bread with my fingers, but you could use store-bought fine breadcrumbs and it would also work well.
Add the salt, pepper and cream and stir thoroughly until you have a homogeneous texture. Then place the flour in a small shallow bowl. Roll the meatballs in your hands, making them each about the size of a walnut. Place them in the bowl with the flour and roll them around to lightly coat them.
Place the rolled meatballs on a plate as you go along.
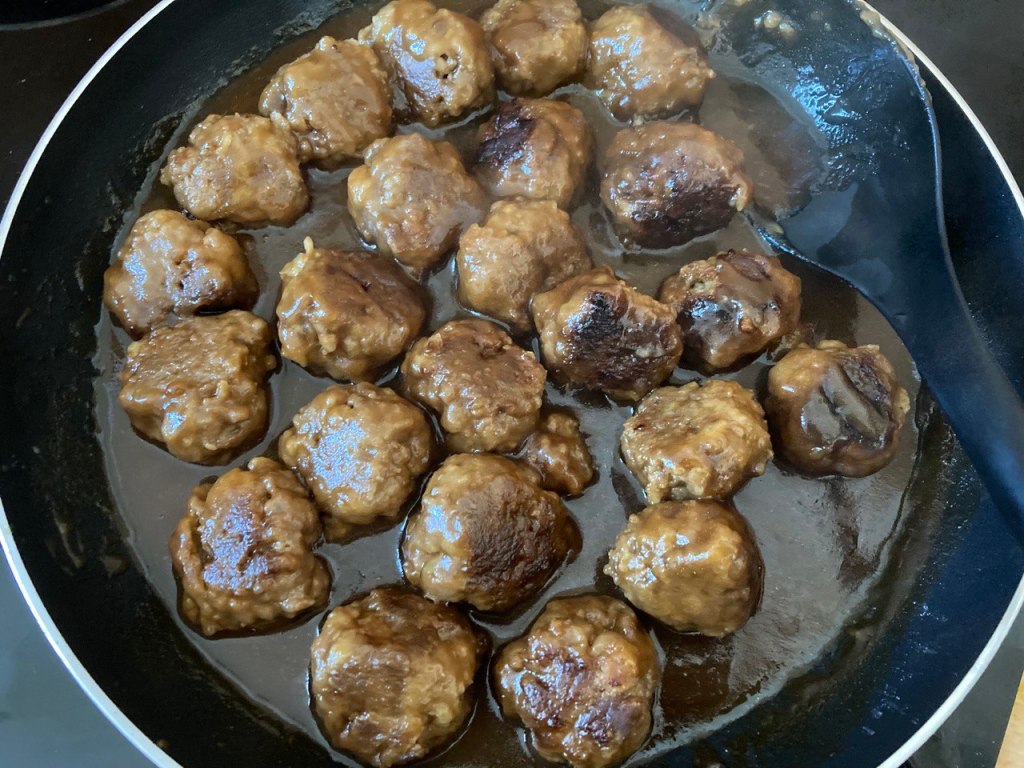
Warm some vegan butter or margarine in a large frying pan over medium heat. Add the meatballs.
Cover (not shown, oops!) and cook the meatballs for several minutes on each side. Keep a close eye on them to be sure they aren’t burning or getting too brown.
While the meatballs are cooking, start making the sauce. Roughly crush the gingersnap or speculoos cookies into a 1/3 measuring cup (the crumb size doesn’t matter since the crumbs will quickly dissolve).
Heat the broth, add the crushed cookies, brown sugar and vinegar. Once the cookie crumbs have dissolved and the mixture is drawing close to a boil, remove from heat.
Immediately pour the sauce over the meatballs, cover the pan again and let simmer for 20 minutes. The flour coating from the meatballs will thicken the sauce. Stir occasionally, turning the meatballs over to ensure they’re all evenly coated with the sauce.
While the meatballs are simmering, prepare your pasta or rice. Use whatever amount you’ll need to serve the number of people who will be sharing this meal.
And there you have it! As a side note, I’m happy to report that my mom now makes this dish in a meat-free version herself even when I’m not there. With Beyond Meat or similar products, the taste is so close to the original, but the impact in terms of health, biodiversity and the planet is much, much better. Not to mention nicer for the animals!
As always, if you try this, let me know how it turned out!
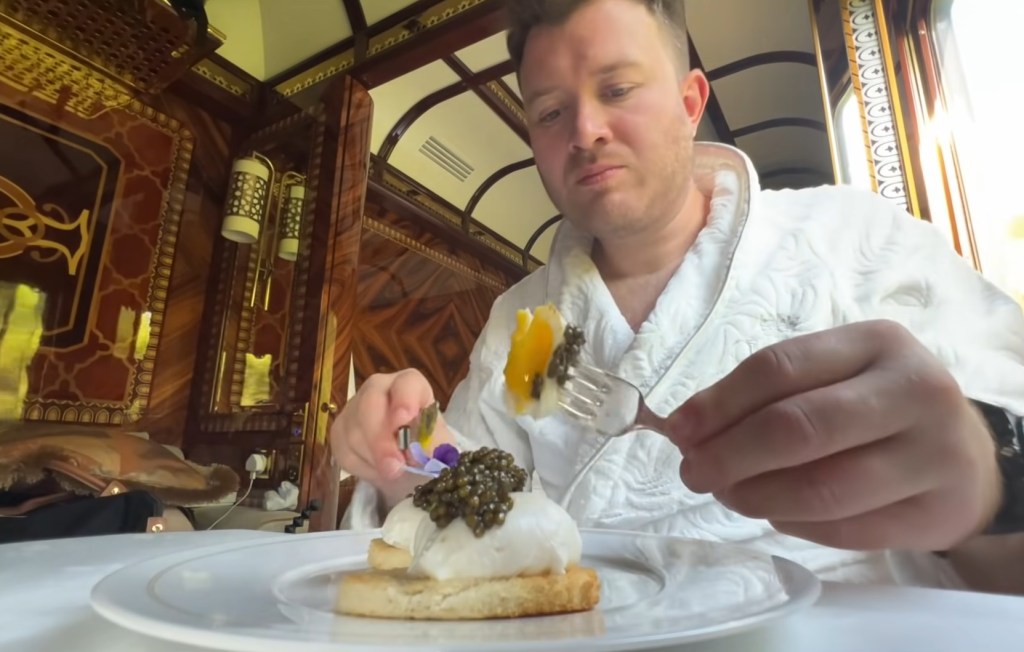
The other day, a YouTube algorithm served me up a fascinating video documenting a trip from Northern France to Venice on board the luxury sleeper train the Orient Express. Yes, the same one Agatha Christie wrote about in 1934, on which detective Hercule Poirot must solve a murder that occurs during the night.
In this YouTube video, not only are no crimes committed, but the host also enjoys a very pleasant surprise. He and his traveling companion have booked a twin cabin ($5,000 double occupancy) but are for some reason upgraded to the Istanbul Grand Suite ($23,000 double occupancy), which features a bedroom with a double bed and a living space with a table to dine at plus an Italian marble en-suite bathroom with gold fixtures and a shower. The room’s 1930s-era interior décor includes polished inlaid woodwork, a hand-carved headboard and a button you can press to summon a butler any time of the day or night.
The train fare includes all meals, in which caviar, lobster and truffle make frequent appearances, plus bottomless champagne. Shortly after boarding the train, the host changes into a jacket and heads to the dining car for his evening repast.
By this point in the video I’d already begun daydreaming, wondering if one day I too could save up and indulge in this unforgettable once-in-a-lifetime experience (the twin cabin version, that is). But when the meals were shown I realized that on this hypothetical journey I’d undoubtedly be surviving on PB&J in my room, since the train menu is unlikely to have vegan options. Although I suspect that if Joaquin Phoenix or Woody Harrelson were to book the train, some nice vegan dishes would magically appear! As a non-celebrity, I may wait another decade or two for plant-based dining to become more universal first.
In the meantime, there’s no reason we can’t have fun reproducing these dishes at home with vegan ingredients and at far lower cost!
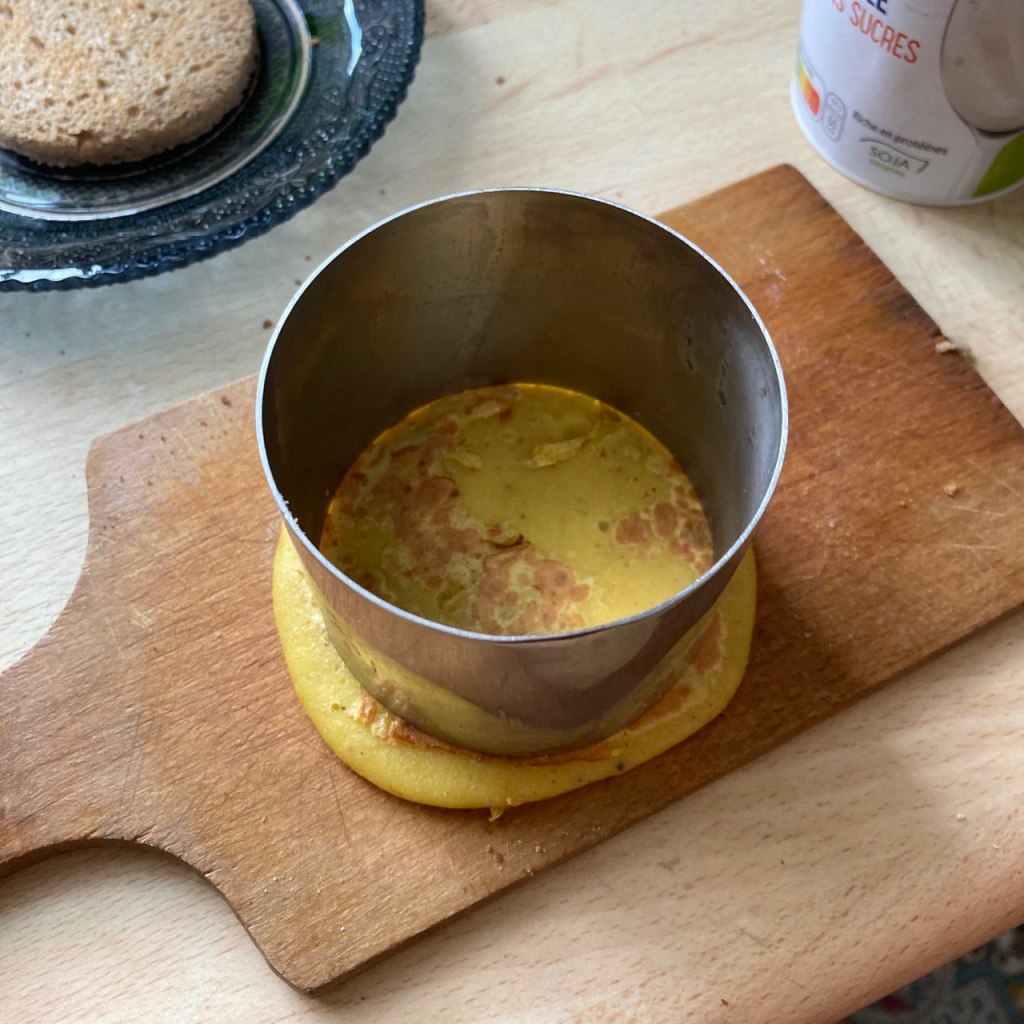
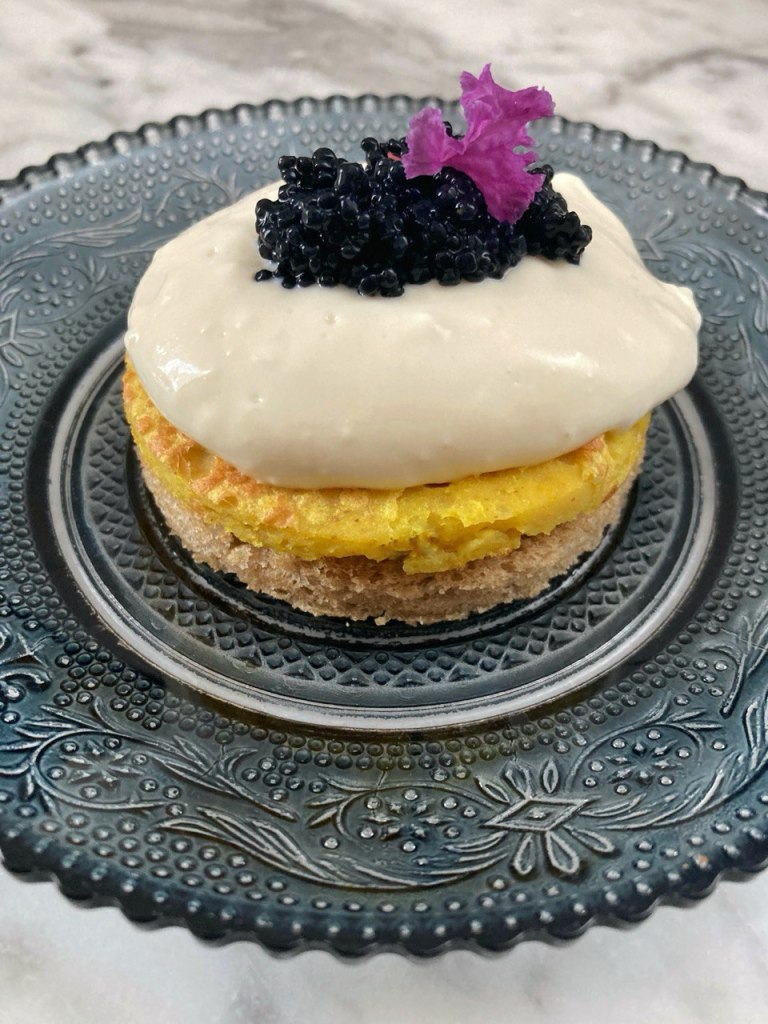
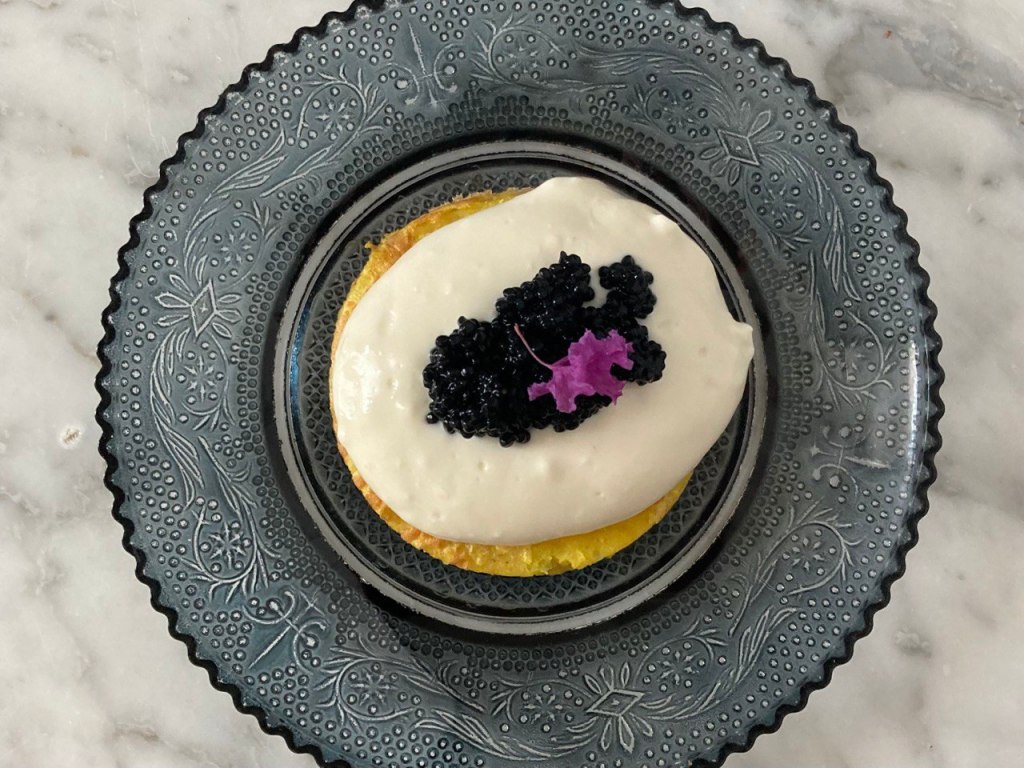
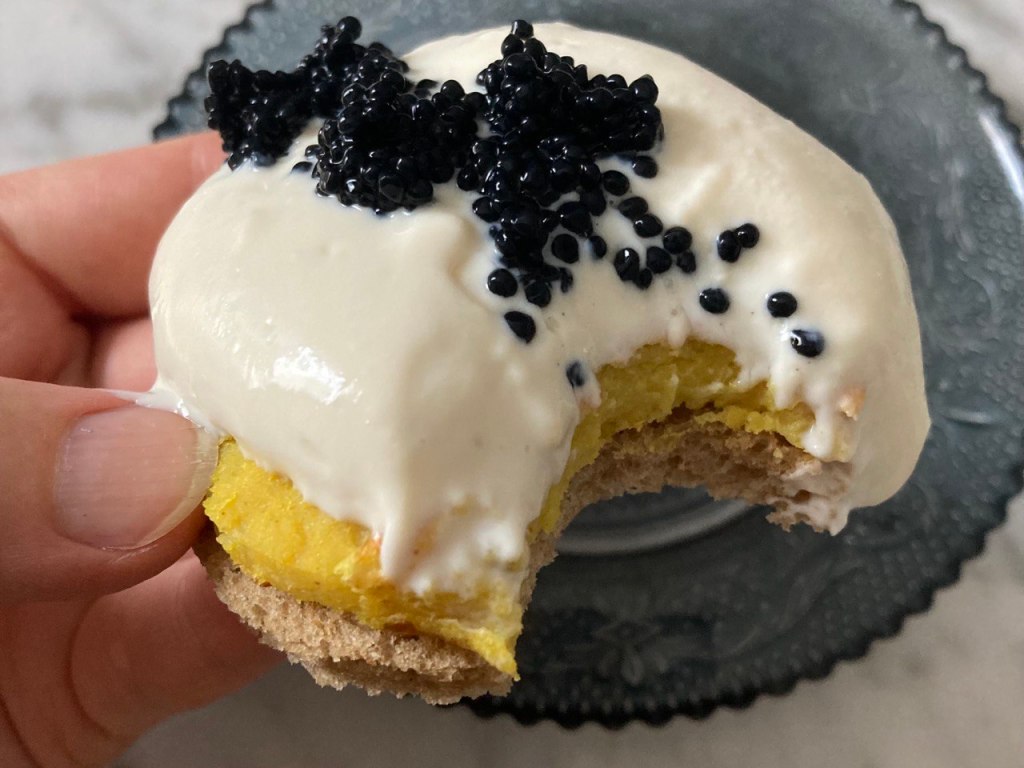
This breakfast dish composed of toast topped with a poached egg and caviar caught my eye as something quite opulent and aesthetically pleasing too. It may seem like something hard to veganize, what with the egg and caviar, but in today’s world just about anything is possible.
My version of the dish is so simple, it’s not so much a recipe as a set of assembly instructions, much like the kind that come with an IKEA bookshelf. Speaking of IKEA, it’ll be handy if you have one nearby.
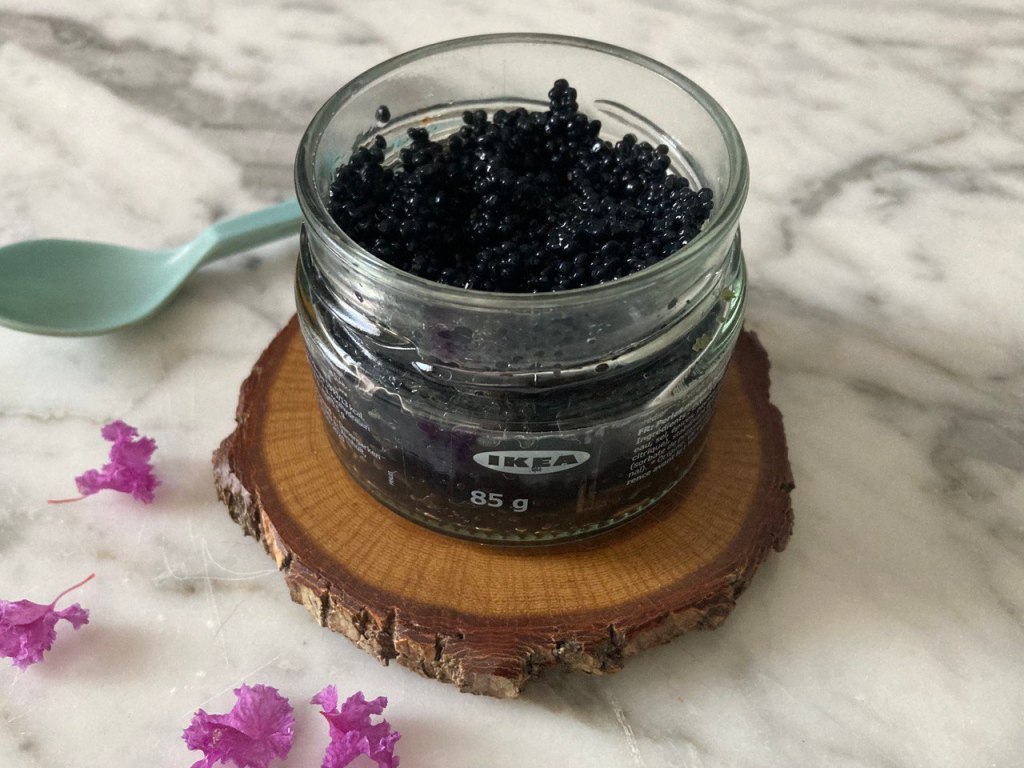
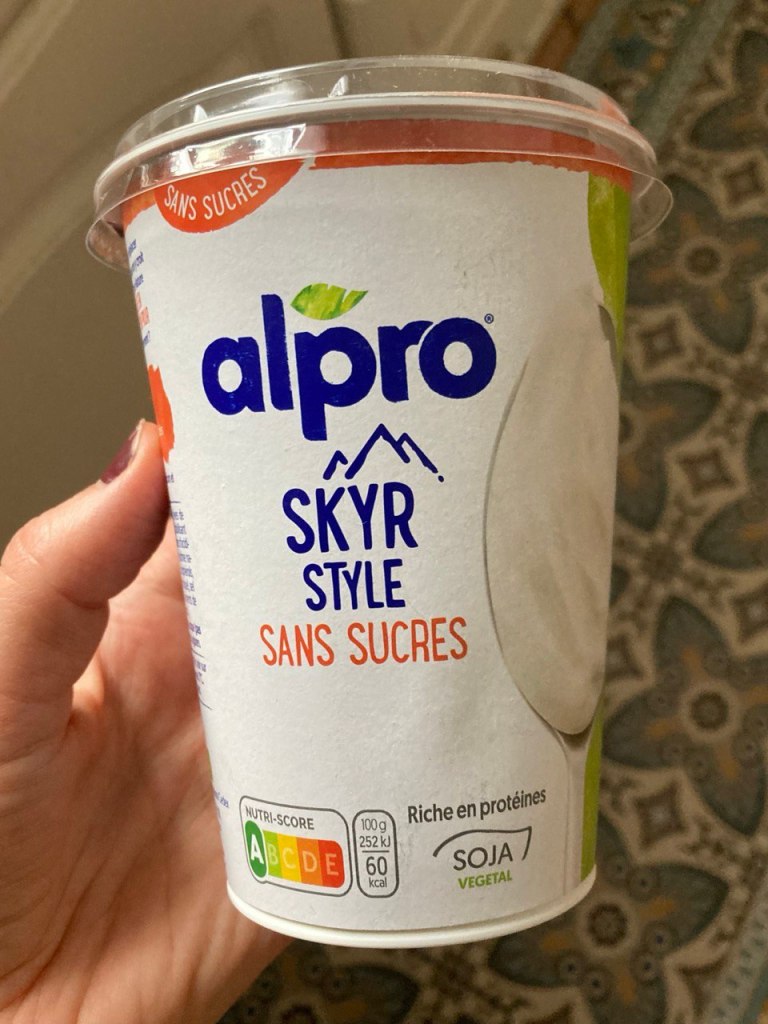
I opted to use a vegan scrambled egg mix to make a egg-like base for the flavor, plus some very thick vegan skyr or Greek-style yogurt to reproduce the appearance of the poached egg. For the caviar, I used a very inexpensive kind made from seaweed that you can find in the food section of the nearest Swedish furniture store (look for Sjörapport Black Seaweed Pearls). It’s salty and briny, probably doesn’t taste very different from traditional caviar, is way less expensive and is definitely more pleasant for the fish!
Edible flowers add an especially high-end touch but can be difficult to find. Full disclosure: I didn’t go to the bother of looking for any but just pulled some blossoms off a tree on my street! I assumed they weren’t edible so simply took them off before sampling my creation. Alternatively, a lacy green herb such as chervil would also look nice.
Vegan poached egg on toast with caviar
Makes two toasts.
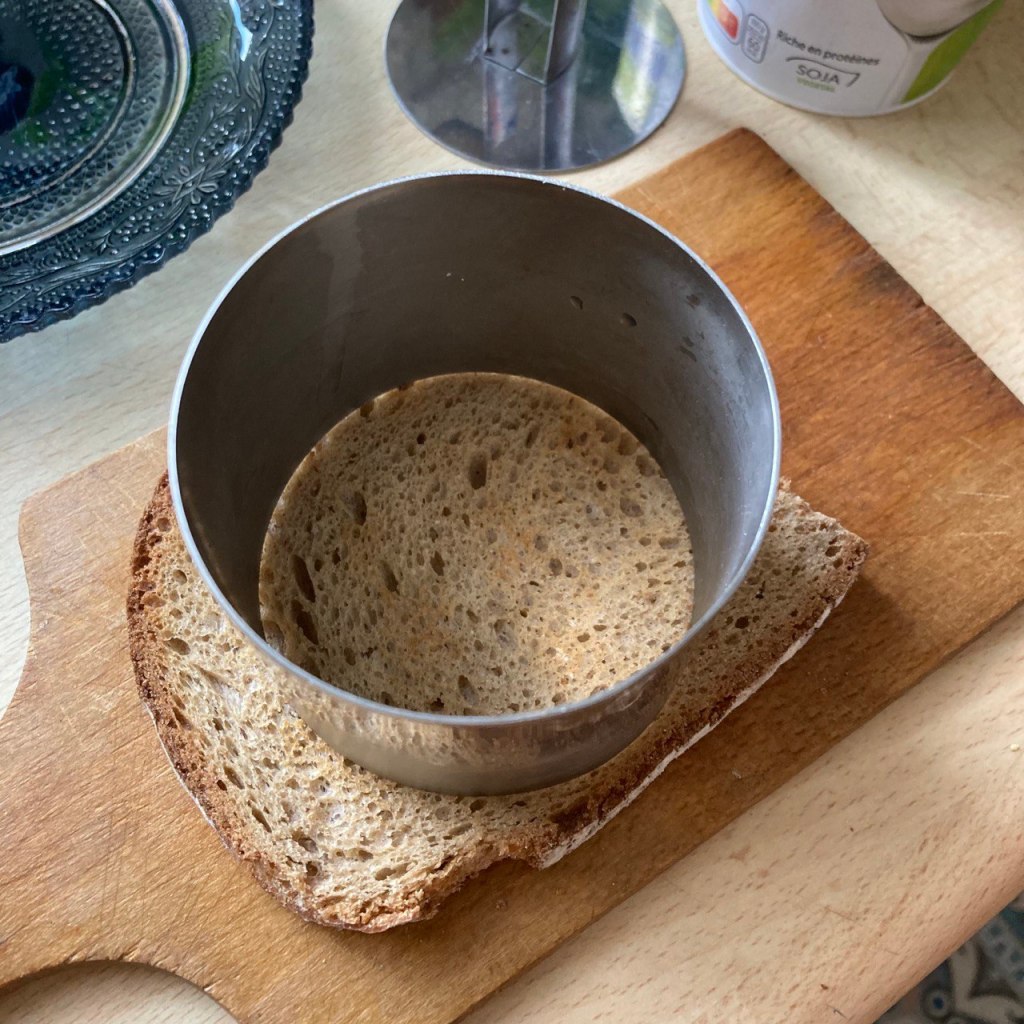
2 slices of firm whole-grain bread
1/4 cup (35 g) Orgran Vegan Easy Egg powder + 1/2 cup (120 ml) water or other scrambled-egg replacer
2 teaspoons IKEA Sjörapport Black Seaweed Pearls or other brand seaweed caviar
Edible flowers or leafy herbs, for garnish
Start by cooking two small “pancakes” of the egg mixture (with a tiny pinch of kala namak incorporated into the mixture or sprinkled on top) in a frying pan. Once they’re done on both sides, cut them into perfect circles using a cookie cutter or an upturned glass.Toast two slices of bread and cut circles out of them using the same cookie cutter or glass.
Transfer to a small serving dish and assemble: place the circle of egg on top of the circle of toast, then carefully top with a generous rounded tablespoon of the thick yogurt. Top this in turn with a bit of the caviar (use a plastic or wooden spoon as metal is said to alter the flavor) and then add your garnish.
Don’t forget to remove the flower if you used one that isn’t confirmed to be edible!
Ah, the taste of luxury! I can almost see those mountains rolling past me now . . .
If you try this, let me know how it turned out, and what you think of the seaweed caviar!
Also don’t miss the 2017 film adaptation of Murder on the Orient Express, directed by Kenneth Branagh and starring himself as Poirot, plus Penélope Cruz, Michelle Pfeiffer, Johnny Depp, Willem Dafoe, Olivia Colman and the incomparable Judi Dench.
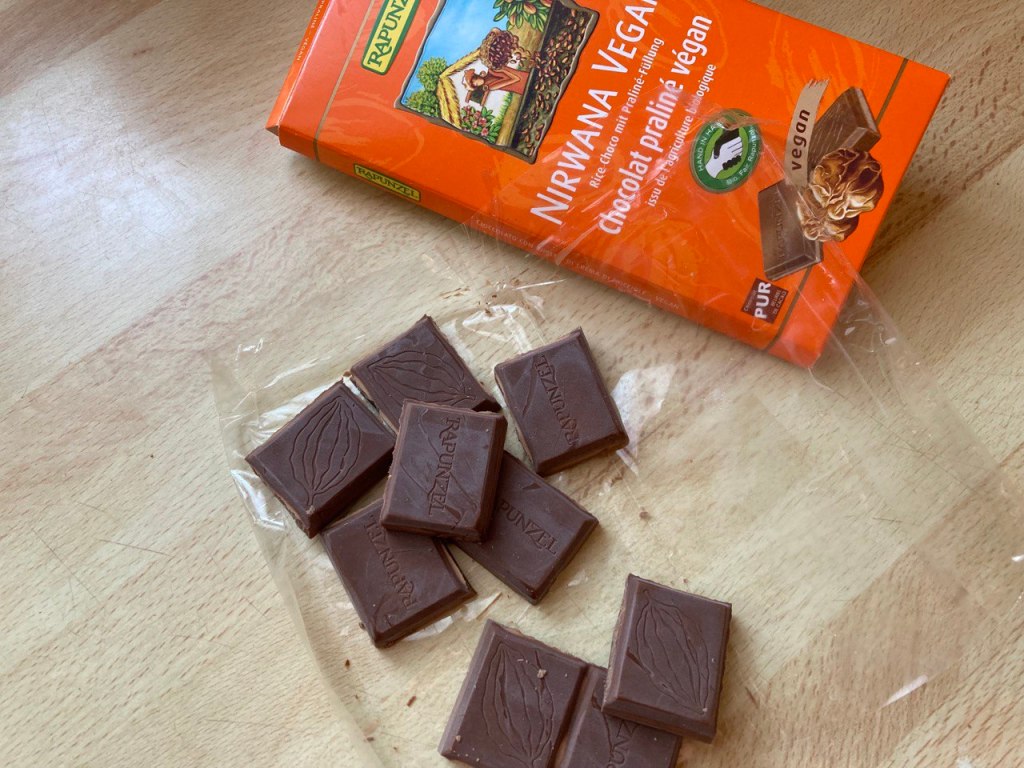
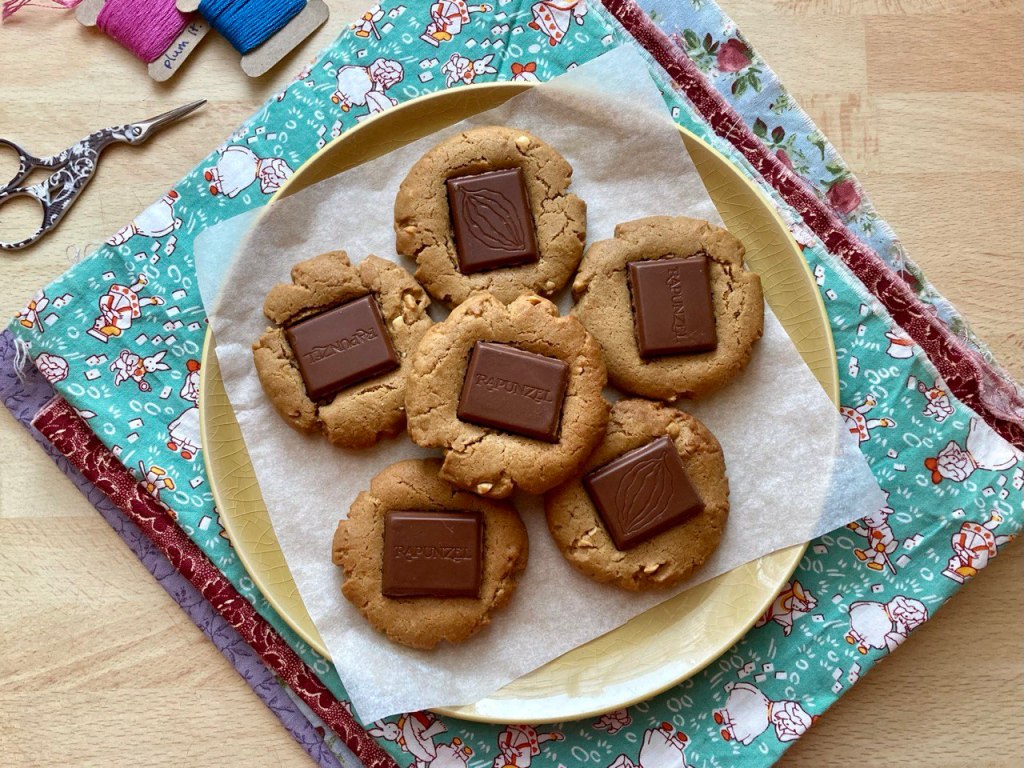
Who doesn’t love peanut butter and chocolate together? Such a successful combination, especially in these cookies! I paired a basic peanut butter cookie recipe (my mom’s!) with one of the best vegan chocolate bars on the planet, German brand Rapunzel’s Nirwana Vegan, which has a delightful hazelnut cream center.
Like with my matcha cookies from the other month, the trick is to add the chocolate squares to the cookies near the end of the baking process so they don’t melt too much. This recipe makes about 2 dozen cookies, so you can opt to get one chocolate bar and leave some of the cookies plain (make a criss-cross design with a fork if you like), or get two chocolate bars to cover them all.
The peanut butter I used is incidentally also from Rapunzel, and is “American style” which I think means with added sugar and salt? (probably, haha)
Scroll to the bottom for the recipe.
Peanut butter and chocolate cookies
Makes about 24 cookies.
1 teaspoon Orgran Egg Replacer for baking, or similar (the equivalent of one egg)
2 tablespoons water
1/2 cup (100 g) vegan butter or margarine
3 tablespoons plant-based milk
2 teaspoons vanilla
1/2 cup (110 g) brown sugar
3/4 cup (180 g) peanut butter
2 cups (260 g) flour
3/4 teaspoon baking soda
1/4 teaspoon salt
1 or 2 Rapunzel Nirwana chocolate bars
Directions:
Preheat your oven to 375 F (190 C).
Mix the Orgran Egg Replacer powder with the water in a small bowl and set aside.
Combine the butter, milk, vanilla and brown sugar in a medium mixing bowl, stirring until completely combined.
Incorporate the peanut butter and egg replacer mixture, and stir again until fully combined.
In a separate medium bowl, sift together the flour, baking soda and salt.
Add the peanut butter mixture to the flour and stir until just combined, taking care not to overmix.
Form balls with the cookie dough, place them on a paper-lined baking sheet, evenly spaced, and flatten them slightly with your fingers.
Place the baking sheet in the preheated oven and bake for 8 to 9 minutes.
Break the chocolate bar into squares.
Remove the baking sheet and press one chocolate square into the top of each cookie. Return the baking sheet to oven for another 3 minutes, watching the chocolate to be sure it doesn’t look like it’s going to melt too much.
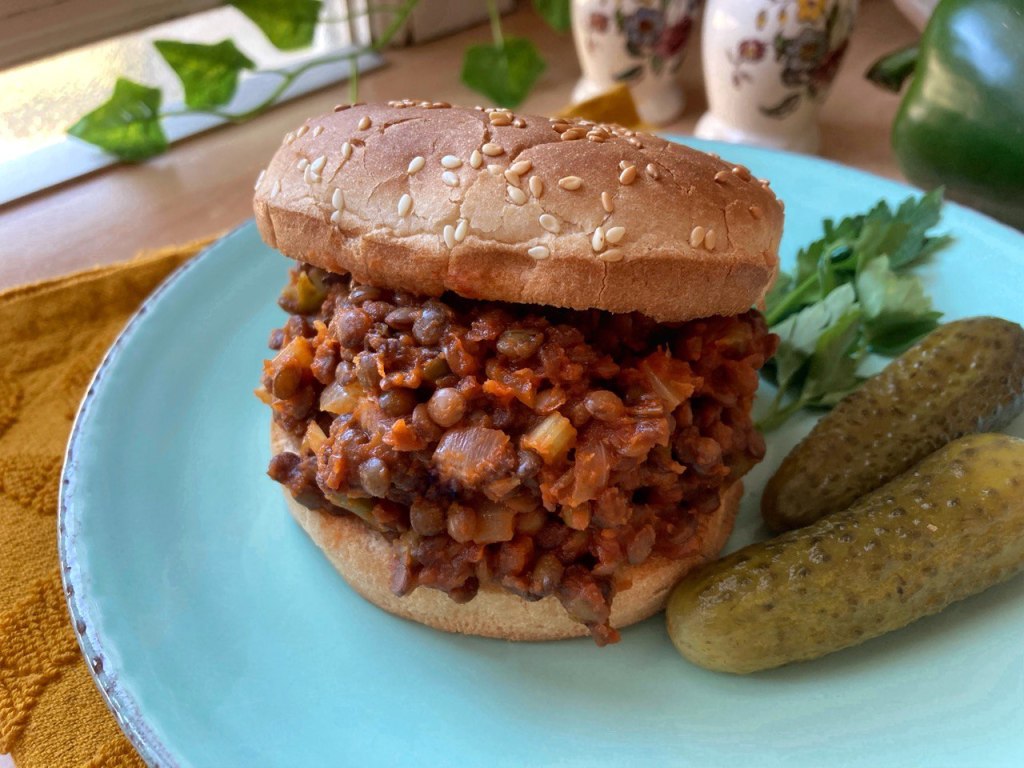
We take things so literally when we’re little. Sloppy joes were a frequent meal at our house when I was growing up, and I always wondered about the name. Who was this Joe, and why was he so sloppy? I reasoned it might be my own uncle Joe, whose shirts were often untucked and face unshaven.
Whoever Joe may have been, the sloppy part is clear enough – this isn’t a dish for a first date. But it is delicious, so feel free to make it once the relationship’s sealed and the person’s no longer a flight risk. Also, thanks to advanced lentil technology, your sloppy joe can now be vegan!
Scroll to the bottom for my take on this iconic recipe.
Sloppy lentils
Serves about 4.
1 cup dry green or brown lentils (don’t use red lentils)
1 bay leaf
¾ cup (80 g) onion (any color), diced
½ cup (60 g) green pepper, diced
½ cup (55 g) celery, diced
1 cup ketchup
1 tablespoon brown or red miso paste
1 teaspoon prepared mustard
1 teaspoon dried Italian herbs (oregano, thyme etc.) or herbes de Provence
A few squeezes fresh lemon juice (about 1 teaspoon)
½ teaspoon garlic powder
A couple grinds fresh black pepper
Soy sauce, to taste (optional)
Maple syrup, to taste (optional)
4 hamburger buns
Start by cooking the lentils in 3 cups water, with the bay leaf, for 20 minutes. Remove bay leaf, drain any excess water, and set aside.
While the lentils are cooking, chop and dice the onion, green pepper and celery.
In a large skillet, sauté these vegetables in a bit of olive oil over medium heat until tender.
Add the cooked lentils and stir to combine.
Incorporate the ketchup, miso paste, mustard, dried herbs, lemon juice, garlic powder and black pepper.
Taste and adjust seasoning as desired. If it isn’t salty enough, I recommend a splash of soy sauce rather than actual salt because soy sauce will boost the umami profile of the dish. If you would like the sauce to be sweeter, add a bit of maple syrup (but I find that the ketchup usually makes the sauce sweet enough).
Toast your hamburger buns, if you like, and then load them with the sloppy lentil mixture. Eat leaning well over your plate, which many globs of lentils and sauce will land on, in the company of someone who already knows and accepts you even with sauce all over your face. 😉
Variation: try this same recipe using about 2 cups vegan ground “beef” from a brand like Beyond Meat, Impossible Meat or (in France), HappyVore or Herta.
Enjoy! If you’re a lentil aficionado, you might also like my Lockdown Lentils recipe. And if you too are curious about the name sloppy joe, you’ll find some theories here.