French flan with prunes

This month, I bring you a vegan version of a traditional dessert from the French region of Brittany. Known as far breton in the local dialect, this delectable flan is packed with sweet liquor-infused prunes that deliver a burst of summertime flavor.

Scroll down past the recipe for behind the scenes photos!

Makes 6 servings.

Ingredients:

  • 1 and 2/3 cup (200 g) all-purpose flour
  • 1/4 cup (25 g) corn starch
  • 1/8 teaspoon salt
  • 3 and 1/4 cups (770 ml) soy milk
  • 2 tablespoons (30 ml) melted margarine/vegan butter
  • 1/3 cup (75 g) granulated white sugar
  • 3 teaspoons vanilla extract
  • 8 oz (225 g) prunes without pits (about 25 prunes)
  • 1/4 cup (60 ml) cognac or rum
  • Powdered sugar for decoration

Directions:

Preheat your oven to 350°F (180°C). Grease the bottom and sides of your baking dish with some solid margarine and dust with flour, tapping out the excess. I used a 1.1 liter rectangular dish measuring 10 x 6 x 2 in. (25 x 15 x 5 cm), but a square or round dish of a similar volume would also work.

Warm the prunes with the liquor over medium heat, stirring occasionally, until most of the liquid is absorbed. Remove from heat and allow to cool.

In the meantime, sift the flour, corn starch and salt into a medium-sized mixing bowl. In another mixing bowl, combine the soy milk, melted margarine, sugar and vanilla extract. Slowly incorporate the liquid mixture into the dry ingredients, whisking gently until everything is combined and taking care not to over-mix.

Place the prunes evenly in a single layer in the bottom of the baking dish, then carefully pour the batter over the prunes. Bake in the preheated oven for 40 to 45 minutes. At the end of the baking time, poke a toothpick or a knife into the flan to make sure it’s fully baked (if it isn’t, return it to the oven for a little longer). Remove from oven, let cool to room temperature, then chill for at least two hours before serving to allow the flan to set.

Cut into squares and, right before serving, dust with a bit of powdered sugar. Chill remaining flan and eat within two or three days.

Stewing the prunes in the liquor

Mixing up the batter

Arranging the prunes in the bottom of the baking dish

Pouring the batter over the top

After baking… it doesn’t look exciting now, but will when it’s cut! (chill for two hours first)

Enjoy!

French tomato-mustard tart

Summer is almost over, which means tomato season is drawing to a close. But it’s not over yet! And I have just the recipe you need to enjoy this year’s last fragrant, juicy tomatoes – a French one that will take you straight to the beautiful city of Dijon. Enter the tarte à la tomate, or tomato tart. This warm, pizza-like savory tart offers a crunchy, flaky crust with a spicy kick from everyone’s favorite Dijon mustard and the earthy, green notes of herbes de Provence. It’s super easy to make too, especially if you use a ready-made crust.

Dijon Invader art
The city of Dijon takes its mustard very seriously. In 2019, French street artist Invader paid homage to both city and condiment with a series of mustard-themed space invader mosaics (photo credit: @chesterlight75).

But you can also make your own crust, or use a pizza crust. Feel free to make your tart larger than the one I describe in this recipe – just add more mustard, tomato and herbs accordingly.

If you don’t happen to have herbes de Provence, you can make your own blend using equal amounts of the herbs often used in it: savory, marjoram, rosemary, thyme and oregano. Herbes de Provence blends vary though, so you’ll sometimes see other herbs such as basil and lavender included – just use the ones you like. Another option would be an Italian herb blend.

French tomato-mustard tart

  • 1 premade vegan flaky pastry crust, 11 in. (28 cm.) in diameter
  • 2 to 3 tablespoons Dijon mustard
  • 2 or 3 medium vine-ripened tomatoes
  • 1 tablespoon herbes de Provence or equivalent herb blend
  • 1 tablespoon olive oil
  • pinch or two salt
  • freshly ground black pepper

Preheat your oven to 425°F (218°C). Unroll the pastry dough and place it on a baking sheet. Poke it with a fork. When your oven has reached the target heat, bake the pastry for 4 minutes.

IMG_9265

Spread the Dijon mustard on the pre-baked pastry. What you see in the photo above is a fairly light layer of mustard, about 2½ tablespoons on a pastry measuring 11 in. (28 cm) in diameter. If you love mustard, feel free to use more.

IMG_9262

Slice your tomatoes – aim for ¼ inch (3 mm) thick slices. Start by slicing up just two tomatoes as you might not need more than that, depending on the thickness of your slices. Cut out and discard the tough white core.

IMG_9266

Arrange the tomato slices on top of your pastry, overlapping slightly.

IMG_9268

Sprinkle the top evenly with your herbes de Provence or equivalent herb blend.

IMG_9274

Then sprinkle a small pinch or two of salt over the top.

IMG_9278

Finally, drizzle a tablespoon of olive oil evenly over the tart.

IMG_9284

Place the tart in the oven and bake for 15 to 20 minutes. Check on it midway – if the edges seem to get too brown too quickly, you can cover them with foil partway through the baking.

IMG_9296

Slice up your tart pizza-style and grind some black pepper over the top if you like.

IMG_9298

And enjoy! This tart is excellent paired with a nice green salad.

Ghost town

One of the things I admire about France is that every employee, regardless of the company they work for and their own seniority, gets a mandatory five weeks of paid vacation time per year. Even though this doesn’t include me as a freelancer, I’m happy to see others getting the time they deserve to relax and enjoy their families. I already knew that my native US was far behind other countries in this respect, but this color-coded map on Wikipedia makes the contrast even more embarrassingly clear.

Anyway, as you might expect, the most popular time to take one’s time off is the summer, and the month of August has long been a time of exodus for Parisians. Everyone seems to leave all at the same time for various destinations, be they in France or farther afield. One side effect of this is that lots of small businesses all close simultaneously. A stroll around a non-touristy neighborhood will take you past a series of shuttered storefronts and notice signs such as the ones below (click any photo to switch to slide show mode) informing customers of their re-opening dates.

I always get a bit of an eerie feeling, walking around the empty streets of my mainly residential neighborhood in August. I also often forget that things are closed and make a detour to get a coffee from Dose, for example, only to find the place deserted and to curse my poor memory.

So while it’s a good thing for people working in France, this annual departure can be a bummer for tourists who come to Paris in part to try our vegan restaurants (usually small businesses that close all of August).

If your chosen destination restaurant (or clothes shop, etc.) has a sign in their window, you can try looking for the following key phrases to decipher it and see how long it will be closed:

  • fermé – closed
  • ouvert – open
  • fermeture estivale – summer closing
  • congés d’été – summer vacation
  • vacances annuelles – annual vacation
  • horaires d’été – (shorter) summer hours
  • réouverture – reopening (date)
  • en vacances – on vacation
  • bel été – have a good summer (= without us) 😉

But to help make planning easier, I’ve prepared a short list of some places where you can still find vegan food the rest of this August. Note that this list is not exhaustive and that it’s a good idea to double-check their current hours on their social media pages or call ahead. Don’t rely on what Google or even their own websites say, because those won’t necessarily be updated to reflect any special summer conditions.

Vegan places that are open

Every year, a handful of vegan restaurants in Paris do stay open all summer. Here are some that I personally recommend (plus one brand-new one I’ve heard good things about). Note however that Thursday, August 15th is a national holiday and some of these places might be closed that day.

Aujourd’hui Demain
42 rue du Chemin Vert, 75011 Paris (metro Richard Lenoir)
Restaurant/café and grocery store. A good place to hang out with a coffee and catch up on your email or work. If you’re in the mood for a sweet indulgence, don’t miss their Freak Shake.

Cantine Le Myrha
70 rue Myrha, 75018 Paris (metro Château Rouge)
Spacious and well-lit, excellent place for a buffet brunch with friends on a Sunday. You may make the acquaintance of Rainette, the restaurant’s sweet tabby cat, who sometimes wanders among the customers to be petted.

Cloud Cakes
6 rue Mandar, 75002 Paris (metro Sentier)
As their name suggests, they have some heavenly cakes! Savory lunch items available too until the mid-afternoon. Limited seating at busy times, but well worth a visit.

Le Faitout
23 avenue Simon Bolivar, 75019 Paris (metro Pyrénées)
All the ambiance of a traditional French brasserie, none of the usual animal products. Live music on Thursday nights. Don’t miss their platter of housemade vegan cheeses!

Hank Burger
55 rue des Archives, 75003 Paris (metro Rambuteau)
8 rue de Rochechouart, 75009 Paris (metro Cadet)
Really nice burgers, with a choice between their standard patty and a Beyond Beef one. I also love their potato wedges with a cheese topping and their chocolate chip cookies!

Hank Pizza
18 rue des Gravilliers, 75003 Paris (metro Arts et Métiers)
Vegan pizza with a range of preset toppings, including a couple of gluten-free ones each day. They have a particularly spacious upstairs dining room. If you come here, be sure to stop by the vegan grocery store Mon Epicerie Paris on the same street (see below for a description).

Les Petites Pâtisseries Raw & Vegan
44 rue du Chemin Vert, 75011 Paris (metro Richard Lenoir)
So many creative and delightful raw desserts! I especially like their little fruit tarts and matcha opéra cakes. Rumor has it you can now also find blue mermaid nice cream bowls there! On the same block as Aujourd’hui Demain (see above).

Le Potager du Marais
24 rue Rambuteau, 75003 Paris (metro Rambuteau)
Traditional French dishes in vegan versions. I often recommend this place to visitors since it’s a way to try classic dishes without the animal products. I love their seitan bourgignon, onion soup and crème brûlée.

Sunday’s Coffee Paris
171 boulevard Voltaire, 75011 Paris (metro Charonne)
This place is so new, I haven’t had a chance to go there yet. People on Instagram seem to like it though, so take a look if you’re nearby!

Wild & the Moon
Various locations throughout Paris
Another chain place with generous hours. Try one of their superfood elixir drinks or one of their dishes of the day (often a rice and curry bowl). I love their raw desserts, especially the lemon tart. Their location near Opéra is especially nice as it gets less traffic.

Other options

Certain other places are fairly reliably sources of vegan eats.

Restaurants

L’As du Fallafel
32-34 rue des Rosiers, 75004 Paris (metro Saint Paul)
Home of the best falafel sandwich in Paris! Prepare yourself for a line at the door. Closed Friday evenings and Saturdays all year round.

Ethiopian restaurants
Various locations throughout Paris
Due to a cultural tradition of abstaining from all animal products on certain days of the week and at certain times of year, Ethiopian restaurants generally always have a vegan option (sometimes labeled “vegetarian” on the menu). Be sure to specify that you don’t want fish. Google “restaurant Ethiopien Paris” plus the number of your arrondissement to find one. My personal favorite is Le Ménélik in the 17th.

Lebanese restaurants
Various locations throughout Paris
The chances of finding falafel (an accidentally vegan food) are high at just about every Lebanese restaurant. Look for places with the country’s very cute cedar tree flag.

Maison Landemaine
Various locations throughout Paris
Try their croissant ordinaire (regular croissant), which is always vegan, but be sure to specify ordinaire so they don’t give you a non-vegan butter croissant. They also have a vegan chausson aux pommes (apple turnover) and usually at least one vegan fancy dessert/pastry. Check the labels in the display case for the “VEGAN” in very small green text, or ask if unsure. They also sometimes have a vegan tofu, avocado and sun-dried tomato sandwich. Their baguettes, like all baguettes in France, are vegan by default.

Prêt à Manger
Various locations throughout Paris
This chain store is from the UK, which means it’s quite vegan-friendly. In France, they offer one vegan sandwich (avocado, sun-dried tomato and black olive spread on baguette type bread) as well as some vegan soups, chia pudding and sometimes a muesli bowl. They make coffee and matcha drinks with plant milk at no extra charge!

Vegan grocery stores

Vegan items can increasingly be found at mainstream grocery stores (check the bio (organic) aisle in particular), but with the stores below there’s no need to scrutinize labels since everything at them is fully vegan. This can be a good source for groceries for your AirBnB, or for things to pick up and put in a baguette for a DIY sandwich-on-the-go.

Aujourd’hui Demain
42 rue du Chemin Vert, 75011 Paris (metro Richard Lenoir)
Combination grocery store and restaurant/café. Also sells clothing, shoes, purses and personal care products. They offer an extensive range of vegan cheeses and certain hard-to-find items such as vegan honey and liquid smoke. Beyond Meat products are available here.

Naturalia Vegan
4 locations in Paris and the near suburbs
Part of the Naturalia organic grocery chain, these stores have a much wider selection of vegan cheeses, yogurts and plant-based imitation meats than other Naturalias. Unlike the other vegan grocery stores listed here, Naturalia Vegan locations also offer fresh produce.

Mon Epicerie Paris
31 rue des Gravilliers, 75003 Paris (metro Arts et Métiers)
This little grocery has a surprisingly wide selection of products, including Beyond Meat and some others that are found nowhere else in Paris as far as I know (for example Linda McCartney frozen items). Carries more Asian products than the other ones.

Un Monde Vegan
64 rue Notre-Dame-de-Nazareth, 75003 Paris (metro Strasbourg-Saint Denis)
The first all-vegan food shop to open in Paris, Un Monde Vegan is still a popular source of interesting grocery products and books.

With that, I wish you a pleasant stay (or staycation) in Paris. Bon appétit!

Matcha galette des reines

If you’ve been following my blog for a while or know me in real life, you may have noticed that I love borrowing bits of different cultures and bringing them together in unexpected ways. And the culinary world is a great vehicle for this type of expression (click here to see some of my past fusion cuisine creations).

Bartolomé_Esteban_Murillo_-_Adoration_of_the_Magi_-_Google_Art_Project
Adoration of the Magi (c. 1660) by Bartolomé Esteban Murillo

Today I bring you my interpretation of a classic French dessert. The galette des rois (kings’ cake) is an institution of French culture, traditionally prepared for the feast day Epiphany, celebrated each January 6th to commemorate the visit of the Magi (also known as the Three Wise Men or Three Kings) to the Christ Child. In practice however, this dessert pops up in bakery windows all over France right at the beginning of January and stay until the end of the month.

The galette des rois is a flat flaky pastry traditionally filled with an almond paste. And like the crêpes eaten in February for Candlemas, it has its own customs. Somewhere inside the galette is a fève – in the olden days this was actually a literal fève (dry bean), but these days, little ceramic figurines are used. Whoever finds the fève in their piece becomes a king or queen, gets to wear the paper crown that comes with the galette, and is supposed to pick someone else in the party to be their queen or king. According to a 2014 survey, 68% of French families find sneaky ways to make sure the fève ends up in their child’s slice. Sparkling wine, hard cider or apple juice traditionally accompany a galette des rois.

galettedesrois.jpg
A galette des rois such as you might find at a bakery in France, supplied with paper crown.

In my version of this dessert, I’ve incorporated matcha powder for a Japanese twist. And I’m calling it galette des reines (queens’ cake) because sure, maybe the magi were kings, but queens should get their chance too. The fève I used also happens to be a little lady… in keeping with the theme, I’m imagining her as an olden-day Japanese noblewoman from a northern part of the island nation, bundled up in sakura-colored wraps against the cold.

If you live in France, you can usually find fèves at any vide-grenier (garage sale) for cheap, or from baking supplies stores. Otherwise, have a look on eBay or Etsy. There are some really cool ones out there that could double as doll-house accessories the rest of the year.

Note that matcha powder (and green tea in general) doesn’t stay fresh for long, rapidly losing its color and flavor, so it’s best to buy it just before you plan to use it and then to use up the rest fairly quickly. You can use matcha powder in a cake or cupcake recipe, add it to a smoothie, make a matcha latte from it or just prepare it with water in its most traditional form. Store any unused matcha powder, tightly sealed, in your refrigerator.

See my tips for flavor variations (basic almond, pistachio, chocolate etc.) at the end of this post.

Matcha galette des reines

Makes one 12-inch (30-cm) diameter galette

2 pre-made round flaky pastry crusts (not filo dough) – keep in fridge until last minute
3 cups + 1/4 cup (325 g) ground almonds
1/2 cup + 2 tablespoons (125 g) granulated sugar
1/3 cup (50 g) cornstarch
4 teaspoons fresh unsweetened matcha powder
3/4 cup + 1 tablespoon (200 ml) almond or soy cream
2 tablespoons soymilk or other milk
2 tablespoons neutral-flavored oil
1 teaspoon almond extract
1 to 2 tablespoons apricot jam, apple jelly or other light-colored jam/jelly (for the glaze)
1 fève (ceramic object or large dry bean)

IMG_7178.JPG
Begin by combining the dry ingredients (ground almonds, granulated sugar, cornstarch and matcha powder) in a mixing bowl. Stir thoroughly with a mixing spoon until the matcha is evenly distributed.

IMG_7190
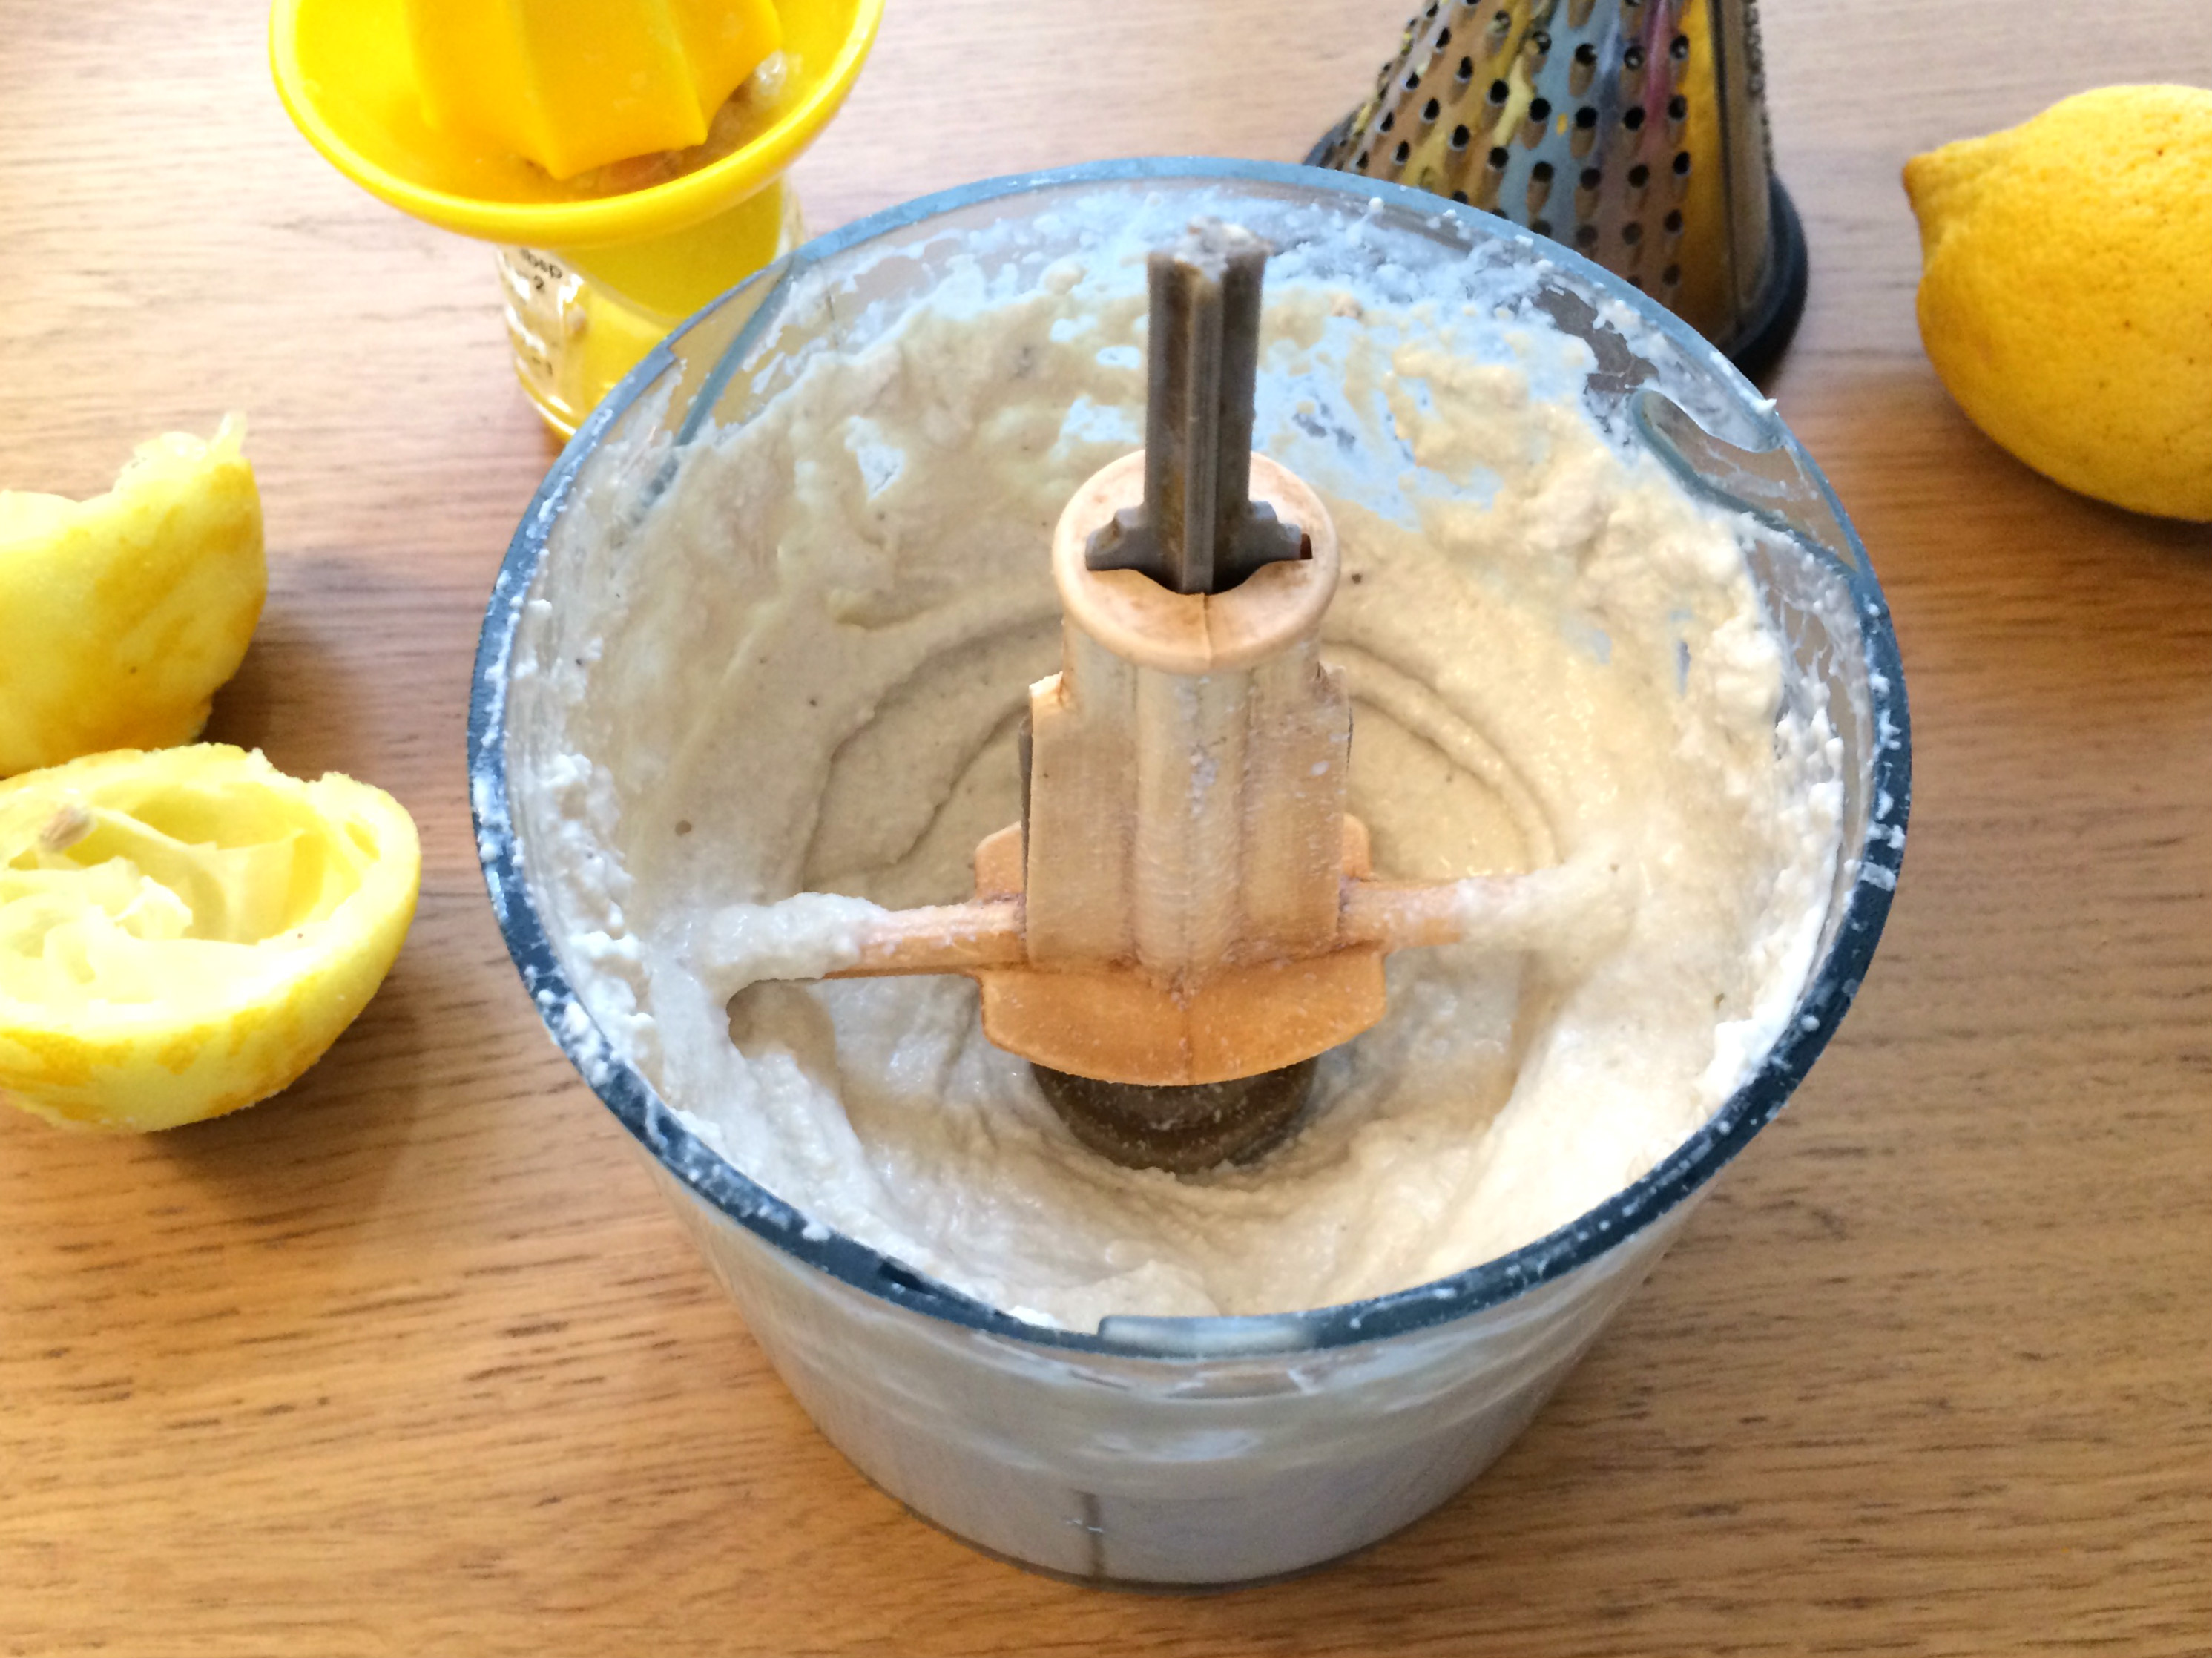
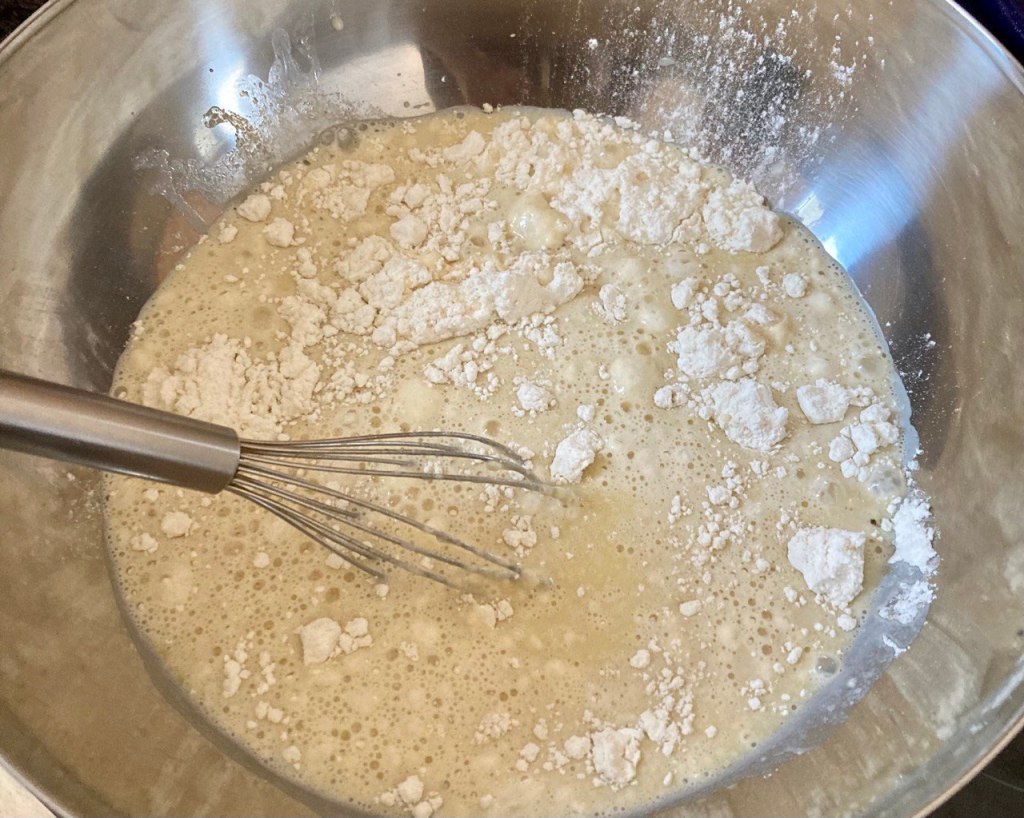
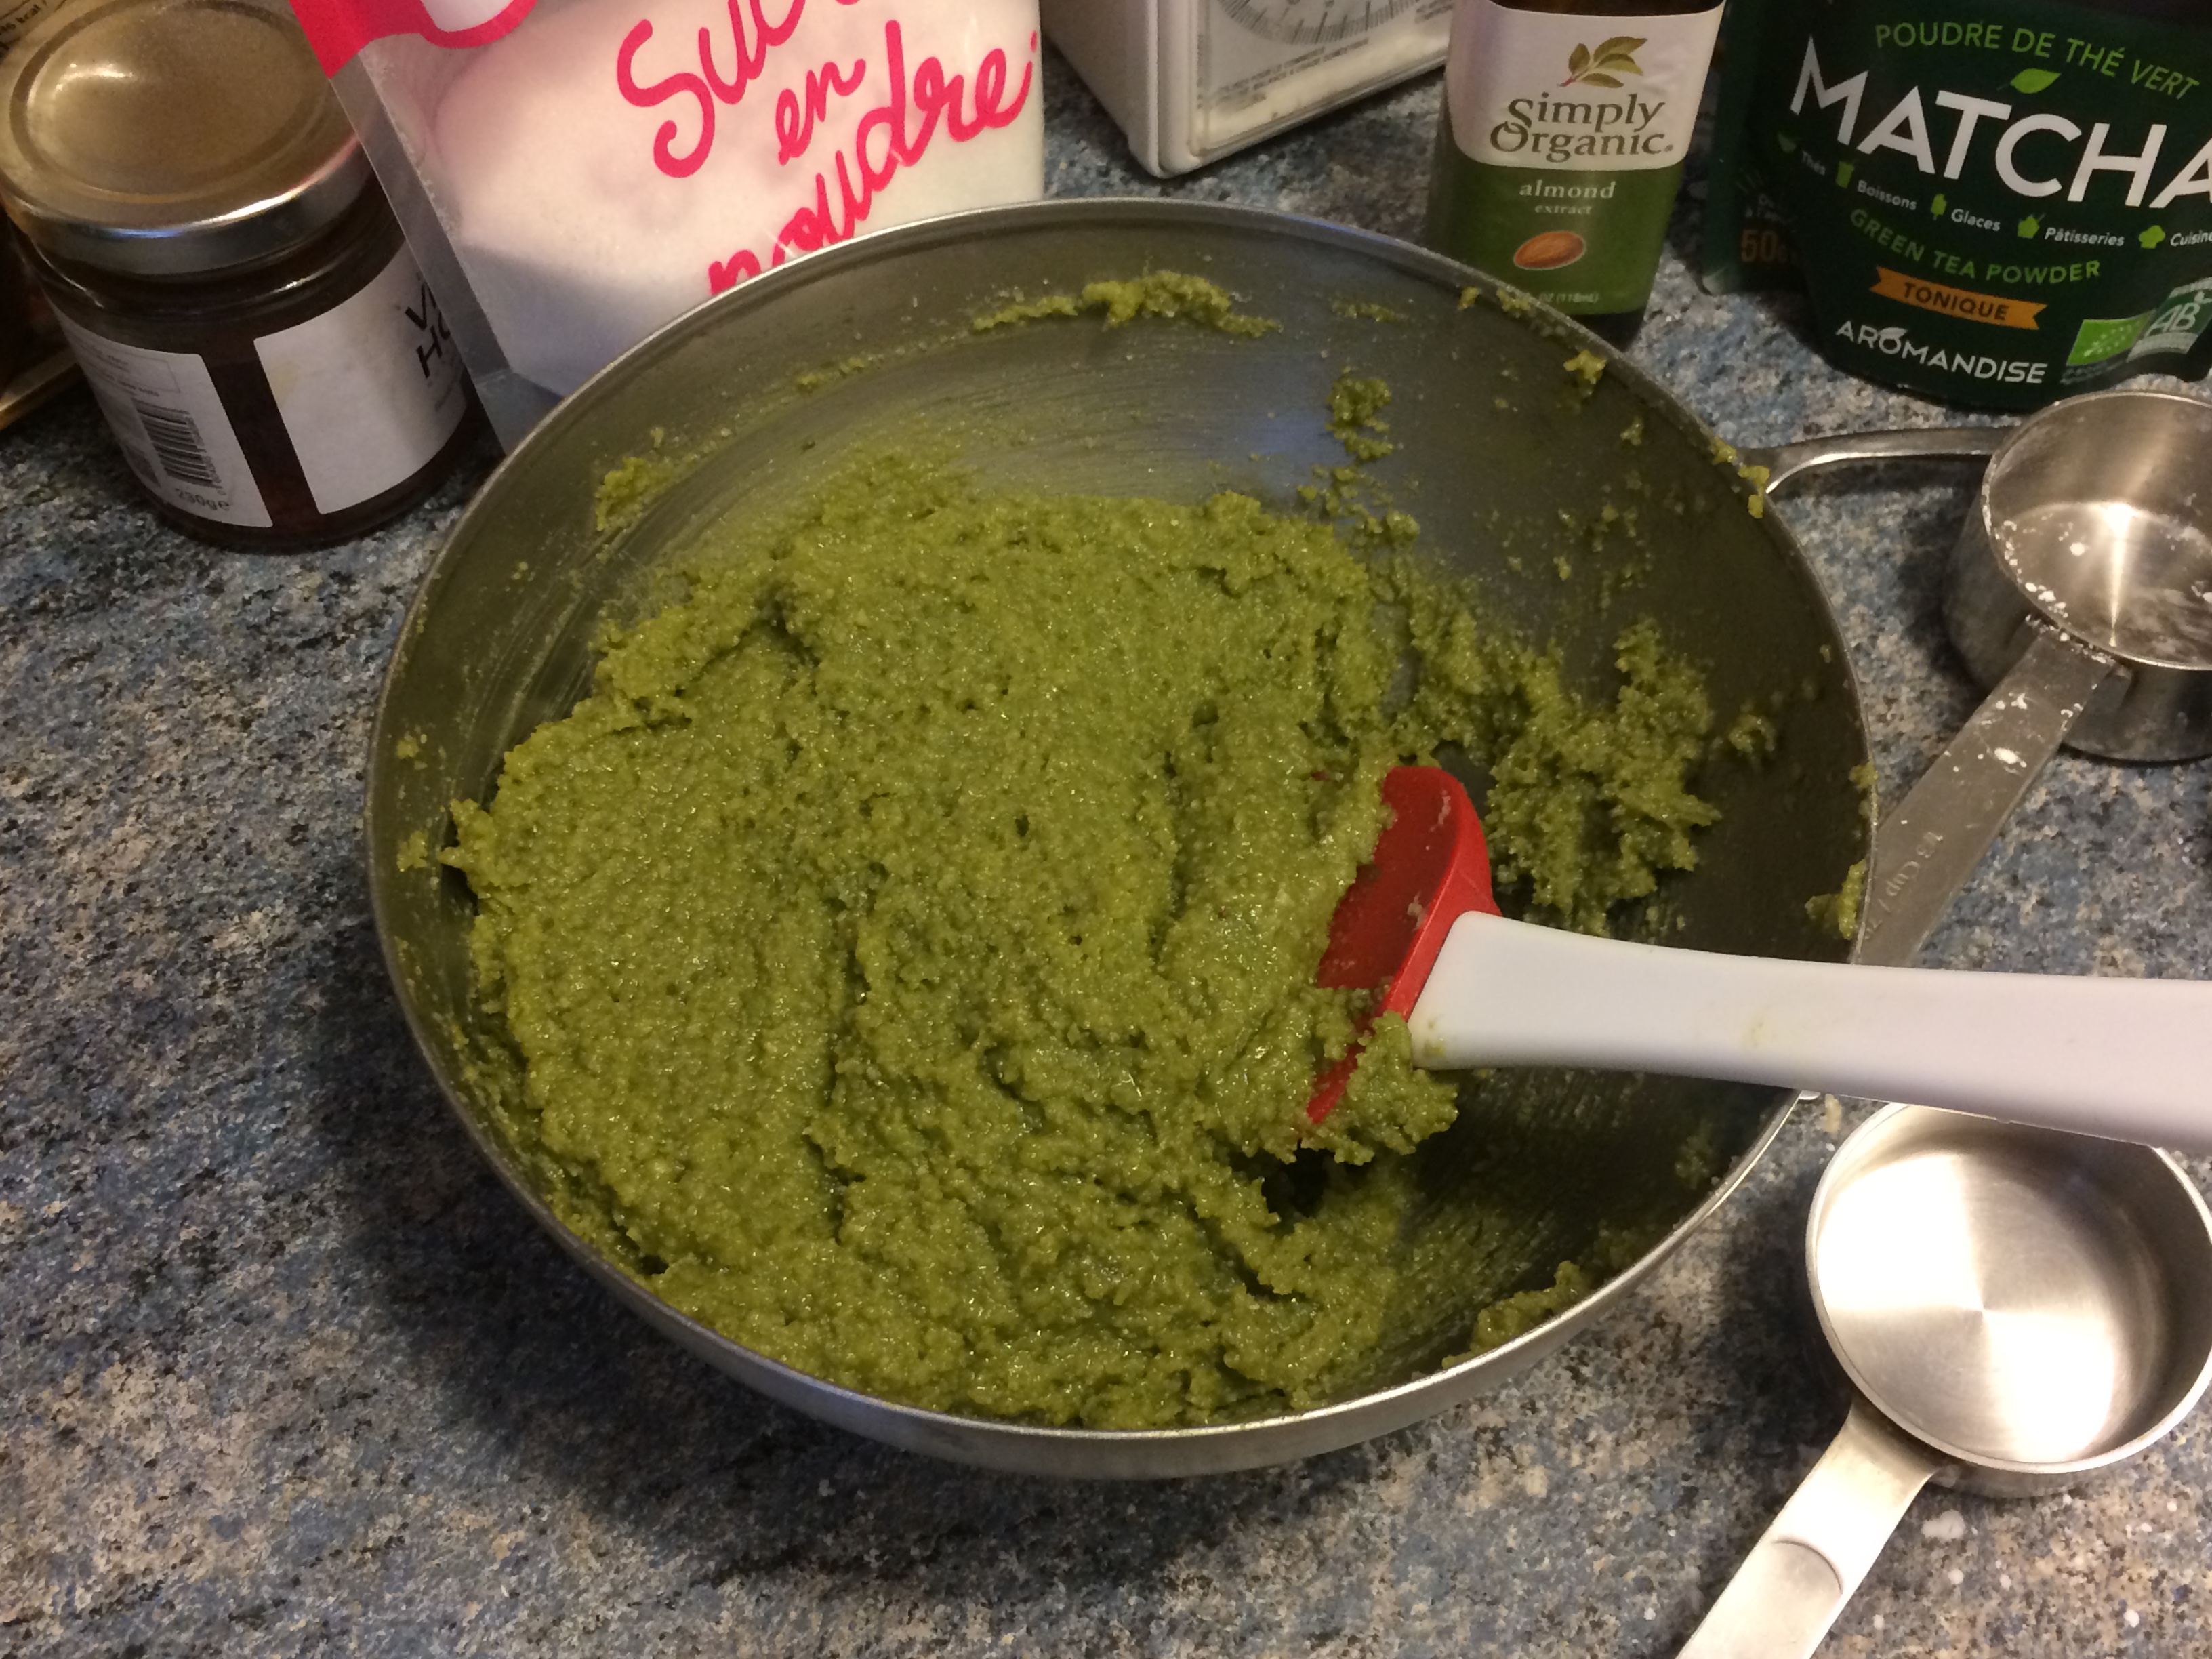
In a separate small bowl, combine the cream, milk, oil and almond extract, whisking with a fork. Add this liquid mixture to the dry mixture and stir thoroughly until you have a thick uniform paste. Taste it to check the sweetness – as matcha is fairly bitter, you may find you need a bit more sugar.

IMG_7193
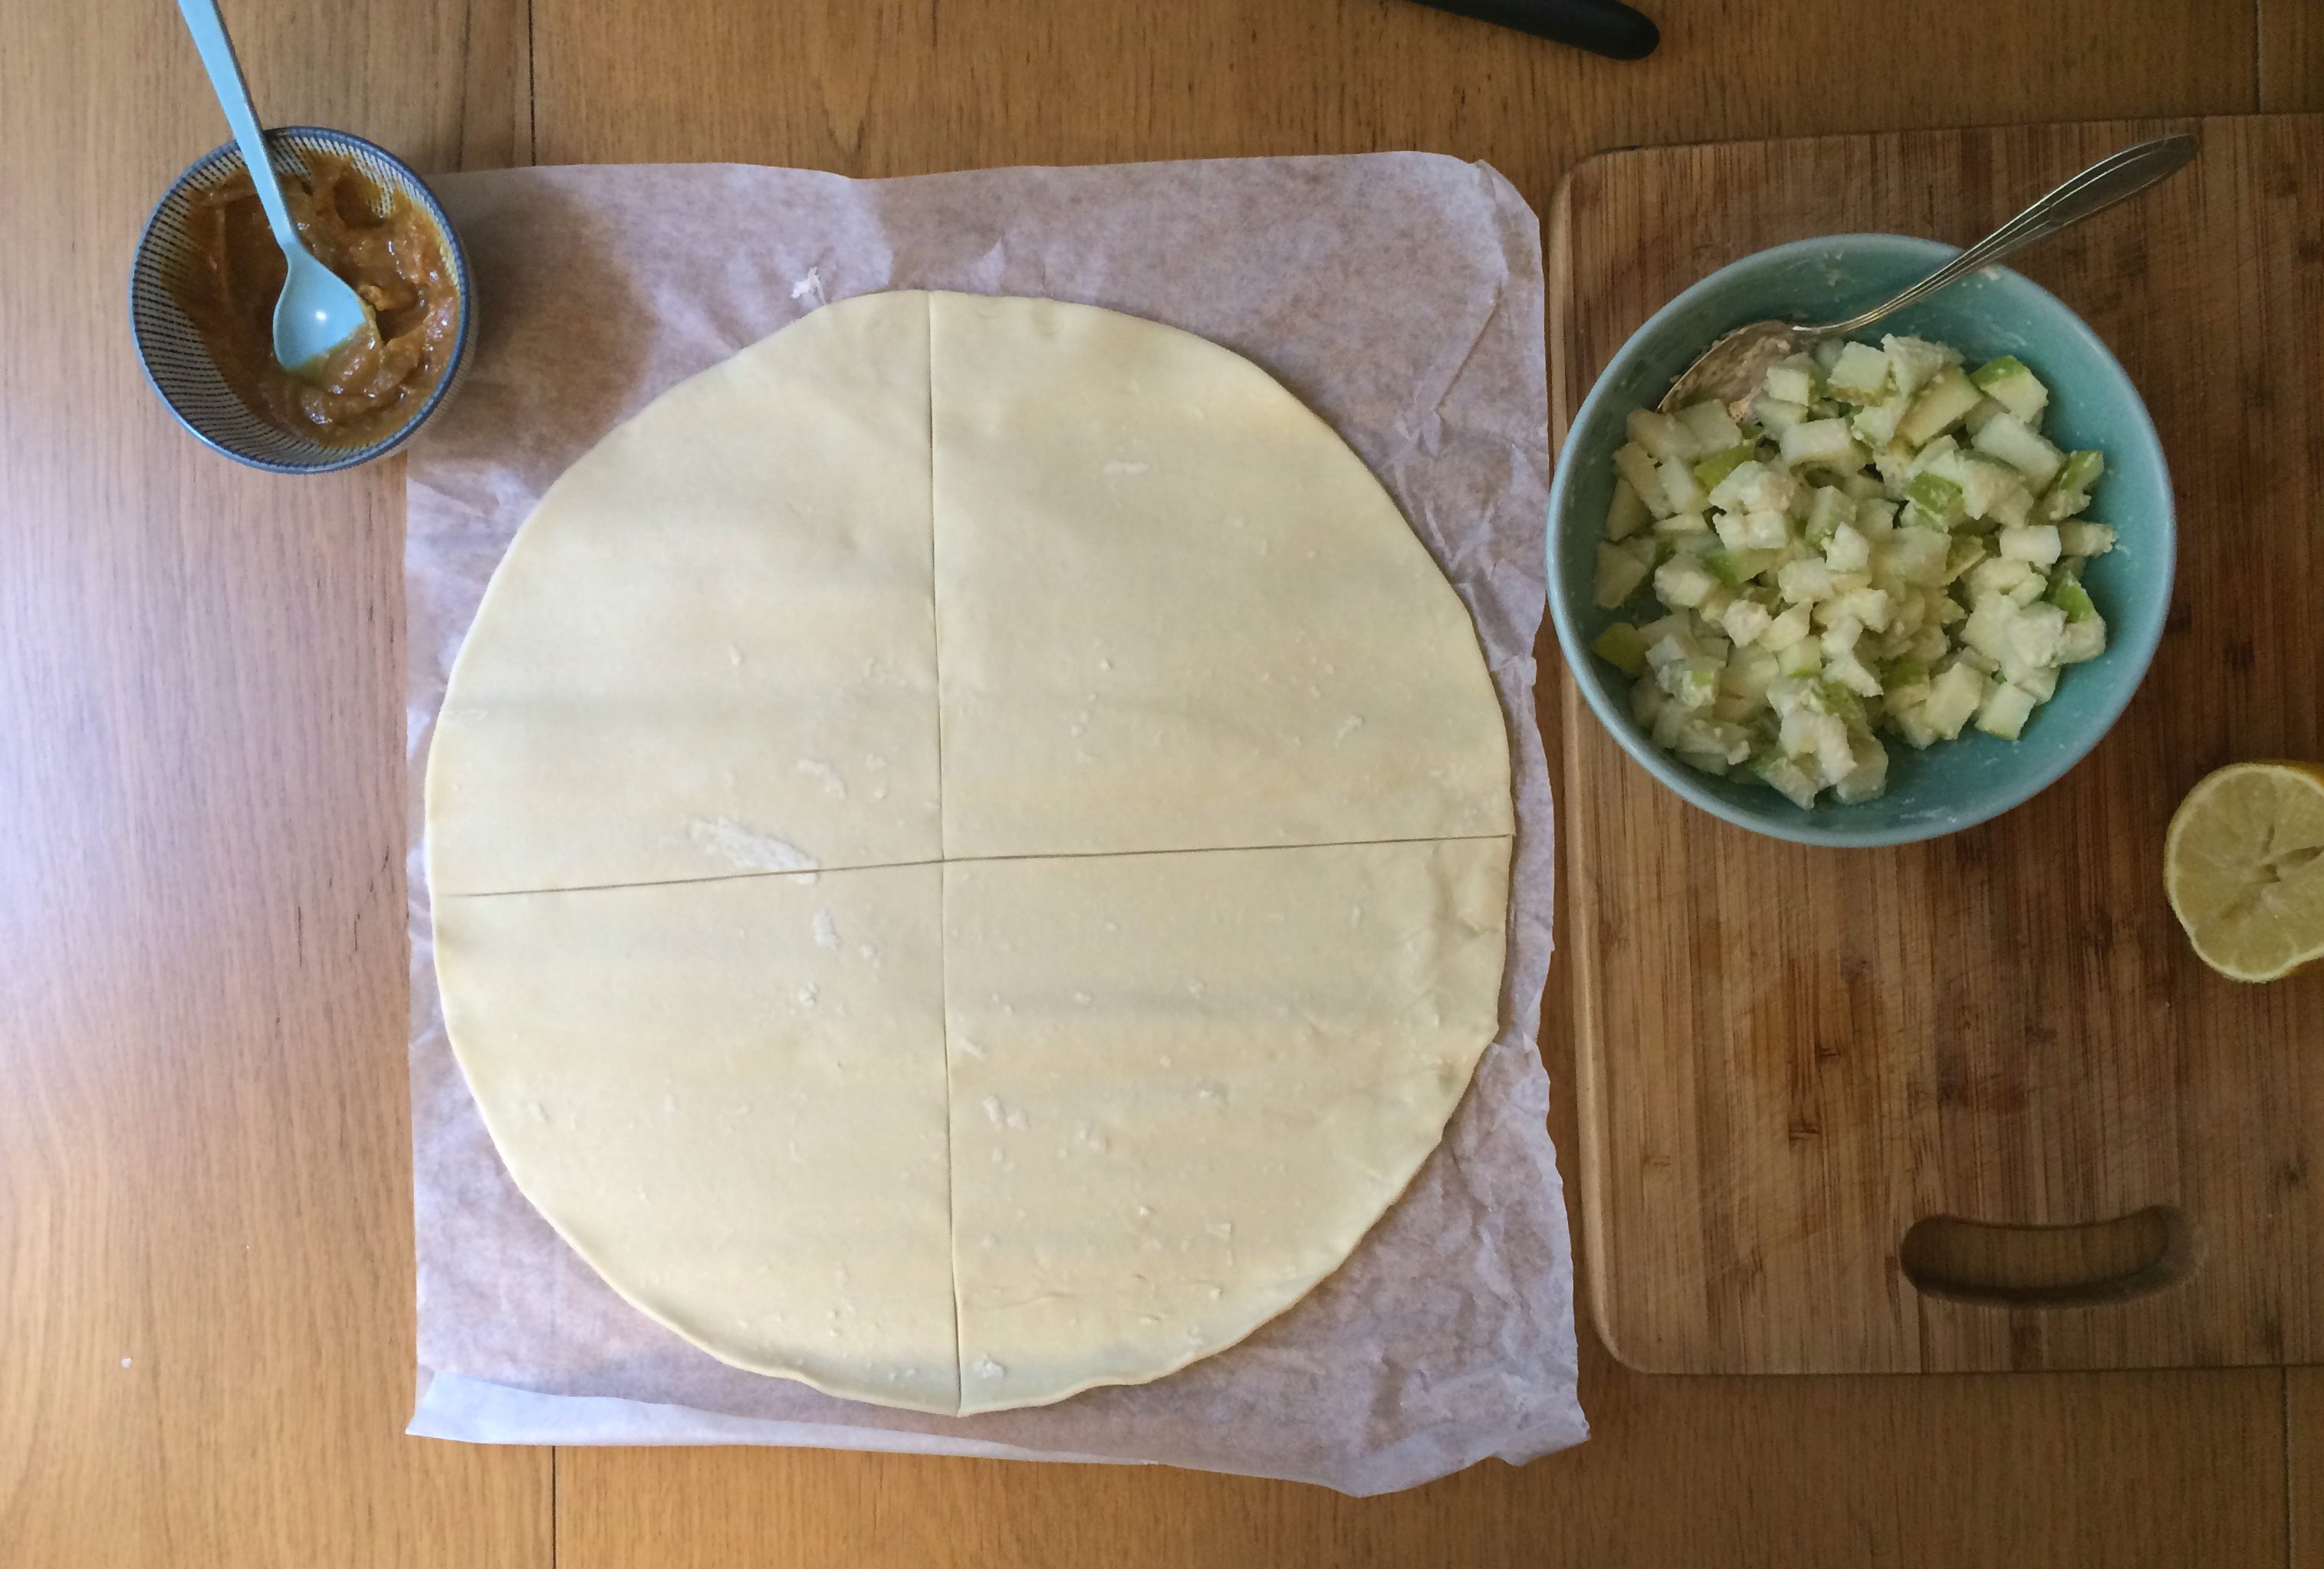
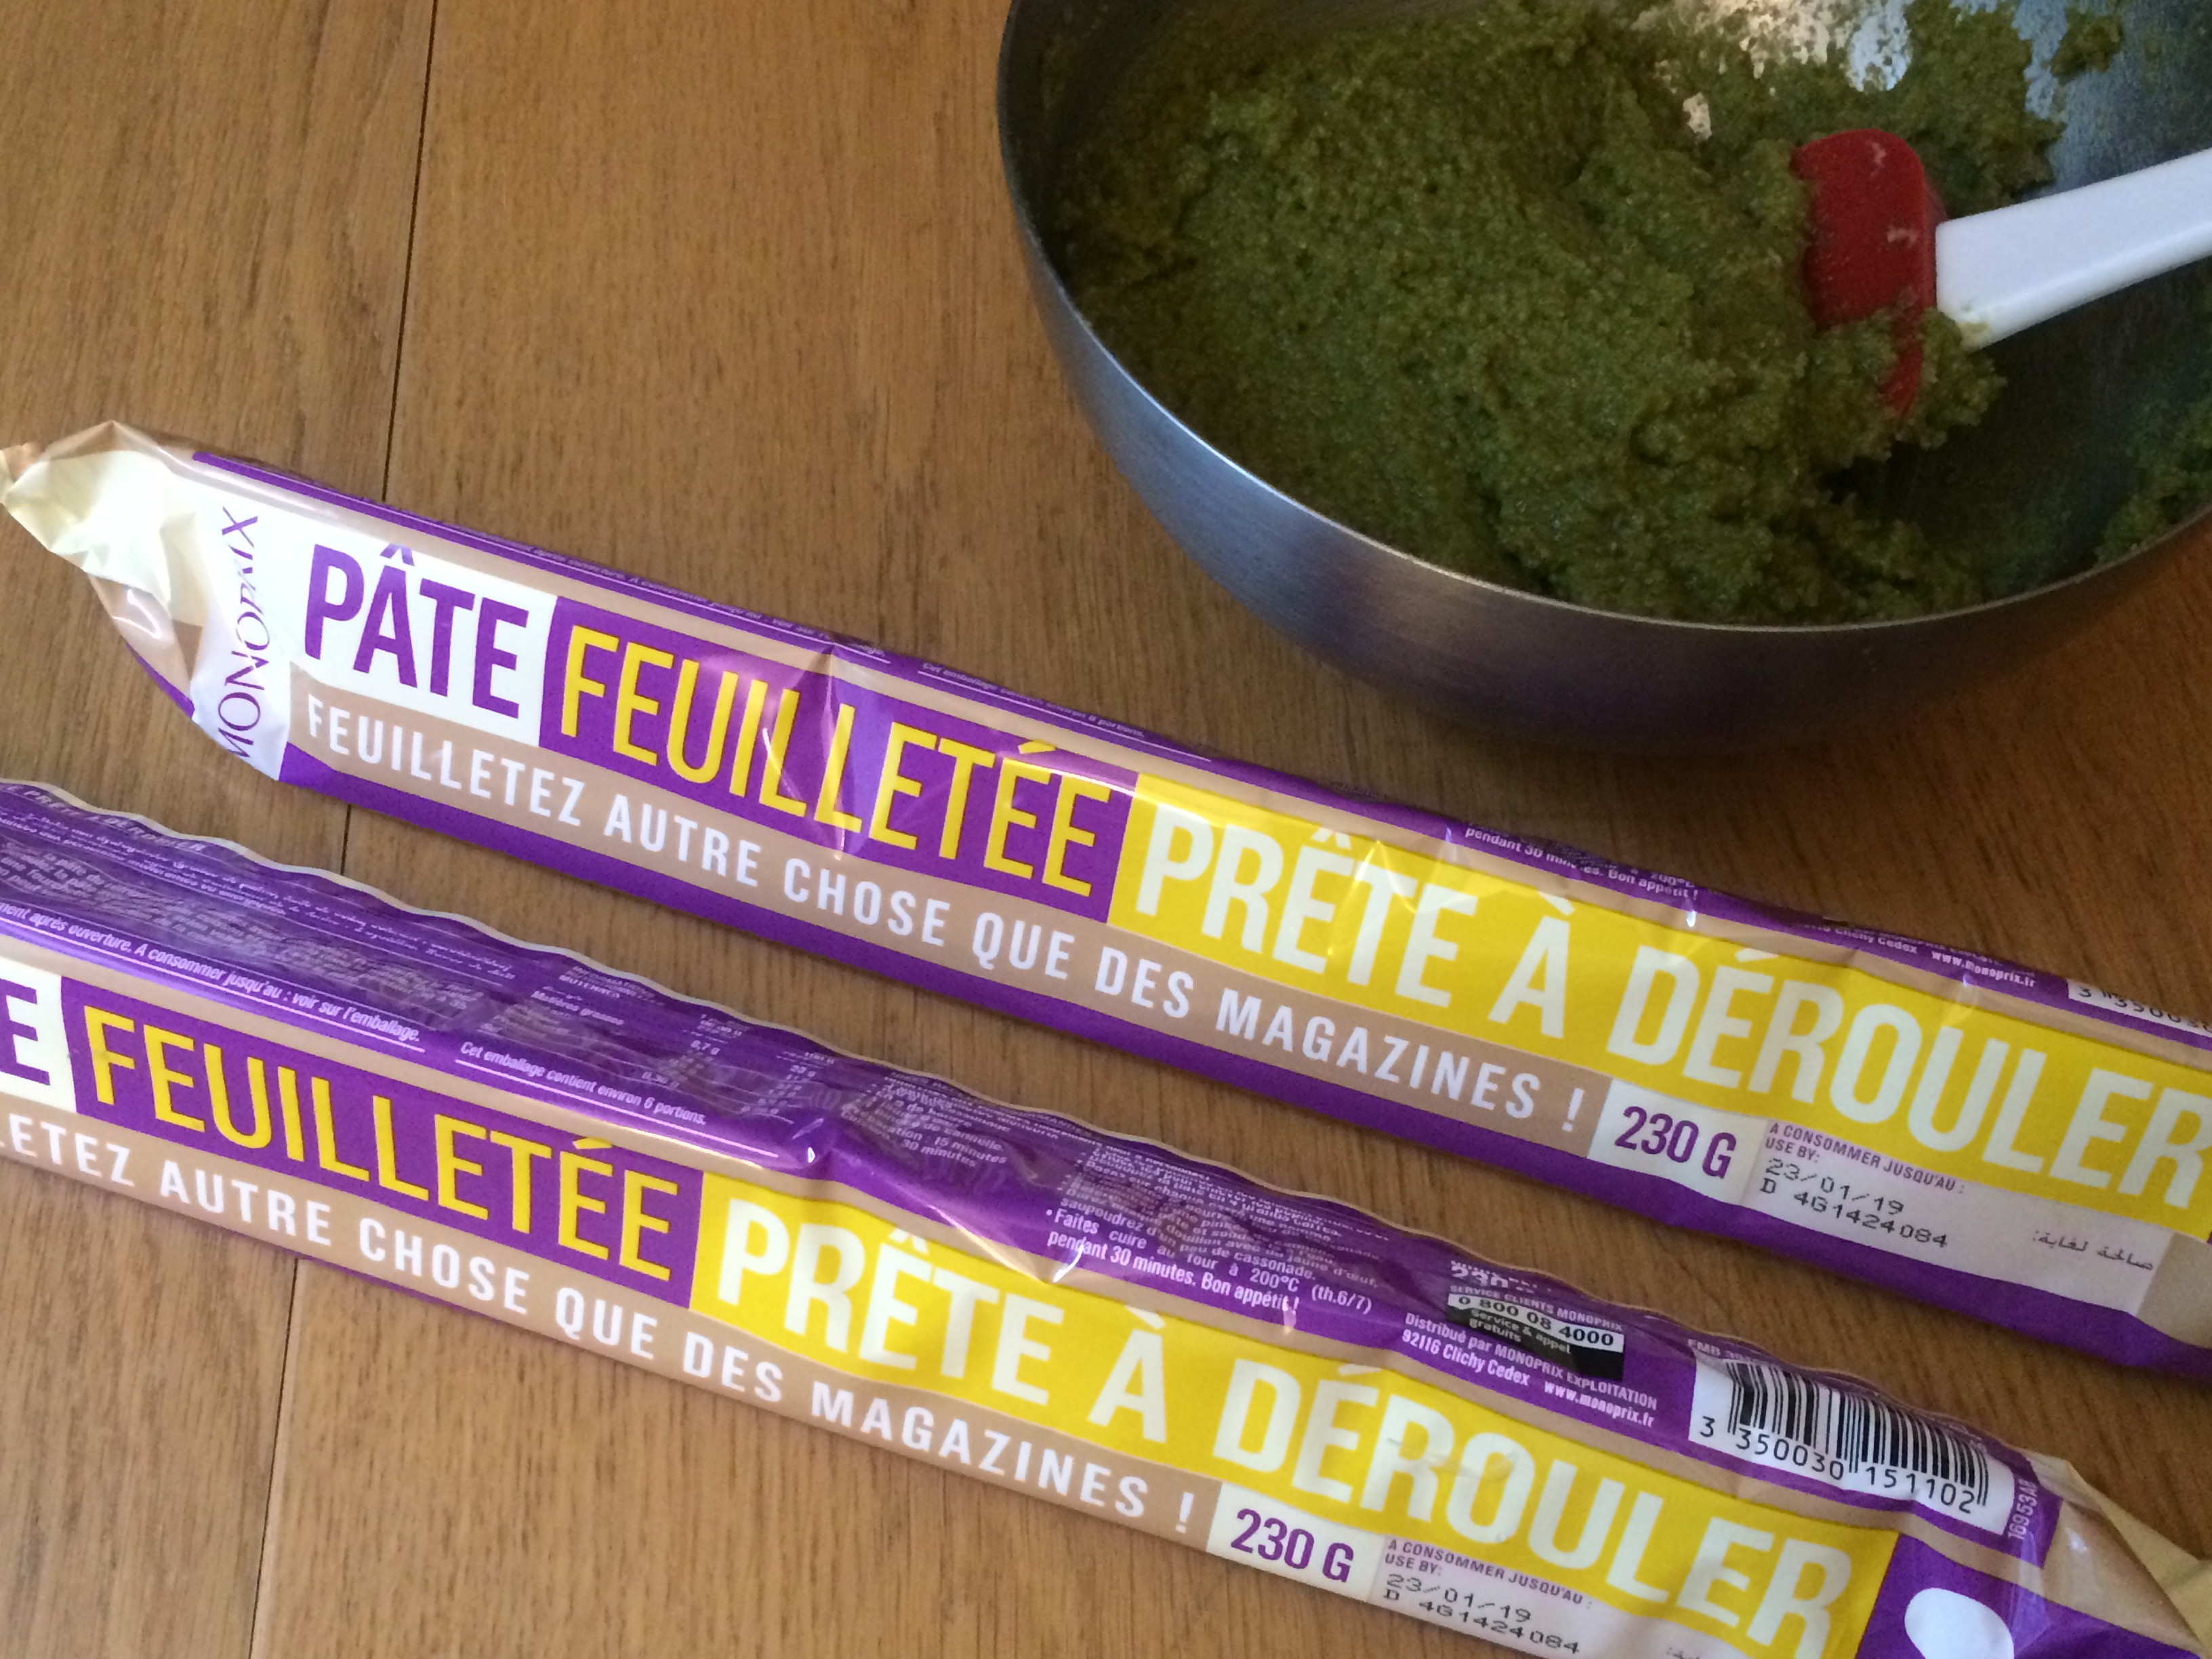
Preheat your oven to 350°F (180°C) and take your first pastry crust out of the fridge. Unroll it on a large surface.

IMG_7196
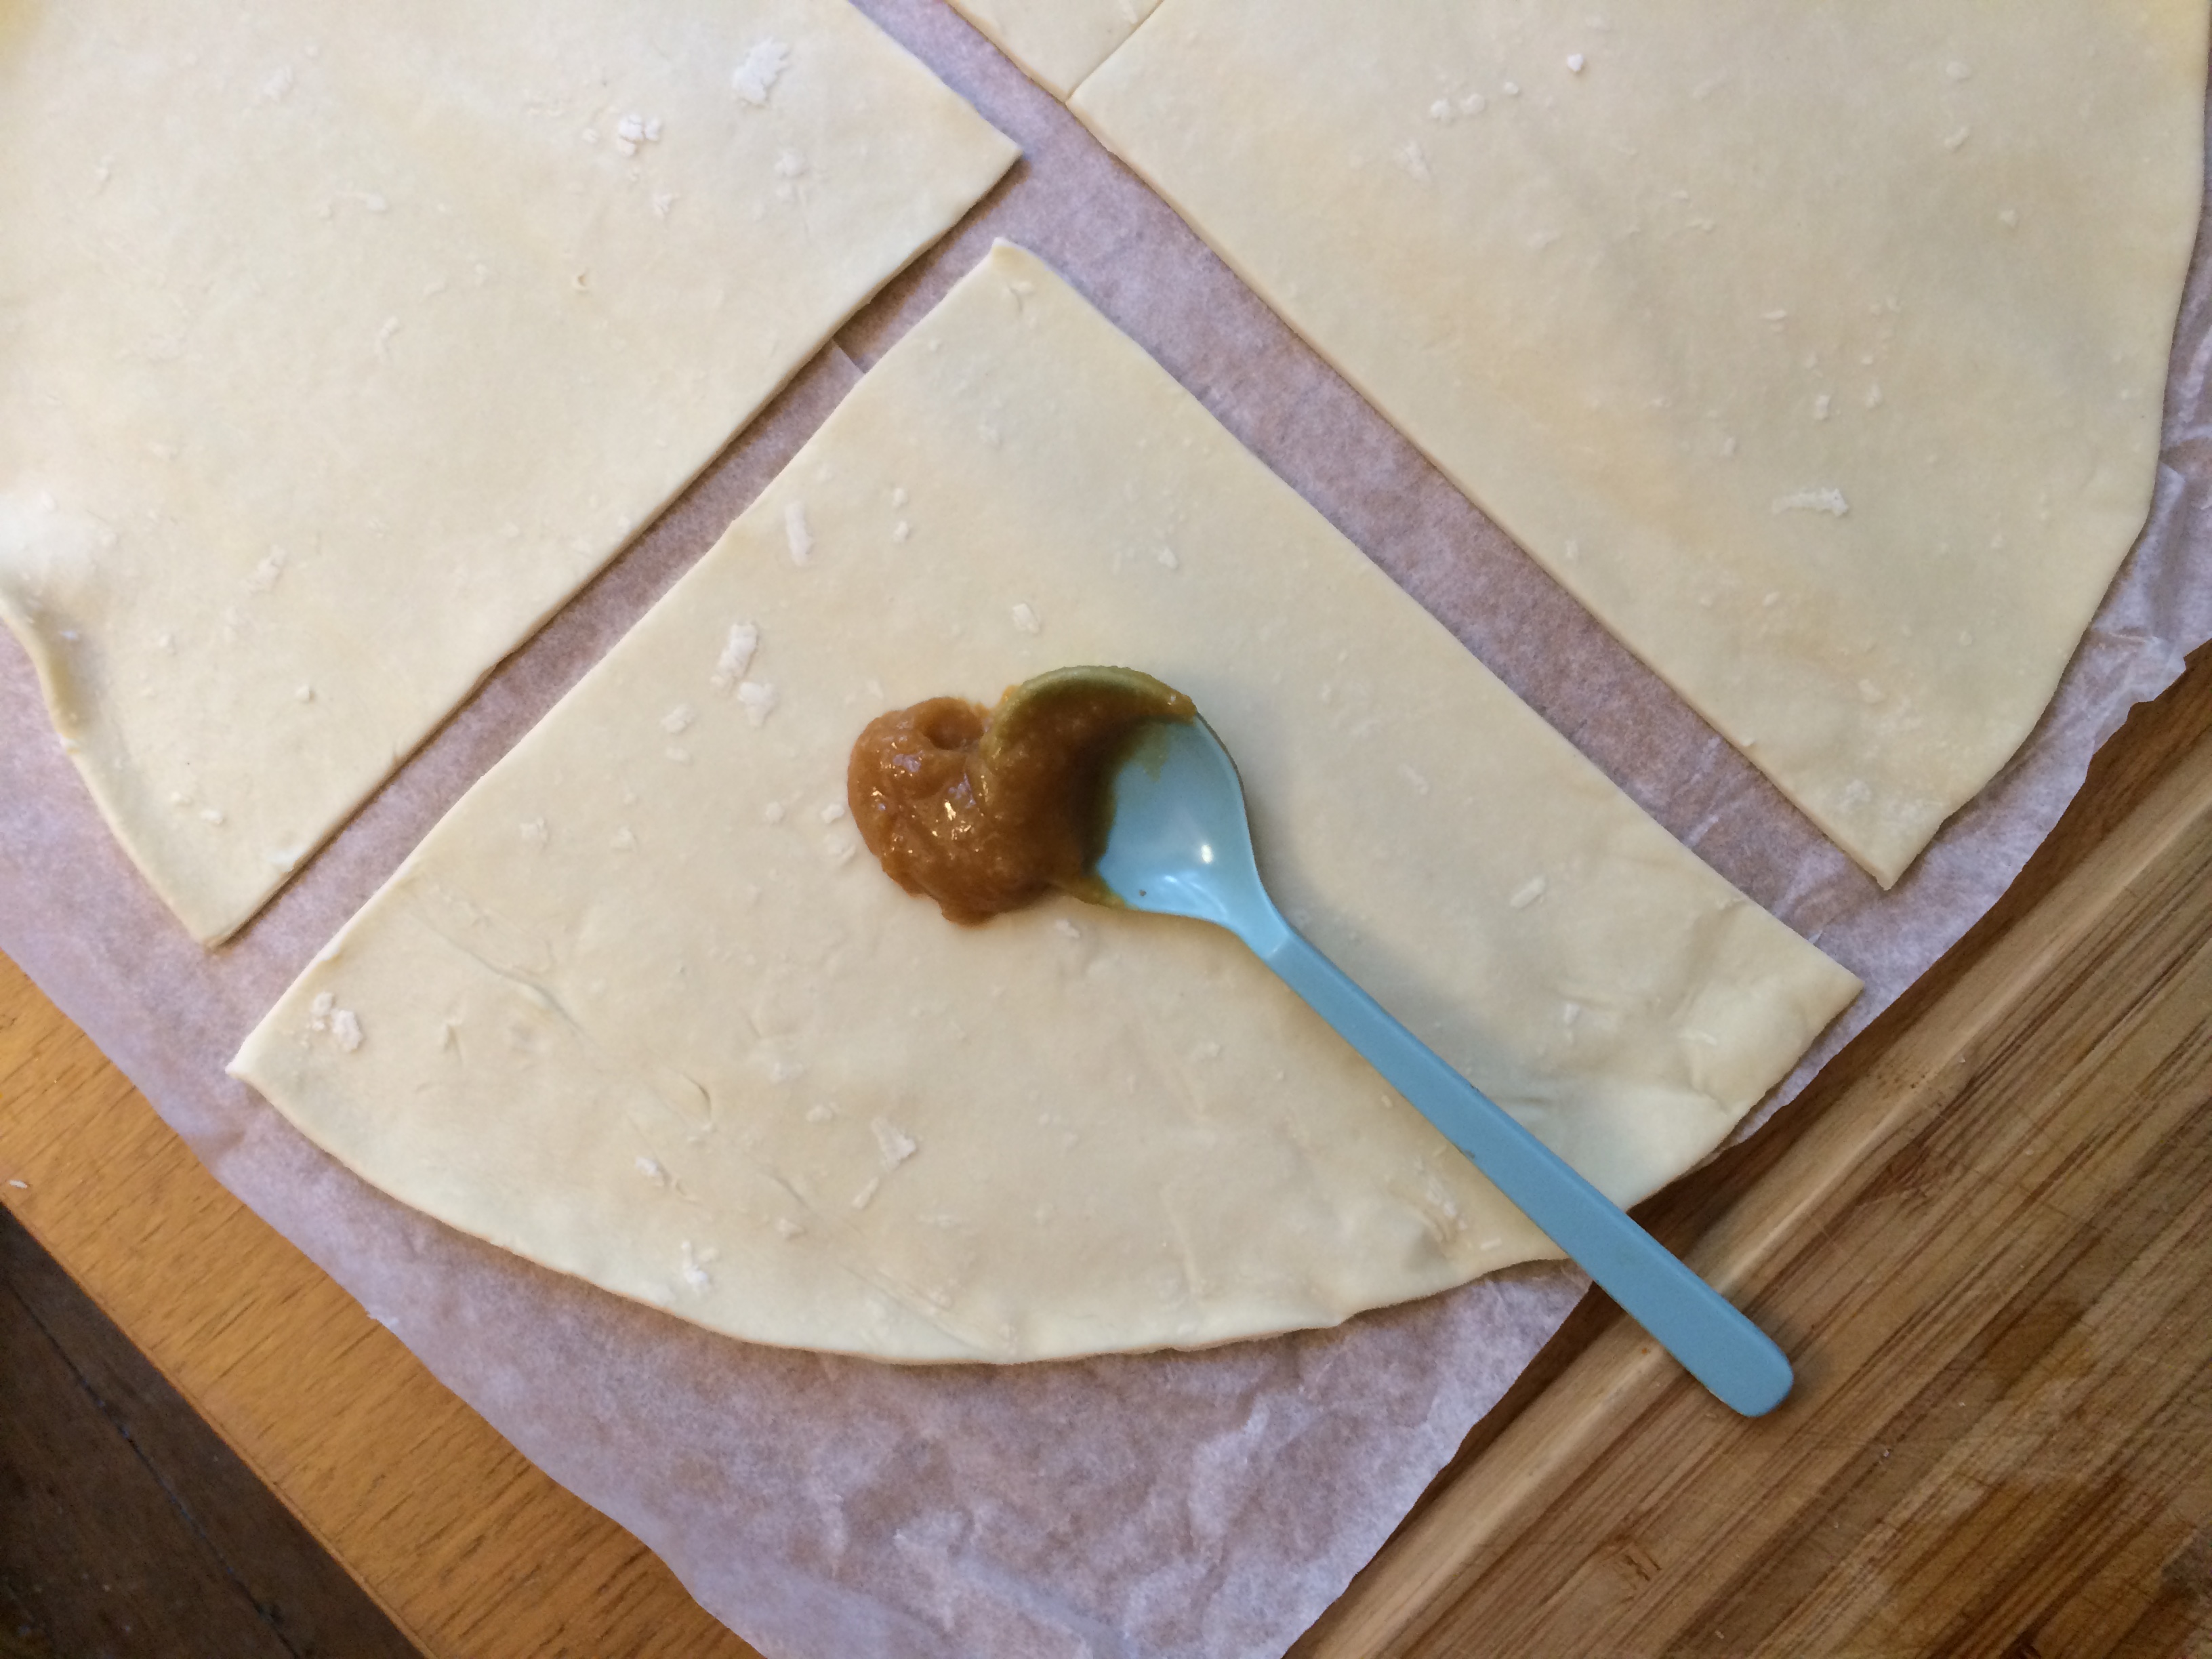
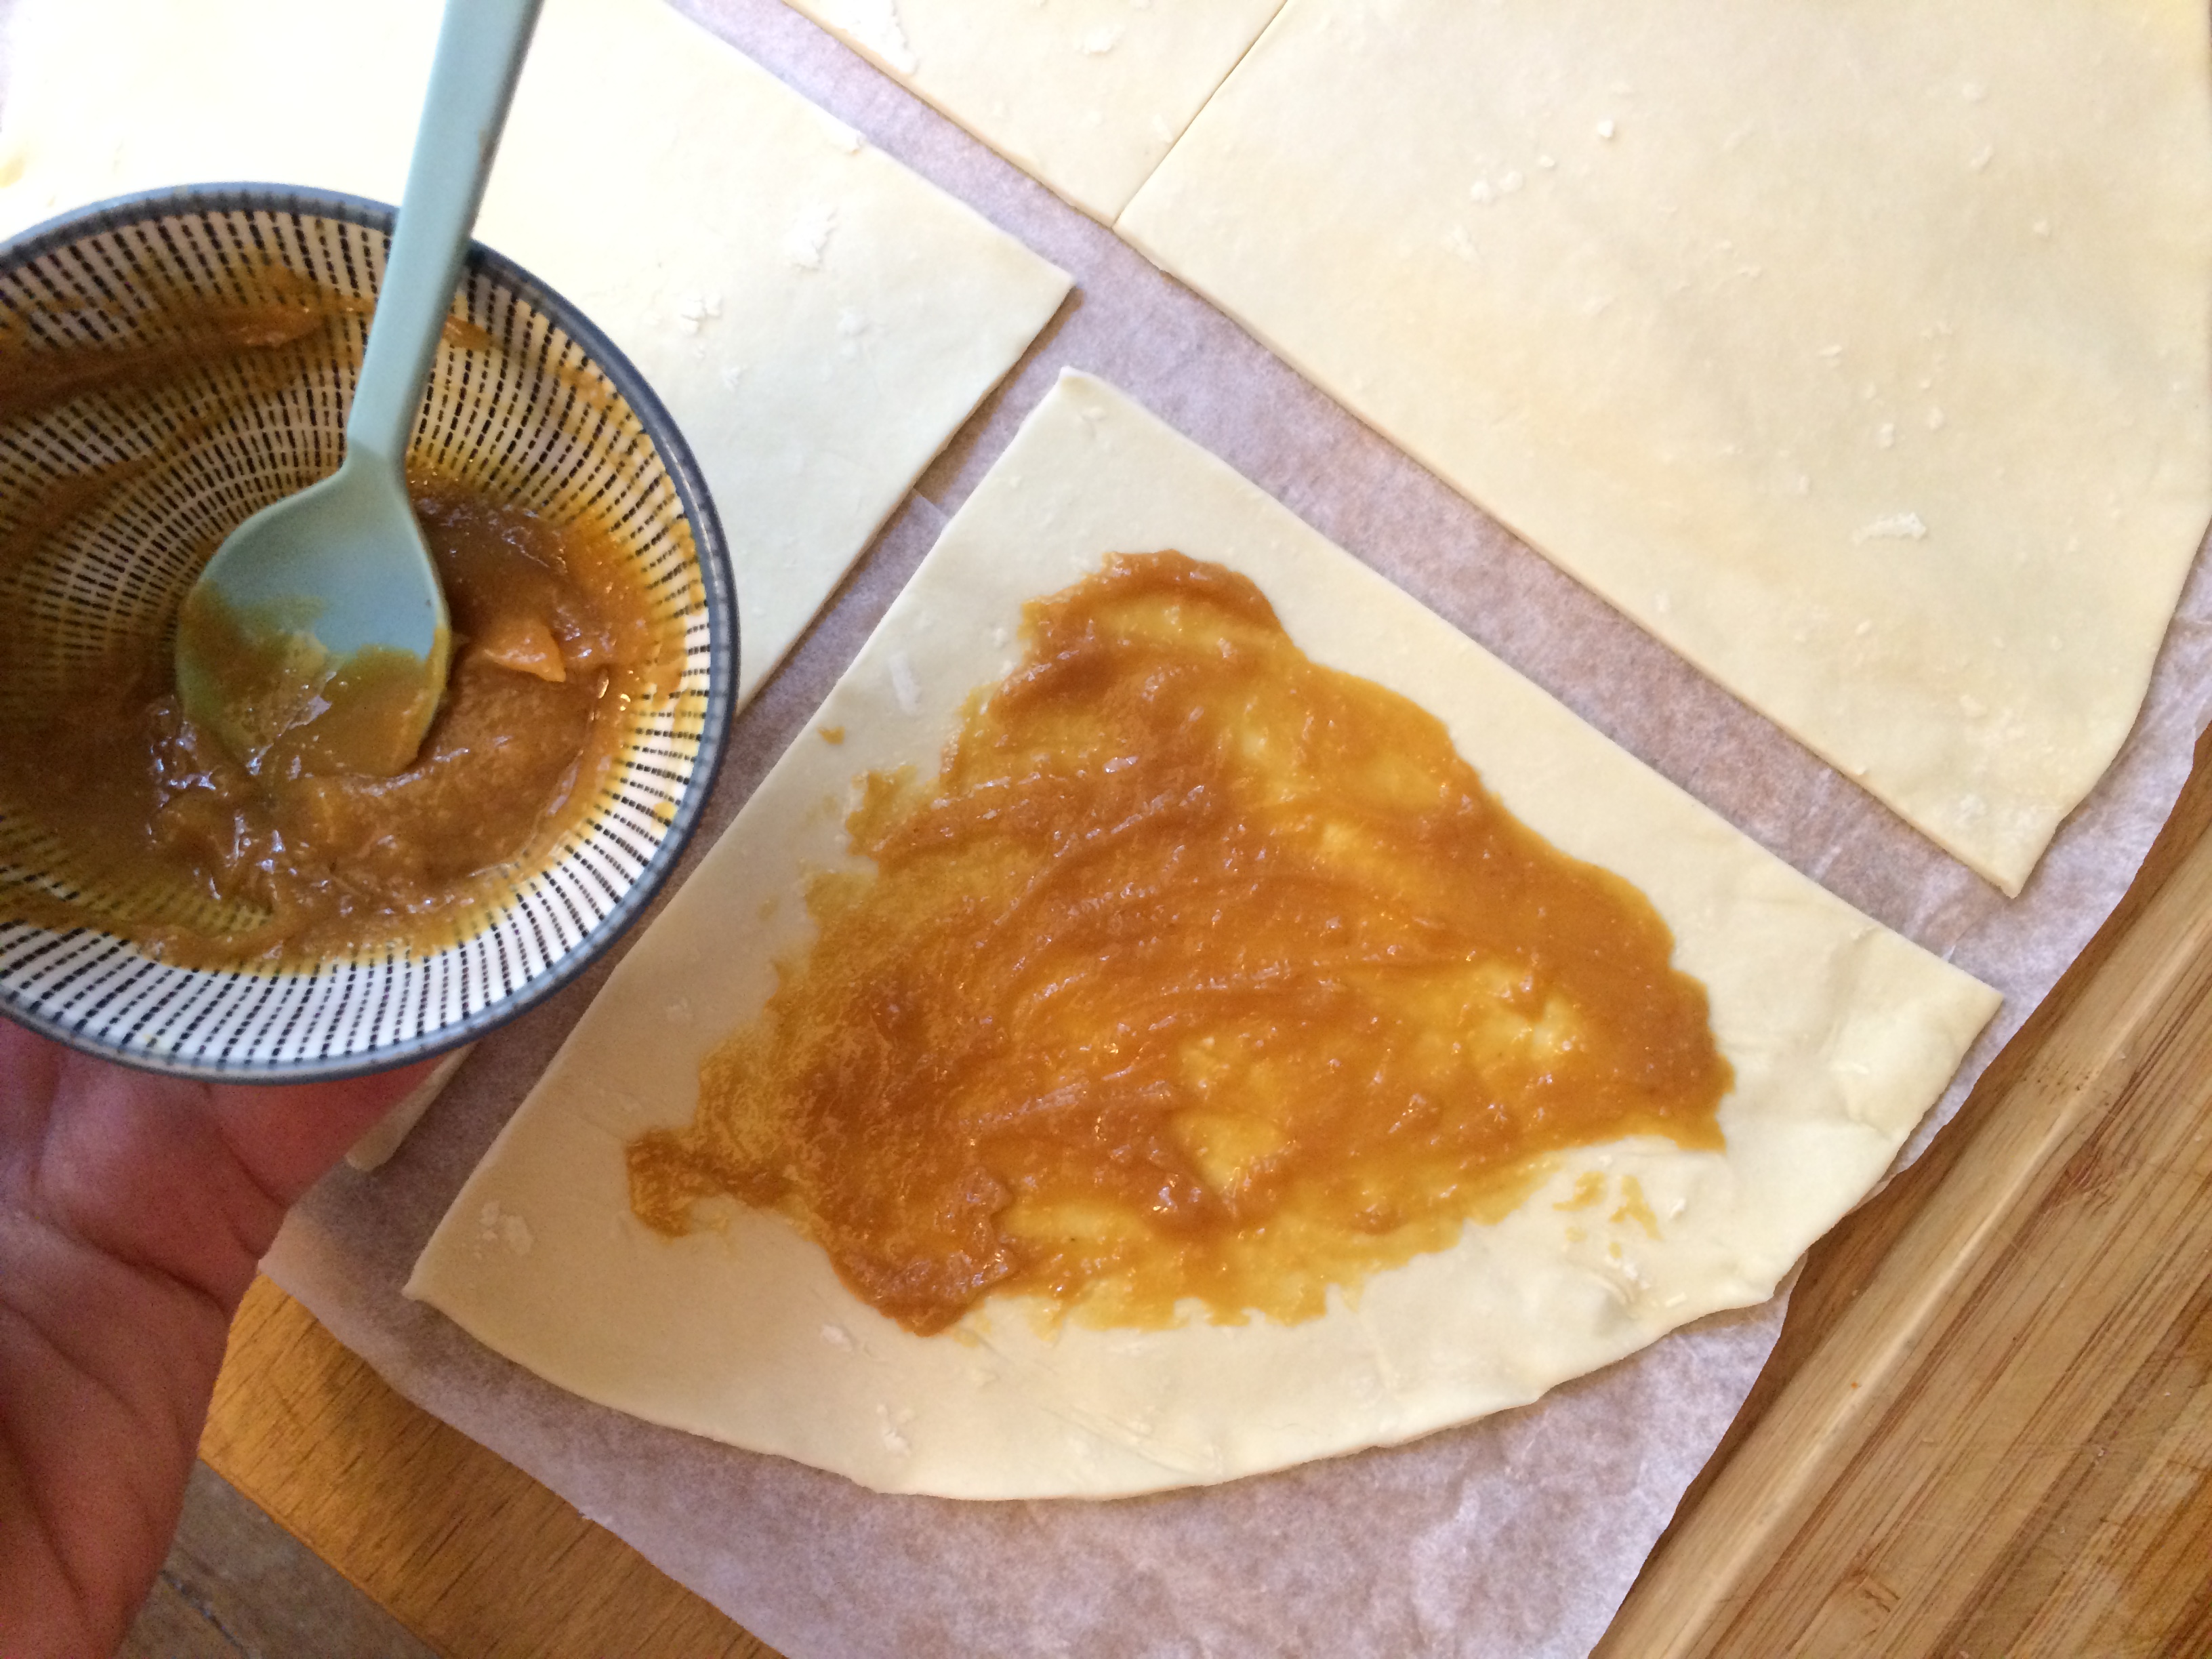
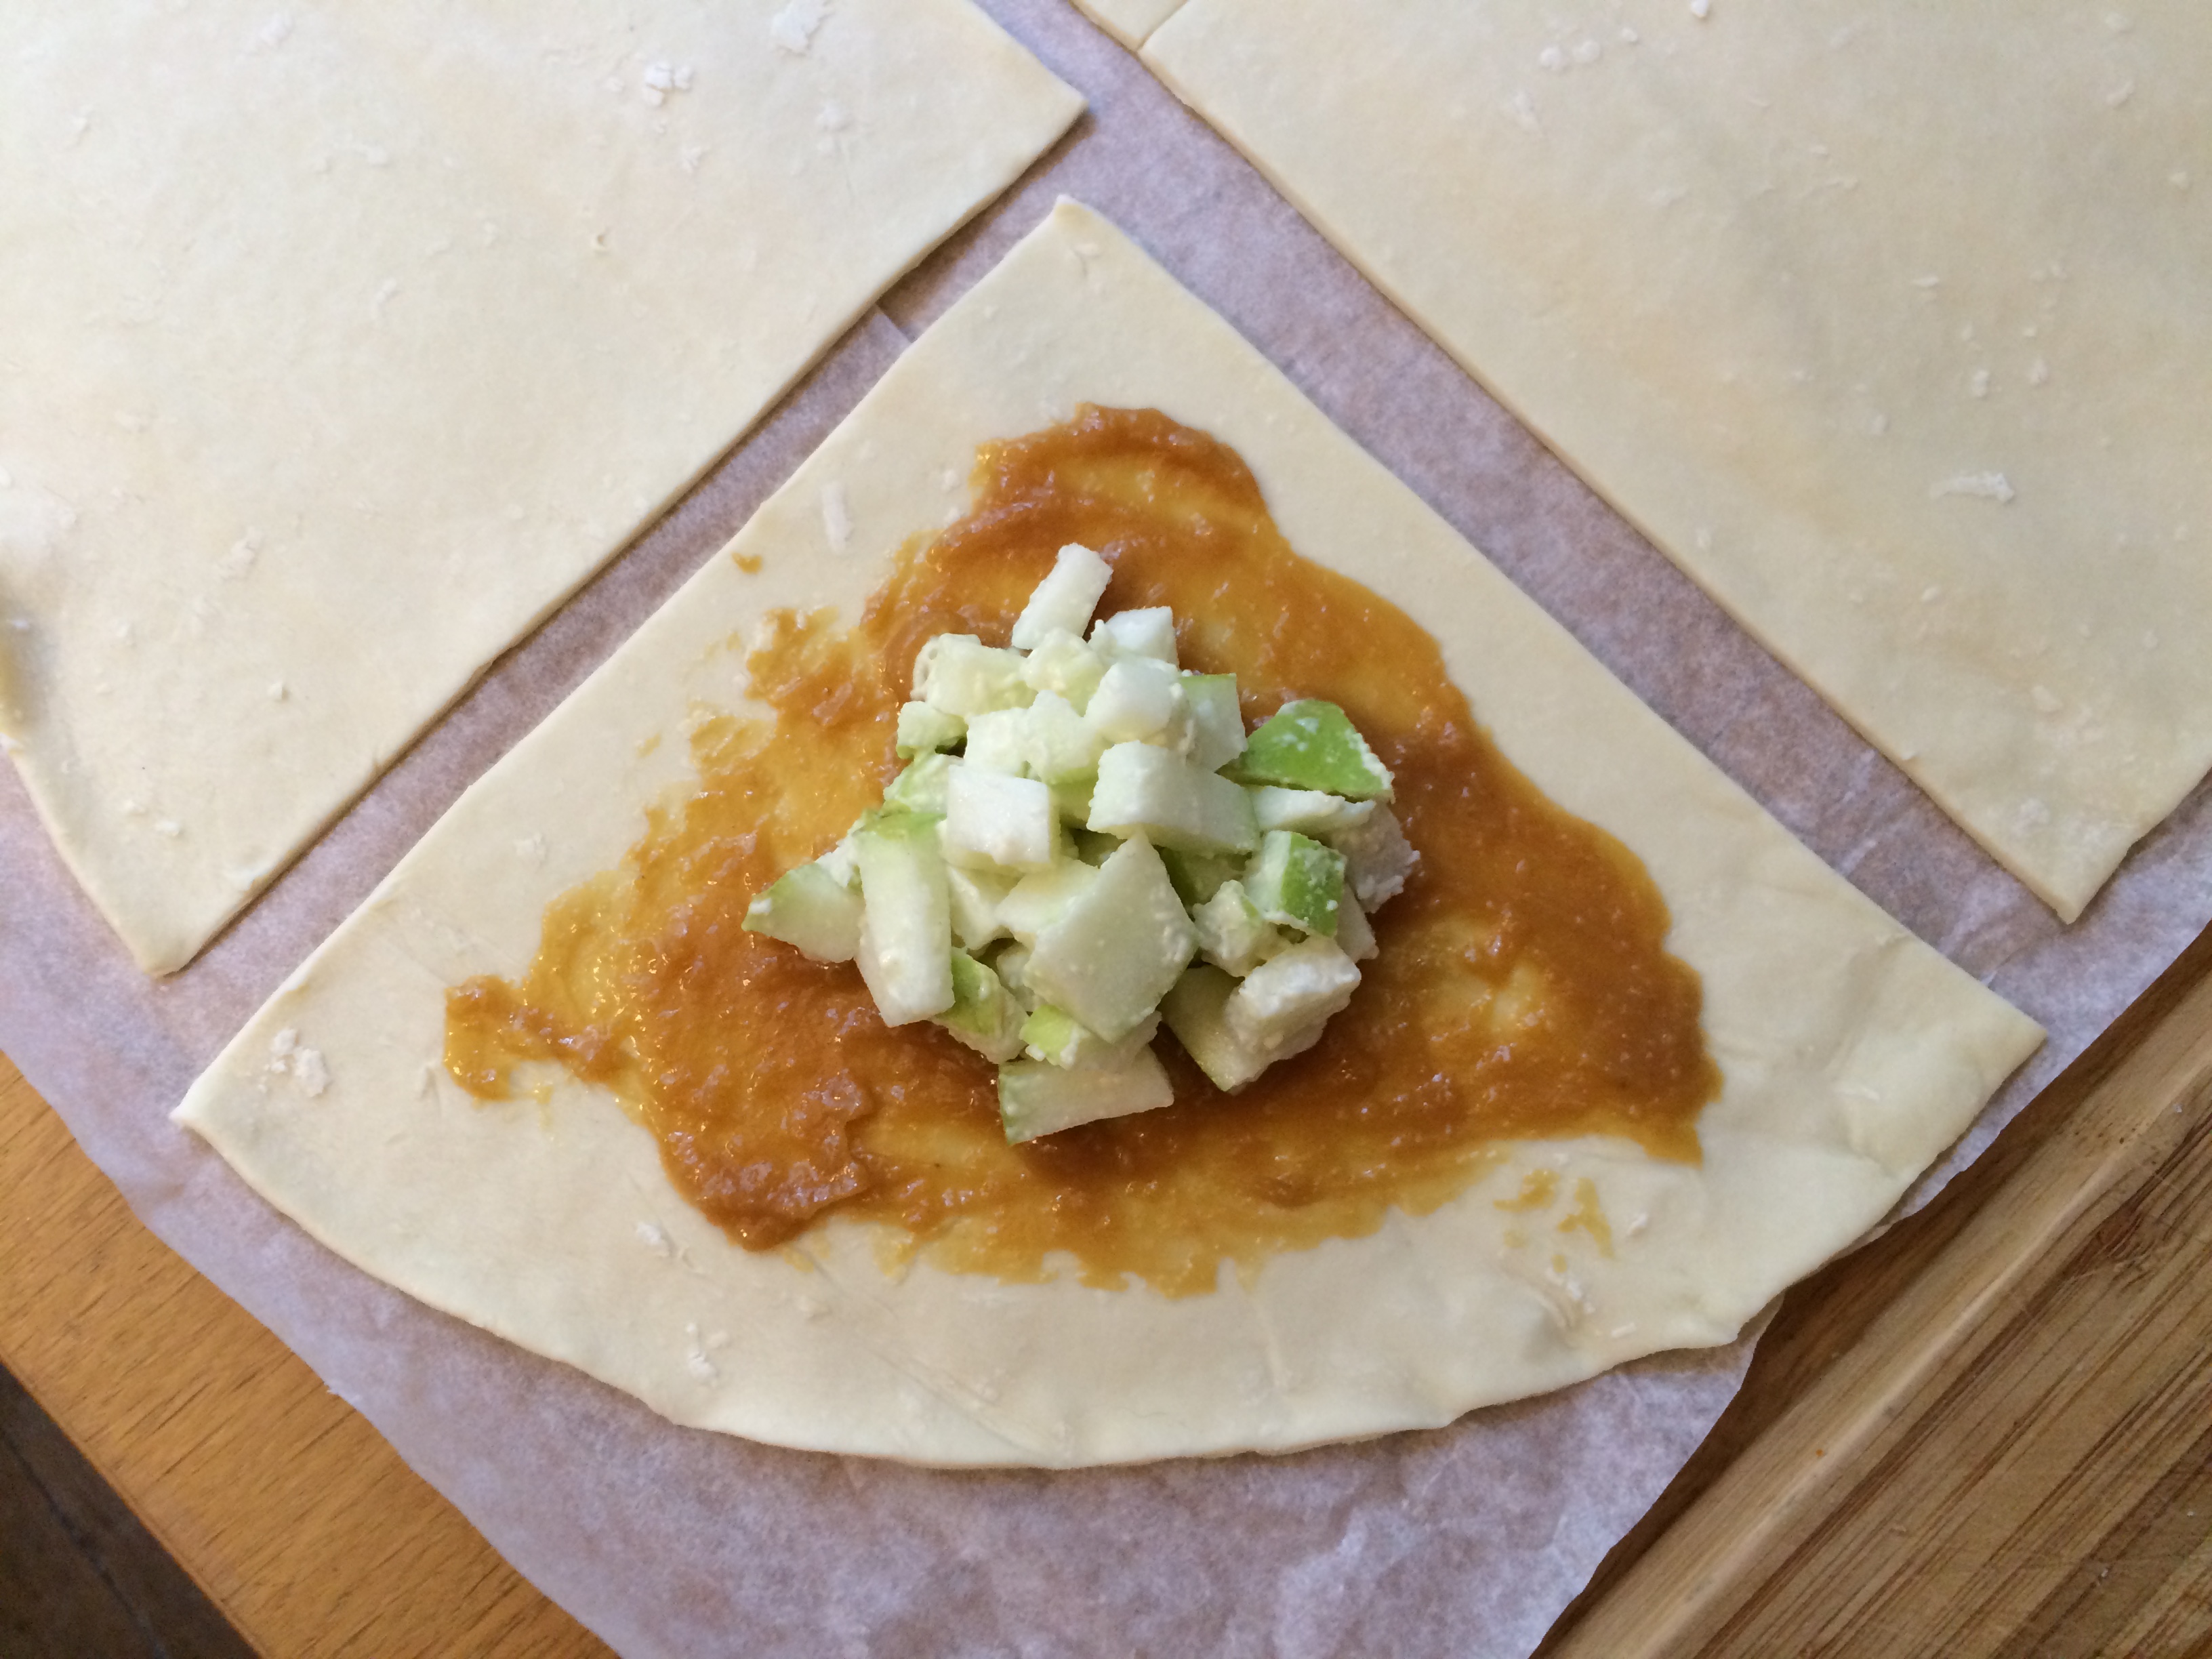
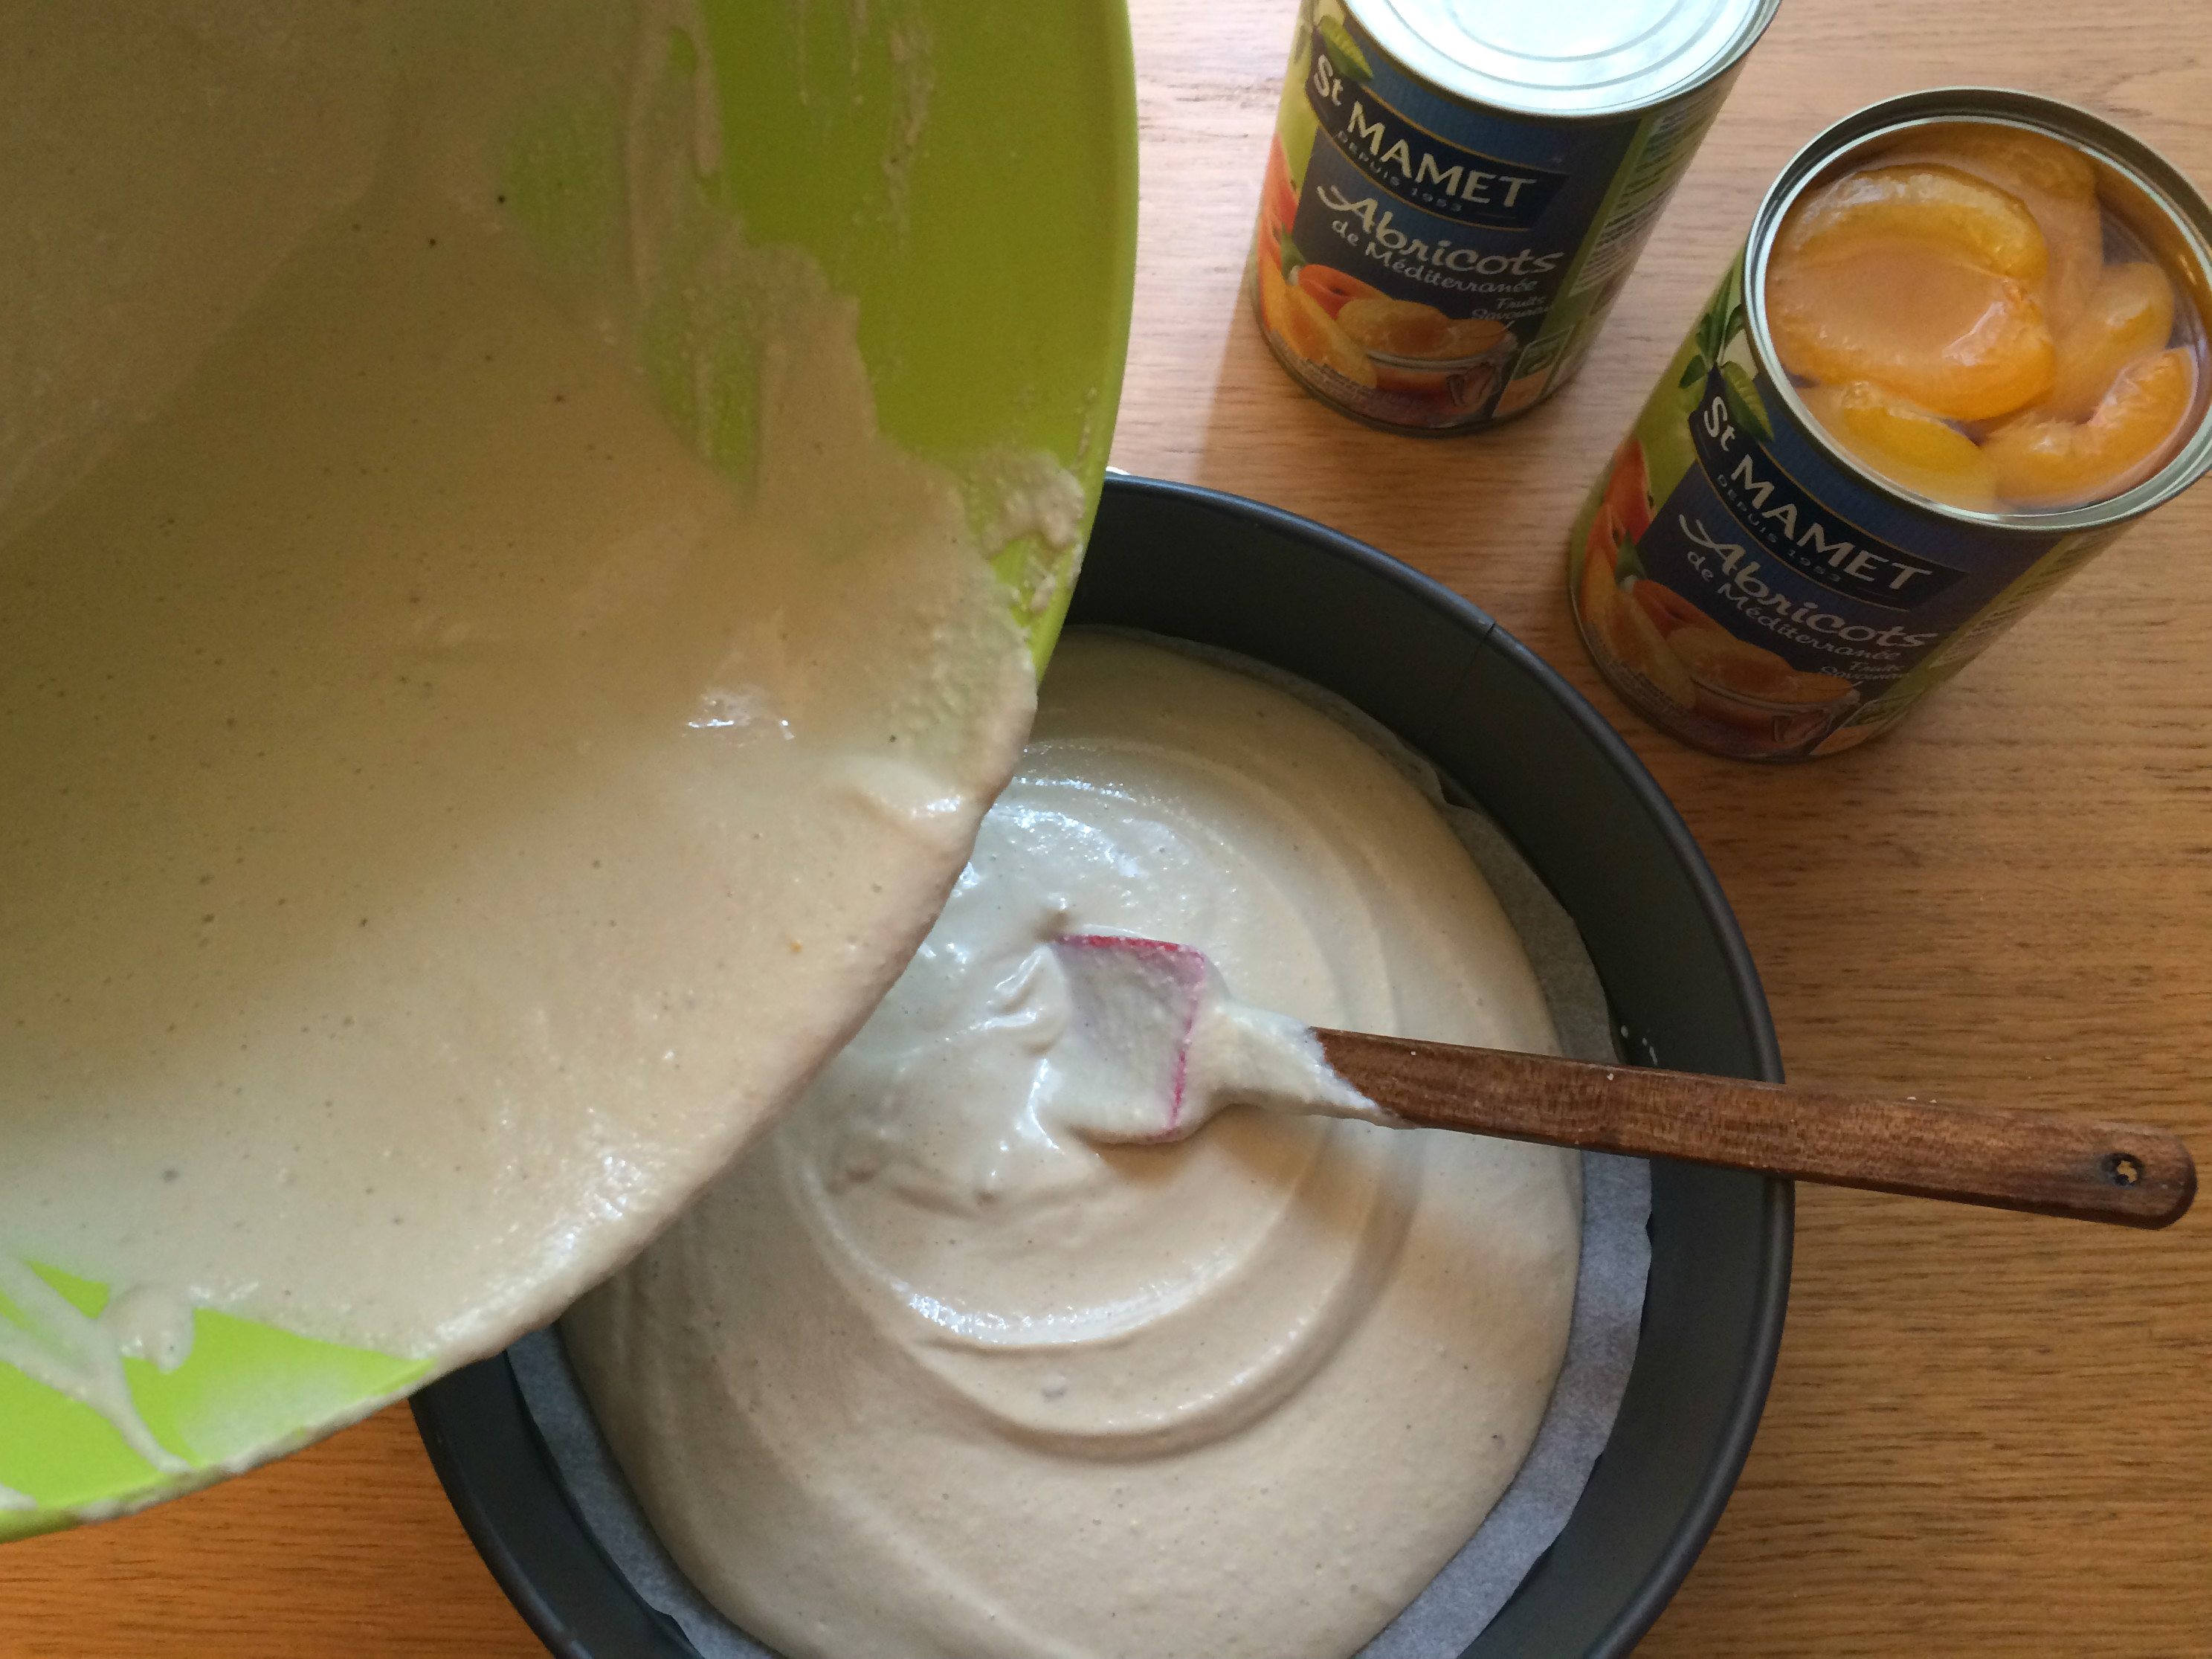
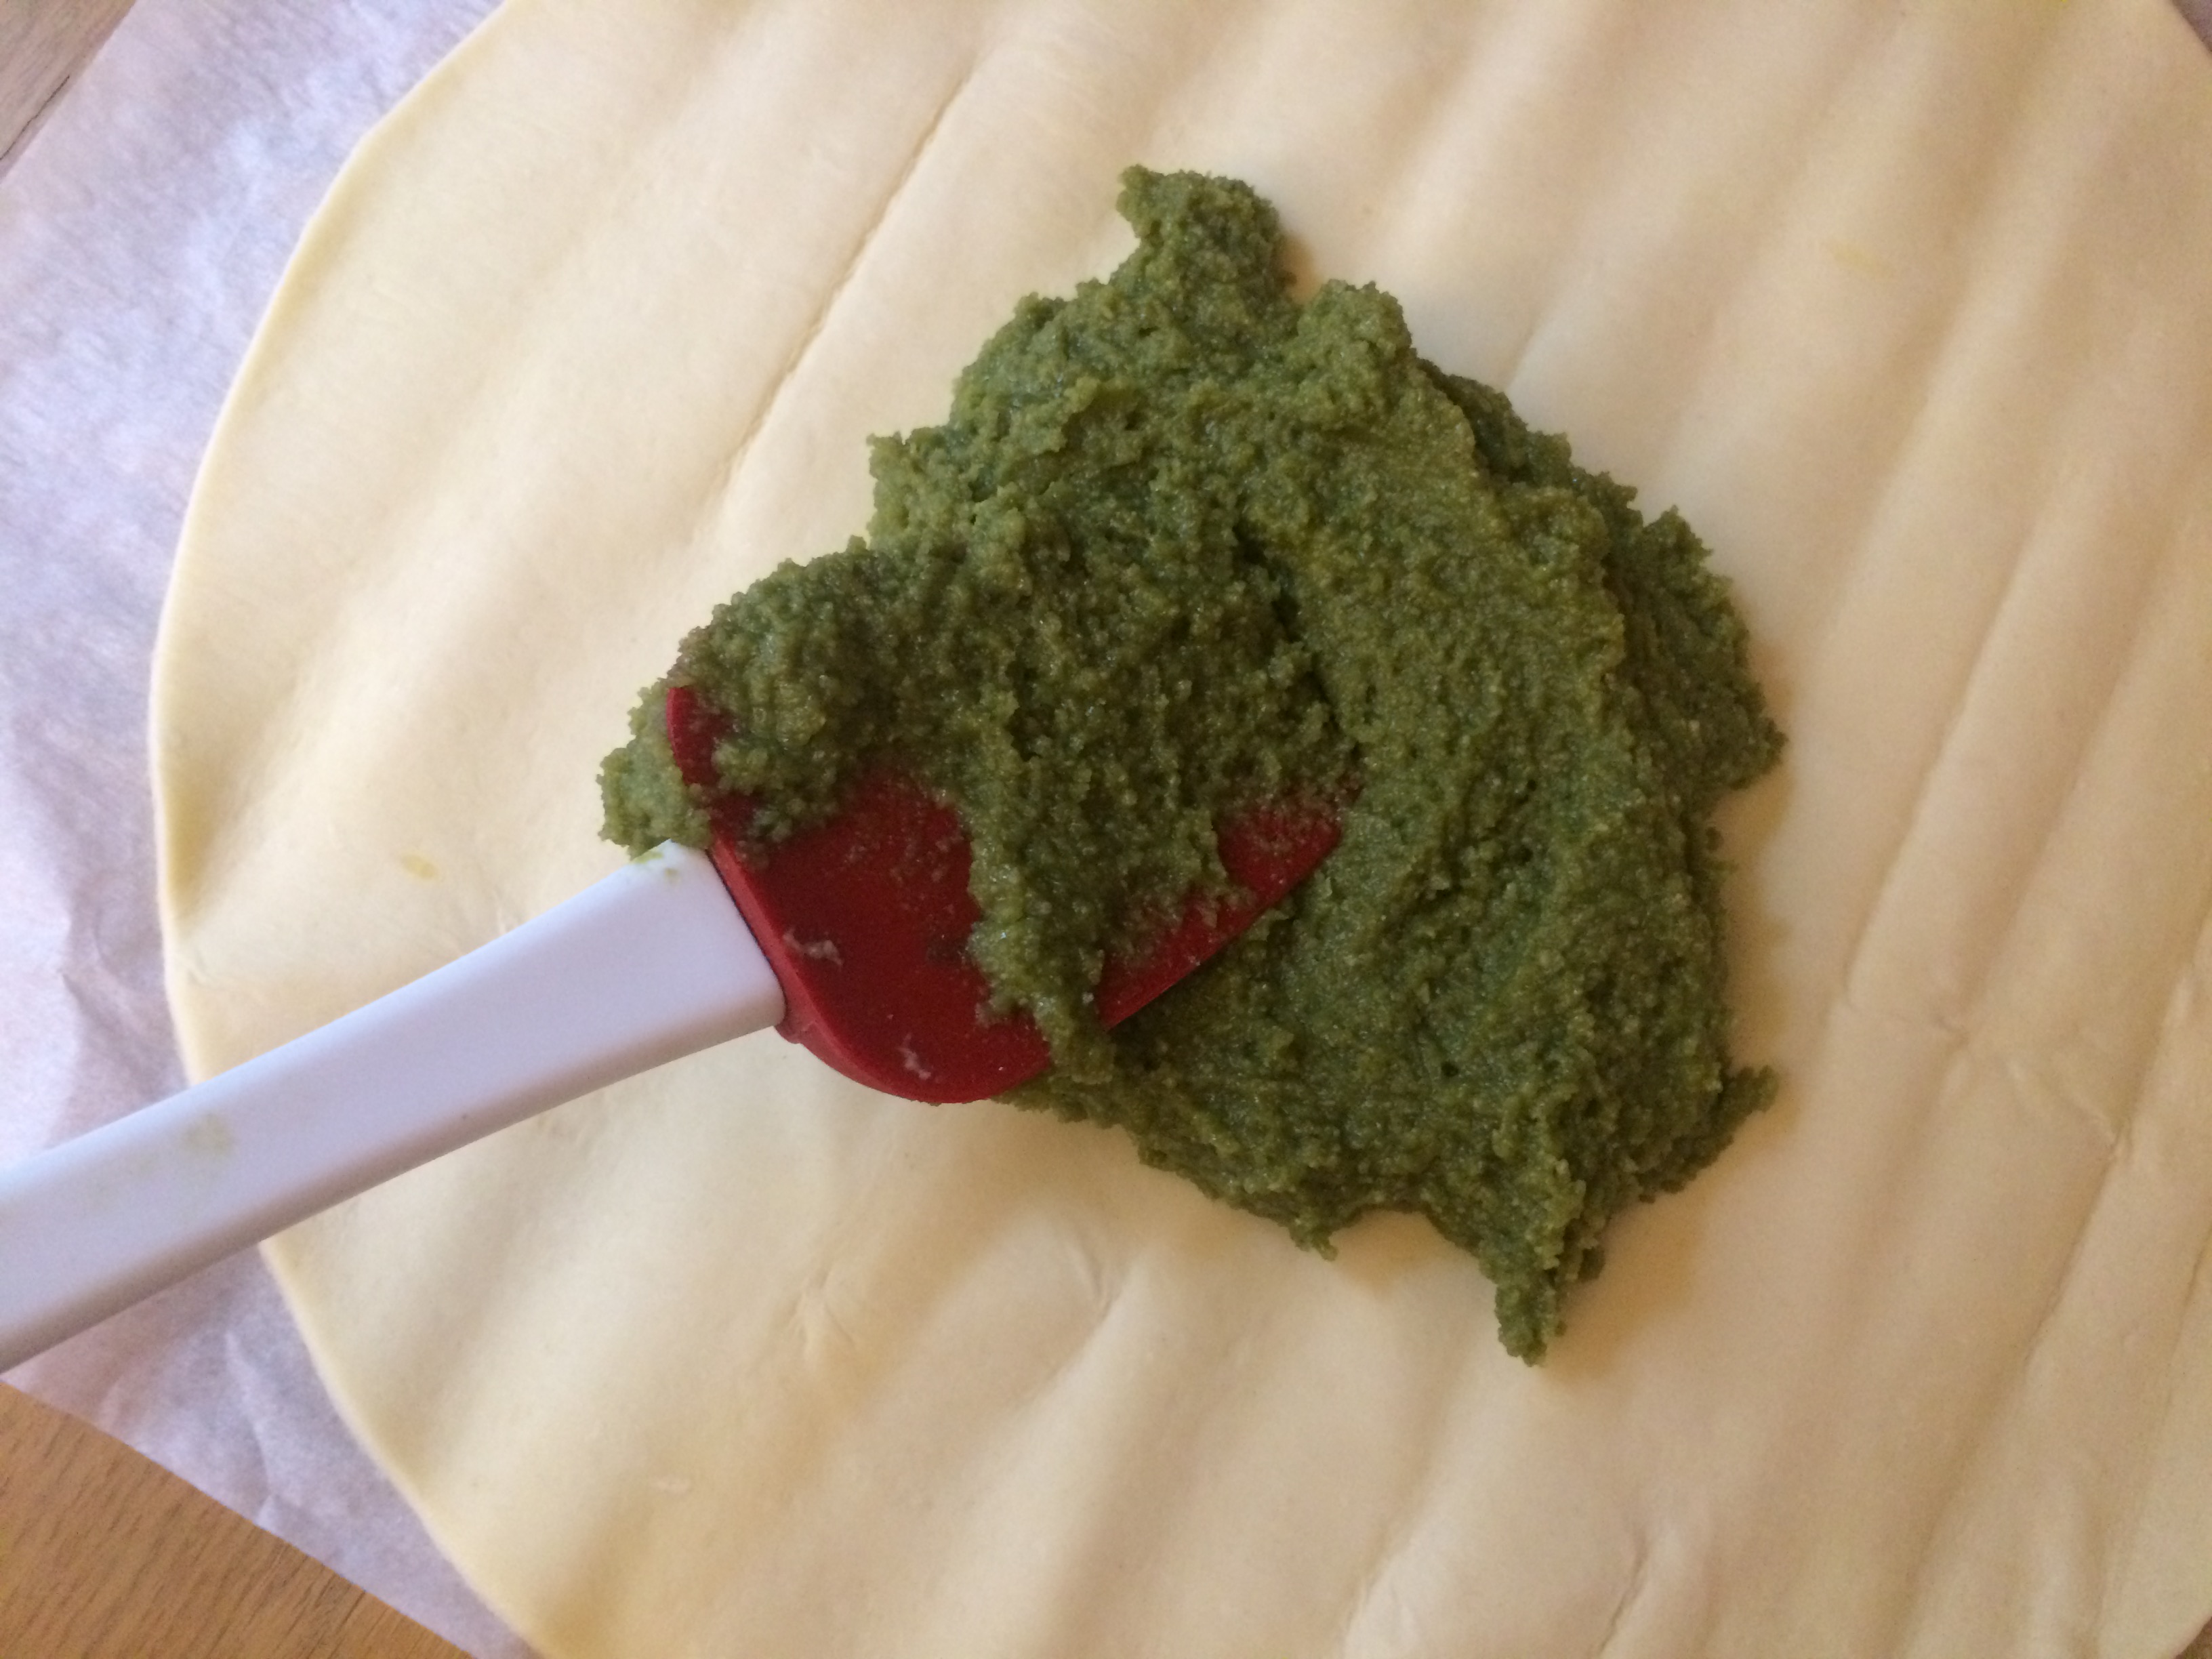
Transfer your matcha almond paste to the center of the pastry and gently spread it out with a spatula to a uniform thickness.

IMG_7198
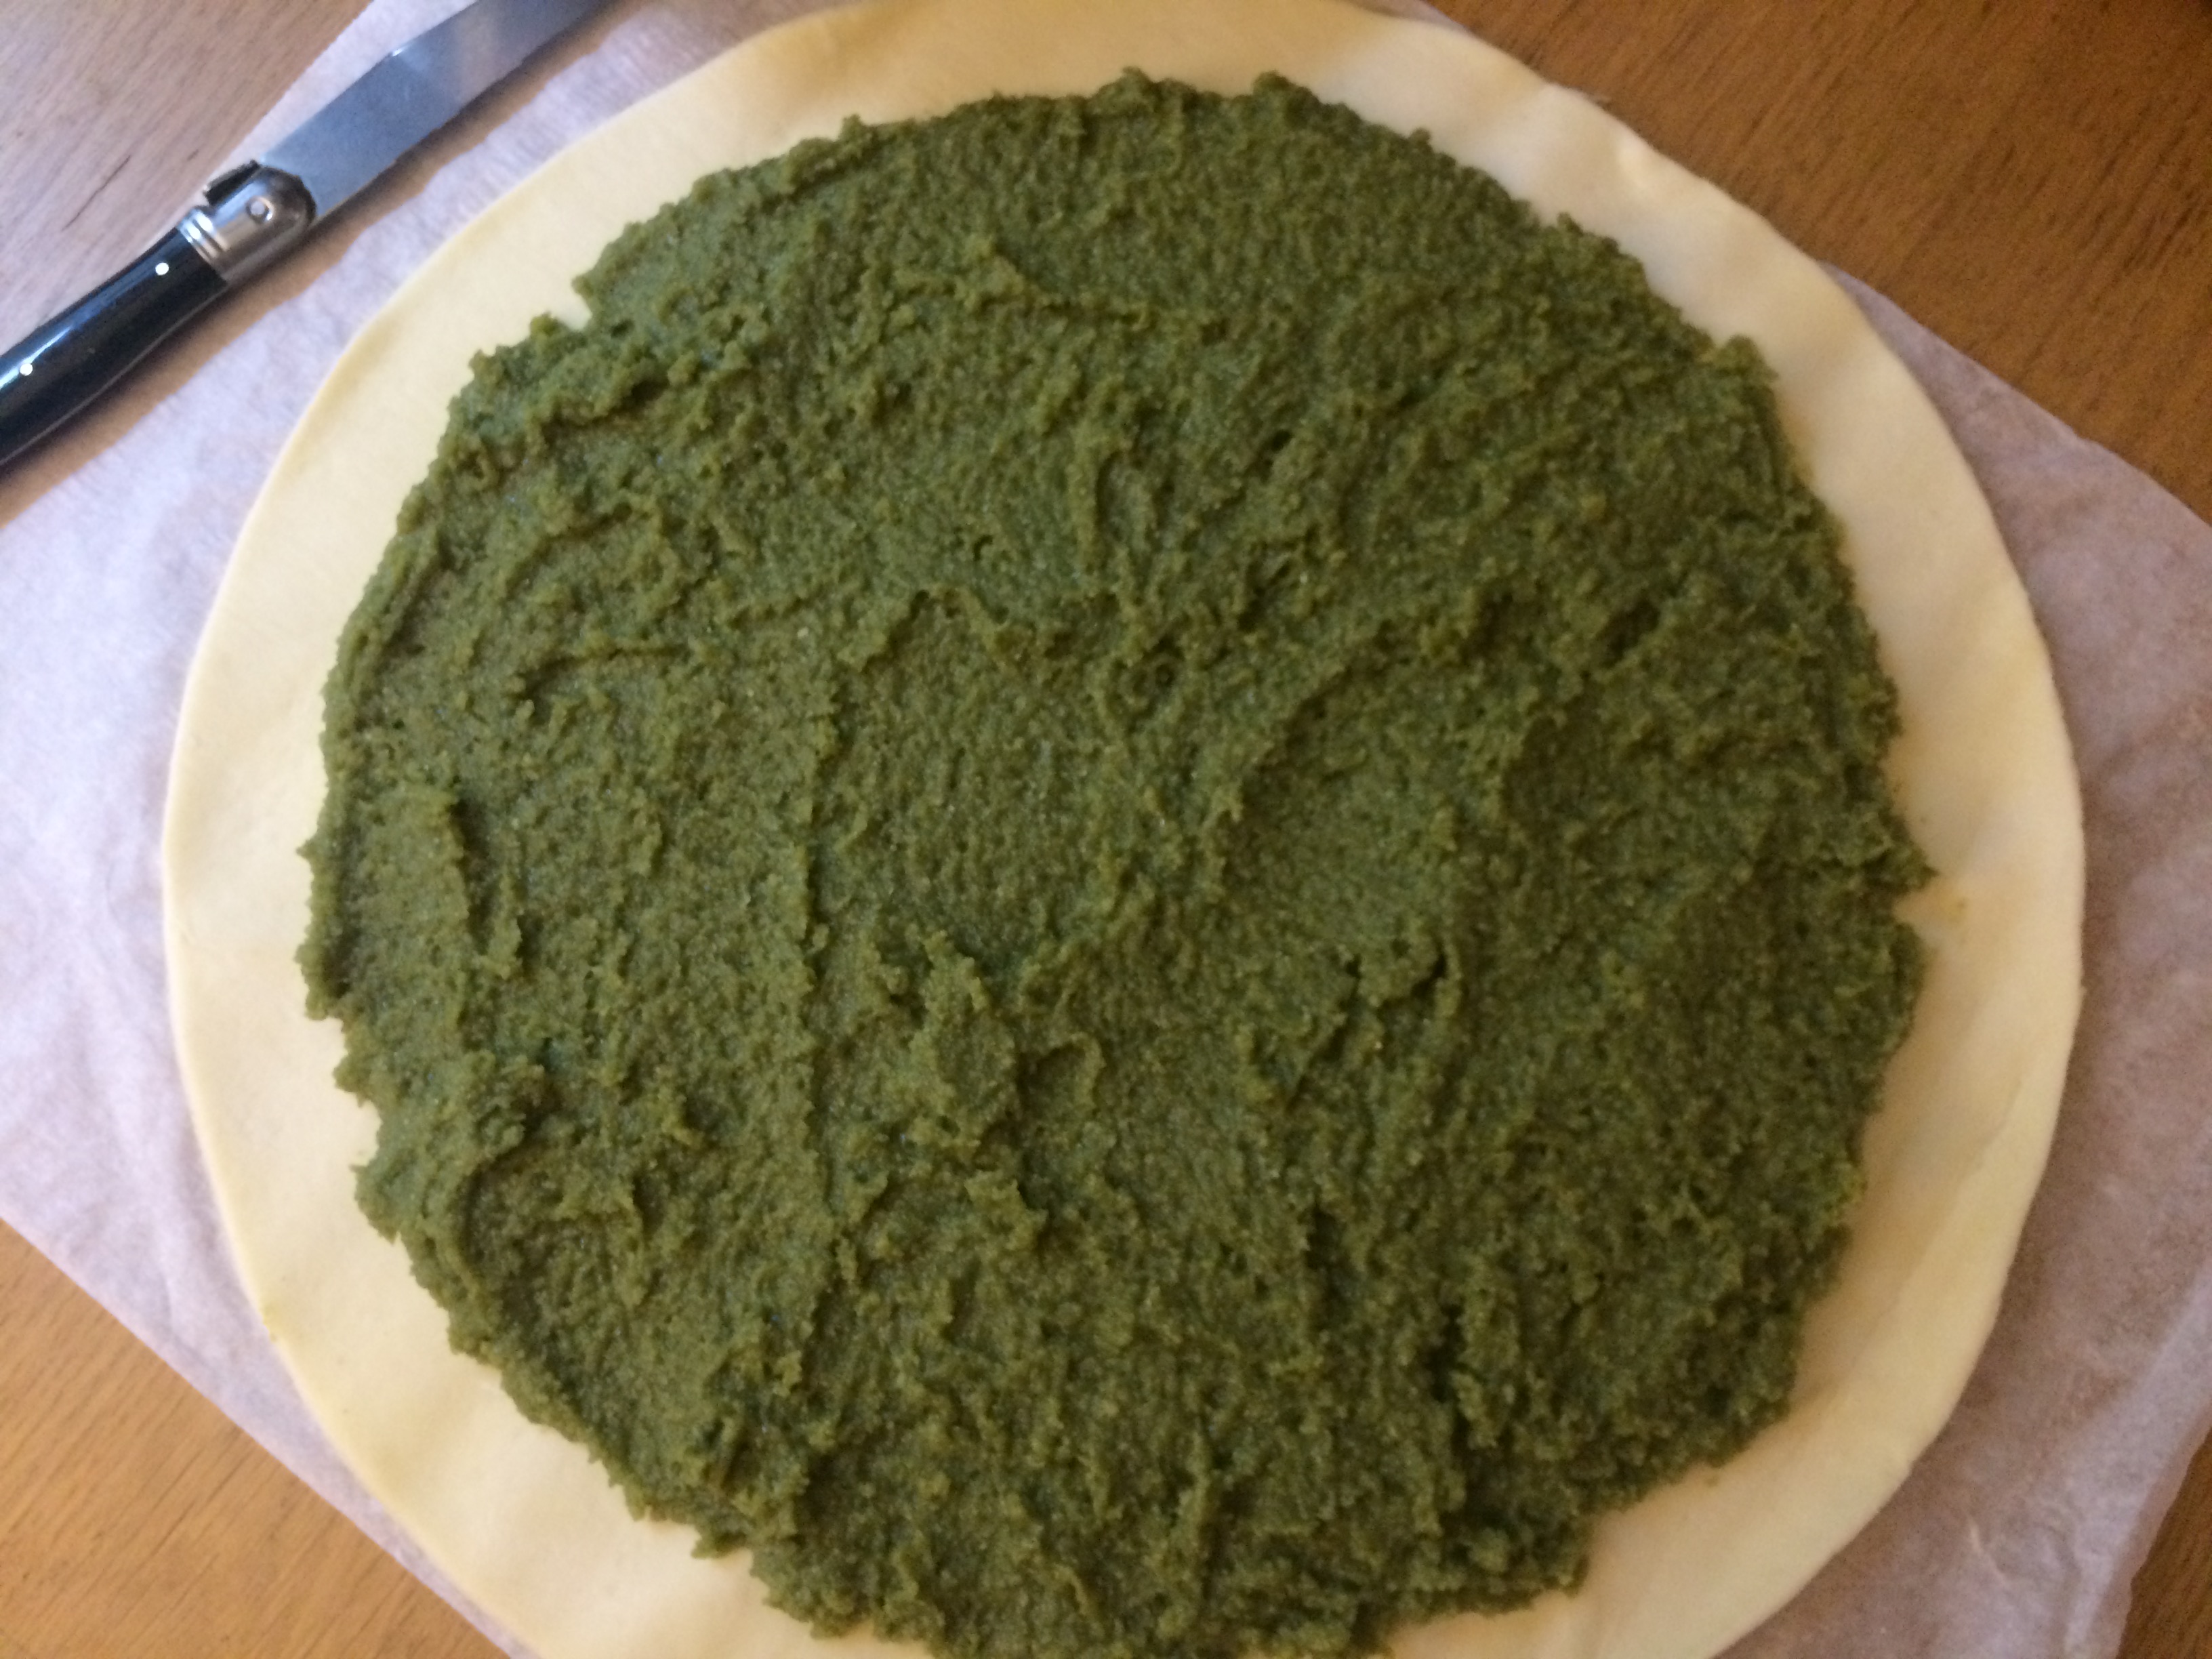
Leave a margin around the edge, as you’ll be folding it upwards to seal the galette.

IMG_7204.JPGGently press your fève into the matcha almond paste. Choose a spot closer to the edge than the center.

IMG_7213.JPG
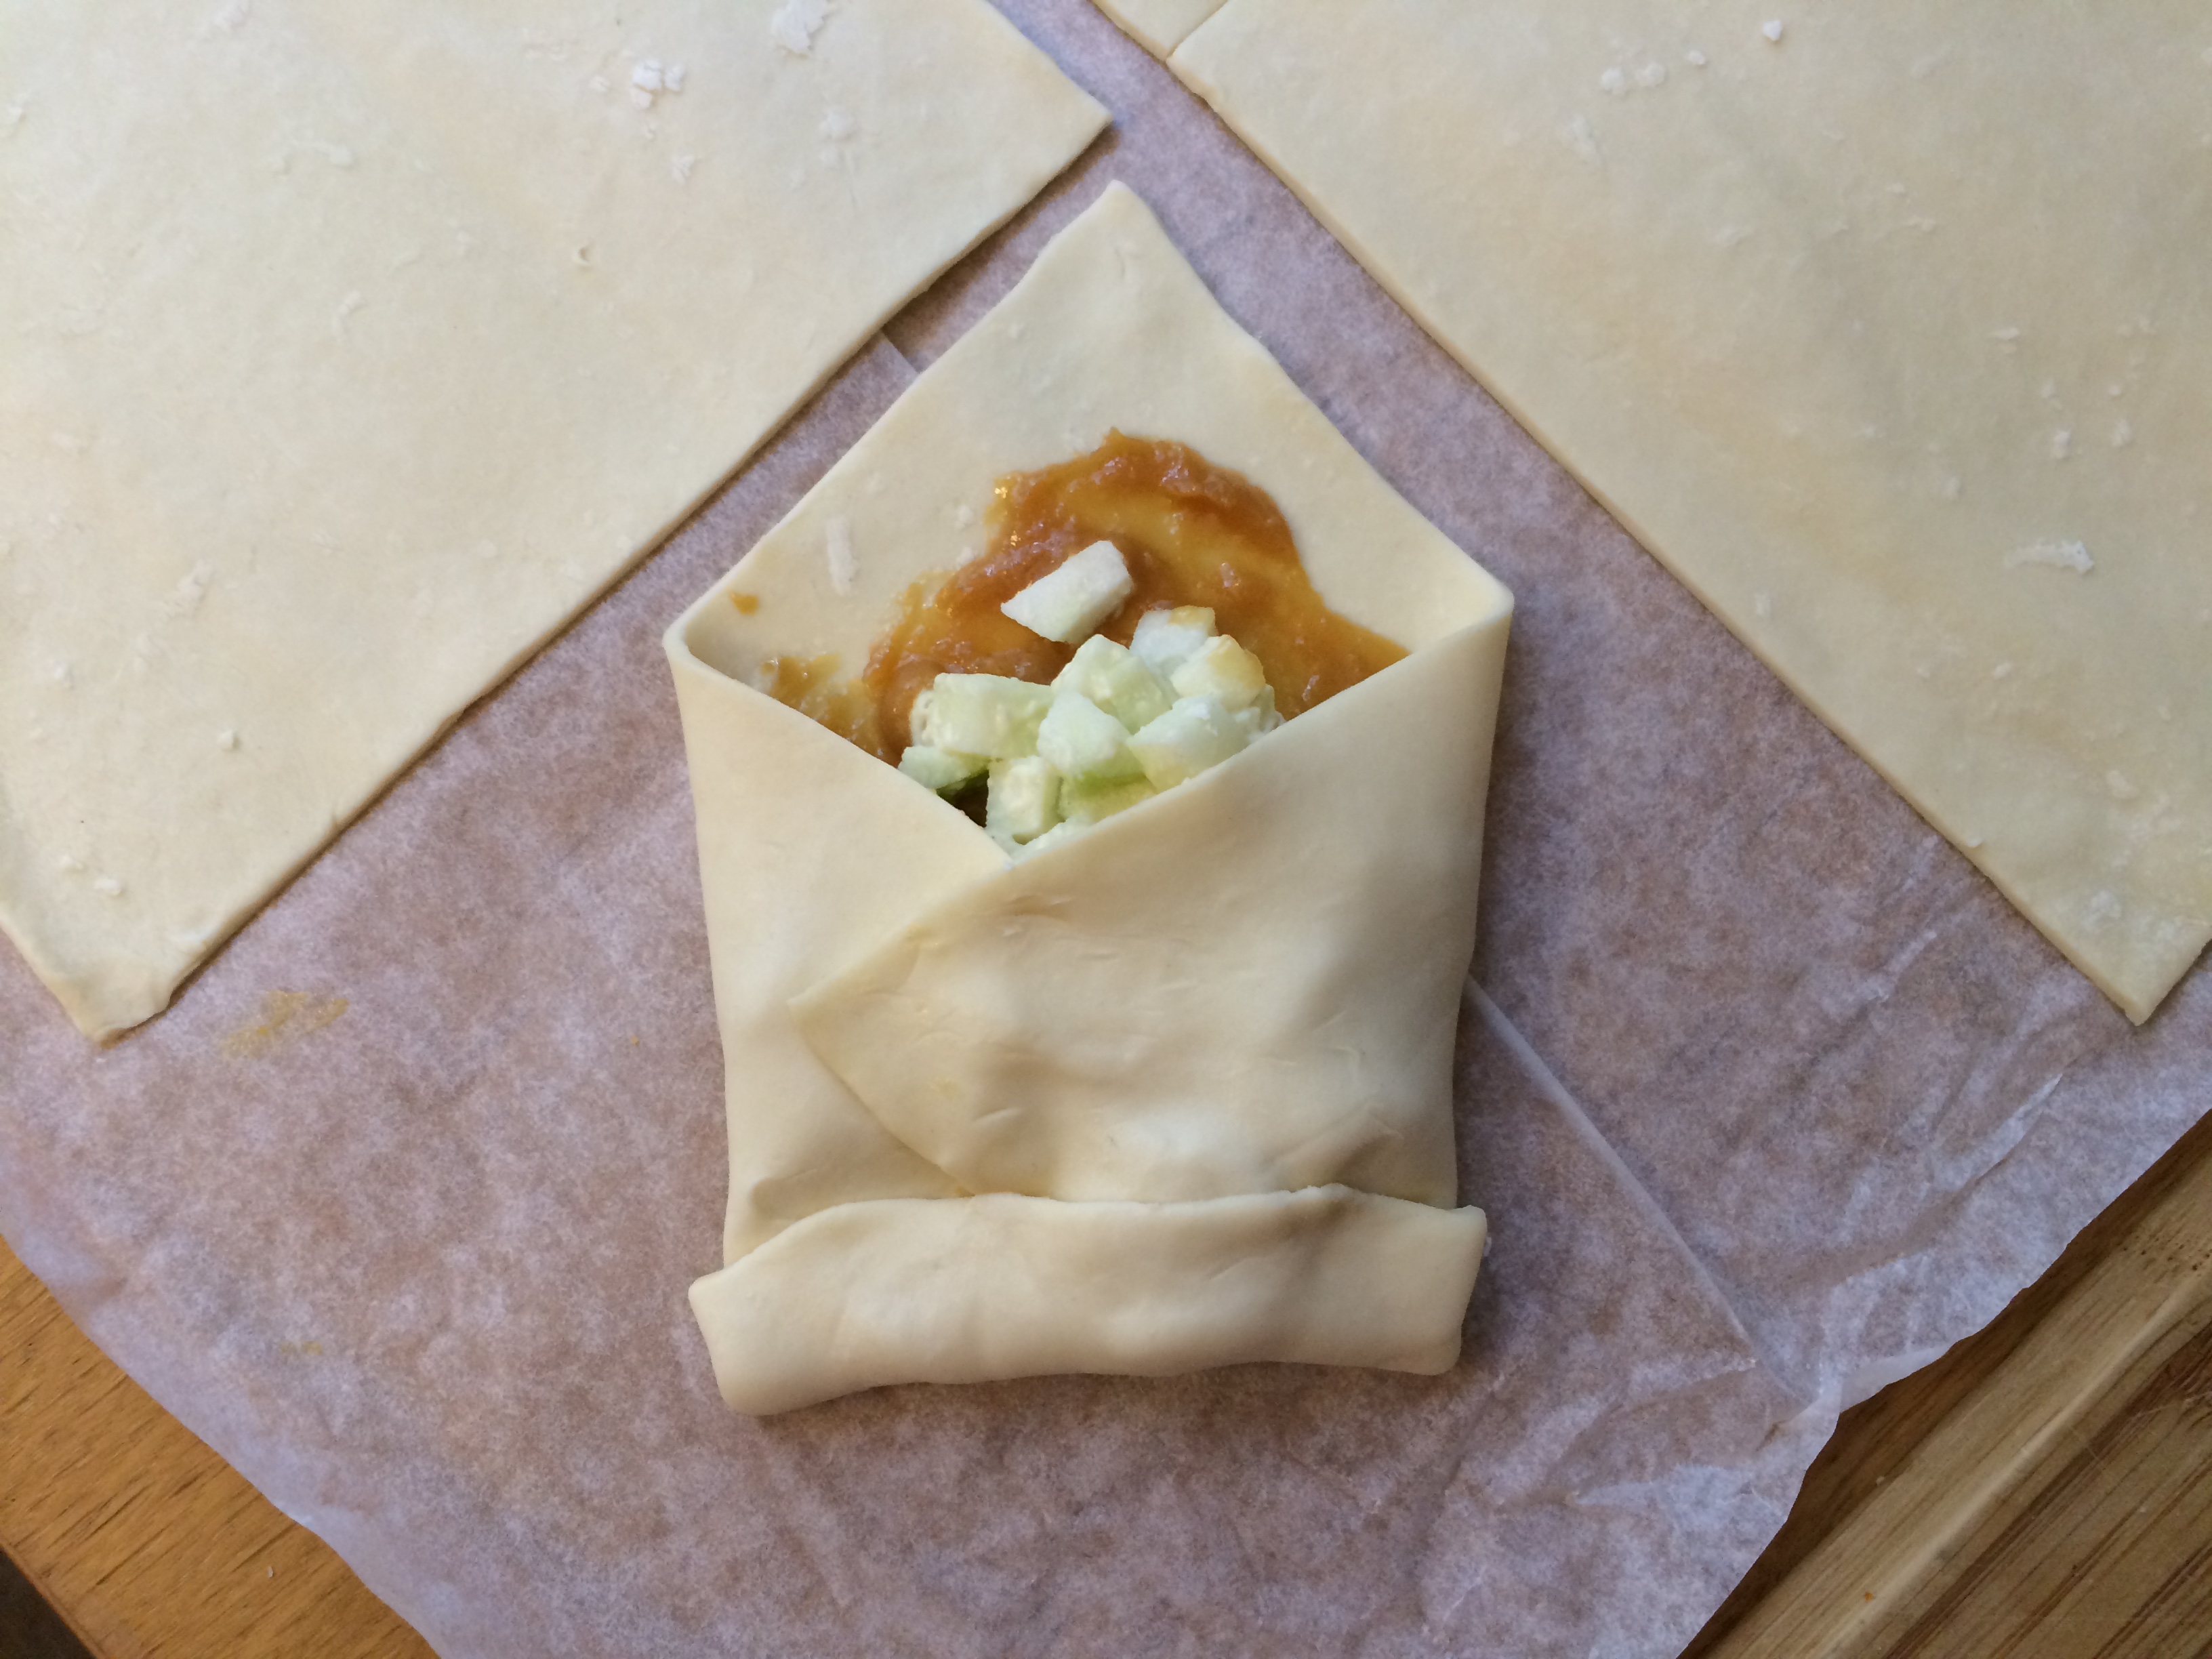
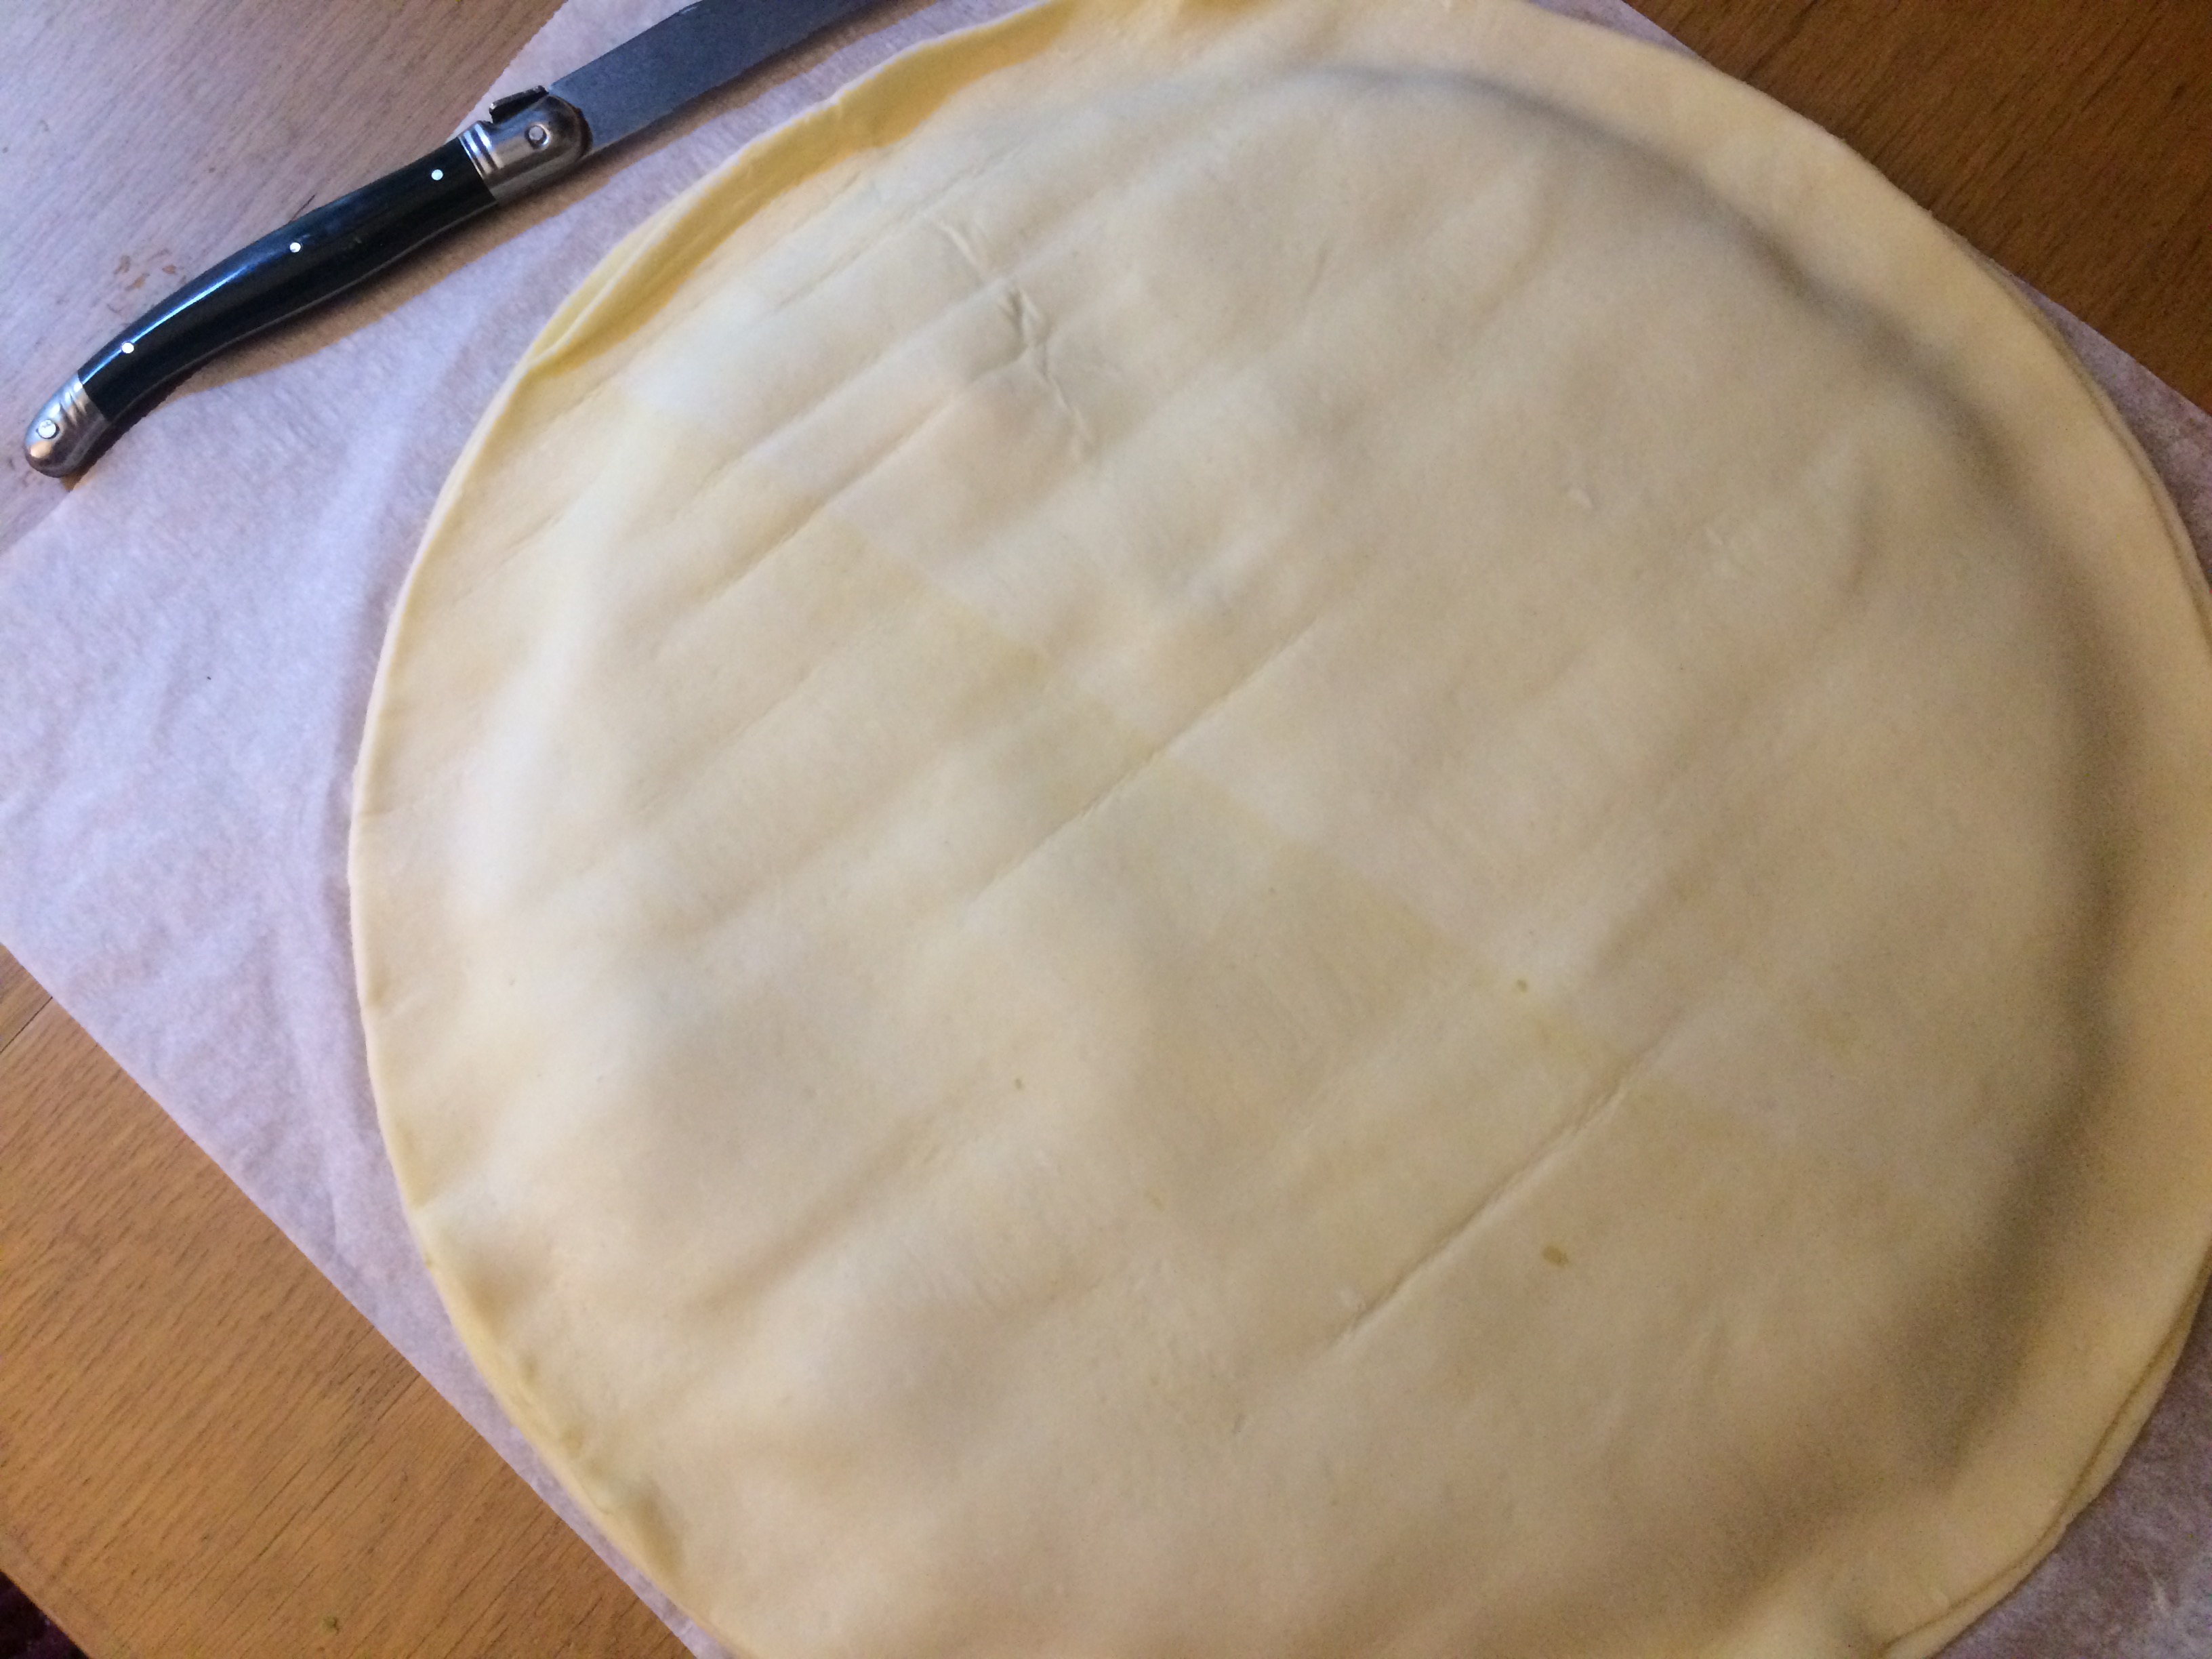
Take your second pastry crust out of the fridge. Carefully place it atop the bottom one so that they align as closely as possible. Push the top pastry down gently around the edge of the almond paste underneath. If you want to make sure that a certain person ends up with the fève, find a way to remember where you’ve put it. 😉

IMG_7216.jpg
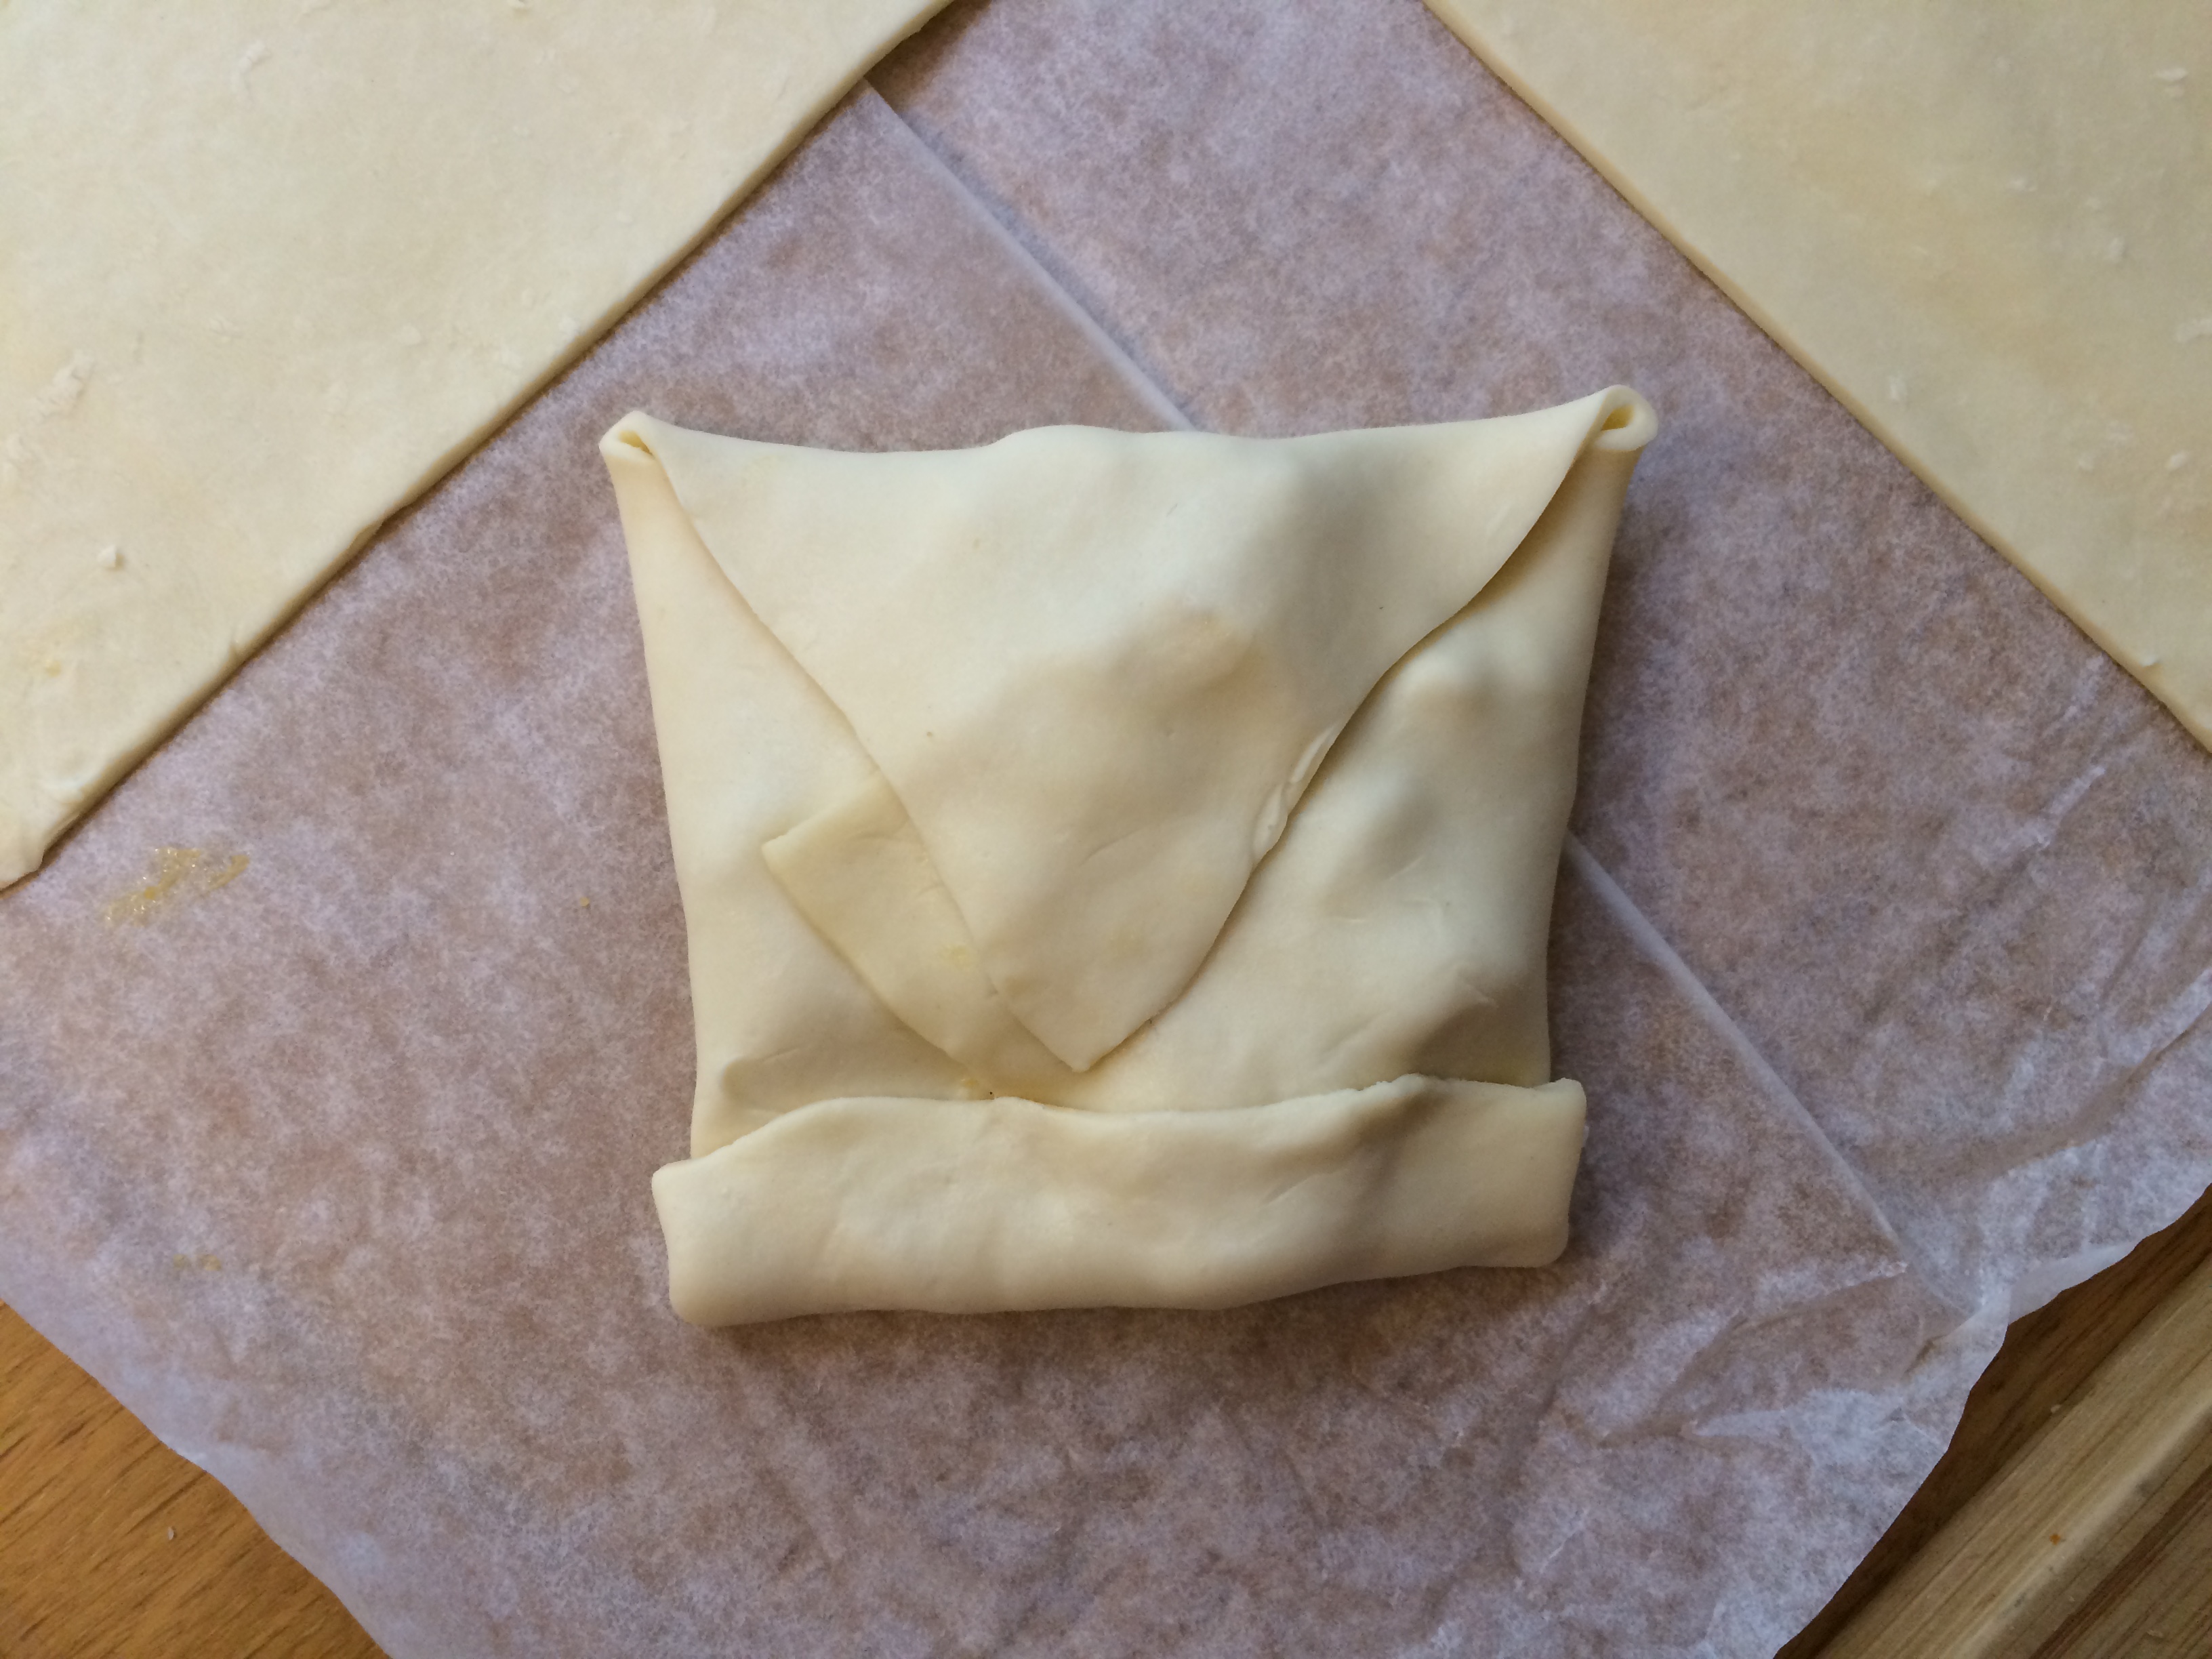
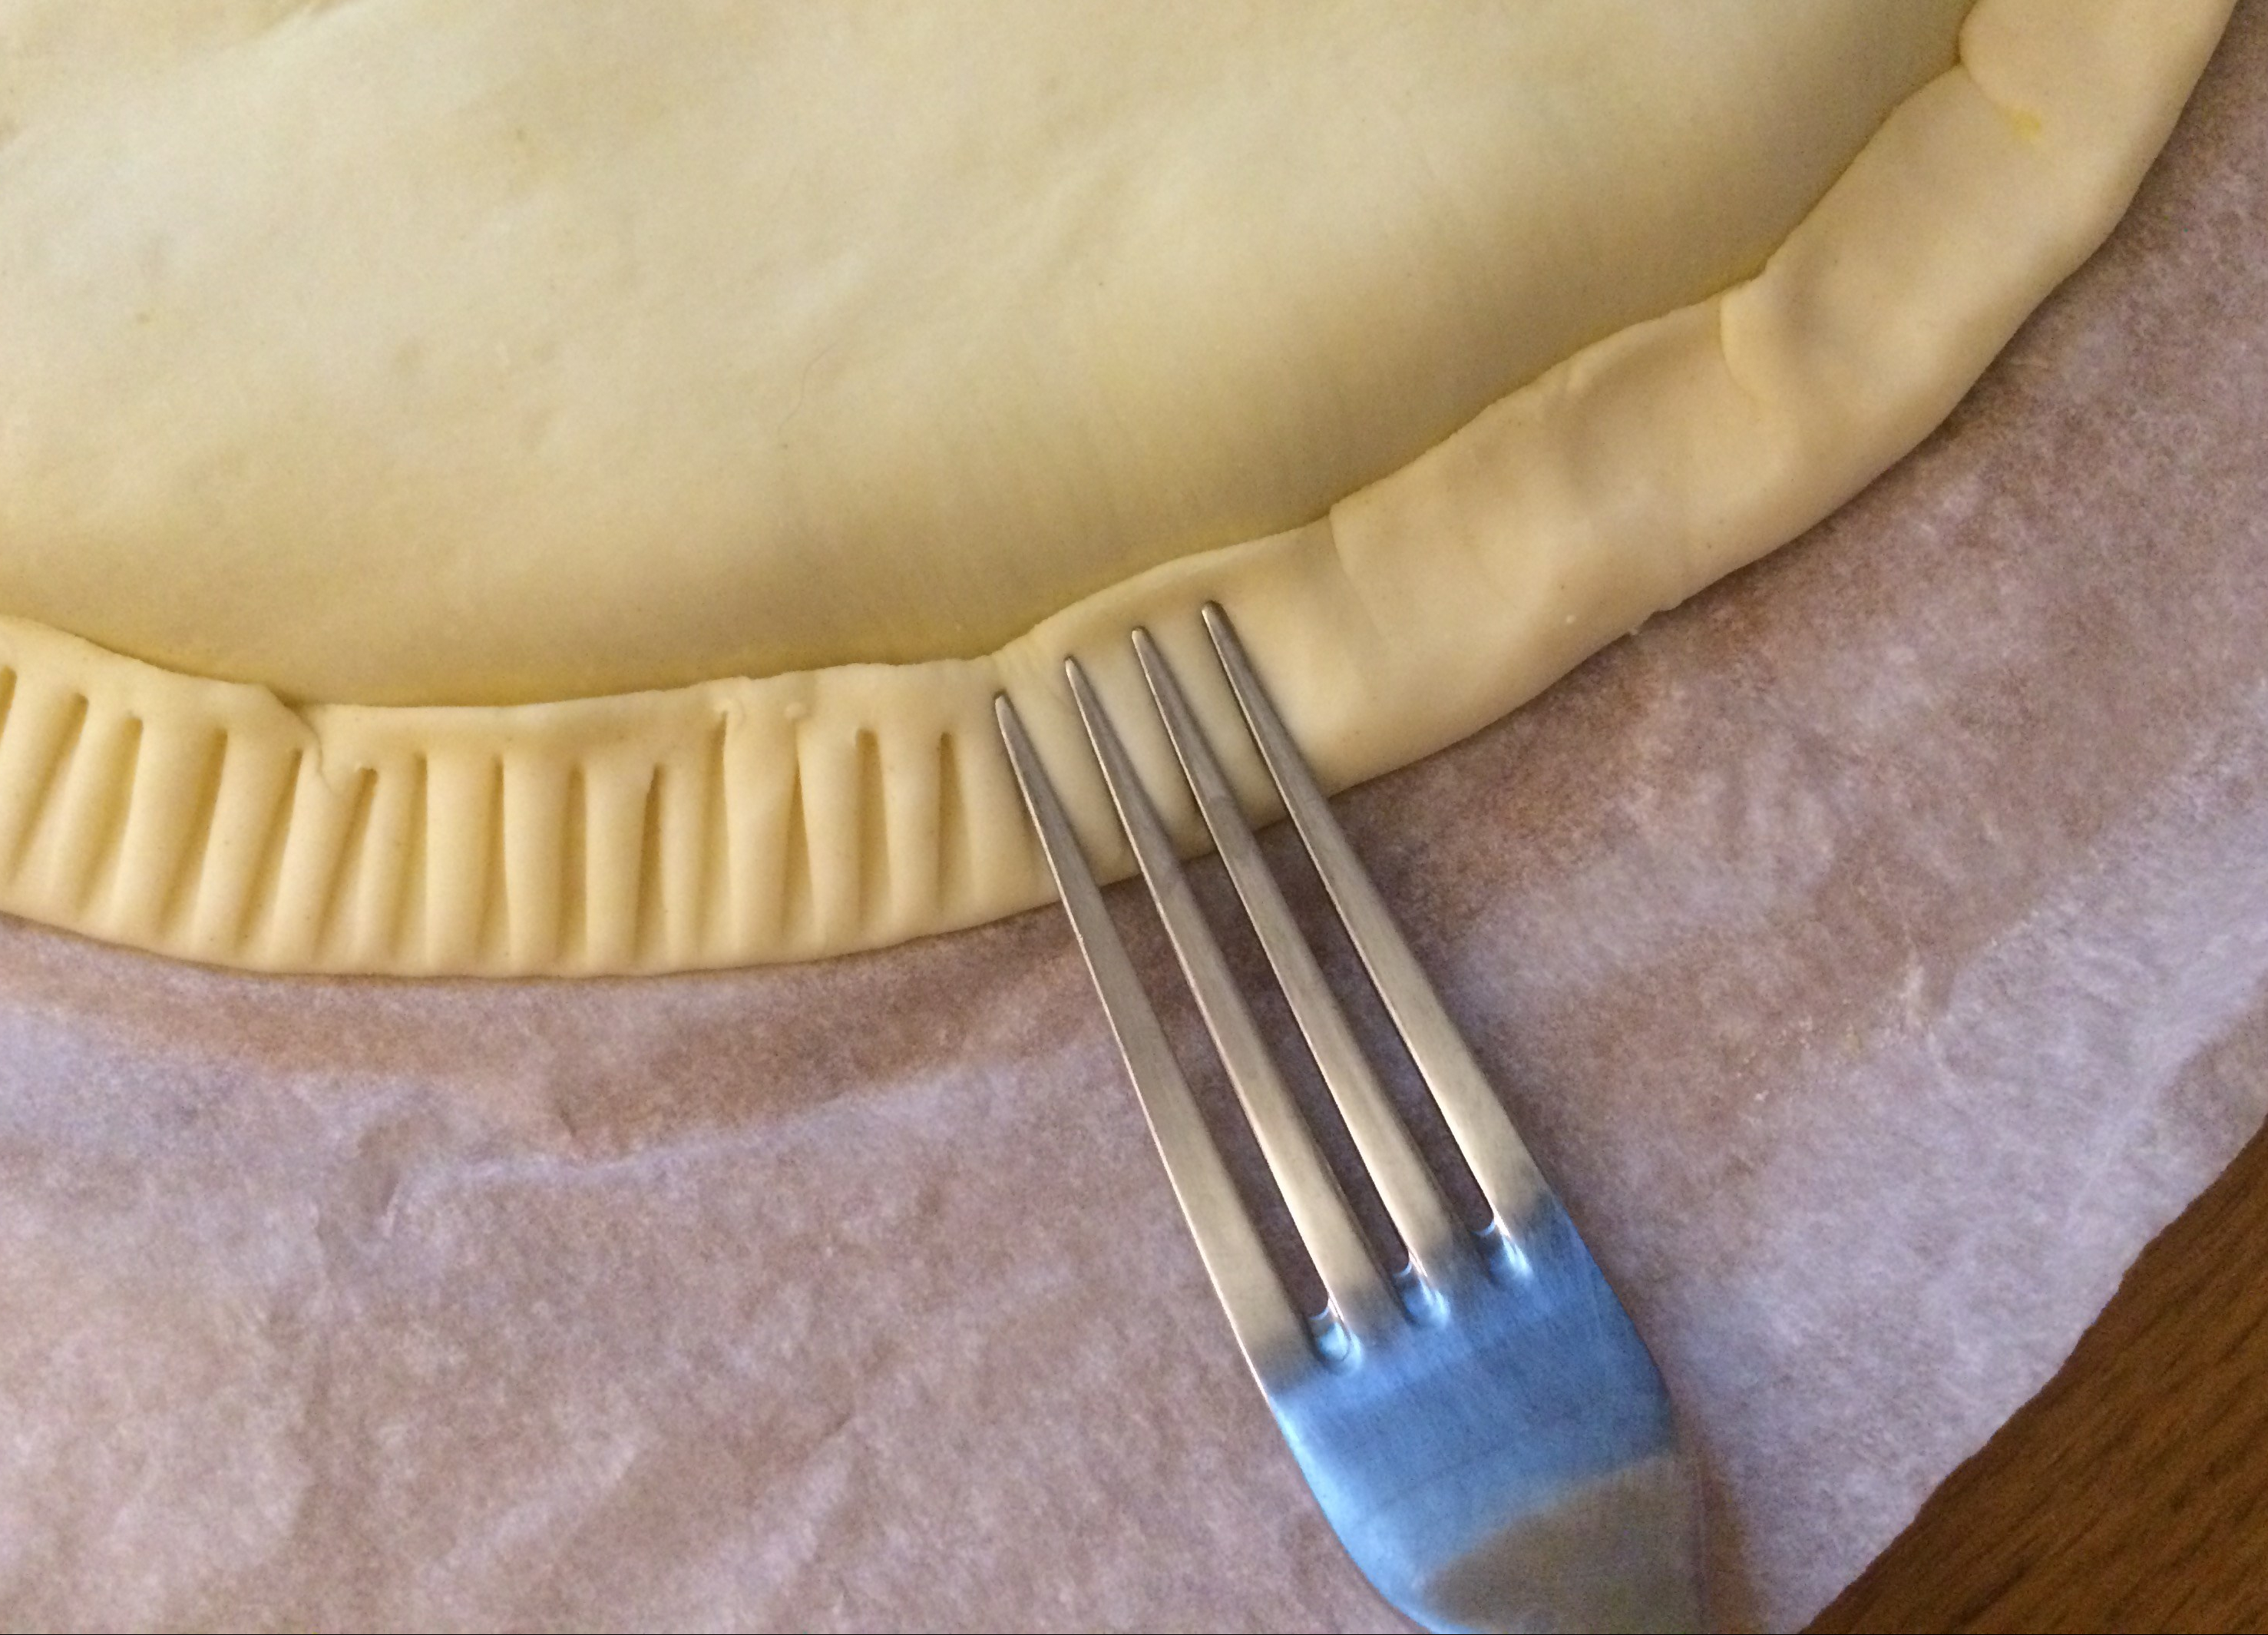
Fold the edges of the bottom and top pastries upward together and seal with the tines of a fork.

IMG_7221
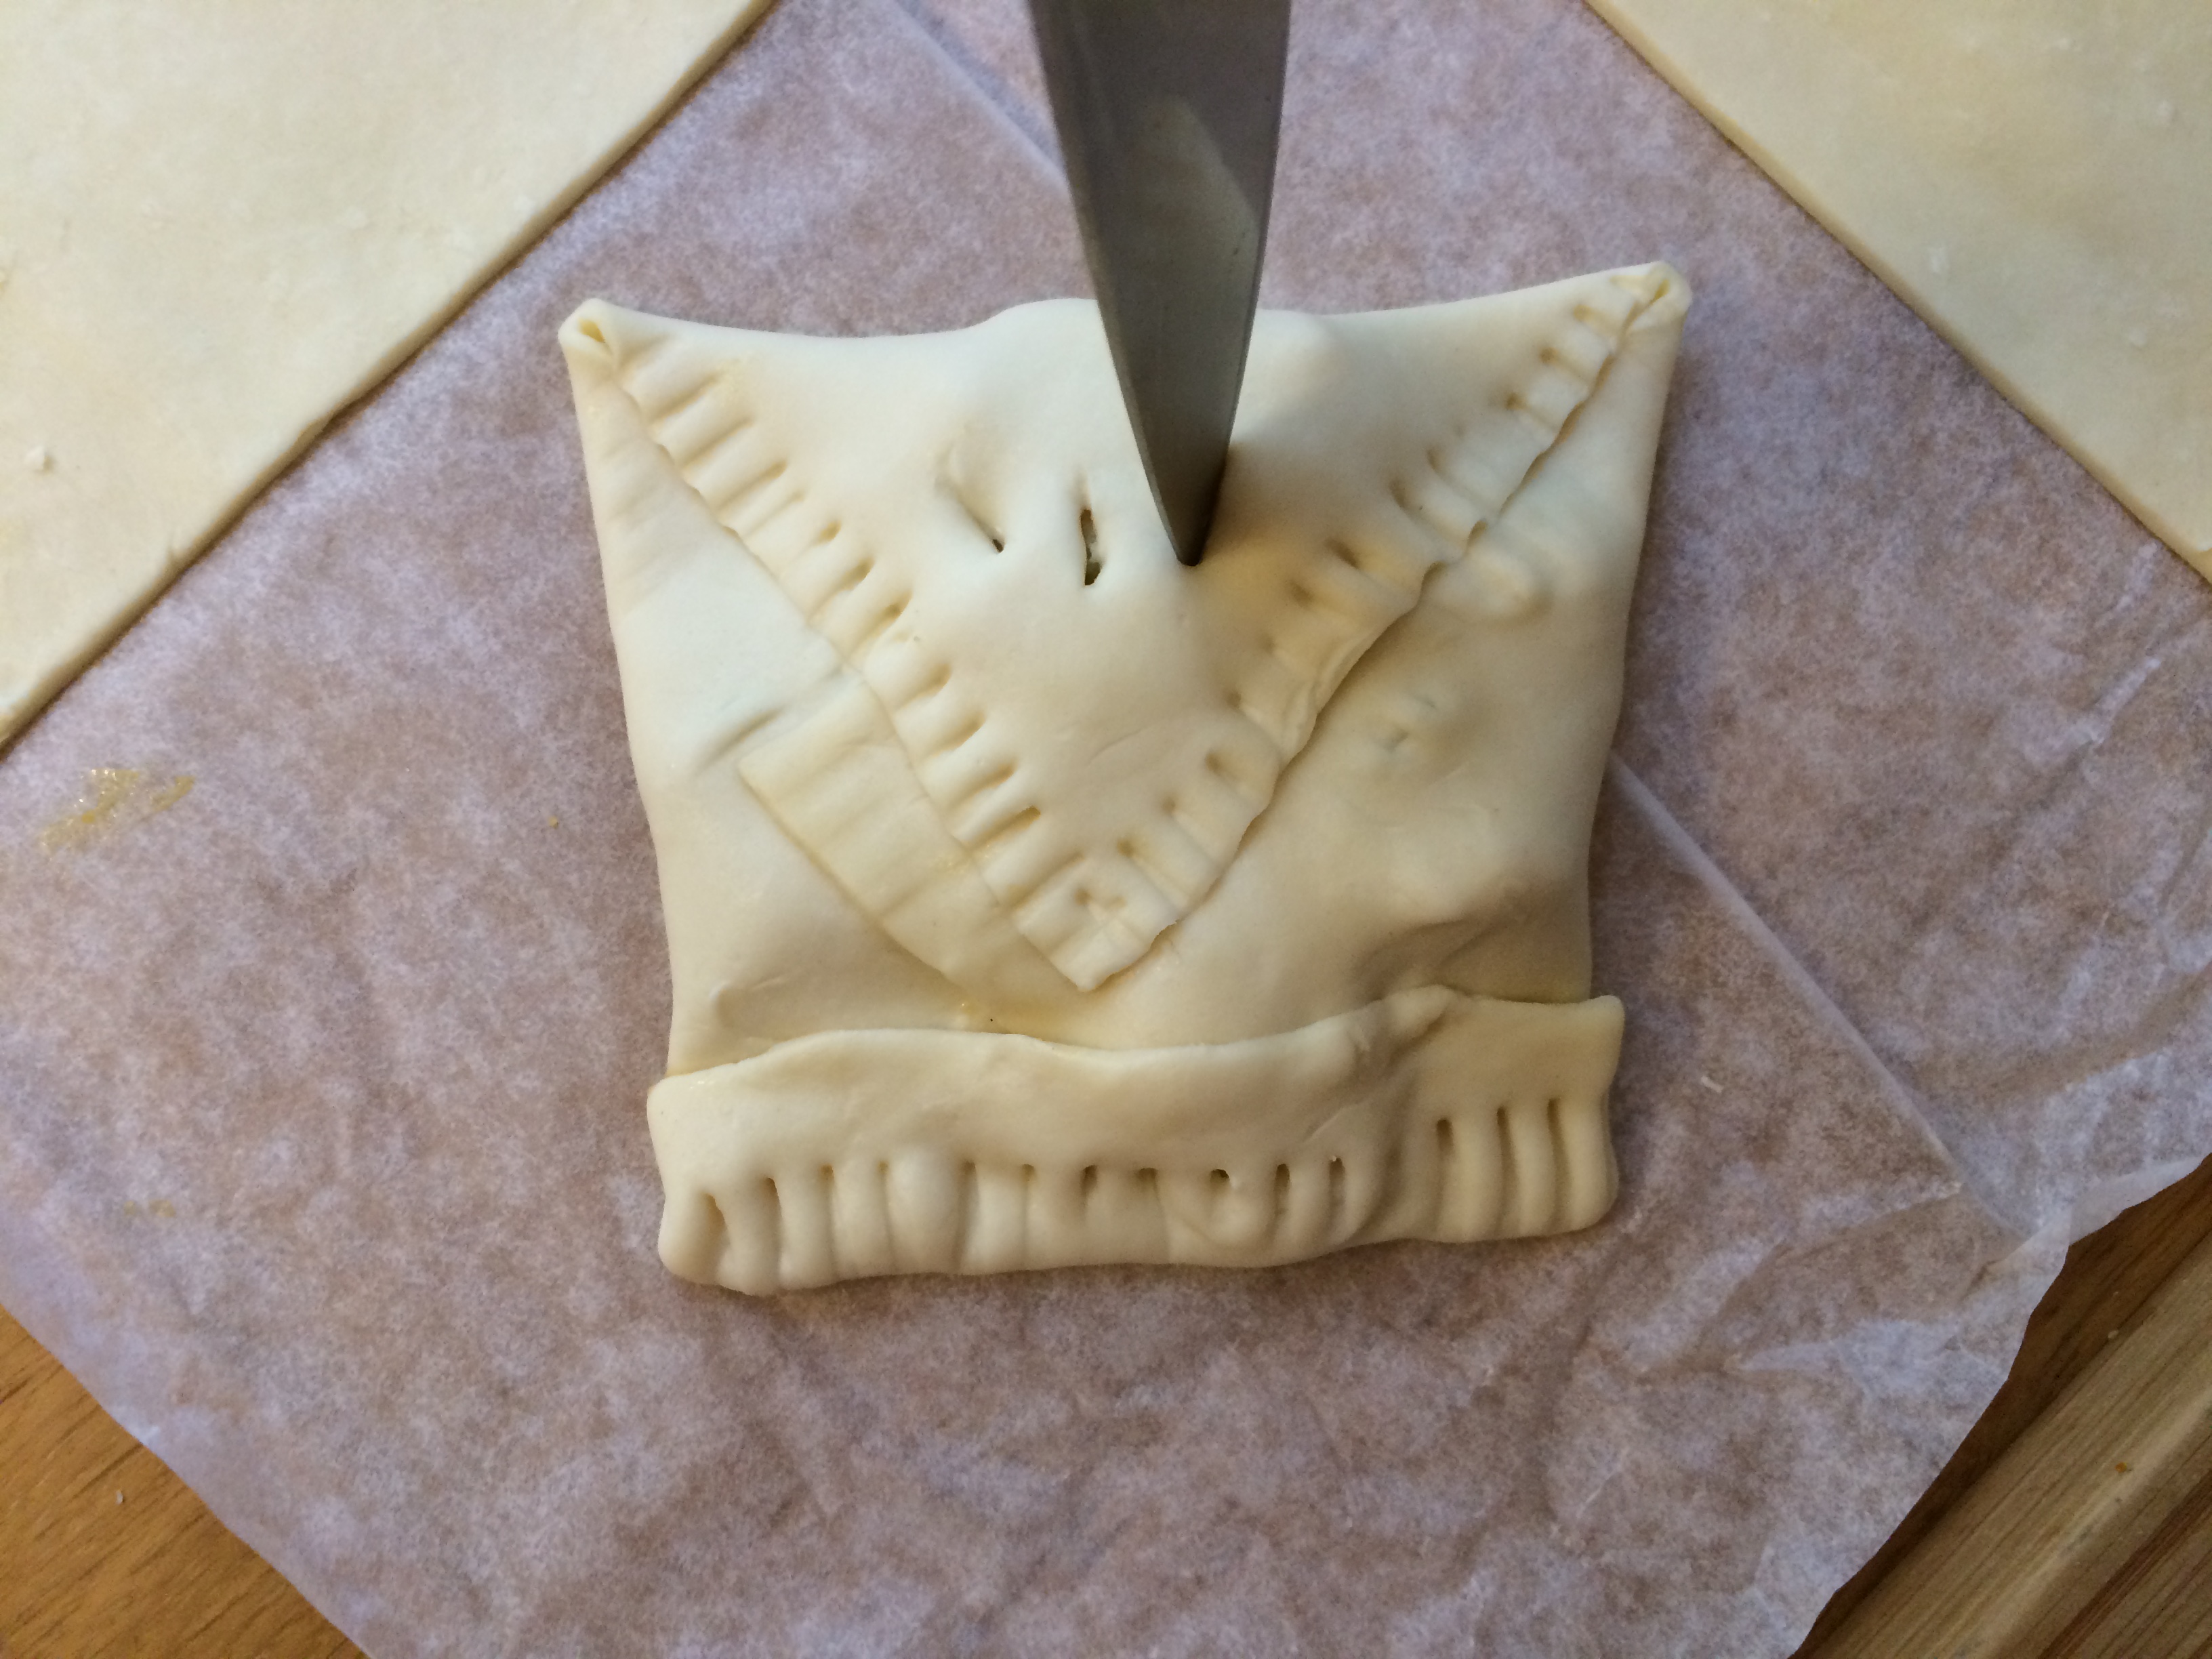
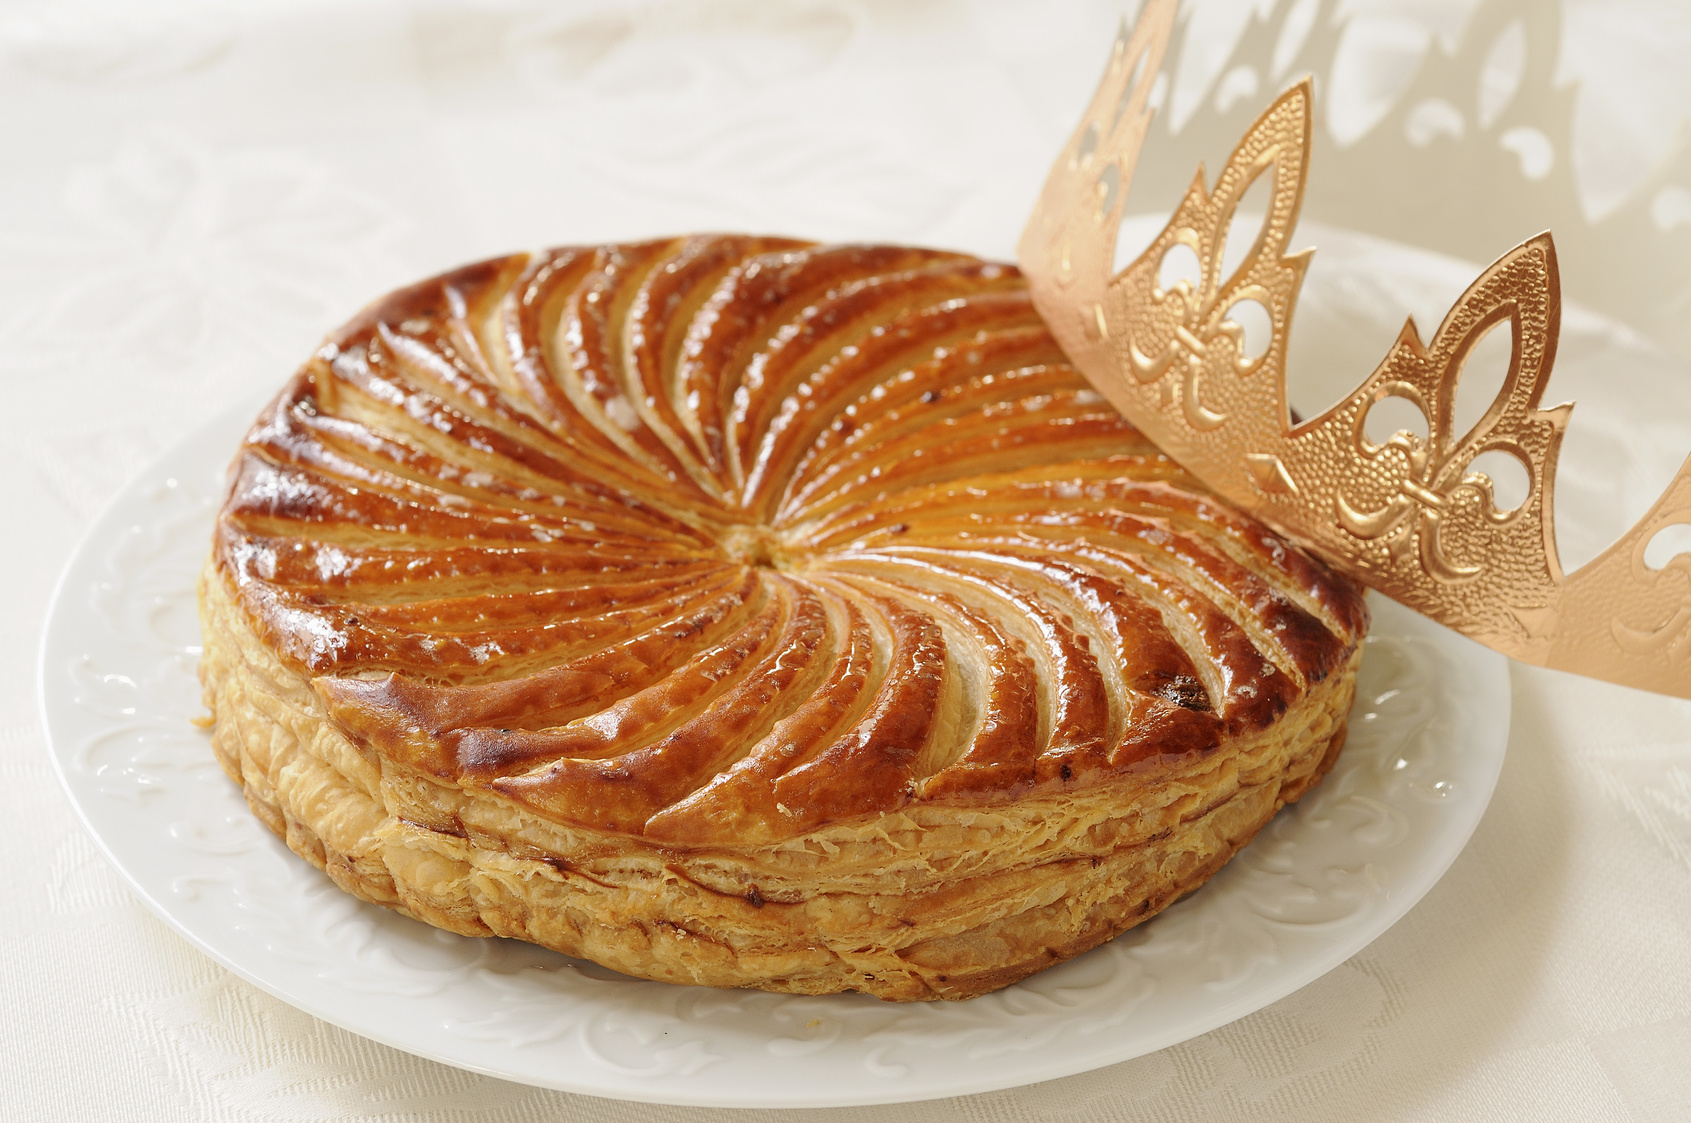
With a sharp knife, trace a design into the top pastry. Try to occasionally cut through the top pastry to allow steam to escape while the galette bakes, but take care not to cut through it too continuously or pieces of the top crust could break off when you slice the baked galette. You can get creative at this point and make a fancy design of your choosing (swirls, flowers, geometrical lines). Do a Google image search to see the different galette des rois designs that are out there.

IMG_7224IMG_7231IMG_7235IMG_7249
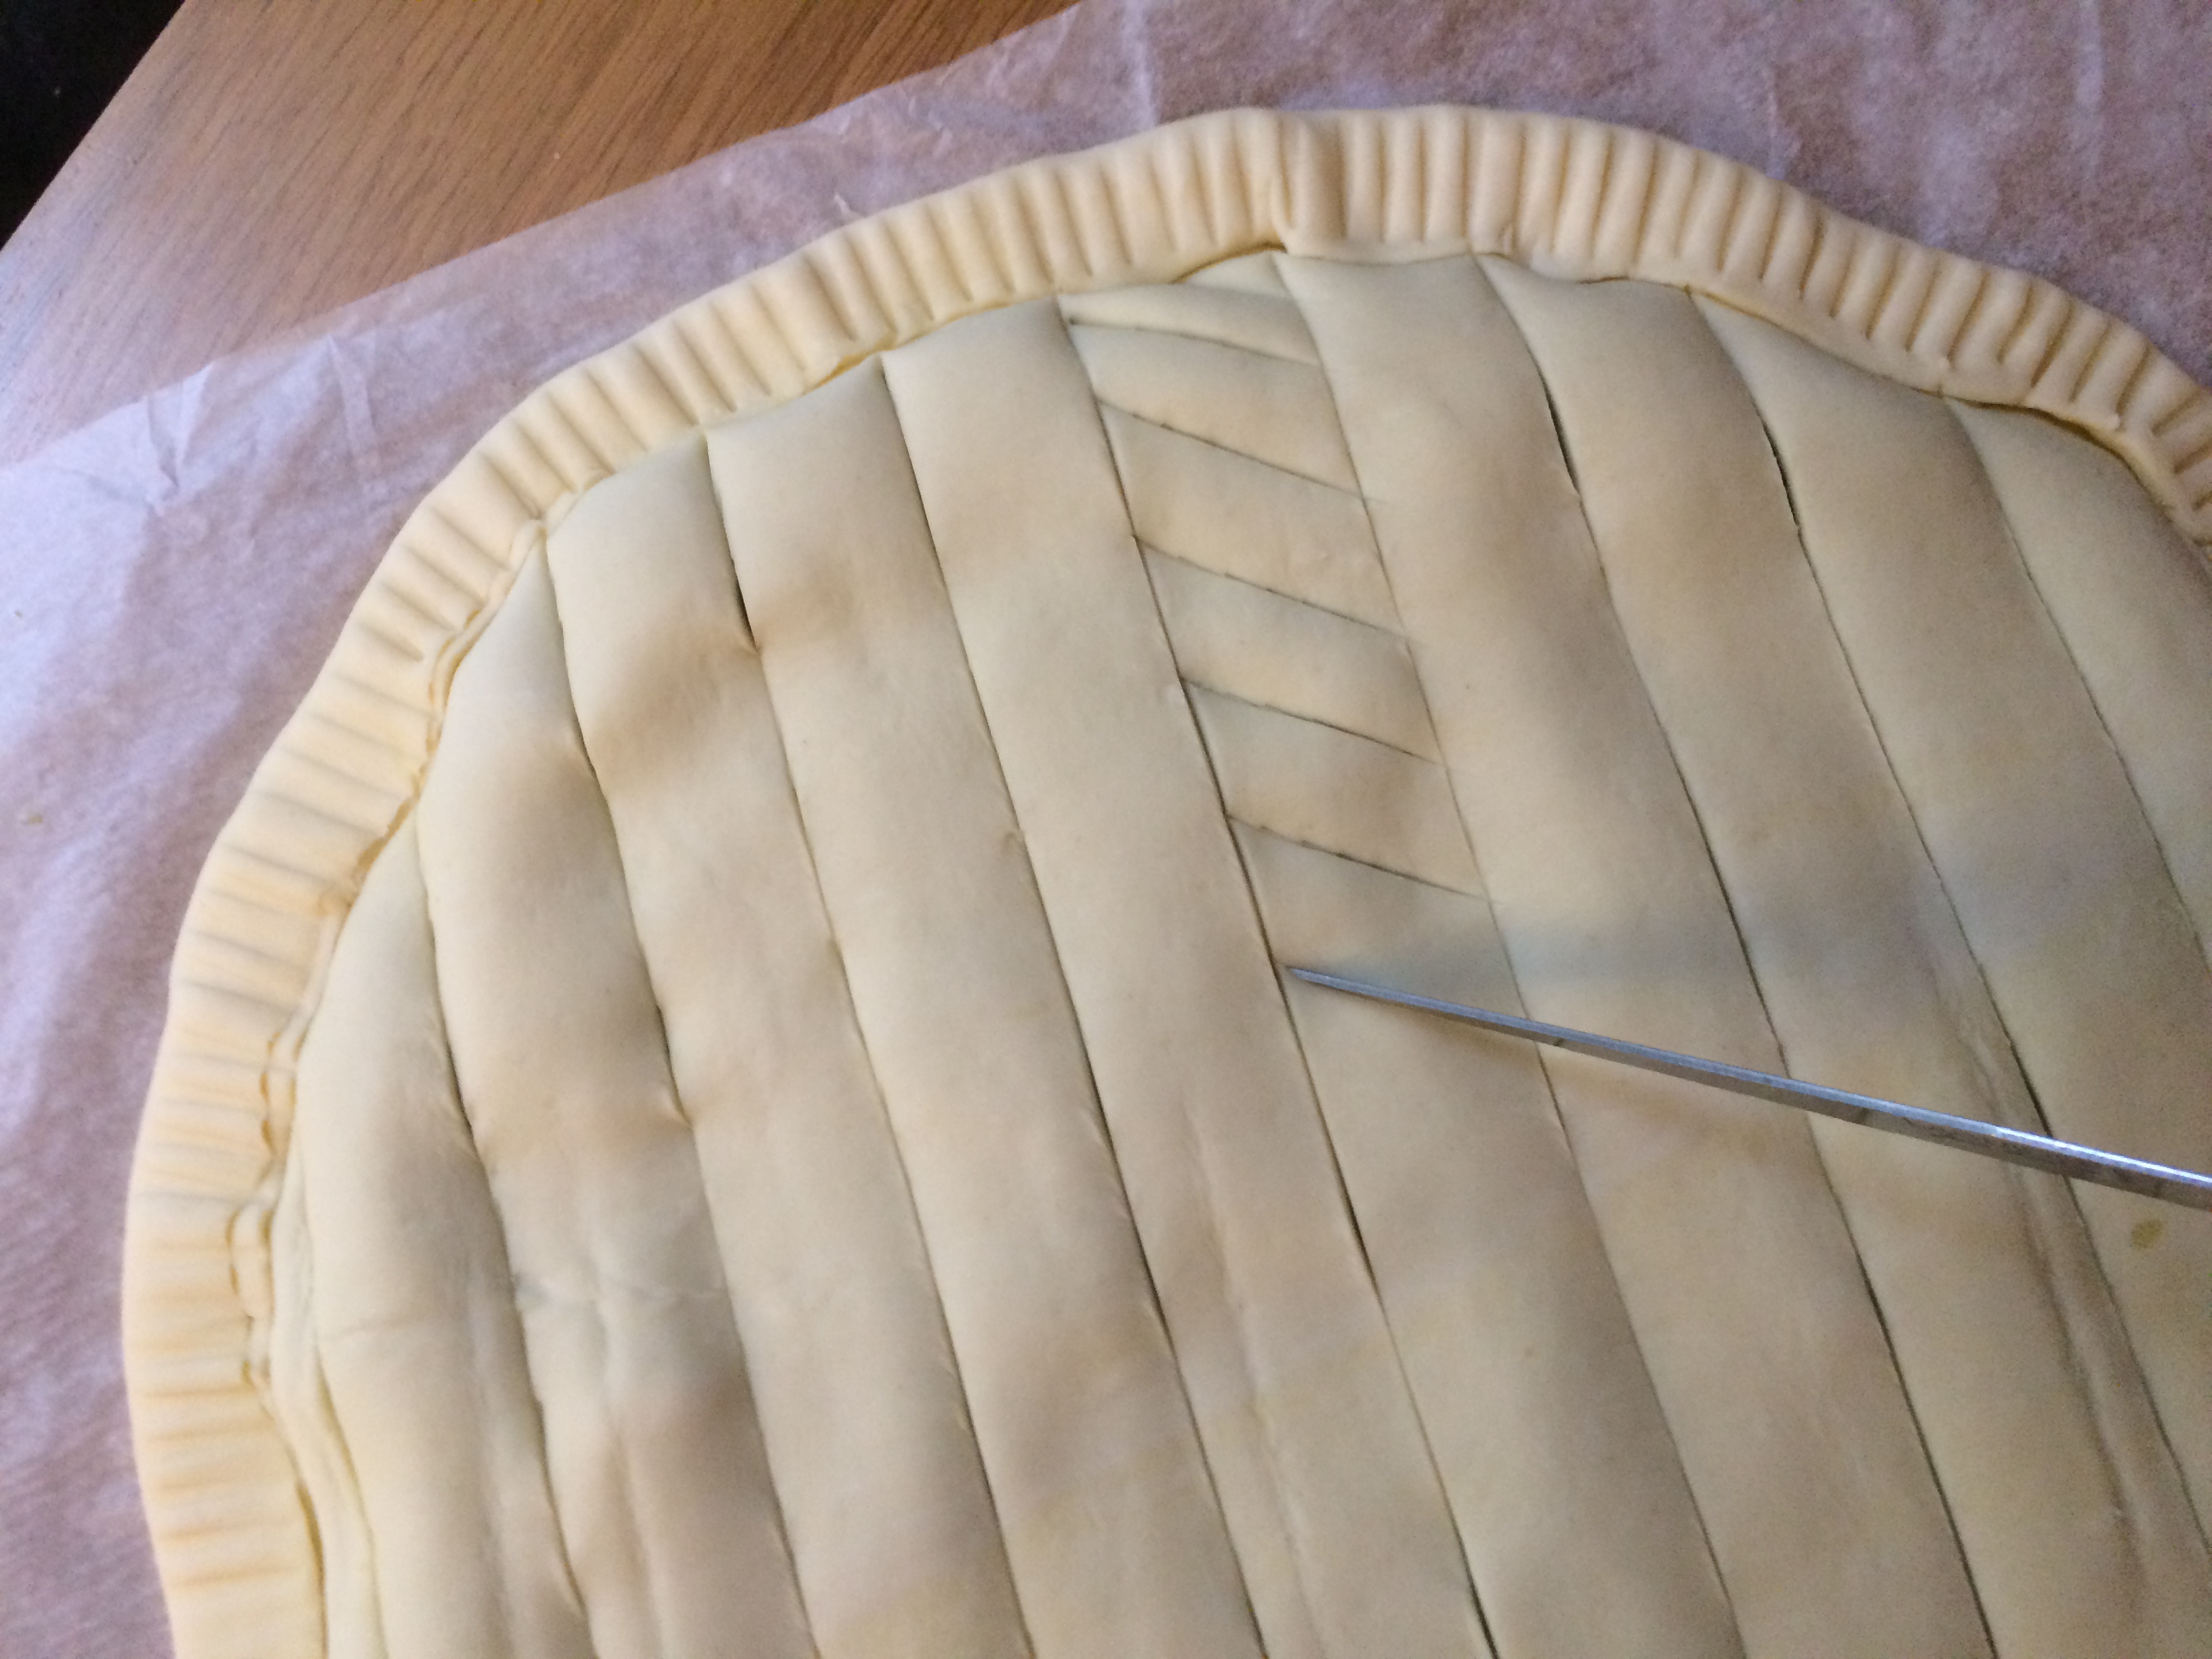
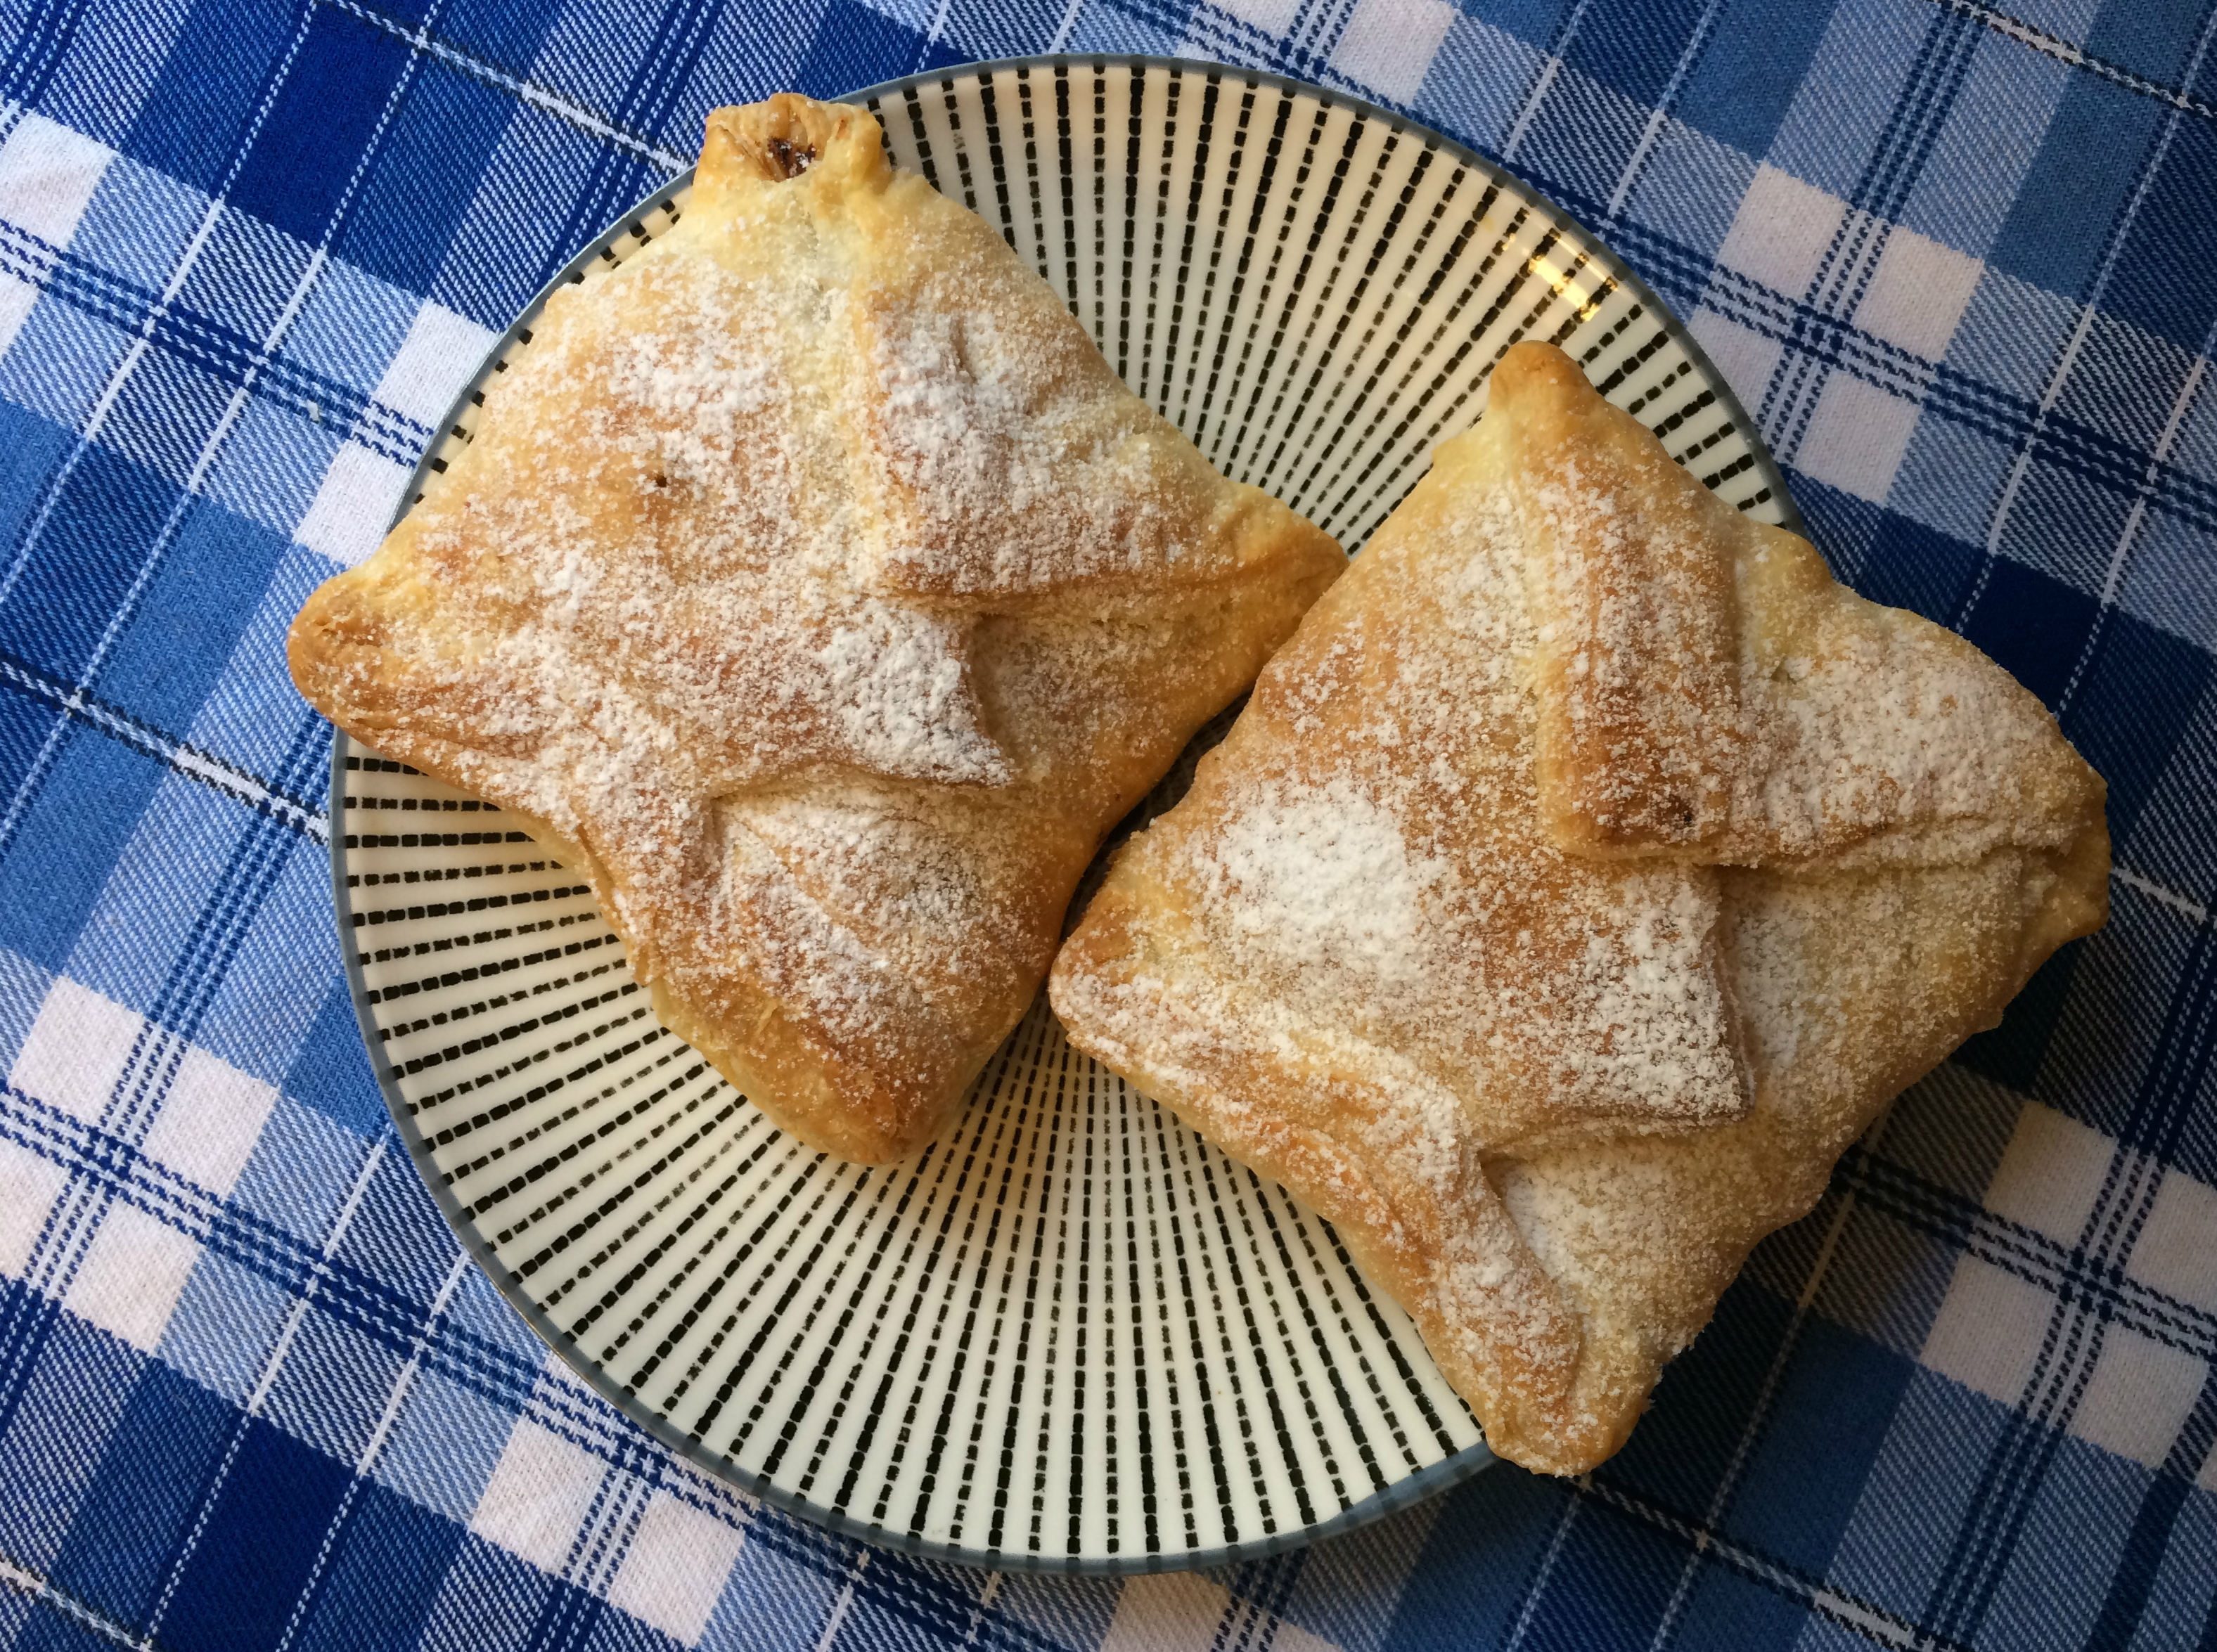
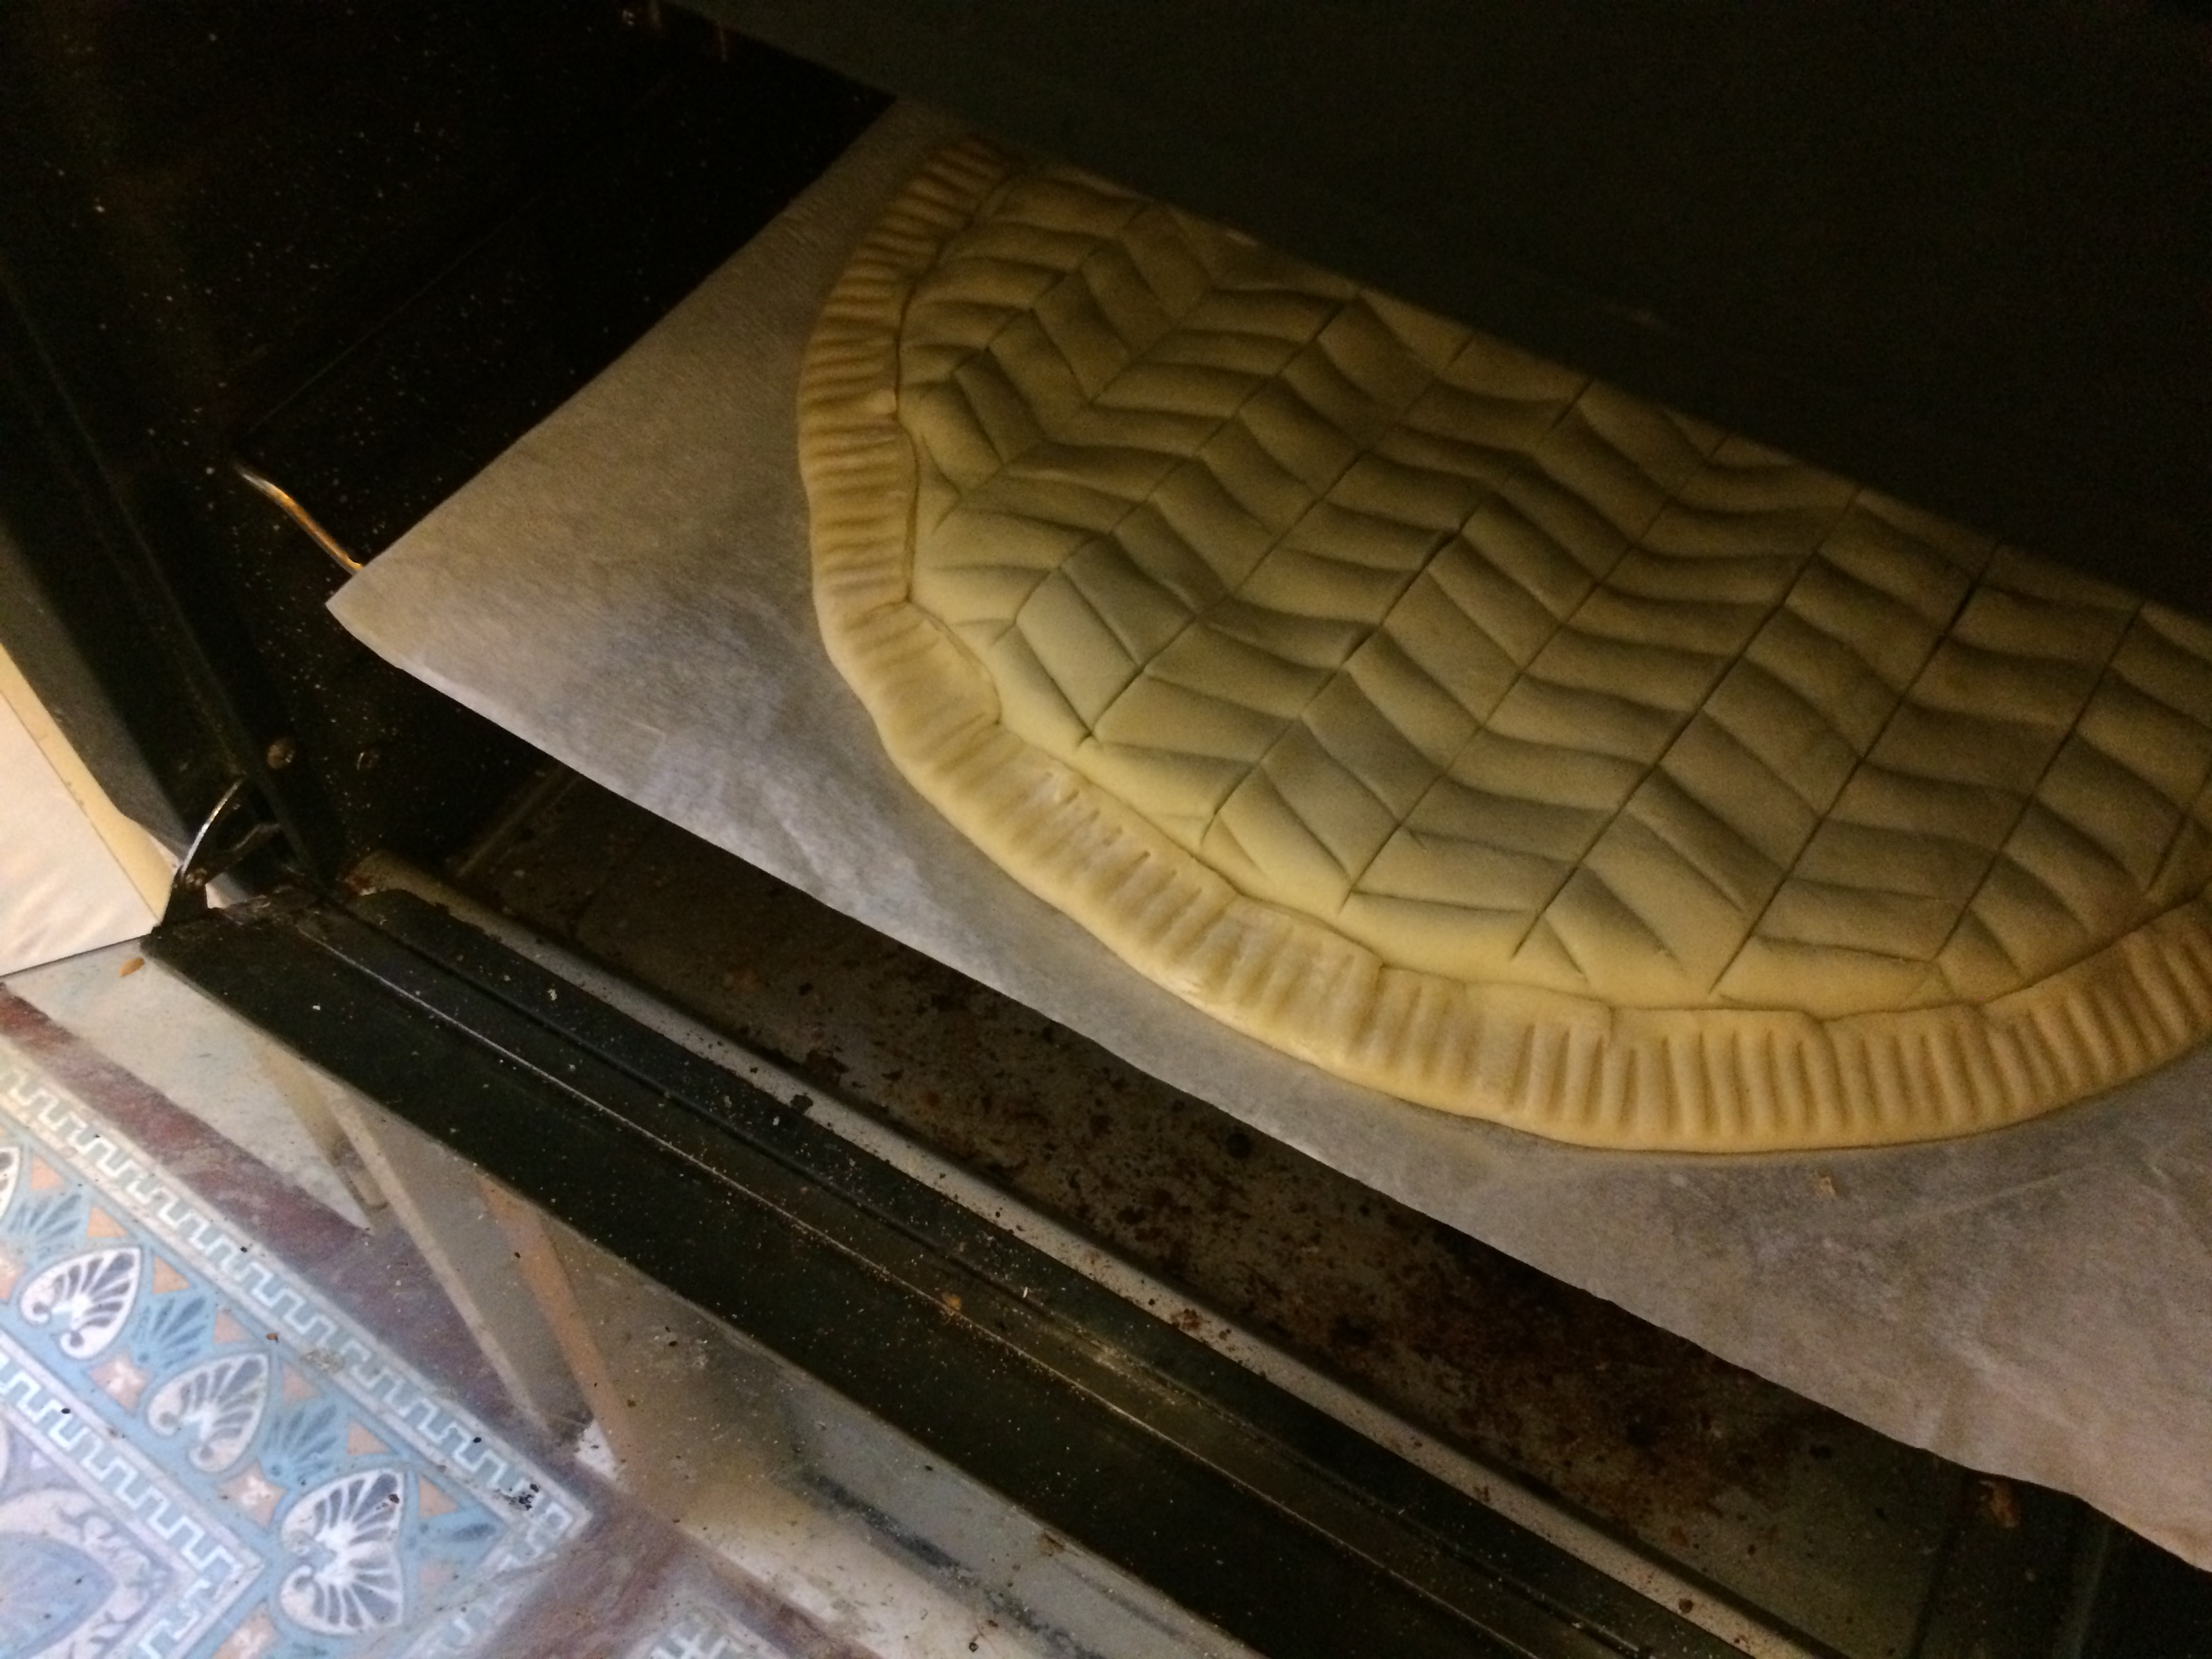
Place your galette into the preheated oven (on a baking sheet, if you like, but I put mine directly on the rack as my baking sheet is too small). Bake for 25 to 30 minutes, until the top is golden brown but not too dark. Begin checking it at around 20 minutes to make sure it doesn’t get too dark.

IMG_E7255While the galette bakes, you can prepare the (optional) apricot glaze.

IMG_E7258
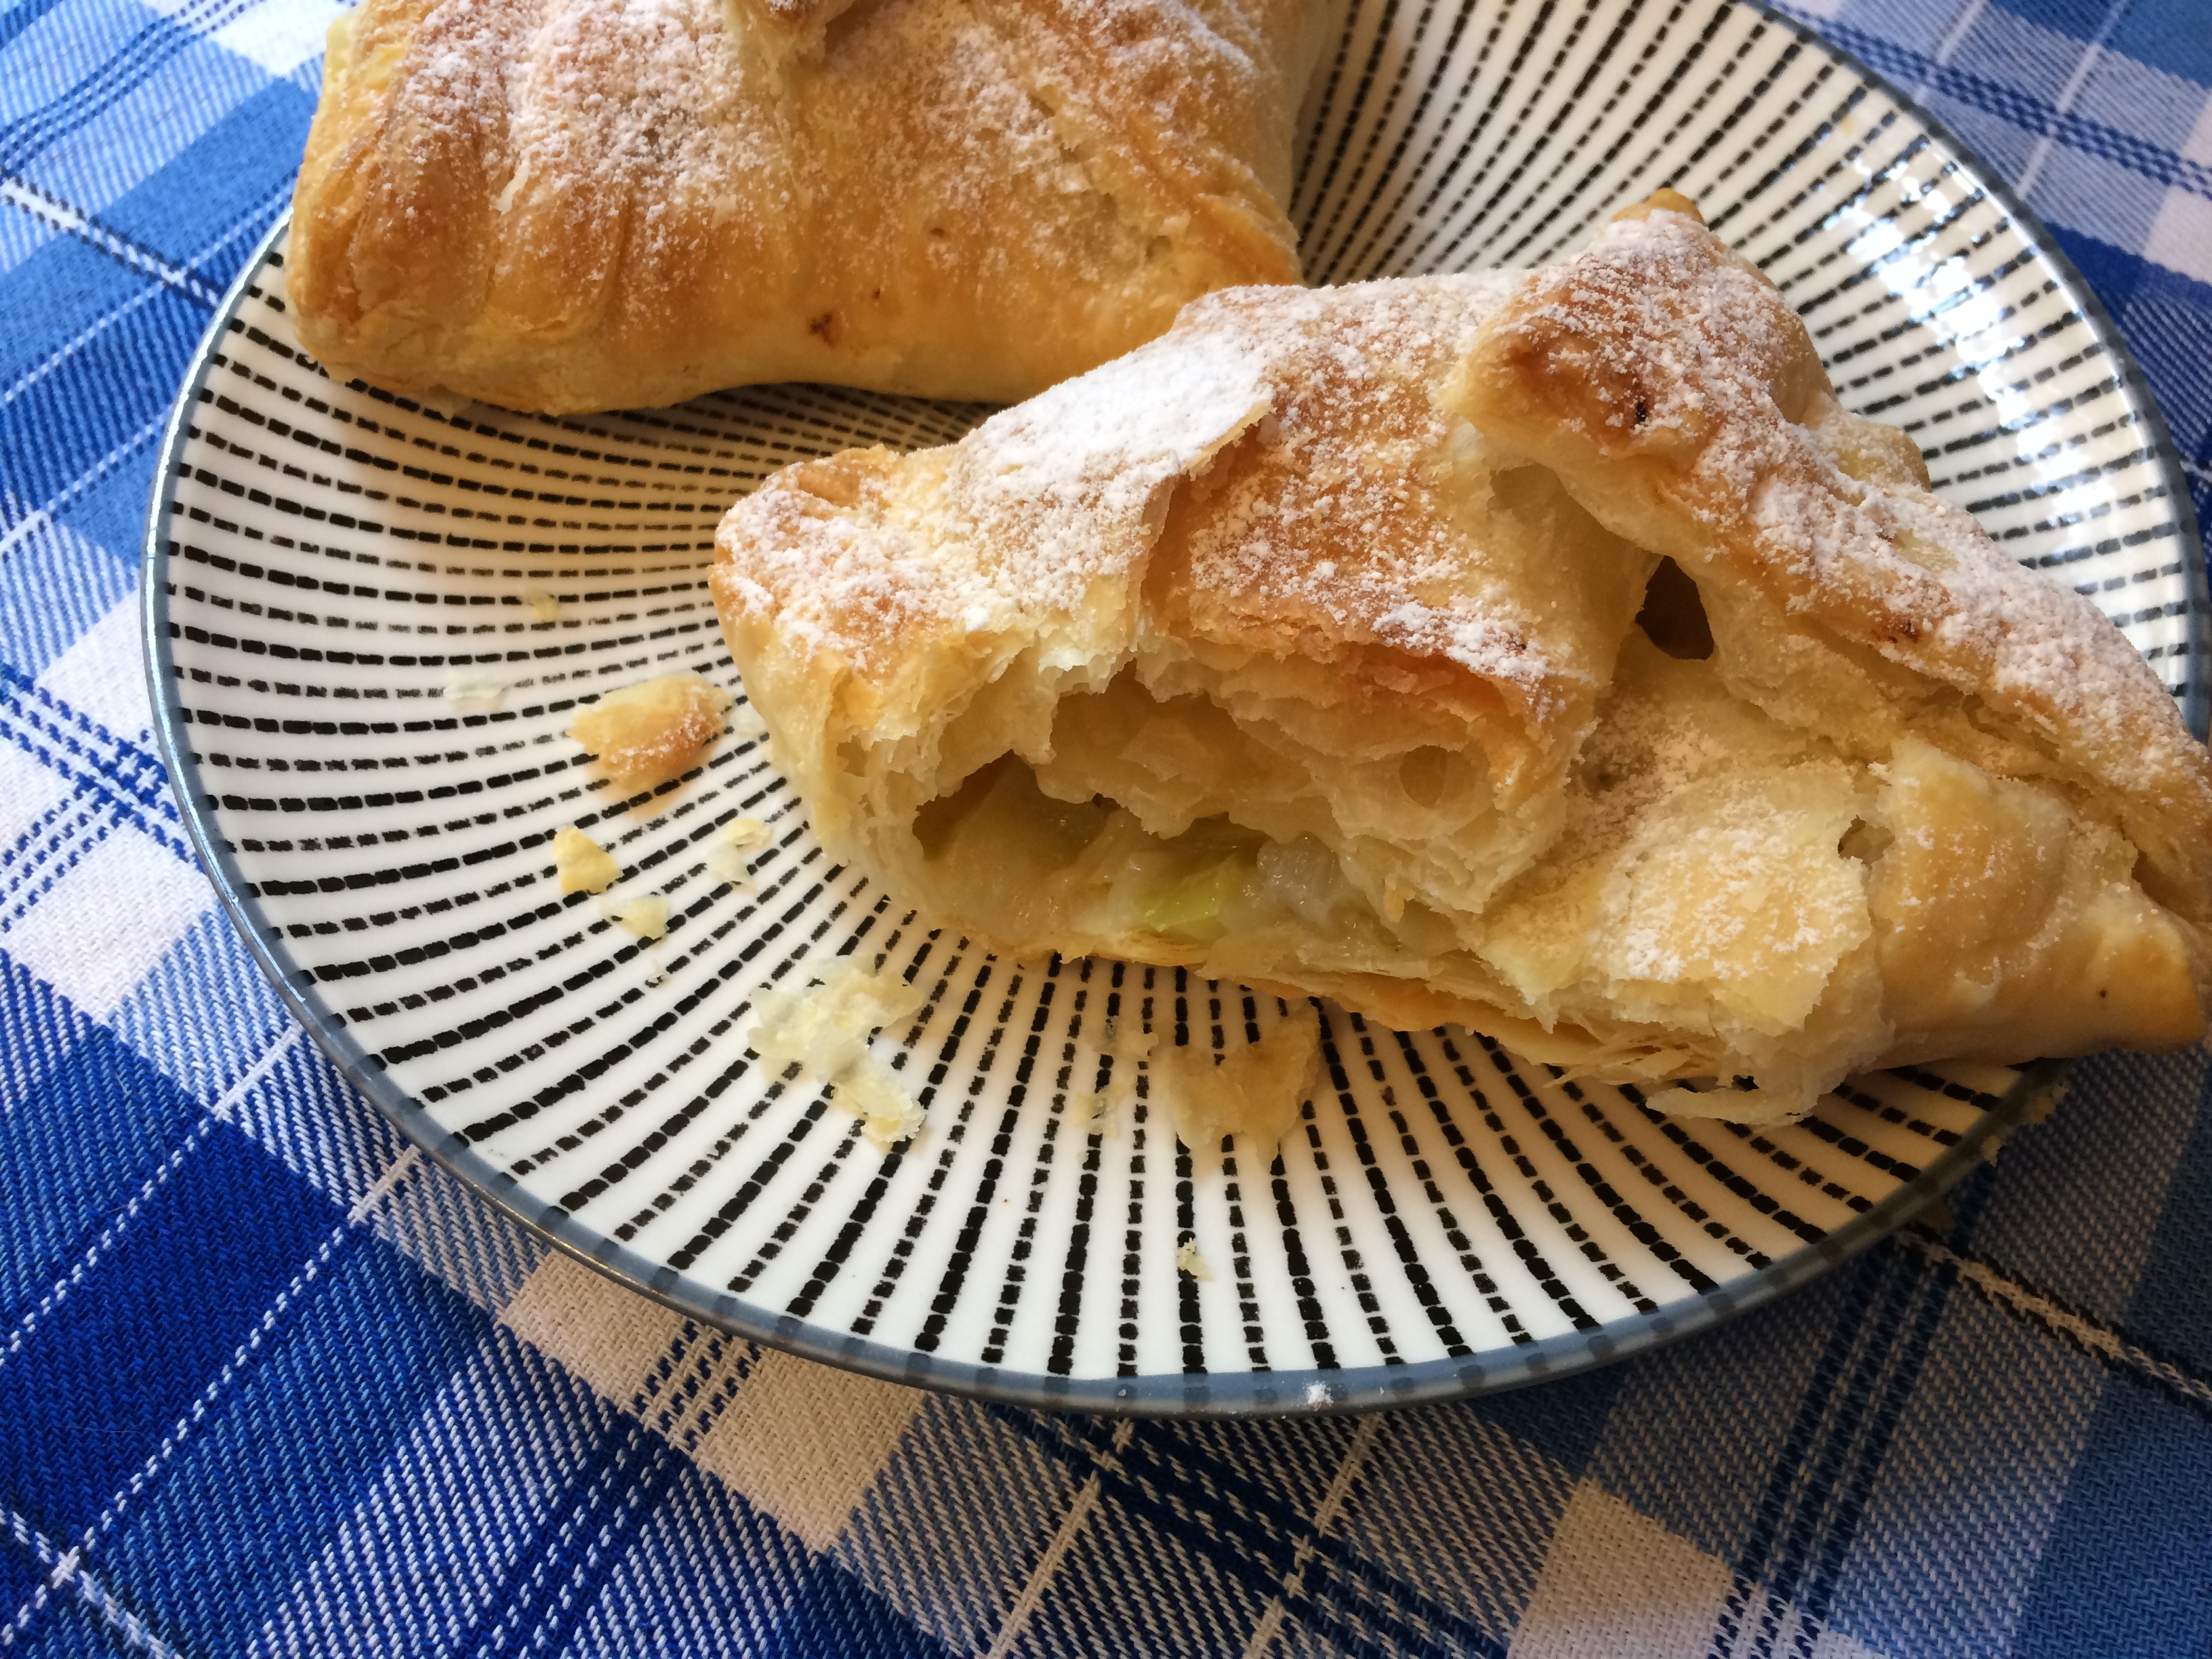
Place 1 to 2 tablespoons of the jam in a small saucepan over medium heat with a couple tablespoons of water. Bring to a boil, then turn the heat down low and simmer for a minute or two, stirring constantly to break up the lumps. Try to remove any unbreakable lumps or bits of apricot skin.

IMG_7265When the galette is done baking, remove it from the oven and place it on a cooling rack. Brush a thin layer of the apricot glaze across the top, including the top of the edges. At first it may seem that the jam is too sticky and shiny, but once it’s dry it will be fairly dry to the touch and more matte. Remove any jam clumps that collect in the crevices of the pastry design.

IMG_7267
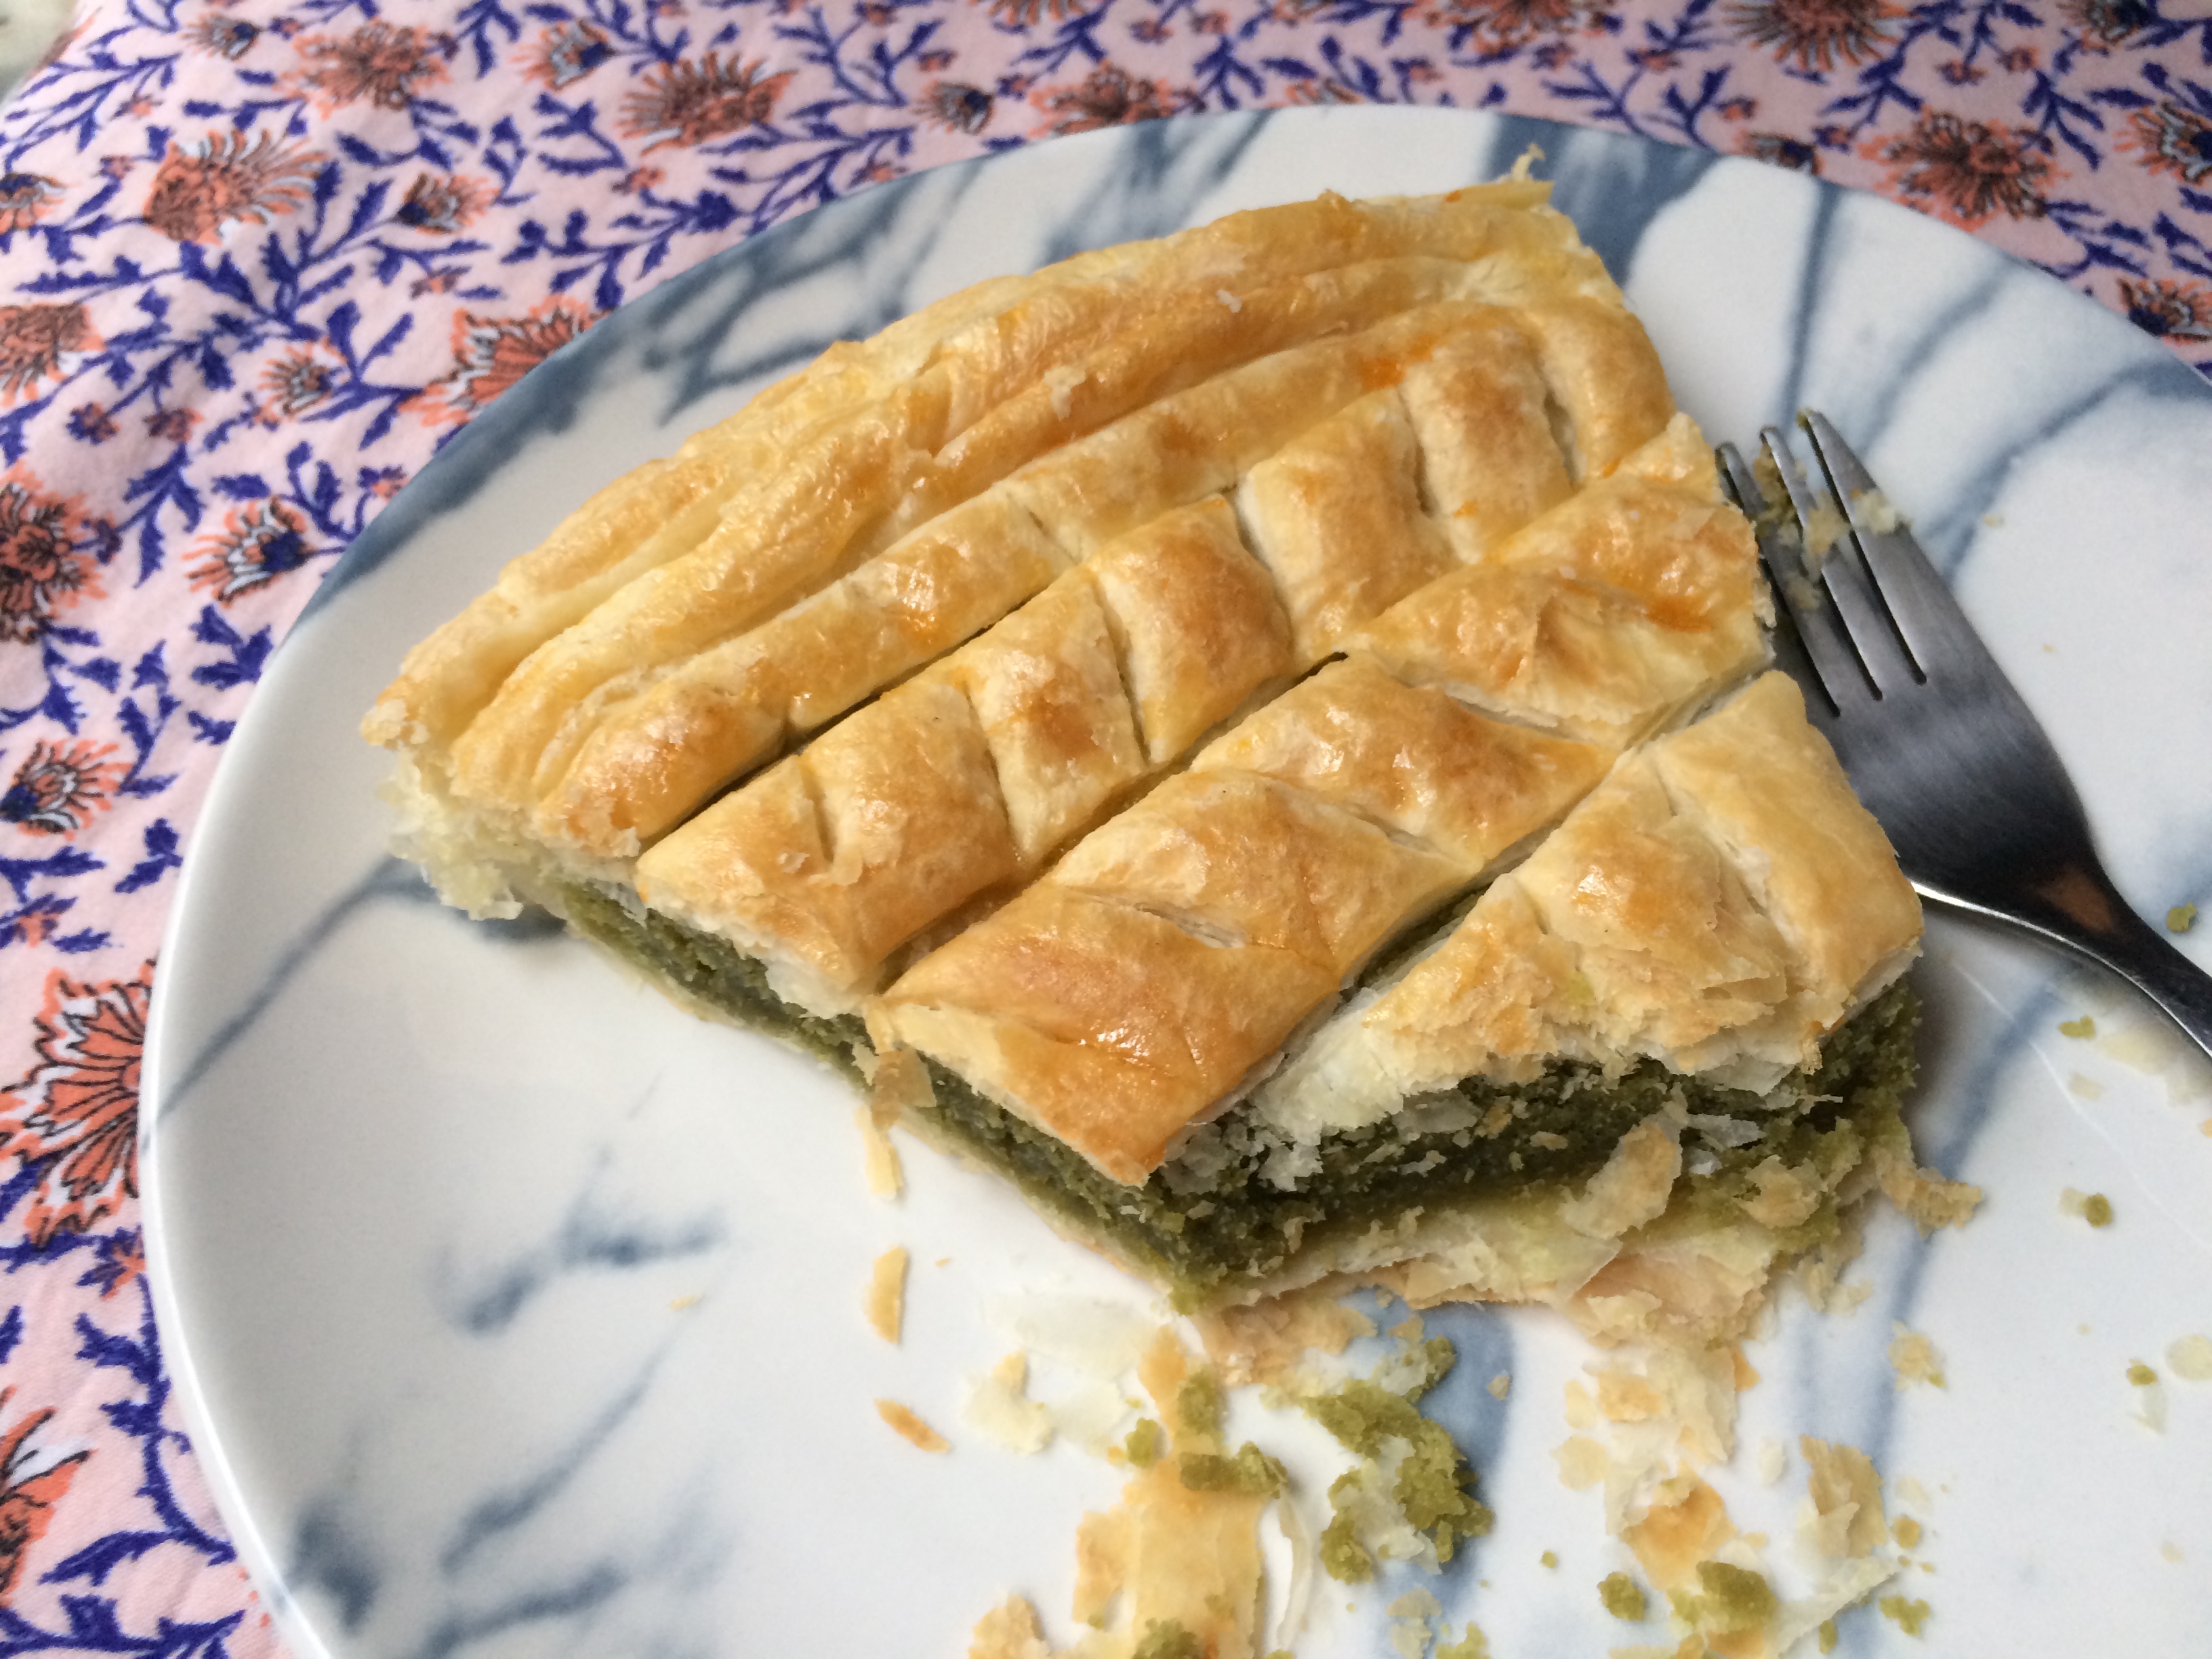
Allow the glaze to dry (5-10 minutes) before serving. If not serving immediately, you can pop the galette in the oven again to warm it just prior to serving.

IMG_7273
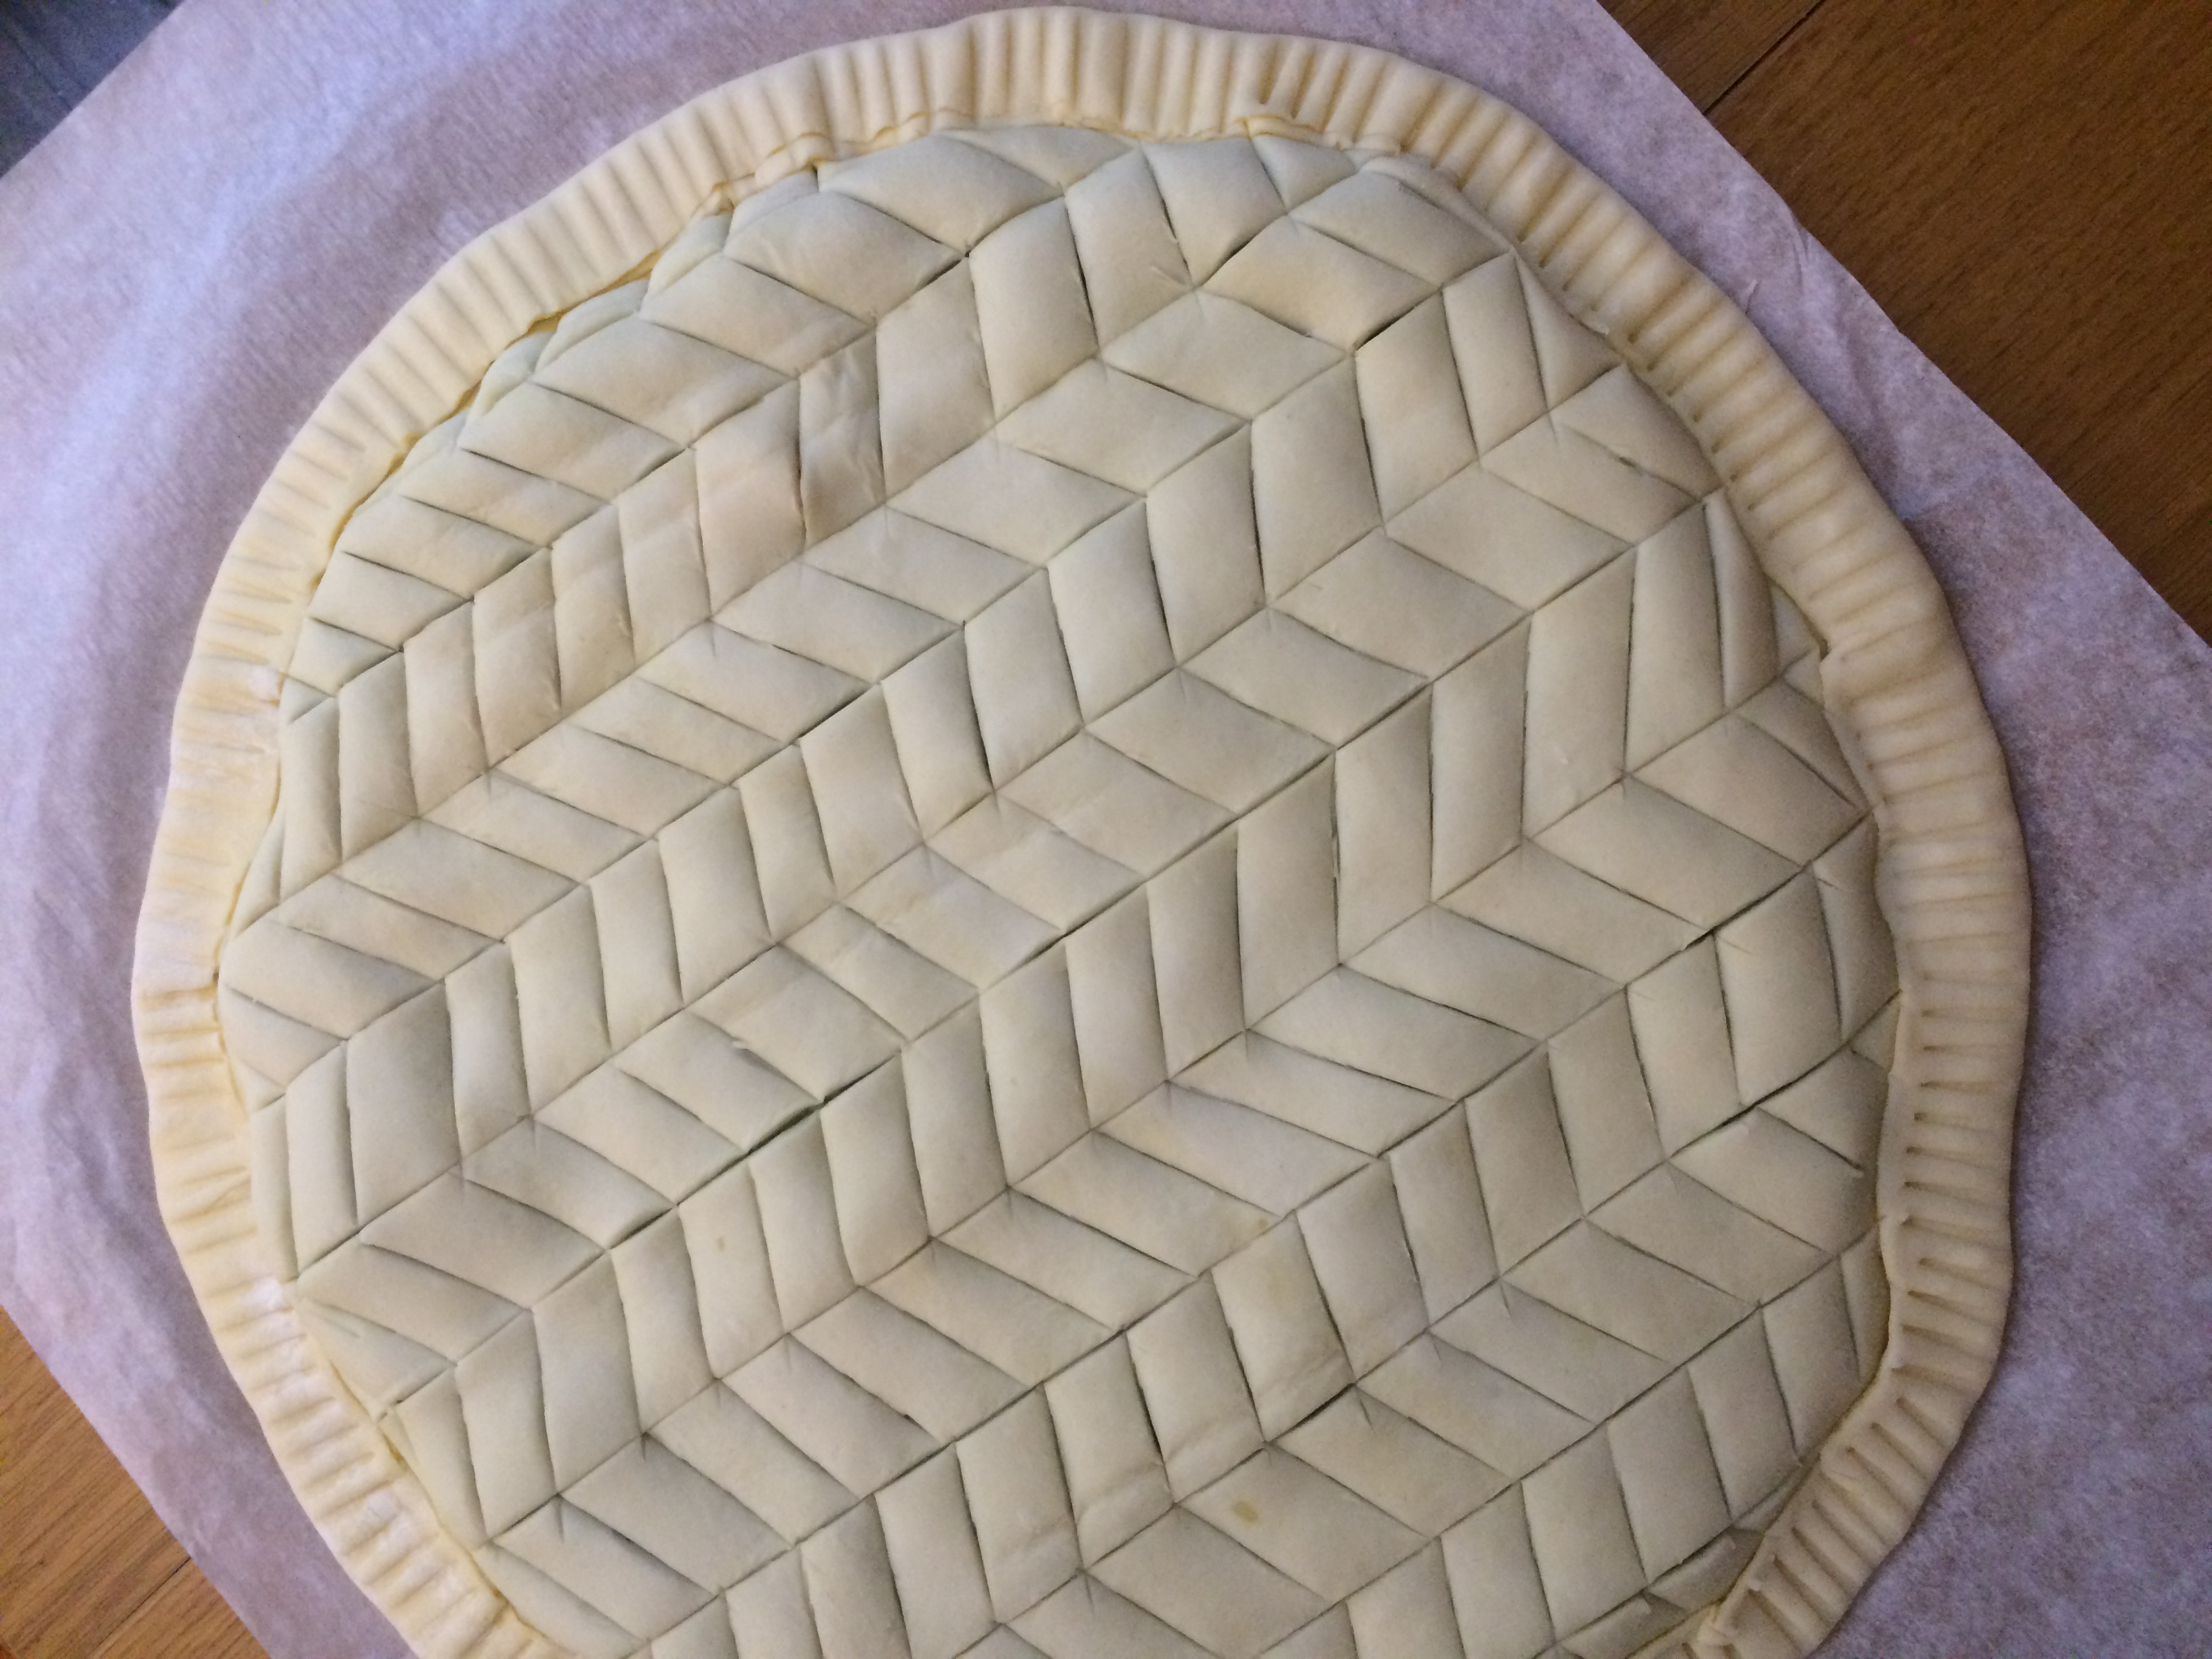
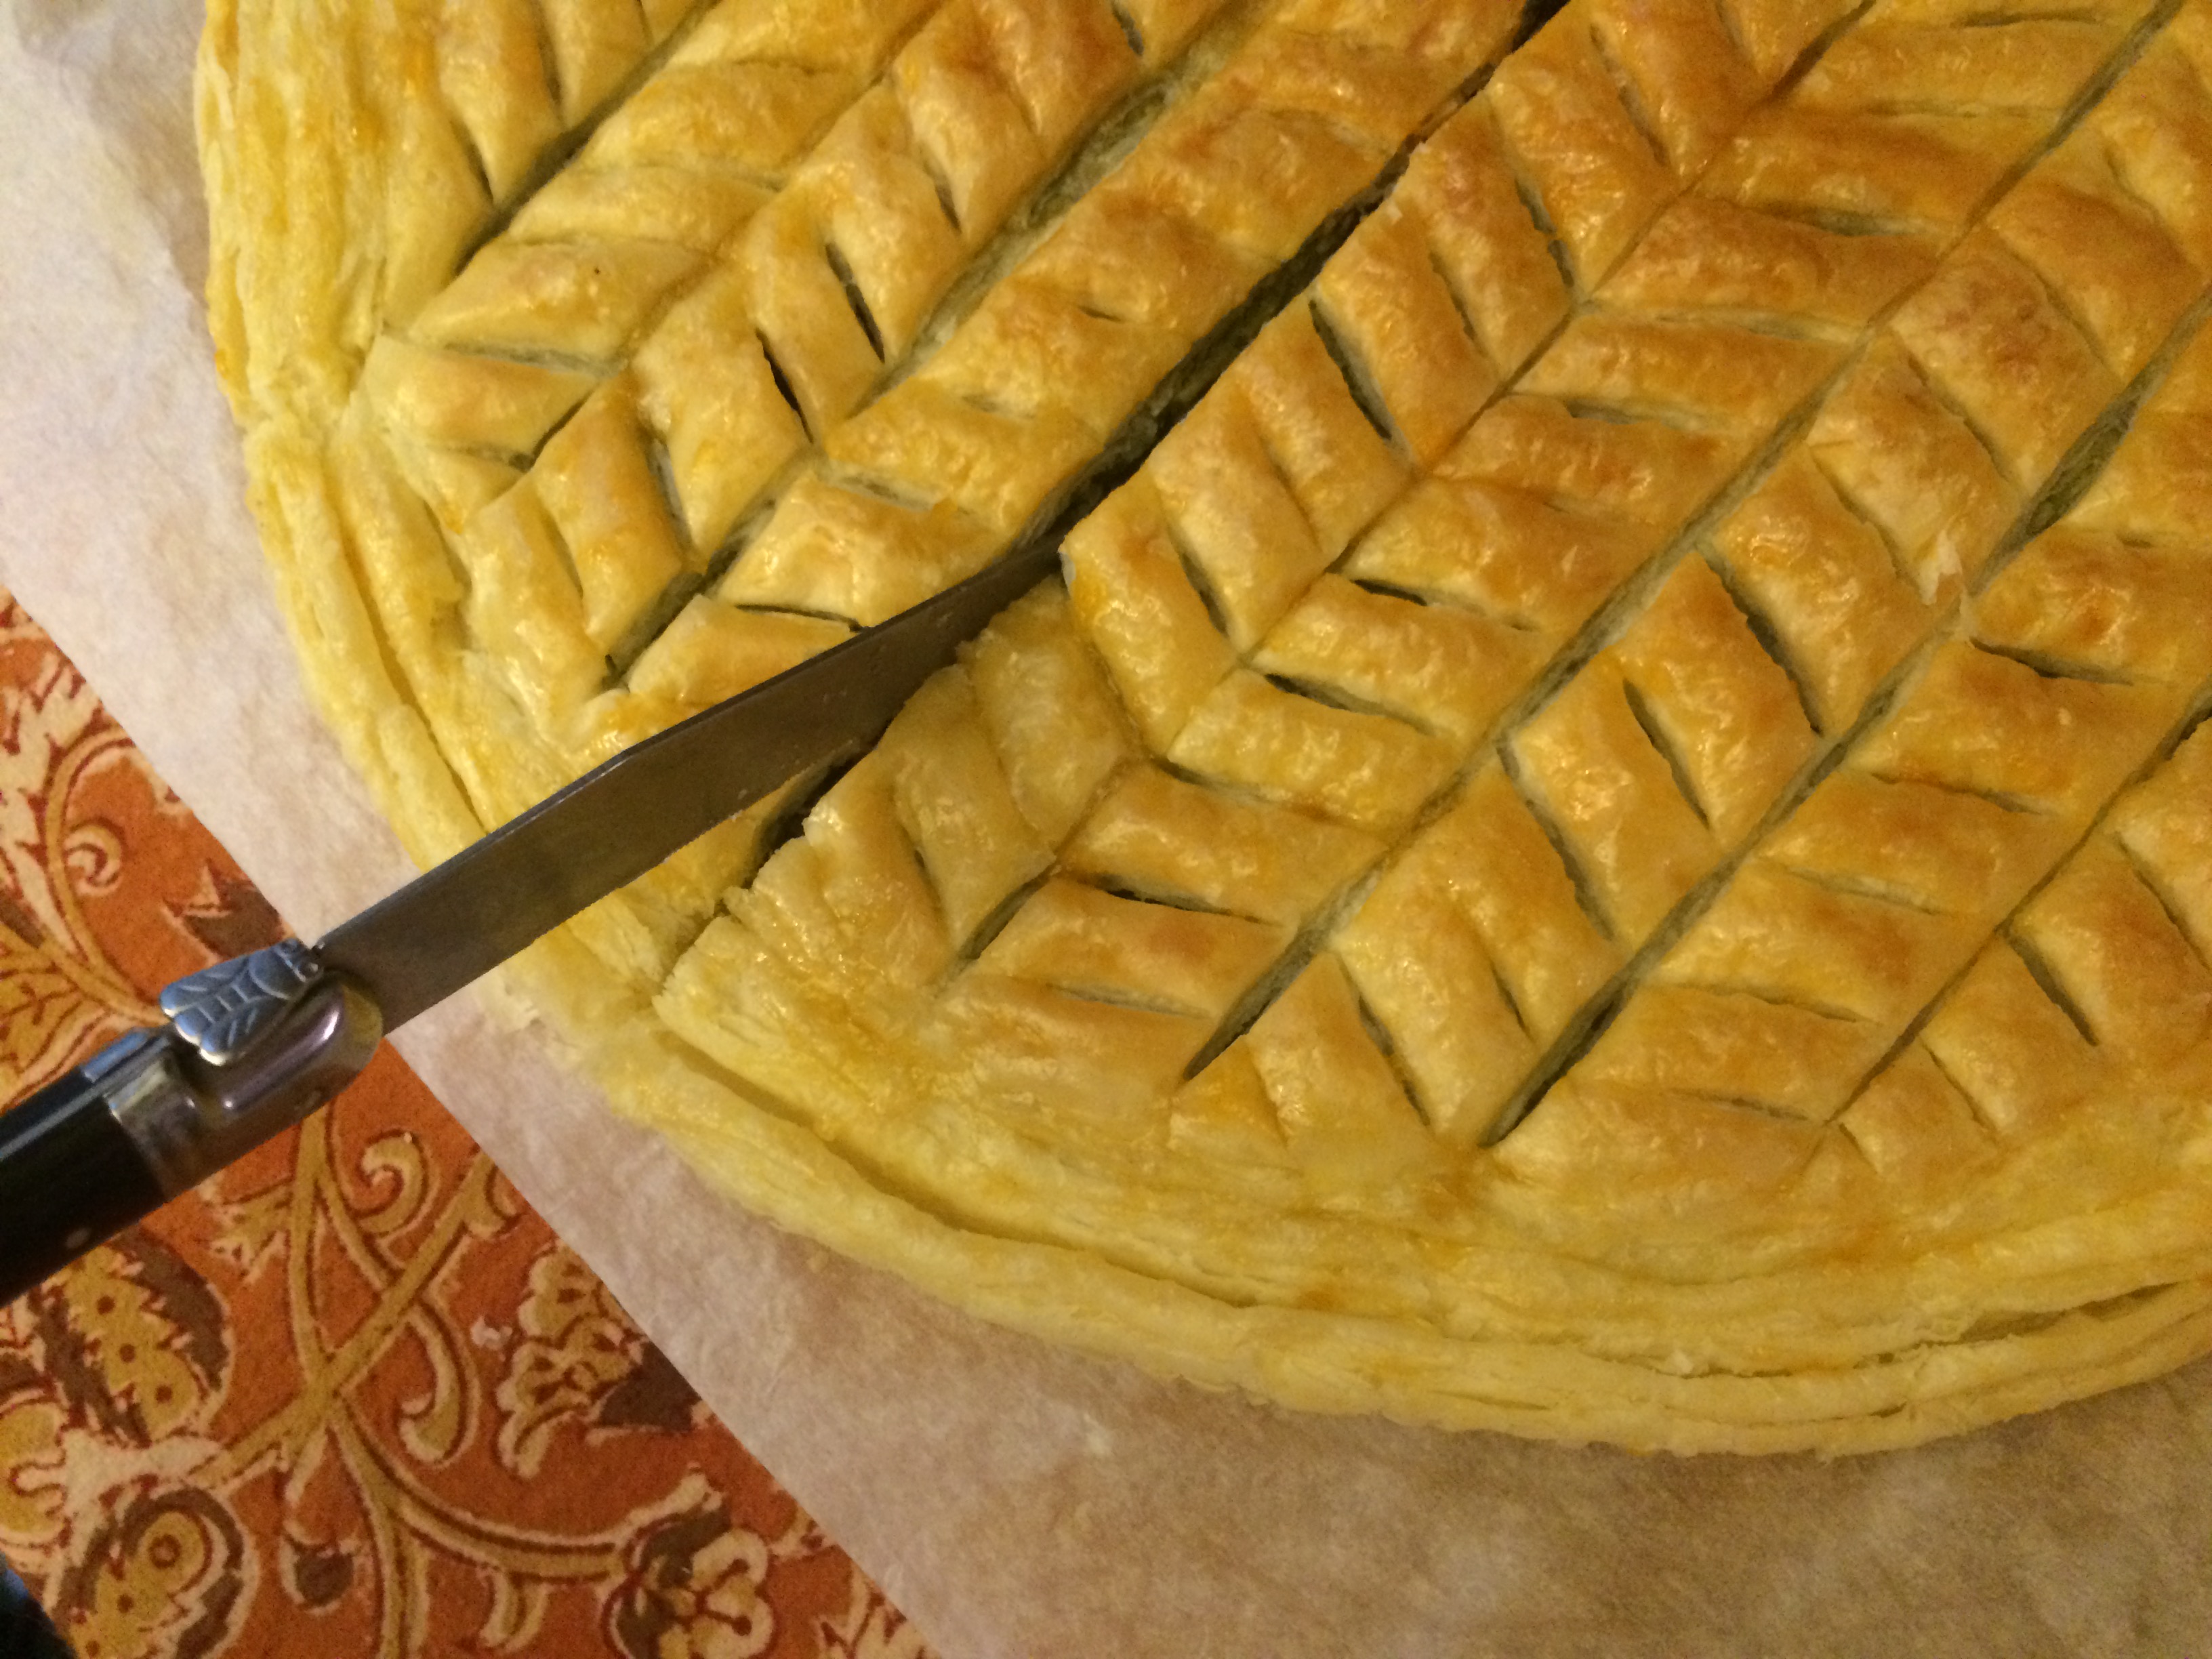
A design like this one, with the first line traced right down the center, makes it easy to slice up.

IMG_7405IMG_7467
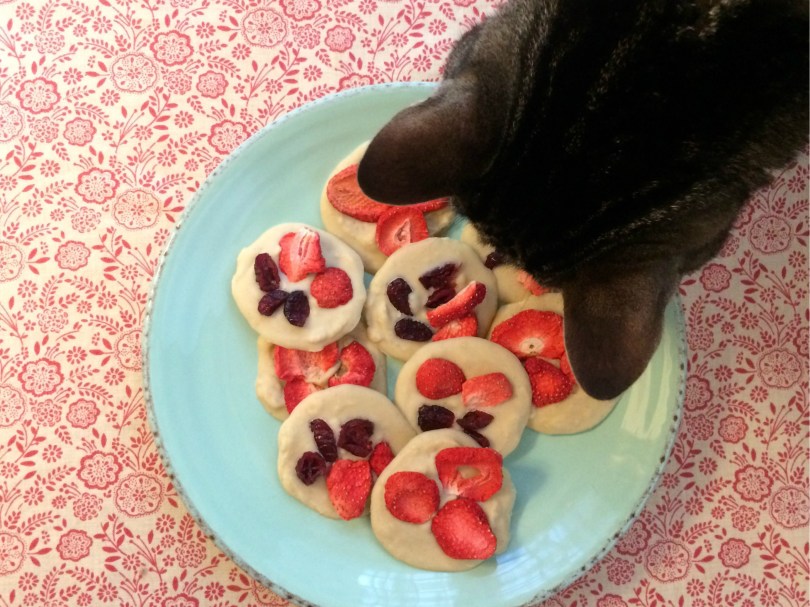
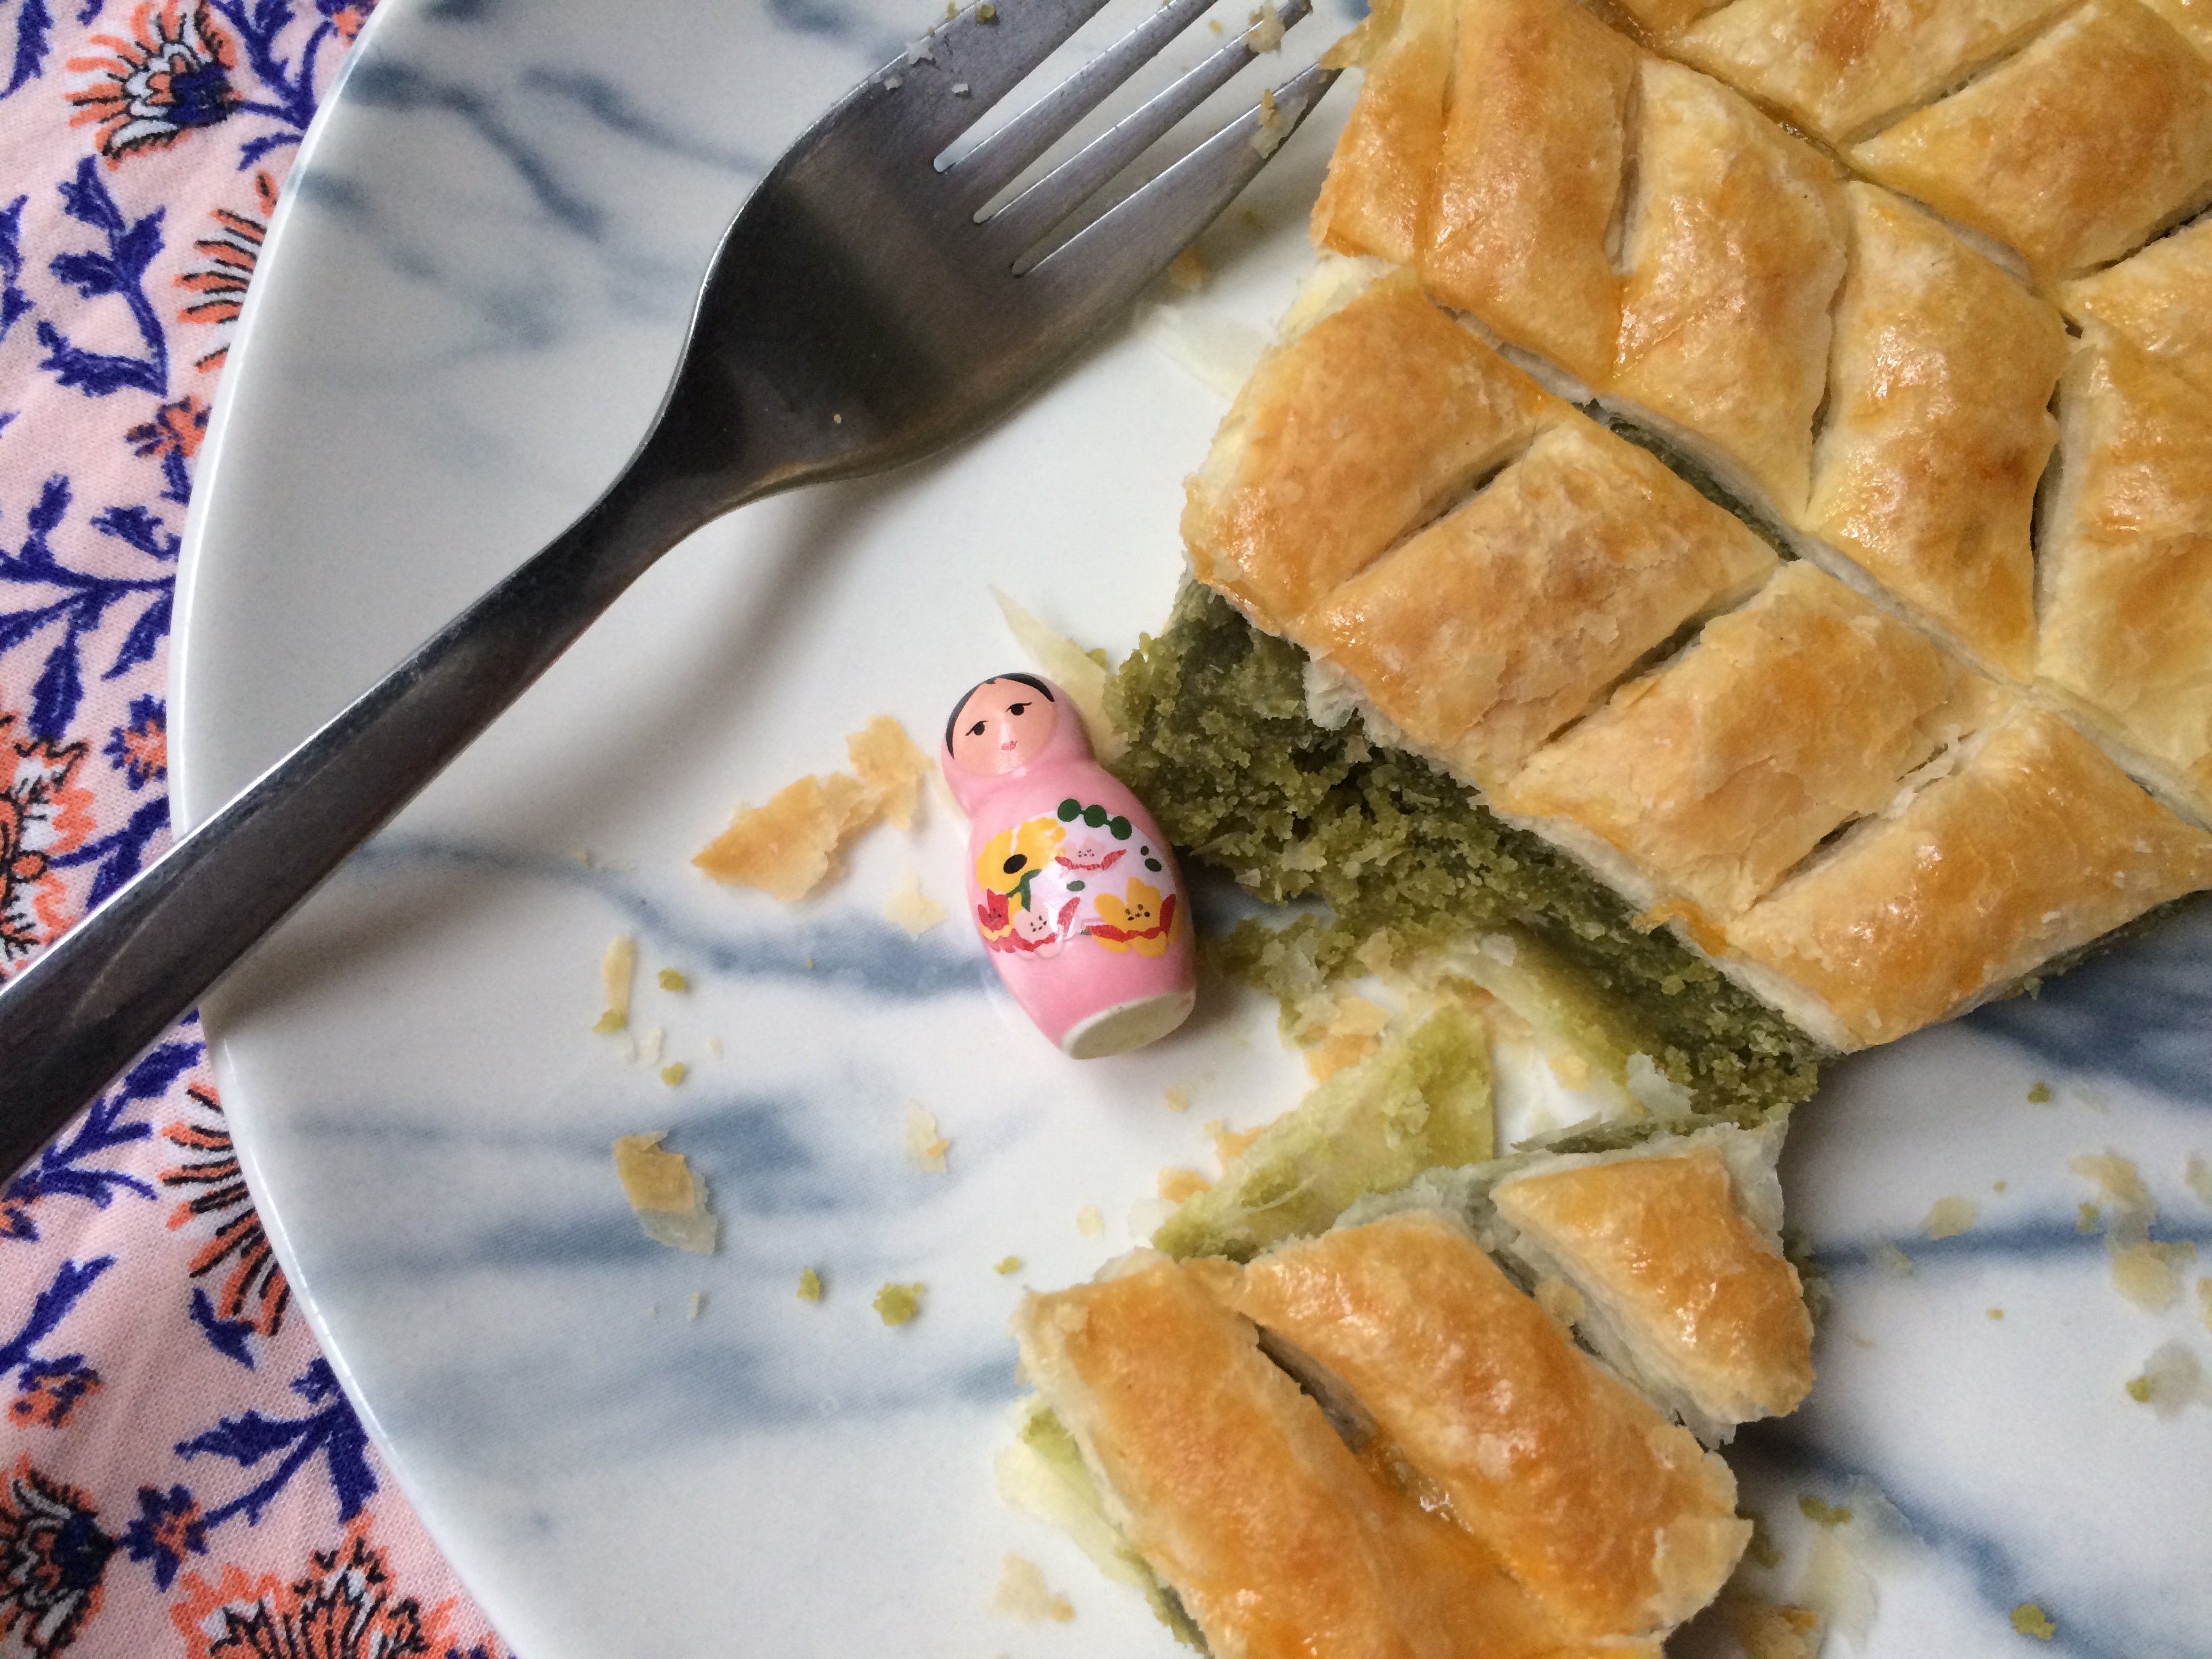
Hey, you found the fève! Congratulations, you’re the queen! Or king!

feature2.jpgSince you’re making your own galette, you may want to make a crown to go with it (or look for one at a costume shop). I decided to make things simple and design a kitty-sized one (toilet paper tube + aluminum foil).

IMG_7477

I hope this post inspires you to try making a galette des reines of your own! Let us know in the comments how it turned out, and tag @rd.violet if you post a photo on Instagram. 🙂

Variations: Omit the matcha powder and add an optional tablespoon or two of rum for a traditional basic almond galette. Use ground hazelnuts, walnuts or pistachios for a different flavor profile and/or include a layer of chocolate-hazelnut spread or chestnut cream underneath the nut paste. To cut costs, use ground cashews instead of almonds, or a combination of the two.

White chocolate mendiants

It’s that time of year again… hearts seem to be popping up all around town, mingling strangely with the last remaining Christmas decorations and sometimes (like this year) accompanied by snow. For my Valentine’s Day post last year, I waxed philosophical about the meaning of the holiday and presented you with a recipe for sugar cookies with rosewater-raspberry icing. This year, perhaps inspired by all the discarded Christmas trees I’ve been walking past on the sidewalks over the past few weeks, I decided to revisit a traditional French yuletide confection in a white, pink and red version.

As with the original dark chocolate version, this is a very easy and versatile recipe. You need only melt a bar of chocolate or two and then add whatever fruit and nut toppings you like. At the end, you have a very cute little DIY treat to give to your loved ones.

White chocolate mendiants

Makes around 12 mendiants

Ingredients:

  • about 5.6 oz. (160 g) vegan white chocolate
  • a few teaspoons of coconut oil, if needed to thin the chocolate (do not use any other type of oil)
  • freeze-dried strawberry slices
  • dried cranberries or other dried red berries of your choice
  • optional: toasted almond slivers, toasted pine nuts, candied ginger

Equipment needed: double-boiler or metal mixing bowl plus saucepan, parchment or waxed paper. A tray that can fit inside your refrigerator and a heat-safe silicone spatula will be handy too.

Gather the white chocolate plus all the berries and any other toppings you want to use. I used these 80-gram bars of vanilla-infused white chocolate from iChoc that I found at Un Monde Vegan in Paris, but if you live somewhere else you can look for white chocolate at an organic shop or online.

IMG_7354

Set up a double-boiler or, as I have done here, boil some water in a saucepan with a metal bowl on top. Make sure that the bottom of the bowl doesn’t touch the water.

IMG_7355

Break the chocolate into squares/chunks and put them in the bowl. You’ll be keeping the heat on so that the water continues to boil throughout the entire process.

IMG_7361

Using a heat-safe silicone spatula, stir the chocolate as it melts. While waiting for it to be ready, grab a tray that’s the right size to fit inside your refrigerator and prepare it with a sheet of parchment or waxed paper.

IMG_7362

If your chocolate seems too thick or dry, you can add a small amount of coconut oil to thin it. Add the oil sparingly, incorporating each amount to see the result before adding more.

IMG_E7372

When the chocolate has fully melted and become smooth, place a teaspoonful or so onto a sheet of parchment paper and shape into a circle of even thickness. Make only around six rounds at once so you have time to garnish them with the fruit and other toppings before the surface of the chocolate cools. Once you’ve filled an entire tray, place it in the refrigerator to cool and set (this takes about an hour).

IMG_7363

Continue the process with the remaining melted chocolate. I melted three bars, which made about six mendiants per bar, and opted to do a different type of topping with each set of six. For the ones above, I used strawberries, cranberries and some almonds. I added a few pine nuts here and there after taking this photo.

IMG_7370

A strawberry-only version. Which of these three topping versions do you like best?

IMG_7379

After about an hour, the mendiants should be fully cooled and set. You can take them out of the fridge and put them on a plate!

IMG_7380

I plated mine for this post on this great contrasting blue/green plate that I nabbed in the sales at Habitat the other day… but if you’re making these to give to friends as gifts, you can wrap them up in a bit of waxed or parchment paper tied with some fancy string.

IMG_7433

They look kind of nice on a smaller rectangular plate, too.

IMG_E7390_b

Two paws up from Sésame, who wishes you a very happy Valentine’s Day, by the way. 🙂

Enjoy!

Variations: experiment with other combinations of fruit and nuts. Make some dark chocolate mendiants to create an assorted set.

My best breakfasts of 2017

Last January, I wrote a post about the best books I’d read in 2016. But this past year, I didn’t read quite as many books and none of them were really exciting enough to devote a whole post to. So this January, for something a bit different, I’ve decided to talk about the 15 best breakfasts I had this past year. Some are my own original recipes, others are from cookbooks and a few were at restaurants or food stands. If you follow me on Instagram, you might recognize some of them!

As with my post about the books, my goal is to inspire you to try some new things. You might find a new favorite flavor combination or get ideas for further experimentation.  Many of these are simple enough that you can reproduce them just from the photo and description, but in other cases I’ve tracked down recipes for similar dishes or provided a link when the dish is from the archives of this very blog.

I’m a big fan of breakfasts—I find that having a substantial meal in the morning (with coffee or tea, of course) is a great way to start the day with enough energy to get a lot of work done before a mid-afternoon break. I often have just a large-ish breakfast and then dinner without any lunch. Of course, it helps that I work from home and can take the time—when there are no urgent deadlines—to make something interesting. But if you have an office job and are short on time in the mornings, these may still give you some ideas for things to prepare ahead of time, or to make for weekend brunches.

yogurt.jpg

Fresh seasonal fruit (here, apple and persimmon) over plain soy yogurt can make for a simple but tasty and vitamin-rich breakfast. Here, it’s drizzled with Bee-Free apple honey (substitute maple, rice or agave syrup) and topped with chopped toasted almonds.

IMG_7278

Homemade turnovers are really easy to make when you buy premade flaky pie dough and have an apple (or other fruit—pear, banana, berries, etc.) on hand. Check out my recipe for apple turnovers with a sweet, lemony miso paste.

IMG_8228b

On Saturday mornings, all year round, there’s an organic outdoor farmers’ market in my neighborhood (on boulevard des Batignolles in the 17th between metro stations Rome and Place de Clichy). If you live in Paris or will be passing through, you can stop by for some vegetables and also pick up one of these delightful savory chickpea galettes with a soy-basil sauce. They’re completely vegan and super filling and yummy. Look for the stand in the easternmost section of the market, the part closer to Place de Clichy. Or if you’re a Sunday shopper, you’ll find the same people operating a stand at the boulevard Raspail organic farmers’ market in the 6th near metro station Rennes. Alternatively, stay home and make this one yourself!

scones

I recently acquired a great French cookbook devoted to breakfast recipes, L’Heure du petit-déjeuner végane a sonné by Melle Pigut. I love her recipe for scones and make it often. They’re very easy to throw together, as long as you can wait 20 minutes for them to bake! Here, I have spread them with a vegan chocolate-hazelnut spread. If you don’t read French or can’t find this book, you can try this recipe.

bestSQ

This pudding-like dish made with sorghum is a common breakfast dish in Tunisia that I recently learned how to make. I’ve garnished it here with toasted almond slices and Bee-Free apple honey, but you could top it with fruit, grated coconut or whatever else strikes your fancy. Check out the recipe here!

IMG_8881

As an American, I have an undying affection for peanut butter and love incorporating it into breakfast dishes. I find it makes any dish more substantial and provides long-lasting energy. Here, I have spread some on toasted English muffins (newly possible to find in France!) and topped them with fresh nectarine slices and toasted pumpkin seeds.

IMG_0933

This amazing bowl of overnight oats, which I enjoyed at Vegabond during my stay in Amsterdam this October, is one of the best breakfasts I’ve ever had, ever. It was made with rolled oats and chia seeds and topped with green apple, pecans, plenty of cinnamon and a fresh physalis berry. You can try making your own overnight oats with this recipe.

IMG_9667

Another recipe from Melle Pigut’s breakfast cookbook that I loved is these potato flatbreads. They’re also quite easy to make if you plan a bit ahead and have some cooked potato ready. Here, I served them spread with hummus, grated carrot, some fennel seeds and black pepper. If you don’t read French, you can try this recipe.

porridgefigs.jpg

One of my favorite new finds in 2017 is a gluten-free rice porridge from Marks & Spencer, which has recently opened some stores in Paris. I’m not gluten-intolerant, but I happened to try this porridge and LOVE the texture… I find it to be softer and creamier than traditional oat porridge. Here, I made it using soy milk and topped it with fresh fig and peach slices and a sprinkle of toasted blond sesame seeds.

IMG_8804

If you want to prepare an extra-special breakfast or brunch item (best to start the night before), try this French fruit cheesecake. This one is made with apricots, but you could use just about any fruit.

0123.jpg

One memorable breakfast was this homemade buckwheat muesli with sunflower seeds and almonds that I made following a recipe in the French cookbook Délices déshydratés. Served here with soy milk and fresh apricot. A similar recipe in English can be found here.

banana icecream

When it’s really hot out, banana ice cream makes a fantastic breakfast. The “ice cream” part makes it sound more like a dessert, but since it’s much more filling than traditional ice cream and is also just fruit, it’s ideal for the morning. To make it, simply follow these directions. Personally, I always add lemon juice too—I find that the banana/lemon combination strangely results in a cheesecake-like taste (don’t ask me why!). You can also opt to add other frozen fruit or cocoa powder, chocolate chips, etc.

IMG_8890

Another English muffin and peanut butter breakfast! This time the topping is sautéed mushrooms and red onion with a sprinkling of smoked paprika. I know this combination might sound weird to a lot of you, but I love it!

IMG_1770

This was a super yummy chia pudding with mango coulis and fresh berries that I had at a place called Superfoods & Organic Liquids (Mitte district) in Berlin. More about that trip coming soon! You can make your own chia pudding with this recipe. Chia seeds are amazingly good for you, by the way (read more about it in the recipe link).

bestSQ.jpg

Last but not least, if you’re in a French mood, try my recipe for basic sweet crêpes that you can fill with just about anything (even savory items, if you leave out the sugar). In the photo above, I served them with bergamot lemon juice and sugar.

What are your own favorite breakfasts? Are you more of a savory or sweet person? Let us know in the comments. 🙂 Until then, bon appétit!

Apple-miso turnovers

In recent months, I’ve spent less and less time on Facebook, having noticed that I was lingering too long there, focusing on trivial or not-so-positive posts to the detriment of more productive activities. But I like to pop in every once in a while since there are also cool people to meet and useful discoveries to make. The other week, mindlessly trawling the site in spite of myself, I struck gold: Elizabeth Andoh had just posted her recipes for lemon and ginger flavored miso sauces designed to go with fruit. As a big fan of sweet and salty combinations—mango with lime juice and salt, chocolate with fleur de sel, popcorn tossed with both salt and sugar—I was immediately on board. I wasted no time in making these sauces and trying them paired with figs and nectarines, the fruit available at the time. Delicious.

Soon enough, my brain began trying to work out other ways to use these sauces, and I landed upon the idea of adding flavored miso to a fruit pastry! I tried it in apple turnovers, long a homemade breakfast mainstay for me, and loved the result. I understand if that sounds strange to you, but bear with me here. The miso adds a whole new dimension to the panorama of flavors, highlighting the delicate sweetness of the fruit with the contrast of its earthy, salty umami notes. The result is also vaguely reminiscent of a cheesy taste, so you could think of it as a Japanese cheese danish. Also, remember that French woman in Pulp Fiction who enjoys a slice of cheese on her pie?

I should note that I also tried using straight up white miso to see if it would be enough on its own, but it proved too salty and harsh. In the recipe below, the lemon and sugar tame it enough that it nicely complements the apple without overshadowing it.

I adapted Andoh’s recipe somewhat, using a little less miso and a bit more sugar, but feel free to try her exact version too. For the saké, I found a small “one cup” size at my local Asian grocery store for 2 euros (see photo below). If you can’t get saké, you can substitute dry white wine.

For the crust, I used a ready-made vegan puff pastry, or flaky pastry. This is known as pâte feuilletée here in France, and it’s easy to find in an accidentally vegan version even at mainstream stores like Franprix (Herta brand) or else at organic shops. Just check the ingredients as there’s also a version made with butter. In North America, you can look for this one by Pepperidge Farm. Or, if you’re inclined, you can make your own. If puff pastry is impossible to find or too daunting to make, you can use regular pie crust dough (pâte brisée in France). It just won’t be quite as light or flaky.

Note that puff pastry is not the same thing as filo/phyllo dough. You could try that too if you’re experienced at using this kind of dough, but the results may not be quite the same as what you see here.

There are two ways to shape the turnovers: cutting the pastry dough into four triangles and folding the corners inward to form a sort of square parcel (as I have done here), or cutting the pastry into circles and folding them in half to make the traditional turnover shape. For this, you can trace circles onto the dough with an overturned bowl or use a pastry mold. With this approach, some scraps of dough will be left over, but you can press them together for enough dough to make one more turnover.

For greatest efficiency, I recommend preparing the miso sauce the day before. Then all you’ll have to do in the morning is chop up an apple, take the dough out of the fridge and put everything together.

Sweet lemony miso sauce

Makes about ¼ cup sauce

¼ cup shiro miso (white miso) paste
1 tablespoon saké or dry white wine
3 teaspoons granulated sugar, or more to taste
1 tablespoon water
1 teaspoon freshly grated lemon zest

miso sake

The miso and saké that I used. When buying the miso, check the ingredients to be sure it isn’t the kind with added bonito (fish) flakes. That wouldn’t be the nicest thing in a sweet pastry!

IMG_2727 x

Combine the miso, saké and sugar in a small saucepan. Before placing over heat, stir the ingredients until thoroughly mixed. Incorporate the water and half of the lemon zest. Cook over low to medium heat for a few minutes, stirring constantly, until the mixture is glossy and you can see the bottom of the pan after scraping the spatula across it.

IMG_2729 x

Add the remaining lemon zest, stir to incorporate, and taste the mixture. Add more sugar if you like, but don’t worry too much about the saltiness because you’ll be using only a small amount of it, and when the flavors of the apple, lemon and pastry come together, everything gets balanced out. Also remember that you can always add more powdered sugar to the baked pastry at the end if need be.

If the sauce seems too thick, you can add another tiny bit of water. Ideally, you want it to have the consistency of ketchup.

Remove from heat and allow to cool. If not using right away in the turnovers, cover tightly and store in the refrigerator (will keep for 3-4 weeks).

Apple-miso turnovers

Makes 4 turnovers

1 puff pastry dough, 12 in. (32 cm) in diameter (purchased or homemade)
1 medium-sized tart apple (I used Granny Smith)
A few teaspoons all-purpose or whole-wheat flour
A few squeezes lemon juice
1 teaspoon granulated sugar
A few teaspoons powdered sugar (icing sugar)

Begin by preheating your oven to 350°F (180°C).

IMG_3342 xIMG_3344 x

Chop your apple into small cubes (cut into thin slices, then again crossways to dice).

IMG_3347 x

Transfer to a small bowl. Add a few teaspoons of flour and a teaspoon of granulated sugar to the mix until the apple is uniformly coated. The flour helps the apple stick together and become more of a substantial filling.

IMG_3348 x

Add a few squeezes of fresh lemon juice to the mixture (it adds tartness and keeps the apple from browning) and stir to combine.

IMG_3353 x.JPG

Cut your pastry into four equal parts by running a butter knife gently down and across it. Note: if you have made your own pastry, be sure to roll it out thin enough.

IMG_3354 xIMG_3355 x

Spread a teaspoon or so of the sweet lemony sauce across each section of pastry. The amount you use will depend on how adventurous you feel or how much you like miso. You can also experiment by using more sauce in some of the turnovers and less (or none) in others, to compare. If you do this, try to mark them in some way so you remember which ones are which after they come out of the oven.

If any of the miso sauce remains, use it as a dip for whatever fruit you happen to have on hand.

IMG_3356 x

Now deposit a few spoonfuls of the diced apple on the center of the prepared pastry section. Be careful not to use too much apple, as you might have to stretch the dough to cover it and this could cause the pastry to break.

IMG_3357 x

Fold the side points in toward the center.

IMG_3358 x

Fold the bottom edge upward.

IMG_3359 x

Fold the top point downward.

IMG_3360 x

Press down on all the edges to seal so the filling doesn’t escape as the turnover bakes. I usually use the tines of a fork for this. It also results in a nice pattern, although with flaky crust the pattern doesn’t always remain after baking.

IMG_3361 xIMG_3362 x

Cut a few slits somewhere on the top of the turnover to allow hot air to escape during the baking.

IMG_3365 x

Your turnovers are ready to go in the oven! Bake at 350°F (180°C) for about 20 minutes, until the tops are golden brown.

IMG_3371 x

They’ll look kind of like this when they’re done.

IMG_3374 x

I like to decorate the tops with a bit of powdered sugar (icing sugar) sifted over the top (do this while the turnovers are still warm).

IMG_3383 x.JPG

Allow to cool a bit, but not too long—they’re yummiest when warm! The ones you save for later can be popped into the oven for a few minutes at the same temperature (350°F/180°C) to warm them up before serving.

IMG_3390 x

Brew yourself some coffee or tea and enjoy!

IMG_3393 x

Yum!

I hope you love these turnovers as much as I did. Let me know in the comments if you try them!

Variations: Use any other fruit that happens to be in season and seems likely to go well with the miso sauce (pear or persimmon in the winter, peach or nectarine in the summer). Experiment with the gingery red miso sauce too. Decorate the tops of the pastries with slivered almonds (brush a bit of apricot jam on top first, then apply the almond slivers, all before baking).

French fruit cheesecake

Here’s a light dessert for the springtime—a vegan version of gâteau au fromage blanc, a traditional French recipe. Fromage blanc (literally “white cheese”) is a soft cheese that we don’t have in the US, so it’s hard to describe, but it’s said to be something between sour cream and cream cheese. The soft texture of silken tofu, with some structure from blended cashews, recreates this consistency for a 100% plant-based version. Lemon zest and juice add to the tartness of the fromage blanc, while the vanilla and almond extracts balance the overall flavor.

This crustless cheesecake is sometimes made with fruit (cherries, raspberries, apple, pear or stonefruit). Here, I have used canned apricots.

I used a springform cheesecake mold that measures 8 in. (20 cm) in diameter, and the cake was 1 in. (2.5 cm) high. A larger mold could be used, for a lower cake, or a smaller mold for a higher cake.

French fruit cheesecake

Ingredients

  • 14 oz (400 g) silken tofu
  • 1 cup (125 g) raw cashews, soaked for at least 2 hours
  • zest of one lemon (about 1 tablespoon, loosely filled)
  • juice of one lemon (about 3½ tablespoons)
  • 6 tablespoons (55 g) arrowroot powder or cornstarch
  • 6 tablespoons agave syrup, rice syrup or maple syrup
  • 3 teaspoons vanilla extract
  • ½ teaspoon almond extract
  • 14 oz (410 g) can apricots (8 oz/235 g after draining), or other fruit

Equipment needed: food processor or high-power blender, springform cake mold or pie dish

FullSizeRender

The first thing to do is begin soaking your cashews—at least two hours before you plan to start making the cake. If you have a high-power blender or food processor, the soaking time can be shorter.

IMG_8289

When the cashews have finished soaking, zest your lemon and then juice it. Be sure to zest it before cutting it open!

IMG_8304

Drain and rinse the cashews, then blend them in your food processor/blender together with the lemon zest and juice until smooth. Add the silken tofu and blend until it is fully incorporated.

IMG_8305

Add the remaining ingredients (arrowroot powder, agave syrup, vanilla and almond extracts) and combine well, either in the food processor/blender or whisking in a bowl.

IMG_8313

To keep the cake from sticking to the cake pan, cut a circle of baking paper to fit into the bottom.

IMG_8315

Spread a bit of vegetable oil on the bottom of the pan to get the baking paper to stick.

IMG_8317

Fill the pan with the batter.

IMG_8321IMG_8323

Add the apricot halves, cut side down, pressing down gently to partially submerge. Avoid getting batter onto the exposed part of the fruit.

IMG_8330

Bake at 347°F (175°C) for 40 minutes. It will look something something like this, with a solid, dry surface and a golden-brown color around the edges.

IMG_8331

if you’d like to brown the top a bit more, move the cake to the top-most oven rack and broil for about 3 minutes—but stay close to the oven and check every minute or so to avoid over-browning. Given my oven’s small size, I did not increase the temperature for the broiling step, but if you have a standard-size oven you might need to.

Allow the cake to cool fully before unmolding. You will notice that the height reduces as the cake settles. Gently slide a knife with a thin blade around the edges before releasing the spring mold. To remove the cake from the metal cake bottom, first gently slide a thin spatula around the edges between the cake bottom and the paper, then using another spatula, cake server or flat, wide knife (or similar—I used a long wooden crêpe flipper) on the other side, carefully lift the cake from the bottom and transfer to a serving plate.

IMG_8347IMG_8463

IMG_8506b

When slicing the cake, be sure to remove the paper from the bottom.

IMG_8522b

IMG_8524IMG_8578

new01b

If you have some powdered sugar, you can dust the top with it for a pretty effect. Do this just before serving as the sugar tends to melt into the top after a little while.

new05b

supervisor

Finally, please enjoy this behind-the-scenes shot of Sésame supervising the photo shoot. 🙂

Variations: Use a combination of fruits in different colors for a range of flavors and a more colorful appearance. Serve with a fruit sauce and/or whipped coconut cream.

Basic sweet crêpes

Every year on February 2nd, while people in the US and Canada are worrying about groundhogs, people in France celebrate Candlemas, mainly (these days) by eating crêpes. That sounds like a more worthwhile endeavor to me!

La Chandeleur, or la fête des chandelles is celebrated at church with special services, but in the family home, candles are lit and people determine the luck they will have over the coming year by attempting to flip a crêpe in a frying pan (without a spatula!) while holding a coin in their other hand. If it lands back in the pan correctly, good things will come their way over the next 12 months. I’m not sure, in reality, how many people still engage in this crêpe-flipping tradition, but the crêpe-eating part has been confirmed! Candlemas is also the last feast day of the Christmas cycle, and if you had a manger scene up as part of your decorations, Candlemas is when you’re supposed to finally put it away. I suspect this may also apply to my bouquet of pine branches, which may still (ahem) be in a vase on my table…

And so, in honor of La Chandeleur (coming up in just a few days!), I bring you an easy plant-based crêpe recipe, translated and adapted from this French one.

I happen to own an electric crêpe-maker, which is VERY useful anytime you want to make pancakes of any kind, as it automatically heats to the perfect temperature for that sort of thing, reducing the risk of burning (other electric crêpe-makers may have different settings, however). It came with two essential wooden utensils: a batter-spreader and a spatula or crêpe-flipper. If you’ve ever had a crêpe made at one of those street stands in France, you may have seen these utensils before. My crêpe-maker is second-hand, and judging from the harvest-gold color of its base, may have been made in the 70s or early 80s. If so, planned obsolescence was not factored into its design, as it’s still going strong. You can still get similar devices in France online or at department stores (ask to see the crêpières), and the wooden utensils can be purchased separately too.

My favorite way to eat crêpes is with a little lemon juice and sugar. Right now, bergamots (a citrus fruit similar to a lemon, but darker in color and sweeter) are in season—I picked some up today from my local farmers’ market, the Marché Bio des Batignolles. If you’ve never tried them before, bergamots are quite the experience. They have an indescribable scent that you will recognize immediately if you’re a fan of Earl Grey tea, which is made with essential oil of bergamot. For a touch of sweetness, I added a few sprinkles of coconut sugar, but you can use any sugar you like, or even a liquid sweetener such as maple syrup.

Crêpes are most often served as a dessert but also make for a nice breakfast item if you have servants and own a smoking jacket. Any extras should be packed away in an airtight container (rolled up or folded into fourths) or on a plate covered with plastic wrap.

Basic sweet crêpes

Makes 10-11 crêpes

Ingredients

  • 2 cups (250 g) flour (T65 type in France)
  • 3 tablespoons (30 g) cornstarch
  • 2 tablespoons raw sugar
  • pinch salt
  • 2 cups plus 2 tablespoons (500 ml) non-dairy milk
  • 2 teaspoons vanilla extract or a packet of vanilla sugar
  • 2 tablespoons neutral-tasting oil such as canola

Crêpe garnishes (see also the variations at the end of this post)

  • 1 or 2 lemons (bergamot or regular)
  • several tablespoons of sugar (coconut, raw or other)

Equipment needed: large bowl, whisk, ladle, spatula for flipping crêpes, electric crêpe-maker or wide and shallow frying pan

img_5504bimg_5508b

Combine all the dry ingredients and mix well with the whisk to incorporate.

img_5512b

Add the non-dairy milk, vanilla and oil and incorporate briefly with your whisk, stirring only long enough for it to reach a smooth consistency. Be careful not to overmix. Set the bowl aside and allow the batter to sit for 45-50 minutes, but (IMPORTANT) no longer than that or it will get too thick and you won’t be able to achieve the thin, somewhat elastic result you’re going for.

img_5523b

When the resting time is up and your crêpe-maker or frying pan is hot enough, pour one ladleful of batter onto the surface (if your frying pan doesn’t have a non-stick surface, you may need a splash of oil). Working quickly, spread the batter, either by hand with a wooden spreader on an electric crêpemaker or, if you’re using a frying pan, by rotating the pan evenly until the batter covers most of its bottom. I sadly could not get a photo of this step, since I was making these on my own, but it looks a bit like this, though on a smaller scale. Aim for the same thickness throughout the crêpe (avoid having thinner edges, which will become too brown and crisp).

img_5535b

Once the edges of the crêpe begin to look firm (about 60 seconds with my crêpe maker), gently slide your wooden crêpe turner or spatula underneath it. If the underside is slightly browned, flip it over. Otherwise, give it a bit more time and check again.

img_5536b

Allow the crêpe to cook for around 30 seconds on the other side (it will need less time than the first side). Slide the crêpe off the heating surface with your flipper or spatula and onto a plate, and repeat until the batter is gone. You will have 10 or 11 crêpes, depending on the size. Consider placing a wide saucepan lid on top of the stack to keep them warm as you work.

img_5562b

Squeeze some lemon juice on top of the crêpe (the less browned side) and then sprinkle some sugar over that. In the bottom left corner of this photo, you can see one regular lemon next to two bergamots, for comparison.

img_5586b

Next, either fold the crêpes into fourths as shown above, or roll them up into a long cigar shape. If you are adding ice cream or whipped cream, or other similarly voluminous toppings, you may wish to simply fold the left and right edges of the crêpe together (and eat it with a fork).

img_5590

Other yummy things that are nice on crêpes are chestnut spread (called “cream” on this label, but it is always dairy-free) and chocolate spreads (dark chocolate in the center and a chocolate-hazelnut version on the right). The chestnut and dark chocolate spreads are accidentally-vegan items and come from Franprix, while the Nuté+ is a vegan version of Nutella and can be found at most organic shops in France. Try chestnut and chocolate together on the same crêpe—it’s a great combination!

More variations: The possibilities are endless. Consider banana slices (might as well, if you’re already using chocolate!), applesauce, vegan apple honey, cubed fresh mango or pear, berries, white almond butter, jam, poppyseed paste, fresh fig with toasted walnuts. Top with some coconut whipped cream if you want to be fancy.

Chocolate mendiants

It’s easy to get overly ambitious around Christmastime and to plan a number of grand meals and complicated desserts, only to wake up one day and realize it’s already the 23rd or 24th and you don’t have the right ingredients or enough time to make everything you wanted. This is especially likely to happen, for some reason, with dishes that you hope to bring to holiday parties, escalating your anxiety levels further. But never fear, your favorite blogger is here to the rescue! Today I bring you a very easy-to-make traditional French confectionery creation that will nevertheless impress just about everyone. And since the toppings can vary greatly, you might already have everything you need in your kitchen cupboards.

These little Yuletide delicacies hail from the south of France and the fruits and nuts traditionally used represent the colors of the robes worn by the friars in four mendicant orders during the Middle Ages. These are gray (raisins) for the Dominicans, brown (hazelnuts) for the Augustinians, white (almonds cut in half) for the Caramelites and purple (fig or cranberry) for the Franciscans. As these friars subsisted on charitable offerings, they were referred to as mendiants (beggars), and the confections took on the same name. These items are also among the 13 desserts served at the end of the traditional Christmas meal in Provence.

Today, many types and combinations of nuts and fruits are used, so feel free to use whatever you have on hand! I used walnuts, peanuts, pistachios, cranberries, physalis and pineapple.

Chocolate mendiants

Makes 12 to 15 mendiants

Ingredients

  • about 6 oz (180 g) dark chocolate in bar form (or chocolate chips)
  • toasted nuts (walnuts, peanuts, almonds, pistachios, macadamia, etc.)
  • dried fruit (cranberries, cherries, raisins, apricot, citrus segments, etc.)
  • other items such as pumpkin seeds, candied ginger, white chocolate chips, toasted coconut chips, colorful Christmas sprinkles, fleur de sel, gold leaf

Equipment needed: double-boiler or metal mixing bowl plus saucepan, parchment or waxed paper

img_4111_ed

Begin by assembling all the fruits and nuts you will use, so that you’re ready once the chocolate has melted.

img_4097_ed

Break or chop your chocolate bar into more or less evenly sized pieces.

img_4103_ed

Next, heat some water in a medium-sized saucepan and place a metal bowl on top of it (or a second, smaller saucepan for a double-boiler). Be sure that the water in the saucepan does not touch the bottom of the bowl or second saucepan. Place the chopped chocolate in it and heat, stirring occasionally with a heat-proof spatula.

img_4106_ed

Once all of the chocolate has melted, turn off the heat but keep the bowl on top of the saucepan full of hot water.

img_4113

Line a tray with parchment paper and, using a teaspoon (the kind you use to stir your coffee, not the measuring kind), form small, round disks. After creating them, go back and add a bit more on the top of each one to ensure that they are thick enough. Make only six at a time so that you have time to add all the toppings before the chocolate firms.

img_4114

Add your toppings. I like to start with the larger items and then add the other ones around them.

img_4115img_4117

Once you’ve finished the first batch, put the tray in the fridge and continue making mendiants until you have used up the rest of your chocolate. The mendiants will be set after an hour or two of chilling (allow two to three hours to be on the safe side).

img_4179_ed

Serve your mendiants on a platter at a party, or box them up as a gift!

img_4193_ed

These mendiants were my Christmas gift to the concierge of my building, who brings our mail to our doors and takes time out of her morning to give Sésame (who is in love with her) a thorough scratching and petting on the days when my mail includes a package. This year, I included some photos of the furry little guy, which she was delighted to receive (they now adorn her refrigerator door, I was told). 🙂

Variations: change things up with this white chocolate version!