Black sesame turnovers

Today, in honor of little Sésame’s sixth birthday, I’ve prepared another black sesame recipe for you! (Last year it was a striped sesame cake). But it’s actually two recipes in one – first, we’ll be making a Japanese sweet white bean paste (shiro an) that can be used in many ways, and then adding some black sesame paste to it (making kuro goma an) and using it as a turnover filling.

Both parts of this recipe are fairly straightforward and easy, but as making the sweet white bean paste takes quite a while, I’m not putting it in the “easy recipes” category. You need to start soaking the beans the day before making the paste, and then the beans need to cook for two hours. But once you have the paste ready, the rest goes pretty fast.

Sweet white bean paste (shiro an)

Makes about 2 cups of sweet white bean paste.

  • 1 cup (175 g) dry white beans
  • 3/4 cup + 2 Tbsp white sugar
  • 1/2 teaspoon salt

Equipment needed: large heavy stockpot, food processor or high-power blender.

Place the dry beans in a bowl and cover with water. Let soak for 12 hours, refilling the water if needed. The photo above shows the beans at the end of the soaking period.

Transfer the beans to your stockpot, add enough water to cover them, and bring to a boil over medium-low heat. Once the water comes to a boil, reduce the heat to low. Cover the stockpot and simmer the beans for 1.5 to 2 hours (set a timer so you don’t forget about them!), checking occasionally to make sure the water level is still high enough that the beans cannot burn, and adding more water if necessary. Once the beans are tender enough to squash between your thumb and pinky finger, they’re ready.

Drain the beans, reserving the cooking liquid.

Transfer to a food processor and purée, adding a bit of the cooking liquid if it’s too dry. At the end it’ll look kind of like this.

Transfer back to the stockpot over low heat and add the sugar and salt, stirring constantly. The sugar will begin dissolving immediately.

After the sugar has dissolved, the mixture will be a bit more liquidy and look glossy. Continue to heat, stirring constantly, until the mixture has become dry enough that you can draw a line down the center of the stockpot bottom with a spatula and it doesn’t fill in.

Black sesame sweet bean paste (kuro goma an)

Makes 1 cup of black sesame sweet bean paste.

Now you can take your white bean paste and flavor it with black sesame. I chose to keep half of the paste unflavored, and make half of it into a black sesame version. The amounts below are therefore for half of the above mixture (1 cup).

  • 1 cup sweet white bean paste
  • 3 heaping tablespoons black sesame paste
  • 1/4 teaspoon vanilla extract (optional, but nice)

In a food processor, combine the prepared sweet white bean paste, the black sesame paste and (if desired) the vanilla extract. Vanilla is not included in the traditional Japanese preparation, but I find it goes so well with sesame!

If you’re opening your jar of black sesame paste for the first time and there’s a layer of oil on top as you can see in this photo, stir it with a butter knife to incorporate the oil and achieve a more homogenous texture before you add any to the white bean paste.

Mix everything up and it will look something like this. If it seems too liquidy, you can put it back in the stockpot and heat it over medium-low, stirring constantly, until it’s a bit drier.

At this point, you can just transfer the paste to a covered container (a jar or tupperware container) and store in the fridge to use later as a spread, or to add to yogurt (see photo at the end of this post). It can also make a nice filling/frosting for a layer cake. If you’d like to use it as a turnover filling, follow the instructions below.

Black sesame turnovers

Makes 4 turnovers.

  • 1 prepared flaky pastry crust
  • 1 cup black sesame sweet bean paste (some may be left over)

First, preheat your oven to 350°F (180°C).

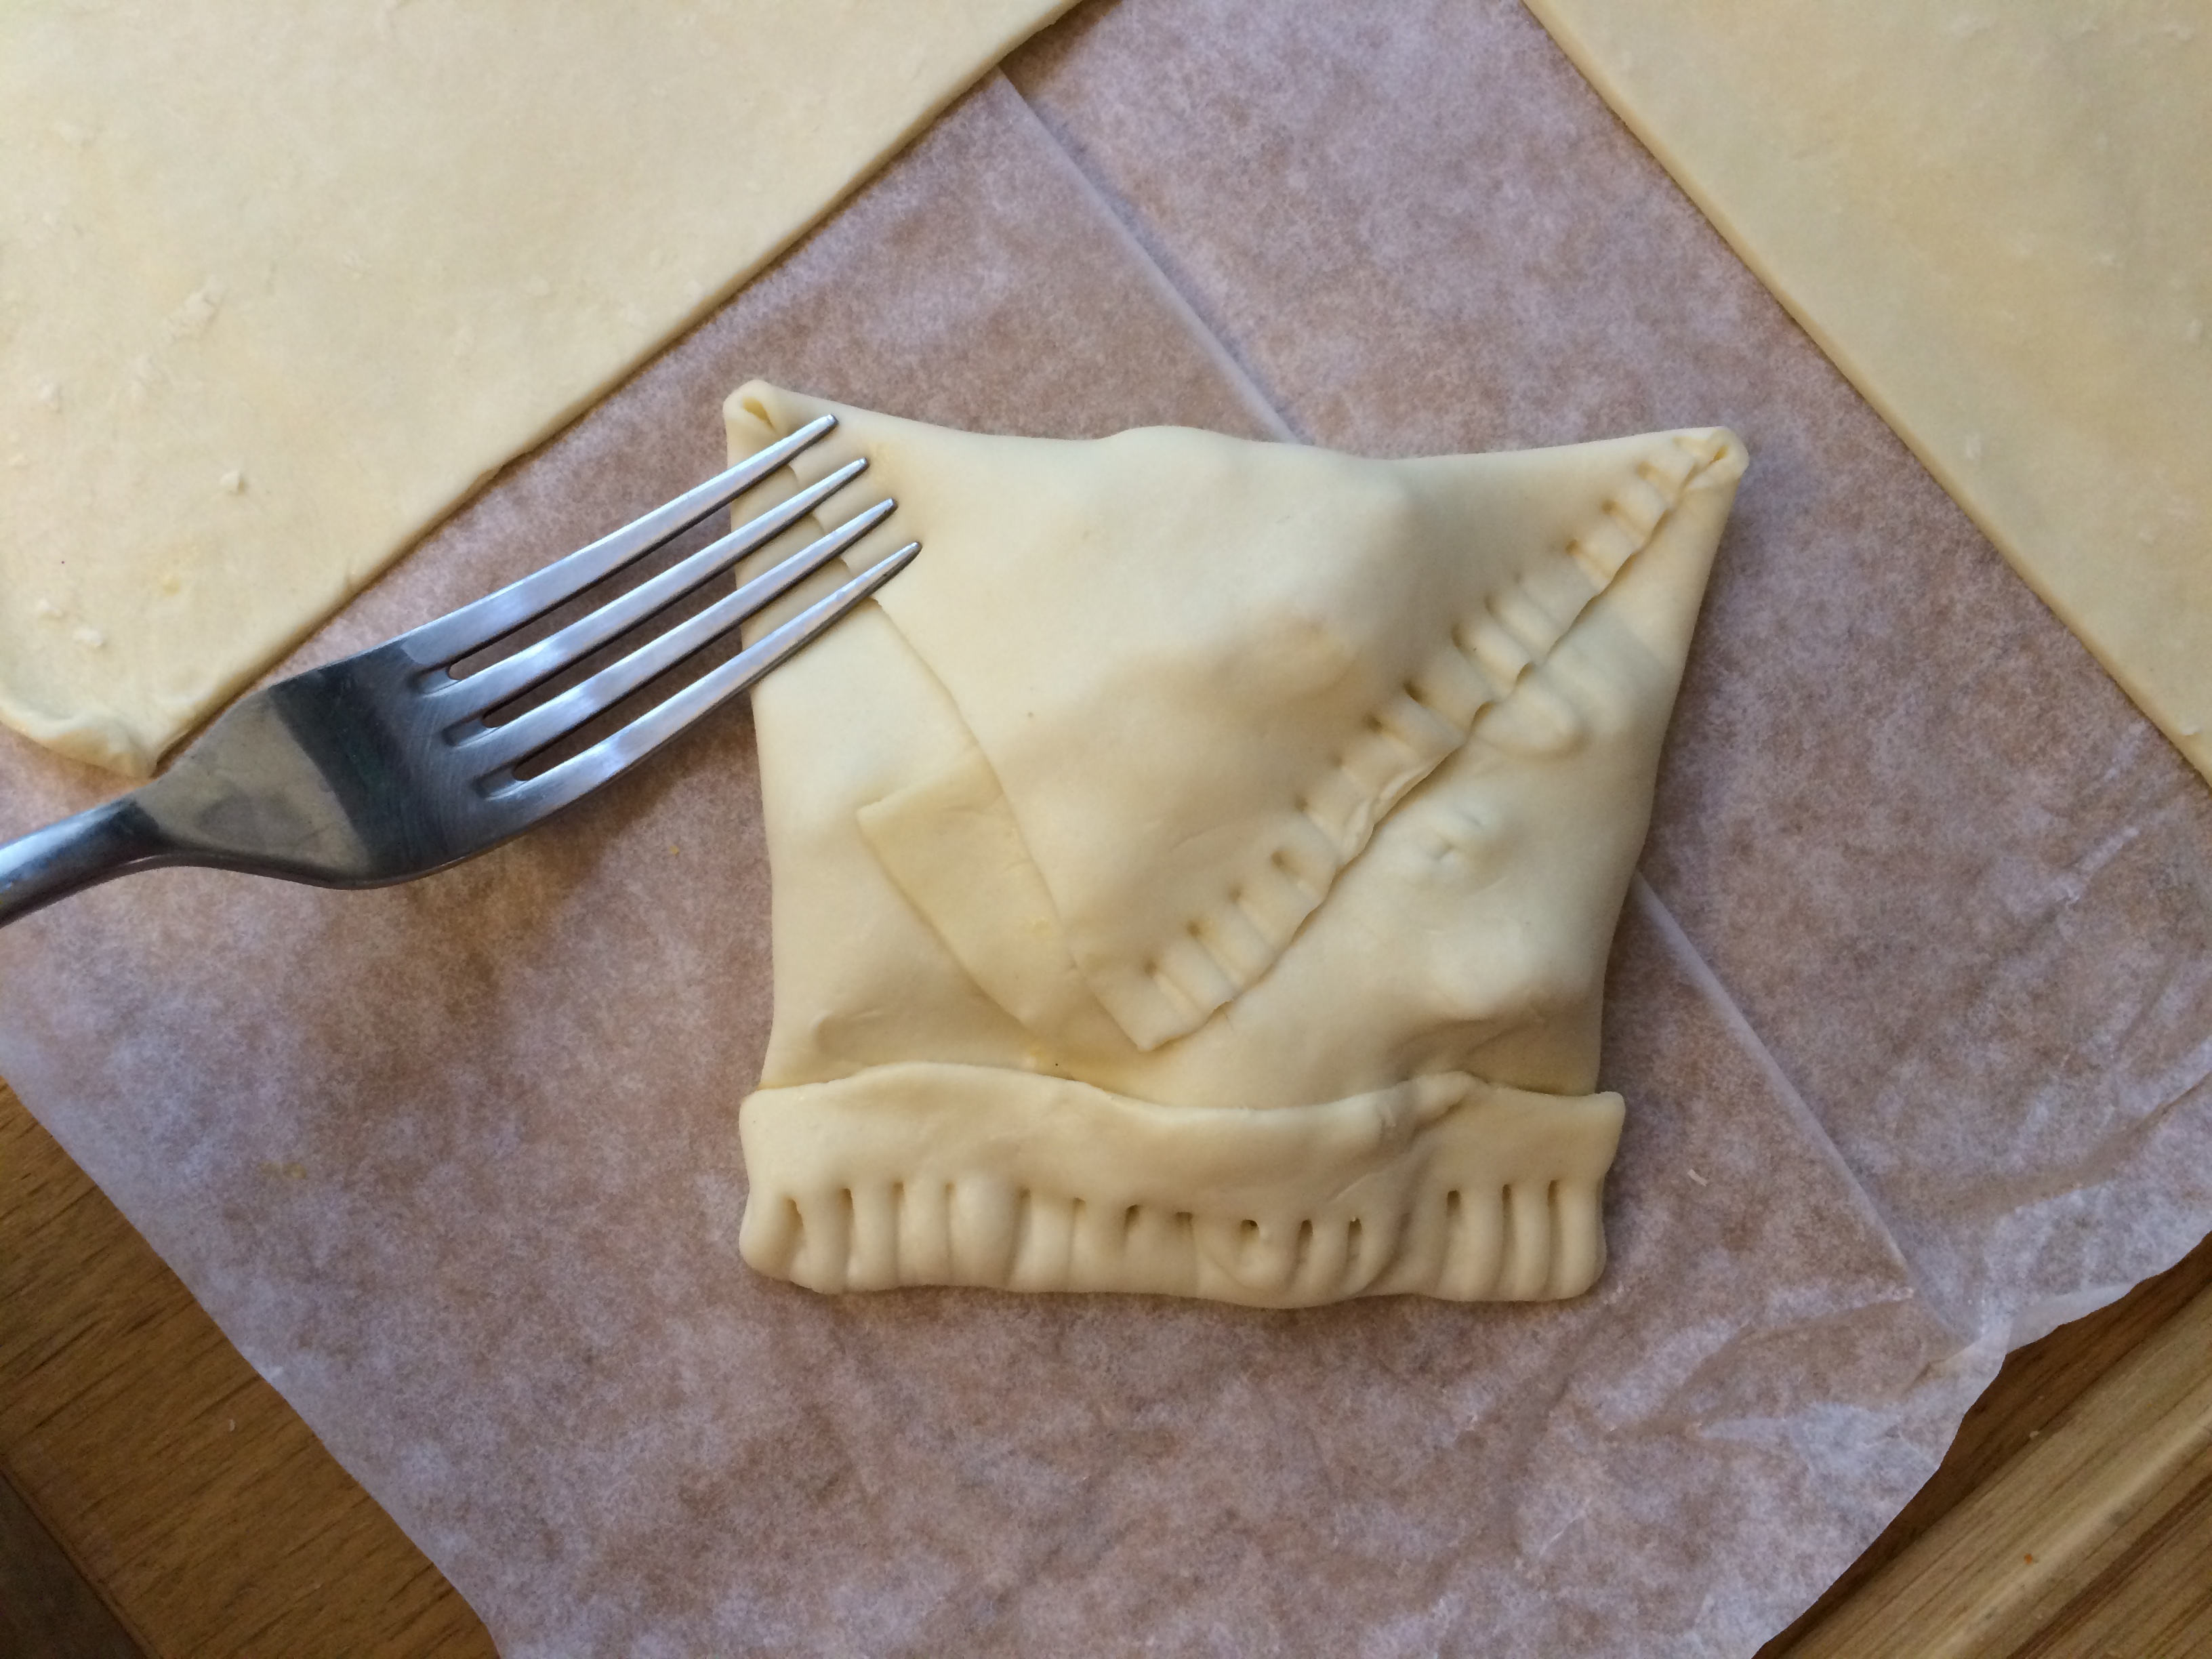
Cut out circle shapes from the flaky pastry crust (in these photos I’m making just two turnovers, but the ingredient quantities listed above will make four). Place about two heaping tablespoons of the black sesame sweet bean paste on half of each circle, spreading it out to near the edges but leaving a margin.

Fold each circle over once to create a crescent shape.

Press down firmly on the edges to seal the dough.

Score the tops of the turnovers with a sharp knife to allow air to escape during the baking process. Place in the oven for about 15 minutes. As the filling is already rather dry, the baking tends to go faster than with fruit-filled turnovers.

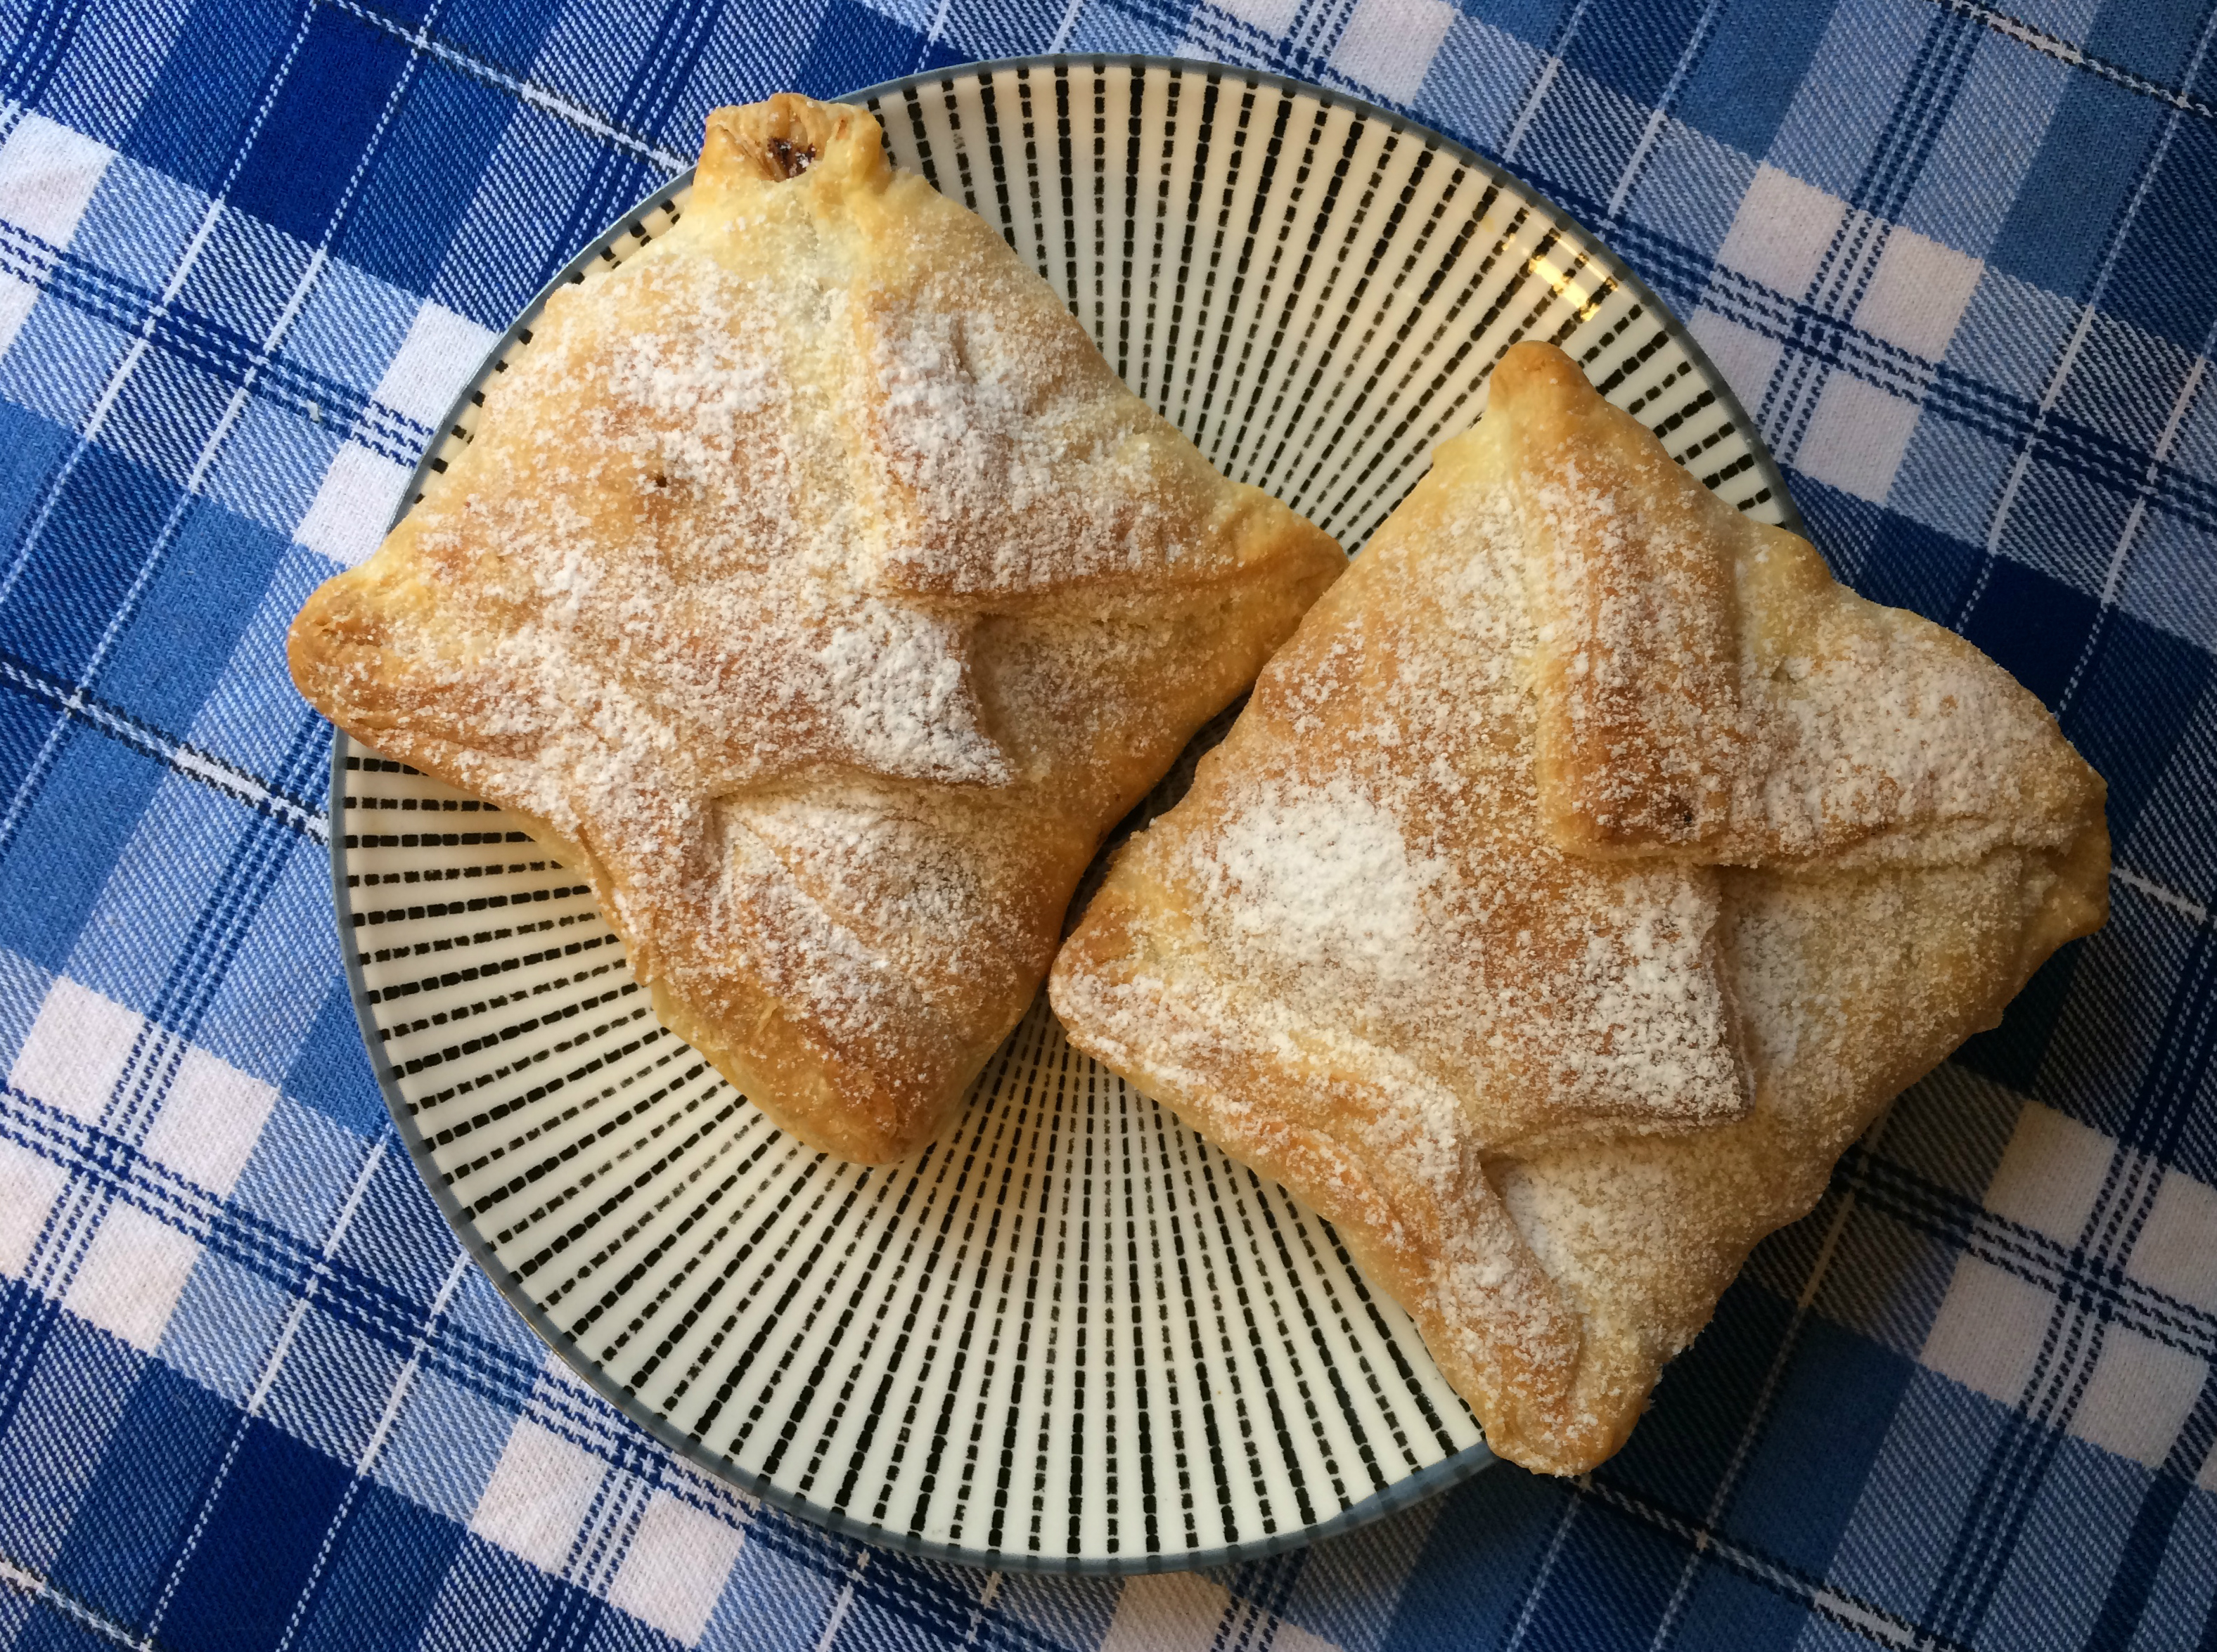
If you like, you can dust the tops of the turnovers with a bit of powdered sugar.

Mine got quite puffy and lost their seal, but once they cooled a bit they de-puffed.

So yummy! They’re great with green tea.

Enjoy!

Another way to enjoy the sweet bean paste is in a dish with some plain or vanilla yogurt, fruit and a sprinkling of gomasio.

It’s really nice on bread, too!

Variations: try flavoring the sweet white bean paste with other things: matcha, lemon (zest and a bit of juice) or pumpkin purée.

The plate used in the turnover photos is the “Chysanthemum” in unglazed white/gray by 1616 Arita in Aritayaki, Japan, via Brutal Ceramics.

Learning Japanese in France

In the fall of 2017, this introvert did something bold and adventurous.

I’d been living in France for eight years and things were somewhat stagnant. Everything felt like the same old same old… I’d been in the same city longer than any other since childhood, living in the same apartment for years, and my work was fairly routine and predictable too. I’d been speaking French for decades and had apparently already reached my personal ceiling in it. A new challenge seemed called for, so I took a long-held albeit vague ambition down from the shelf and registered for a year-long Japanese class in the continuing education program offered by the City of Paris.

photo_2019-07-01_14-45-50
Our textbook, whose title means something like “You can learn Japanese!” or, more realistically, “Japanese is possible.”

Vague, because I wasn’t at all certain I would actually be able to learn the language. It seemed so very complex and bewildering, and I’d already heard that it’s considered the most difficult language for English native speakers to learn, meriting a category of its own (one level up from the “super-hard languages”) in the Foreign Service Institute’s ranking of commonly taught languages. So rather than setting out confidently to conquer this new language, I planned to just dip a toe into Japanese for a closer look at how it worked. I figured I’d learn at least a few words and maybe some basic grammar if I made it through the year. I didn’t expect much more than that, but also didn’t dismiss the possibility (wild hope?) that I would turn out to have some natural knack for the language.

So while I wasn’t stressed about Japanese itself, I was a bit nervous about jumping into a class full of French people. I felt I would somehow be at a disadvantage and worried that I might not make friends. I would be a double gaijin (foreigner) of sorts. But I plunged ahead nonetheless – this is where the “bold and adventurous” part came in!

Fast-forward to the present. Last week, I finished my second year of Japanese in the program and got decent grades. I’ll probably register for the third year this fall. So how did it go? Just how tough was it, and how did I manage to get this far? How did the other students react to the strange American in their midst?

I’ll get to that in a bit. But first…

Why Japanese?

kana chartsMaybe it’s the look of the language that attracted me – the beautiful loopy hiragana, the slanty futuristic katakana and the forbidding kanji, which look like little houses and dense thornbushes. It seemed like an enigma waiting to be unraveled. But my interest in the country and culture was probably piqued in childhood.

My earliest brush with Japan was at age six when my dad’s company sent him on a business trip to Tokyo. The situation was explained to me, but I could barely wrap my head around the idea of him flying such a long distance away. When I looked at Japan on a globe, it seemed just as remote as the moon.

I believe I was somewhat in awe of him when he returned, bearing all manner of strange and wonderful gifts for my mom, my little brother and me. Among them, I clearly remember a large spiral-bound booklet of flexible chalkboard pages made of rough green material and printed with mysterious roundish characters that you were supposed to trace and copy in chalk. It came with a thick yellow foam eraser of a kind I’d never seen before. My dad explained that the booklet was designed for Japanese children to practice writing their letters in. I can still recall the character あ (hiragana for the sound “a”) being one of them.

photo_2019-07-04_08-54-05He also brought my mom some women’s fashion magazines that I would page through time and again, captivated by the inscrutable writing and above all the fact that they were read from “back” to “front”. And there was a Japanese baby doll for me – she had very white skin, was dressed in a red kimono and there was a pink satin cushion for her to sit on.

My dad had his photos developed into slides and we sat in the living room watching them on the projector screen, listening to his stories as we saw him standing in various squares in front of temples or near Mt. Fuji, surrounded by Japanese business partners and pigeons (see some of his photos below). He told us about eating octopus tentacles and being served a luxurious dish of strawberries with cream. He’d brought home some miniature tubes of toothpaste from his hotel room and these delighted me because the caps were really tiny too, unlike the mini toothpaste tubes in the US. They soon became accessories for my dolls.

These early experiences must have planted a seed of some kind. Later, at university, I had a series of Korean and Japanese roommates and friends. I absorbed a few expressions in those languages without really trying to and began reading some Japanese literature in translation (Banana Yoshimoto was a favorite). In those days, I was interested in foreign languages of all kinds and took a few semesters of Arabic (that’s a story for another day) while continuing on with French, eventually earning my Bachelor’s in linguistics.

In the years after that, I continued to meet Japanese people and be exposed to more and more Japanese literature and culture. I followed the misadventures of An Englishman in Osaka. I acquired Elizabeth Andoh’s excellent cookbook Kansha and tried my hand at many of her shōjin ryōri (Buddhist “temple cooking” or vegan) recipes. Every dorayaki I made, every Haruki Murakami novel I read and every Ozu film I saw was like another knock at the door, another invitation to try learning the language.

Rachel and Jun
Rachel and Jun

A surprising shift in my attitude to learning the language happened in 2016 when I discovered Rachel and Jun on YouTube. Somehow, seeing Rachel – also American, also female – speaking Japanese made me feel that if she could do it, I surely could too. Or that I at least had a reasonable hope. It may seem strange, but prior to that, most of the people I’d known who had learned Japanese were men, and I realized that on some subconscious although illogical level I’d felt that it wasn’t open to me. I would have to look at statistics on this, if they exist, but I have a sense that in the US it is indeed a language more men try to learn than women. In my classes in France, there have been equal numbers of women and men.

So although Japanese was daunting on many levels, and I had a hard time imagining myself understanding and speaking it, I just had to try!

Learning Japanese in French

Since these courses take place in Paris, they are of course taught in French. Trying to learn Japanese in another foreign language may seem like asking for trouble – I myself wondered if that would complicate things – but now after two years I can say that it hasn’t really made much difference.

photo_2019-07-01_14-45-49
Some notes I took early in my first year.

My French is solid enough that the instructors’ explanations have always been clear to me. The main effect of my being a foreigner is probably that I’m more reluctant to ask a question in class… but then I’m an introvert already.

Something kind of interesting does happen when I take notes in class. As the instructor speaks (in French), my page becomes a mishmash of French and English. In some cases, I write exactly what’s being said in French while at other moments, sometimes in the same sentence, my brain sends the signal down to my hand directly in English without any special intention on my part. This reflex may also be due to my being a professional translator, but I wasn’t the only one doing it – another foreign student who sat near me (and was not a translator) confessed that she also wrote her notes partly in French and partly in her language. The jumble of languages doesn’t pose any particular problem except when I realize I’m doing it and hesitate for a moment.

Occasionally, when I speak Japanese in class and then revert “back” to add something I can’t yet say in that language, I accidentally jump into English and have to start over again in French. This never happens when I’m speaking just French, so I assume the switch out of Japanese triggers a “reset” function of some kind and my system automatically reboots in English.

Apart from these small details, when it came to my potential compared to that of the French students, the playing field was leveled by the fact that this was a new and difficult language for all of us. I may even have had an advantage in a few respects: 1. the most common rōmaji (Romanized Japanese) transliteration system is based on English sound/spelling correspondences and is incorrect if pronounced according to French rules, 2. a good number of “Japanese” words are English borrowings which, while sometimes hard to recognize, can be traced back to their origin more easily by English native speakers than others (sutoraiki/strike, aisu/ice cream) and 3. I could already pronounce the “h” sound, which is usually troublesome for French native speakers. But this hasn’t put me at the head of the class or anything. Some of my classmates have worked at it harder than me and/or have lived in Japan or have a Japanese partner and get to practice all the time.

Is Japanese really that hard?

It sure is – the Foreign Service Institute was right. Or rather, let’s say it has many complex features. The grammar is quite different than what we’re used to, so that takes time become familiar with, and then there are unusual things such as special “counter” words that come after numbers when expressing a number of people or objects depending on their shape, size and other details. One counter word is used for pieces of paper (“flat thing” category), another for umbrellas (“long and thin thing” category) and still another for housecats (“small animal” category).

The writing system of course presents a host of additional challenges. You need to learn two syllabaries, the aforementioned hiragana and katakana, each of which has 46 base characters and 20+ variations. Those aren’t so bad once you’ve had enough practice with them, but they still act as a barrier, significantly slowing down the reading process for beginners compared to a language with a familiar writing system. Then there are the 2,000 kanji or Chinese characters you must eventually learn to be decently literate in Japanese (more than that exist for the ambitious). At this stage, having done two years, I’ve become familiar with a handful of the kanji just by being passively exposed to them in the textbook although I focus more on the small kana that are written above them as training wheels for foreign learners.

On the plus side, the pronunciation is a breeze and you have no gender or articles to worry about. It’s a very concise language, so a lot can often be conveyed with a just a single short expression. Sōdesuka!

But the complexities mean you do need to invest a significant amount of time between classes to studying. This, more than anything else, has been my particular challenge. I was accustomed to language-learning being easier (because I was learning easier languages, apart from Arabic that is), and sometimes didn’t put in the time I needed to, especially at times when work occupied most of my waking time. My solution was to keep going to all the classes, bumble through them (not ideal) and then catch up later. It worked, but please avoid going down this path!

Did I turn out to have a natural knack for Japanese? Definitely not! Luckily hard work is a good replacement.

Learning how to learn

It had been a while since I’d attempted a foreign language and I’d forgotten some of the tips and tricks for learning, practicing and memorizing things. And because Japanese is different in many ways from the other languages I had experience with, I had to figure out how to go about learning it.

Our textbook, Dekiru Nihongo, is full of what we need to know but at the same time maddeningly user unfriendly. It’s written only in Japanese so it can be used anywhere in the world, but this means it can’t provide any grammatical explanations for beginners. We therefore depend on what the instructor tells us to make sense of the example sentences and exercises in the book. As a result, you cannot afford to ever miss a class and supplementary materials can be very useful. I bought Everett F. Bleiler’s Basic Japanese Grammar as well as some French-language vocabulary books to help me figure things out a bit faster.

Japanese keyboard iphoneI’m also thankful that this is now the Internet age. When I began learning French back in middle school, there was no such thing, and no way to even hear French spoken by a native speaker except by going to see good ol’ Gérard Depardieu at the movies (he was in ALL the French movies in those days). Now, learning Japanese, I have a multitude of resources available to me at all times on both my computer and my phone. I quickly found the very useful online dictionary jisho.org as well as conjugation sites and YouTubers specialized in helping Japanese learners. An unexpected resource is Instagram… I activated the Japanese keyboard to be able to add hashtags like #ヴィーガン (vegan) and #猫 (cat) to my photos and discovered that when you type words in romaji or kana, the autocorrect feature suggests kanji. But then you have to make sure you’re picking the right kanji as so many words have the same sound. And to check your pronunciation, you can open up “notes” on your phone and activate the dictation feature (the little microphone next to the space bar). Say a few words and see if the right characters appear. This is also a major confidence-booster!

Double gaijin

I’m happy to report that in spite of my foreignness (which didn’t bother anyone, it turned out), I did make friends in my classes. What’s more, I wasn’t the only non-French student. There were three or four of us in each of my classes (from South Korea, Madagascar, Venezuela and Spain, plus another American), so I didn’t even stand out as much as I expected. Occasionally when something related to the US or the English language would come up in the class conversation, everyone would turn to me for my pronouncement on the topic (“What’s the English for sac à dos?” when we were trying to determine the origin of the loanword meaning “backpack”). But the people in my classes were generally friendly and kind. We still sometimes meet up to attend Japanese-related events.

And I’d say this community of fellow learners has been one of the biggest things keeping me going at times when the classes got tough. There have been many points when I was afraid I would have to give up due to falling behind, but the desire to go on to the next year along with everyone else motivated me to keep attending the classes and make time to catch up.

This is a language that would probably be hard to make consistent progress in without an exterior motivation such as a formal class. It gets painful at times, so I know if I were just trying to do it on my own I would have given up long ago.

Meeting the challenge

So the answer to my question of the beginning (Can I really learn this language?) is at this point a somewhat confident maybe! I’m only two years in and don’t know what the future may hold. But for the time being, I’m very happy to have made it as far as I have. We’ll see this fall how the next chapter in my story goes.

Cover image from Yasujirō Ozu’s Ohayō (1959).

Matcha galette des reines

If you’ve been following my blog for a while or know me in real life, you may have noticed that I love borrowing bits of different cultures and bringing them together in unexpected ways. And the culinary world is a great vehicle for this type of expression (click here to see some of my past fusion cuisine creations).

Bartolomé_Esteban_Murillo_-_Adoration_of_the_Magi_-_Google_Art_Project
Adoration of the Magi (c. 1660) by Bartolomé Esteban Murillo

Today I bring you my interpretation of a classic French dessert. The galette des rois (kings’ cake) is an institution of French culture, traditionally prepared for the feast day Epiphany, celebrated each January 6th to commemorate the visit of the Magi (also known as the Three Wise Men or Three Kings) to the Christ Child. In practice however, this dessert pops up in bakery windows all over France right at the beginning of January and stay until the end of the month.

The galette des rois is a flat flaky pastry traditionally filled with an almond paste. And like the crêpes eaten in February for Candlemas, it has its own customs. Somewhere inside the galette is a fève – in the olden days this was actually a literal fève (dry bean), but these days, little ceramic figurines are used. Whoever finds the fève in their piece becomes a king or queen, gets to wear the paper crown that comes with the galette, and is supposed to pick someone else in the party to be their queen or king. According to a 2014 survey, 68% of French families find sneaky ways to make sure the fève ends up in their child’s slice. Sparkling wine, hard cider or apple juice traditionally accompany a galette des rois.

galettedesrois.jpg
A galette des rois such as you might find at a bakery in France, supplied with paper crown.

In my version of this dessert, I’ve incorporated matcha powder for a Japanese twist. And I’m calling it galette des reines (queens’ cake) because sure, maybe the magi were kings, but queens should get their chance too. The fève I used also happens to be a little lady… in keeping with the theme, I’m imagining her as an olden-day Japanese noblewoman from a northern part of the island nation, bundled up in sakura-colored wraps against the cold.

If you live in France, you can usually find fèves at any vide-grenier (garage sale) for cheap, or from baking supplies stores. Otherwise, have a look on eBay or Etsy. There are some really cool ones out there that could double as doll-house accessories the rest of the year.

Note that matcha powder (and green tea in general) doesn’t stay fresh for long, rapidly losing its color and flavor, so it’s best to buy it just before you plan to use it and then to use up the rest fairly quickly. You can use matcha powder in a cake or cupcake recipe, add it to a smoothie, make a matcha latte from it or just prepare it with water in its most traditional form. Store any unused matcha powder, tightly sealed, in your refrigerator.

See my tips for flavor variations (basic almond, pistachio, chocolate etc.) at the end of this post.

Matcha galette des reines

Makes one 12-inch (30-cm) diameter galette

2 pre-made round flaky pastry crusts (not filo dough) – keep in fridge until last minute
3 cups + 1/4 cup (325 g) ground almonds
1/2 cup + 2 tablespoons (125 g) granulated sugar
1/3 cup (50 g) cornstarch
4 teaspoons fresh unsweetened matcha powder
3/4 cup + 1 tablespoon (200 ml) almond or soy cream
2 tablespoons soymilk or other milk
2 tablespoons neutral-flavored oil
1 teaspoon almond extract
1 to 2 tablespoons apricot jam, apple jelly or other light-colored jam/jelly (for the glaze)
1 fève (ceramic object or large dry bean)

IMG_7178.JPG
Begin by combining the dry ingredients (ground almonds, granulated sugar, cornstarch and matcha powder) in a mixing bowl. Stir thoroughly with a mixing spoon until the matcha is evenly distributed.

IMG_7190In a separate small bowl, combine the cream, milk, oil and almond extract, whisking with a fork. Add this liquid mixture to the dry mixture and stir thoroughly until you have a thick uniform paste. Taste it to check the sweetness – as matcha is fairly bitter, you may find you need a bit more sugar.

IMG_7193Preheat your oven to 350°F (180°C) and take your first pastry crust out of the fridge. Unroll it on a large surface.

IMG_7196Transfer your matcha almond paste to the center of the pastry and gently spread it out with a spatula to a uniform thickness.

IMG_7198Leave a margin around the edge, as you’ll be folding it upwards to seal the galette.

IMG_7204.JPGGently press your fève into the matcha almond paste. Choose a spot closer to the edge than the center.

IMG_7213.JPGTake your second pastry crust out of the fridge. Carefully place it atop the bottom one so that they align as closely as possible. Push the top pastry down gently around the edge of the almond paste underneath. If you want to make sure that a certain person ends up with the fève, find a way to remember where you’ve put it. 😉

IMG_7216.jpgFold the edges of the bottom and top pastries upward together and seal with the tines of a fork.

IMG_7221With a sharp knife, trace a design into the top pastry. Try to occasionally cut through the top pastry to allow steam to escape while the galette bakes, but take care not to cut through it too continuously or pieces of the top crust could break off when you slice the baked galette. You can get creative at this point and make a fancy design of your choosing (swirls, flowers, geometrical lines). Do a Google image search to see the different galette des rois designs that are out there.

IMG_7224IMG_7231IMG_7235IMG_7249Place your galette into the preheated oven (on a baking sheet, if you like, but I put mine directly on the rack as my baking sheet is too small). Bake for 25 to 30 minutes, until the top is golden brown but not too dark. Begin checking it at around 20 minutes to make sure it doesn’t get too dark.

IMG_E7255While the galette bakes, you can prepare the (optional) apricot glaze.

IMG_E7258Place 1 to 2 tablespoons of the jam in a small saucepan over medium heat with a couple tablespoons of water. Bring to a boil, then turn the heat down low and simmer for a minute or two, stirring constantly to break up the lumps. Try to remove any unbreakable lumps or bits of apricot skin.

IMG_7265When the galette is done baking, remove it from the oven and place it on a cooling rack. Brush a thin layer of the apricot glaze across the top, including the top of the edges. At first it may seem that the jam is too sticky and shiny, but once it’s dry it will be fairly dry to the touch and more matte. Remove any jam clumps that collect in the crevices of the pastry design.

IMG_7267Allow the glaze to dry (5-10 minutes) before serving. If not serving immediately, you can pop the galette in the oven again to warm it just prior to serving.

IMG_7273A design like this one, with the first line traced right down the center, makes it easy to slice up.

IMG_7405IMG_7467Hey, you found the fève! Congratulations, you’re the queen! Or king!

feature2.jpgSince you’re making your own galette, you may want to make a crown to go with it (or look for one at a costume shop). I decided to make things simple and design a kitty-sized one (toilet paper tube + aluminum foil).

IMG_7477

I hope this post inspires you to try making a galette des reines of your own! Let us know in the comments how it turned out, and tag @rd.violet if you post a photo on Instagram. 🙂

Variations: Omit the matcha powder and add an optional tablespoon or two of rum for a traditional basic almond galette. Use ground hazelnuts, walnuts or pistachios for a different flavor profile and/or include a layer of chocolate-hazelnut spread or chestnut cream underneath the nut paste. To cut costs, use ground cashews instead of almonds, or a combination of the two.

Apple-miso turnovers

In recent months, I’ve spent less and less time on Facebook, having noticed that I was lingering too long there, focusing on trivial or not-so-positive posts to the detriment of more productive activities. But I like to pop in every once in a while since there are also cool people to meet and useful discoveries to make. The other week, mindlessly trawling the site in spite of myself, I struck gold: Elizabeth Andoh had just posted her recipes for lemon and ginger flavored miso sauces designed to go with fruit. As a big fan of sweet and salty combinations—mango with lime juice and salt, chocolate with fleur de sel, popcorn tossed with both salt and sugar—I was immediately on board. I wasted no time in making these sauces and trying them paired with figs and nectarines, the fruit available at the time. Delicious.

Soon enough, my brain began trying to work out other ways to use these sauces, and I landed upon the idea of adding flavored miso to a fruit pastry! I tried it in apple turnovers, long a homemade breakfast mainstay for me, and loved the result. I understand if that sounds strange to you, but bear with me here. The miso adds a whole new dimension to the panorama of flavors, highlighting the delicate sweetness of the fruit with the contrast of its earthy, salty umami notes. The result is also vaguely reminiscent of a cheesy taste, so you could think of it as a Japanese cheese danish. Also, remember that French woman in Pulp Fiction who enjoys a slice of cheese on her pie?

I should note that I also tried using straight up white miso to see if it would be enough on its own, but it proved too salty and harsh. In the recipe below, the lemon and sugar tame it enough that it nicely complements the apple without overshadowing it.

I adapted Andoh’s recipe somewhat, using a little less miso and a bit more sugar, but feel free to try her exact version too. For the saké, I found a small “one cup” size at my local Asian grocery store for 2 euros (see photo below). If you can’t get saké, you can substitute dry white wine.

For the crust, I used a ready-made vegan puff pastry, or flaky pastry. This is known as pâte feuilletée here in France, and it’s easy to find in an accidentally vegan version even at mainstream stores like Franprix (Herta brand) or else at organic shops. Just check the ingredients as there’s also a version made with butter. In North America, you can look for this one by Pepperidge Farm. Or, if you’re inclined, you can make your own. If puff pastry is impossible to find or too daunting to make, you can use regular pie crust dough (pâte brisée in France). It just won’t be quite as light or flaky.

Note that puff pastry is not the same thing as filo/phyllo dough. You could try that too if you’re experienced at using this kind of dough, but the results may not be quite the same as what you see here.

There are two ways to shape the turnovers: cutting the pastry dough into four triangles and folding the corners inward to form a sort of square parcel (as I have done here), or cutting the pastry into circles and folding them in half to make the traditional turnover shape. For this, you can trace circles onto the dough with an overturned bowl or use a pastry mold. With this approach, some scraps of dough will be left over, but you can press them together for enough dough to make one more turnover.

For greatest efficiency, I recommend preparing the miso sauce the day before. Then all you’ll have to do in the morning is chop up an apple, take the dough out of the fridge and put everything together.

Sweet lemony miso sauce

Makes about ¼ cup sauce

¼ cup shiro miso (white miso) paste
1 tablespoon saké or dry white wine
3 teaspoons granulated sugar, or more to taste
1 tablespoon water
1 teaspoon freshly grated lemon zest

miso sake

The miso and saké that I used. When buying the miso, check the ingredients to be sure it isn’t the kind with added bonito (fish) flakes. That wouldn’t be the nicest thing in a sweet pastry!

IMG_2727 x

Combine the miso, saké and sugar in a small saucepan. Before placing over heat, stir the ingredients until thoroughly mixed. Incorporate the water and half of the lemon zest. Cook over low to medium heat for a few minutes, stirring constantly, until the mixture is glossy and you can see the bottom of the pan after scraping the spatula across it.

IMG_2729 x

Add the remaining lemon zest, stir to incorporate, and taste the mixture. Add more sugar if you like, but don’t worry too much about the saltiness because you’ll be using only a small amount of it, and when the flavors of the apple, lemon and pastry come together, everything gets balanced out. Also remember that you can always add more powdered sugar to the baked pastry at the end if need be.

If the sauce seems too thick, you can add another tiny bit of water. Ideally, you want it to have the consistency of ketchup.

Remove from heat and allow to cool. If not using right away in the turnovers, cover tightly and store in the refrigerator (will keep for 3-4 weeks).

Apple-miso turnovers

Makes 4 turnovers

1 puff pastry dough, 12 in. (32 cm) in diameter (purchased or homemade)
1 medium-sized tart apple (I used Granny Smith)
A few teaspoons all-purpose or whole-wheat flour
A few squeezes lemon juice
1 teaspoon granulated sugar
A few teaspoons powdered sugar (icing sugar)

Begin by preheating your oven to 350°F (180°C).

IMG_3342 xIMG_3344 x

Chop your apple into small cubes (cut into thin slices, then again crossways to dice).

IMG_3347 x

Transfer to a small bowl. Add a few teaspoons of flour and a teaspoon of granulated sugar to the mix until the apple is uniformly coated. The flour helps the apple stick together and become more of a substantial filling.

IMG_3348 x

Add a few squeezes of fresh lemon juice to the mixture (it adds tartness and keeps the apple from browning) and stir to combine.

IMG_3353 x.JPG

Cut your pastry into four equal parts by running a butter knife gently down and across it. Note: if you have made your own pastry, be sure to roll it out thin enough.

IMG_3354 xIMG_3355 x

Spread a teaspoon or so of the sweet lemony sauce across each section of pastry. The amount you use will depend on how adventurous you feel or how much you like miso. You can also experiment by using more sauce in some of the turnovers and less (or none) in others, to compare. If you do this, try to mark them in some way so you remember which ones are which after they come out of the oven.

If any of the miso sauce remains, use it as a dip for whatever fruit you happen to have on hand.

IMG_3356 x

Now deposit a few spoonfuls of the diced apple on the center of the prepared pastry section. Be careful not to use too much apple, as you might have to stretch the dough to cover it and this could cause the pastry to break.

IMG_3357 x

Fold the side points in toward the center.

IMG_3358 x

Fold the bottom edge upward.

IMG_3359 x

Fold the top point downward.

IMG_3360 x

Press down on all the edges to seal so the filling doesn’t escape as the turnover bakes. I usually use the tines of a fork for this. It also results in a nice pattern, although with flaky crust the pattern doesn’t always remain after baking.

IMG_3361 xIMG_3362 x

Cut a few slits somewhere on the top of the turnover to allow hot air to escape during the baking.

IMG_3365 x

Your turnovers are ready to go in the oven! Bake at 350°F (180°C) for about 20 minutes, until the tops are golden brown.

IMG_3371 x

They’ll look kind of like this when they’re done.

IMG_3374 x

I like to decorate the tops with a bit of powdered sugar (icing sugar) sifted over the top (do this while the turnovers are still warm).

IMG_3383 x.JPG

Allow to cool a bit, but not too long—they’re yummiest when warm! The ones you save for later can be popped into the oven for a few minutes at the same temperature (350°F/180°C) to warm them up before serving.

IMG_3390 x

Brew yourself some coffee or tea and enjoy!

IMG_3393 x

Yum!

I hope you love these turnovers as much as I did. Let me know in the comments if you try them!

Variations: Use any other fruit that happens to be in season and seems likely to go well with the miso sauce (pear or persimmon in the winter, peach or nectarine in the summer). Experiment with the gingery red miso sauce too. Decorate the tops of the pastries with slivered almonds (brush a bit of apricot jam on top first, then apply the almond slivers, all before baking).

Chocolate cake with azuki filling

In recent weeks, I’ve been experimenting with more and more Asian-inspired flavors and ingredients. It all began when my friend Yukiko introduced me to a Japanese dish that has become one of my top favorite recipes of all time. My discovery then furthered when I got my hands on Elizabeth Andoh’s outstanding recipe book Kansha. In it, she focuses on shojin ryori, or “temple cooking”, which in line with the Buddhist principle of non-harm is plant-based. I now realize how much more there is to Japanese cuisine than the usual sushi, maki rolls and mochi that we’re all familiar with. I’ve tried about seven or eight recipes from this book so far, including cold buckwheat noodles with a tangy umeboshi sauce and herbaceous shiso, creamy/crispy kabocha squash croquettes, candied sweet potatoes and pancakes filled with red-bean jam (check my Instagram from a few weeks ago for photos of all these).

61j58mxqSzL

In Japanese cuisine, an effort is made to combine a range of colors, textures and flavors in each dish. Pasta with a creamy sauce is paired with a crunchy, tangy salad made of colorful carrot, cucumber or red pepper. White rice is cooked together with a few spoonfuls of black rice to become lavender, and is then studded with bright green edamame beans. Sweet preparations may include a few drops of soy sauce or a touch of miso to temper the sugary taste. Such combinations result in works of art that are pleasing to both the palate and the eyes.

It was in this context, then, that I began imagining ways of integrating these principles and ingredients into familiar Western dishes. After my discovery of red-bean (azuki) jam, I wondered how it would taste paired with chocolate. This fusion recipe is the result: a traditional chocolate layer cake with a sweet azuki filling, topped with a sprinkling of powdered sugar and kinako (toasted soybean flour).

I’m quite pleased with the way this experiment turned out. The dark, rich chocolate goes very well with the sweet paste, which gains a caramel-like dimension from the soy sauce. The kinako adds an interesting color contrast as well as a nutty, toasted flavor. And with the traditional layer cake form, it would be the perfect birthday cake for anyone who (like me!) enjoys Asian cuisines and is not a huge fan of cakes slathered in frosting. 😉

This recipe is also a good example of mindful, contemplative shojin cooking (“slow food” in contrast with today’s trends), since the azuki paste takes time and watchfulness to make. I recommend making it the day before the actual cake.

So, what exactly are azuki beans? They’re smallish red legumes with a white stripe and must not be confused with kidney beans (see below). I get mine from my local organic shop, but they should also be available online.

kidney vs. azuki

You may already have heard of azuki (sometimes spelled adzuki) beans, or red beans, being used in Asian desserts. When I lived in San Francisco, I would sometimes buy something called a mooncake, which has a red-bean filling, when I passed through Chinatown. If you live near an Asian supermarket, you may be able to get pre-made red-bean paste there. But if you’re a do-it-yourself type, like I am, or want your filling to be free from preservatives and coloring agents, or just less sweet than the ones found at stores, you can make your own with the recipe below. In making this jam, I drew inspiration from two recipes: Andoh’s and this one from the blog Just Hungry (but any errors in the following are purely my own fault).

This azuki preparation (tsubu-an in Japanese) can also be spread on toast or pancakes like jam, used as a topping for oatmeal or rice pudding, or even served with cheese in lieu of a fruit chutney. The blogger behind Just Hungry recommends enjoying it with ice cream and strawberries, which does sound pretty good.

Azuki filling

Makes about 2¼ cups of filling. Can be made a day or two before the cake.

Ingredients

  • 1 cup (200 g) dry azuki beans
  • ¾ cup to 1 cup (150 to 200 g) granulated sugar
  • 1 teaspoon (5 ml) soy sauce, or more to taste

Equipment needed: food processor or high-power blender (alternatively, a potato masher  or fork and some patience).
soak.jpg

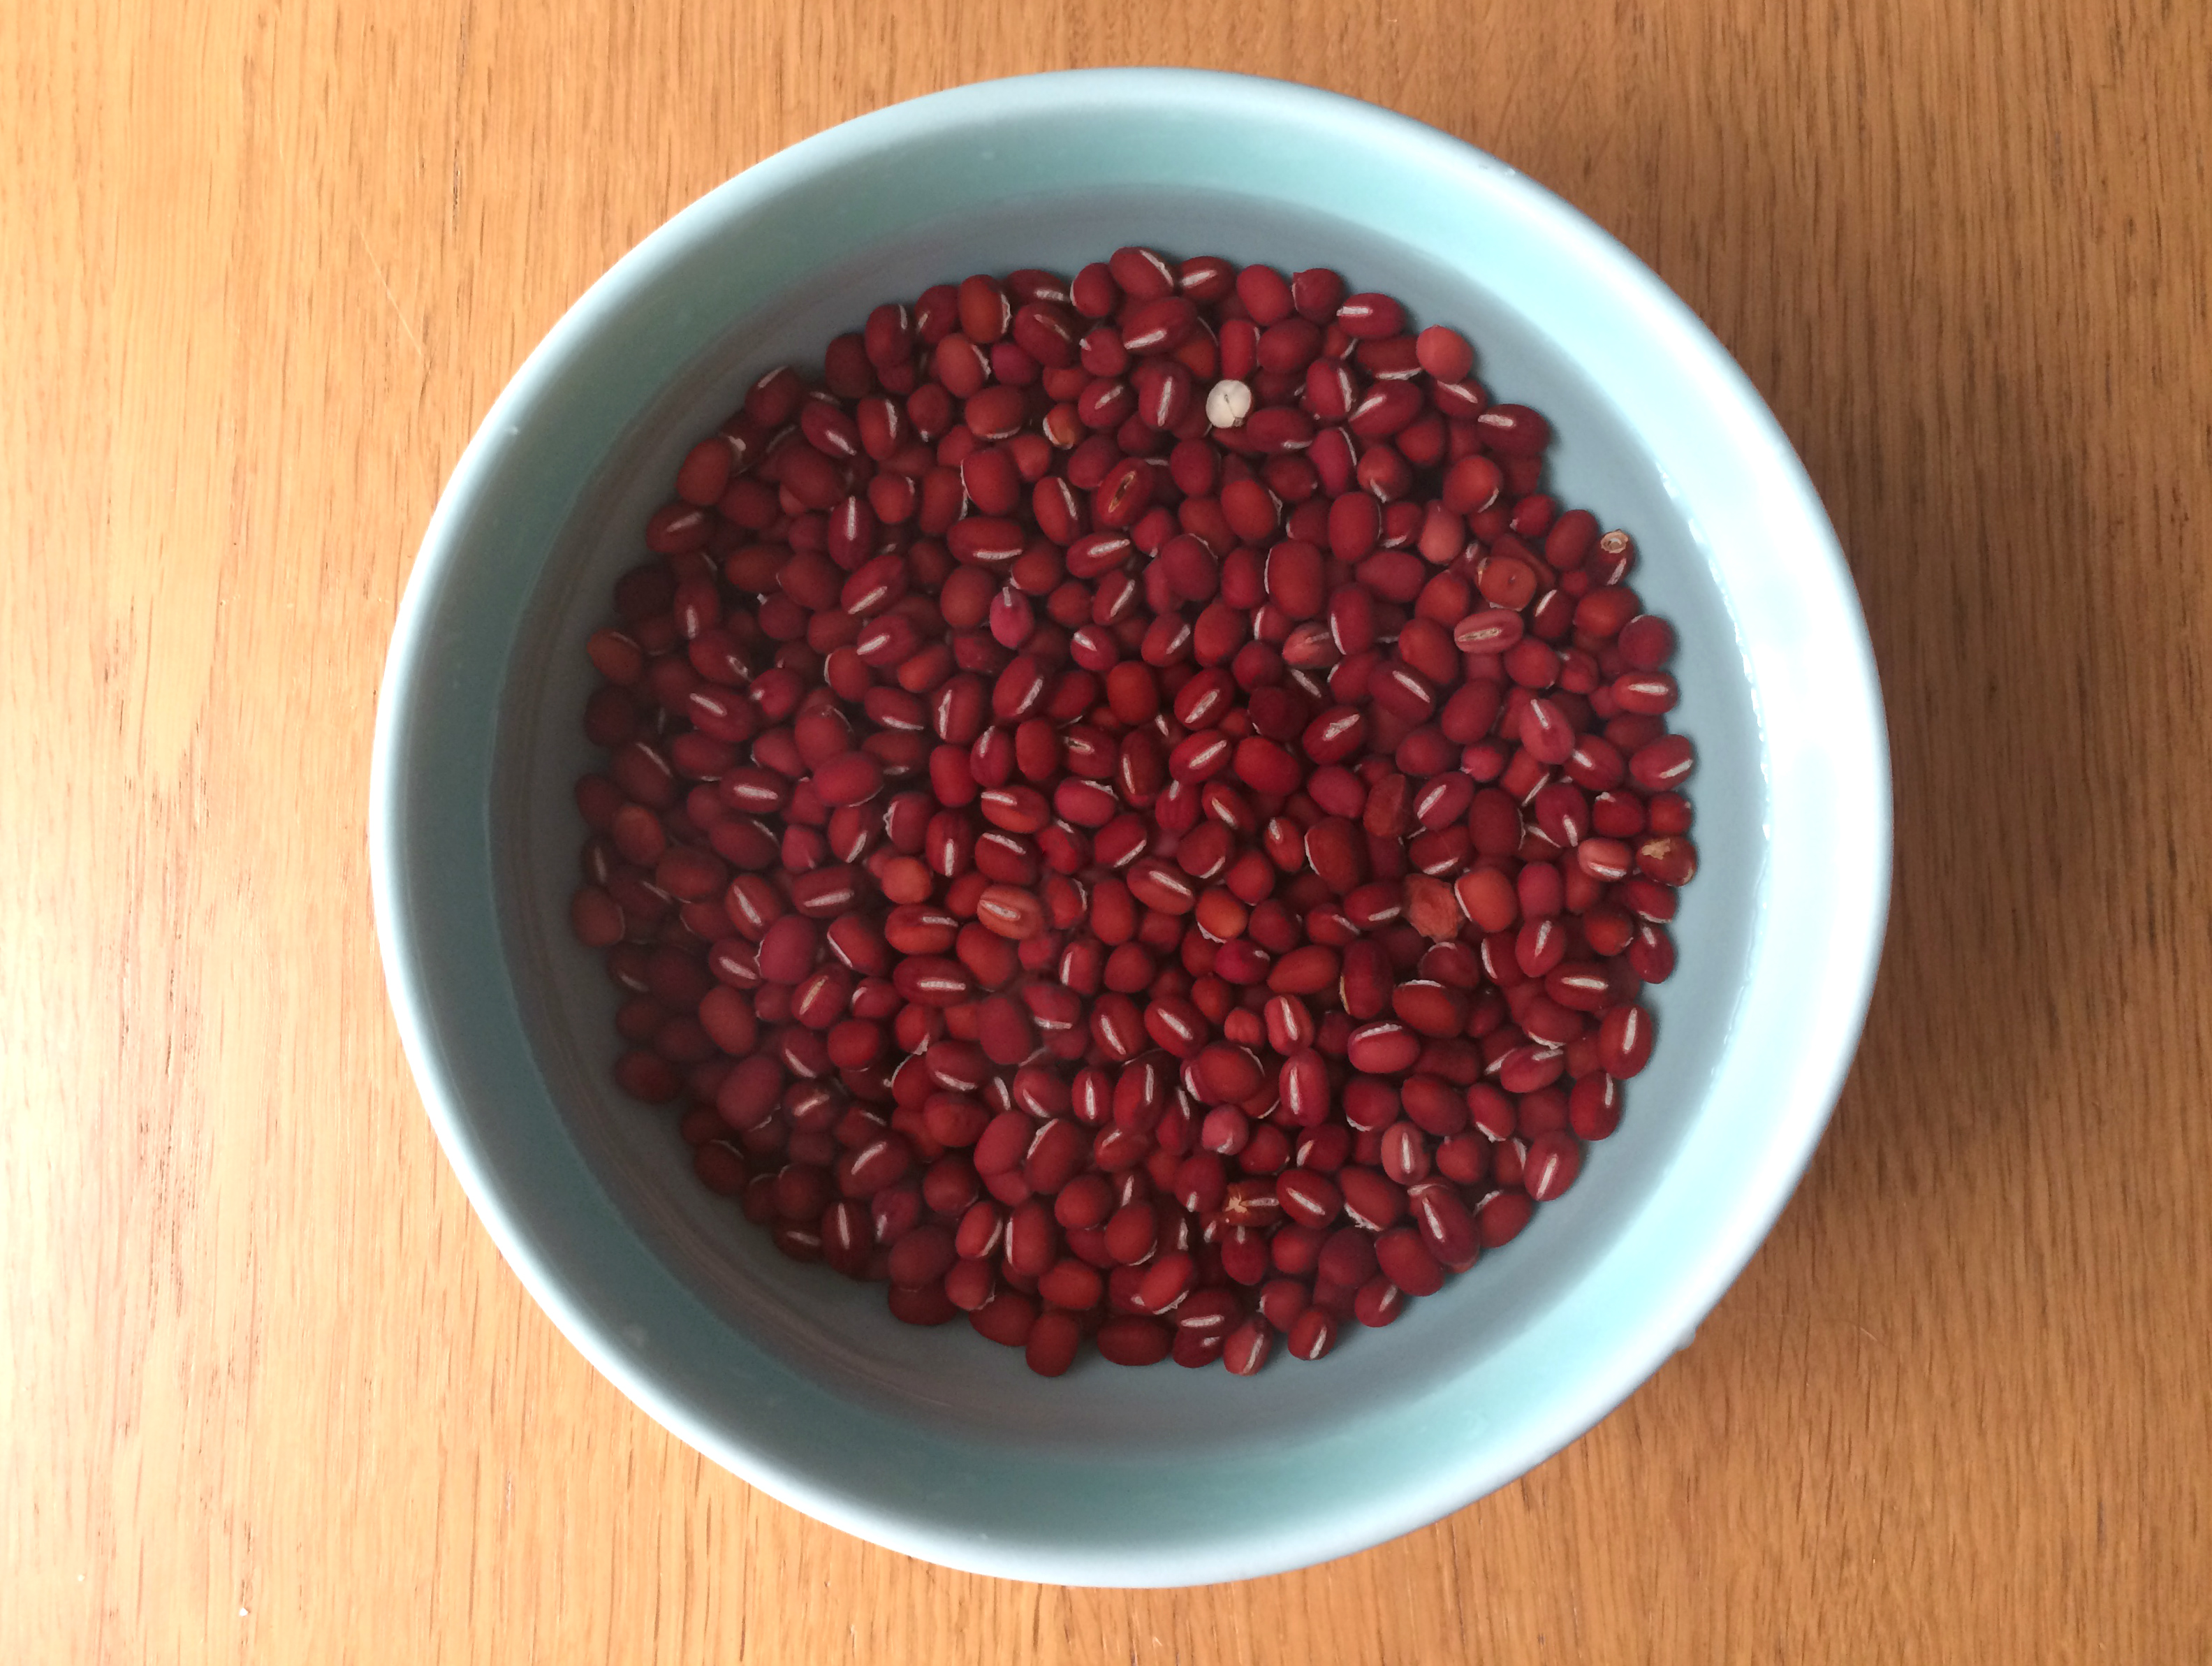
Place the dry beans in a bowl and add enough water to cover them. Allow to soak for 24 hours (keep in the fridge for best results). The beans will lose their red color as they soak. If you don’t have time for this soaking step, you can skip it, but the cooking process will take longer.

01

At the end of the soaking stage, rinse the beans and transfer them to a large stock pot. Fill  it with enough water to cover the beans (never add salt when cooking legumes, except at the very end) and bring to a boil. Allow to boil for one minute, then drain and rinse the beans with cold water.

Return the beans to the pot, refill with fresh water and bring to a boil a second time. Allow to boil for one minute as before, then drain and rinse the beans again. Rinse and wipe the inside of the pot with a sponge to remove all residue. Although lengthy, this process ensures that all impurities are removed. If you have plants, you can save the cooking water to water them with once it’s cool.

Now you’re ready to cook the beans for real! Return them to the pot and refill with fresh water to about 1 inch (2 cm) above the beans.

02

Bring to a boil, then reduce the heat to low and simmer, covered, until the beans are soft enough to crush between your thumb and pinky finger (45-60 minutes). If you did not soak the beans before cooking, this step may take longer. Check them every once in a while during this time, adding more water if the level goes down too low and they aren’t done yet. If you have a table in your kitchen, this is a good time to take a seat and delve into a good book.

When the beans pass the thumb-and-pinky test, drain them but reserve about a cup of the cooking water.

03

Return the beans to the pan and add about ½ cup of the reserved cooking water back in, or more as needed—the idea is to have just enough to keep the beans from getting too dry and sticking.

Add the sugar and continue to simmer, stirring occasionally with a wooden spoon, until you have a thick syrupy sauce (about 15 minutes). The beans will darken in color once the sugar is added. If at any point they become too dry, add more of the reserved cooking water in small amounts (¼ cup at a time).

04

Now add the soy sauce, stir to incorporate, and taste. If it seems too salty to you, add a bit more sugar. If it seems too sweet, add a bit more soy sauce, or ¼ teaspoon salt if you need more saltiness but want to limit the soy sauce flavor. Simmer for a minute or two more, then remove from heat and allow to cool.

05

Transfer the beans to a food processor or high-power blender and pulse or purée until you have a smooth, paste-like consistency.

06

Mine ended up looking like this because the little food processor I use is not super powerful. You could also opt to mash it with a potato masher or similar. It’s fine if a few chunky bits remain.

Store the azuki filling in the refrigerator and use within 5 to 7 days.

Chocolate cake

Makes two cake layers.

Ingredients

  • 3 cups (375 g) all-purpose flour
  • 1¼ cup (250 g) white or raw cane granulated sugar
  • 1 teaspoon (7 g) salt
  • 2 teaspoons (9 g) baking soda
  • ½ cup (40 g) unsweetened cocoa powder, sifted
  • 3 teaspoons (15 ml) vanilla extract
  • ¾ cup (177 ml) neutral-flavored oil, like sunflower or canola
  • 2 tablespoons (30 ml) white vinegar
  • 2 cups (500 ml) cold water

Decoration

  • a few tablespoons powdered sugar
  • a few tablespoons kinako (roasted soy flour), optional

Equipment needed: two 8-inch (20-cm) round cake pans (or bake them in two stages using one pan—be careful to divide the batter evenly). You can use pans with a larger diameter if you like, but the layers will be lower and the cake shorter than what you see in these photos.

01

First, preheat your oven to 350°F (180°C). Combine all the dry ingredients in a large mixing bowl. I used a raw cane sugar in this case, but regular white granulated sugar is fine.

02

Combine the liquid ingredients in a smaller bowl and whisk to combine.

03

Prepare your cake pans by lining them with some baking paper. Apply a bit of oil to the pan first to make the paper stick. I like to leave little “handles” like these on the sides to be able to dislodge the baked cakes more easily.

04

Whisk the dry ingredients together and then add the liquid ingredients to the bowl with the dry mixture. Whisk everything together just until combined, being careful not to over mix as this would make the cake stiff.

05

Transfer the batter to your prepared baking pans, diving it evenly between the two, and place in the oven. Bake at 350°F (180°C) for about 20 minutes.

06

Check for doneness at this point by inserting a toothpick or fork into the center of the cakes. If it comes out clean, the cakes are done. If not, put them back in the oven for another five minutes and check again. When fully baked, place them on a baking rack or stovetop to cool. Allow the cakes to cool completely before attempting to remove them from the pans.

07

You will notice that each cake layer has a domed shape. The tops will need to be leveled before you can assemble the two layers.

08

Using a large knife, carefully slice off the top of each cake, depositing the pieces you cut off into a bowl. Crouch down to look at the cake from the side, at tabletop height, to check whether it’s even enough.

09

It will look something like this. Remove the baking paper from underneath it and transfer it, cut side facing up, to a clean plate.

10

Apply the azuki filling thickly, spreading it with a spoon or large knife to ensure that it covers the surface evenly. Reserve a small amount to fill in any gaps that remain in the sides once you’ve placed the other cake layer on top.

11

Now carefully place the other cake layer, cut side facing down, on top of the filling. The cake will have a nicely defined edge along the top. With a frosting knife or flat spatula, fill in any gaps between the two layers with more azuki filling and smooth out the sides. Cover the cake with a cover or an upside-down salad bowl until just before serving. Powdered sugar tents to “melt” into the surface of a cake, so if you apply it ahead of time you will most likely have to do it again and the results will not be as nice. If you will be serving the cake the next day, keep it in the refrigerator until about an hour beforehand.

12

A few minutes before serving the cake, apply the powdered sugar. I recommend using a sieve such as this one, or a sifter of some kind, to prevent any large clumps of sugar from falling on the surface and ruining the powdered effect.

13

You can use more sugar than this if you like. It depends how opaque you want the surface to be.

01

After the powdered sugar, use the same method to sprinkle some kinako on top. Or if you prefer, you can apply the kinako first and then the powdered sugar. It depends which color you would like to be more prominent.

02

And now you’re done!

03

04

06

05

After serving, cover the remaining cake and place it in the refrigerator (without preservatives apart from sugar, the homemade azuki paste can go bad if left too long at room temperature).

Variations: Use the azuki paste as cupcake filling: after filling the cupcake cups half-way full with batter, deposit a small dollop of azuki paste in the center and push it down until it’s submerged by the batter. Also try it as a frosting for the top of a single-layer cake, or as a spread for toast, etc. as mentioned in the azuki filling recipe above.

Creamy miso ramen soup

Have you ever met a new friend and immediately felt as if you’d always known them? I experienced this not long ago when Yukiko, an online contact of mine (we first met in a group for volunteers of an international vegan organization) visited Paris from her native Japan and we got together for a smoothie in the Marais. It turned out she was planning to move to France very soon to be with her French boyfriend. As we shared impressions of Paris and discussed expat life in France, and of course the usual favorite topic of vegans from anywhere in the world—food and cooking!—the time ran short and we still had more to say. Another meetup was thus in order, and we decided to make it a culinary one so she could introduce me to one of her favorite Japanese dishes.

One chilly day not long after, she appeared at my door with a smile, bearing a cloth shopping bag full of goodies—fresh organic oranges, carrots, green onion, ginger root, vegetable bouillon and, best of all, some homemade miso that she’d brought with her from Japan! On my end, I’d stocked up on ramen noodles, sesame paste and toasted sesame oil, shiitake mushrooms and soymilk. We put on aprons, rolled up our sleeves, and set to work making the dish she had chosen: tantanmen (担々麺), a Taiwanese-Japanese fusion dish featuring Chinese ramen noodles and a Japanese-style creamy miso broth, served with a crisp carrot salad for a balance of textures in line with the traditional Japanese approach.

As we worked, Yukiko and I chatted about this and that and all kinds of things and Sésame padded in and out of the kitchen, the tip of his tail curled into a question mark, checking on our doings and trying to detract our guest’s attention to himself. We kept discovering more and more things we had in common, from similar past (mis)adventures in the romance department to literary interests and even our age—we were born the same year, exactly one month apart! In spite of all our chatter, we eventually managed to finish the dish, and sitting down to this fragrant soup at the end of the afternoon was just heavenly.

Tantanmen has since become one of my new favorite dishes. It’s the perfect comfort food for a chilly winter day, especially around this time of year when sunshine and fresh warm breezes are but a distant memory and there’s at least another month of cold ahead. The creamy miso broth with earthy garlic notes and a touch of spicy cayenne warms your tummy while the noodles fill it, the tender shiitake mushrooms and toasted sesame add an extra dimension of texture and flavor, and the tangy ginger and citrus of the carrot salad provides a burst of freshness that reminds you of the spring season that is surely coming back around sooner or later.

Since we can all benefit from a warming winter pick-me-up right about now, I decided (with Yukiko’s blessing) to share her recipe with you!

There’s some room for variation in this dish, for example substituting seitan or tofu for the mushrooms or using a different crisp vegetable (cucumber, radish or a crunchy lettuce such as romaine) in place of the carrot, according to what you have on hand.

The soup and salad may be served separately, as shown in the main photo above, but they’re best enjoyed together for the contrast of textures, so for the presentation you may opt to place the salad directly on top of the noodles, either to one side as shown in the last photo below, or all around the edges of the dish, leaving the noodles and mushrooms visible at the center.

Carrot salad with tangy sesame-ginger dressing

Serves 2 (about 3/4 cup dressing; some will be left over)

  • 14 oz. (400 g) raw carrots, julienned or roughly grated
  • small bunch fresh parsley or cilantro
  • 4 tablespoons sesame paste (tahini)
  • juice of 1 orange
  • 1 tablespoon soy sauce
  • 1 teaspoon toasted sesame oil
  • 1 teaspoon grated fresh ginger

Equipment needed: food processor or blender for the dressing, julienne peeler or other device (spiralizer, grater) for the carrot (or just cut julienne style with a regular knife)

Start by making the dressing (can be made even a day ahead). Place the sesame paste, orange juice, soy sauce, sesame oil and grated ginger in your food processor or blender and pulse until you have a creamy consistency. Taste and add more soy sauce, sesame oil or ginger if needed.

img_3791-x

Julienne the carrots, roughly chop the herbs, and toss together in a salad bowl. If you will be serving the noodle soup within the hour, you can go ahead and add the dressing, tossing to coat the carrots evenly. If you’re using a more delicate item such as lettuce or cucumber in place of the carrots, wait to add the dressing just before serving or your salad may wilt. Add the dressing a little bit at a time; you probably won’t need the whole amount, but it’s good to have it on hand in case you do! (If some remains, it makes an excellent dip for crudités, and can also work as a spread in a bánh mì type sandwich.) Transfer to serving bowls and top with an extra sprig of parsley.

Creamy miso ramen soup

Serves 2

  • 10 oz. (280 g) brown rice ramen noodles, or other noodles
  • 6 oz. (175 g) fresh shiitake mushrooms
  • 1 tablespoon miso, preferably red
  • 2 tablespoons blond sesame paste (tahini)
  • 1 cube vegetable bouillon
  • 2 tablespoons sesame oil, divided
  • 1 and 3/4 cup (400 ml) unsweetened soy milk
  • 3/4 cup to 1 cup (200-250 ml) hot water
  • 2 cloves garlic
  • 1 tablespoon soy sauce, or more to taste
  • pinch cayenne pepper
  • 2 green onions/scallions

img_3801-x

Begin by rinsing and slicing the shiitake mushrooms.

img_3805-x

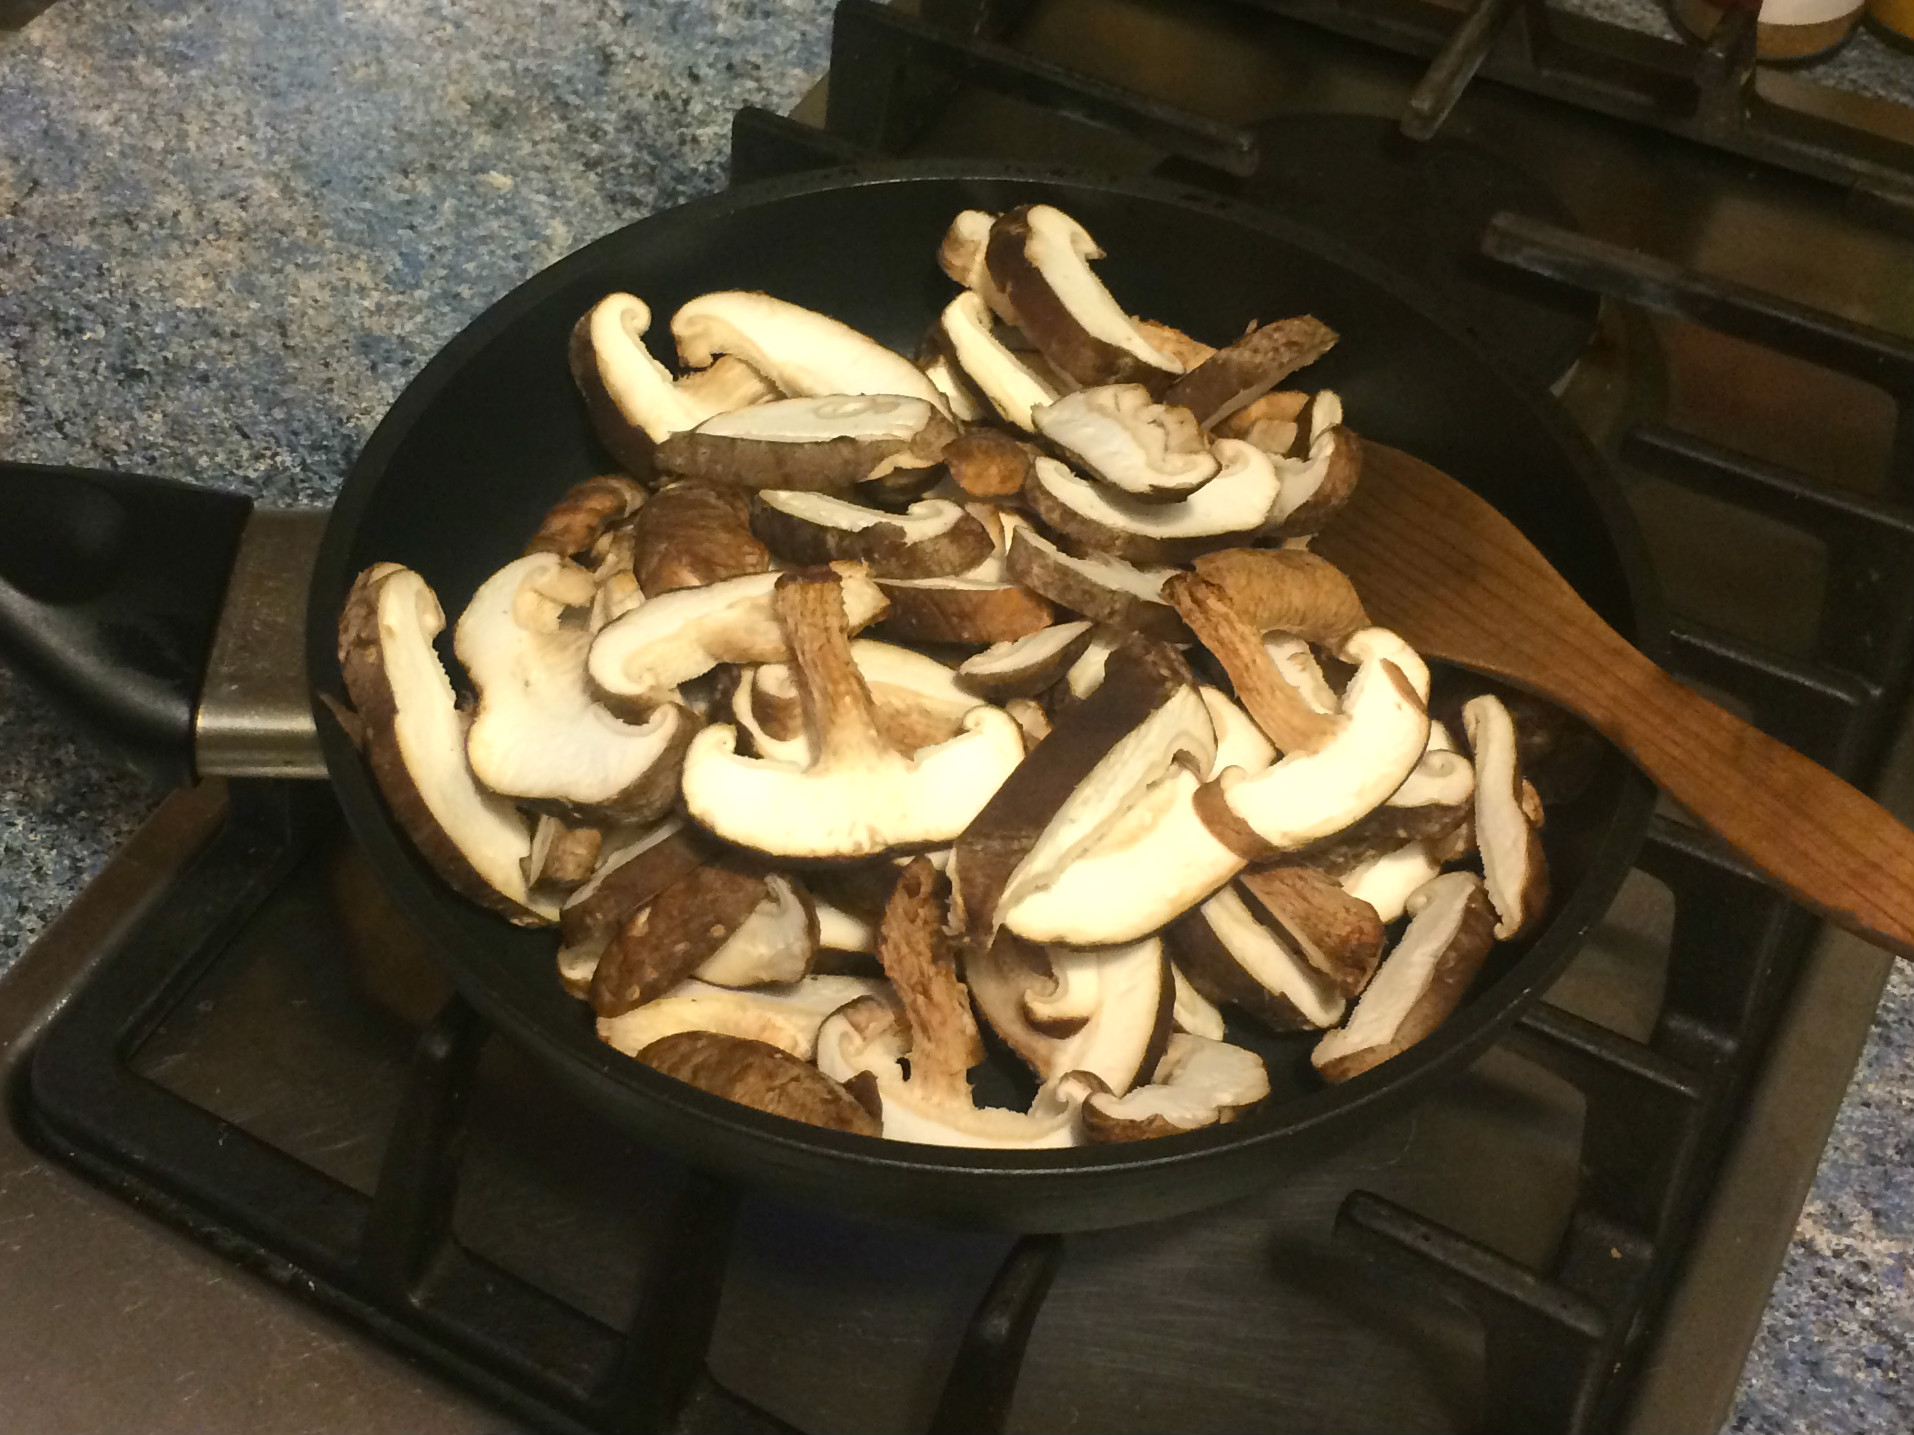
Place them in a nonstick skillet or frying pan over medium heat, without any oil at this stage as the mushrooms will release liquid as they cook. As always with mushrooms, the volume will reduce considerably, so don’t worry too much about overcrowding at the beginning if your skillet is on the smaller size, as is this one in the photo above.

While the mushrooms cook, mince one clove garlic.

img_3812-x

When the mushrooms have become tender and browned, as shown, you can push them to one side and, tipping the skillet slightly, add the toasted sesame oil and minced garlic to the other side. Reduce the heat to low or medium-low, cook the garlic a minute or two, stirring gently, then mix it in with the mushrooms and remove from heat. Note that this is just my own convenience-based approach and not the way my friend did it. You can alternatively remove the mushrooms and return them to the pan again to combine them once the garlic has browned. Set the mushroom-garlic mixture aside. Ideally, keep them in the skillet and cover them so they retain some of their heat (unlike what I have done in the photo below). 😉

img_3815-x

Prepare your ramen (or other) noodles according to the directions on the package, being very careful not to overcook them because they will be heated further once combined with the hot broth at the end. If in doubt, go for al dente. Drain the noodles, return them to the pan they cooked in, cover to maintain the heat and set aside.

img_3798-x

You will now make the creamy miso broth. Combine the sesame paste, the remaining clove of garlic (minced), miso paste, bouillon cube, soy sauce (not shown) and 1 tablespoon of the toasted sesame oil in a small or medium ceramic or glass bowl. Ideally, you should prepare these ahead of time so the mushrooms and noodles don’t lose too much heat while you make this part. Heat 1 cup water in a tea kettle, but not to boiling. If you have a way to check the temperature, it should be around 158°F (70°C). Add about 3/4 cup hot water to the bowl and whisk to combine.

img_3822-x

Heat the 1 and 3/4 cup (400 ml) unsweetened soymilk on the stovetop until close to simmering (do not allow to reach a boil). Turn off the heat and quickly incorporate the miso mixture with a whisk. Important: avoid reheating after this stage, and definitely do not bring it to a boil since the soymilk would most likely separate and the health benefits of the miso (a fermented product) would be neutralized.

Add the pinch of cayenne pepper, taste, and adjust if needed. If you want the broth to be saltier, add a bit more soy sauce. Cover the broth and transfer the drained noodles directly to the serving bowls. At this point, you will want to work somewhat fast since you need to put everything together without losing too much of the heat—this is why it’s useful to have the salad already prepared ahead of time.

img_3824-x

Ladle the broth over the top of the noodles, dividing it evenly between the two bowls, until you have the right quantity of broth for a soup but the noodles can still be seen poking through the top.

img_3826-x

Add the shiitake mushrooms to the top of the noodles and ladle a bit of the broth over the top of them. Top with sliced green onions and you’re ready to serve your dish!

img_3830_d

As I mentioned above, you can serve the soup and salad separately, as shown here, or in the same bowl, as below. Encourage your guests to combine noodles and salad together in each bite. 🙂 You will want to remember to provide a spoon too!

img_3849-xb

I hope you enjoy this soup, a fusion dish that celebrates international encounters and friendship. It tastes best when made with a friend! 🙂

Variations: Instead of mushrooms, use finely sliced tender seitan or diced tofu. Substitute lettuce leaves or sliced cucumber for the carrot.