Apple-miso turnovers

In recent months, I’ve spent less and less time on Facebook, having noticed that I was lingering too long there, focusing on trivial or not-so-positive posts to the detriment of more productive activities. But I like to pop in every once in a while since there are also cool people to meet and useful discoveries to make. The other week, mindlessly trawling the site in spite of myself, I struck gold: Elizabeth Andoh had just posted her recipes for lemon and ginger flavored miso sauces designed to go with fruit. As a big fan of sweet and salty combinations—mango with lime juice and salt, chocolate with fleur de sel, popcorn tossed with both salt and sugar—I was immediately on board. I wasted no time in making these sauces and trying them paired with figs and nectarines, the fruit available at the time. Delicious.

Soon enough, my brain began trying to work out other ways to use these sauces, and I landed upon the idea of adding flavored miso to a fruit pastry! I tried it in apple turnovers, long a homemade breakfast mainstay for me, and loved the result. I understand if that sounds strange to you, but bear with me here. The miso adds a whole new dimension to the panorama of flavors, highlighting the delicate sweetness of the fruit with the contrast of its earthy, salty umami notes. The result is also vaguely reminiscent of a cheesy taste, so you could think of it as a Japanese cheese danish. Also, remember that French woman in Pulp Fiction who enjoys a slice of cheese on her pie?

I should note that I also tried using straight up white miso to see if it would be enough on its own, but it proved too salty and harsh. In the recipe below, the lemon and sugar tame it enough that it nicely complements the apple without overshadowing it.

I adapted Andoh’s recipe somewhat, using a little less miso and a bit more sugar, but feel free to try her exact version too. For the saké, I found a small “one cup” size at my local Asian grocery store for 2 euros (see photo below). If you can’t get saké, you can substitute dry white wine.

For the crust, I used a ready-made vegan puff pastry, or flaky pastry. This is known as pâte feuilletée here in France, and it’s easy to find in an accidentally vegan version even at mainstream stores like Franprix (Herta brand) or else at organic shops. Just check the ingredients as there’s also a version made with butter. In North America, you can look for this one by Pepperidge Farm. Or, if you’re inclined, you can make your own. If puff pastry is impossible to find or too daunting to make, you can use regular pie crust dough (pâte brisée in France). It just won’t be quite as light or flaky.

Note that puff pastry is not the same thing as filo/phyllo dough. You could try that too if you’re experienced at using this kind of dough, but the results may not be quite the same as what you see here.

There are two ways to shape the turnovers: cutting the pastry dough into four triangles and folding the corners inward to form a sort of square parcel (as I have done here), or cutting the pastry into circles and folding them in half to make the traditional turnover shape. For this, you can trace circles onto the dough with an overturned bowl or use a pastry mold. With this approach, some scraps of dough will be left over, but you can press them together for enough dough to make one more turnover.

For greatest efficiency, I recommend preparing the miso sauce the day before. Then all you’ll have to do in the morning is chop up an apple, take the dough out of the fridge and put everything together.

Sweet lemony miso sauce

Makes about ¼ cup sauce

¼ cup shiro miso (white miso) paste
1 tablespoon saké or dry white wine
3 teaspoons granulated sugar, or more to taste
1 tablespoon water
1 teaspoon freshly grated lemon zest

miso sake

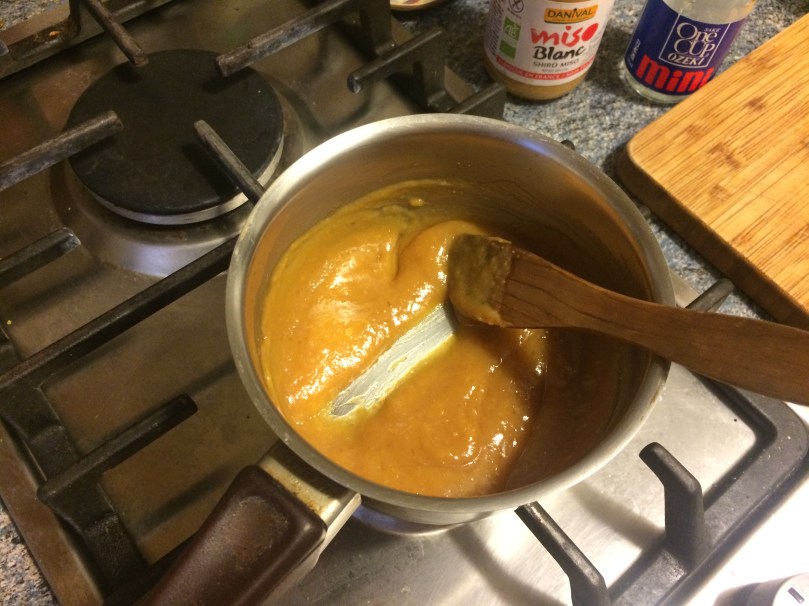
The miso and saké that I used. When buying the miso, check the ingredients to be sure it isn’t the kind with added bonito (fish) flakes. That wouldn’t be the nicest thing in a sweet pastry!

IMG_2727 x

Combine the miso, saké and sugar in a small saucepan. Before placing over heat, stir the ingredients until thoroughly mixed. Incorporate the water and half of the lemon zest. Cook over low to medium heat for a few minutes, stirring constantly, until the mixture is glossy and you can see the bottom of the pan after scraping the spatula across it.

IMG_2729 x

Add the remaining lemon zest, stir to incorporate, and taste the mixture. Add more sugar if you like, but don’t worry too much about the saltiness because you’ll be using only a small amount of it, and when the flavors of the apple, lemon and pastry come together, everything gets balanced out. Also remember that you can always add more powdered sugar to the baked pastry at the end if need be.

If the sauce seems too thick, you can add another tiny bit of water. Ideally, you want it to have the consistency of ketchup.

Remove from heat and allow to cool. If not using right away in the turnovers, cover tightly and store in the refrigerator (will keep for 3-4 weeks).

Apple-miso turnovers

Makes 4 turnovers

1 puff pastry dough, 12 in. (32 cm) in diameter (purchased or homemade)
1 medium-sized tart apple (I used Granny Smith)
A few teaspoons all-purpose or whole-wheat flour
A few squeezes lemon juice
1 teaspoon granulated sugar
A few teaspoons powdered sugar (icing sugar)

Begin by preheating your oven to 350°F (180°C).

IMG_3342 xIMG_3344 x

Chop your apple into small cubes (cut into thin slices, then again crossways to dice).

IMG_3347 x

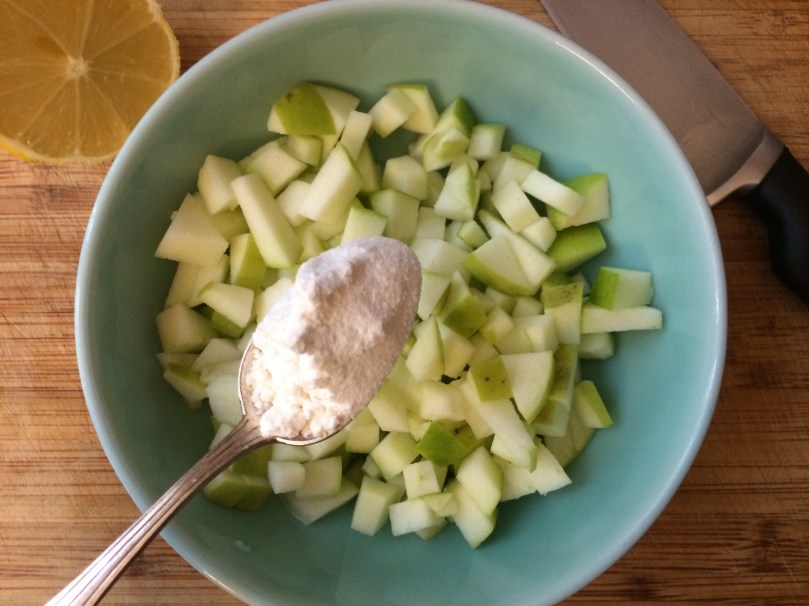
Transfer to a small bowl. Add a few teaspoons of flour and a teaspoon of granulated sugar to the mix until the apple is uniformly coated. The flour helps the apple stick together and become more of a substantial filling.

IMG_3348 x

Add a few squeezes of fresh lemon juice to the mixture (it adds tartness and keeps the apple from browning) and stir to combine.

IMG_3353 x.JPG

Cut your pastry into four equal parts by running a butter knife gently down and across it. Note: if you have made your own pastry, be sure to roll it out thin enough.

IMG_3354 xIMG_3355 x

Spread a teaspoon or so of the sweet lemony sauce across each section of pastry. The amount you use will depend on how adventurous you feel or how much you like miso. You can also experiment by using more sauce in some of the turnovers and less (or none) in others, to compare. If you do this, try to mark them in some way so you remember which ones are which after they come out of the oven.

If any of the miso sauce remains, use it as a dip for whatever fruit you happen to have on hand.

IMG_3356 x

Now deposit a few spoonfuls of the diced apple on the center of the prepared pastry section. Be careful not to use too much apple, as you might have to stretch the dough to cover it and this could cause the pastry to break.

IMG_3357 x

Fold the side points in toward the center.

IMG_3358 x

Fold the bottom edge upward.

IMG_3359 x

Fold the top point downward.

IMG_3360 x

Press down on all the edges to seal so the filling doesn’t escape as the turnover bakes. I usually use the tines of a fork for this. It also results in a nice pattern, although with flaky crust the pattern doesn’t always remain after baking.

IMG_3361 xIMG_3362 x

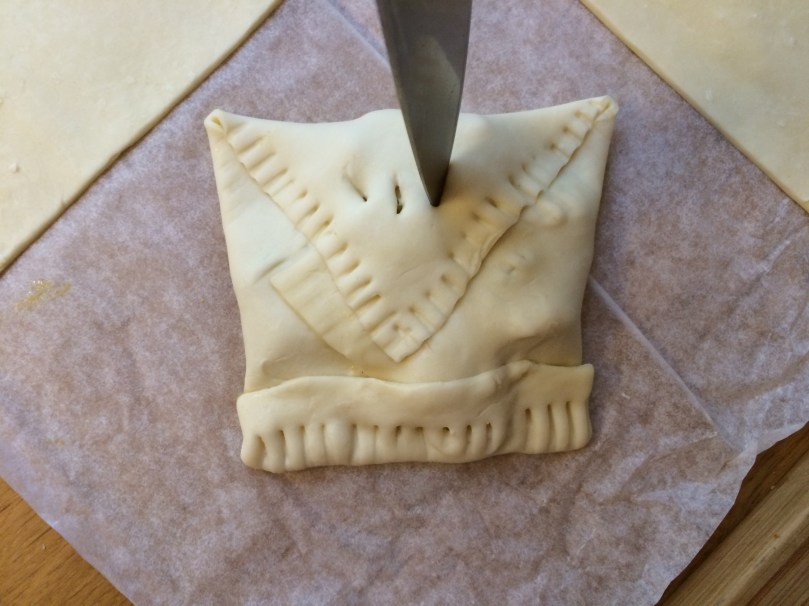
Cut a few slits somewhere on the top of the turnover to allow hot air to escape during the baking.

IMG_3365 x

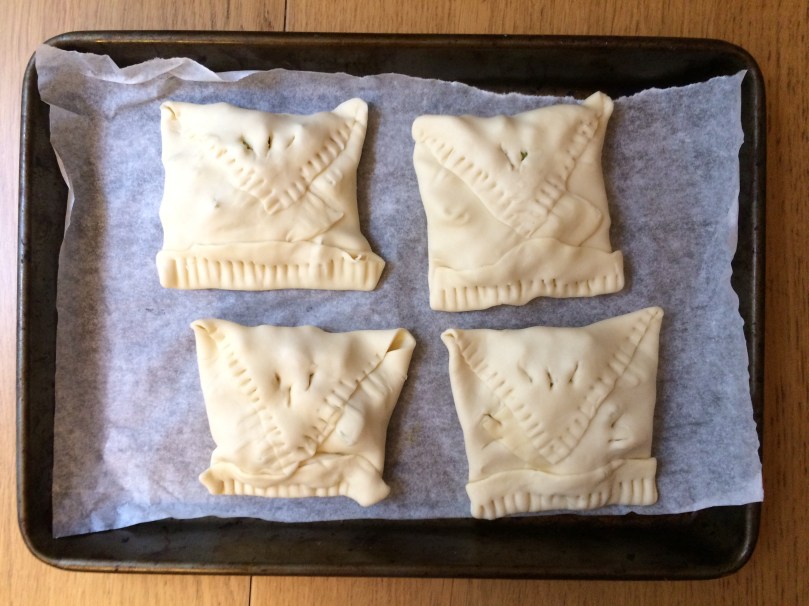
Your turnovers are ready to go in the oven! Bake at 350°F (180°C) for about 20 minutes, until the tops are golden brown.

IMG_3371 x

They’ll look kind of like this when they’re done.

IMG_3374 x

I like to decorate the tops with a bit of powdered sugar (icing sugar) sifted over the top (do this while the turnovers are still warm).

IMG_3383 x.JPG

Allow to cool a bit, but not too long—they’re yummiest when warm! The ones you save for later can be popped into the oven for a few minutes at the same temperature (350°F/180°C) to warm them up before serving.

IMG_3390 x

Brew yourself some coffee or tea and enjoy!
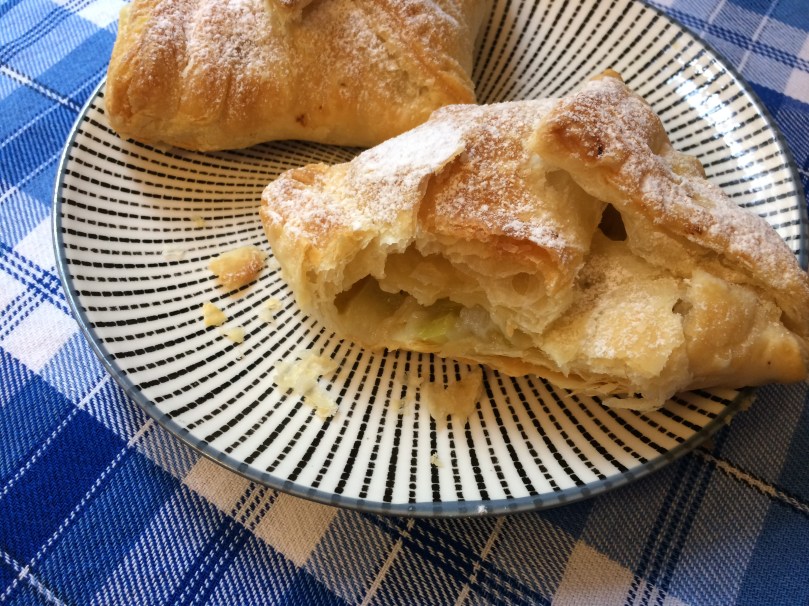
IMG_3393 x

Yum!

I hope you love these turnovers as much as I did. Let me know in the comments if you try them!

Variations: Use any other fruit that happens to be in season and seems likely to go well with the miso sauce (pear or persimmon in the winter, peach or nectarine in the summer). Experiment with the gingery red miso sauce too. Decorate the tops of the pastries with slivered almonds (brush a bit of apricot jam on top first, then apply the almond slivers, all before baking).

Creamy miso ramen soup

Have you ever met a new friend and immediately felt as if you’d always known them? I experienced this not long ago when Yukiko, an online contact of mine (we first met in a group for volunteers of an international vegan organization) visited Paris from her native Japan and we got together for a smoothie in the Marais. It turned out she was planning to move to France very soon to be with her French boyfriend. As we shared impressions of Paris and discussed expat life in France, and of course the usual favorite topic of vegans from anywhere in the world—food and cooking!—the time ran short and we still had more to say. Another meetup was thus in order, and we decided to make it a culinary one so she could introduce me to one of her favorite Japanese dishes.

One chilly day not long after, she appeared at my door with a smile, bearing a cloth shopping bag full of goodies—fresh organic oranges, carrots, green onion, ginger root, vegetable bouillon and, best of all, some homemade miso that she’d brought with her from Japan! On my end, I’d stocked up on ramen noodles, sesame paste and toasted sesame oil, shiitake mushrooms and soymilk. We put on aprons, rolled up our sleeves, and set to work making the dish she had chosen: tantanmen (担々麺), a Taiwanese-Japanese fusion dish featuring Chinese ramen noodles and a Japanese-style creamy miso broth, served with a crisp carrot salad for a balance of textures in line with the traditional Japanese approach.

As we worked, Yukiko and I chatted about this and that and all kinds of things and Sésame padded in and out of the kitchen, the tip of his tail curled into a question mark, checking on our doings and trying to detract our guest’s attention to himself. We kept discovering more and more things we had in common, from similar past (mis)adventures in the romance department to literary interests and even our age—we were born the same year, exactly one month apart! In spite of all our chatter, we eventually managed to finish the dish, and sitting down to this fragrant soup at the end of the afternoon was just heavenly.

Tantanmen has since become one of my new favorite dishes. It’s the perfect comfort food for a chilly winter day, especially around this time of year when sunshine and fresh warm breezes are but a distant memory and there’s at least another month of cold ahead. The creamy miso broth with earthy garlic notes and a touch of spicy cayenne warms your tummy while the noodles fill it, the tender shiitake mushrooms and toasted sesame add an extra dimension of texture and flavor, and the tangy ginger and citrus of the carrot salad provides a burst of freshness that reminds you of the spring season that is surely coming back around sooner or later.

Since we can all benefit from a warming winter pick-me-up right about now, I decided (with Yukiko’s blessing) to share her recipe with you!

There’s some room for variation in this dish, for example substituting seitan or tofu for the mushrooms or using a different crisp vegetable (cucumber, radish or a crunchy lettuce such as romaine) in place of the carrot, according to what you have on hand.

The soup and salad may be served separately, as shown in the main photo above, but they’re best enjoyed together for the contrast of textures, so for the presentation you may opt to place the salad directly on top of the noodles, either to one side as shown in the last photo below, or all around the edges of the dish, leaving the noodles and mushrooms visible at the center.

Carrot salad with tangy sesame-ginger dressing

Serves 2 (about 3/4 cup dressing; some will be left over)

  • 14 oz. (400 g) raw carrots, julienned or roughly grated
  • small bunch fresh parsley or cilantro
  • 4 tablespoons sesame paste (tahini)
  • juice of 1 orange
  • 1 tablespoon soy sauce
  • 1 teaspoon toasted sesame oil
  • 1 teaspoon grated fresh ginger

Equipment needed: food processor or blender for the dressing, julienne peeler or other device (spiralizer, grater) for the carrot (or just cut julienne style with a regular knife)

Start by making the dressing (can be made even a day ahead). Place the sesame paste, orange juice, soy sauce, sesame oil and grated ginger in your food processor or blender and pulse until you have a creamy consistency. Taste and add more soy sauce, sesame oil or ginger if needed.

img_3791-x

Julienne the carrots, roughly chop the herbs, and toss together in a salad bowl. If you will be serving the noodle soup within the hour, you can go ahead and add the dressing, tossing to coat the carrots evenly. If you’re using a more delicate item such as lettuce or cucumber in place of the carrots, wait to add the dressing just before serving or your salad may wilt. Add the dressing a little bit at a time; you probably won’t need the whole amount, but it’s good to have it on hand in case you do! (If some remains, it makes an excellent dip for crudités, and can also work as a spread in a bánh mì type sandwich.) Transfer to serving bowls and top with an extra sprig of parsley.

Creamy miso ramen soup

Serves 2

  • 10 oz. (280 g) brown rice ramen noodles, or other noodles
  • 6 oz. (175 g) fresh shiitake mushrooms
  • 1 tablespoon miso, preferably red
  • 2 tablespoons blond sesame paste (tahini)
  • 1 cube vegetable bouillon
  • 2 tablespoons sesame oil, divided
  • 1 and 3/4 cup (400 ml) unsweetened soy milk
  • 3/4 cup to 1 cup (200-250 ml) hot water
  • 2 cloves garlic
  • 1 tablespoon soy sauce, or more to taste
  • pinch cayenne pepper
  • 2 green onions/scallions

img_3801-x

Begin by rinsing and slicing the shiitake mushrooms.

img_3805-x

Place them in a nonstick skillet or frying pan over medium heat, without any oil at this stage as the mushrooms will release liquid as they cook. As always with mushrooms, the volume will reduce considerably, so don’t worry too much about overcrowding at the beginning if your skillet is on the smaller size, as is this one in the photo above.

While the mushrooms cook, mince one clove garlic.

img_3812-x

When the mushrooms have become tender and browned, as shown, you can push them to one side and, tipping the skillet slightly, add the toasted sesame oil and minced garlic to the other side. Reduce the heat to low or medium-low, cook the garlic a minute or two, stirring gently, then mix it in with the mushrooms and remove from heat. Note that this is just my own convenience-based approach and not the way my friend did it. You can alternatively remove the mushrooms and return them to the pan again to combine them once the garlic has browned. Set the mushroom-garlic mixture aside. Ideally, keep them in the skillet and cover them so they retain some of their heat (unlike what I have done in the photo below). 😉

img_3815-x

Prepare your ramen (or other) noodles according to the directions on the package, being very careful not to overcook them because they will be heated further once combined with the hot broth at the end. If in doubt, go for al dente. Drain the noodles, return them to the pan they cooked in, cover to maintain the heat and set aside.

img_3798-x

You will now make the creamy miso broth. Combine the sesame paste, the remaining clove of garlic (minced), miso paste, bouillon cube, soy sauce (not shown) and 1 tablespoon of the toasted sesame oil in a small or medium ceramic or glass bowl. Ideally, you should prepare these ahead of time so the mushrooms and noodles don’t lose too much heat while you make this part. Heat 1 cup water in a tea kettle, but not to boiling. If you have a way to check the temperature, it should be around 158°F (70°C). Add about 3/4 cup hot water to the bowl and whisk to combine.

img_3822-x

Heat the 1 and 3/4 cup (400 ml) unsweetened soymilk on the stovetop until close to simmering (do not allow to reach a boil). Turn off the heat and quickly incorporate the miso mixture with a whisk. Important: avoid reheating after this stage, and definitely do not bring it to a boil since the soymilk would most likely separate and the health benefits of the miso (a fermented product) would be neutralized.

Add the pinch of cayenne pepper, taste, and adjust if needed. If you want the broth to be saltier, add a bit more soy sauce. Cover the broth and transfer the drained noodles directly to the serving bowls. At this point, you will want to work somewhat fast since you need to put everything together without losing too much of the heat—this is why it’s useful to have the salad already prepared ahead of time.

img_3824-x

Ladle the broth over the top of the noodles, dividing it evenly between the two bowls, until you have the right quantity of broth for a soup but the noodles can still be seen poking through the top.

img_3826-x

Add the shiitake mushrooms to the top of the noodles and ladle a bit of the broth over the top of them. Top with sliced green onions and you’re ready to serve your dish!

img_3830_d

As I mentioned above, you can serve the soup and salad separately, as shown here, or in the same bowl, as below. Encourage your guests to combine noodles and salad together in each bite. 🙂 You will want to remember to provide a spoon too!

img_3849-xb

I hope you enjoy this soup, a fusion dish that celebrates international encounters and friendship. It tastes best when made with a friend! 🙂

Variations: Instead of mushrooms, use finely sliced tender seitan or diced tofu. Substitute lettuce leaves or sliced cucumber for the carrot.