It’s easy to get overly ambitious around Christmastime and to plan a number of grand meals and complicated desserts, only to wake up one day and realize it’s already the 23rd or 24th and you don’t have the right ingredients or enough time to make everything you wanted. This is especially likely to happen, for some reason, with dishes that you hope to bring to holiday parties, escalating your anxiety levels further. But never fear, your favorite blogger is here to the rescue! Today I bring you a very easy-to-make traditional French confectionery creation that will nevertheless impress just about everyone. And since the toppings can vary greatly, you might already have everything you need in your kitchen cupboards.
These little Yuletide delicacies hail from the south of France and the fruits and nuts traditionally used represent the colors of the robes worn by the friars in four mendicant orders during the Middle Ages. These are gray (raisins) for the Dominicans, brown (hazelnuts) for the Augustinians, white (almonds cut in half) for the Caramelites and purple (fig or cranberry) for the Franciscans. As these friars subsisted on charitable offerings, they were referred to as mendiants (beggars), and the confections took on the same name. These items are also among the 13 desserts served at the end of the traditional Christmas meal in Provence.
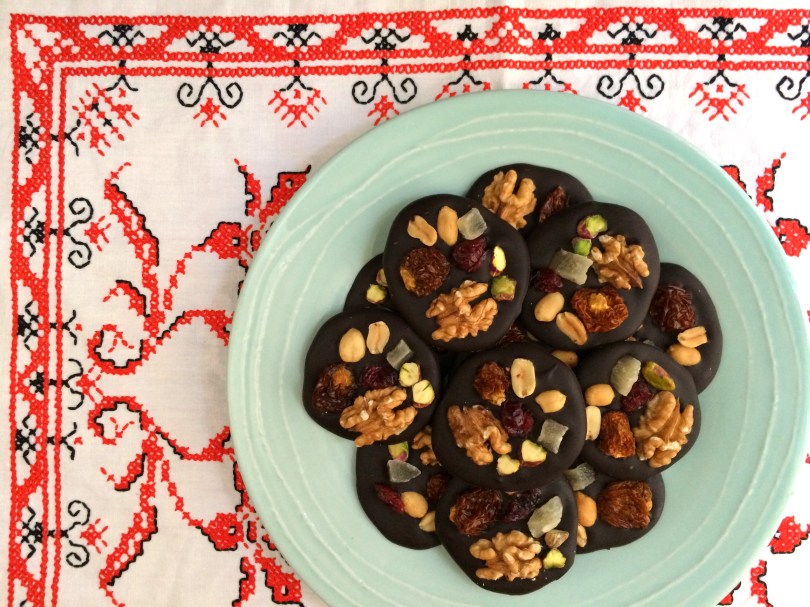
Today, many types and combinations of nuts and fruits are used, so feel free to use whatever you have on hand! I used walnuts, peanuts, pistachios, cranberries, physalis and pineapple.
Chocolate mendiants
Makes 12 to 15 mendiants
Ingredients
about 6 oz (180 g) dark chocolate in bar form (or chocolate chips)
dried fruit (cranberries, cherries, raisins, apricot, citrus segments, etc.)
other items such as pumpkin seeds, candied ginger, white chocolate chips, toasted coconut chips, colorful Christmas sprinkles, fleur de sel, gold leaf
Equipment needed: double-boiler or metal mixing bowl plus saucepan, parchment or waxed paper
Begin by assembling all the fruits and nuts you will use, so that you’re ready once the chocolate has melted.
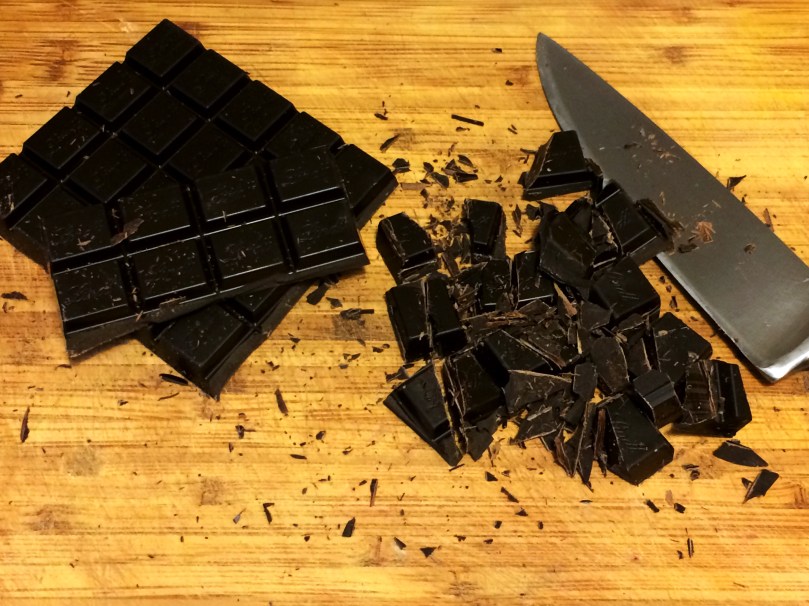
Break or chop your chocolate bar into more or less evenly sized pieces.
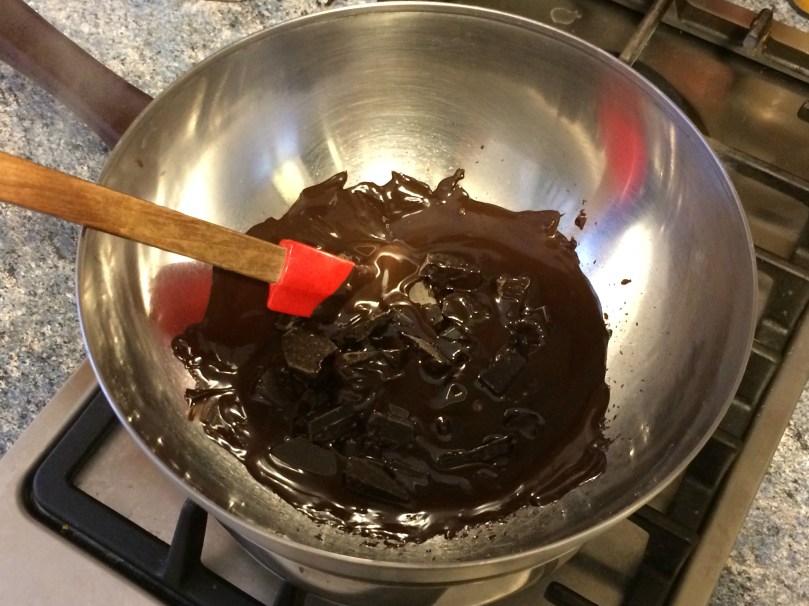
Next, heat some water in a medium-sized saucepan and place a metal bowl on top of it (or a second, smaller saucepan for a double-boiler). Be sure that the water in the saucepan does not touch the bottom of the bowl or second saucepan. Place the chopped chocolate in it and heat, stirring occasionally with a heat-proof spatula.
Once all of the chocolate has melted, turn off the heat but keep the bowl on top of the saucepan full of hot water.
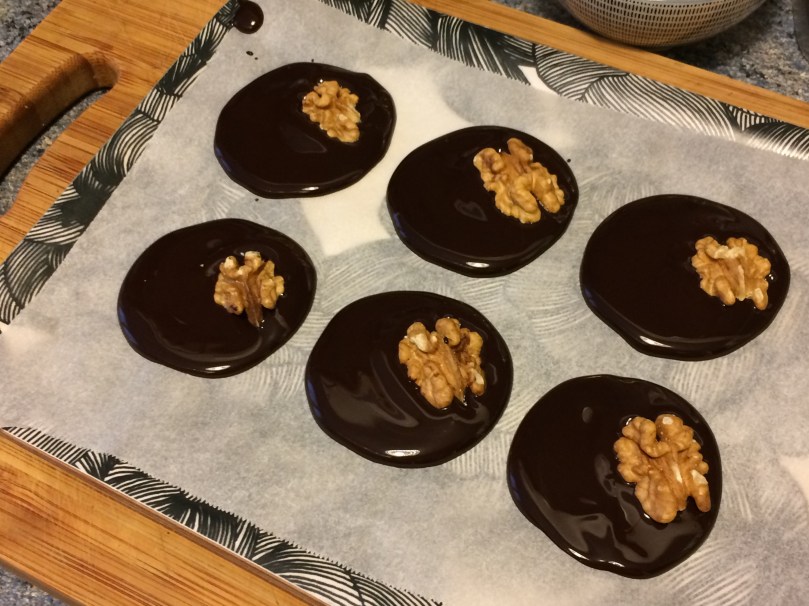
Line a tray with parchment paper and, using a teaspoon (the kind you use to stir your coffee, not the measuring kind), form small, round disks. After creating them, go back and add a bit more on the top of each one to ensure that they are thick enough. Make only six at a time so that you have time to add all the toppings before the chocolate firms.
Add your toppings. I like to start with the larger items and then add the other ones around them.
Once you’ve finished the first batch, put the tray in the fridge and continue making mendiants until you have used up the rest of your chocolate. The mendiants will be set after an hour or two of chilling (allow two to three hours to be on the safe side).
Serve your mendiants on a platter at a party, or box them up as a gift!
These mendiants were my Christmas gift to the concierge of my building, who brings our mail to our doors and takes time out of her morning to give Sésame (who is in love with her) a thorough scratching and petting on the days when my mail includes a package. This year, I included some photos of the furry little guy, which she was delighted to receive (they now adorn her refrigerator door, I was told). 🙂
After living in France for almost eight years now, and having traveled a lot before that, my sense of nationality and culture is somewhat fluid. I’m not French, but I also don’t really feel American anymore. Yet I still have a taste for certain American foods that are not always met with enthusiasm by people from other places. One of these is peanut butter. Often relegated to obscure shelves of mainstream French supermarkets, including the “world cuisines” section, peanut butter is not a guaranteed find at the average grocery store. And when you do encounter it, it’s sometimes quite expensive or not very good. But about a year ago I discovered a nice one from the Ethiquable brand in the fairtrade section of my local Franprix. It comes from a woman-inclusive cooperative in Nicaragua and isn’t any more expensive than most of its non-fairtrade (unfairtrade?) counterparts. And so, safe in the knowledge that I have this steady supply available, I have been freely experimenting with peanut-based recipes like Thai satay sauce, peanut-butter cheesecake (yep!) and of course, desserts with the magical peanut butter and chocolate combination, of which we will see an example below!
First, some history, and the answer to a pressing question. Is peanut butter actually from the United States? A widespread legend has it that it was invented by George Washington Carver (1864-1943), an American botanist and inventor who was born into slavery. But in 1884, before Carver had even begun studying botany, pharmacist Marcellus Gilmore Edson of Canada patented a process to make peanut paste. And much, much before that, as far back as the first century of the Common Era, the Aztecs also mashed roasted peanuts into a paste. So, it’s actually a Mexican-Canadian creation.
But Americans are still very fond of it. We are the world’s leading exporter and, according to this source, we eat around 700 million pounds (317 million kg) of peanut butter per year (about 3 pounds/1.4 kg per person). That’s not too hard to believe. When I was growing up, children brought their lunch to school, and very often it was a peanut butter and jelly sandwich. I carried mine proudly in my metal Pigs in Space lunchbox alongside carrot sticks and a Hostess cupcake. Now, peanut butter has apparently been banned from most schools due to the high number of kids with peanut allergies. I don’t understand how this allergy can have become so common, but that’s a matter for the experts to solve.
So the other week, I began experimenting with chocolate-avocado mousse, and the idea came to me to pair it with peanut butter in some way. I looked around my kitchen and spotted my set of mini-pie plates, and was on my way. The crust proved a bit tricky. My first version was made of ground almonds with peanut butter as a binder, but it wasn’t peanut-buttery enough for me. A second attempt with the addition of toasted millet (for crunch) wasn’t quite what I was looking for. Finally, a third try with a combination of ground roasted peanuts and ground almonds was just right. The rich-but-light texture and slight fruitiness of the mousse is nicely complimented by the earthy, salted peanut crunch of the crust.
As desserts go, this easy, no-bake recipe is definitely on the healthy side. It does contain fat (from the peanuts, avocado and coconut), but has no cholesterol or refined sweetener. And it packs a punch as far as protein goes, so the next time someone asks you where you get your protein, you know what to answer!
Chocolate & peanut butter pies
Makes two mini-pies (5 in./12 cm in diameter at widest point)
Note: several hours before making this recipe, place the coconut cream/milk and your metal mixing bowl plus the beaters of your mixer in the refrigerator to chill. The lower temperature helps ensure a nice firm whip.
Ingredients
For the peanut crust
1/2 cup (75 g) salted peanuts, whole (snack/party kind)
2 tablespoons (12 g) ground almonds
2 tablespoons peanut butter, either creamy or chunky
1 teaspoon maple syrup
For the chocolate mousse filling
1 large avocado (9 oz./250 g weighed when whole)
2 tablespoons unsweetened cocoa powder
2-3 tablespoons maple syrup, or more to taste
1/2 teaspoon vanilla extract
small pinch salt
For the whipped coconut cream
3/4 cup (200 ml) coconut milk (full-fat) or coconut cream, chilled
1-2 tablespoons maple syrup
1/4 teaspoon vanilla extract
For the garnish: roughly chopped bar chocolate, cocoa powder, finely chopped peanuts or gomasio
Equipment needed: food processor for the nuts, electric mixer with beaters to whip the cream, plastic wrap, mini-pie plates (or small bowls/ramekins)
First, grind the peanuts by pulsing them just a few times. Be careful not to grind them too much, or (depending on the power of your processor) you could end up with something closer to peanut butter and the structure of the crust will not hold up as well. I stopped when my peanut chunks looked about like this (see next photo):
Now add the ground almonds, peanut butter and maple syrup. Don’t be tempted to add more maple syrup, as it could make the crust too soggy. It’s okay if the crust is not especially sweet, since the filling and whipped cream will be.
Combine the ingredients, mixing and pressing the mixture against the sides of the bowl with a large spoon or spatula (alternatively, knead with your hands) until you have a sort of sticky dough. Taste it at this point and if it seems to be lacking salt, for example if you have used a natural peanut butter that contains no salt, consider adding a small pinch.
Rip off a piece of plastic wrap that is the length of two mini-pie plates. Cover the inside of the pie plate with one end of it and press half of the crust dough into the plate as shown above. Be sure to fill the tops of the ridges well to get a nice result when the crust is unmolded. Then double the plastic wrap back over the top to cover the crust. Repeat with the second pie plate. If you’re making the crusts well ahead of time, you can place them in the refrigerator to chill at this point, stacked together if space is a problem, but if you will be finishing and serving the dessert right away this step is not necessary.
Cut the avocado in half, scoop out its flesh and transfer to your food processor. Add the cocoa powder, maple syrup, vanilla extract and salt. Process until smooth, stopping to scrape down the sides once or twice.
Now you have your mousse! Taste it and add more maple syrup if you want it to be sweeter, and more vanilla or cocoa powder if it seems to need it (the results of different cocoa brands can vary). Process further if you have added something, and be sure that no chunks of avocado remain.
Fill the crust with the mousse. The crust should still be in the pie plate at this point, as the filling process could make it crack if it were unsupported. Next, holding onto both sides of the plastic wrap, carefully lift the crust out of the pie plate and transfer it to a small dessert plate, removing the plastic.
Take the pre-chilled coconut milk or cream, metal bowl and beaters out of the refrigerator. Transfer the milk or cream to the bowl. If using a can of coconut milk, stir the cream and liquid part together before measuring. Add the maple syrup and vanilla extract and beat on high speed until soft peaks appear (this will take a few minutes). Continue until you have reached the desired thickness, but be careful not to overbeat as it can become too thick. If this happens, do not despair as it can be salvaged—just continue beating and it will eventually revert to a more liquid state (unlike overwhipped dairy cream, which turns into butter!).
When ready to serve the dessert, top each pie with a dollop of the cream and decorate the top with a garnish of roughly chopped bar chocolate, a sprinkle of cocoa powder, some finely chopped peanuts or a pinch of gomasio.
Note that the avocado will begin to oxidize and darken upon contact with the air, so it is best to fill the crusts not long before they will be served. Alternatively, if the top has already darkened, you could opt to cover the entire top with the whipped cream. The lighter color of the mousse inside would then not be noticeably different from the color of the top, and you would also have an interesting tiramisu effect.
Variations:
Make the crust with ground almonds and almond butter (no peanuts) for a chocolate & almond version.
Add banana to the mousse for a tropical flavor.
Serve parfait-style in clear glasses so that the various layers show, alternating with additional layers of whipped cream and chocolate mousse.
When I arrived in Barcelona earlier this year for my three-week stay, I hoped to learn a lot about the city, the region of Catalonia and Catalan language and culture. Among my most burning questions was what is Catalan cuisine exactly, and how it is different from the food of the rest of Spain?
Answers soon began to appear. One afternoon at the beginning of my stay, I entered a bookstore in the city’s old town in search of a small spiral notebook. As I browsed, I noticed a shelf of cookbooks, some of them devoted to traditional Catalan food. Aha! And I had just begun wondering how easy it might be to adapt the recipes to plant-based versions when my eyes fell on the cover of Vegana i Catalana, whose title left no room for ambiguity. Santa Eulàlia, the city’s patron saint, was clearly smiling on me. It was my lucky day!
The book is in Catalan, but as a translator who speaks French and (some) Spanish, and furthermore is always up for a linguistic challenge, I didn’t see that as any serious obstacle—Catalan is like a combination of the two. I browsed through the pages, recognizing the names of some dishes I’d already heard of (pa amb tomàquet, crema catalana) and soon forgetting my recent resolution not to buy any more new cookbooks for a while. What’s more, according to the book’s publication date, it had just been released a few weeks earlier. Who was I to question the workings of fate?
Marta Castells
In Vegana i Catalana, author Marta Castells, a cooking instructor who focuses on healthy cuisine and a holistic approach to food, has revisited the classics of Catalan cooking for people of the region who would like to shift to a more plant-based diet but still want to enjoy the traditional flavors they know and love.
During my time in Barcelona I also dined at the renowned vegetarian restaurant Teresa Carles. I asked the server to point out only the (vegan) Catalan dishes among the wide variety of items on the menu, and soon settled on a dish called rossejatde fideus.
Fideus dish at Teresa Carles
A pasta dish prepared risotto-style and served in a rustic paella pan, it included mushrooms, seaweed and the chef’s own “cocosepia” blend made with coconut and black garlic (giving the dish a darker color). It was topped with a few spoonfuls of allioli, a garlic sauce (similar to the French aïoli). It was fantastic. I was naturally quite pleased, when I returned to my copy of Vegana i Catalana, to find a very similar dish called fideuada in its pages. There was even a recipe for the garlic sauce.
Back home in Paris, I translated and tried my hand at a few of Castells’s recipes, including the fideuada. At the same time, in a quest to continue learning about traditional dishes, I ordered a used copy of Catalan Cuisine by Colman Andrews, which has recipes but is more like a treatise on the history and food culture of Catalonia. It’s a great resource offering a wealth of information, and although it contains some recipes that call for animal products, others are (accidentally) vegan and, with some creativity, most can be veganized (another challenge that I love).
Andrews informs us that the Moors were the ones who brought pasta to Catalonia, by way of Greece, back in the eighth or ninth century. Called alatria at the time by the Spaniards (from the Greek itria), pasta is mentioned in the Libre de Sent Soví (c. 1324), the first known Catalan cookbook. Today, Catalonia’s most popular native pasta is fideus (the name is thought to derive from the Arabic fada, meaning to overflow): a short, very thin noodle similar to Italian vermicelli but developed independently and prepared in a different way. Rather than being boiled in water and then mixed with a sauce, it is cooked slowly in a broth, like risotto, absorbing flavor along the way.
Marta Castells and her publisher have kindly allowed me to share my English translation of her fideuada recipe, to which I have also made a few small adapations based on what worked best for me. First, not having easy access to real fideus pasta here, I bought Italian vermicelli and needed slightly less broth than the amount in the recipe (in the book it’s 1 cup pasta to 3.5 cups of broth, and in my adaptation it’s 1.5 cups pasta to 3 cups broth—feel free to try the first set of proportions if you’re making this with actual fideus.). I also opted to brown the pasta in a dry pan instead of with oil, and finally added some black olives that were not called for in the original recipe. In the original allioli recipe, the silken tofu is marinated in the garlic, which is later removed, but I opted to incorporate the garlic and skip the marination step.
This dish has already become a new favorite for me, one I expect to make again and again. The pasta is very flavorful, having absorbed the garlicky, paprika-seasoned vegetable broth, and finishing it off under the broiler gives it a nice crispy top. Pan-roasted smoked tofu and olives give the dish robustness and aromatic depth. The garlic sauce, a revisited version of allioli with eggs (allioli amb ous), is simply divine and provides a nice textural contrast to the crispy noodles. While allioli is often described as a mayonnaise, I didn’t want to do that here because this allioli, made with silken tofu, garlic, olive oil, turmeric for color and kala namak salt (another addition of mine), is so creamy and smooth that to call it a mayonnaise, triggering associations with the store-bought kind, would be to do it an injustice.
So here, at last, is the fideuada or, as it can also be called, Catalan pasta paella!
Creamy garlic sauce (allioli)
Makes 1/3 cup sauce, enough to top two servings of Catalan pasta paella
Ingredients
4.2 oz (120 g) silken tofu (about 1/3 cup)
1 clove garlic
1 tablespoon olive oil
pinch kala namak (Indian “black” salt), or regular salt
dash ground turmeric
Equipment needed: small food processor or blender
Finely mince the clove of garlic, or crush using a garlic press. Place the silken tofu, garlic and olive oil in a mini food processor. Add a dash of turmeric (for color—only a tiny amount is needed), and pinch of kala namak (its sulfurous flavor recreates an egg-like taste but if you cannot find this salt, regular salt is fine). Process, scraping down the inside of the bowl occasionally, until you have a homogeneous, creamy sauce. Taste and add more salt if desired. Transfer to a small bowl and chill until needed.
This sauce can also be used as a base for a creamy salad dressing or tartar sauce.
Catalan pasta paella (fideuada)
Serves 2
Ingredients
1.5 cups (125 g) egg-free vermicelli pasta
4.2 oz. (120 g) firm tofu, preferably smoked
3 cups (700 ml) vegetable broth
half a fresh tomato or 1/4 cup canned stewed tomato
Equipment needed: large skillet or paella-type pan, small skillet, mortar and pestle (optional), oven (optional).
Begin by chopping the tofu into bite-sized cubes. Place 1 teaspoon olive oil and 1 teaspoon tamari or soy sauce in a small skillet over medium heat.
Once the pan is hot, add the tofu and sauté, stirring occasionally, until browned on both sides. Transfer to a plate covered with paper towel and set aside.
Next, prepare the garlic, paprika and tomato mixture, which you will incorporate into the vegetable broth. Finely mince the garlic and place in a mortar with the 1/2 teaspoon ground paprika and crush. If you don’t have a mortar, you can skip this step, but in that case be especially sure that the garlic is finely minced. Finely dice the half-tomato.
Add 1 teaspoon olive oil to a non-stick pan over medium heat. Once the pan is hot, transfer the garlic-paprika mixture to it and add the diced tomatoes. Sauté, stirring frequently. When the tomato has broken down and the garlic is smelling nice (7 or 8 minutes), remove from heat. It will resemble the mixture in the photo above.
Scrape this mixture into a bowl containing the 3 cups of (warm) broth and whisk to combine. If making your broth from bouillon cubes, err on the side of less bouillon since the black olives (if using) are quite salty. You can always adjust the saltiness later with more tamari or soy sauce.
Then, place a large non-stick or seasoned skillet or paella pan over medium heat. When the pan is hot, add the vermicelli (no oil is needed, but if you want to use it, add 2 teaspoons). You will soon see the color of the pasta on the bottom begin to turn golden pretty soon. Pay close attention and stir frequently to ensure even browning.
Continue browning the vermicelli, stirring frequently, until it reaches the shade you’re aiming for. If you do a Google images search for fideus, you’ll see that the pasta is sometimes a lighter color (with a milder taste), and sometimes darker. The level of darkness is up to you.
Not long after the pasta reached this color (about 13 minutes), I stopped the browning by beginning to add the broth.
Add the broth in stages, about a half-cup (120 ml) at a time, stirring as you go. Wait until the pasta absorbs the broth before adding more. When you have added about half of the broth, incorporate the tofu and optional olives. Continue all the broth has been added to the pasta. Taste occasionally and check for doneness; if the pasta is completely cooked but you still have a bit of broth left over, you don’t have to add it. Adjust the seasonings if desired, adding a splash or two of tamari if you want it to be saltier.
This step took me about 20 minutes (after the browning), so this dish definitely counts as slow food! But it’s well worth it.
Preheat your oven, on broiler mode, to 450°F (about 230°C) and place the skillet under the broiler for 5 minutes to finish the dish. This will make the top crispy, but is not an essential step so can be skipped if you are ovenless.
The dish is now ready to be served! Transfer the pasta to two shallow bowls or plates, distributing the tofu and olives evenly, and top with a generous dollop of the garlic sauce. Garnish with fresh basil, parsley or other herbs. Serve with the remaining sauce on the side so people can add more.
Variations:
Instead of tofu, use lightly pre-cooked (still firm) slices of sweet potato, pumpkin, zucchini, artichoke, broccoli florets or any other vegetables that strike your fancy.
Consider mixing in some additional large chunks of fresh tomato at the middle of the broth-absorption step (so they’re warm and softened but not broken down into sauce).
Create a “seafood” version using vegan shrimp, or a mix-and-match paella by also adding slices of vegan chorizo (a Spanish sausage).
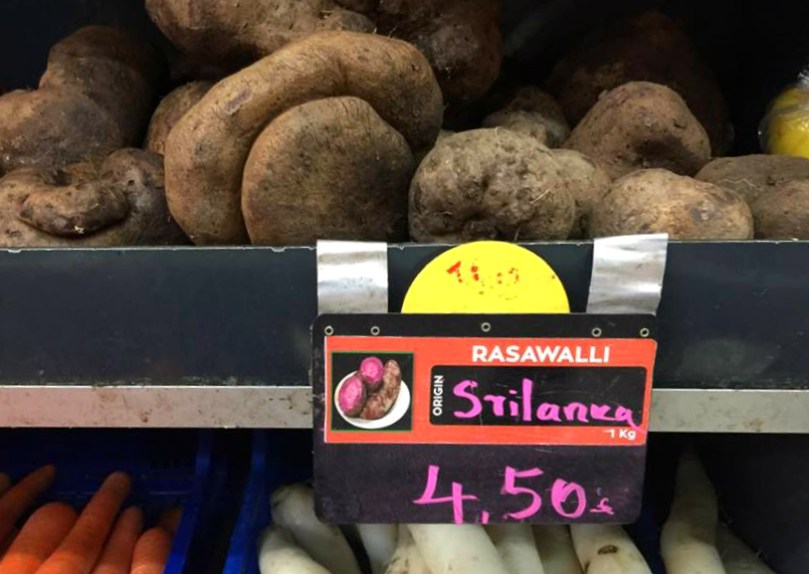
On a recent trip to my favorite cash & carry in the South Asian neighborhood, inspired purely by the photo on the shelf, I picked up a new (to me) vegetable to experiment with. It looked like some kind of great-grandfather root with rhinoscerosy skin, halfway between sweet potato and celeriac. A Google search later on informed me that it’s a purple yam, and that its Latin name is Dioscorea alata. It’s native to Southeast Asia but now also grows in other parts of the world including South America, Australia, China, Africa and the southeast US. Its Tamil name, used on the label in this Sri Lankan shop, israsa valli kilangu, while in Yoruba, a language of southwestern Nigeria, it’s called isu ewura and in the Philippines it’s ube. The purple yam has apparently gained some fame among Western foodies under this name.
In folk medicine, Dioscorea alata is thought to be effective at treating ailments such as fever, leprosy and hemorrhoids. Some even believe that consuming it increases the likelihood of bearing twins!
In Sri Lanka, the purple yam is often cooked and mashed to make a sweet dish. As it contains a lot of starch, it can also be formed in a mold rather like polenta, and then cut it into slices or other shapes.
For my first experiment with this tuber, I decided to try the basic mashed form. As it doesn’t have much flavor on its own, this yam benefits from a bit of vanilla and/or cardamom (the latter being a traditional ingredient in the Sri Lankan dish). The end result is a slightly sweet mash that seems ideal for breakfast, so I am calling it a porridge. Warm and filling, it could become your new favorite comfort food.
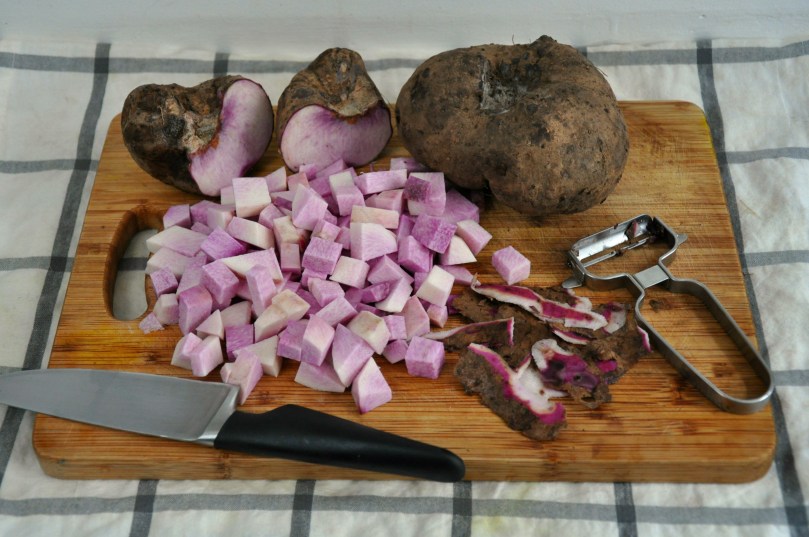
Incidentally, I was disappointed at first that my rasa valli, once peeled, turned out not to be the bright magenta promised by the label photo, but rather a light lavender color. Maybe some are just more purple than others. But lavender is nice too—one of my favorite colors actually. So it’s okay. It’s still sort of (vaguely) in the red-violet range, and therefore acceptable enough for the first recipe to appear on this blog.
Sri Lankan purple yam porridge
Serves 2 (as a fairly filling breakfast)
Ingredients
3 cups (350 g) peeled and cubed purple yam (one large yam)
1/2 cup (118 ml) coconut milk from a can, some cream from top of can reserved
Begin by peeling the yam. Caution: these yams are quite slippery characters once peeled, and will want to suddenly fly out of your grasp and across the kitchen!
Chop the yam into evenly sized cubes.
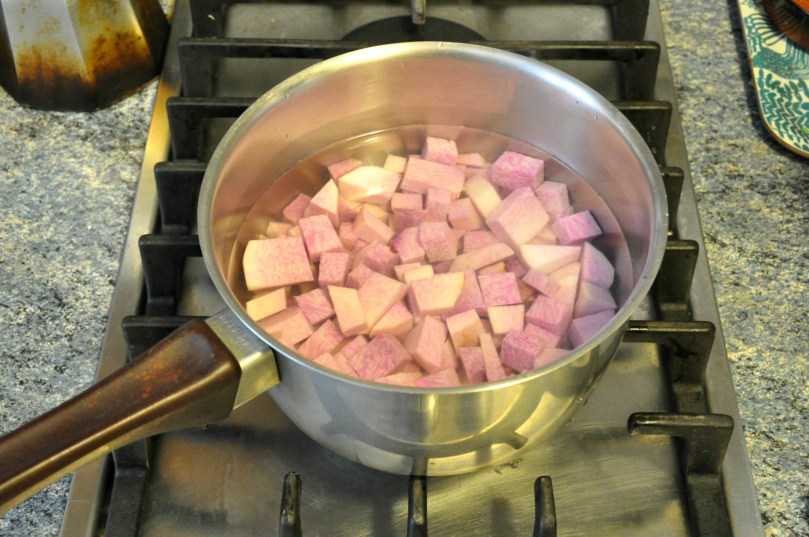
Next, place the cubed yam in a medium-sized saucepan and fill it with enough water to cover it. Bring to a boil, then lower the heat to maintain a gentle simmer. After about 20-25 minutes, test the yam for doneness with a fork. When the cubes seem mashable, turn off the heat and drain most of the water from the pan. With a hand-held potato masher (or large fork), mash the cubes until you have something that resembles mashed potatoes. Alternatively, you could process them with an immersion blender or in a food processor, but they will be so soft that this isn’t really necessary, and the partially chunky texture is kind of nice.
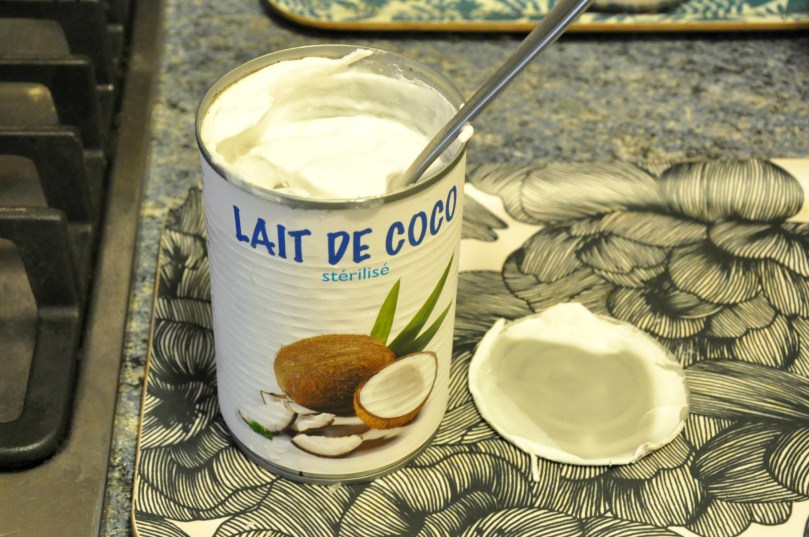
Open up a can of regular (not reduced-fat) coconut milk. Remove a couple tablespoons of the thick cream from the top, transfer to a small bowl, mix with a bit of maple syrup and set aside. This will be the topping.
Stir the rest of the coconut milk in the can so that the watery part at the bottom combines with the thicker part toward the top. Add about 1/2 cup (118 ml) of the mixed coconut milk to the saucepan and turn on the heat again to medium-low. Use a bit more if you want the porridge to be more liquidy.
Continue mashing the yam together with the coconut milk until you achieve a uniform consistency. Now add the maple syrup, vanilla, salt and optional cardamom and combine well. Taste and add more maple syrup and cardamom if you prefer it sweeter or with a stronger cardamom flavor. Alternatively, you can drizzle extra maple syrup on top of the porridge once it has been transferred to the bowls.
Transfer the porridge to two medium-sized bowls (or one larger bowl to share, for romantic types!) and top with the reserved sweetened coconut cream, which will melt a bit. Garnish with added ground cardamom, ground açaí (shown here), dried coconut or edible lavender flowers. Enjoy!
Variations: use regular yams or sweet potatoes, vary the spices (cinnamon, nutmeg, etc.), add golden raisins or chunks of fruit.


 After living in France for almost eight years now, and having traveled a lot before that, my sense of nationality and culture is somewhat fluid. I’m not French, but I also don’t really feel American anymore. Yet I still have a taste for certain American foods that are not always met with enthusiasm by people from other places. One of these is peanut butter. Often relegated to obscure shelves of mainstream French supermarkets, including the “world cuisines” section, peanut butter is not a guaranteed find at the average grocery store. And when you do encounter it, it’s sometimes quite expensive or not very good. But about a year ago I discovered a nice one from the


 When I arrived in Barcelona earlier this year for