Today I’d like to share a recipe for one of my favorite warming comfort beverages that’s perfect for a rainy day or just whenever you need a little boost physically or to your mood. And not only is turmeric in warm milk with chai spices delicious and calming (try it in the evening at bedtime), but it’s also kind of a superfood with health benefits.
Turmeric has very potent anti-inflammatory properties, helping prevent or alleviate inflammatory conditions such as arthritis and stroke. It contains curcumin, a powerful compound that’s been shown to inhibit the growth of certain types of cancer, from cell mutation to metastasis, killing cancer cells without harming your healthy cells. Many sources recommend taking one teaspoon of turmeric per day, which is why I put a full teaspoon in my turmeric chai latte, but you can definitely use less if the taste is too strong for you, especially at first. I found that the flavor grew on me and I was able to have more of it at once over time. The other spices and the sweetener in this drink also help make the turmeric more palatable.
The exact spices (and quantities thereof) you use in this latte are up to you, but don’t skip the black pepper because it greatly enhances your absorption of the turmeric.
Just one thing to be careful of… turmeric’s bright yellow color is almost impossible to get out of fabric and other porous materials! So be sure not to let this chai latte splash on your clothes or get onto your kitchen towels. Similarly, don’t put anything containing turmeric into a plastic container.
The recipe below is for one serving.
Turmeric chai latte
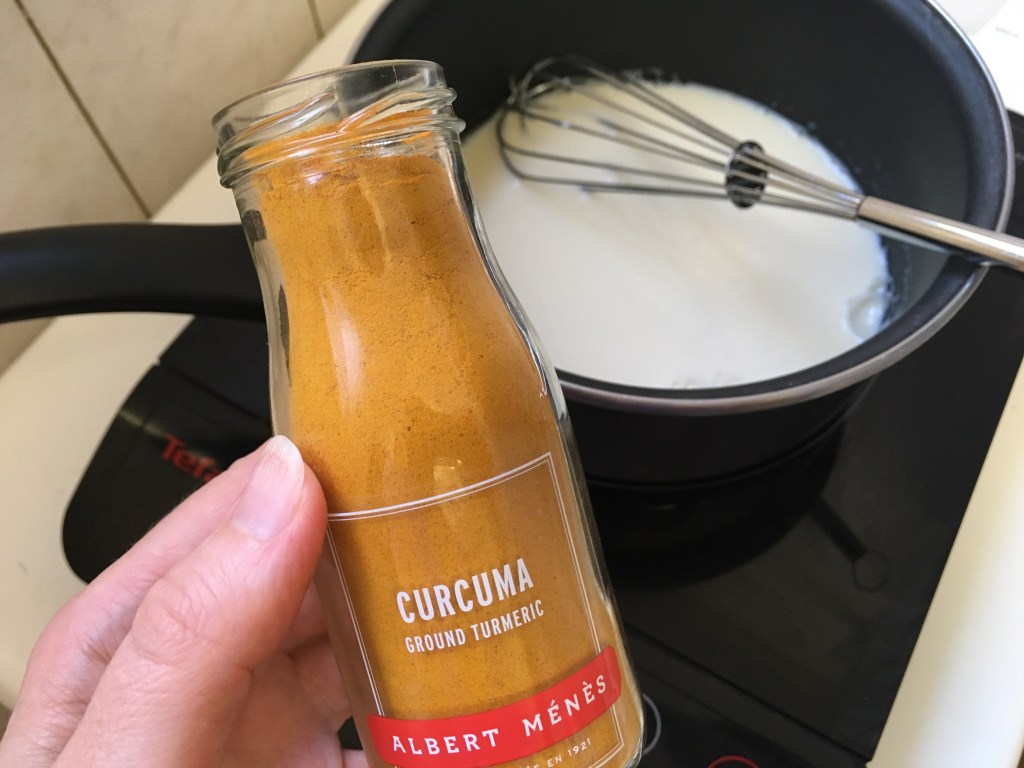
1 cup (240 ml) plant-based milk such as oat or soy
1 teaspoon ground turmeric, or less to taste
1/4 teaspoon ground black pepper
1/4 teaspoon ground ginger
1/4 teaspoon ground cinnamon
1/4 teaspoon ground nutmeg
1/4 teaspoon ground cloves (optional)
1 teaspoon agave syrup, other liquid sweetener or sugar, or more/less to taste
vegan marshmallows (optional but nice!)
Begin by heating up your milk, either on the stovetop or in a microwave, to just below a simmer. Then either turn off the heat or reduce it to very low.
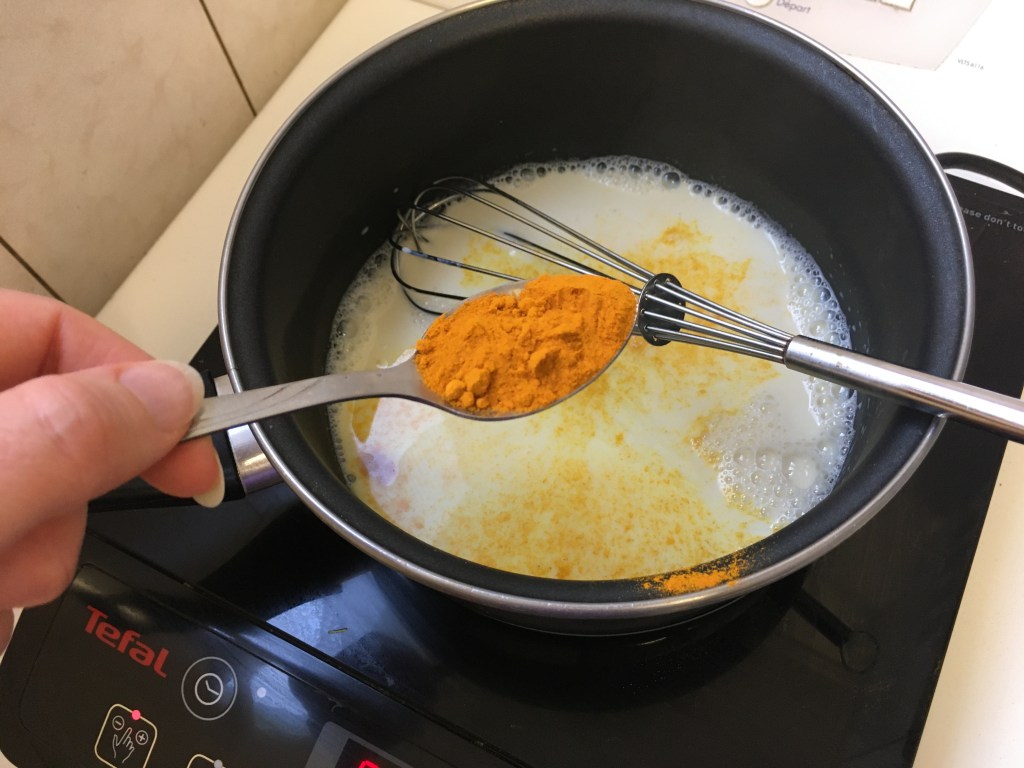
Add the turmeric and other spices.
Whisk everything together to make sure none of the spices form clumps, and to make it a bit frothy.
Now add your agave syrup or other sweetener. Taste and adjust the spices and sweetener to suit your taste.
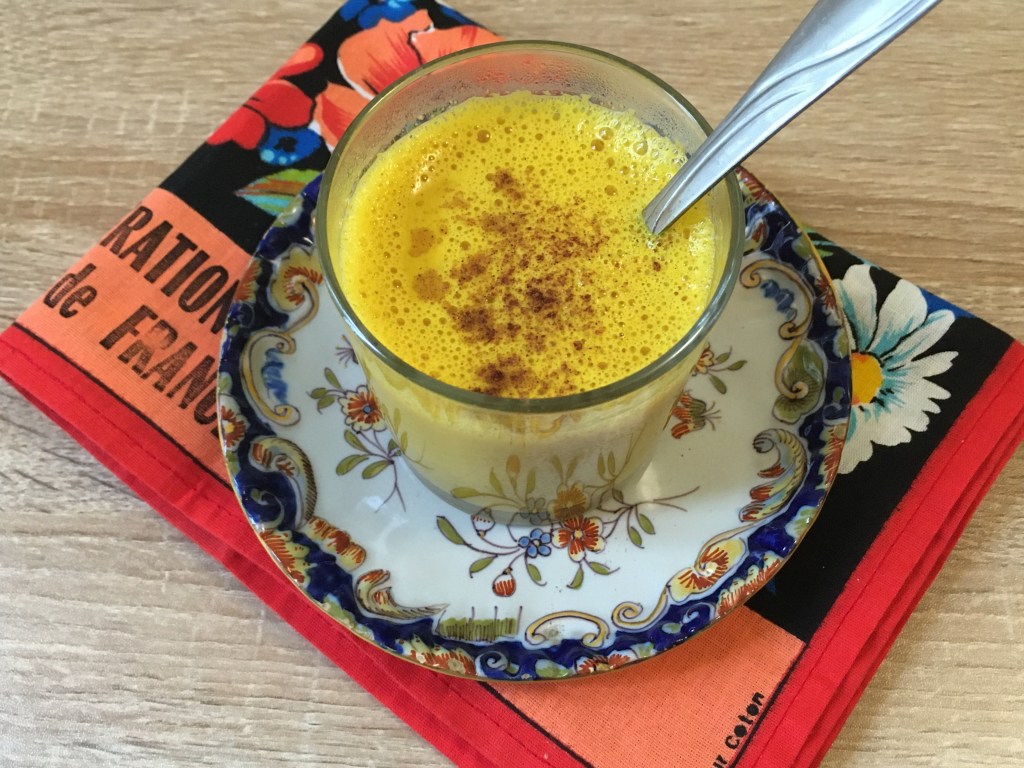
Serve in a glass or ceramic container that’s non-porous enough not to become stained yellow by the turmeric. Top with a sprinkle of cinnamon or any of the other spices in the drink.
And to make this latte into even more of a treat, why not top it with some marshmallows? I used my very favorite vegan vanilla marshmallows (from Ökovital, available at Un Monde Vegan in France) and sprinkled more cinnamon on top.
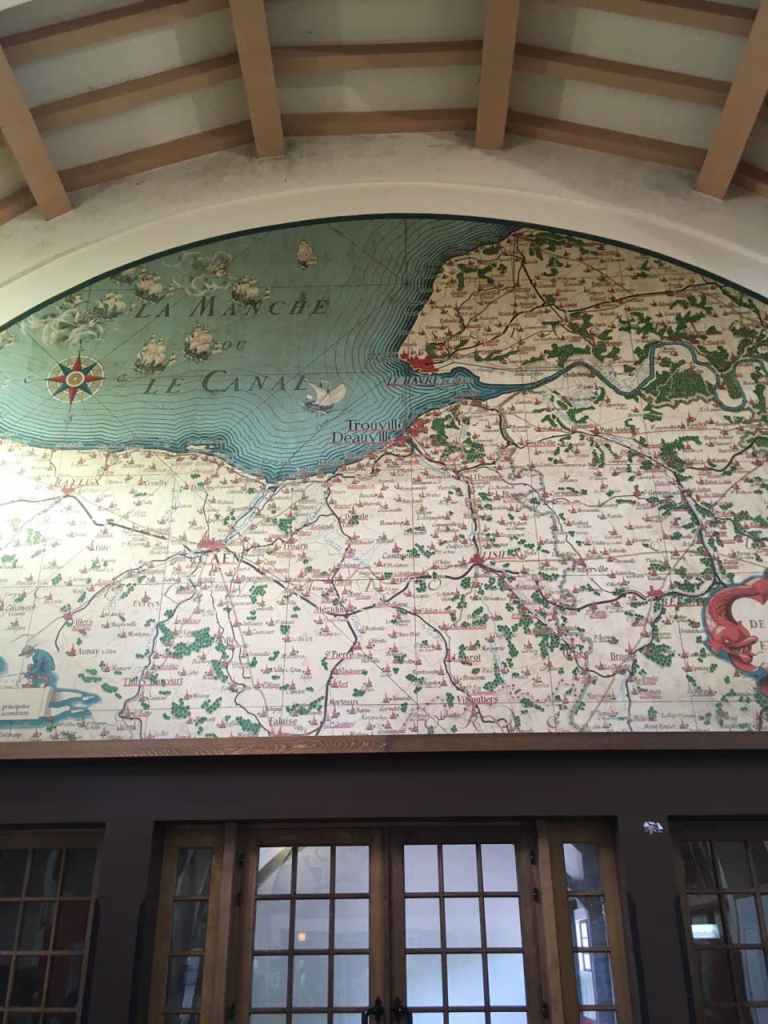
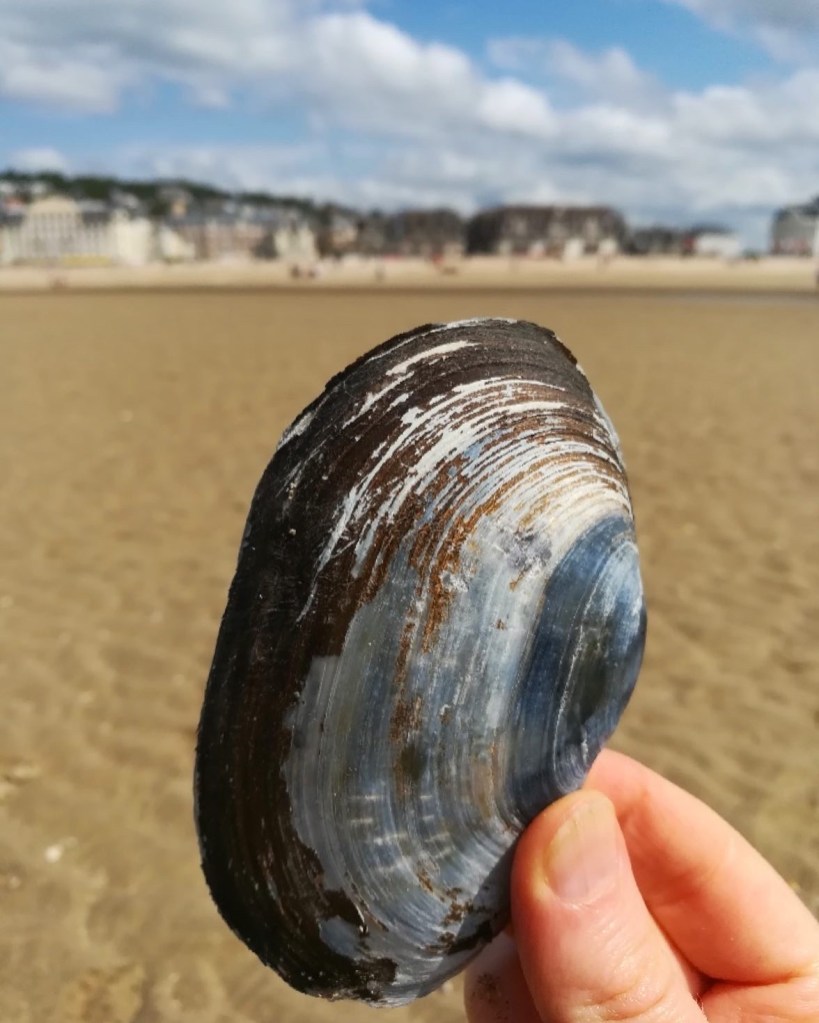
A couple weeks ago, I took my first trip out of Paris since September 2019, and it definitely wasn’t too soon! It was so nice to be on a train going somewhere new again. This was just a short, quick trip two hours northwest of Paris to two adjacent seaside towns, Deauville and Trouville, in the Normandy region. The goal was to see the ocean, swim in it hopefully and just relax.
In the end, it was too cold to swim and rained quite a bit, but just wading along the beach and collecting shells turned out to be very therapeutic. And an unexpected bonus was all the beautiful houses in the two towns.
Here are a few photos to give you an idea (click on them to expand).
There were many beautiful homes (some of them mansions) near the beach on the Deauville side.
One of the highlights was Les Franciscaines, a brand-new cultural center that had just opened its doors in May 2021. Set up on the premises of a former convent, the site integrates ultra-modern details such as this ceiling installation made up of countless clear glass tubes into, on and around the original 19th-century structure. The former central courtyard now houses a reading room – visitors can browse the center’s reading materials for free on site, and members can check them out.
Les Franciscaines also hosts temporary art exhibitions. During our visit, the main one was “Sur les chemins du paradis” with a collection of paintings, sculptures and other works from a range of countries, cultures and traditions related to the theme of heaven and the afterlife. A particularly memorable piece was Bill Viola‘s video installation “Incarnation”.
The center also has a little café with lunch items, desserts, wines and hot drinks. Surprisingly for Deauville, their menu even included a vegan item (the salad shown above, with a nice portion of hummus hiding under the lettuce). Sadly, there were no vegan desserts or plant-based milks for coffee, although it seemed they normally did have oat milk but were just out of it that day.
A very welcome oasis in this not-super-vegan-friendly part of the world was Molybagert, a small fully vegan grocery in Trouville (a few minutes’ walk from Deauville) that also offers lunch items and desserts! The owner/chef was very friendly, helping us choose some local products to bring back as gifts for my friend who took care of Mochi during my absence.
The store has a nice range of food items as well as T-shirts, canvas bags and things for the home.
I fell in LOVE with this amazing vegan cashew-based blue cheese by Tyk Affinage. We got to sample it, and another by the same brand, in the store before buying. Made in the neighboring Brittany region, it was a fairly local product. After getting back to Paris, I discovered you could also (of course!) buy it here, for example at Un Monde Vegan (64 rue Notre Dame de Nazareth 75003).
One of the things we got for lunch was this super yummy croque monsieur with vegan deli slices and cheese. It was a sunny day, so we sat on a bench near the water to eat.
In this part of France you often see these beautiful ceramic hot chocolate bowls (“bol à oreilles” or “bowl with ears”) with names on them. In my search for more information on their origins I found claims by both the Normandy and the Brittany regions. I had been seeing them for years here and there in people’s houses, and when I found my own name I couldn’t resist getting it. If you too would like one, but you have an uncommon name or aren’t going to be in France anytime soon, you can order one online, for example here.
I hope this little bit of armchair travel has inspired you to visit Deauville and Trouville yourself one day!
I recently had the pleasure of visiting a very unique spot in Paris – a place I hadn’t even known existed. A friend had announced he was going to take me to an interesting surprise location, and since at that time museums, cinemas, restaurants and cafés were still closed, I knew it would be someplace outdoors. So I made sure to wear some walking shoes and embarked upon this mysterious adventure with enthusiasm.
Our destination turned out to be just outside the city limits, in the suburb Asnières-sur-Seine to the north of Paris. We took metro line 13, exited at the Gabriel Péri station, and walked for a bit until my friend stopped and pointed to a large gate topped by an elegant Art Nouveau stone arch with the words “Cimetière des chiens” carved into it. A dog cemetery!
I was delighted by my friend’s choice, as he knew I would be. The current full name of this cemetery is “Cimetière des chiens et autres animaux domestiques” – a cemetery for dogs and other pets. In reality there are (reportedly) now more cats than dogs buried here, as well as a few other species including a horse, a lion, a turtle, a monkey, a rabbit or two, some birds and even a bee.
It was founded in 1899 by feminist journalist and stage actress Marguerite Durand together with author Georges Harmois. It’s claimed to be the world’s first pet cemetery of the modern age. If you understand French, I recommend this little documentary on YouTube about the site from the 1990s. It’s a bit dated and the quality isn’t always super great, but it provides an interesting look into the site’s history and also shows a funeral home for animals as well as details of other options including cremation and even taxidermy.
For me, this cemetery was a touching testament to the love that can exist between humans and other animals. I was very moved by the efforts people have made to honor the memory of their beloved companion animals in a world where, on the whole, animals are seen merely as expendable commodities. Of course, here as in the rest of society, a clear distinction can be seen between “pet” animals (the cute and cuddly ones) and “food” animals (mainly absent from this cemetery), but with the importance it places on animals of any kind, the site still contains the germ of something that could spark deeper thought in humans, leading us to question why a place of this kind is an exception rather than the rule.
On a personal level, as I myself have lost two very dear companion cats (Kitty and Camilla, in 1994 and 2012), strolling among the diminutive graves of this cemetery stirred up some emotions. My departed loves are buried in unmarked spots behind the houses where my parents were living at the time and I couldn’t help thinking how nice it would be to have them someplace I could still visit, with small headstones in their memory. I was also just very touched by how loved the animals in this cemetery clearly were and may have shed a tear or two as I read their headstones.
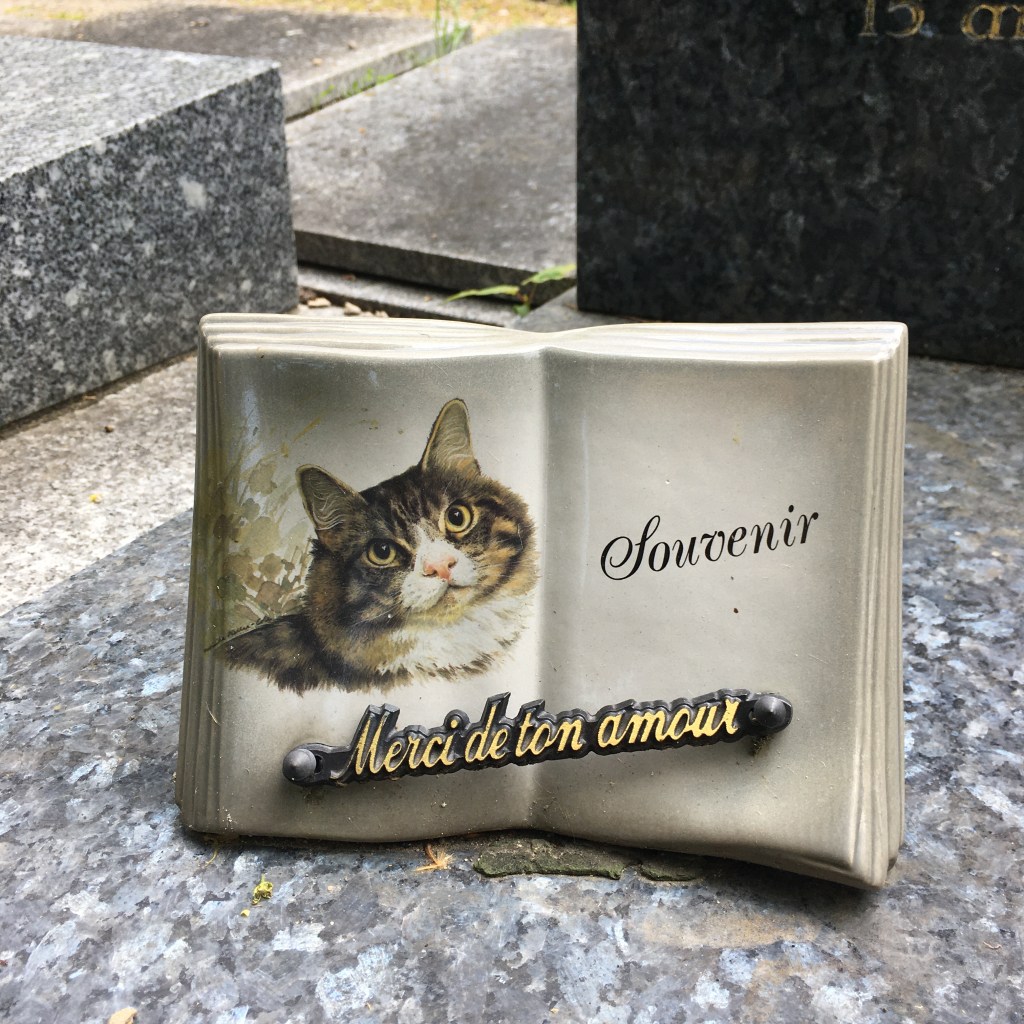
Below is a selection of the graves that caught my eye, with translations of some of the inscriptions. Click on any photo to enlarge it for a closer look.
This gravestone, installed near the front gate by the cemetery’s management, reads “On May 15th, 1958, a stray dog died at the entrance of this cemetery. It was the 40,000th animal to find its final resting place in the Asnières Dog Cemetery.”
Center: “Time heals wounds but doesn’t erase memories.” Right: a large number of the gravestones have a photo of the animal on them. When they didn’t, I could sometimes guess at the animal’s species based on its name.
“In memoriam. Thank you for your love.”
Center: this cat’s guardian described her habit of dunking her paw into her water bowl and licking it to drink, and also transferring her dry food from the bag into her dish before eating it. Right: an old grave belonging to a Pekinese.
“In doggie heaven”
This very elaborate monument testifies to the great love someone had for this cat who lived to the grand old age of 20. The rather poetic inscription reads “Xixi dear, I am thinking of you! The world exists only for a cat. I try in vain to learn how you fare. You see me. I don’t see you. An image of me is reflected in your eyes. Life. Death. For me… no more mystery. My eyes follow a beam of light through the darkness. I guide you towards eternity. How my heart longs for you! Alone but ready to protect you, to give you happiness, peace and wisdom. Your mother who loves you.”
“You had beauty without vanity. Strength without insolence. Courage without ferocity. Intelligence without arrogance. And all the virtues of humans without their depravities.”
The cemetery is also the final resting place of some “foreign” animals (or, like my own Sésame and Mochi, French animals with a foreign human?).
Many of the graves had an adorable little statue of the animal or something representing its species (cat or dog).
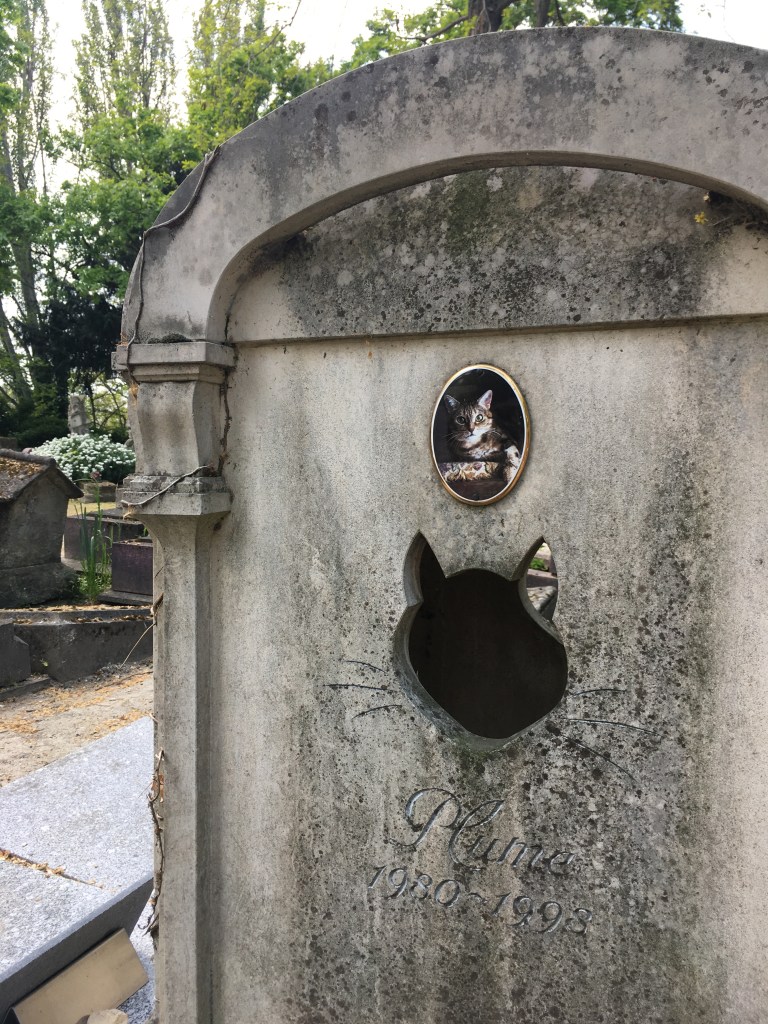
This mini-mausoleum, modeled after the human ones you see at Paris cemeteries such as Père Lachaise or the Montmartre cemetery, is one of the cutest things at this site. Left: person for scale. Center: just as dusty and cobwebby as their counterparts in human cemeteries, the inside of this mausoleum features a photo of the deceased tabby. Right: the cat’s name – Plume (Feather) – and birth and death dates.
Some of the graves included not only photos of the departed animal but also of the animal’s human guardian.
Left: a collection of what must have been the dog’s favorite toys. Right: many cats’ graves had these heart-melting feline headstones.
Top, left and right: more sculptures identifying the graves’ inhabitants.
I love this doghouse-shaped headstone.
Left: one of the oldest headstones I saw, hard to read but dated October 1925. Right: old headstones converted into steps, presumably after the guardian’s family stopped paying for gravesite upkeep.
Left: the grave of a monkey (“Sleep, my darling. You were the joy of my life”). Right: the very smallest grave, belonging to a bee that is apparently the mascot for a movement to save the bees. Its headstone reads “Perished from pesticides while trying to save its species.”
The cemetery is in a very peaceful location overlooking the Seine. If I were a kitty or a dog, I would be happy to rest in peace in this spot.
Admission to the cemetery was €3.50 per person on the day that we visited. For more information about opening hours, visit this site (link to English version at the bottom right of the homepage).
I hope you’ve enjoyed this little bit of armchair travel, especially if pandemic restrictions continue to keep you from visiting France. You may also wish to add it to your list of things to see when you do come to Paris!
Today, in honor of little Sésame’s sixth birthday, I’ve prepared another black sesame recipe for you! (Last year it was a striped sesame cake). But it’s actually two recipes in one – first, we’ll be making a Japanese sweet white bean paste (shiro an) that can be used in many ways, and then adding some black sesame paste to it (making kuro goma an) and using it as a turnover filling.
Both parts of this recipe are fairly straightforward and easy, but as making the sweet white bean paste takes quite a while, I’m not putting it in the “easy recipes” category. You need to start soaking the beans the day before making the paste, and then the beans need to cook for two hours. But once you have the paste ready, the rest goes pretty fast.
Sweet white bean paste (shiro an)
Makes about 2 cups of sweet white bean paste.
1 cup (175 g) dry white beans
3/4 cup + 2 Tbsp white sugar
1/2 teaspoon salt
Equipment needed: large heavy stockpot, food processor or high-power blender.
Place the dry beans in a bowl and cover with water. Let soak for 12 hours, refilling the water if needed. The photo above shows the beans at the end of the soaking period.
Transfer the beans to your stockpot, add enough water to cover them, and bring to a boil over medium-low heat. Once the water comes to a boil, reduce the heat to low. Cover the stockpot and simmer the beans for 1.5 to 2 hours (set a timer so you don’t forget about them!), checking occasionally to make sure the water level is still high enough that the beans cannot burn, and adding more water if necessary. Once the beans are tender enough to squash between your thumb and pinky finger, they’re ready.
Drain the beans, reserving the cooking liquid.
Transfer to a food processor and purée, adding a bit of the cooking liquid if it’s too dry. At the end it’ll look kind of like this.
Transfer back to the stockpot over low heat and add the sugar and salt, stirring constantly. The sugar will begin dissolving immediately.
After the sugar has dissolved, the mixture will be a bit more liquidy and look glossy. Continue to heat, stirring constantly, until the mixture has become dry enough that you can draw a line down the center of the stockpot bottom with a spatula and it doesn’t fill in.
Black sesame sweet bean paste (kuro goma an)
Makes 1 cup of black sesame sweet bean paste.
Now you can take your white bean paste and flavor it with black sesame. I chose to keep half of the paste unflavored, and make half of it into a black sesame version. The amounts below are therefore for half of the above mixture (1 cup).
1 cup sweet white bean paste
3 heaping tablespoons black sesame paste
1/4 teaspoon vanilla extract (optional, but nice)
In a food processor, combine the prepared sweet white bean paste, the black sesame paste and (if desired) the vanilla extract. Vanilla is not included in the traditional Japanese preparation, but I find it goes so well with sesame!
If you’re opening your jar of black sesame paste for the first time and there’s a layer of oil on top as you can see in this photo, stir it with a butter knife to incorporate the oil and achieve a more homogenous texture before you add any to the white bean paste.
Mix everything up and it will look something like this. If it seems too liquidy, you can put it back in the stockpot and heat it over medium-low, stirring constantly, until it’s a bit drier.
At this point, you can just transfer the paste to a covered container (a jar or tupperware container) and store in the fridge to use later as a spread, or to add to yogurt (see photo at the end of this post). It can also make a nice filling/frosting for a layer cake. If you’d like to use it as a turnover filling, follow the instructions below.
Black sesame turnovers
Makes 4 turnovers.
1 prepared flaky pastry crust
1 cup black sesame sweet bean paste (some may be left over)
First, preheat your oven to 350°F (180°C).
Cut out circle shapes from the flaky pastry crust (in these photos I’m making just two turnovers, but the ingredient quantities listed above will make four). Place about two heaping tablespoons of the black sesame sweet bean paste on half of each circle, spreading it out to near the edges but leaving a margin.
Fold each circle over once to create a crescent shape.
Press down firmly on the edges to seal the dough.
Score the tops of the turnovers with a sharp knife to allow air to escape during the baking process. Place in the oven for about 15 minutes. As the filling is already rather dry, the baking tends to go faster than with fruit-filled turnovers.
If you like, you can dust the tops of the turnovers with a bit of powdered sugar.
Mine got quite puffy and lost their seal, but once they cooled a bit they de-puffed.
So yummy! They’re great with green tea.
Enjoy!
Another way to enjoy the sweet bean paste is in a dish with some plain or vanilla yogurt, fruit and a sprinkling of gomasio.
It’s really nice on bread, too!
Variations: try flavoring the sweet white bean paste with other things: matcha, lemon (zest and a bit of juice) or pumpkin purée.
The plate used in the turnover photos is the “Chysanthemum” in unglazed white/gray by 1616 Arita in Aritayaki, Japan, via Brutal Ceramics.
Every year when spring comes around, I find myself suddenly coming back to life after months of a dark, dreary existence that’s gone on so long, I’ve forgotten it’s possible to feel different. All at once I’m able to float outdoors, light and unencumbered by the heavy, hateful coat that’s been my constant companion as long as I can remember. The world is fresh and new, I am fresh and new and an unsuspected life force appears, motivating me to get out of bed, do things and make plans.
It’s all the more cruel when nature realizes it launched spring too early and takes it back for a couple more weeks. That happened recently – after a glorious, wonderful last week of March, during which I felt like a different person, cold weather and colorless skies returned for days and days and days, dousing my inner light.
Clearly, the sun and warmish weather play an enormous role in my well-being. I’m kind of like a solar-powered calculator, malfunctioning or just shutting down when there isn’t enough sunlight. Does this mean I should move to Ecuador? Probably.
Anyway, it was during the bitterness of this time-between-springs here in Paris, as my heart stopped throbbing to the pulse of flowers and honeybees and began muttering existential complaints, that I felt the need for a comfort food of some kind. Especially for breakfast, waking up to another cold day and definitely needing some crunchy, apple-y courage to face it. Toast naturally came to mind, as did apple pie. But you can’t have both. Or can you?
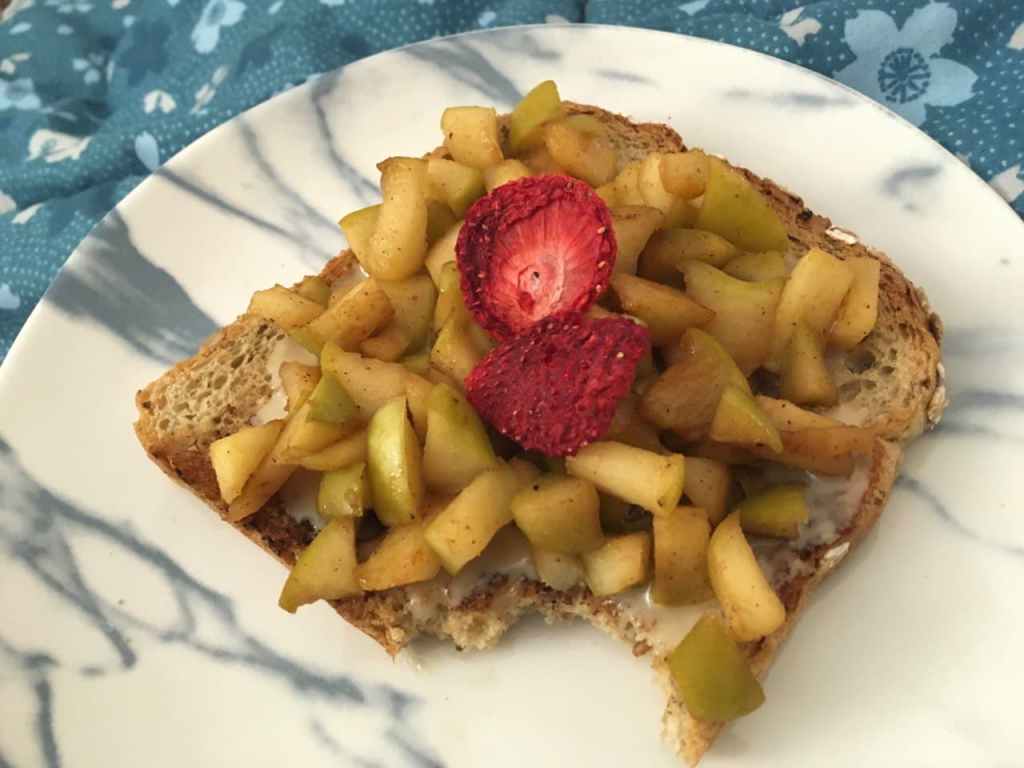
Introducing apple pie toast: a very easy apple pie, or a very fancy kind of toast, depending on your point of view. You can whip it up fairly quickly, cooking the apples while your coffee is brewing, and the results are well worth it. There’s also lots of room for variation and different flavor combinations depending on the spreads you use.
Happily, the weather has turned nice again (for good this time, let’s hope), but I’m glad to have come up with this chilly-season comfort breakfast while awaiting spring’s return.
Apple pie toast
Makes enough for 2 to 3 pieces of toast
1 apple (I prefer a green, tart kind like Granny Smith)
Juice from half a lemon
3 teaspoons sugar, white or unrefined cane, or more to taste
Small pinch salt
Ground cinnamon
Ground nutmeg
Ground ginger
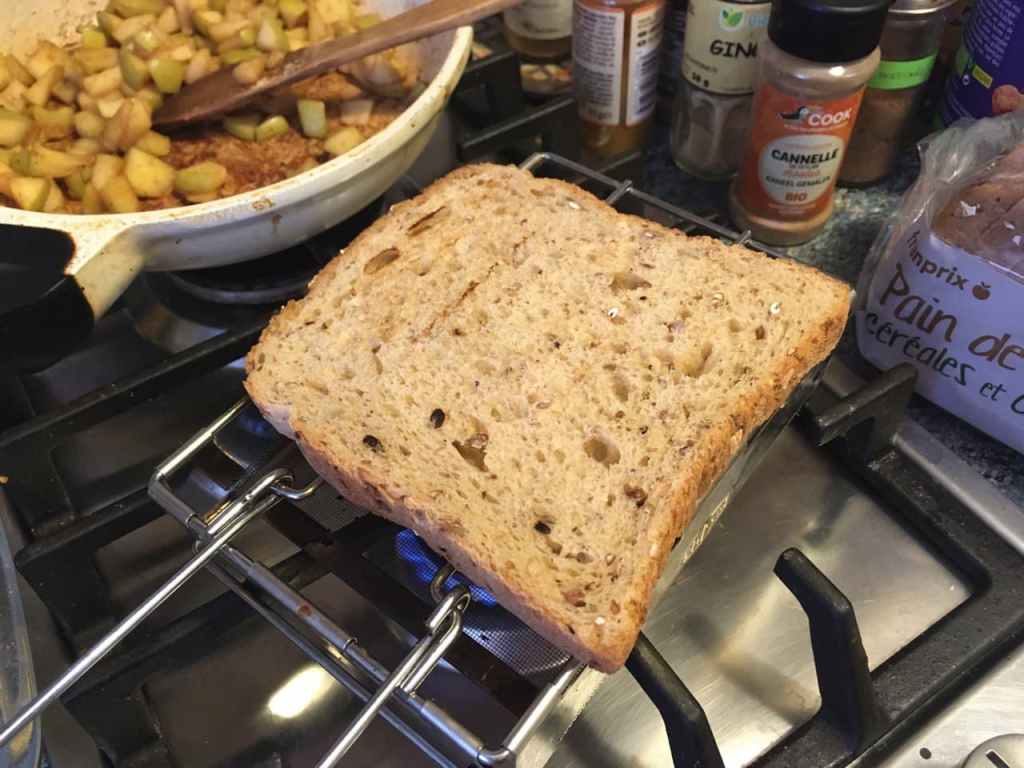
2 or 3 pieces of sliced bread
Nut butter (white almond, cashew or other)
Optional garnish: raisins, sliced strawberries etc.
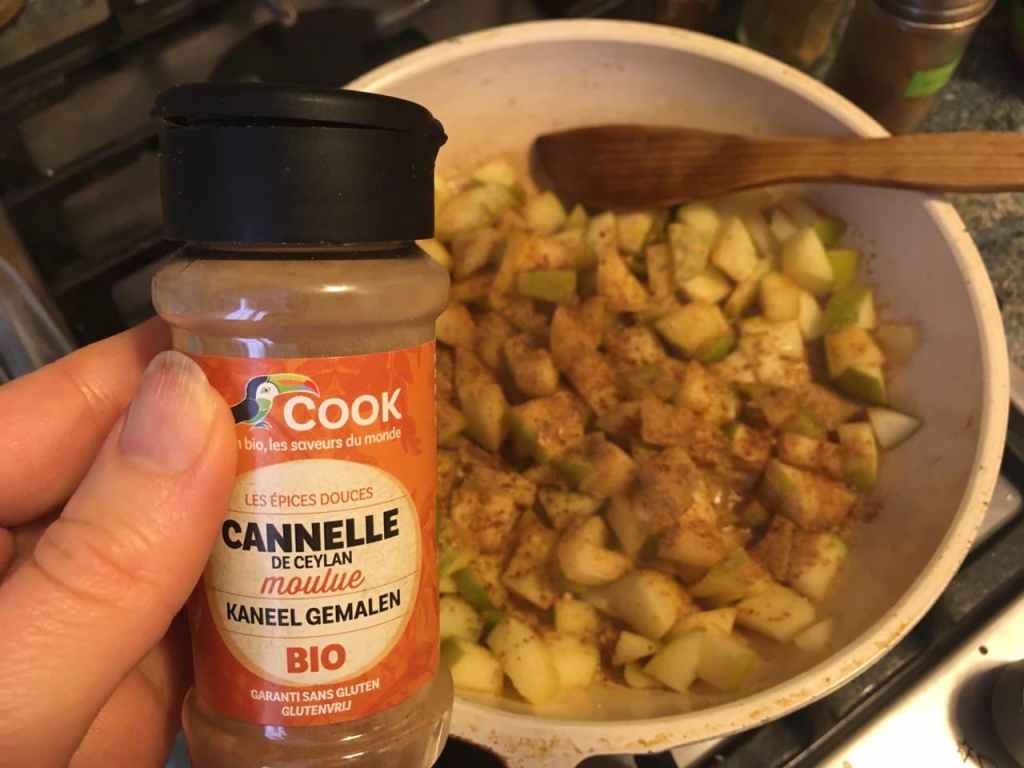
Chop your apple up into smallish cubes. If it’s organic, you can leave the skin on.
Place in a small frying pan over medium-high heat. Squeeze the juice of about half a lemon over the diced apple and stir to incorporate. If the apple seems like it’s going to stick to the pan, add a small amount (a few tablespoons) of water.
As the apple cooks, add the sugar and stir it in (I used rapadura). The sugar will caramelize a bit, so be sure to keep stirring occasionally so nothing burns.
Add a few shakes each of ground cinnamon, nutmeg and ginger. If you like, add other seasonings such as ground cloves (be careful: a little goes a long way) or tonka bean.
Take the apple off the heat once it reaches the level of done-ness that you like. For me, that’s somewhere between crisp (raw) and the texture of apples inside a traditional apple pie baked in an oven with a crust on top.
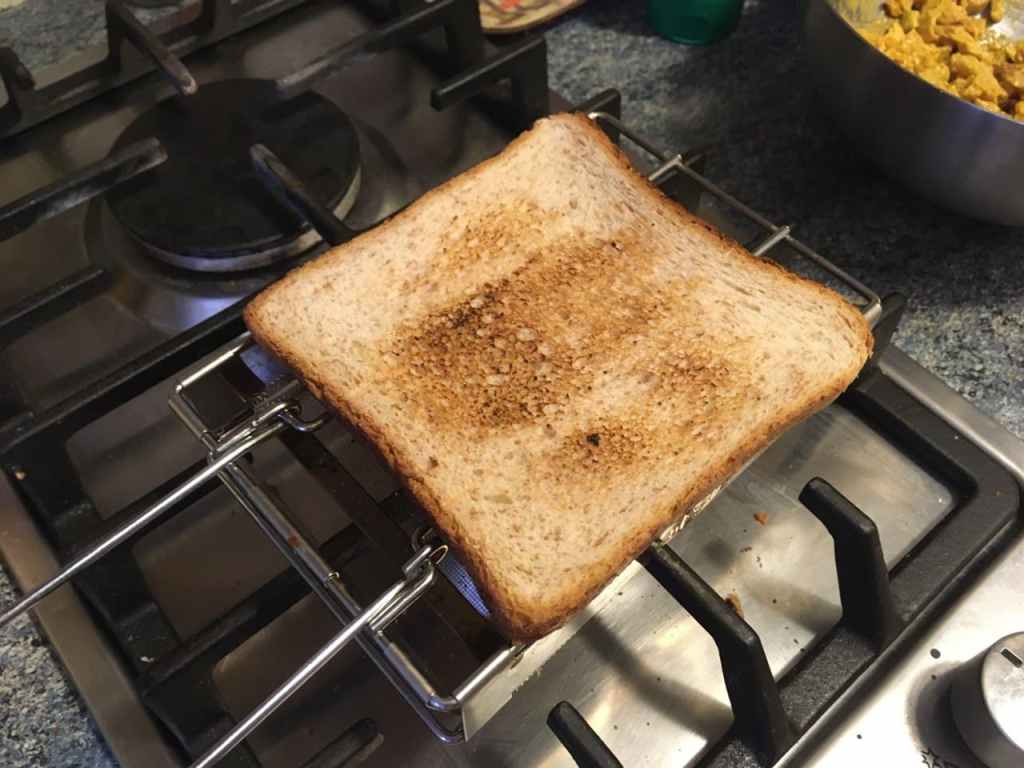
Now toast your bread. I’m still using the trusty camping toaster you first saw in my curry “chicken” salad post.
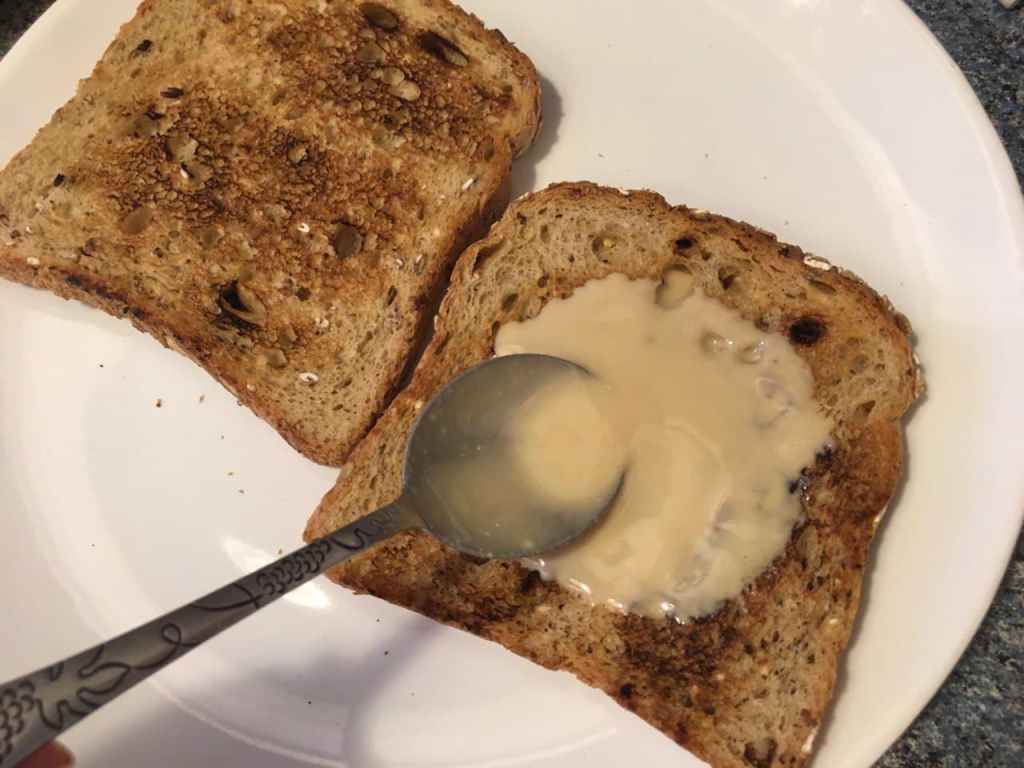
Spread some nut butter on your toast. Here, I’ve used white almond butter (which is a bit runny), but you could opt for cashew butter or something with a more noticeable flavor like hazelnut butter, speculoos spread, chocolate-hazelnut spread or even peanut butter (?). Alternatively, plain or vanilla yogurt or cream cheese would work too. If your spread has a lot of sugar in it, consider adding less sugar when cooking your apple.
Now place the cooked apple evenly over the toast, and serve. Optional garnish: I used dried strawberry, but man, are they expensive! I recommend fresh strawberry instead, or maybe raisins or dried cranberries. Consider a sprinkling of gomasio too.
Apple pie toast makes for a lovely breakfast, together with coffee or tea. Keep it in mind if you want something to amaze and delight your next overnight guest!
(Also yummy in bed if your place has circa-1912 single-paned windows and is just too drafty.)
If you try this, let me know in the comments what your favorite spread to use is!
So 12 years ago today, I stepped off a plane and into my new life here in France. And 12 years later, I’m still here! The past decade plus two years have been eventful enough, marked by both highs and lows – relationships, career milestones, adopting Sésame, terrorist attacks, a pandemic and gaining the French nationality, to name a few. I’ve also talked a bit here about some cultural differences that can be unsettling. But let’s not get into any serious topics right now. Today, for a lighthearted tribute to this 12th Franciversary, I thought it would be fun to tell you about a few things I’m STILL not used to about France, even after all these years. They’re all pretty minor things, but whenever I encounter them I still shake my head in confusion.
A spoon for any and every dessert
In France, when people have dessert, no matter what the dessert is, they always eat it with a spoon. Much like when Mr. Pitt on Seinfeld carved up his Milky Way bar with a fork and knife, it never fails to look and feel wrong to me. I mean sure, a spoon is the way to go if you’re eating ice cream or chia pudding, but why would you attempt to eat cake with one? Why try to seize hold of a dense, spongy substance with a shallow shovel-like implement that could easily lead to something landing on the floor when humanity has already mastered the concept of the dessert fork?
Non-absorbant kitchen towels
I also don’t understand why kitchen towels in France seem designed to be more decorative than anything else. They do come in lots of nice colors and prints, but they tend to be made of a stiff, furniture upholstery type material that’s good for little else than pushing the rinse water around on a plate rather than absorbing it. Why, France, why?
Graph paper notebooks
I’m one of those people who still enjoys writing by hand, especially when making to-do lists. For some reason, notebooks in France are always lined both horizontally and vertically, which makes writing in one very distracting for people who grew up with only horizontal lines. Often, the lines are darker and more intricate than the example shown above, looking more useful to an engineer than anyone else. Many times, I’ve gone to office-supply stores hoping to somehow find the kind of paper I was used to, but ended up buying completely unlined sketchbooks to write in instead. Recently, however, I was fortunate enough to find some horizontally lined notebooks at Paris locations of the Dutch variety-store chain Hema. Before that, I used to stock up on a notebook or two every time I went back to the US for a family visit.
La bise
This is one thing I won’t have to worry about again for a while, at least for as long as this pandemic lasts. If you’re not aware, in France whenever you meet up with friends or are introduced to new people (in a friends context), you traditionally have had to touch your face to their face – one time on each side in Paris, but three or four times elsewhere – while making a kissing sound. This is la bise. Normally, your lips don’t actually touch their skin and theirs don’t touch yours, although the ambiguity of the situation means that creepy guys sometimes use it as a chance to actually kiss you.
I never minded participating in la bise with my actual friends, but it always felt like a violation of my personal space when I had to do it at a party with people I didn’t know and wasn’t necessarily ever going to see again. Especially when large numbers of people were involved. If you’re a man, you get kind of a break because you’re expected only to shake hands with other men (but still have to do la bise with women).
Paris-based English comedian Paul Taylor captures my feelings about la bise pretty accurately in this video. He’s not even exaggerating – it really does happen the way he describes. See also his coronavirus bise update.
Of course, these days, people are being cautioned specifically not to touch each other during greetings. There are even billboards on the street reminding you of this. Instead, people bump elbows, a practice I can definitely get behind. Personally, I’ve seen so few other humans since this whole business began, a year ago, that I don’t think I’ve even done any elbow-bumps. I did recently do some “shoe bises” though, which was amusing and should be adopted far and wide, in my opinion.
Completely illegible signatures
In the US, people tend to sign their actual names, with the result that if you squint long enough at a signature, you can generally figure out what the first couple of letters are. But in France (and this is probably the custom in many other parts of the world too), I’ve never seen a signature that resembles an actual name or contains identifiable letters of the alphabet. The person often makes a few energetic up-and-down lines, finishing them off with a horizontal flourish somewhere, with the resulting marks looking like the print-out of a bad liar’s polygraph test. Or it may resemble a huge elliptical oval, as in the above example.
This one doesn’t affect me much, except that it means my way of signing my name makes me stand out. I became aware of this difference too late to change my own signature accordingly (I’d already signed important documents at my French bank etc.), and now always strangely feel a bit sheepish when signing my name in my own traditional way, with the first and last names mostly legible, as it takes longer to write and maybe looks (to French people, in my imagination at least) less authentic…?
Writing “Lu et approuvé”
In a similar vein, when signing important documents in France, your completely illegible (or legible, in my case) signature is not enough. You also have to handwrite “lu et approuvé” (“read and approved”) above it. That might not seem like such a big deal, but when you’re doing something like opening a bank account or signing the documents to rent an apartment, you’ll have to write this like 10 or 20 times because the paperwork in France is endless. And it also just strikes me as odd. If your signature on the document doesn’t mean you’ve read and approved it, what on earth does it signify?
Okay, by now, especially if you’re French yourself, you might be thinking, “If you don’t like it here, lady, you can always leave. Don’t let the door hit you on your way out!” But there are of course also many, many things that I prefer about France and Europe compared to my home country. Otherwise I wouldn’t still be here! Beyond the obvious ones like a decent healthcare system, affordable higher education and ample paid vacation for all employees regardless of seniority, there are the day-to-day blessings such as the world’s best bread, beautiful architecture just about everywhere you look and the availability of white almond butter and crème de marrons.
If you’ve ever spent time in France or another country that’s foreign to you, what things seemed incomprehensible to you, or better than the way things are back home? Tell us in the comments!
Here’s a fun and easy salad that you can use as a sandwich filling or serve atop a green salad or in lettuce cups. It’s a vegan dish inspired by a chicken and pinenut salad sandwich I used to have at Beans & Barley in Milwaukee back in my student days. The curry adds a delicious warming dimension, the chopped celery gives a nice crunch and the toasted pine nuts lend a gourmet air.
Begin by toasting your pinenuts. Place them in a dry frying pan and heat over low/medium for several minutes, shaking the pan to stir occasionally. Stay right there in the kitchen during this process, so you can keep an eye on them… once they begin toasting, things can go fast and they can end up burnt in no time. Pinenuts are expensive, so it would be sad to have to throw them out. You can also chop your celery during this time (not shown).
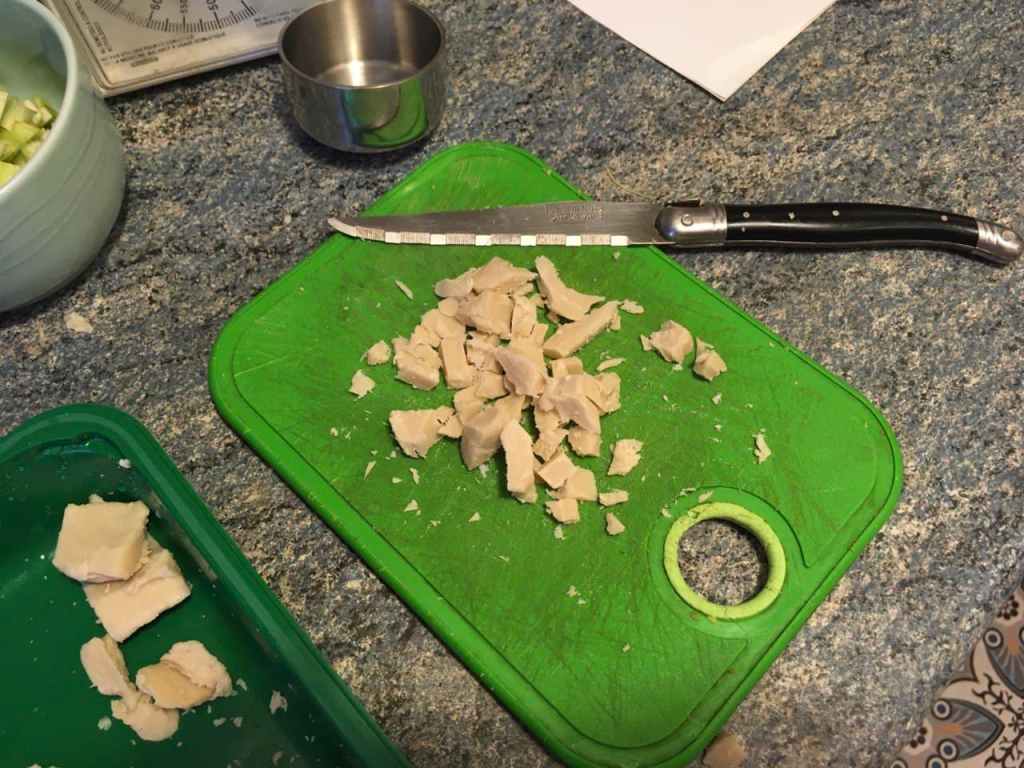
This is the vegan “chicken” I used. You can also try this same recipe with firm tofu, tempeh, chickpeas or seitan.
It comes in the form of large chunks, which I recommend chopping into smaller pieces. The package says to cook it, but it’s actually already cooked and since this is a cold sandwich, there’s no need.
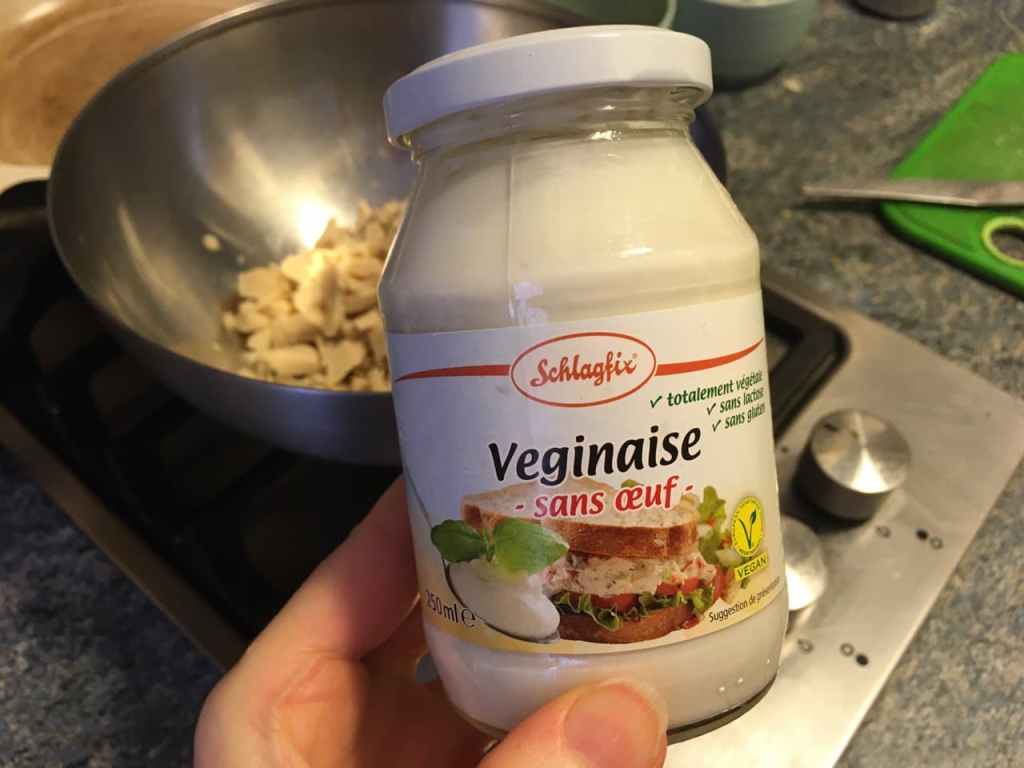
I used this German vegan mayonnaise I found at Un Monde Vegan in Paris. These days, more and more vegan and non-vegan brands are coming out with vegan mayo.
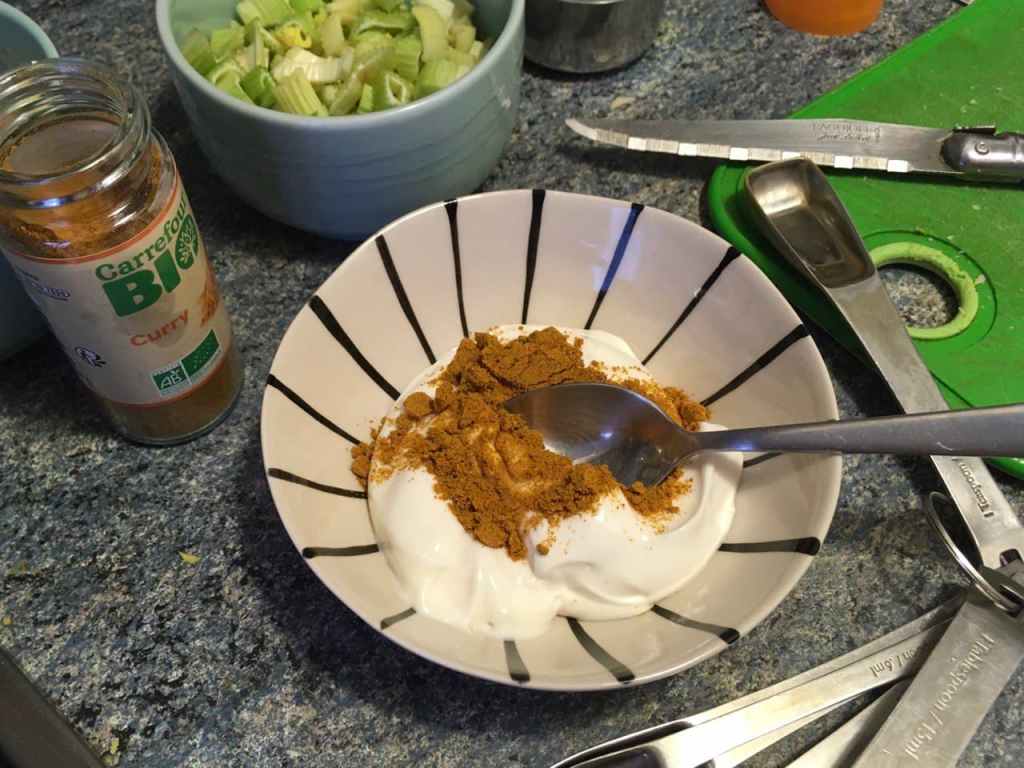
Mix the curry powder into the mayonnaise. I used 3 teaspoons for 1/3 cup mayo, but you could add less or more curry powder as you like. Make sure your curry powder is fresh, because after it sits around for a while it loses its flavor, and you don’t want to miss the punch that full-flavor curry packs in this dish.
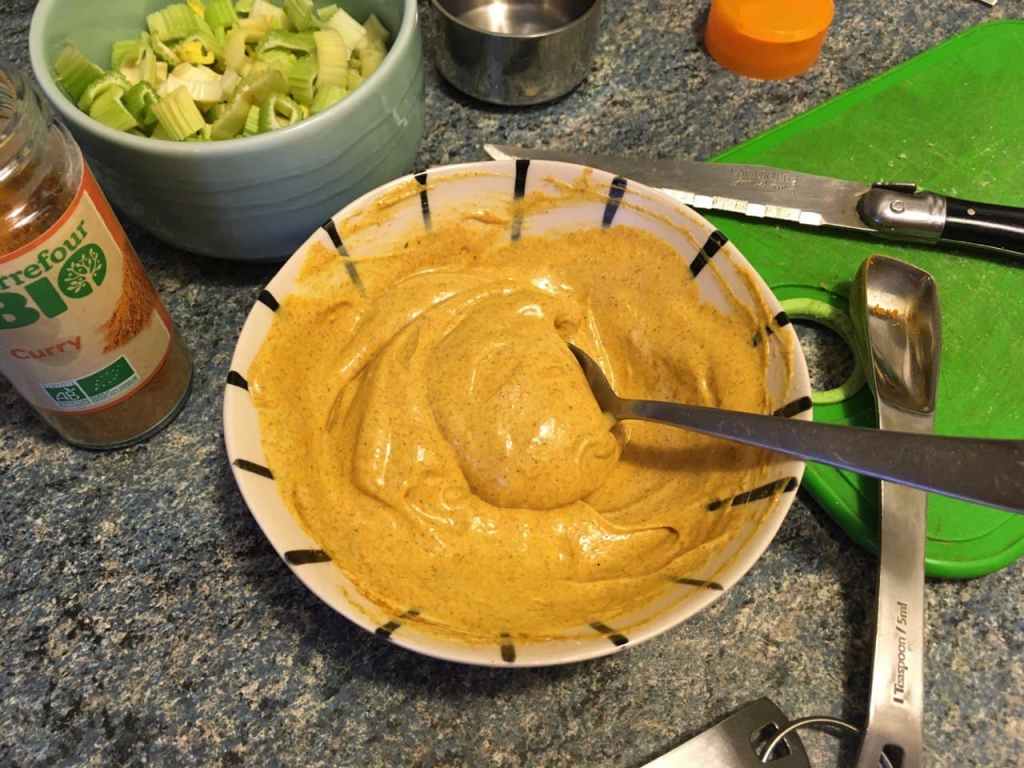
The curry gives the mayonnaise a beautiful vibrant yellow color.
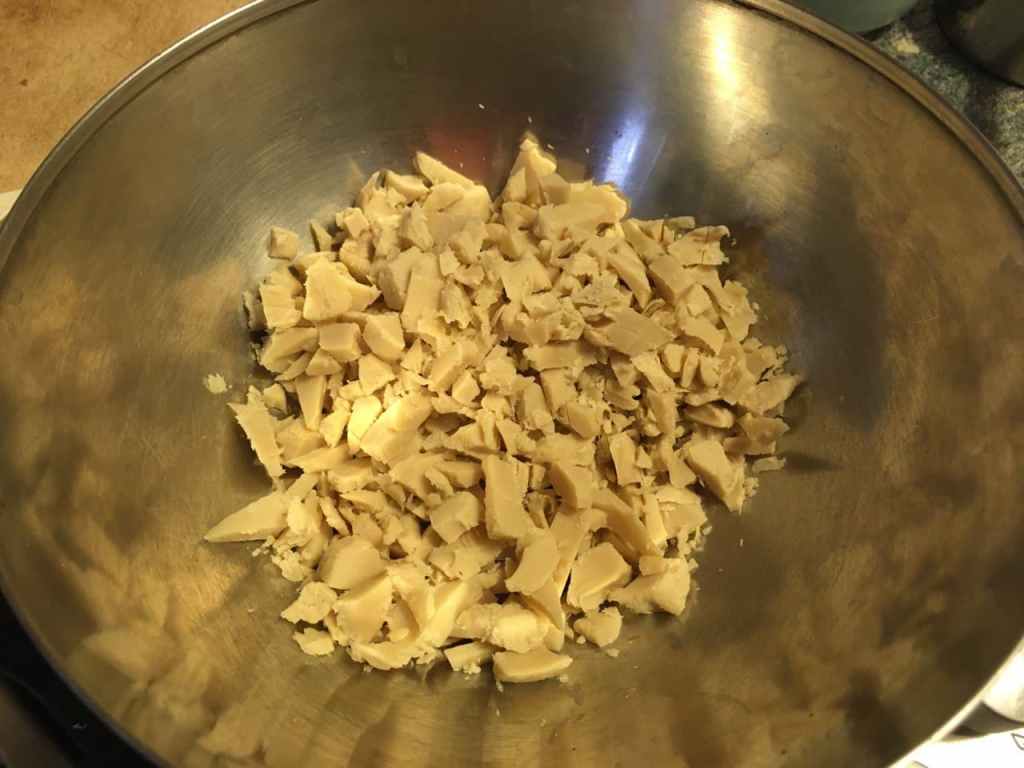
Mix the curry mayonnaise into the “chicken”, then incorporate the chopped celery and pinenuts. If you won’t be serving the salad right away, wait until the last moment to incorporate the pinenuts so they stay more crunchy. You may want to reserve some pinenuts to add as a final garnish if you’re serving this salad in lettuce cups for example.
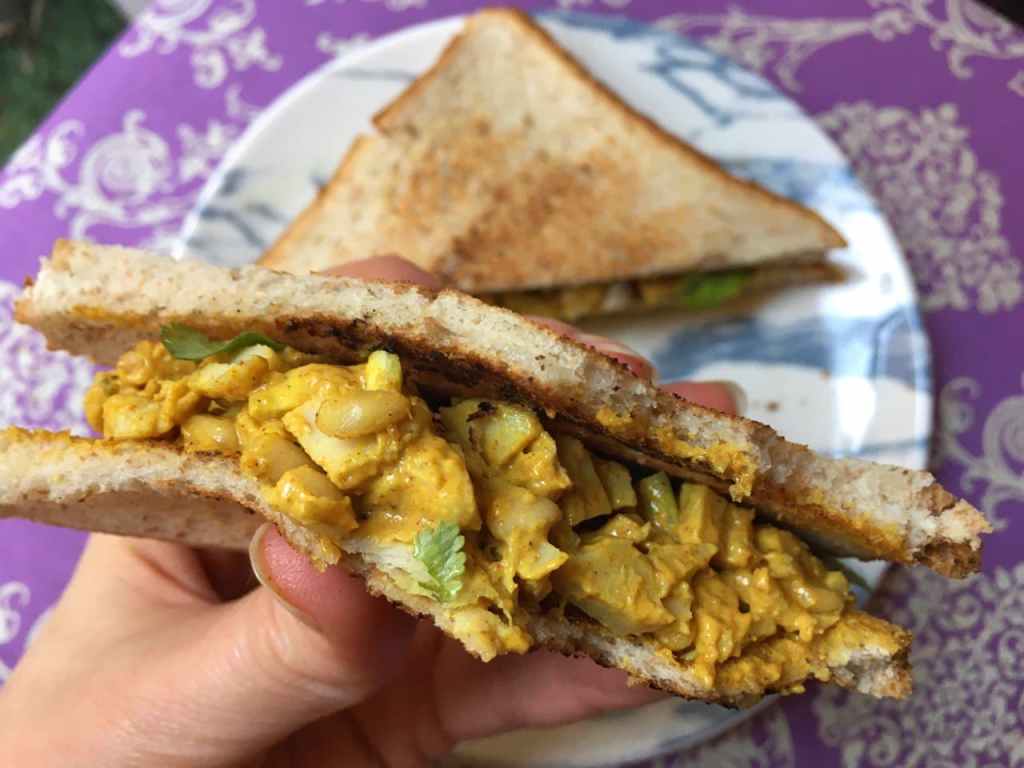
To make a sandwich, toast some bread (this is the foldable stovetop “camping” toaster I use because there isn’t room in my kitchen for a normal toaster). 😉
Top the toast with some of the “chicken” salad, then add onion and an herb garnish, if desired. You could also serve this with lettuce and tomato. This can be either an open-faced sandwich, as shown above, or a traditional sandwich with two pieces of bread, as shown below.
Enjoy!
Variation: I recently learned of a British dish, coronation chicken, that’s quite similar to this and was invented for Queen Elizabeth II’s coronation banquet. It differs in that it has no pinenuts but does have chopped dried apricots and flaked almonds.
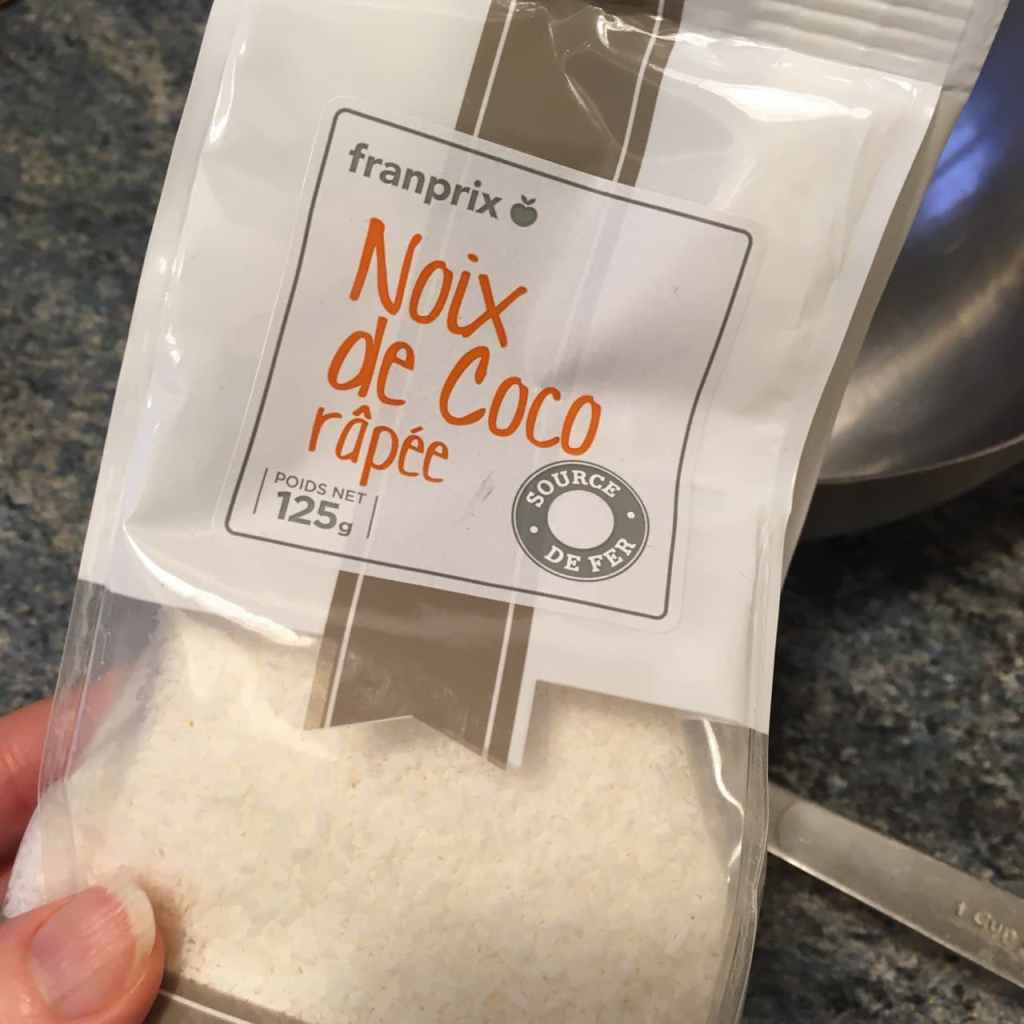
Necessity truly is the mother of invention, as I learned last month when I wanted to make my annual vegan galette des rois (see my matcha version for more details). As soon as the first of January rolls around, everyone in France is seized with the desire to make one of these frangipane-filled pastries, which require a sizable quantity of ground almonds. If you don’t happen to think of it ahead of time and buy your ground almonds before the end of December, you may be out of luck. I was, at least, on the day I went out to get mine… all three stores I tried were out of stock even though it was past the middle of the month.
Ordinarily, I might have given up at this point, but I was determined to make the dessert to serve at my Biden-Harris inauguration viewing party (well, not really a party since there were just two of us, but it felt festive!) because I had a plan to make it BLUE. Yes, blue, in honor of the Democratic Party’s color. And it struck me that grated coconut could probably substitute quite nicely for the almonds and would also accommodate the blue spirulina I planned to use as a natural food coloring. It worked out really well, and I realized I’d inadvertently invented something new, which I am calling “cocopane” (as in coconut frangipane; pronounced “coco pan”).
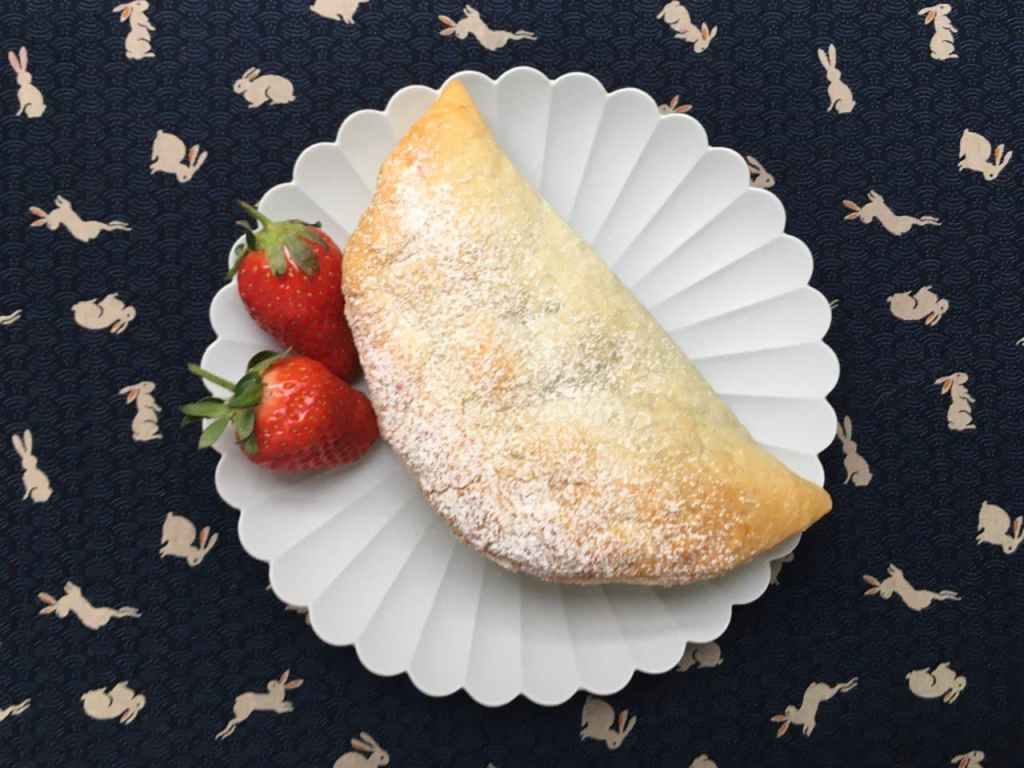
So for this month’s recipe, I decided to experiment more with this new filling and to try pairing it with a fruit. I initially thought of banana, but then since it was to be a Valentine’s recipe, I decided to use something pink instead.
These lovely turnovers would make an excellent romantic breakfast for you and your Valentine – whether they’re human or a furry friend – but could also serve as a dessert. They’re best enjoyed soon after baking, so if you plan to have them as an after-dinner treat you could prepare them earlier in the day, up to the point where they would go into the oven, but then chill them in the fridge, preferably in a sealed container so the dough doesn’t dry out.
Raspberry cocopane pastries
Makes 4 turnovers
1 prepared flaky pastry crust (keep refrigerated until the last moment)
3/4 cup (50 g) dried grated coconut
2 tablespoons cornstarch
3 tablespoons white sugar
1/4 cup (60 ml) unsweetened liquid coconut cream or canned coconut milk
1 tablespoon coconut oil, melted
1/2 cup fresh or frozen raspberries (or raspberry jam)
1 teaspoon additional white sugar
1 to 2 tablespoons powdered sugar for dusting
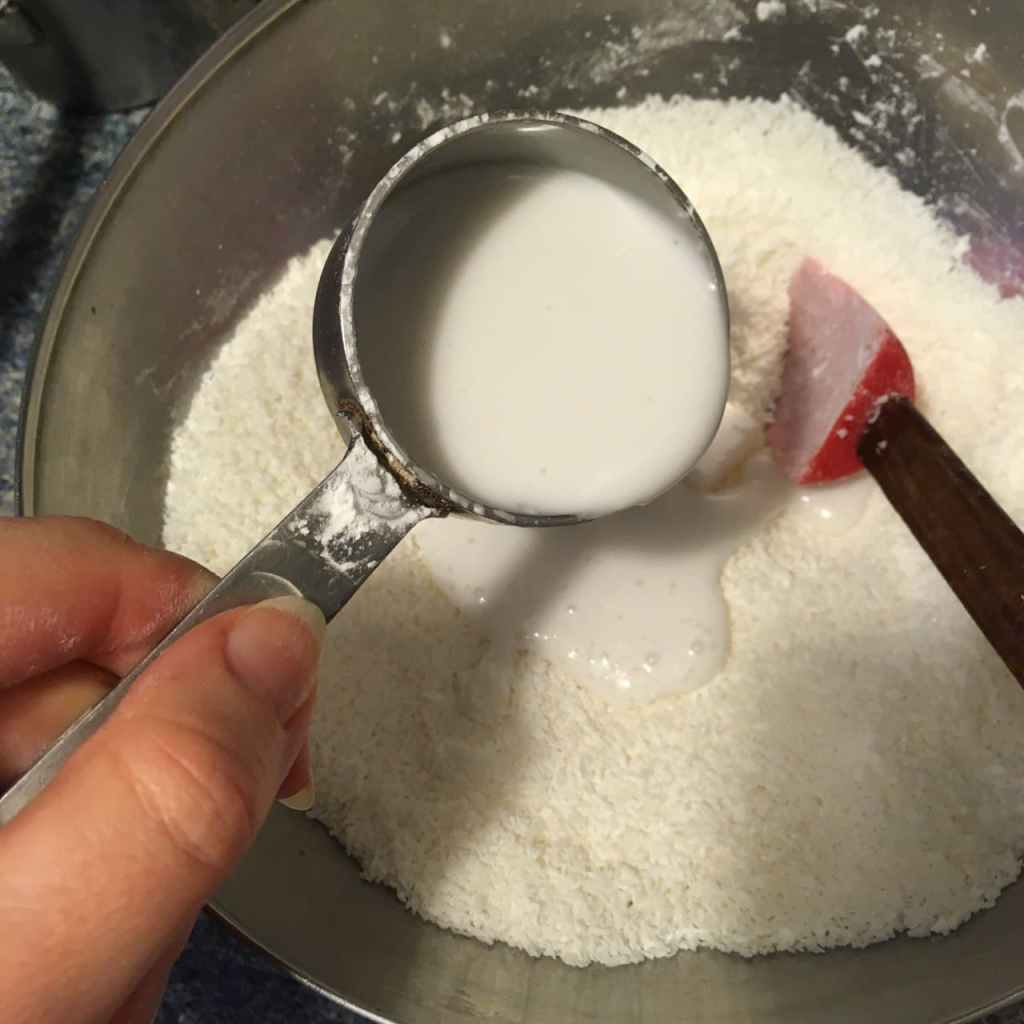
Preheat your oven to 350°F (180°C) and mix together the grated coconut, cornstarch, sugar, liquid coconut cream (or canned coconut milk) and melted coconut oil. If you can’t find coconut cream/milk, another unsweetened liquid plant-based cream (such as soy or rice) will do.
You now have a bowlful of “cocopane” and it should have the consistency of a moist paste. If your mixture is too dry, add a bit more coconut cream/milk, and if it’s too wet, add some more grated coconut.
Now for the raspberries… I used frozen berries and allowed them to thaw on the counter for a few hours. I then strained out the juice they released while thawing and mashed the berries lightly with a fork. I added about a teaspoon of white sugar, but you could use less or more according to taste. If you can’t find berries, you could always use prepared raspberry jam or compote (in this case, do not add sugar).
You can use the raspberry juice later as a food coloring, for example to make a pink frosting as in my Valentine’s cookie recipe or to color almost anything else pink (the juice will keep in the fridge for a few days).
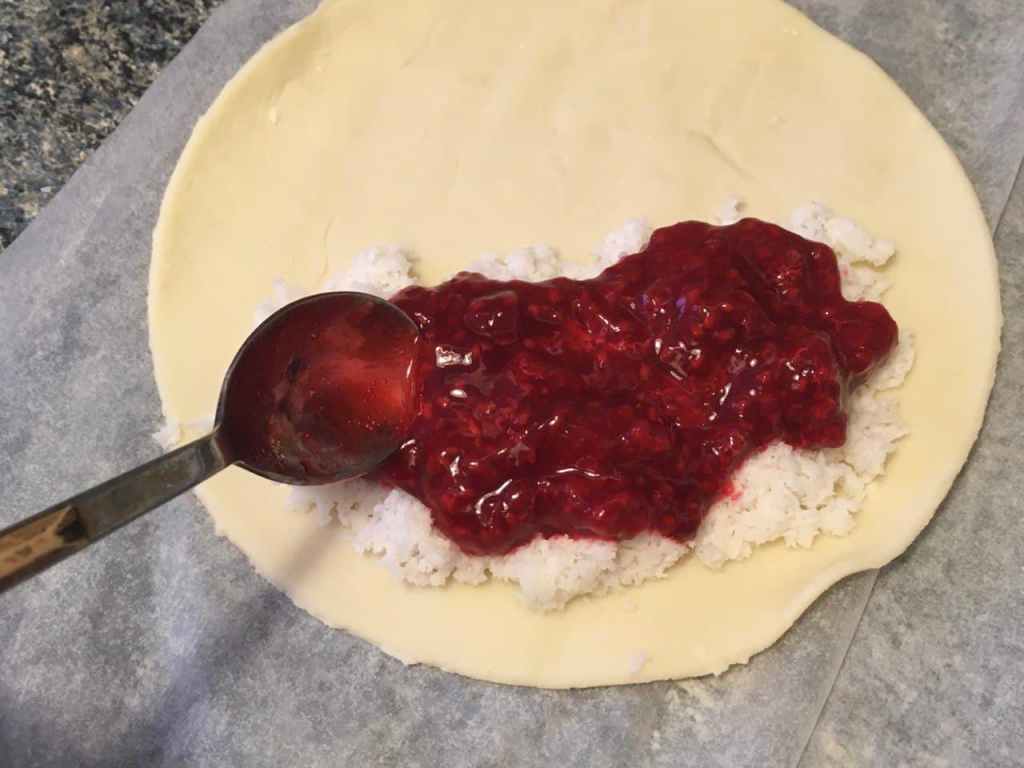
Trace a few circles onto the pastry, either with a paper template or an upturned bowl. I made mine 5.5 inches (14 cm) in diameter, but the size will depend on the size of your pastry. I then pieced together the remaining pastry bits to make a fourth circle. Alternatively, you can cut the pastry into four parts and fold each one over for a more triangle-shaped turnover.
Place about a tablespoon of the cocopane onto one half of each pastry circle, leaving a border around the edge. Be careful not to overfill.
Now add some of the crushed raspberry mixture on top of that.
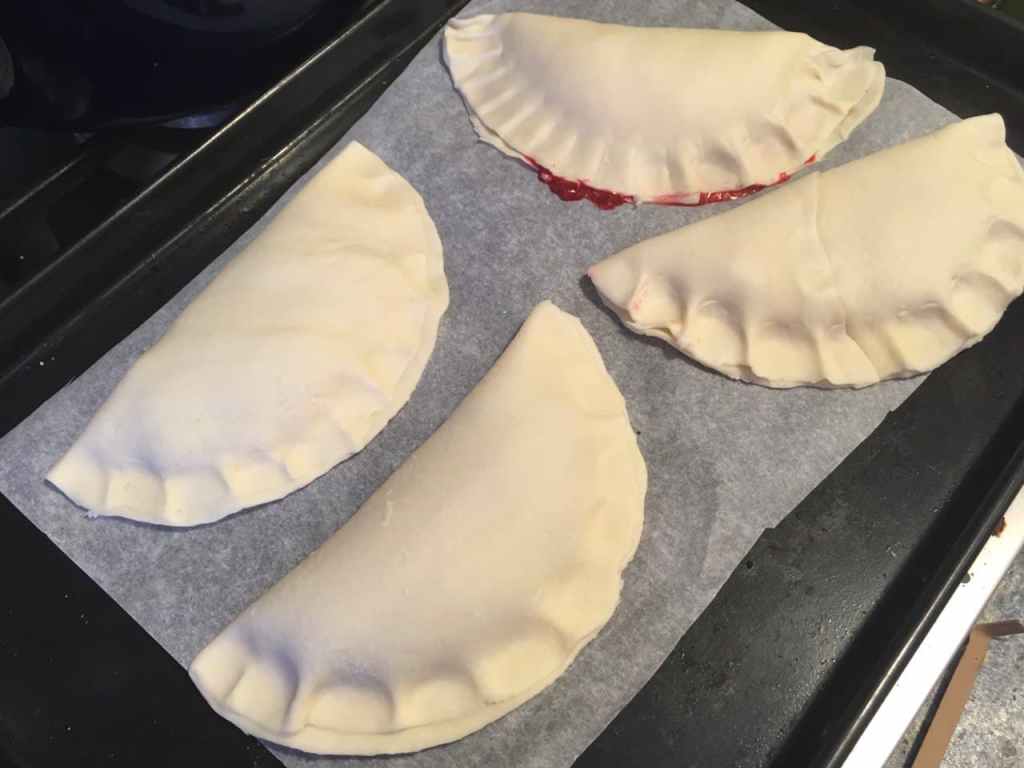
Fold the pastry circle over until the edges meet.
Now seal the edges firmly with a finger or thumb to ensure that they don’t come apart while baking. Some cocopane and raspberry mixture may be left over when all your pastry circles are filled (they make a nice topping for plain yogurt).
Place the pastries onto a baking sheet lined with parchment paper, and bake for 20 to 25 minutes in your preheated oven.
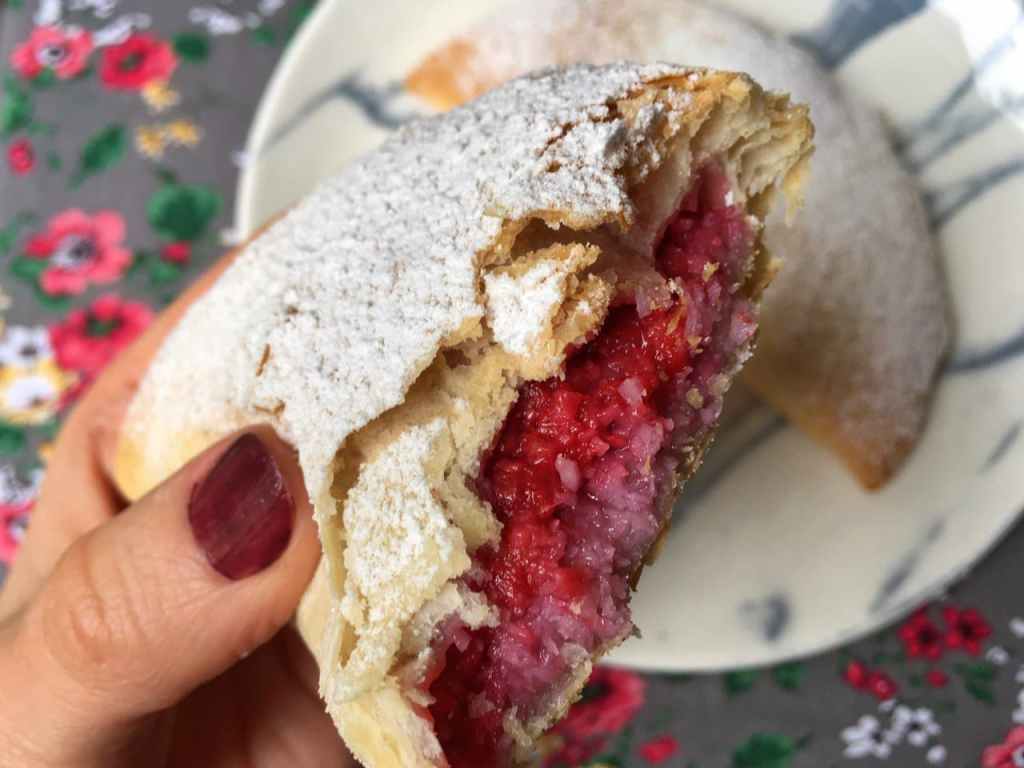
They’re ready when the tops are golden brown. As you can see, the one at the back left didn’t have a good seal because some of the raspberry mixture overflowed while I was closing it. The one at the back right was made from the pieced-together pastry scraps so did not stay completely together… Luckily, the powdered sugar dusting is a remedy for small flaws like these!
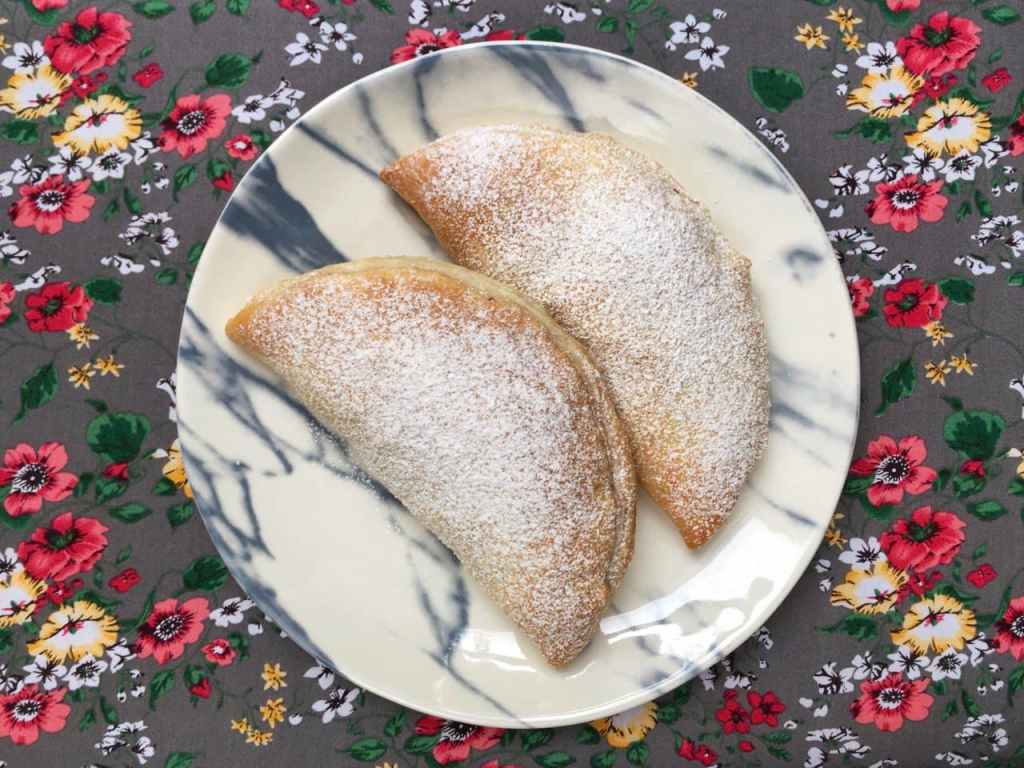
Allow the pastries to cool for a few minutes, then dust the top with some powdered sugar. I like to put mine through a small sieve to ensure a fine consistency.
And there you have some lovely, freshly baked raspberry cocopane pastries… the perfect thing for a very romantic Valentine’s Day breakfast!
Crunchy and flaky on the outside, soft and fruity on the inside.
Just before serving these yummy treats, hit “play” on this video:
Variations:
Use another type of fruit (cherries, apricot, apple or banana come to mind).
Color the cocopane blue with blue spirulina before adding the raspberry (your result will undoubtedly be a bit purple) or green with matcha.
Add a bit of rosewater to make a raspberry-rosewater version.
For a frangipane version, use ground almonds instead of grated coconut, and substitute soy cream and canola oil for the coconut cream and coconut oil.
In all my years eating (American) carrot cake, it somehow never once occurred to me to put chocolate on it. But when I discovered that such a thing existed in Brazil (bolo de cenoura com calda de chocolate in Portuguese), it made nothing less than perfect sense to me. Here’s my vegan version of this tasty treat – try it for yourself and see what you think!
Traditionally, Brazilian carrot cake doesn’t contain raisins or walnuts, but I couldn’t resist adding them for nostalgia reasons (they’re totally optional though and can be omitted without the need to change the other ingredients). For the chocolate topping, I made a simple glaze from cocoa powder, maple syrup and a bit of salt. I recommend mixing up the glaze and applying it to the individual slices just before serving them, so the amounts given for the glaze are for two pieces of cake. You can double or triple this as needed however, if you’re making this after the Great Pandemic of 2020-2021 is over (fingers crossed it doesn’t last longer) and you actually have nine people eating this together in one place.
Carrot cake
Makes one 8 x 8 in. (20 x 20 cm) cake
1 packed cup (150 g) grated carrot
1/2 cup (118 ml) applesauce or other fruit compote
1/4 cup (59 ml) neutral-flavored oil
2 teaspoons apple-cider or white vinegar
2 teaspoons vanilla extract
1/4 teaspoon lemon zest
1 & 1/2 teaspoon cinnamon
3/4 teaspoon salt
1/2 teaspoon baking soda
1/2 cup sugar
1 & 1/2 cups flour
1/4 cup golden raisins (optional)
1/4 cup walnuts, roughly chopped (optional)
Begin by grating up your carrot into a medium or large mixing bowl. If it’s organic, you can just scrub it with a vegetable brush rather than peeling it. Preheat your oven to 350°F (180°C).
Next, add your applesauce or other fruit compote to the bowl. I actually used apricot sauce (compote) as that’s what I had on hand, without it changing the flavor of the cake in particular.
Grate a bit of lemon zest to add some brightness to the cake. I used 1/4 teaspoon, but you could add a bit more if you’re partial to a lemony flavor.
Now add all the other ingredients apart from the flour, and stir thoroughly to combine.
Finally, add the flour and stir gently until just combined (be careful not to overstir).
Transfer the batter to an 8 x 8 inch (20 x 20 cm) baking dish lined with baking paper or oiled. Place in the preheated oven and bake for 25 to 30 minutes. Check for doneness by inserting a toothpick into various parts of the cake. If it comes out clean, it’s ready but if there’s some batter sticking to it, give it another 5 minutes and then test it again.
The nice thing about baking paper is you can just lift the entire cake out of the baking dish and put it on your countertop for easier cutting. Allow the cake to cool for 15 minutes or so before cutting or you might not be able to make clean cuts through it.
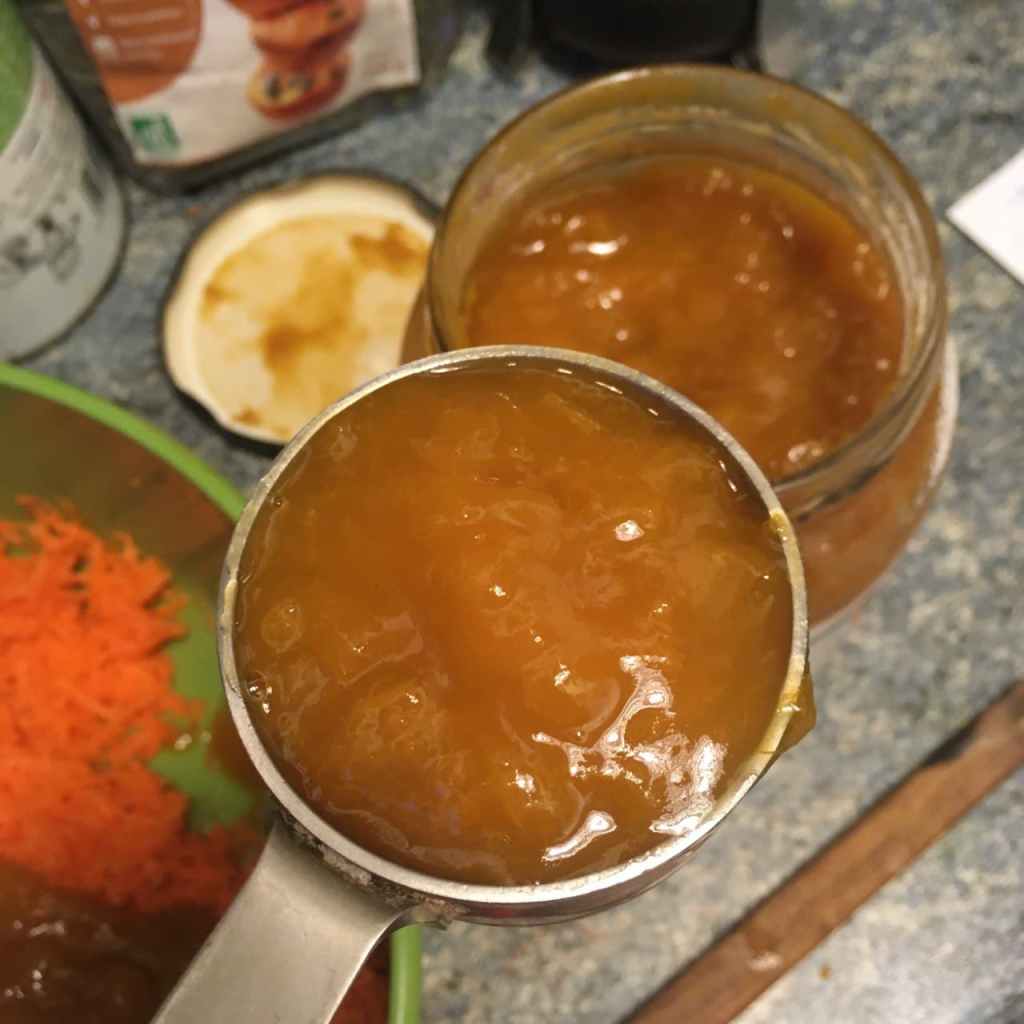
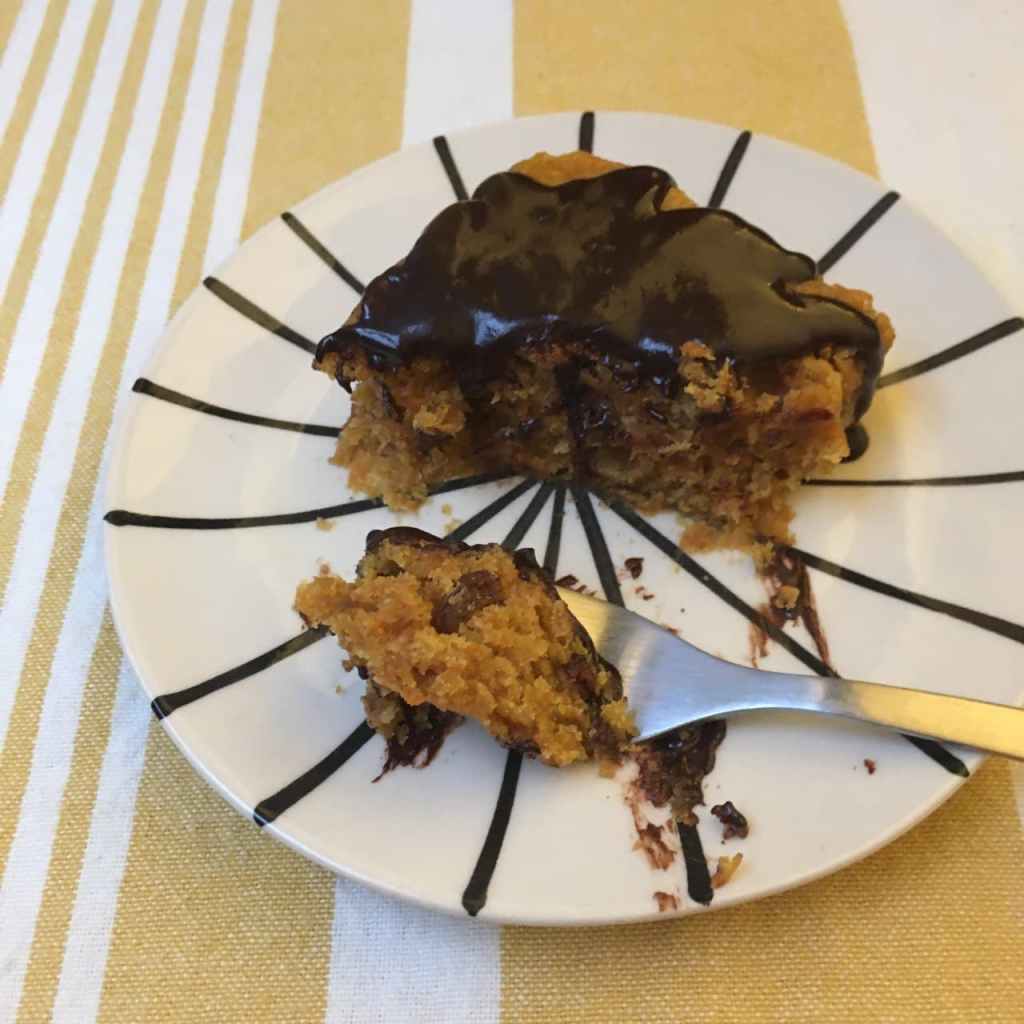
I cut mine into nine pieces, each measuring about 2.5 inches (6 cm) square. Now you’re ready to mix up some chocolate glaze!
Chocolate glaze
Makes enough glaze for two pieces of the carrot cake.
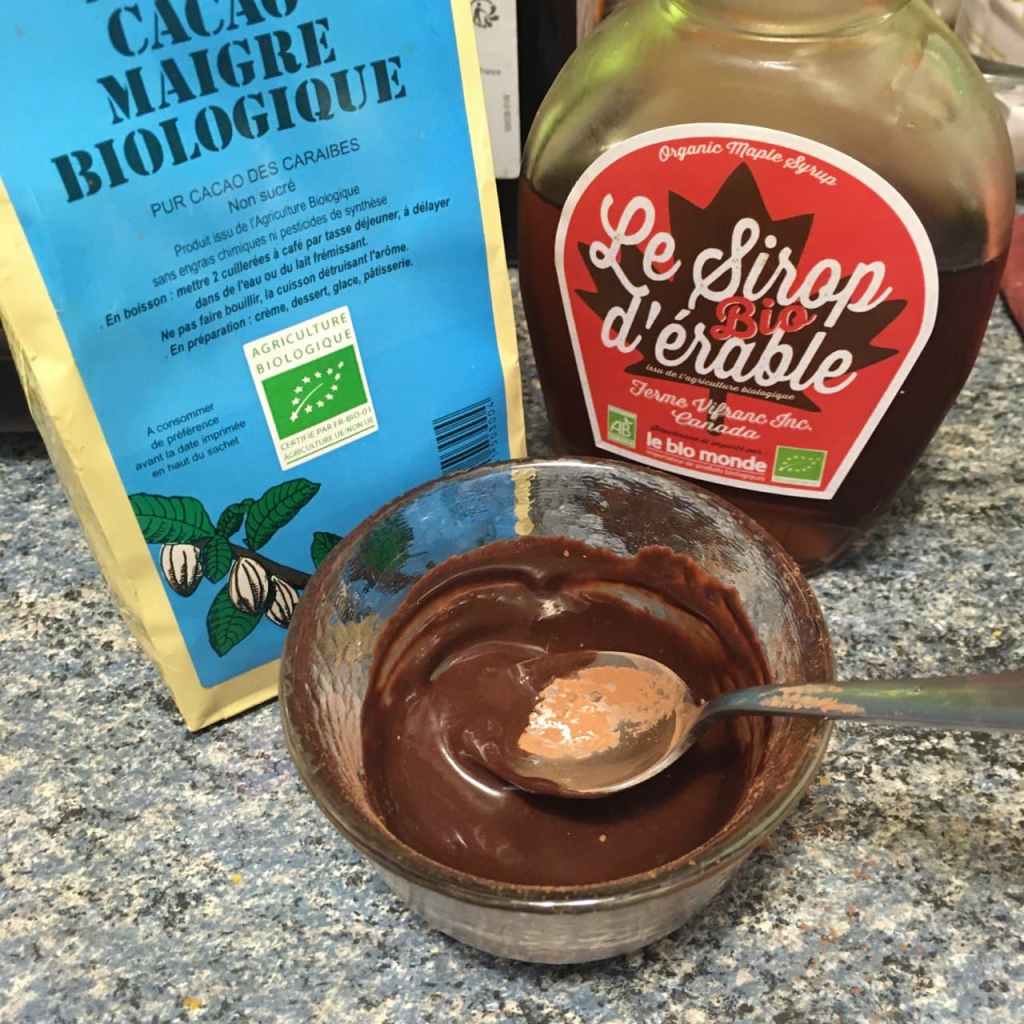
2 teaspoons unsweetened cocoa powder
2 teaspoons pure maple syrup (add more for a thinner glaze)
tiny pinch salt
You can hardly find a simpler recipe… just put these three things together and stir! At first the maple syrup will not seem to mix into the cocoa powder, but keep persisting and it will suddenly become a frosting/glaze. If you want it to be thinner and more drippy, add a bit more maple syrup.
Apply the glaze in whatever amount you like.
And there you have it!
Time to take a bite…
Looks moist and yummy. But how will it taste?
Two thumbs up!
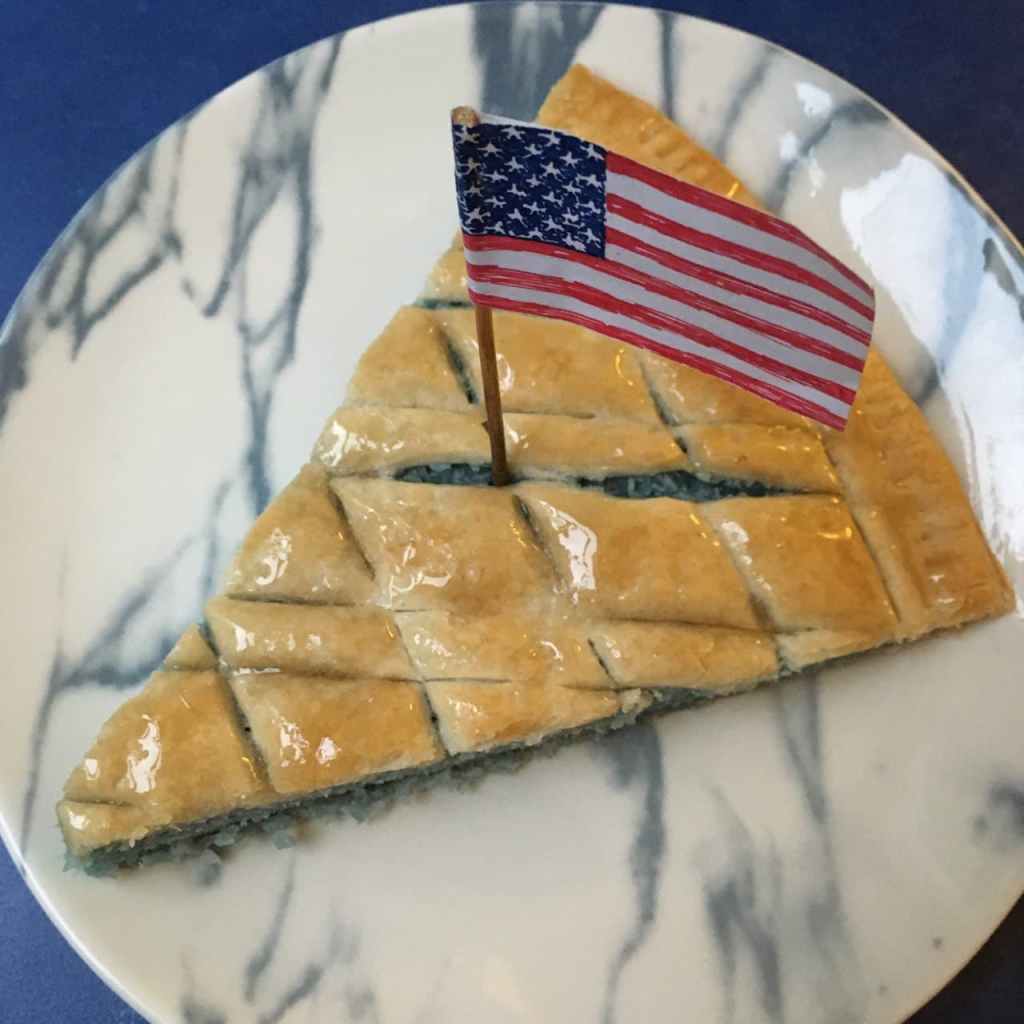
And as you may be aware, Valentine’s Day is just around the corner! This dessert may not seem very Valentine-y at first glance, but stick a heart on it and it suddenly is. 🙂
In the years since my move to France, I’ve often missed the contact with Mexican culture that you get living in the United States. While attending university, in both Wisconsin and California, I supported myself working as a restaurant server, and in our downtime would often chat with the cooks. No matter what type of restaurant it was, in the Midwest and on the West Coast alike, the kitchen staff was invariably 95% Mexican, and I ended up learning not only lots of things about these immigrants’ lives and experiences but also a good deal of Spanish too (pretty easy, since I already knew French).
I recently happened upon a Netflix show that brought up lots of nostalgia for me: Gentefied, which tells the story of urban displacement, or gentrification, and the ways it affects the lives of a fictional Mexican-American family living in Los Angeles.
The comedy-drama, which debuted in 2020 and is supposed to have a second season at some point, follows the adventures of Casimiro Morales, who runs a taqueria, and three of his grandchildren: Erik, who helps out at the shop, budding artist Ana, and Chris, who works in the kitchen of a swanky restaurant and dreams of earning a culinary degree in Paris.
When gentrification begins to push the rents in the neighborhood upward, Casimiro realizes that the future of his taco shop may be in jeopardy. Chris tries to help with ideas to attract more customers, one of them being to begin offering exotic new tacos of the day. As you may have guessed, his first one is an Indian-Mexican fusion creation, a chicken tikka masala taco. He makes one for his skeptical grandpa to try, but while Casimiro ends up loving it, the unconventional taco doesn’t appeal to his regular customers.
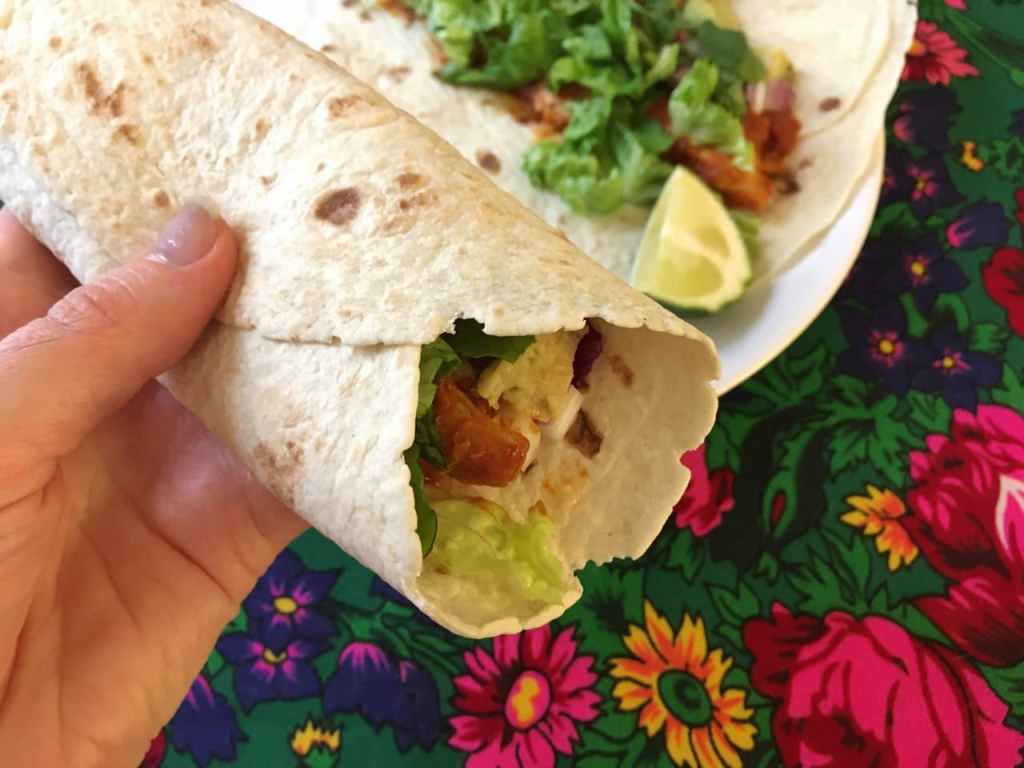
It sure appealed to me though, and it wasn’t long before I assembled my own version of a tikka masala taco, using vegan “chicken” (once with aiguillettes from Les Nouveaux Fermiers and another time with émincés from Herta) and a tikka masala curry paste I found at Mon Epicerie Paris here in the City of Light. But you can use any kind of vegan chicken, or even tofu, tempeh or seitan, etc. and substitute another red curry paste if you don’t happen to find a tikka masala one.
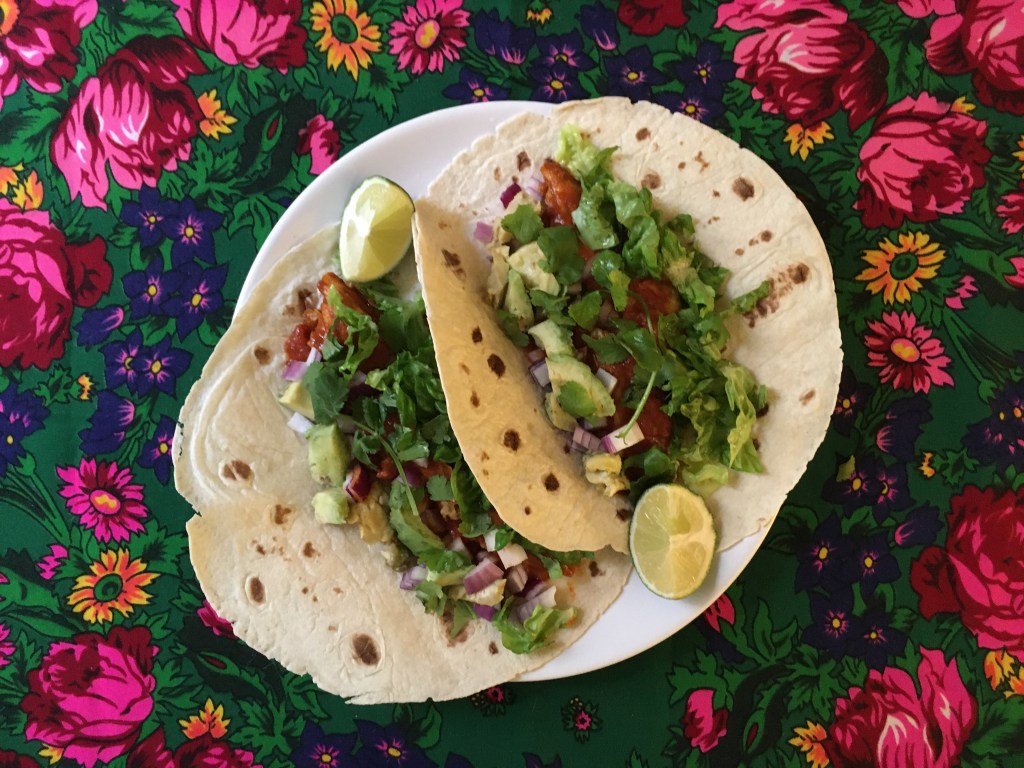
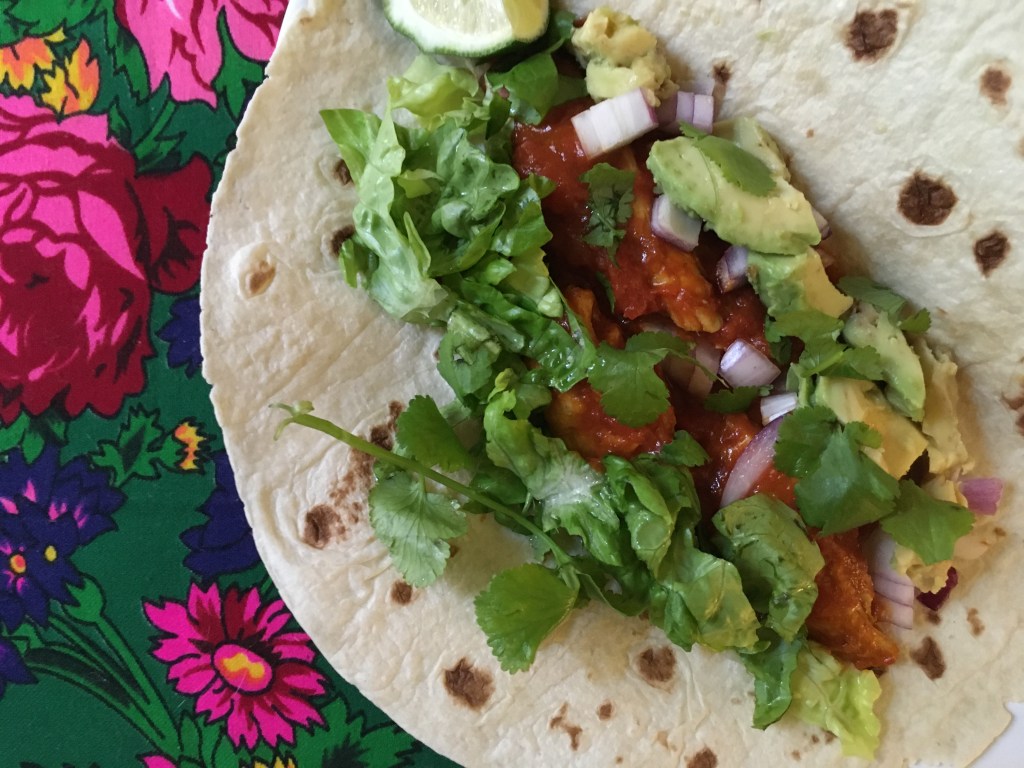
Vegan “chicken” tikka masala tacos
Makes around 6 large tacos or 12 smaller ones, depending on tortilla size
17 oz (500 g) tomato purée or stewed tomatoes
6.5 oz (180 g) tikka masala curry paste or other red curry paste
10.5 oz (300 g) vegan “chicken” or other vegan protein (tofu, seitan etc.)
6 large or 12 smaller Mexican-style wheat or corn tortillas
1 large red onion
1 small head lettuce
2 avocados
a few limes
fresh cilantro
optional: hot sauce, plain vegan sour cream or yogurt
Start by prepping the taco garnishes, dicing the onion, chopping the lettuce and cutting up the avocados (or make a guacamole out of them) and the limes. Set them all out in small bowls so you can put your tacos together quickly once the tikka masala “chicken” is ready.
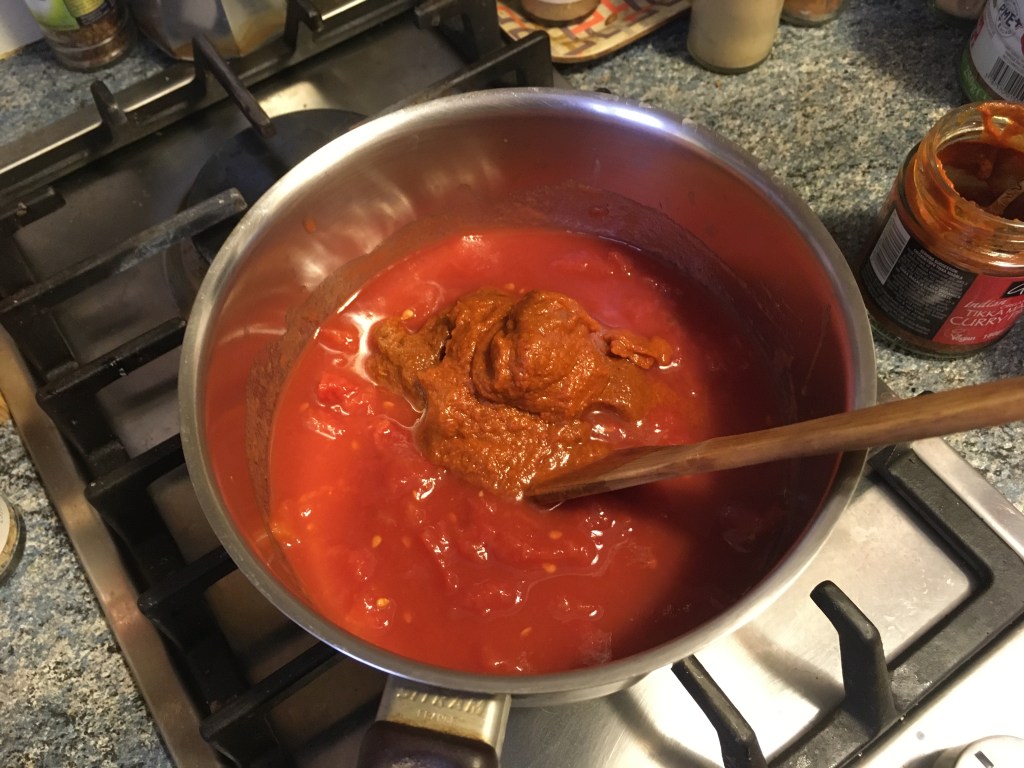
I used a little more than half this can of stewed tomatoes, and the whole jar of curry paste, but you can experiment with larger or smaller amounts of curry paste depending on how spicy your paste is and how spicy you want to make your sauce.
Break up the whole tomatoes, if using whole stewed tomatoes, and stir in the curry paste until it’s fully incorporated.
These are the vegan “chicken” products I used, for different batches. They’re quite similar to each other, but the Nouveaux Fermiers one is probably nicer (and more expensive). To make the amount specified in this recipe, you’ll need two packages of whichever one you opt for.
Place the “chicken” in a frying pan with a little vegetable or olive oil (shown here is the Nouveaux Fermiers “chicken”). Since the product is already cooked, you basically just need to heat it up and maybe get it a little bit browned.
Now add some of the tikka masala sauce and heat it together with the “chicken” until the sauce has the thickness you like. You might have some sauce left over. Shown here is a portion of just 5 oz (150 g) of the “chicken”, so not all the sauce has been added.
If you’d like to have a creamy tikka masala sauce, mix in a bit of unsweetened soy cream or yogurt at the very end, after you turn off the heat. I didn’t do that here, but will try it another time.
Open the tortilla package at the last moment to prevent them from drying out (shown is the tortilla size I am referring to as “large”). If you want to heat the tortillas before making your tacos, try to do it in a steamer and then immediately transfer them to a plastic or ceramic airtight tortilla keeper like the ones they use at Mexican restaurants. I don’t recommend heating them in the oven or on the stovetop, since they’ll become dry and rigid and will no longer fold properly. You’ll find some more tortilla reheating tips here.
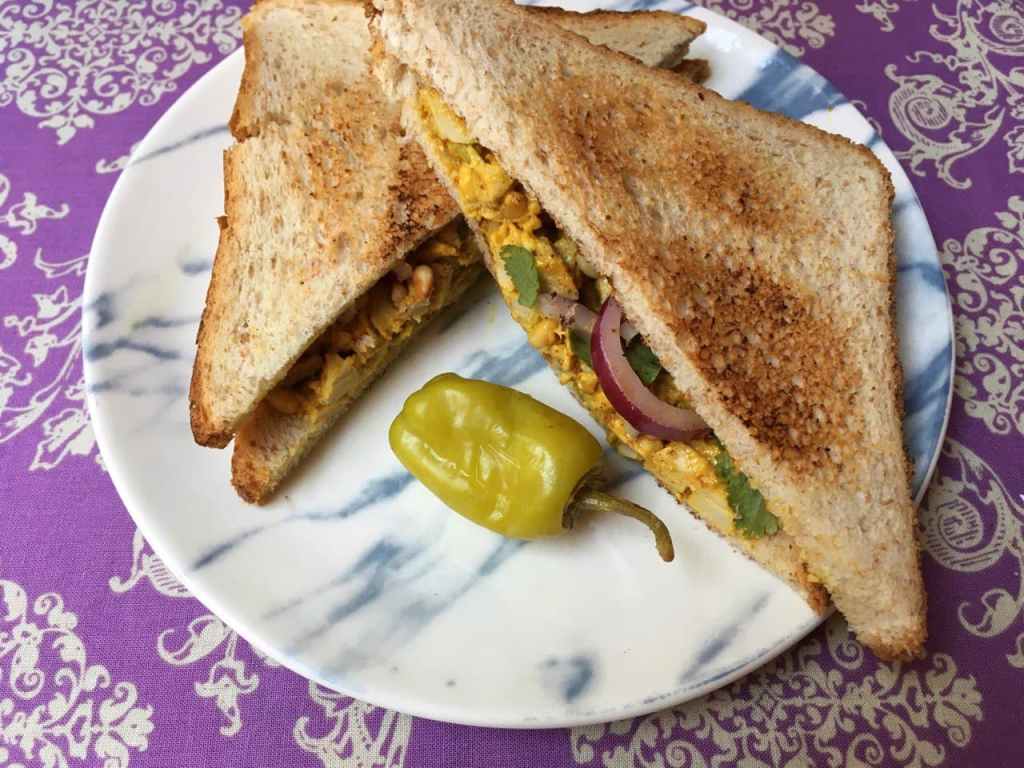
Place a serving of the tikka masala “chicken” along the center of a tortilla and then add your garnishes. Squeeze some lime juice over top and finish with some cilantro leaves. The lime and cilantro make a big difference to the overall flavor of the taco, so don’t leave them out!
If you like, you can also add some vegan crema (sour cream or plain soy yogurt with a bit of tamari mixed in).
I garnished this taco with some spicy green olives too. You may want to drizzle some Tabasco or other hot sauce over the top as well.
Fold up the taco and it’s ready to eat! To keep to the Indian-Mexican fusion theme, play some Bollywood music while you eat. Afterwards, have some chai tea while checking Gentefied out.
And for those of you in Paris, I have some good news! Vegan Mexican chefs @veganomexa have been holding pop-up events here and there around the city! I was recently lucky enough to get in on one and enjoy some authentic Mexican tacos and tamales with fillings like jackfruit mole and soyrizo with a green tomatillo sauce. I was in heaven! Follow their Instagram to find out about upcoming events.