White chocolate mendiants

It’s that time of year again… hearts seem to be popping up all around town, mingling strangely with the last remaining Christmas decorations and sometimes (like this year) accompanied by snow. For my Valentine’s Day post last year, I waxed philosophical about the meaning of the holiday and presented you with a recipe for sugar cookies with rosewater-raspberry icing. This year, perhaps inspired by all the discarded Christmas trees I’ve been walking past on the sidewalks over the past few weeks, I decided to revisit a traditional French yuletide confection in a white, pink and red version.

As with the original dark chocolate version, this is a very easy and versatile recipe. You need only melt a bar of chocolate or two and then add whatever fruit and nut toppings you like. At the end, you have a very cute little DIY treat to give to your loved ones.

White chocolate mendiants

Makes around 12 mendiants

Ingredients:

  • about 5.6 oz. (160 g) vegan white chocolate
  • a few teaspoons of coconut oil, if needed to thin the chocolate (do not use any other type of oil)
  • freeze-dried strawberry slices
  • dried cranberries or other dried red berries of your choice
  • optional: toasted almond slivers, toasted pine nuts, candied ginger

Equipment needed: double-boiler or metal mixing bowl plus saucepan, parchment or waxed paper. A tray that can fit inside your refrigerator and a heat-safe silicone spatula will be handy too.

Gather the white chocolate plus all the berries and any other toppings you want to use. I used these 80-gram bars of vanilla-infused white chocolate from iChoc that I found at Un Monde Vegan in Paris, but if you live somewhere else you can look for white chocolate at an organic shop or online.

IMG_7354

Set up a double-boiler or, as I have done here, boil some water in a saucepan with a metal bowl on top. Make sure that the bottom of the bowl doesn’t touch the water.

IMG_7355

Break the chocolate into squares/chunks and put them in the bowl. You’ll be keeping the heat on so that the water continues to boil throughout the entire process.

IMG_7361

Using a heat-safe silicone spatula, stir the chocolate as it melts. While waiting for it to be ready, grab a tray that’s the right size to fit inside your refrigerator and prepare it with a sheet of parchment or waxed paper.

IMG_7362

If your chocolate seems too thick or dry, you can add a small amount of coconut oil to thin it. Add the oil sparingly, incorporating each amount to see the result before adding more.

IMG_E7372

When the chocolate has fully melted and become smooth, place a teaspoonful or so onto a sheet of parchment paper and shape into a circle of even thickness. Make only around six rounds at once so you have time to garnish them with the fruit and other toppings before the surface of the chocolate cools. Once you’ve filled an entire tray, place it in the refrigerator to cool and set (this takes about an hour).

IMG_7363

Continue the process with the remaining melted chocolate. I melted three bars, which made about six mendiants per bar, and opted to do a different type of topping with each set of six. For the ones above, I used strawberries, cranberries and some almonds. I added a few pine nuts here and there after taking this photo.

IMG_7370

A strawberry-only version. Which of these three topping versions do you like best?

IMG_7379

After about an hour, the mendiants should be fully cooled and set. You can take them out of the fridge and put them on a plate!

IMG_7380

I plated mine for this post on this great contrasting blue/green plate that I nabbed in the sales at Habitat the other day… but if you’re making these to give to friends as gifts, you can wrap them up in a bit of waxed or parchment paper tied with some fancy string.

IMG_7433

They look kind of nice on a smaller rectangular plate, too.

IMG_E7390_b

Two paws up from Sésame, who wishes you a very happy Valentine’s Day, by the way. 🙂

Enjoy!

Variations: experiment with other combinations of fruit and nuts. Make some dark chocolate mendiants to create an assorted set.

My best breakfasts of 2017

Last January, I wrote a post about the best books I’d read in 2016. But this past year, I didn’t read quite as many books and none of them were really exciting enough to devote a whole post to. So this January, for something a bit different, I’ve decided to talk about the 15 best breakfasts I had this past year. Some are my own original recipes, others are from cookbooks and a few were at restaurants or food stands. If you follow me on Instagram, you might recognize some of them!

As with my post about the books, my goal is to inspire you to try some new things. You might find a new favorite flavor combination or get ideas for further experimentation.  Many of these are simple enough that you can reproduce them just from the photo and description, but in other cases I’ve tracked down recipes for similar dishes or provided a link when the dish is from the archives of this very blog.

I’m a big fan of breakfasts—I find that having a substantial meal in the morning (with coffee or tea, of course) is a great way to start the day with enough energy to get a lot of work done before a mid-afternoon break. I often have just a large-ish breakfast and then dinner without any lunch. Of course, it helps that I work from home and can take the time—when there are no urgent deadlines—to make something interesting. But if you have an office job and are short on time in the mornings, these may still give you some ideas for things to prepare ahead of time, or to make for weekend brunches.

yogurt.jpg

Fresh seasonal fruit (here, apple and persimmon) over plain soy yogurt can make for a simple but tasty and vitamin-rich breakfast. Here, it’s drizzled with Bee-Free apple honey (substitute maple, rice or agave syrup) and topped with chopped toasted almonds.

IMG_7278

Homemade turnovers are really easy to make when you buy premade flaky pie dough and have an apple (or other fruit—pear, banana, berries, etc.) on hand. Check out my recipe for apple turnovers with a sweet, lemony miso paste.

IMG_8228b

On Saturday mornings, all year round, there’s an organic outdoor farmers’ market in my neighborhood (on boulevard des Batignolles in the 17th between metro stations Rome and Place de Clichy). If you live in Paris or will be passing through, you can stop by for some vegetables and also pick up one of these delightful savory chickpea galettes with a soy-basil sauce. They’re completely vegan and super filling and yummy. Look for the stand in the easternmost section of the market, the part closer to Place de Clichy. Or if you’re a Sunday shopper, you’ll find the same people operating a stand at the boulevard Raspail organic farmers’ market in the 6th near metro station Rennes. Alternatively, stay home and make this one yourself!

scones

I recently acquired a great French cookbook devoted to breakfast recipes, L’Heure du petit-déjeuner végane a sonné by Melle Pigut. I love her recipe for scones and make it often. They’re very easy to throw together, as long as you can wait 20 minutes for them to bake! Here, I have spread them with a vegan chocolate-hazelnut spread. If you don’t read French or can’t find this book, you can try this recipe.

bestSQ

This pudding-like dish made with sorghum is a common breakfast dish in Tunisia that I recently learned how to make. I’ve garnished it here with toasted almond slices and Bee-Free apple honey, but you could top it with fruit, grated coconut or whatever else strikes your fancy. Check out the recipe here!

IMG_8881

As an American, I have an undying affection for peanut butter and love incorporating it into breakfast dishes. I find it makes any dish more substantial and provides long-lasting energy. Here, I have spread some on toasted English muffins (newly possible to find in France!) and topped them with fresh nectarine slices and toasted pumpkin seeds.

IMG_0933

This amazing bowl of overnight oats, which I enjoyed at Vegabond during my stay in Amsterdam this October, is one of the best breakfasts I’ve ever had, ever. It was made with rolled oats and chia seeds and topped with green apple, pecans, plenty of cinnamon and a fresh physalis berry. You can try making your own overnight oats with this recipe.

IMG_9667

Another recipe from Melle Pigut’s breakfast cookbook that I loved is these potato flatbreads. They’re also quite easy to make if you plan a bit ahead and have some cooked potato ready. Here, I served them spread with hummus, grated carrot, some fennel seeds and black pepper. If you don’t read French, you can try this recipe.

porridgefigs.jpg

One of my favorite new finds in 2017 is a gluten-free rice porridge from Marks & Spencer, which has recently opened some stores in Paris. I’m not gluten-intolerant, but I happened to try this porridge and LOVE the texture… I find it to be softer and creamier than traditional oat porridge. Here, I made it using soy milk and topped it with fresh fig and peach slices and a sprinkle of toasted blond sesame seeds.

IMG_8804

If you want to prepare an extra-special breakfast or brunch item (best to start the night before), try this French fruit cheesecake. This one is made with apricots, but you could use just about any fruit.

0123.jpg

One memorable breakfast was this homemade buckwheat muesli with sunflower seeds and almonds that I made following a recipe in the French cookbook Délices déshydratés. Served here with soy milk and fresh apricot. A similar recipe in English can be found here.

banana icecream

When it’s really hot out, banana ice cream makes a fantastic breakfast. The “ice cream” part makes it sound more like a dessert, but since it’s much more filling than traditional ice cream and is also just fruit, it’s ideal for the morning. To make it, simply follow these directions. Personally, I always add lemon juice too—I find that the banana/lemon combination strangely results in a cheesecake-like taste (don’t ask me why!). You can also opt to add other frozen fruit or cocoa powder, chocolate chips, etc.

IMG_8890

Another English muffin and peanut butter breakfast! This time the topping is sautéed mushrooms and red onion with a sprinkling of smoked paprika. I know this combination might sound weird to a lot of you, but I love it!

IMG_1770

This was a super yummy chia pudding with mango coulis and fresh berries that I had at a place called Superfoods & Organic Liquids (Mitte district) in Berlin. More about that trip coming soon! You can make your own chia pudding with this recipe. Chia seeds are amazingly good for you, by the way (read more about it in the recipe link).

bestSQ.jpg

Last but not least, if you’re in a French mood, try my recipe for basic sweet crêpes that you can fill with just about anything (even savory items, if you leave out the sugar). In the photo above, I served them with bergamot lemon juice and sugar.

What are your own favorite breakfasts? Are you more of a savory or sweet person? Let us know in the comments. 🙂 Until then, bon appétit!

Scandinavian juleboller with spiced blackcurrant sauce

Christmas is just around the corner, and if you’re as busy as me you may still be wondering what in the world to make for Christmas dinner. Today’s decidedly festive Nordic recipe, created by French chef Ôna Maiocco, may be the answer!

This savory dish offers a range of lovely textures and flavors. Smoked tofu comes together with onion, toasted nuts and mashed potato to form balls with a nice firm consistency and a bit of crunch. These are paired with fluffy mashed potatoes (everyone’s favorite!) and a rich, creamy brown sauce based on a buckwheat roux with fruity notes provided by blackcurrant juice. Finally, an armada of spices (cinnamon, ginger, nutmeg, turmeric and black pepper) makes this a perfect Christmas dish—juleboller in fact means “Christmas balls” in Swedish and Norwegian.

I discovered this recipe a few years ago in Ôna’s 2013 cookbook Boulettes et galettes végétales (in French only). I’ve made it for several Christmas dinners since then and it’s always a delight. And while I usually present only original recipes on this blog, this one is so good that I felt it deserved a wider audience and asked Ôna if I could translate it for you.

Before we go on, a few words about Ôna. From an early age, she had been familiar with healthy organic cuisine thanks to her parents, who were firm believers in the merits of this type of food. Several years ago, after a first career in biology, she returned to her roots, deciding to forge a path for herself in the culinary arts, her true passion. Ôna earned a degree in pastry-making and supplemented her knowledge through self-study. Building upon her family’s tradition and her own values, she opted to make local, organic, sustainable vegan cuisine her focus. In 2011, she won the top prize in the professional category of the French sustainable food culinary competition Saveurs durables.

Today, she offers cooking classes in her beautiful sunlit and spacious atelier in the 18th arrondissement of Paris. The classes are in French, but with enough advance notice and a minimum number of participants, a class in English can be arranged. In addition to the cookbook from which this recipe is adapted, she has also published Je mange veggie : Bien manger végétarien c’est facile ! (January 2016), a guide to plant-based eating, and Ma cuisine super naturelle : manger bio, végétal et local (October 2017), a larger and more comprehensive cookbook.

And now, back to our recipe. The version presented here includes a few tiny changes and adaptations from the original. I’ve doubled the original amount to serve more people, added the cranberries as an optional garnish and suggested pomegranate juice as an optional alternative to the blackcurrant juice. The mashed potatoes recipe is my own.

If you know you’ll be pressed for time on the day of your dinner, you can make all three parts (mashed potatoes, tofu balls and sauce) ahead of time and reheat them, but I recommend making at least the sauce the day of.

Let’s get started!

Mashed potatoes

Serves 4 after removing 2 cups for the tofu balls. Can be made a day ahead and reheated on the stovetop.

  • 8-10 medium potatoes of a variety that’s good for mashing (Yukon Gold or others)
  • 2-3 tablespoons vegan butter, margarine or olive oil
  • 1/3 cup (78 ml) unsweetened soy or other plant-based cream, or more as needed
  • 1 teaspoon salt, or to taste
  • a few grinds of white or black pepper, or to taste

Peel the potatoes and cut them into large chunks. Place them in a large stockpot, add enough water to cover them and bring to a boil, covered, over high heat. After the water starts to boil, reduce the heat to medium-low and simmer, covered but leaving a little space for the steam to escape, until the potatoes are tender, about 25-30 minutes. Drain the water and mash the potato chunks using a potato masher or immersion blender (if using a blender, try not to overmix).

Reserve 2 cups of the mashed potatoes (before anything else is added to them) for your tofu balls and set aside.

Add the vegan butter, plant-based cream, salt and pepper to the remaining potatoes and mash further to combine. Taste and adjust the seasonings as needed. Put the cover back on the stockpot and set aside.

Juleboller (Christmas tofu balls)

Makes around 30 tofu balls, enough for 4 people if served with mashed potatoes; otherwise enough for 2-3 people. Can be made a day ahead and reheated in the oven.

  • 3/4 cup (80 g) nuts (almonds, walnuts, hazelnuts etc.) or seeds (pumpkin, sunflower)
  • 1 tablespoon olive oil
  • 1 medium onion
  • 1/2 teaspoon ground cinnamon
  • 1/2 teaspoon ground ginger
  • 1/4 teaspoon ground nutmeg
  • 1/4 teaspoon ground black pepper
  • 2 cups, loosely packed (300 g) mashed potatoes reserved from the above recipe
  • 7 ounces (200 g) smoked tofu (or use plain tofu plus a bit of liquid smoke)
  • 1/2 cube vegetable bouillon (enough to make 1 cup/236 ml bouillon)
  • 1/2 cup (50 g) rolled oats
  • 1/3 cup (60 g) dried cranberries, for garnish (optional)
  • Small bunch parsley, for garnish
  • 1 recipe spiced blackcurrant sauce (scroll down for recipe)
IMG_3919

Begin by chopping the nuts, tofu and onion.

IMG_3923

I used a combination of hazelnuts, walnuts and almonds, but you can use any nuts or large seeds. Chop roughly; the pieces should be around the size of a pumpkin seed. Be careful not to chop too finely as you want recognizable pieces of nuts in the final product.

IMG_4360 x
IMG_4365.JPG

Break the tofu into chunks with your fingers and then crush the chunks between your fingers and thumb to form coarse crumbs as shown.

IMG_3932

Peel and roughly dice a medium onion.

IMG_3957

Heat a dash of olive oil in a sauté pan and begin browning the onion over low-medium heat, stirring frequently.

IMG_3965

After a couple of minutes, add the nuts. Stir to combine.

IMG_3971.JPG

Add the cinnamon, ginger, nutmeg and black pepper and stir to incorporate. Take a moment to enjoy the wonderful Christmasy scents that are now filling your kitchen. 🙂

IMG_3985

Continue browning the mixture, stirring often, until the onion is soft.

IMG_3976b.jpg

While waiting for the mixture to cook, dilute half of a bouillon cube in 1/4 cup plus 2 tablespoons (88 ml) hot water. Keep the remaining half-cube out as you’ll need it for the sauce recipe.

IMG_3938

Transfer the reserved 2 cups of mashed potato to a medium or large mixing bowl. Mash any remaining lumps, as the potatoes need to be as smooth as possible to hold the tofu, oats, nuts and onion together.

IMG_4369.JPG

Add the tofu, rolled oats and onion/nut mixture.

IMG_4373.JPG

Pour the bouillon uniformly over the top of the mixture and stir thoroughly to combine. Preheat your oven at this point to 350°F (180°C).

IMG_4377.JPG

Roll up your sleeves and, with scrupulously clean hands, shape the mixture into balls of around 1.5 inch (4 cm) in diameter. But they don’t have to be exactly this size—just try to make all the balls the same size as each other for a uniform result. Place them on a baking sheet covered with baking paper.

IMG_4379.JPG

When the tray is full, put it in the preheated oven and bake for 20 minutes. In the meantime, you’ll prepare the sauce and reheat the mashed potatoes (if serving).

Spiced blackcurrant sauce

Makes enough sauce to go with the tofu balls in the above recipe.

  • 2 tablespoons olive oil
  • 2 tablespoons buckwheat flour (do not substitute another flour because the buckwheat plays an important role in the flavor)
  • 1/2 cube vegetable bouillon (enough to make 1 cup/236 ml bouillon)
  • 1/3 cup plus 1 tablespoon (100 ml) unsweetened soy cream
  • 1/4 cup plus 2 teaspoons (70 ml) blackcurrant juice (not syrup!) or pomegranate juice
  • 2 teaspoons soy sauce
  • 2 teaspoons granulated sugar (or more to taste), UNLESS you use a sweetened juice
  • 1/8 teaspoon ground cinnamon
  • 1/8 teaspoon ground ginger
  • 1/8 teaspoon ground turmeric
  • 1/8 teaspoon ground black pepper
IMG_4005.JPG

Heat the 2 tablespoons of olive oil over low-medium heat. While waiting for it to heat, dilute the remaining half cube of bouillon in 1 and 1/4 cup (300 ml) hot water and set aside.

IMG_4010

When the oil is hot, add the buckwheat flour and whisk to incorporate. Stir frequently.

IMG_4011

After a few minutes, it will have formed a thickish roux base and be simmering lightly.

IMG_4015.JPG
IMG_4018

Add the bouillon (not shown), blackcurrant (or pomegranate) juice, soy sauce and spices. Whisk to combine.

IMG_4023

Add the soy cream and whisk to incorporate. Simmer, stirring frequently, for another two or three minutes. Taste the sauce to see if it needs any sugar (if it’s too acidic) or more salt (add more soy sauce) or more of the spices. Turn off burner and cover the saucepan to keep the sauce warm. At this point, if the tofu balls are almost ready, you can reheat the mashed potatoes if they need it.

Plating

IMG_4388b.jpg

Once the tofu balls are done baking, begin plating the mashed potatoes (leave the tofu balls in the oven for the time being so they don’t lose heat). If you want to get fancy, a circle mold like this one will give you a nicely defined cylindrical shape. But you can achieve a similar effect using a measuring cup or small ramekin or bowl.

IMG_4382

Just after baking, the tofu balls can be a bit fragile (they firm up more after they cool a bit), so remove them from the paper carefully, using a twisting motion to gently release the part that’s stuck to the paper.

IMG_4393.JPG

Arrange the tofu balls around the mashed potatoes. You can use more tofu balls than this if your plate is larger, and also depending how many people you will be serving (just make sure you have enough for everyone). 😉

best2.jpg

Spoon the sauce over the tofu balls, add some cranberries and garnish the potatoes with the parsley sprigs.

IMG_4440 x.JPG
IMG_4443 x.JPG
IMG_4466.jpg

You can also opt to serve the tofu balls alone without mashed potatoes.

IMG_4123

Finally, here’s a more casual presentation with a mound of mashed potatoes (not molded) in the center and the sauce poured over the top.

Whichever way you choose, waste no time in getting everyone around the table and tucking in, as this dish is seriously yummy and you’ve been sweating in the kitchen long enough!

For a festive Scandinavian ambiance, put some nice Swedish Christmas songs or choir music on.

Enjoy and God Jul (Merry Christmas) to you!

If you liked this dish and can read French, I highly recommend picking up a copy of Boulettes et galettes végétales, the book it comes from. I’ve been impressed by every one of the recipes (both savory and sweet) that I’ve made from it. It’s actually now out of print, but (as of December 2017 at least—act fast!), you can still get it on Amazon.fr. Also check out Ôna’s new book, Ma cuisine super naturelle : manger bio, végétal et local.

Variations: Instead of mashed potatoes, serve with rice or couscous (note however that you will still need mashed potatoes in the balls to hold them together). Use roughly chopped or whole pumpkin seeds as an additional or single garnish.

Apple-miso turnovers

In recent months, I’ve spent less and less time on Facebook, having noticed that I was lingering too long there, focusing on trivial or not-so-positive posts to the detriment of more productive activities. But I like to pop in every once in a while since there are also cool people to meet and useful discoveries to make. The other week, mindlessly trawling the site in spite of myself, I struck gold: Elizabeth Andoh had just posted her recipes for lemon and ginger flavored miso sauces designed to go with fruit. As a big fan of sweet and salty combinations—mango with lime juice and salt, chocolate with fleur de sel, popcorn tossed with both salt and sugar—I was immediately on board. I wasted no time in making these sauces and trying them paired with figs and nectarines, the fruit available at the time. Delicious.

Soon enough, my brain began trying to work out other ways to use these sauces, and I landed upon the idea of adding flavored miso to a fruit pastry! I tried it in apple turnovers, long a homemade breakfast mainstay for me, and loved the result. I understand if that sounds strange to you, but bear with me here. The miso adds a whole new dimension to the panorama of flavors, highlighting the delicate sweetness of the fruit with the contrast of its earthy, salty umami notes. The result is also vaguely reminiscent of a cheesy taste, so you could think of it as a Japanese cheese danish. Also, remember that French woman in Pulp Fiction who enjoys a slice of cheese on her pie?

I should note that I also tried using straight up white miso to see if it would be enough on its own, but it proved too salty and harsh. In the recipe below, the lemon and sugar tame it enough that it nicely complements the apple without overshadowing it.

I adapted Andoh’s recipe somewhat, using a little less miso and a bit more sugar, but feel free to try her exact version too. For the saké, I found a small “one cup” size at my local Asian grocery store for 2 euros (see photo below). If you can’t get saké, you can substitute dry white wine.

For the crust, I used a ready-made vegan puff pastry, or flaky pastry. This is known as pâte feuilletée here in France, and it’s easy to find in an accidentally vegan version even at mainstream stores like Franprix (Herta brand) or else at organic shops. Just check the ingredients as there’s also a version made with butter. In North America, you can look for this one by Pepperidge Farm. Or, if you’re inclined, you can make your own. If puff pastry is impossible to find or too daunting to make, you can use regular pie crust dough (pâte brisée in France). It just won’t be quite as light or flaky.

Note that puff pastry is not the same thing as filo/phyllo dough. You could try that too if you’re experienced at using this kind of dough, but the results may not be quite the same as what you see here.

There are two ways to shape the turnovers: cutting the pastry dough into four triangles and folding the corners inward to form a sort of square parcel (as I have done here), or cutting the pastry into circles and folding them in half to make the traditional turnover shape. For this, you can trace circles onto the dough with an overturned bowl or use a pastry mold. With this approach, some scraps of dough will be left over, but you can press them together for enough dough to make one more turnover.

For greatest efficiency, I recommend preparing the miso sauce the day before. Then all you’ll have to do in the morning is chop up an apple, take the dough out of the fridge and put everything together.

Sweet lemony miso sauce

Makes about ¼ cup sauce

¼ cup shiro miso (white miso) paste
1 tablespoon saké or dry white wine
3 teaspoons granulated sugar, or more to taste
1 tablespoon water
1 teaspoon freshly grated lemon zest

miso sake

The miso and saké that I used. When buying the miso, check the ingredients to be sure it isn’t the kind with added bonito (fish) flakes. That wouldn’t be the nicest thing in a sweet pastry!

IMG_2727 x

Combine the miso, saké and sugar in a small saucepan. Before placing over heat, stir the ingredients until thoroughly mixed. Incorporate the water and half of the lemon zest. Cook over low to medium heat for a few minutes, stirring constantly, until the mixture is glossy and you can see the bottom of the pan after scraping the spatula across it.

IMG_2729 x

Add the remaining lemon zest, stir to incorporate, and taste the mixture. Add more sugar if you like, but don’t worry too much about the saltiness because you’ll be using only a small amount of it, and when the flavors of the apple, lemon and pastry come together, everything gets balanced out. Also remember that you can always add more powdered sugar to the baked pastry at the end if need be.

If the sauce seems too thick, you can add another tiny bit of water. Ideally, you want it to have the consistency of ketchup.

Remove from heat and allow to cool. If not using right away in the turnovers, cover tightly and store in the refrigerator (will keep for 3-4 weeks).

Apple-miso turnovers

Makes 4 turnovers

1 puff pastry dough, 12 in. (32 cm) in diameter (purchased or homemade)
1 medium-sized tart apple (I used Granny Smith)
A few teaspoons all-purpose or whole-wheat flour
A few squeezes lemon juice
1 teaspoon granulated sugar
A few teaspoons powdered sugar (icing sugar)

Begin by preheating your oven to 350°F (180°C).

IMG_3342 xIMG_3344 x

Chop your apple into small cubes (cut into thin slices, then again crossways to dice).

IMG_3347 x

Transfer to a small bowl. Add a few teaspoons of flour and a teaspoon of granulated sugar to the mix until the apple is uniformly coated. The flour helps the apple stick together and become more of a substantial filling.

IMG_3348 x

Add a few squeezes of fresh lemon juice to the mixture (it adds tartness and keeps the apple from browning) and stir to combine.

IMG_3353 x.JPG

Cut your pastry into four equal parts by running a butter knife gently down and across it. Note: if you have made your own pastry, be sure to roll it out thin enough.

IMG_3354 xIMG_3355 x

Spread a teaspoon or so of the sweet lemony sauce across each section of pastry. The amount you use will depend on how adventurous you feel or how much you like miso. You can also experiment by using more sauce in some of the turnovers and less (or none) in others, to compare. If you do this, try to mark them in some way so you remember which ones are which after they come out of the oven.

If any of the miso sauce remains, use it as a dip for whatever fruit you happen to have on hand.

IMG_3356 x

Now deposit a few spoonfuls of the diced apple on the center of the prepared pastry section. Be careful not to use too much apple, as you might have to stretch the dough to cover it and this could cause the pastry to break.

IMG_3357 x

Fold the side points in toward the center.

IMG_3358 x

Fold the bottom edge upward.

IMG_3359 x

Fold the top point downward.

IMG_3360 x

Press down on all the edges to seal so the filling doesn’t escape as the turnover bakes. I usually use the tines of a fork for this. It also results in a nice pattern, although with flaky crust the pattern doesn’t always remain after baking.

IMG_3361 xIMG_3362 x

Cut a few slits somewhere on the top of the turnover to allow hot air to escape during the baking.

IMG_3365 x

Your turnovers are ready to go in the oven! Bake at 350°F (180°C) for about 20 minutes, until the tops are golden brown.

IMG_3371 x

They’ll look kind of like this when they’re done.

IMG_3374 x

I like to decorate the tops with a bit of powdered sugar (icing sugar) sifted over the top (do this while the turnovers are still warm).

IMG_3383 x.JPG

Allow to cool a bit, but not too long—they’re yummiest when warm! The ones you save for later can be popped into the oven for a few minutes at the same temperature (350°F/180°C) to warm them up before serving.

IMG_3390 x

Brew yourself some coffee or tea and enjoy!

IMG_3393 x

Yum!

I hope you love these turnovers as much as I did. Let me know in the comments if you try them!

Variations: Use any other fruit that happens to be in season and seems likely to go well with the miso sauce (pear or persimmon in the winter, peach or nectarine in the summer). Experiment with the gingery red miso sauce too. Decorate the tops of the pastries with slivered almonds (brush a bit of apricot jam on top first, then apply the almond slivers, all before baking).

Chickpea of the sea salad

Chickpea of the what?

Allow me to explain. Those of you who live in the US will probably be familiar with the Chicken of the Sea tuna brand. I never knew why they called it that, but a quick visit to their site the other day revealed that fishermen of yesteryear used to refer to white albacore tuna this way because its light color and neutral flavor made them think of chicken.

Today, amid concerns about mercury levelsoverfishing and bycatch (the needless demise of non-targeted fish and other species such as dolphins and turtles), more and more people are reducing their fish consumption. Happily, for those who like the taste of certain seafood dishes, there are ways to reproduce the flavors.

This very easy chickpea salad has a mayonnaise-mustard-caper dressing that gives it a tangy flavor reminiscent of tuna fish salad (hence the name). It’s also filling and protein-rich and has a bit of crunch thanks to the celery and onion. Furthermore, it is a versatile and forgiving recipe—the quantities of the various ingredients don’t need to be exact, and if you add too much of one thing you can easily balance it out by adding more of another. Also, if you love onion, you can add more that the amount specified, or less (even none!) if you’re not so much of a fan. If you don’t happen to have celery on hand, you could add other crunchy things like radish, green apple or even walnuts. This is a recipe where you can let your imagination loose and experiment endlessly.

It can be served in the same ways as a tuna or chicken salad: on bread for an open-faced or traditional sandwich, atop a green salad, on endive leaves, in lettuce cups or even on halved canned peaches! (yes, I’ve tried this and as strange as it sounds, it’s good!).

Without further ado, let’s move on to the recipe!

Chickpea salad

Makes about 2 cups of chickpea salad

Ingredients

  • 14 ounces (400 g) cooked chickpeas
  • 1/4 cup (40 g) finely diced red onion
  • 1/2 cup (112 g) diced celery
  • 1 teaspoon whole capers, or more to taste
  • 3 tablespoons vegan mayonnaise
  • 2 tablespoons Dijon mustard
  • 1 teaspoon lemon juice
  • 1 teaspoon brine from the caper jar
  • 2 teaspoons dried seaweed flakes or shredded nori sheet
  • 1/4 cup (5 g) chopped fresh parsley, plus extra for garnish


IMG_9846b

IMG_9848 (1).jpg

Begin by dicing the onion and slicing the celery. If your celery branches are very wide, cut them in half lengthwise so the pieces are more bite-sized.

IMG_9855 (1)

Drain the chickpeas, saving the water from the can if you want to make something with aquafaba later.

IMG_9862 (1)

Transfer the chickpeas to a bowl and mash them with a potato masher or fork. They should be broken but not pulverized to the point that they become hummus (for this reason, it’s best not to use a food processor). There should still be visible chunks of chickpea in the mixture.

IMG_9876 (1)

Now, in a small bowl, combine the mayonnaise, mustard, lemon juice, caper brine and seaweed flakes or finely shredded nori sheet.

IMG_9879 (1)

The mayonnaise mixture will look like this when ready. Taste it and adjust to your liking. You may find you would like it to be a little more spicy (add more mustard) or less so (add more mayonnaise), or more “tuna-y” (add more caper brine and/or seaweed).

IMG_9882 (1)

IMG_9884

Add the onion, celery and capers to the mashed chickpeas and stir to combine.

IMG_9890 (1)

Finally, fold the mayonnaise mixture into the chickpeas and stir until thoroughly integrated. Add the shredded parsley and stir a few more times to combine. Your chickpea of the sea salad is now ready!

IMG_9924

The chickpea salad can be served in many ways. Here, I have prepared some mini open-faced sandwiches on a type of rye bread often found with the name Baltik or Artik in bakeries in France.

IMG_9943 (1)

chickpeas peaches.jpg

Enjoy!

Variations: Make a curry version of this chickpea salad by adding curry powder and omitting the capers and caper brine. Add any of your favorite nuts and seeds (pine nuts are quite good in this). Serve in endive leaves, lettuce cups or on halved canned peaches as shown above.

Chocolate cake with azuki filling

In recent weeks, I’ve been experimenting with more and more Asian-inspired flavors and ingredients. It all began when my friend Yukiko introduced me to a Japanese dish that has become one of my top favorite recipes of all time. My discovery then furthered when I got my hands on Elizabeth Andoh’s outstanding recipe book Kansha. In it, she focuses on shojin ryori, or “temple cooking”, which in line with the Buddhist principle of non-harm is plant-based. I now realize how much more there is to Japanese cuisine than the usual sushi, maki rolls and mochi that we’re all familiar with. I’ve tried about seven or eight recipes from this book so far, including cold buckwheat noodles with a tangy umeboshi sauce and herbaceous shiso, creamy/crispy kabocha squash croquettes, candied sweet potatoes and pancakes filled with red-bean jam (check my Instagram from a few weeks ago for photos of all these).

61j58mxqSzL

In Japanese cuisine, an effort is made to combine a range of colors, textures and flavors in each dish. Pasta with a creamy sauce is paired with a crunchy, tangy salad made of colorful carrot, cucumber or red pepper. White rice is cooked together with a few spoonfuls of black rice to become lavender, and is then studded with bright green edamame beans. Sweet preparations may include a few drops of soy sauce or a touch of miso to temper the sugary taste. Such combinations result in works of art that are pleasing to both the palate and the eyes.

It was in this context, then, that I began imagining ways of integrating these principles and ingredients into familiar Western dishes. After my discovery of red-bean (azuki) jam, I wondered how it would taste paired with chocolate. This fusion recipe is the result: a traditional chocolate layer cake with a sweet azuki filling, topped with a sprinkling of powdered sugar and kinako (toasted soybean flour).

I’m quite pleased with the way this experiment turned out. The dark, rich chocolate goes very well with the sweet paste, which gains a caramel-like dimension from the soy sauce. The kinako adds an interesting color contrast as well as a nutty, toasted flavor. And with the traditional layer cake form, it would be the perfect birthday cake for anyone who (like me!) enjoys Asian cuisines and is not a huge fan of cakes slathered in frosting. 😉

This recipe is also a good example of mindful, contemplative shojin cooking (“slow food” in contrast with today’s trends), since the azuki paste takes time and watchfulness to make. I recommend making it the day before the actual cake.

So, what exactly are azuki beans? They’re smallish red legumes with a white stripe and must not be confused with kidney beans (see below). I get mine from my local organic shop, but they should also be available online.

kidney vs. azuki

You may already have heard of azuki (sometimes spelled adzuki) beans, or red beans, being used in Asian desserts. When I lived in San Francisco, I would sometimes buy something called a mooncake, which has a red-bean filling, when I passed through Chinatown. If you live near an Asian supermarket, you may be able to get pre-made red-bean paste there. But if you’re a do-it-yourself type, like I am, or want your filling to be free from preservatives and coloring agents, or just less sweet than the ones found at stores, you can make your own with the recipe below. In making this jam, I drew inspiration from two recipes: Andoh’s and this one from the blog Just Hungry (but any errors in the following are purely my own fault).

This azuki preparation (tsubu-an in Japanese) can also be spread on toast or pancakes like jam, used as a topping for oatmeal or rice pudding, or even served with cheese in lieu of a fruit chutney. The blogger behind Just Hungry recommends enjoying it with ice cream and strawberries, which does sound pretty good.

Azuki filling

Makes about 2¼ cups of filling. Can be made a day or two before the cake.

Ingredients

  • 1 cup (200 g) dry azuki beans
  • ¾ cup to 1 cup (150 to 200 g) granulated sugar
  • 1 teaspoon (5 ml) soy sauce, or more to taste

Equipment needed: food processor or high-power blender (alternatively, a potato masher  or fork and some patience).

soak.jpg

Place the dry beans in a bowl and add enough water to cover them. Allow to soak for 24 hours (keep in the fridge for best results). The beans will lose their red color as they soak. If you don’t have time for this soaking step, you can skip it, but the cooking process will take longer.

01

At the end of the soaking stage, rinse the beans and transfer them to a large stock pot. Fill  it with enough water to cover the beans (never add salt when cooking legumes, except at the very end) and bring to a boil. Allow to boil for one minute, then drain and rinse the beans with cold water.

Return the beans to the pot, refill with fresh water and bring to a boil a second time. Allow to boil for one minute as before, then drain and rinse the beans again. Rinse and wipe the inside of the pot with a sponge to remove all residue. Although lengthy, this process ensures that all impurities are removed. If you have plants, you can save the cooking water to water them with once it’s cool.

Now you’re ready to cook the beans for real! Return them to the pot and refill with fresh water to about 1 inch (2 cm) above the beans.

02

Bring to a boil, then reduce the heat to low and simmer, covered, until the beans are soft enough to crush between your thumb and pinky finger (45-60 minutes). If you did not soak the beans before cooking, this step may take longer. Check them every once in a while during this time, adding more water if the level goes down too low and they aren’t done yet. If you have a table in your kitchen, this is a good time to take a seat and delve into a good book.

When the beans pass the thumb-and-pinky test, drain them but reserve about a cup of the cooking water.

03

Return the beans to the pan and add about ½ cup of the reserved cooking water back in, or more as needed—the idea is to have just enough to keep the beans from getting too dry and sticking.

Add the sugar and continue to simmer, stirring occasionally with a wooden spoon, until you have a thick syrupy sauce (about 15 minutes). The beans will darken in color once the sugar is added. If at any point they become too dry, add more of the reserved cooking water in small amounts (¼ cup at a time).

04

Now add the soy sauce, stir to incorporate, and taste. If it seems too salty to you, add a bit more sugar. If it seems too sweet, add a bit more soy sauce, or ¼ teaspoon salt if you need more saltiness but want to limit the soy sauce flavor. Simmer for a minute or two more, then remove from heat and allow to cool.

05

Transfer the beans to a food processor or high-power blender and pulse or purée until you have a smooth, paste-like consistency.

06

Mine ended up looking like this because the little food processor I use is not super powerful. You could also opt to mash it with a potato masher or similar. It’s fine if a few chunky bits remain.

Store the azuki filling in the refrigerator and use within 5 to 7 days.

Chocolate cake

Makes two cake layers.

Ingredients

  • 3 cups (375 g) all-purpose flour
  • 1¼ cup (250 g) white or raw cane granulated sugar
  • 1 teaspoon (7 g) salt
  • 2 teaspoons (9 g) baking soda
  • ½ cup (40 g) unsweetened cocoa powder, sifted
  • 3 teaspoons (15 ml) vanilla extract
  • ¾ cup (177 ml) neutral-flavored oil, like sunflower or canola
  • 2 tablespoons (30 ml) white vinegar
  • 2 cups (500 ml) cold water

Decoration

  • a few tablespoons powdered sugar
  • a few tablespoons kinako (roasted soy flour), optional

Equipment needed: two 8-inch (20-cm) round cake pans (or bake them in two stages using one pan—be careful to divide the batter evenly). You can use pans with a larger diameter if you like, but the layers will be lower and the cake shorter than what you see in these photos.

01

First, preheat your oven to 350°F (180°C). Combine all the dry ingredients in a large mixing bowl. I used a raw cane sugar in this case, but regular white granulated sugar is fine.

02

Combine the liquid ingredients in a smaller bowl and whisk to combine.

03

Prepare your cake pans by lining them with some baking paper. Apply a bit of oil to the pan first to make the paper stick. I like to leave little “handles” like these on the sides to be able to dislodge the baked cakes more easily.

04

Whisk the dry ingredients together and then add the liquid ingredients to the bowl with the dry mixture. Whisk everything together just until combined, being careful not to over mix as this would make the cake stiff.

05

Transfer the batter to your prepared baking pans, diving it evenly between the two, and place in the oven. Bake at 350°F (180°C) for about 20 minutes.

06

Check for doneness at this point by inserting a toothpick or fork into the center of the cakes. If it comes out clean, the cakes are done. If not, put them back in the oven for another five minutes and check again. When fully baked, place them on a baking rack or stovetop to cool. Allow the cakes to cool completely before attempting to remove them from the pans.

07

You will notice that each cake layer has a domed shape. The tops will need to be leveled before you can assemble the two layers.

08

Using a large knife, carefully slice off the top of each cake, depositing the pieces you cut off into a bowl. Crouch down to look at the cake from the side, at tabletop height, to check whether it’s even enough.

09

It will look something like this. Remove the baking paper from underneath it and transfer it, cut side facing up, to a clean plate.

10

Apply the azuki filling thickly, spreading it with a spoon or large knife to ensure that it covers the surface evenly. Reserve a small amount to fill in any gaps that remain in the sides once you’ve placed the other cake layer on top.

11

Now carefully place the other cake layer, cut side facing down, on top of the filling. The cake will have a nicely defined edge along the top. With a frosting knife or flat spatula, fill in any gaps between the two layers with more azuki filling and smooth out the sides. Cover the cake with a cover or an upside-down salad bowl until just before serving. Powdered sugar tents to “melt” into the surface of a cake, so if you apply it ahead of time you will most likely have to do it again and the results will not be as nice. If you will be serving the cake the next day, keep it in the refrigerator until about an hour beforehand.

12

A few minutes before serving the cake, apply the powdered sugar. I recommend using a sieve such as this one, or a sifter of some kind, to prevent any large clumps of sugar from falling on the surface and ruining the powdered effect.

13

You can use more sugar than this if you like. It depends how opaque you want the surface to be.

01

After the powdered sugar, use the same method to sprinkle some kinako on top. Or if you prefer, you can apply the kinako first and then the powdered sugar. It depends which color you would like to be more prominent.

02

And now you’re done!

03

04

06

05

After serving, cover the remaining cake and place it in the refrigerator (without preservatives apart from sugar, the homemade azuki paste can go bad if left too long at room temperature).

Variations: Use the azuki paste as cupcake filling: after filling the cupcake cups half-way full with batter, deposit a small dollop of azuki paste in the center and push it down until it’s submerged by the batter. Also try it as a frosting for the top of a single-layer cake, or as a spread for toast, etc. as mentioned in the azuki filling recipe above.

Tofu bánh mì

Vietnamese food has been on my mind a bit lately due to the recent opening of a great new vegan restaurant in the 9th arrondissement, La Palanche d’Âulac. I had lunch there a couple weeks ago and fell in love! Scrumptious food (noodles, egg rolls, soups, coconut desserts) and a dining room that manages to be both spacious and cozy at the same time. And it is of course always very nice to be able to choose what actually appeals to you on the menu of an Asian restaurant rather than having to select from only two or three items that happen not to contain oyster sauce. Paris did already have a vegan Vietnamese restaurant, Vietnam in Paris, but for some reason it didn’t win me over like this new place has. If you live in Paris or will be visiting, definitely put La Palanche d’Âulac on your list.

So today I thought I would bring you an easy but delicious Vietnamese recipe that also happens to have a French connection. As you may already be aware, Vietnam is a former French colony—from the late 19th century to 1945, together with what is now Cambodia and Laos, it formed French Indochina. During this time, the colonizers introduced bread to the region and this fusion sandwich featuring traditional Asian ingredients was eventually born. The name bánh mì literally means “wheat cake” and so is the Vietnamese word for bread, as I understand it, but outside of Vietnam, the term is used to refer to this iconic and so very delicious sandwich.

If you have a Vietnamese or general Asian grocery store in your area, you can try looking for Vietnamese baguettes, which are made with added rice flour and so differ a bit from the firmer, crustier traditional French baguettes. But any baguette-shaped bread will work. A must for this recipe is the toasted sesame oil—be sure not to buy untoasted sesame oil by mistake because it’s key to this sandwich’s yumminess.

Since the various components of this sandwich can easily be marinated ahead of time, it’s ideal for bringing to a picnic or a day of hiking. Just assemble it shortly before leaving to ensure that the bread doesn’t get too soggy (you may also want to bring the “sauce” or soy-sesame marinade along in a separate container to add just before serving).

Tofu bánh mì

Makes two sandwiches

  • 7 oz (200 g) firm tofu
  • 1 long baguette or 2 submarine sandwich type buns
  • 1/2 cup (50 g) carrot, shredded/grated
  • 1/2 cup (75 g) cucumber, sliced thinly and chopped into quarters
  • 1/4 cup (60 ml) rice vinegar
  • 1 green onion/scallion, chopped into rounds
  • small bunch fresh cilantro (or coriander in UK English)
  • 1/4 cup (60 ml) soy sauce or tamari sauce
  • 1/4 cup (60 ml) toasted sesame oil (be sure it’s the toasted kind)
  • 2 cloves garlic, minced
  • 1 teaspoon Sriracha or other hot sauce
  • a few tablespoonfuls vegan mayonnaise
  • 1 or 2 limes


IMG_4792

The first thing you’ll want to do is get your carrot and cucumber marinating. Shred or grate the carrot and chop the cucumber into small pieces. Place in a smallish bowl and add 1/4 cup (60 ml) rice vinegar. Stir the veggies a bit with a fork to make sure they’re evenly covered by the vinegar. Set aside and take note of the time, as this should marinate for about an hour (longer is okay too).

IMG_4798

Next you’ll be preparing the tofu for its marinade.

IMG_4802

With a non-serrated knife, chop the tofu into slices as shown. Be careful not to cut overly thin slices as the tofu could break apart. Each sandwich will get three or four of these slices.

IMG_4815

In a non-stick pan over low heat and without any oil (this makes it firmer — also there will be plenty of oil in the marinade!), brown the tofu about five minutes on each side until golden as shown and slightly crispy.

IMG_4806

While you’re waiting for the tofu to brown, prepare the tofu marinade. Combine the soy sauce, toasted sesame oil and hot sauce, and then stir in the two minced garlic cloves.

IMG_4809IMG_4820

As soon as the tofu is done browning, transfer it to the soy sauce and sesame oil marinade and toss a bit to coat evenly. Allow to marinate for the remainder of the time that the veggies are marinating, or longer, but the tofu should ideally marinate for at least a half hour. Stir them halfway through, changing the positions of the tofu slices to be sure that they all get to soak up some of this magical marinade.

IMG_4821

Once the marinating step is finished, you can begin to assemble your sandwiches.

IMG_4834

With a serrated knife, slice a length of baguette (this one was about 8 inches/20 cm long), taking care not to cut entirely through to the other side as having one uncut side helps keep all the fillings in. Spread the bottom part with some mayonnaise and squeeze a bit of lime juice over the top. Alternatively, you could mix the mayonnaise and lime juice ahead of time, but the result will be much the same.

IMG_4836

Add three or four slices of marinated tofu, depending on the size of your bread and how stuffed you want the sandwich to be. Spoon some of the marinade over the top.

IMG_4838

Now top that with your marinated carrot and cucumber, plus some sliced green onion and fresh cilantro leaves. Make sure you’re using only half of all the ingredients for your first sandwich so that the ingredients for the second one don’t come up short!

IMG_4849 (1)

Close the sandwich, and you’re done! If you have overstuffed it and it threatens to spring open, you can secure the bread with some of those long toothpicks that have fancy decorative tops.

IMG_4858b

You can use the excess tofu marinade to stir-fry some seitan, mushrooms or other veggies for a great Asian umami dish (serve over rice or noodles). If any of the rice vinegar remains from the other marinade, you can add it to a homemade salad dressing.

Variations: Substitute or add different fillings: avocado, marinated radish, red bell pepper, etc. Experiment with a peanut-based sauce by mixing some peanut butter into the tofu marinade. Garnish the fillings with sesame seeds before closing the bread for an extra-fancy touch. For a gluten-free version, prepare everything as described (making sure that the soy or tamari sauce you use is a gluten-free one) but serve over a bowl of rice noodles.

Retro spinach-artichoke ring

In the United States in 1971, Nixon was president, the Vietnam war was going on, the 26th Amendment lowered the voting age from 21 to 18, National Public Radio broadcast for the first time, Amtrak was founded, Texas Instruments released the first pocket calculator, soft contact lenses became available, cigarette advertising on television was finally banned and the Walt Disney Resort opened in Orlando, Florida. And, in somewhat less sensational news, the Betty Crocker Recipe Card Library was created.

IMG_2832b

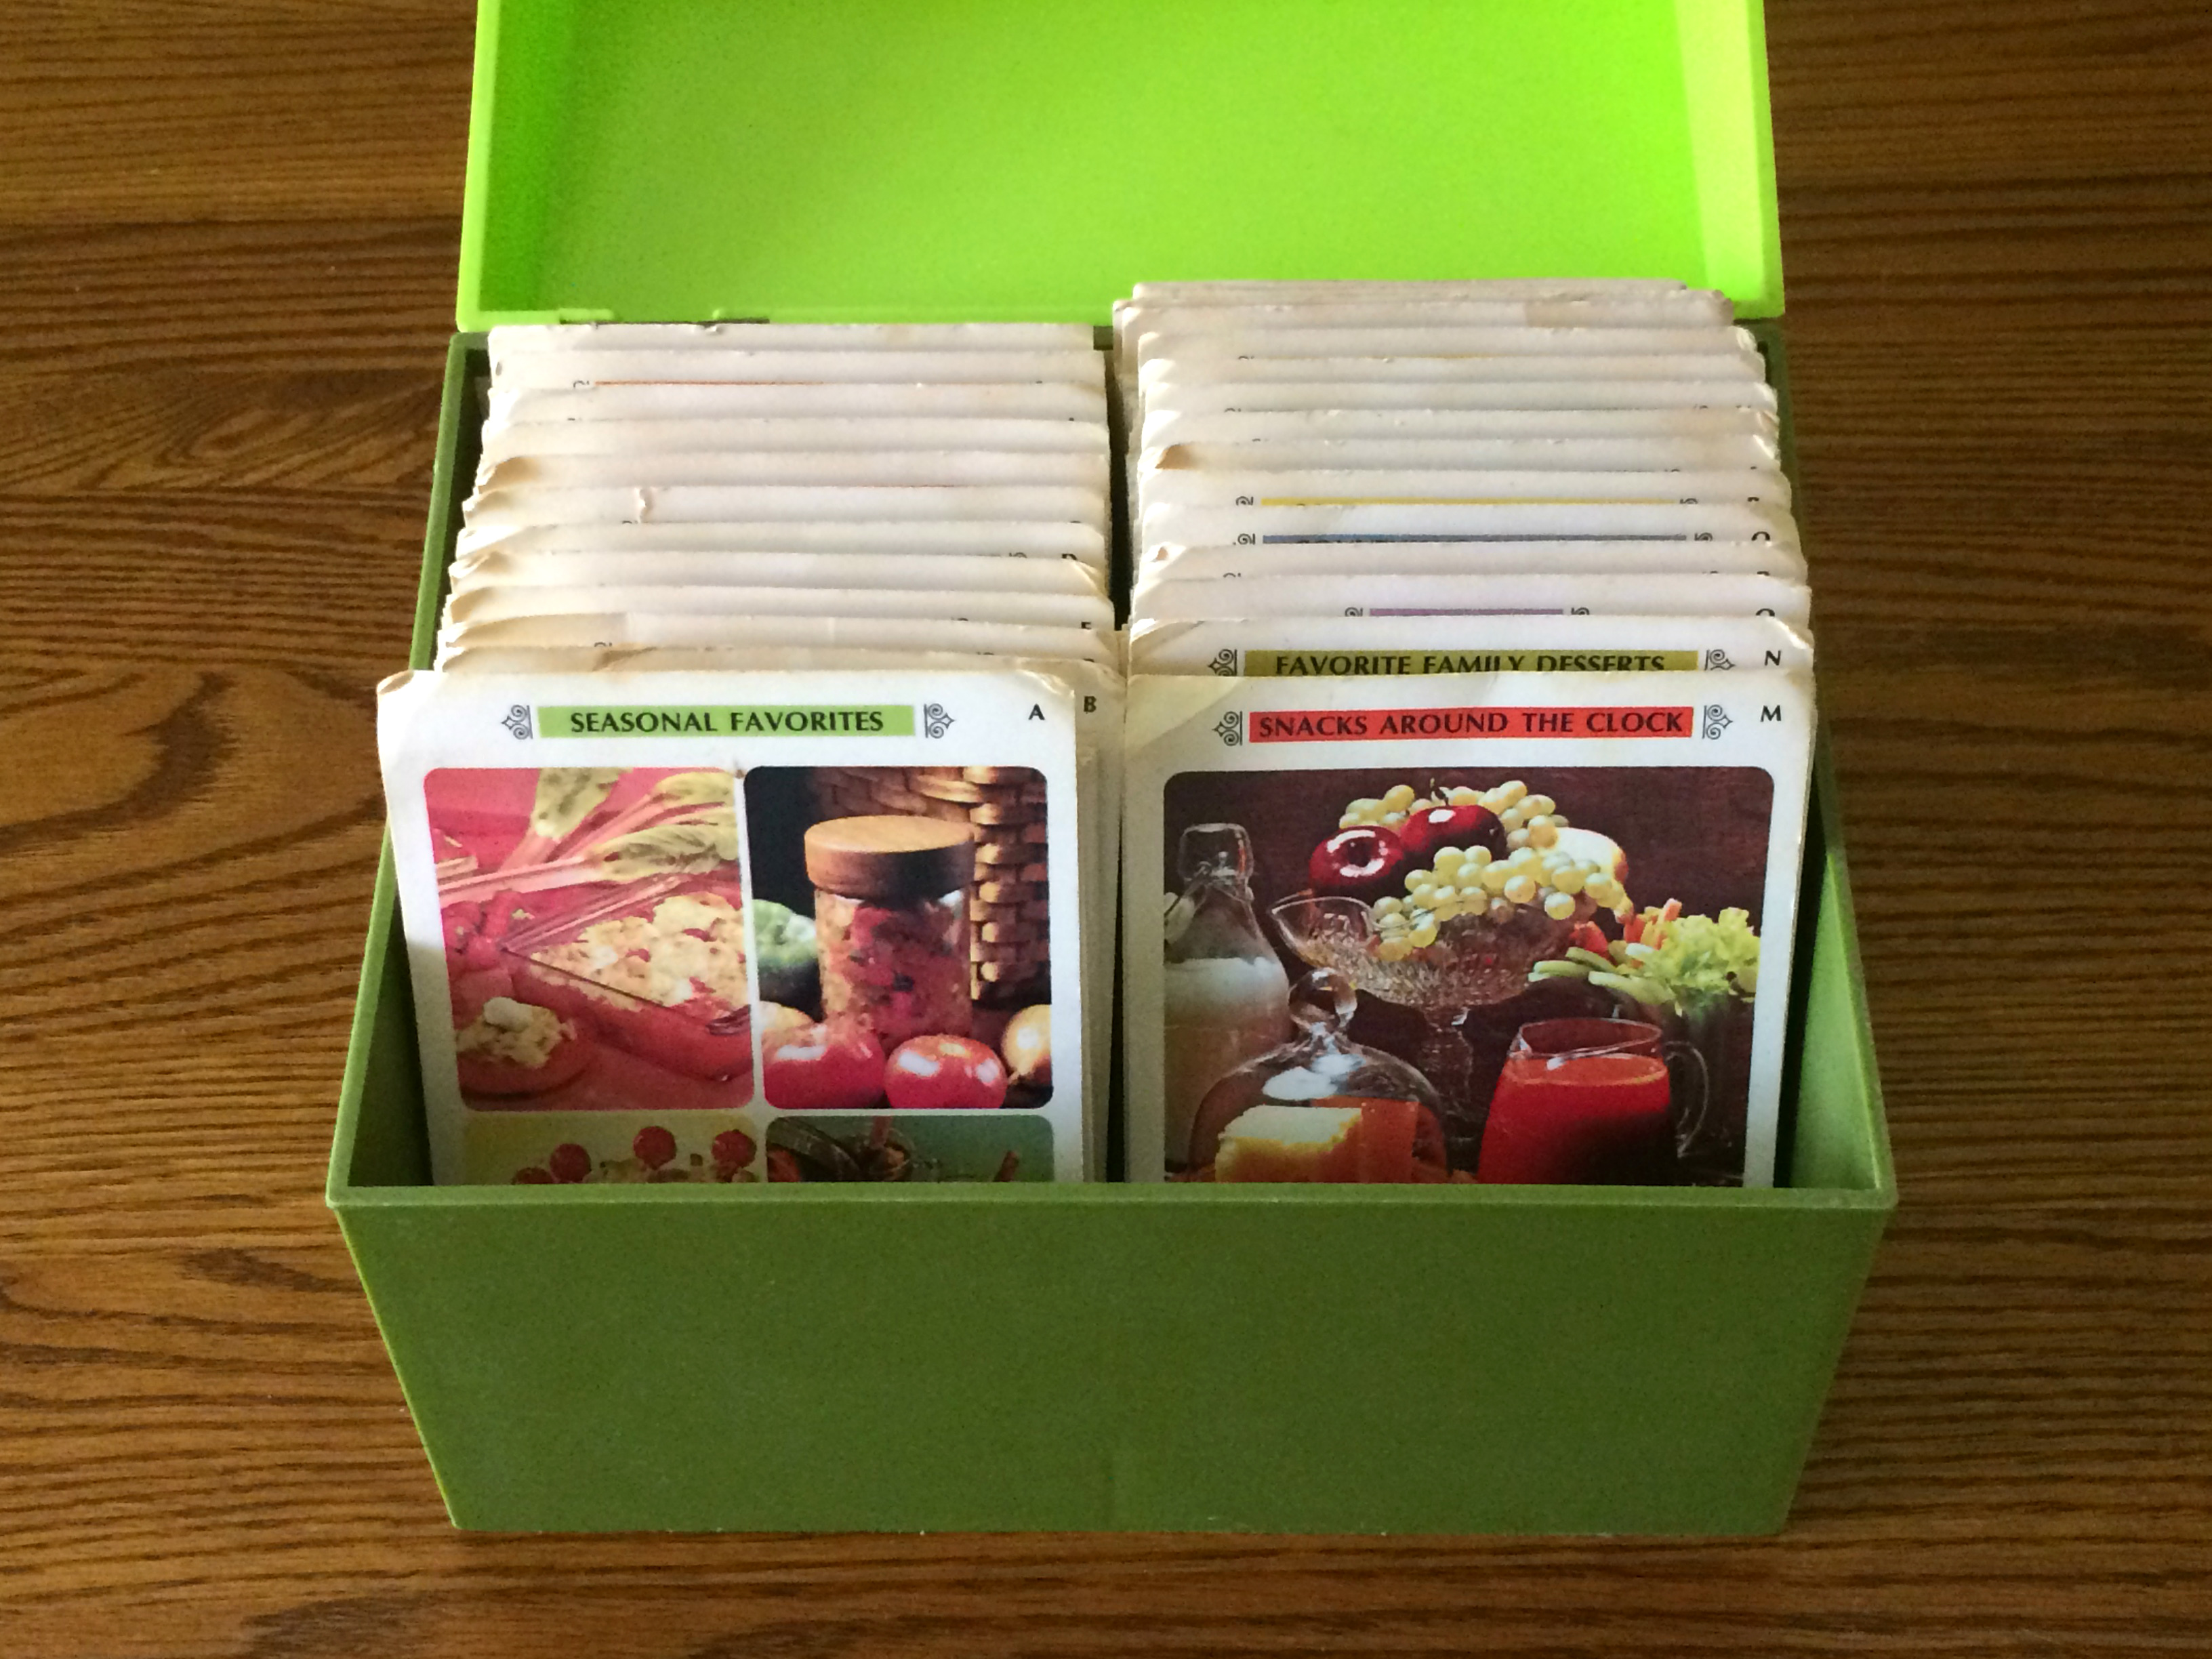
The recipe card collection could be acquired through a subscription arrangement, where you paid in installments and received a new set of cards every couple of weeks for a few dollars each time. In 1972, my newlywed mother subscribed. In the first shipment, she received her first set of cards and the (otherwise empty) plastic box in its trendy avocado green shade. Over the following months, she received the remaining 23 card sets with titles such as Family Breakfast Brighteners, Hurry-Up Main Dishes, Fondues, Recipes for Calorie-Counters and Entertaining on a Shoestring.

Visiting my parents this past month, I happened upon the familiar green box in the basement and opened it up to delve into the memories.

IMG_2859b

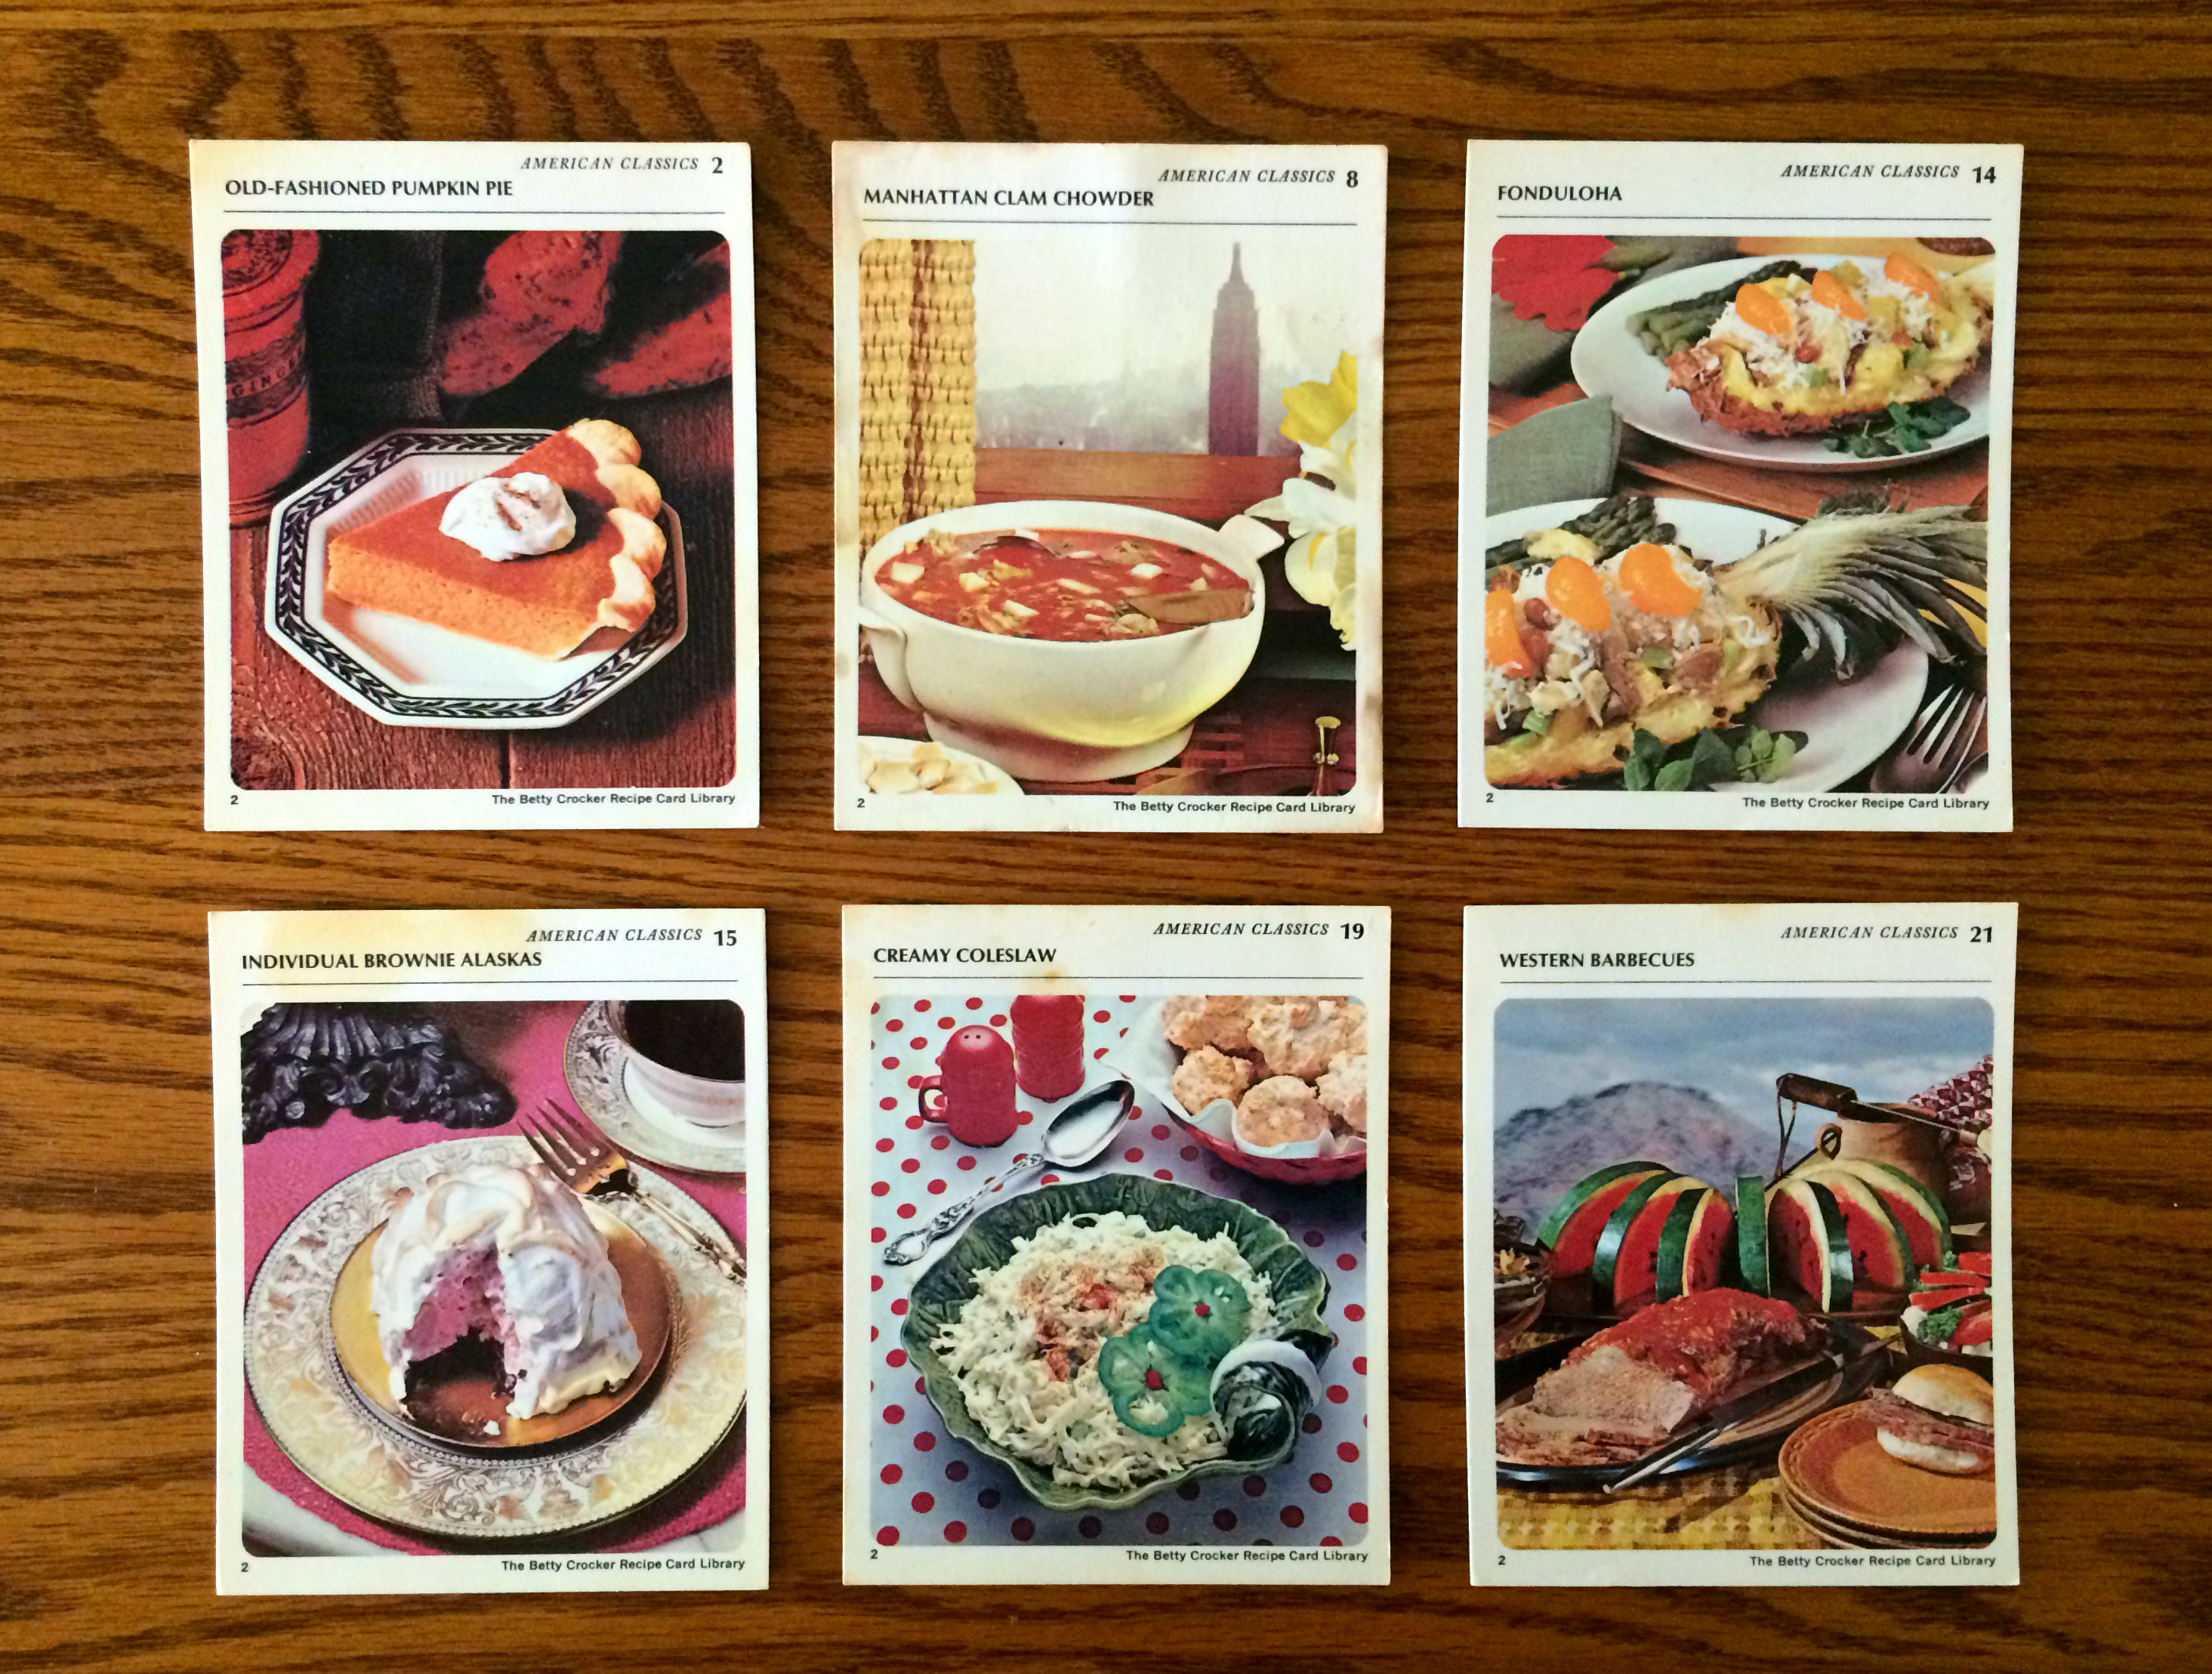
Living abroad as I do, and being regularly called upon to explain the cuisine of my country, or lack thereof, I found the American Classics set quite interesting. I know the traditional Midwestern dishes, of course, but sometimes forget what the iconic foods of other regions are. Also noteworthy is that in 1971, Hawaii and Alaska had been US states for only 12 years. It must have been rather a novelty for homemakers of the day to make recipes paying tribute to them, if not necessarily originating in the states.

IMG_2843b

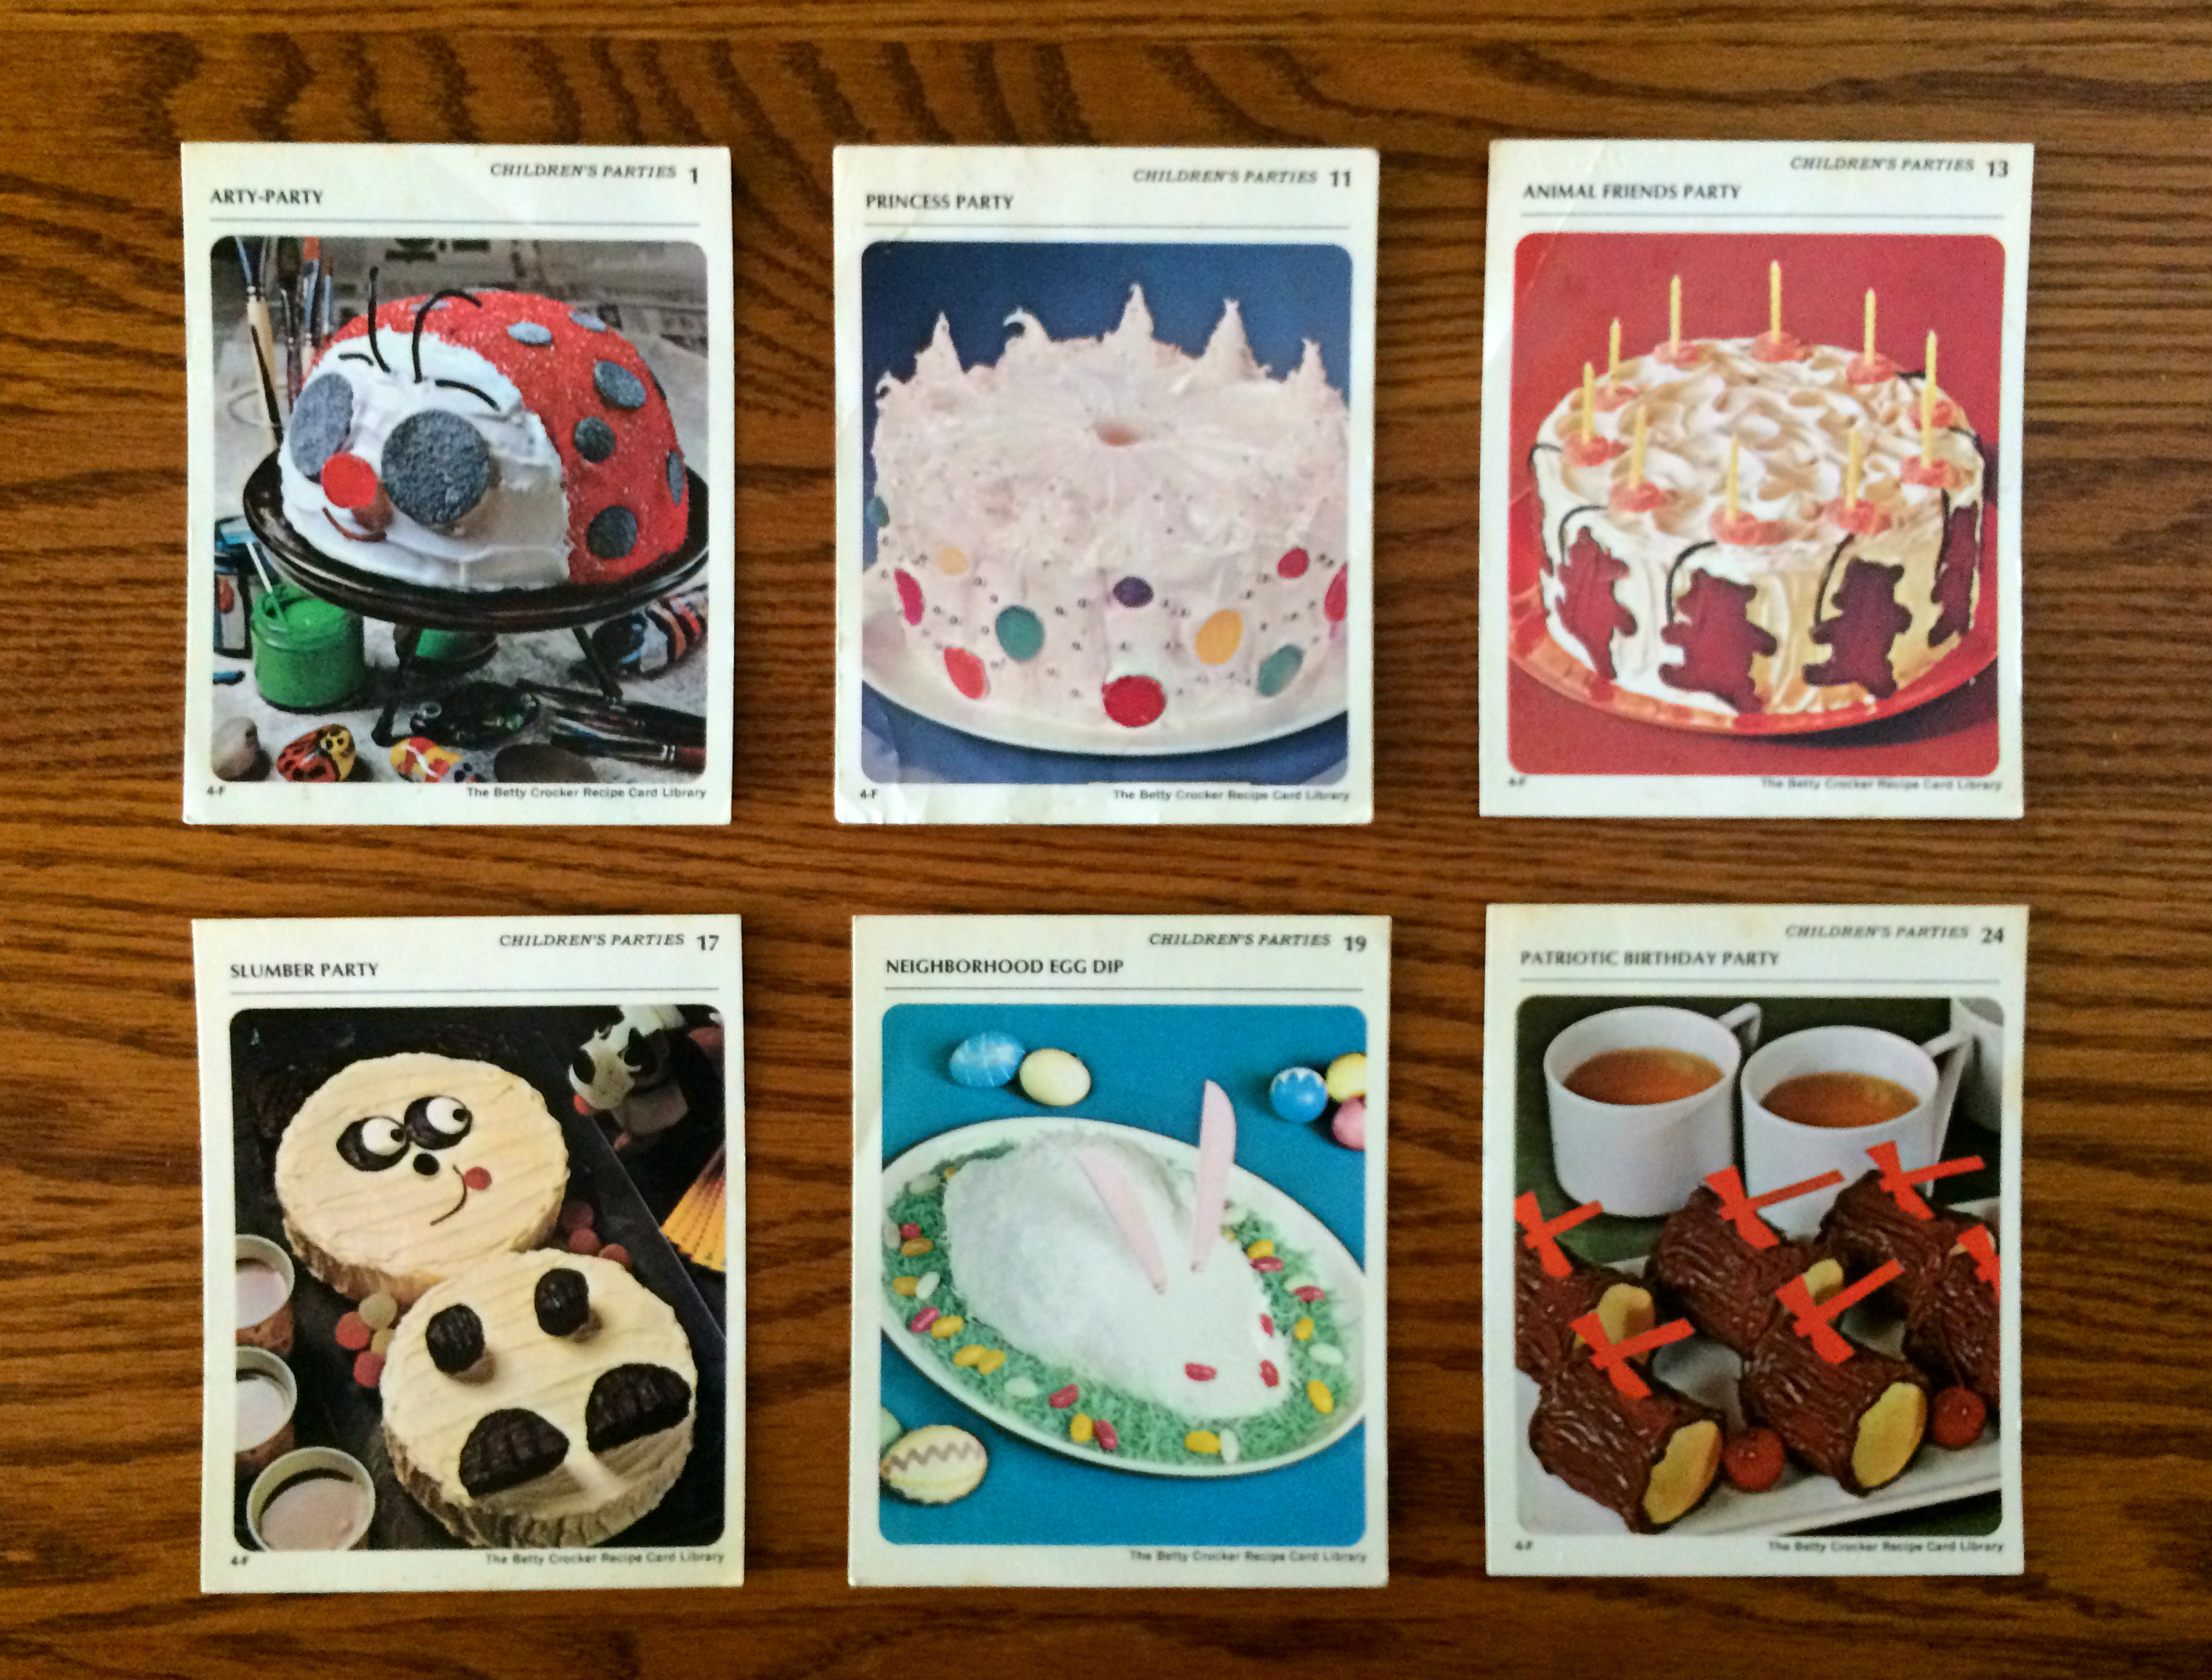
My favorite set is Children’s Parties. My mom made the top three cakes for our birthdays on various years, and the first two of the bottom row on other occasions. She never made the Lincoln-inspired Patriotic Birthday Party cakes as far as she can remember, but it would be a cute thing to make for a lumberjack-themed party, if you’re ever invited to one of those.

IMG_2835b

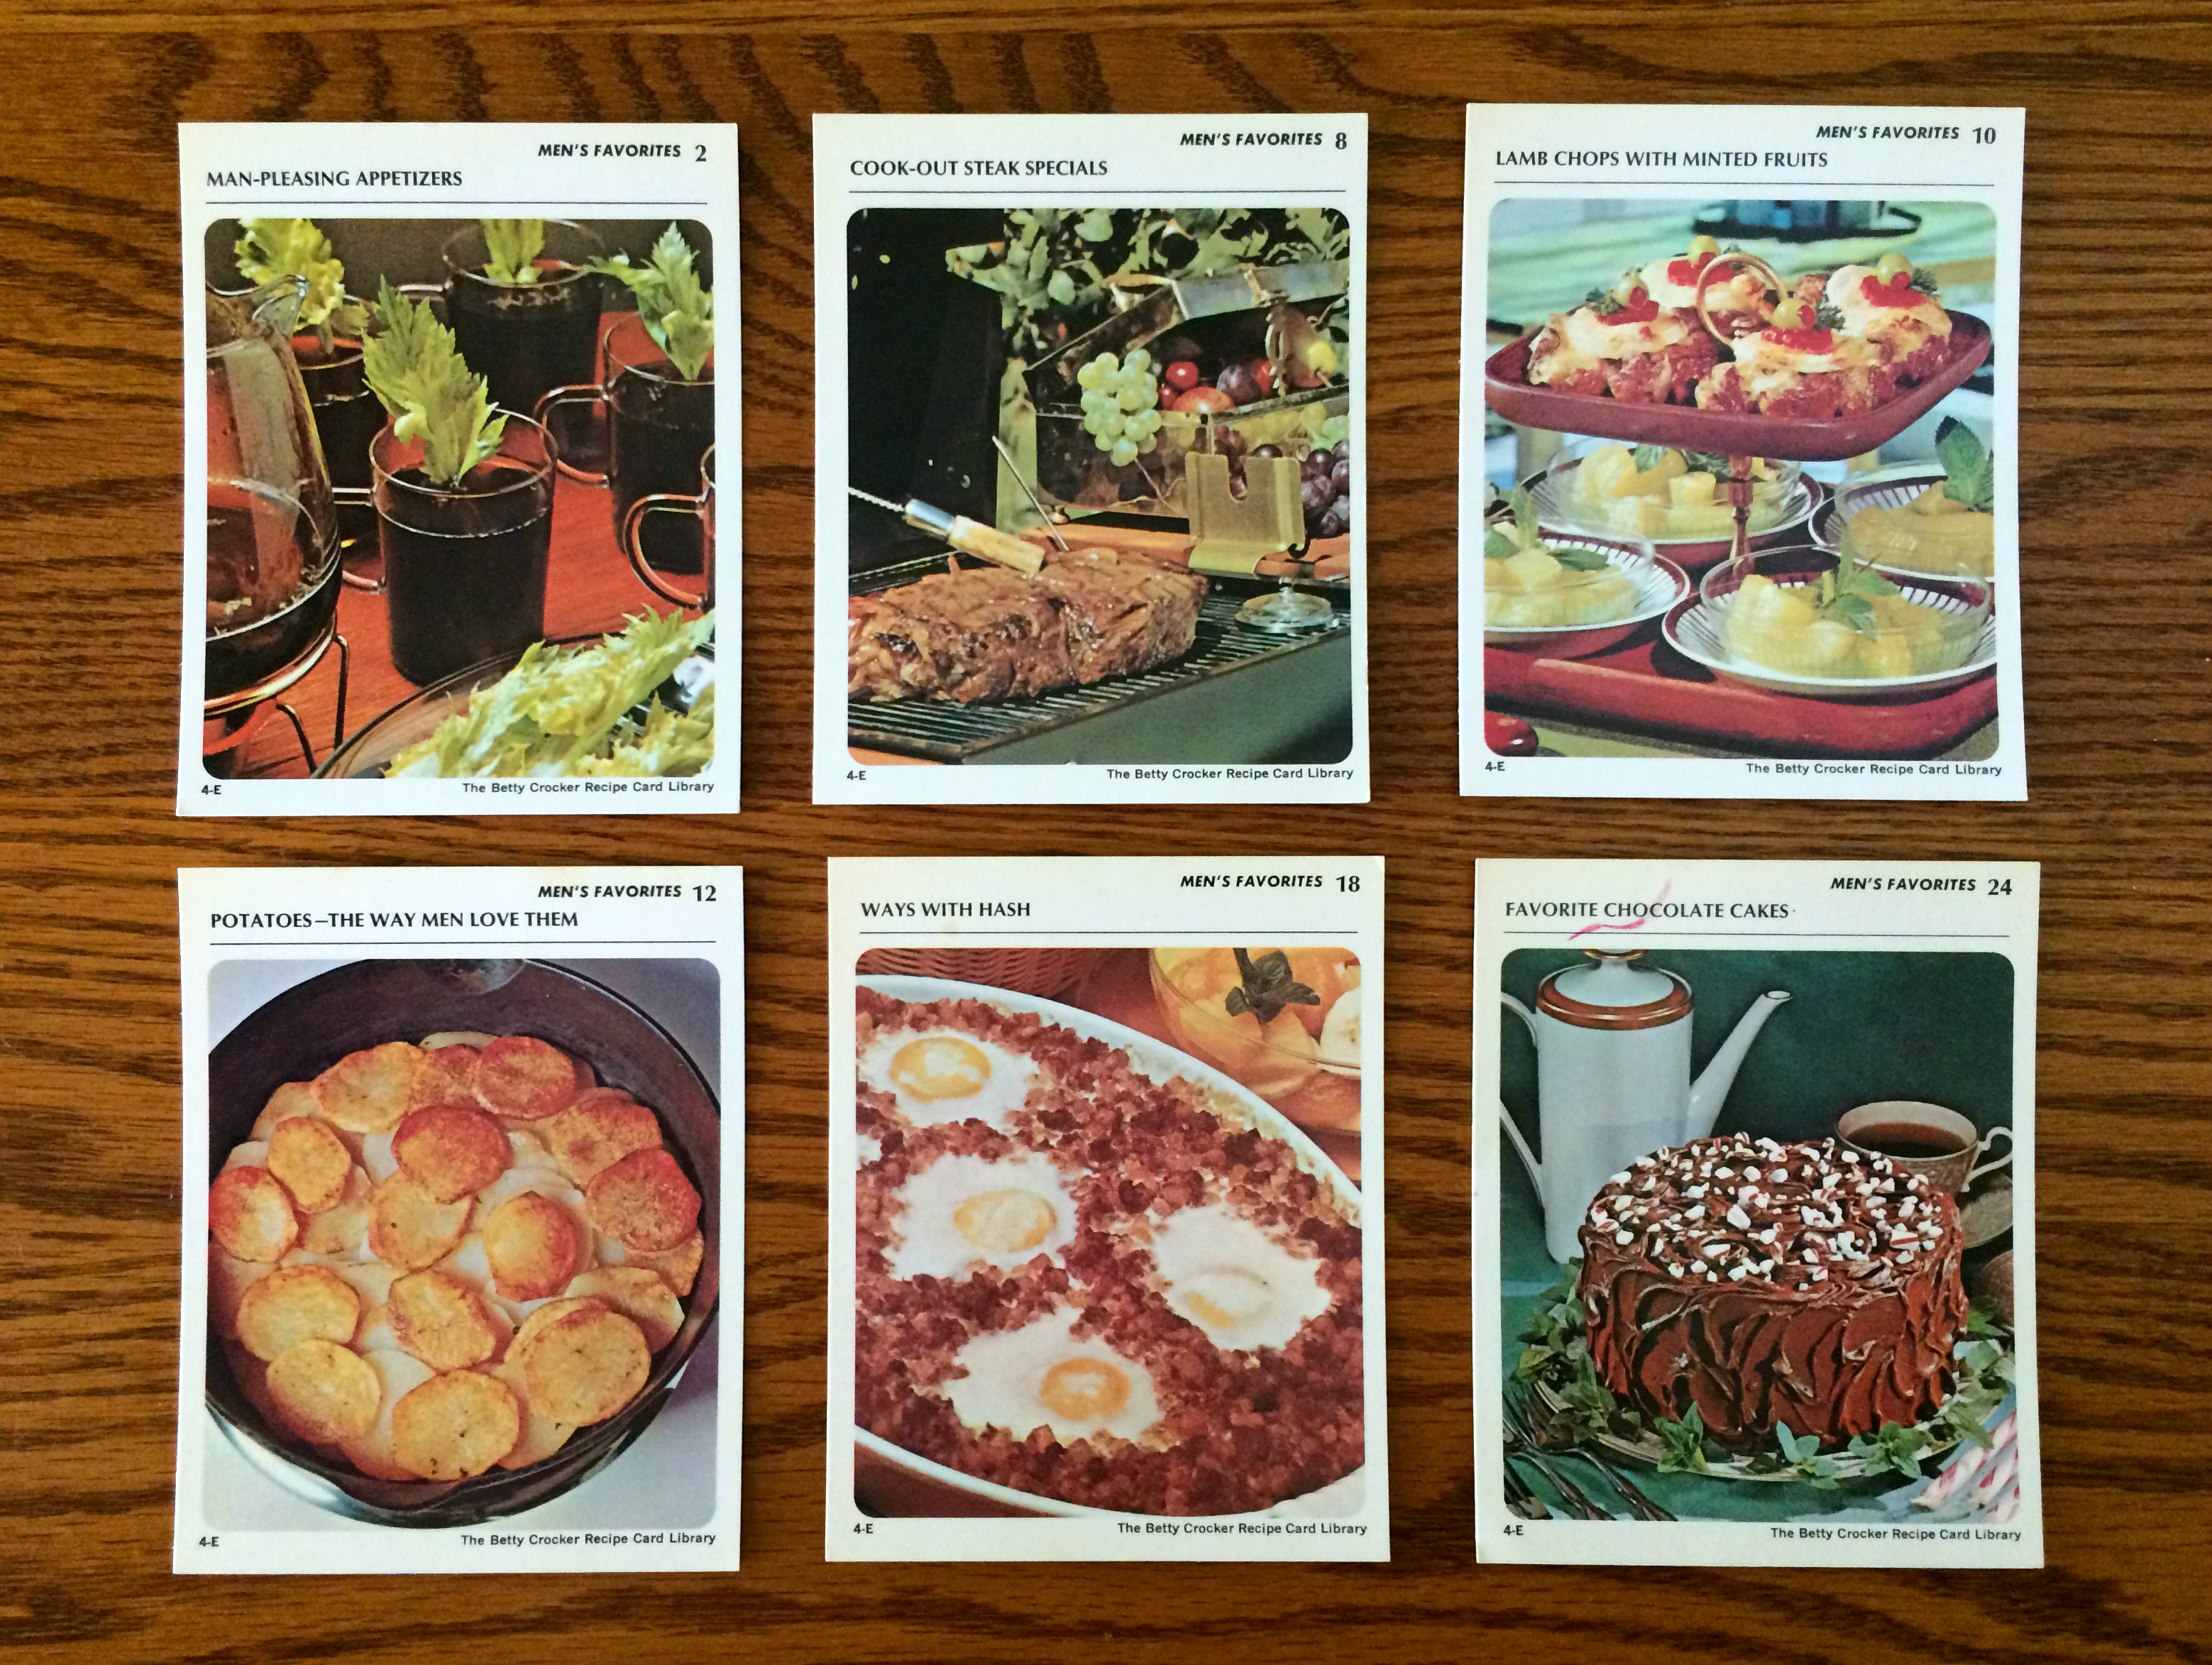
Men’s Favorites is a set that you (hopefully) won’t find in a recipe card set today, but in the world of the 1970s it was perfectly normal. As the introduction to the set goes, “When a man’s fancy turns to thoughts of his favorite foods, chances are good that you’ll find the right recipe in this collection. . . . They’re all here—princely recipes for kingly dishes, tested and male-approved for you.” There was clearly always the chance of losing your man if you were hopeless in the kitchen. Fortunately, Betty Crocker had your back with her Man-Pleasing Appetizers (mugs of beef broth and chicken livers wrapped in bacon). As you might expect, the set is full of meat-based dishes (but then, so is the entire library, so I’m not sure what the difference really is), but confusingly there are also some suspiciously fussy items like the minted fruit cups in the third recipe and tomatoes and lettuce on a plate (not shown).

As we looked through the cards together, my mom commented that for most of the recipes, a pre-made mix of some kind was a main ingredient, forcing you to buy Bisquick or a can of frosting rather than telling you how to make it from scratch. This may be due in part to the limited available space—the entire recipe always had to fit on one side of a 5 x 4 in. (10 x 13 cm) card—but we also suspect some collusion with the manufacturers of the mixes. But that was how cooking had been since the 1950s, she said, when convenience took priority over healthfulness. I also heard her say “gross” while looking at the ingredients for the breakfast recipe Pork-Potato-Apple Bake (corn syrup, crunchy peanut butter, boiled crab apples and Spam, anyone?). But she got a good chuckle from seeing the cards again and reminiscing.

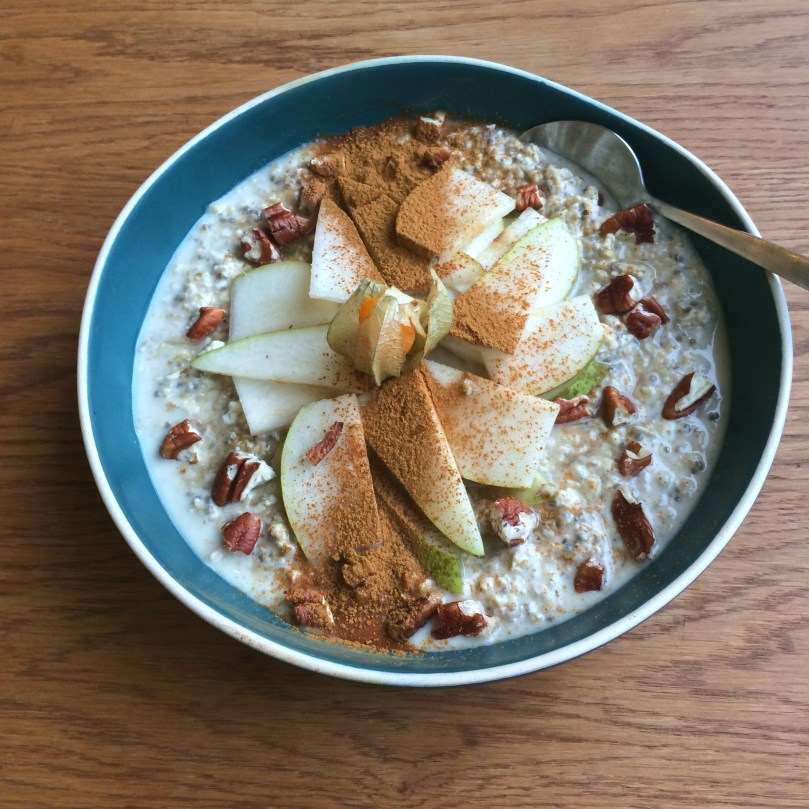
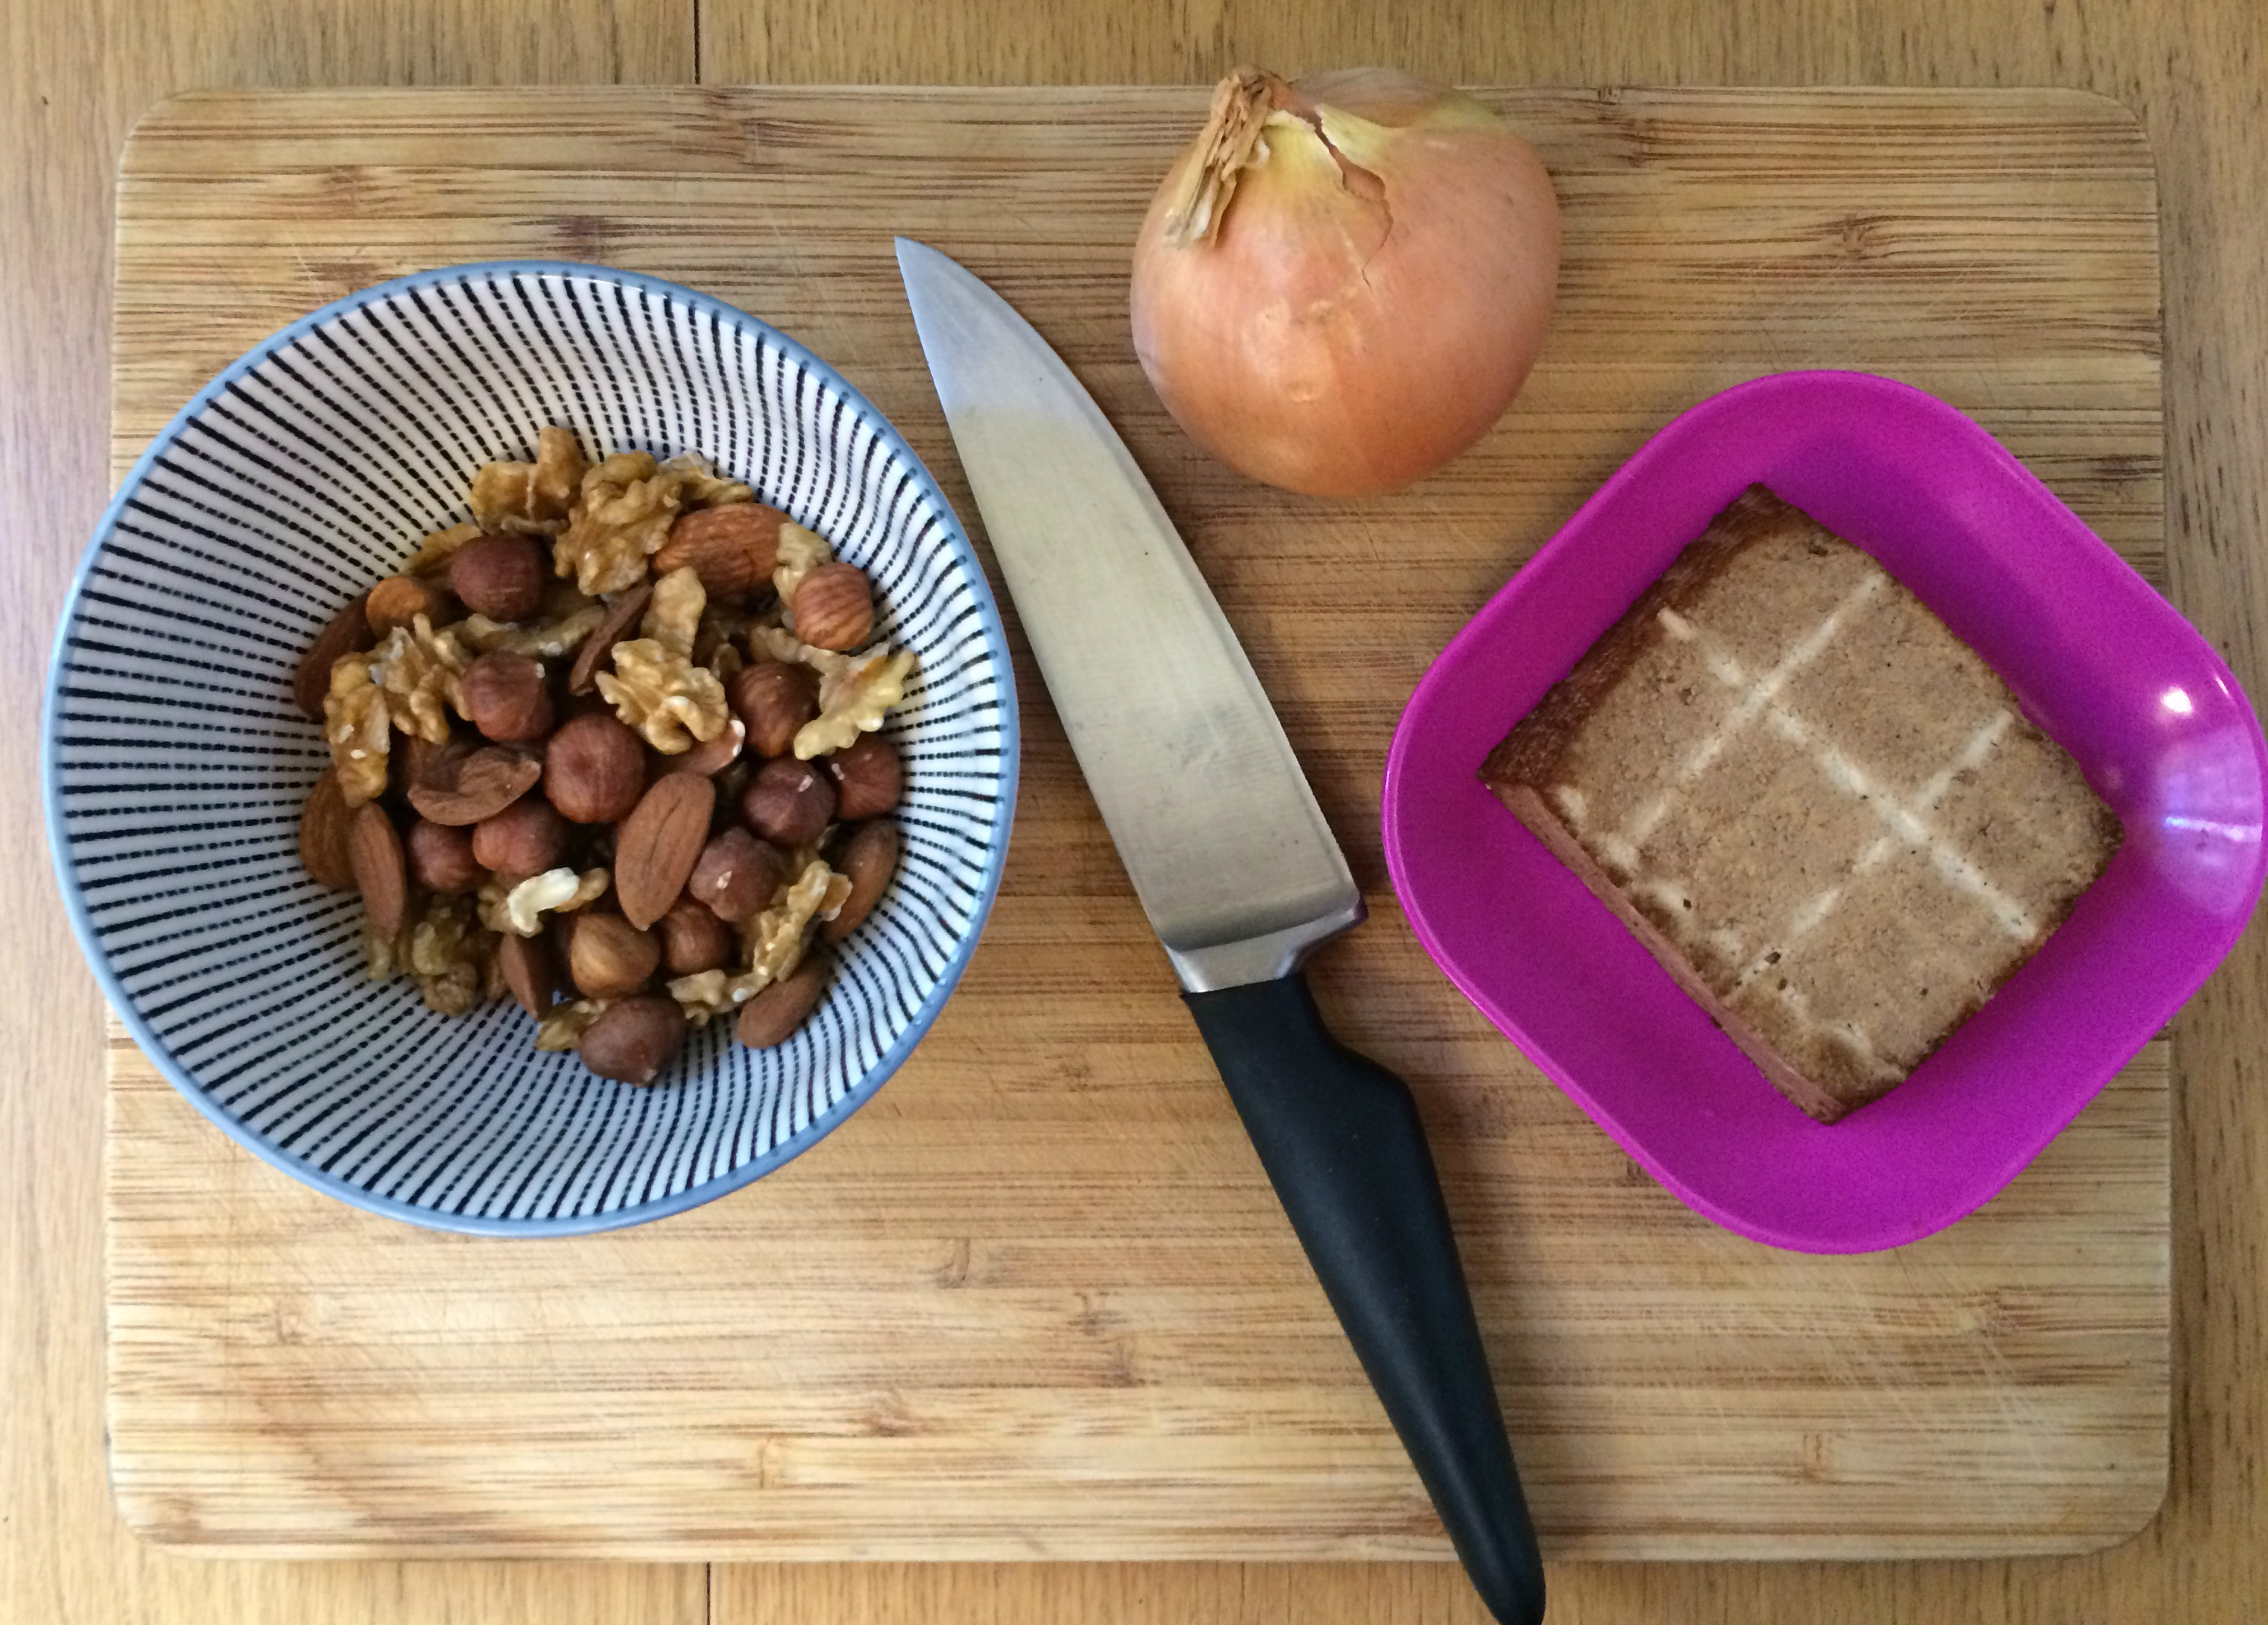
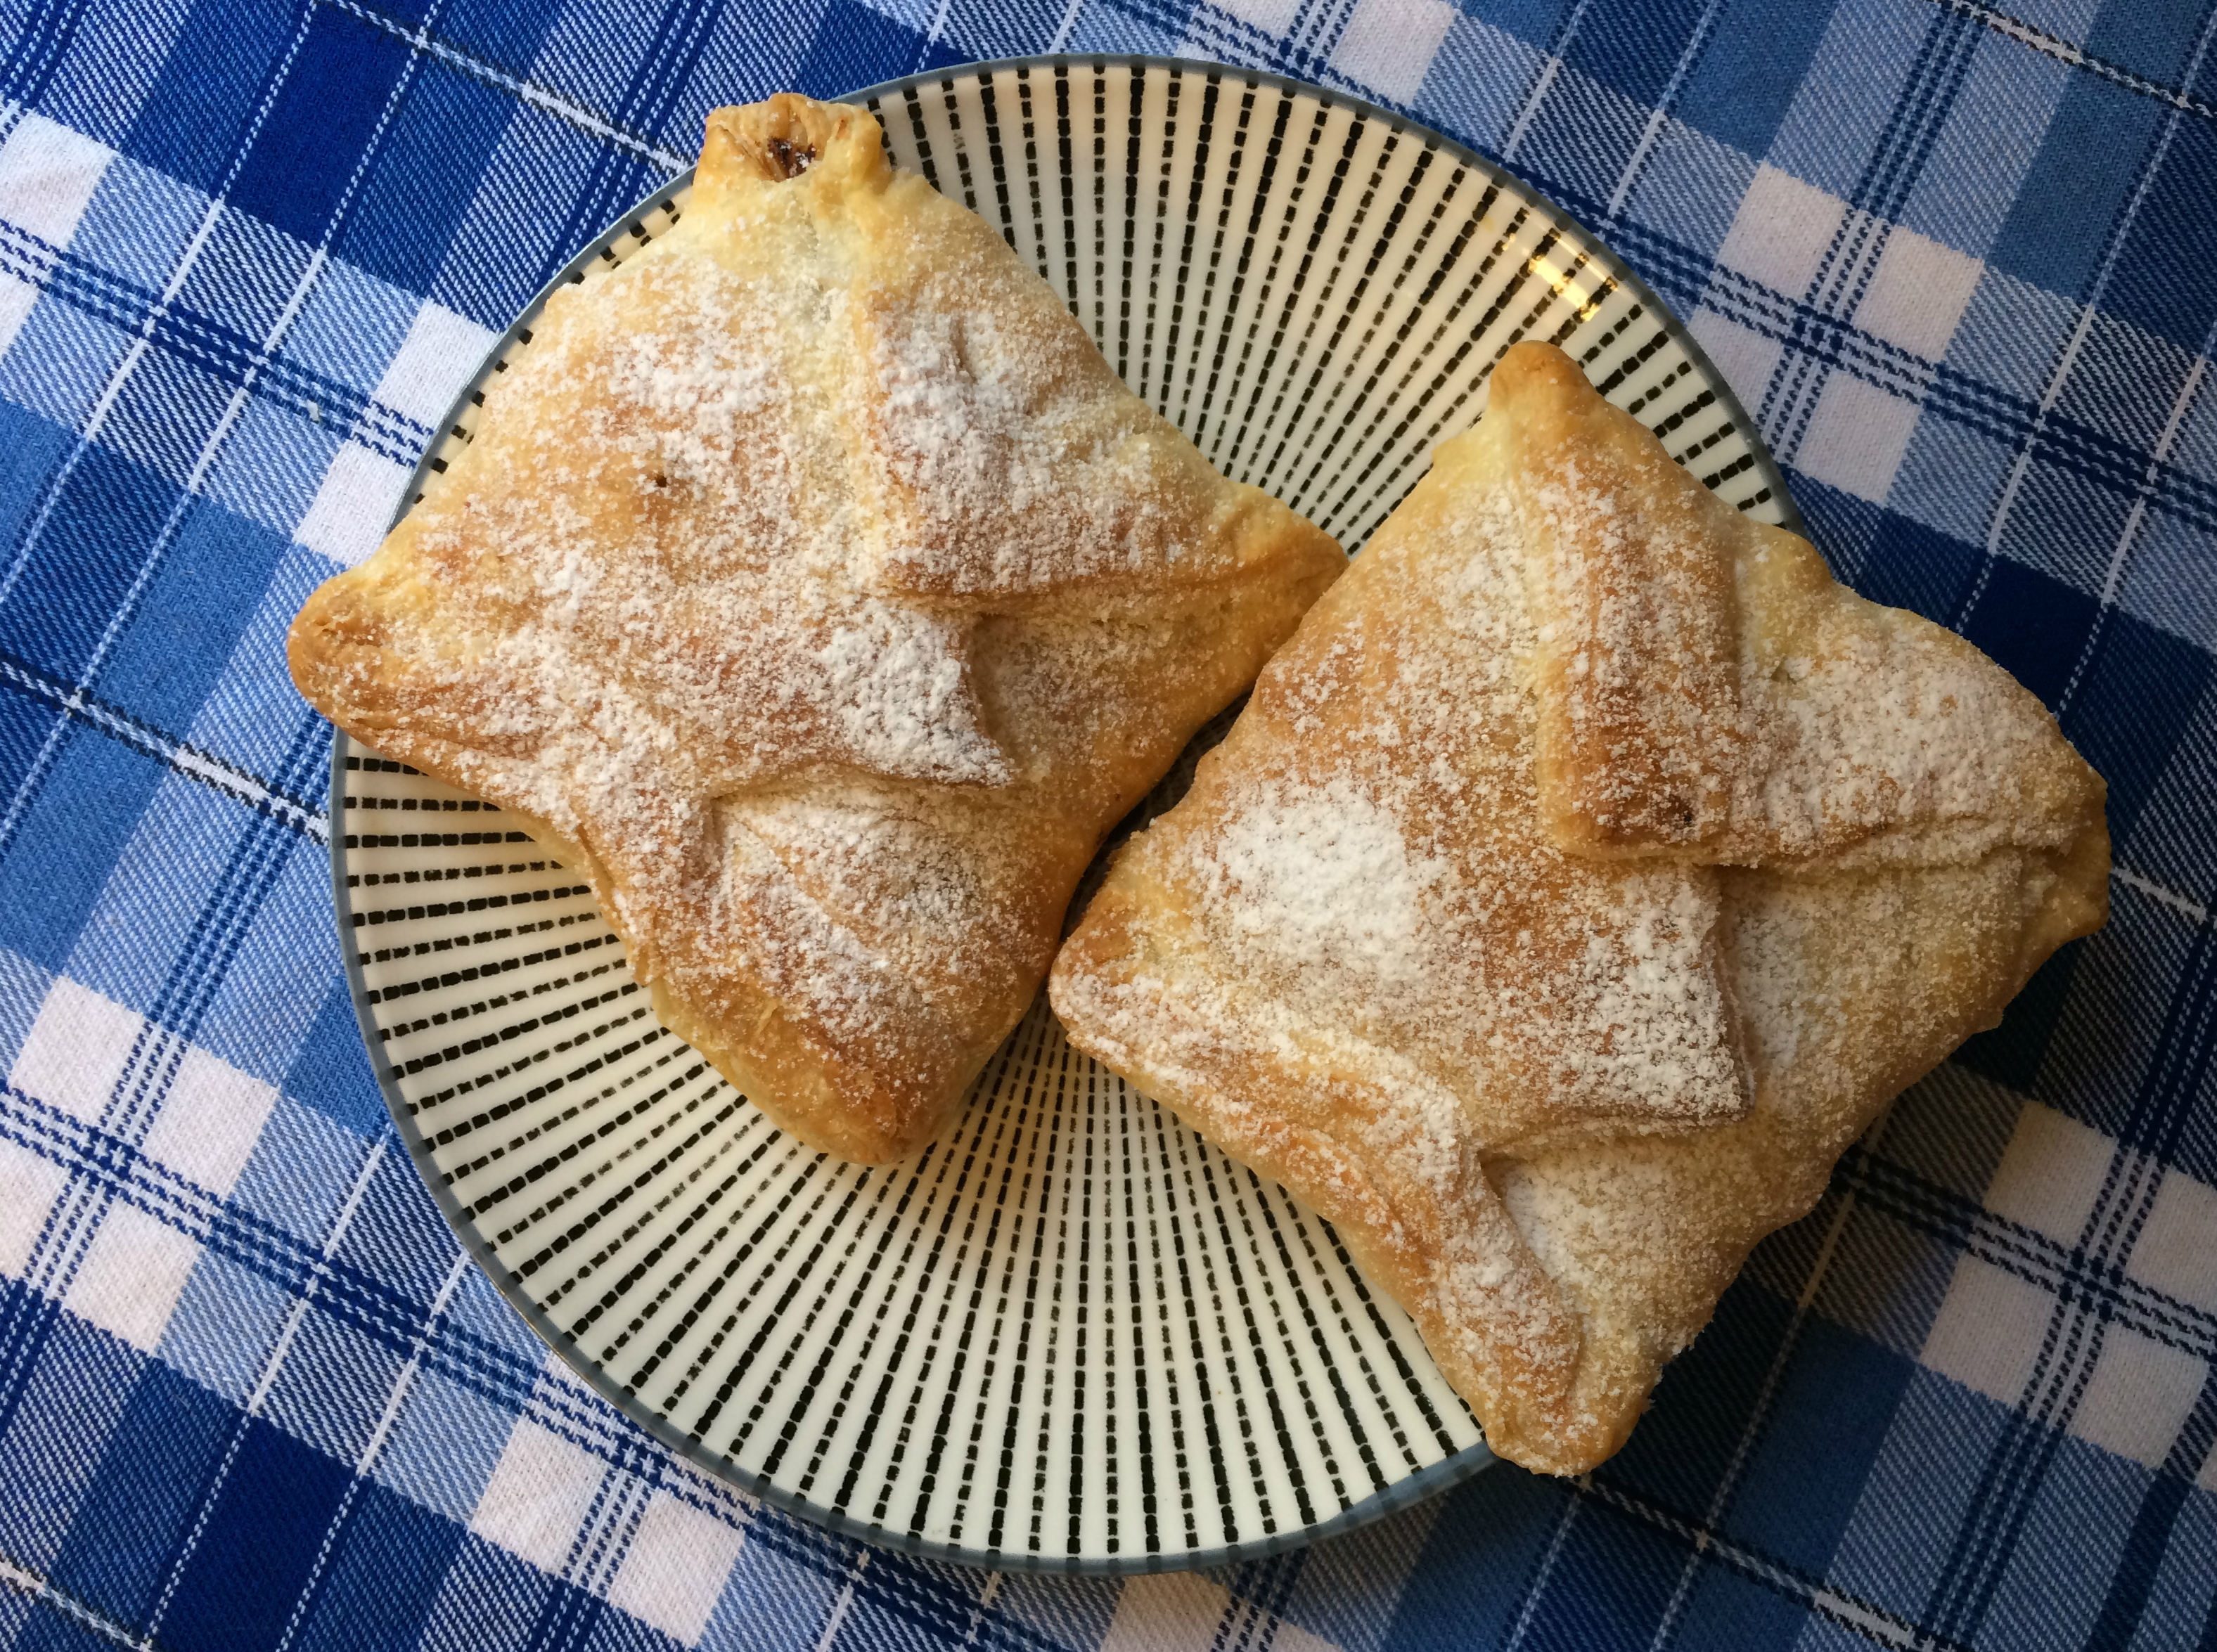
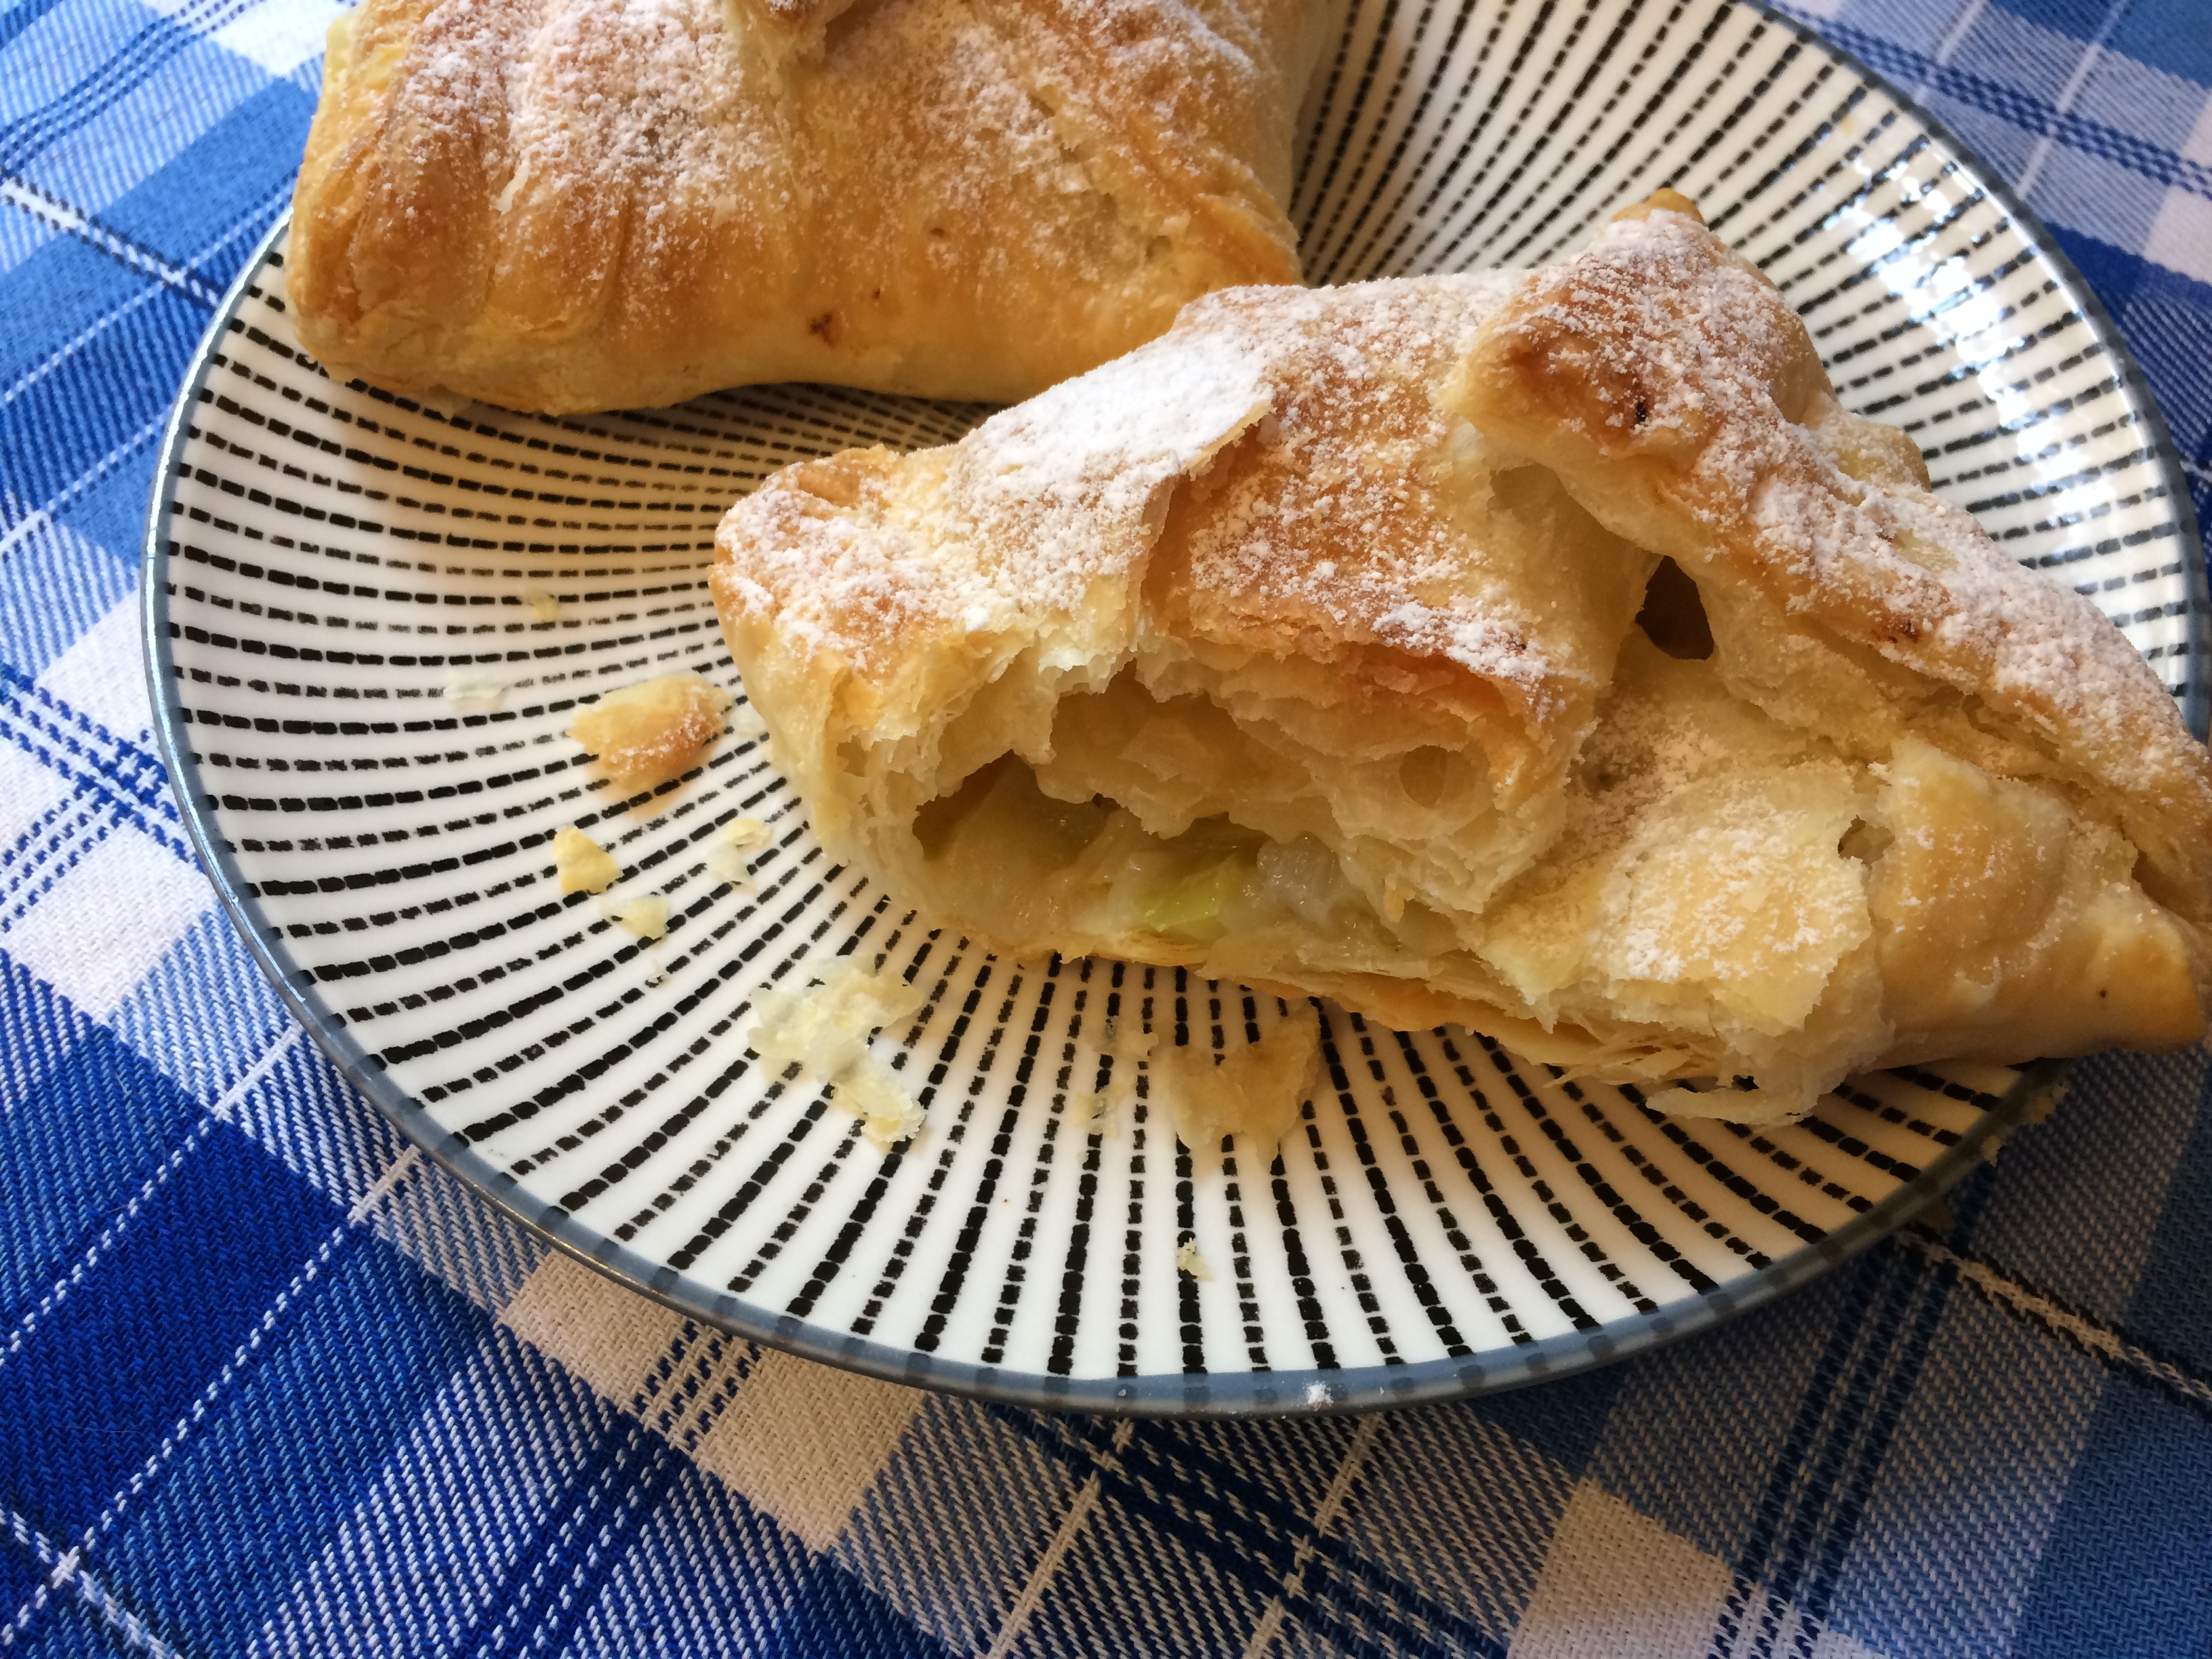
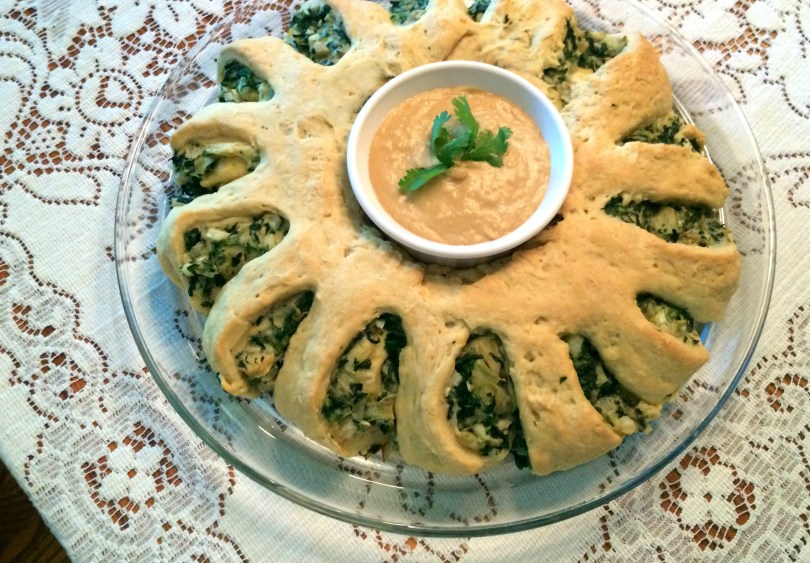
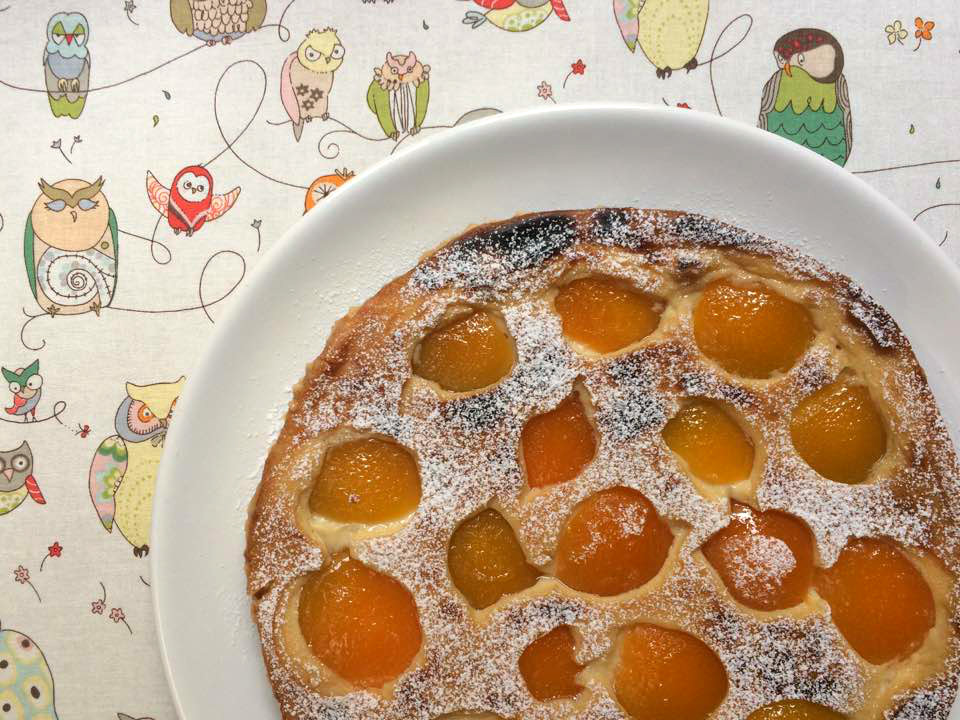
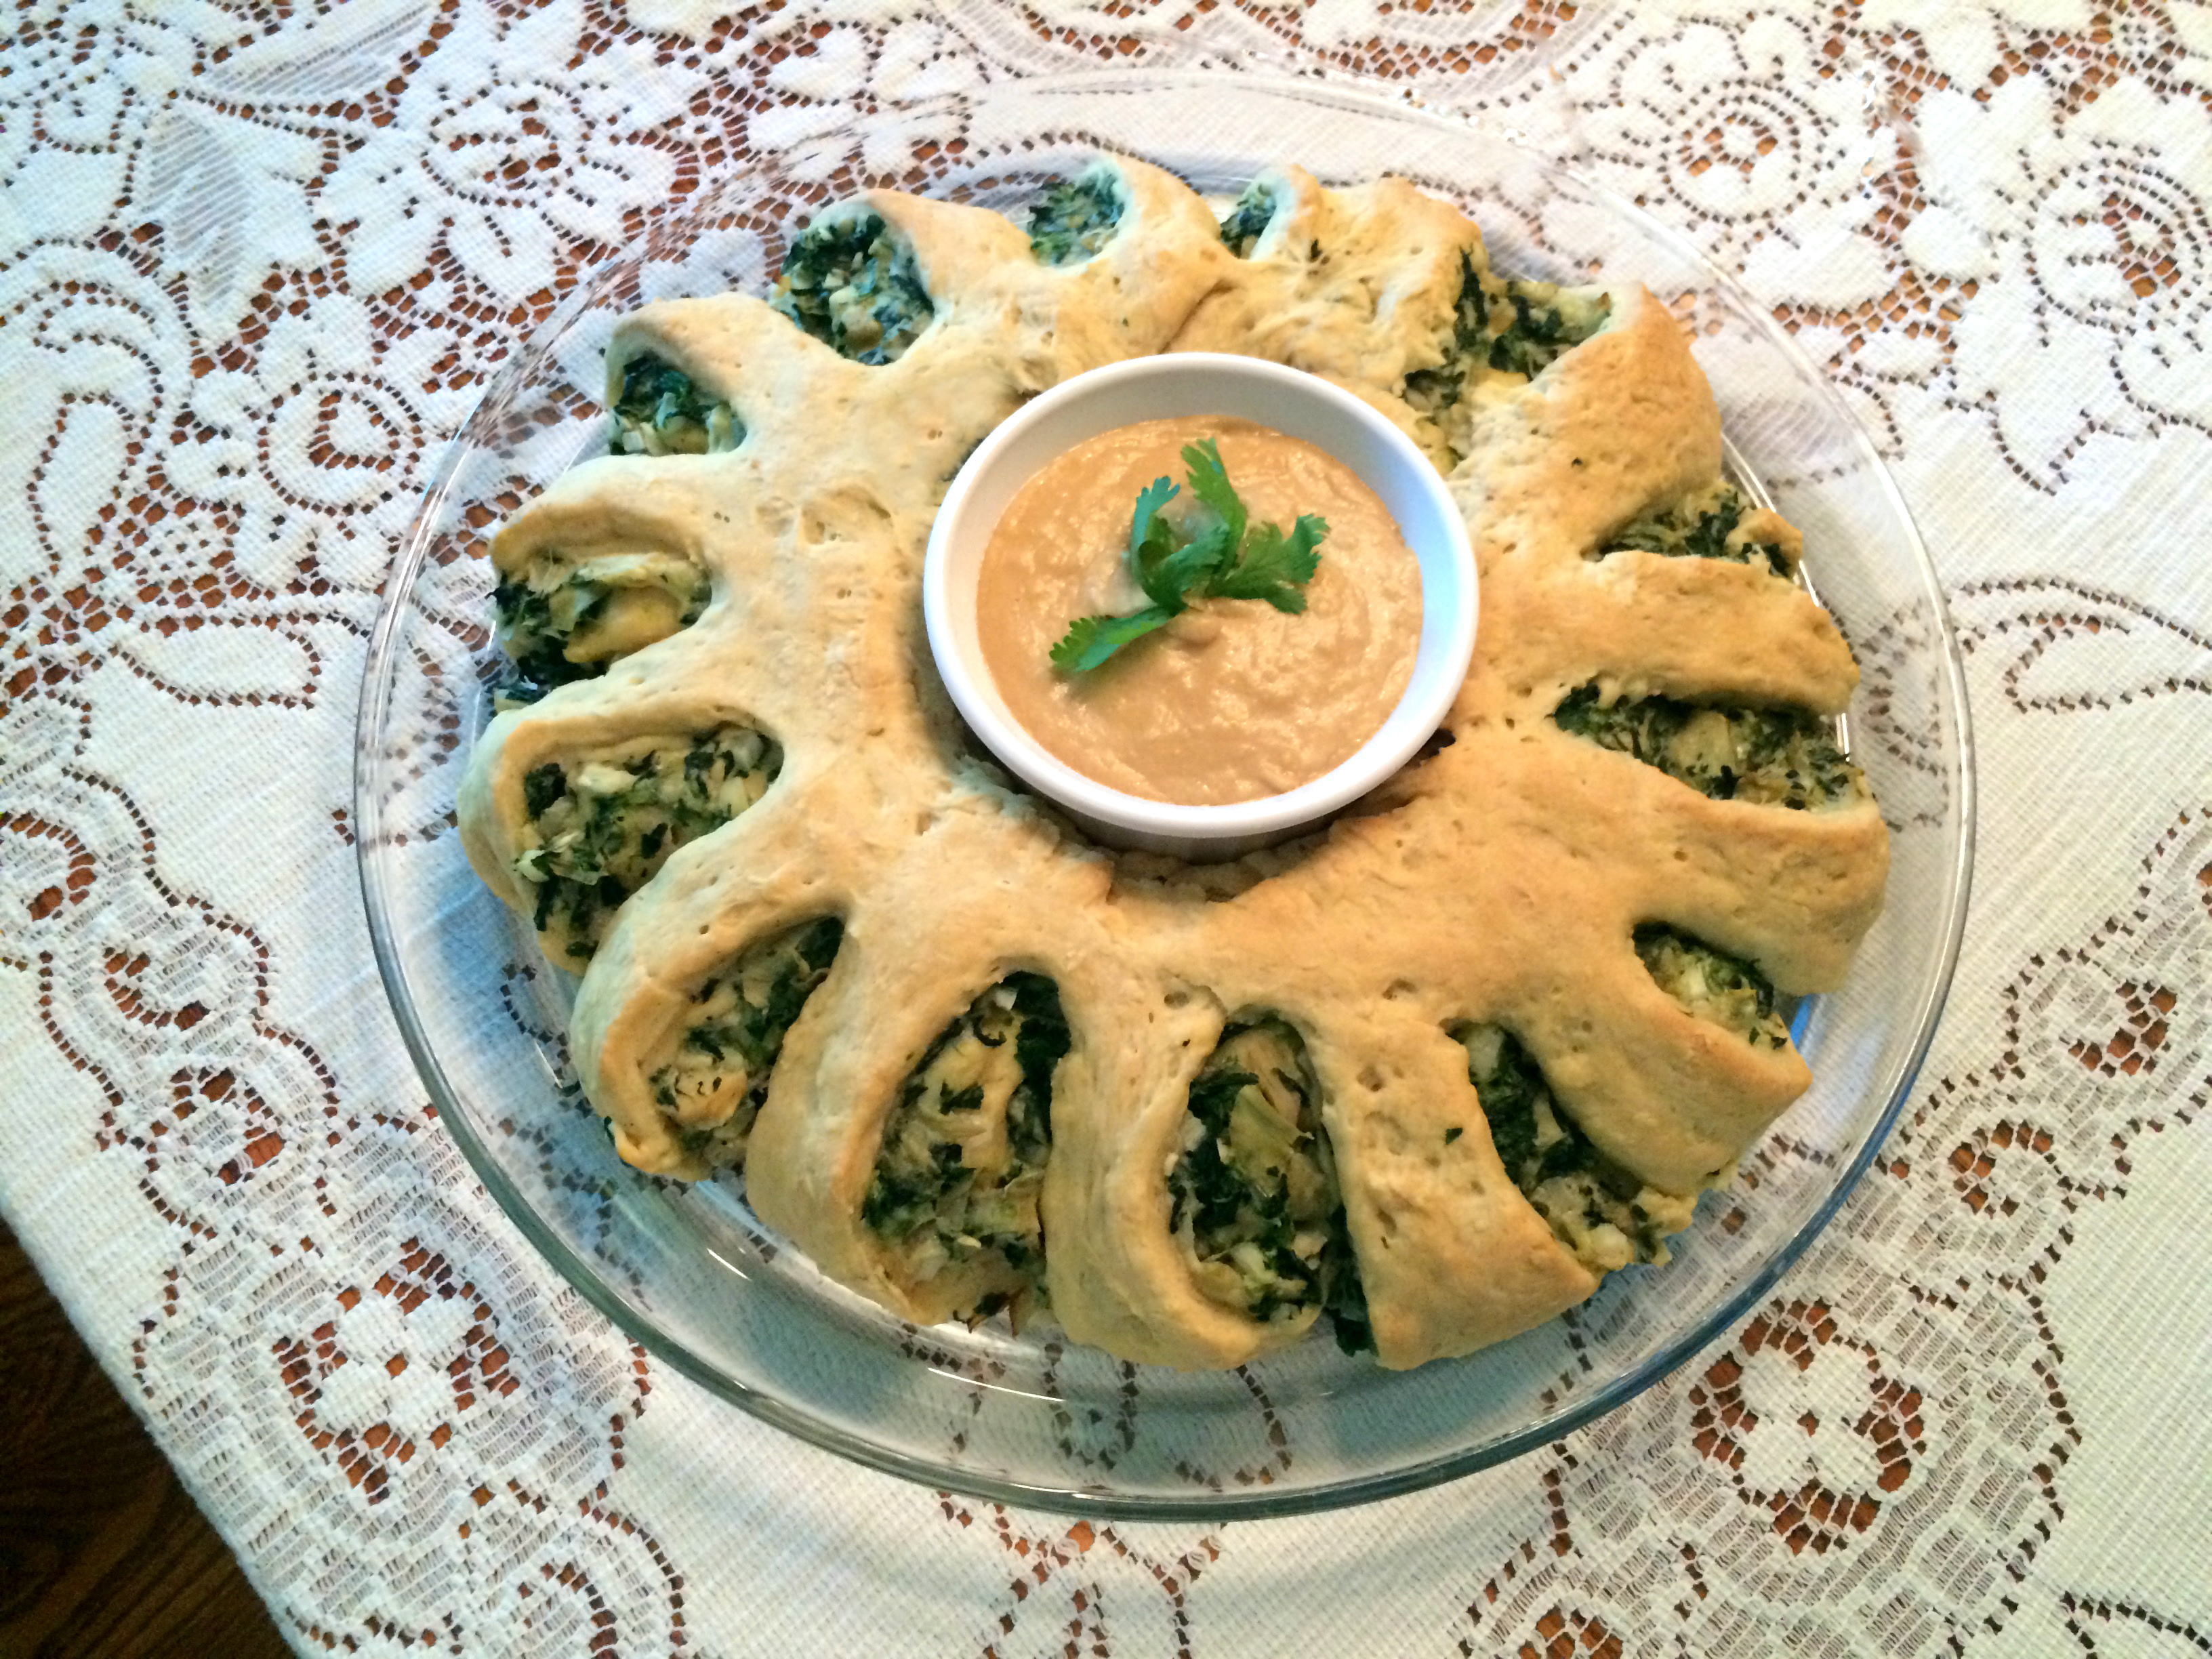
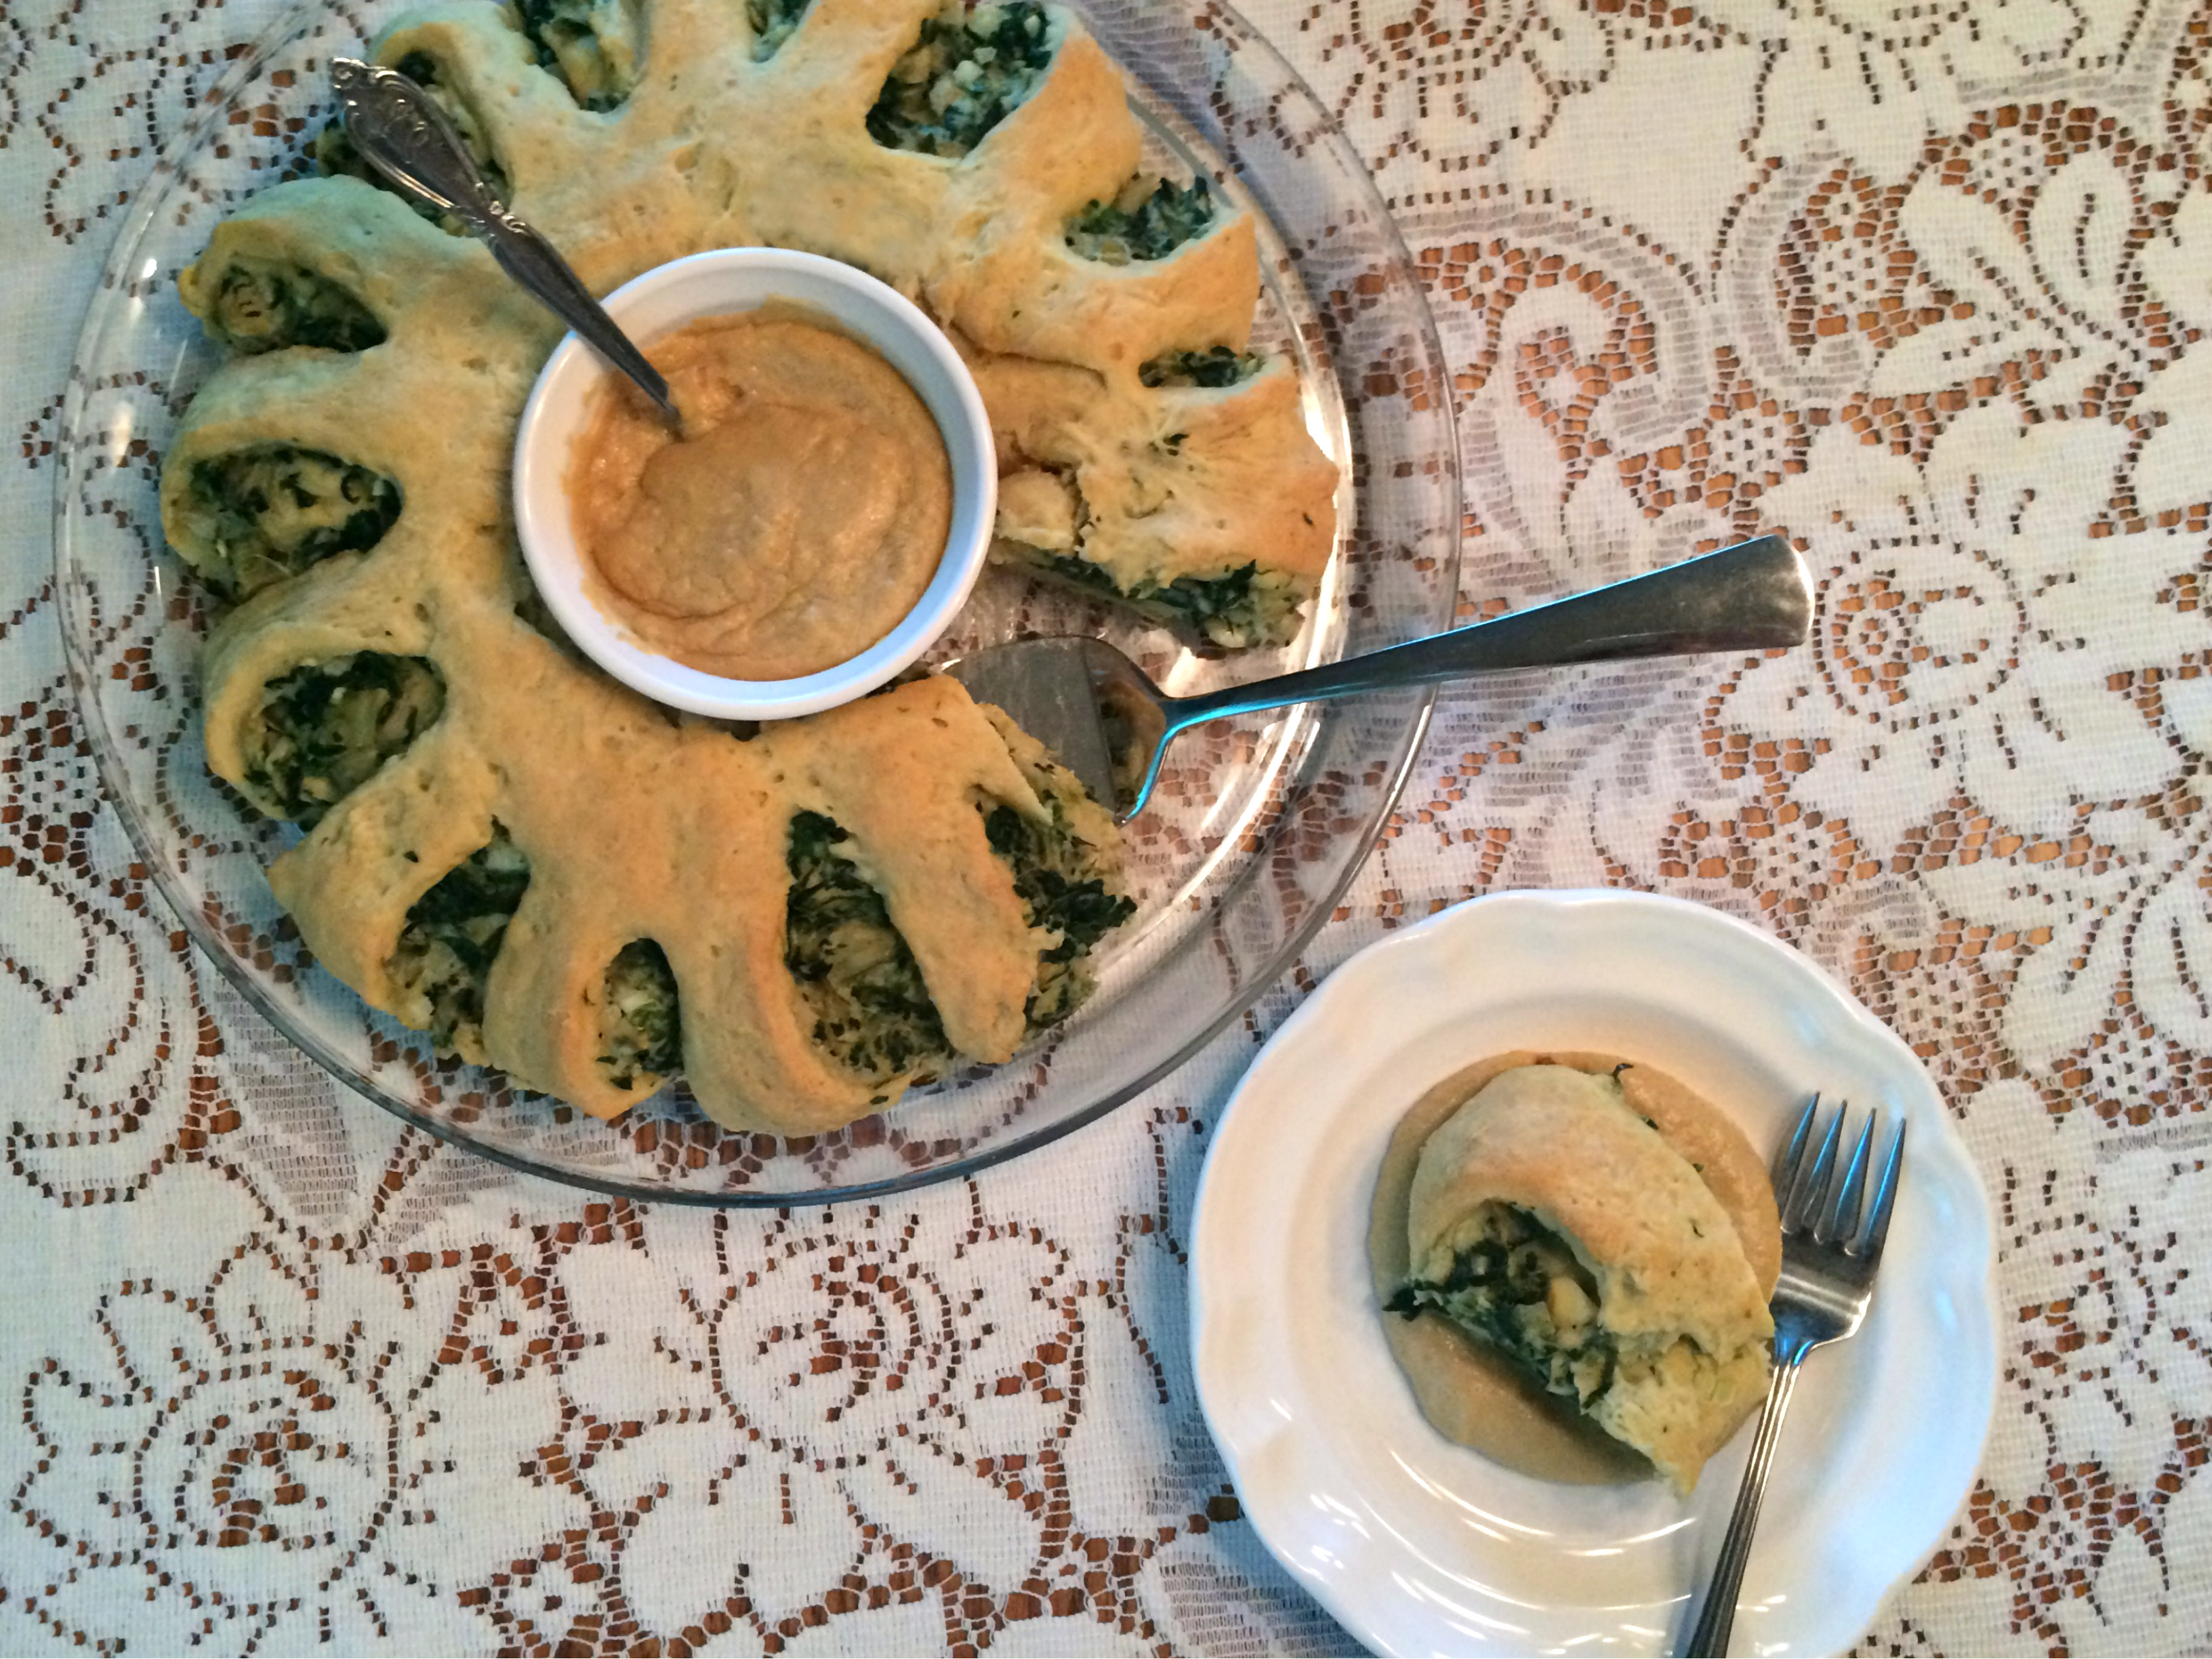
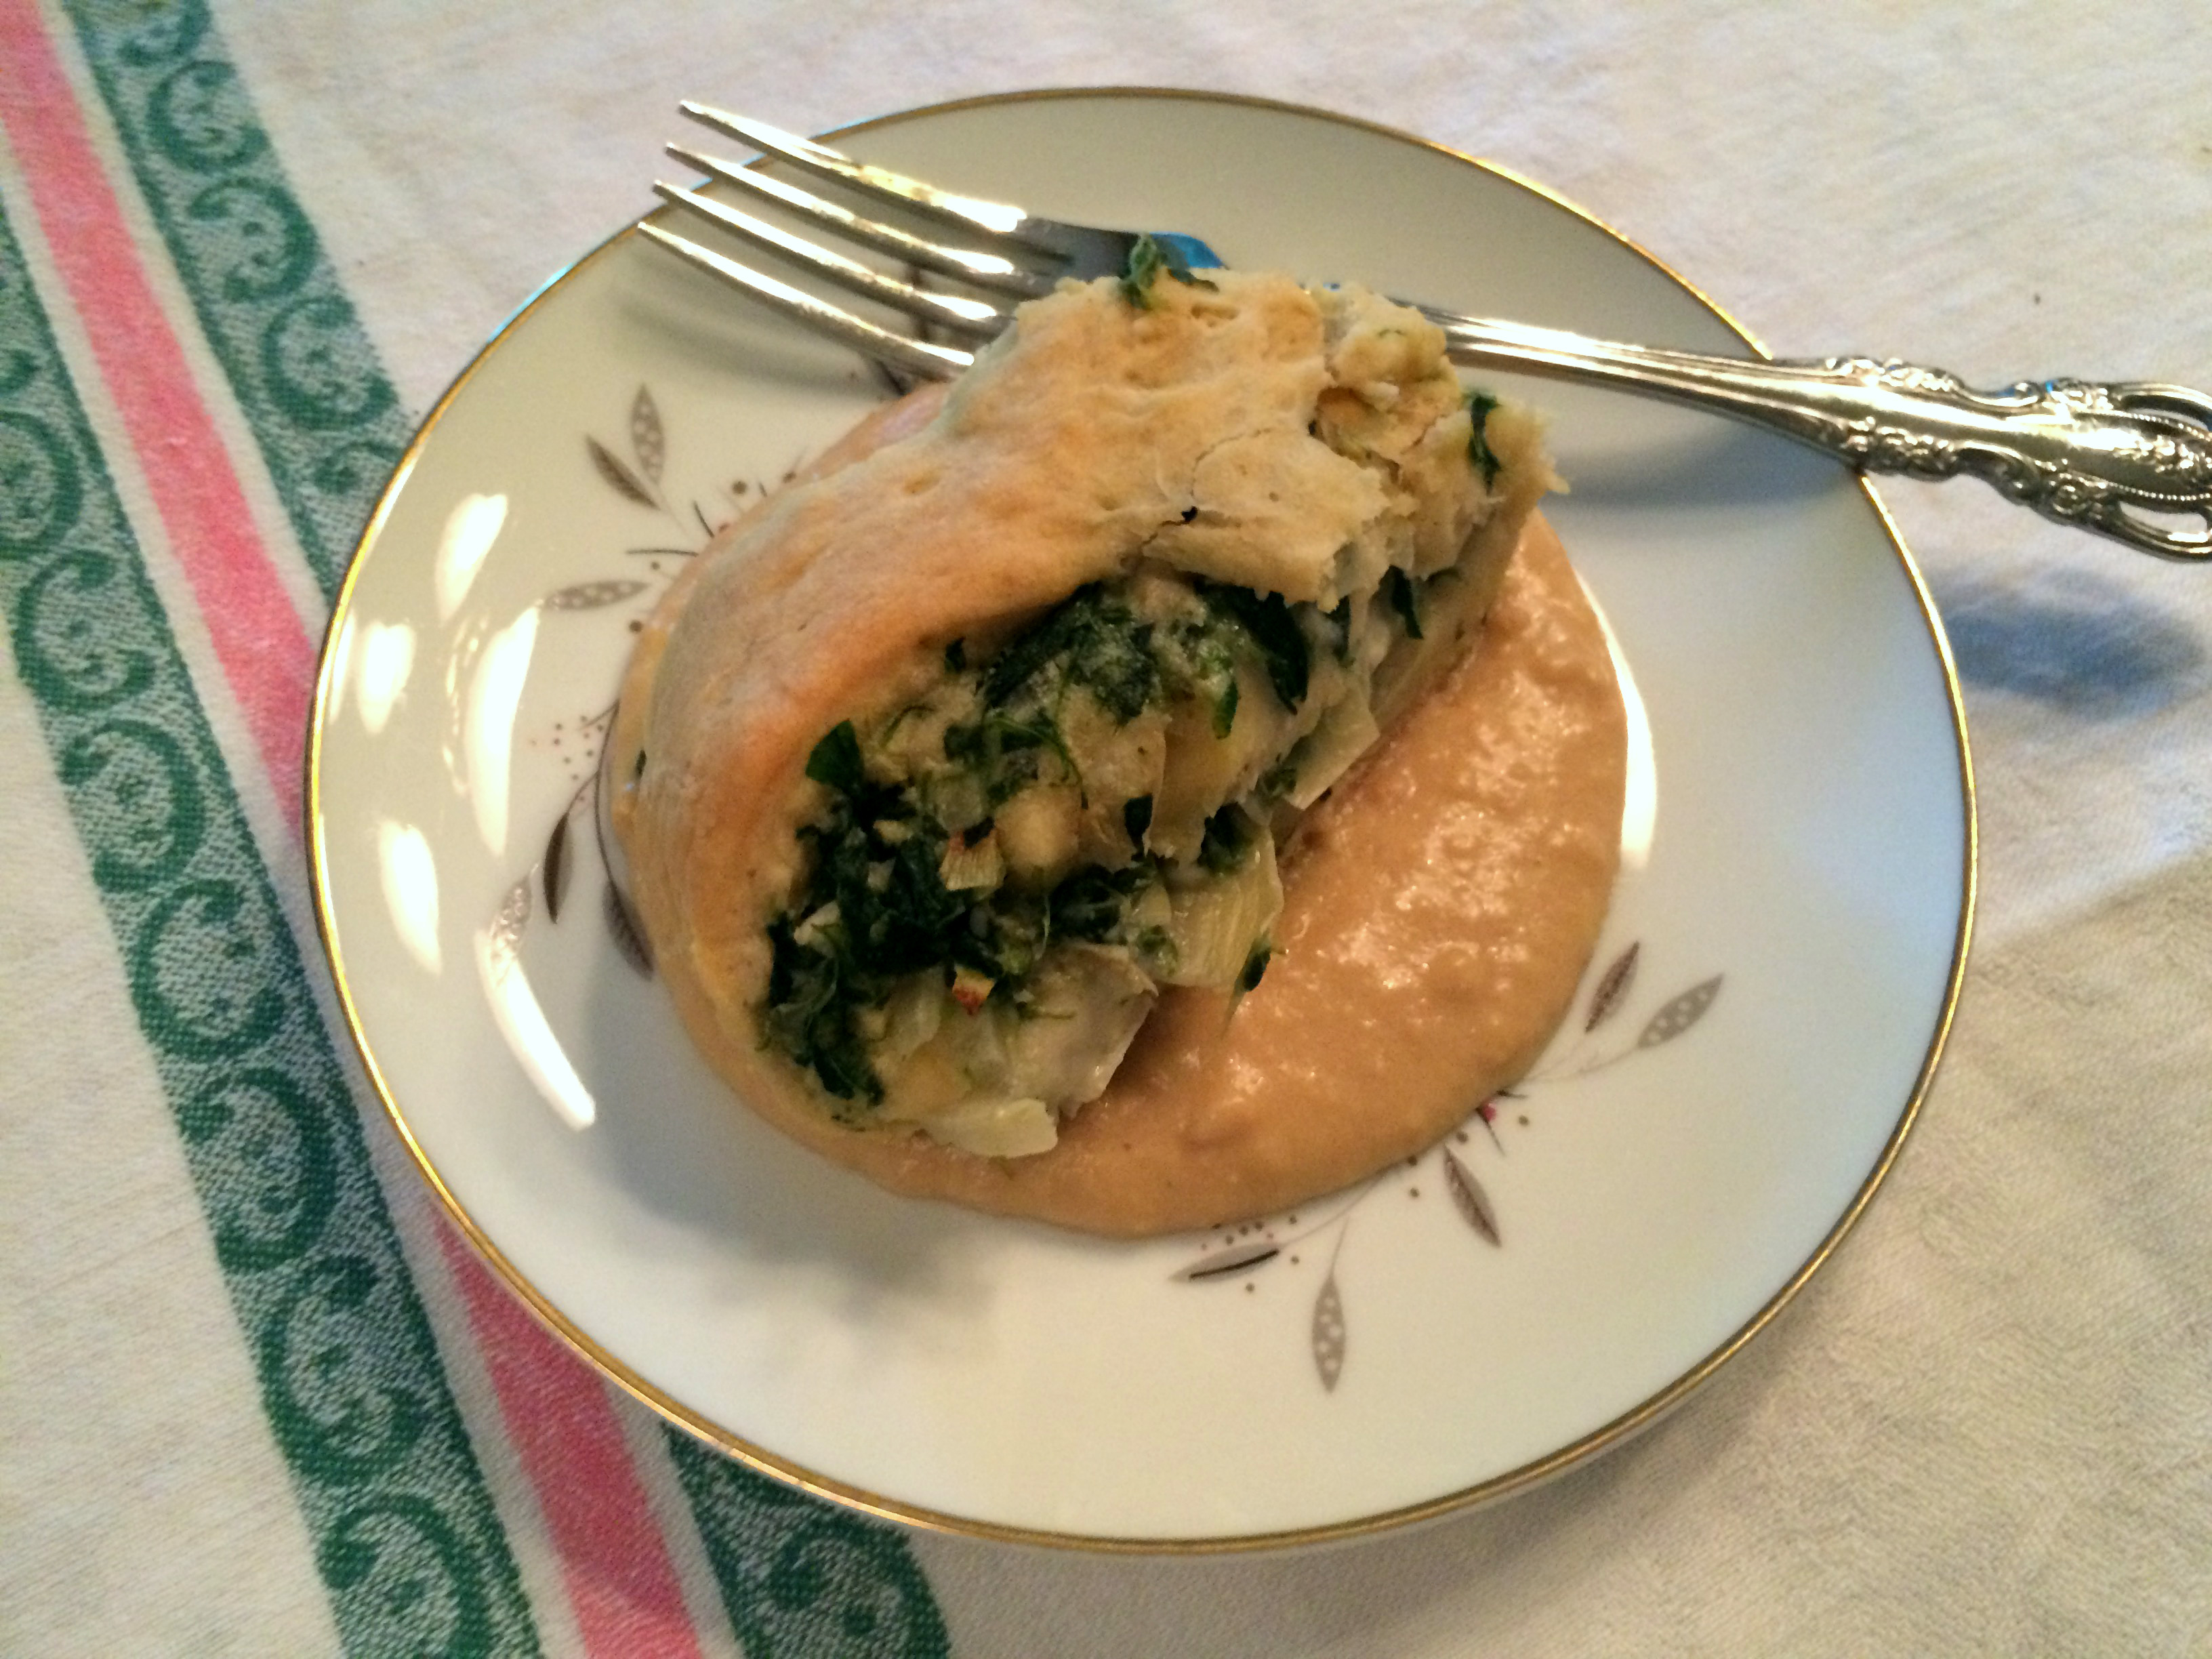
But let me finally get to the point of this post. As I was looking through the cards, I thought it might be fun to revisit one of the recipes for you. Choosing one was hard, but I finally settled on Tuna Ring with Cheese Sauce, with its entertaining impress-your-guests ring shape and ramekin of cheese sauce, from the Budget Casseroles set. In my first attempt, I experimented with a chickpea-based mock tuna salad that proved too starchy and heavy in combination with the thick biscuit crust. In search of a lighter, moister filling, I then tried a spinach-artichoke mixture that turned out to be very yummy with the crust and cheese sauce. I’m very happy with how it turned out. It was also a chance to share an activity with my mom, who helped me with the process of rolling the dough into a log and forming a ring, modeling the motions so I could take more action-oriented explanatory photos for a change.

I’m not sure how specifically 1970s this recipe is, since (as my mom informed me), people have been making sweet “tea ring” cakes with the same cutting-and-turning technique since forever, but something about this dish just spoke to me. And as it’s inspired by the Betty Crocker Recipe Card Library, I feel justified in tacking the word “retro” onto the title.

So roll up your sleeves, take a moment to feel gratitude for pocket calculators, soft contact lenses and NPR, and let’s get started!

Spinach-artichoke filling

  • 6 ounces (170 g) artichoke hearts
  • ¼ of a yellow or white onion, diced (about ½ cup)
  • 2 cloves garlic, finely minced
  • 1 cup frozen spinach
  • ¼ cup (60 ml) unsweetened non-dairy milk
  • ¼ teaspoon salt
  • ¼ teaspoon ground white pepper
  • 1 batch stretchy mozzarella-style cashew cheese (prepare last; see below)

If you’re pressed for time, you may want to start the cashews boiling for the mozzarella-style cashew cheese recipe (see below) before you begin making this spinach-artichoke mixture.

IMG_2521IMG_2523

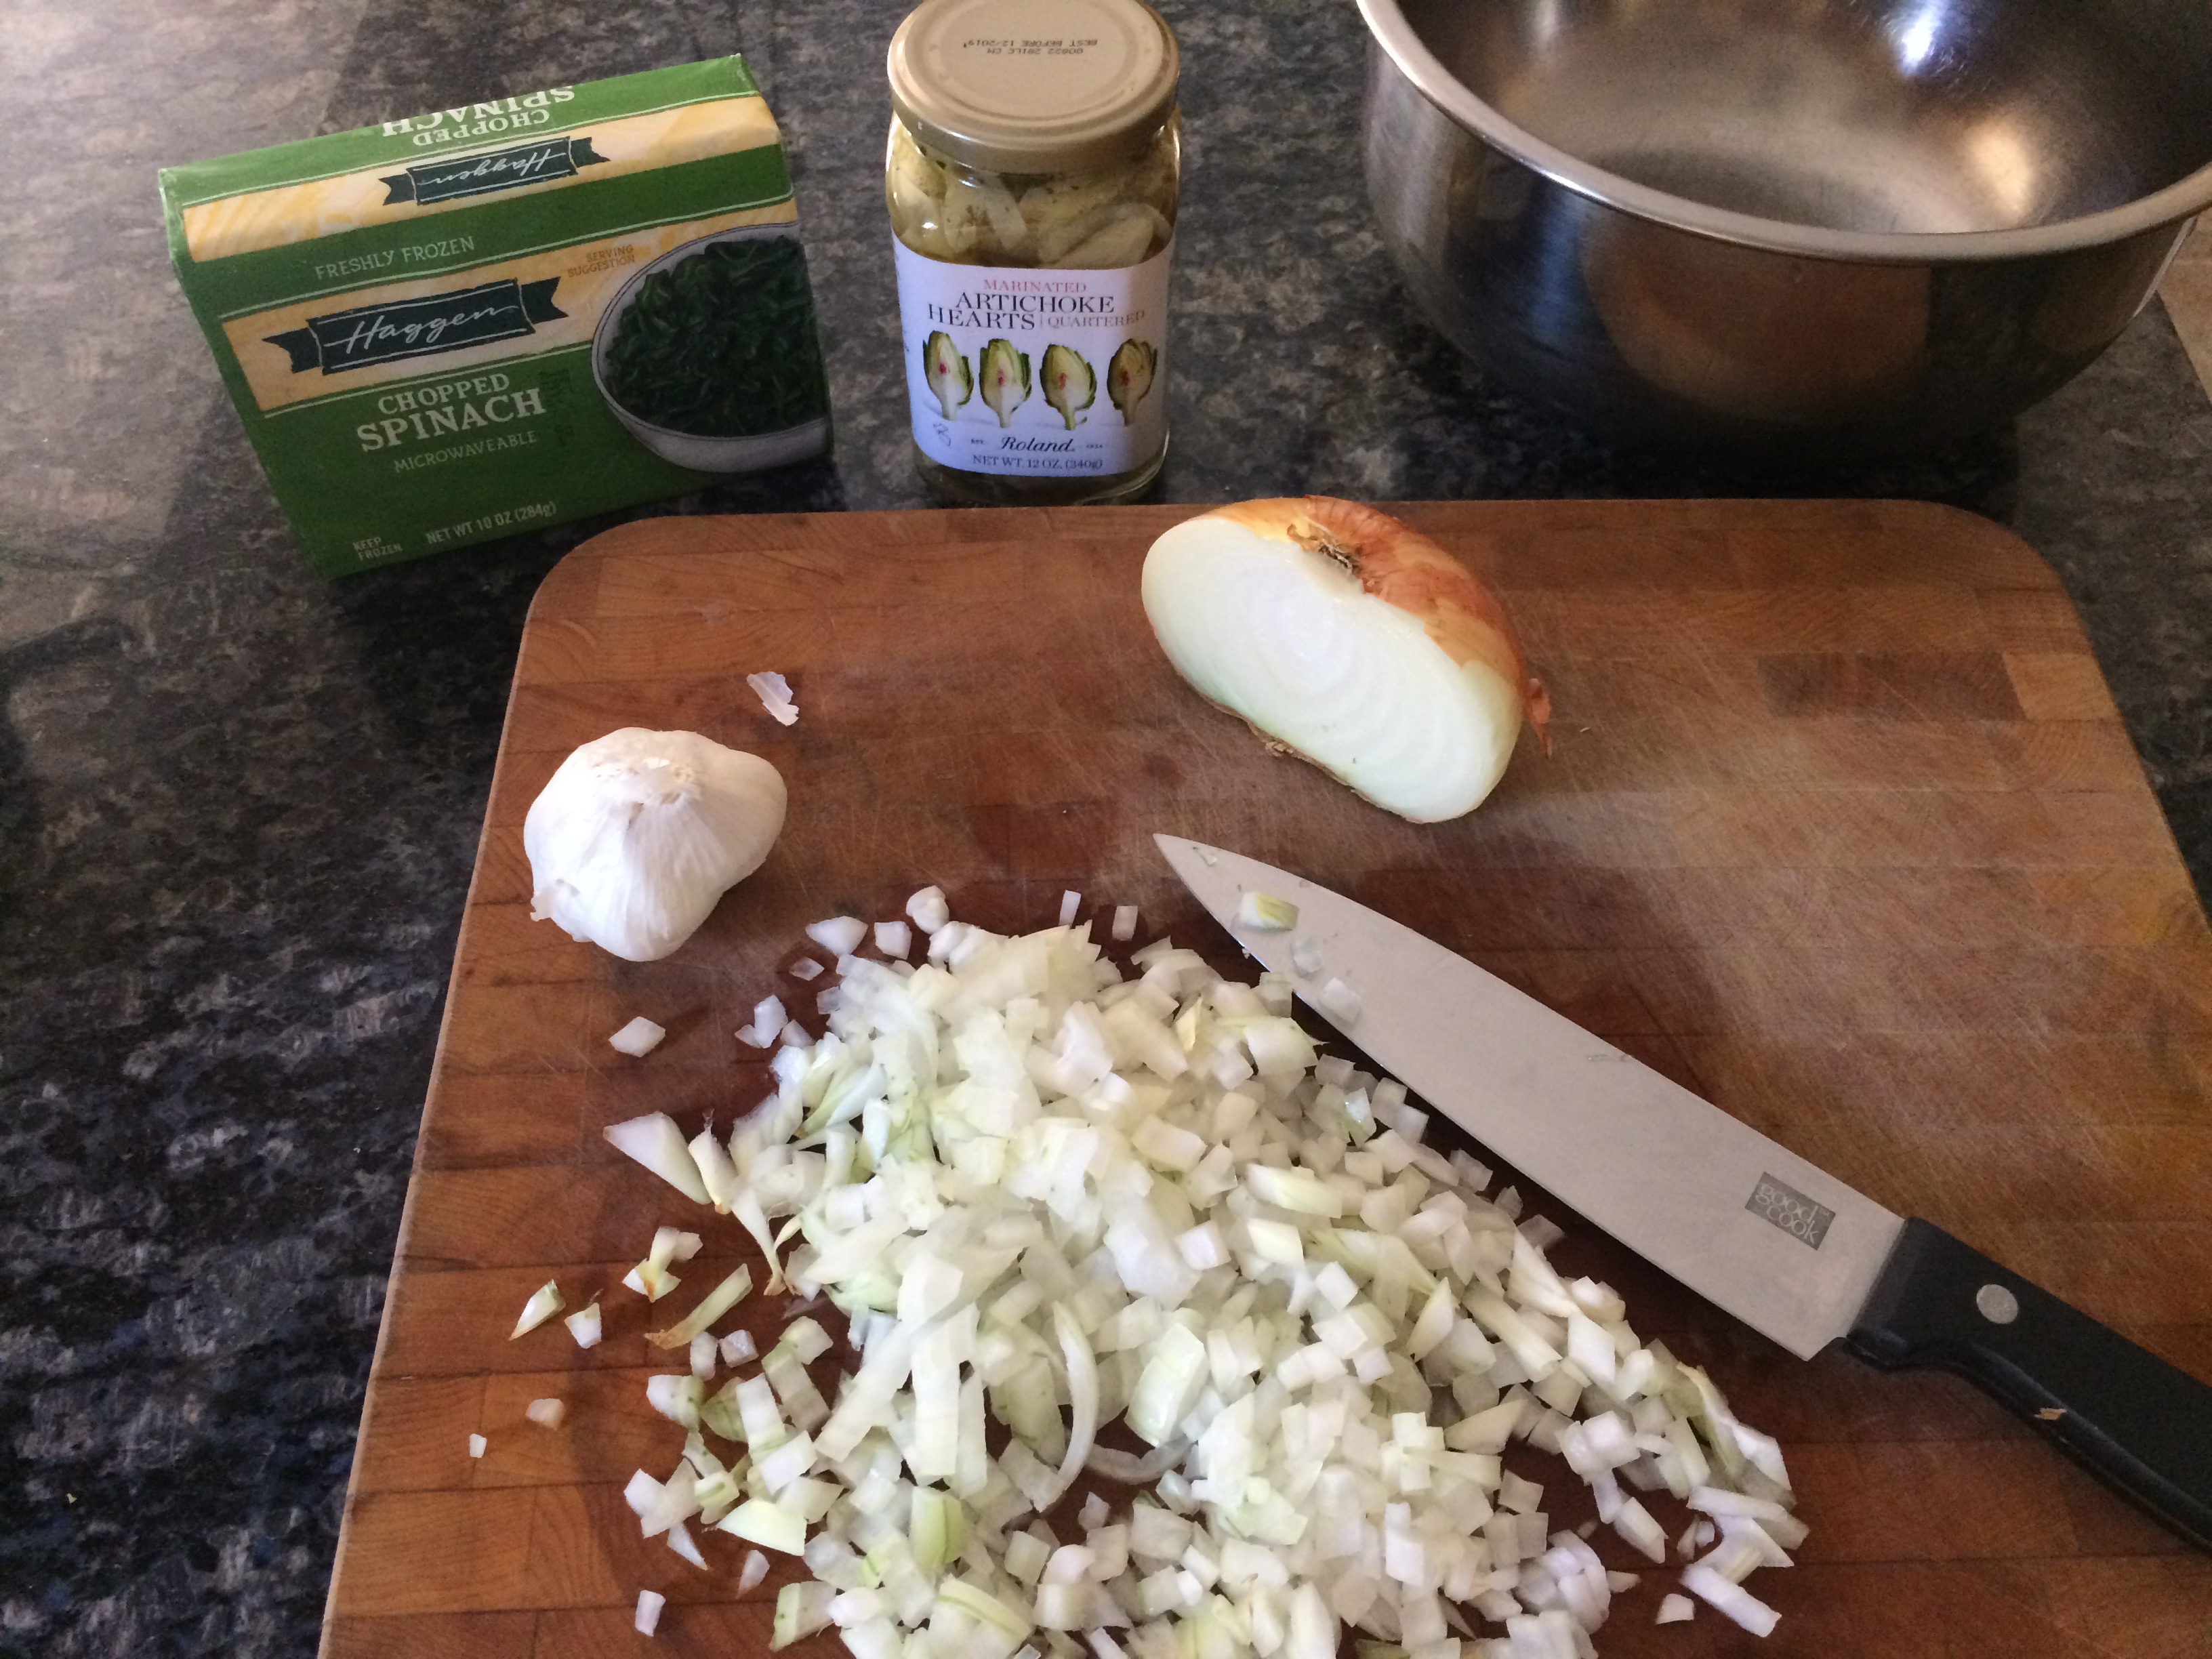
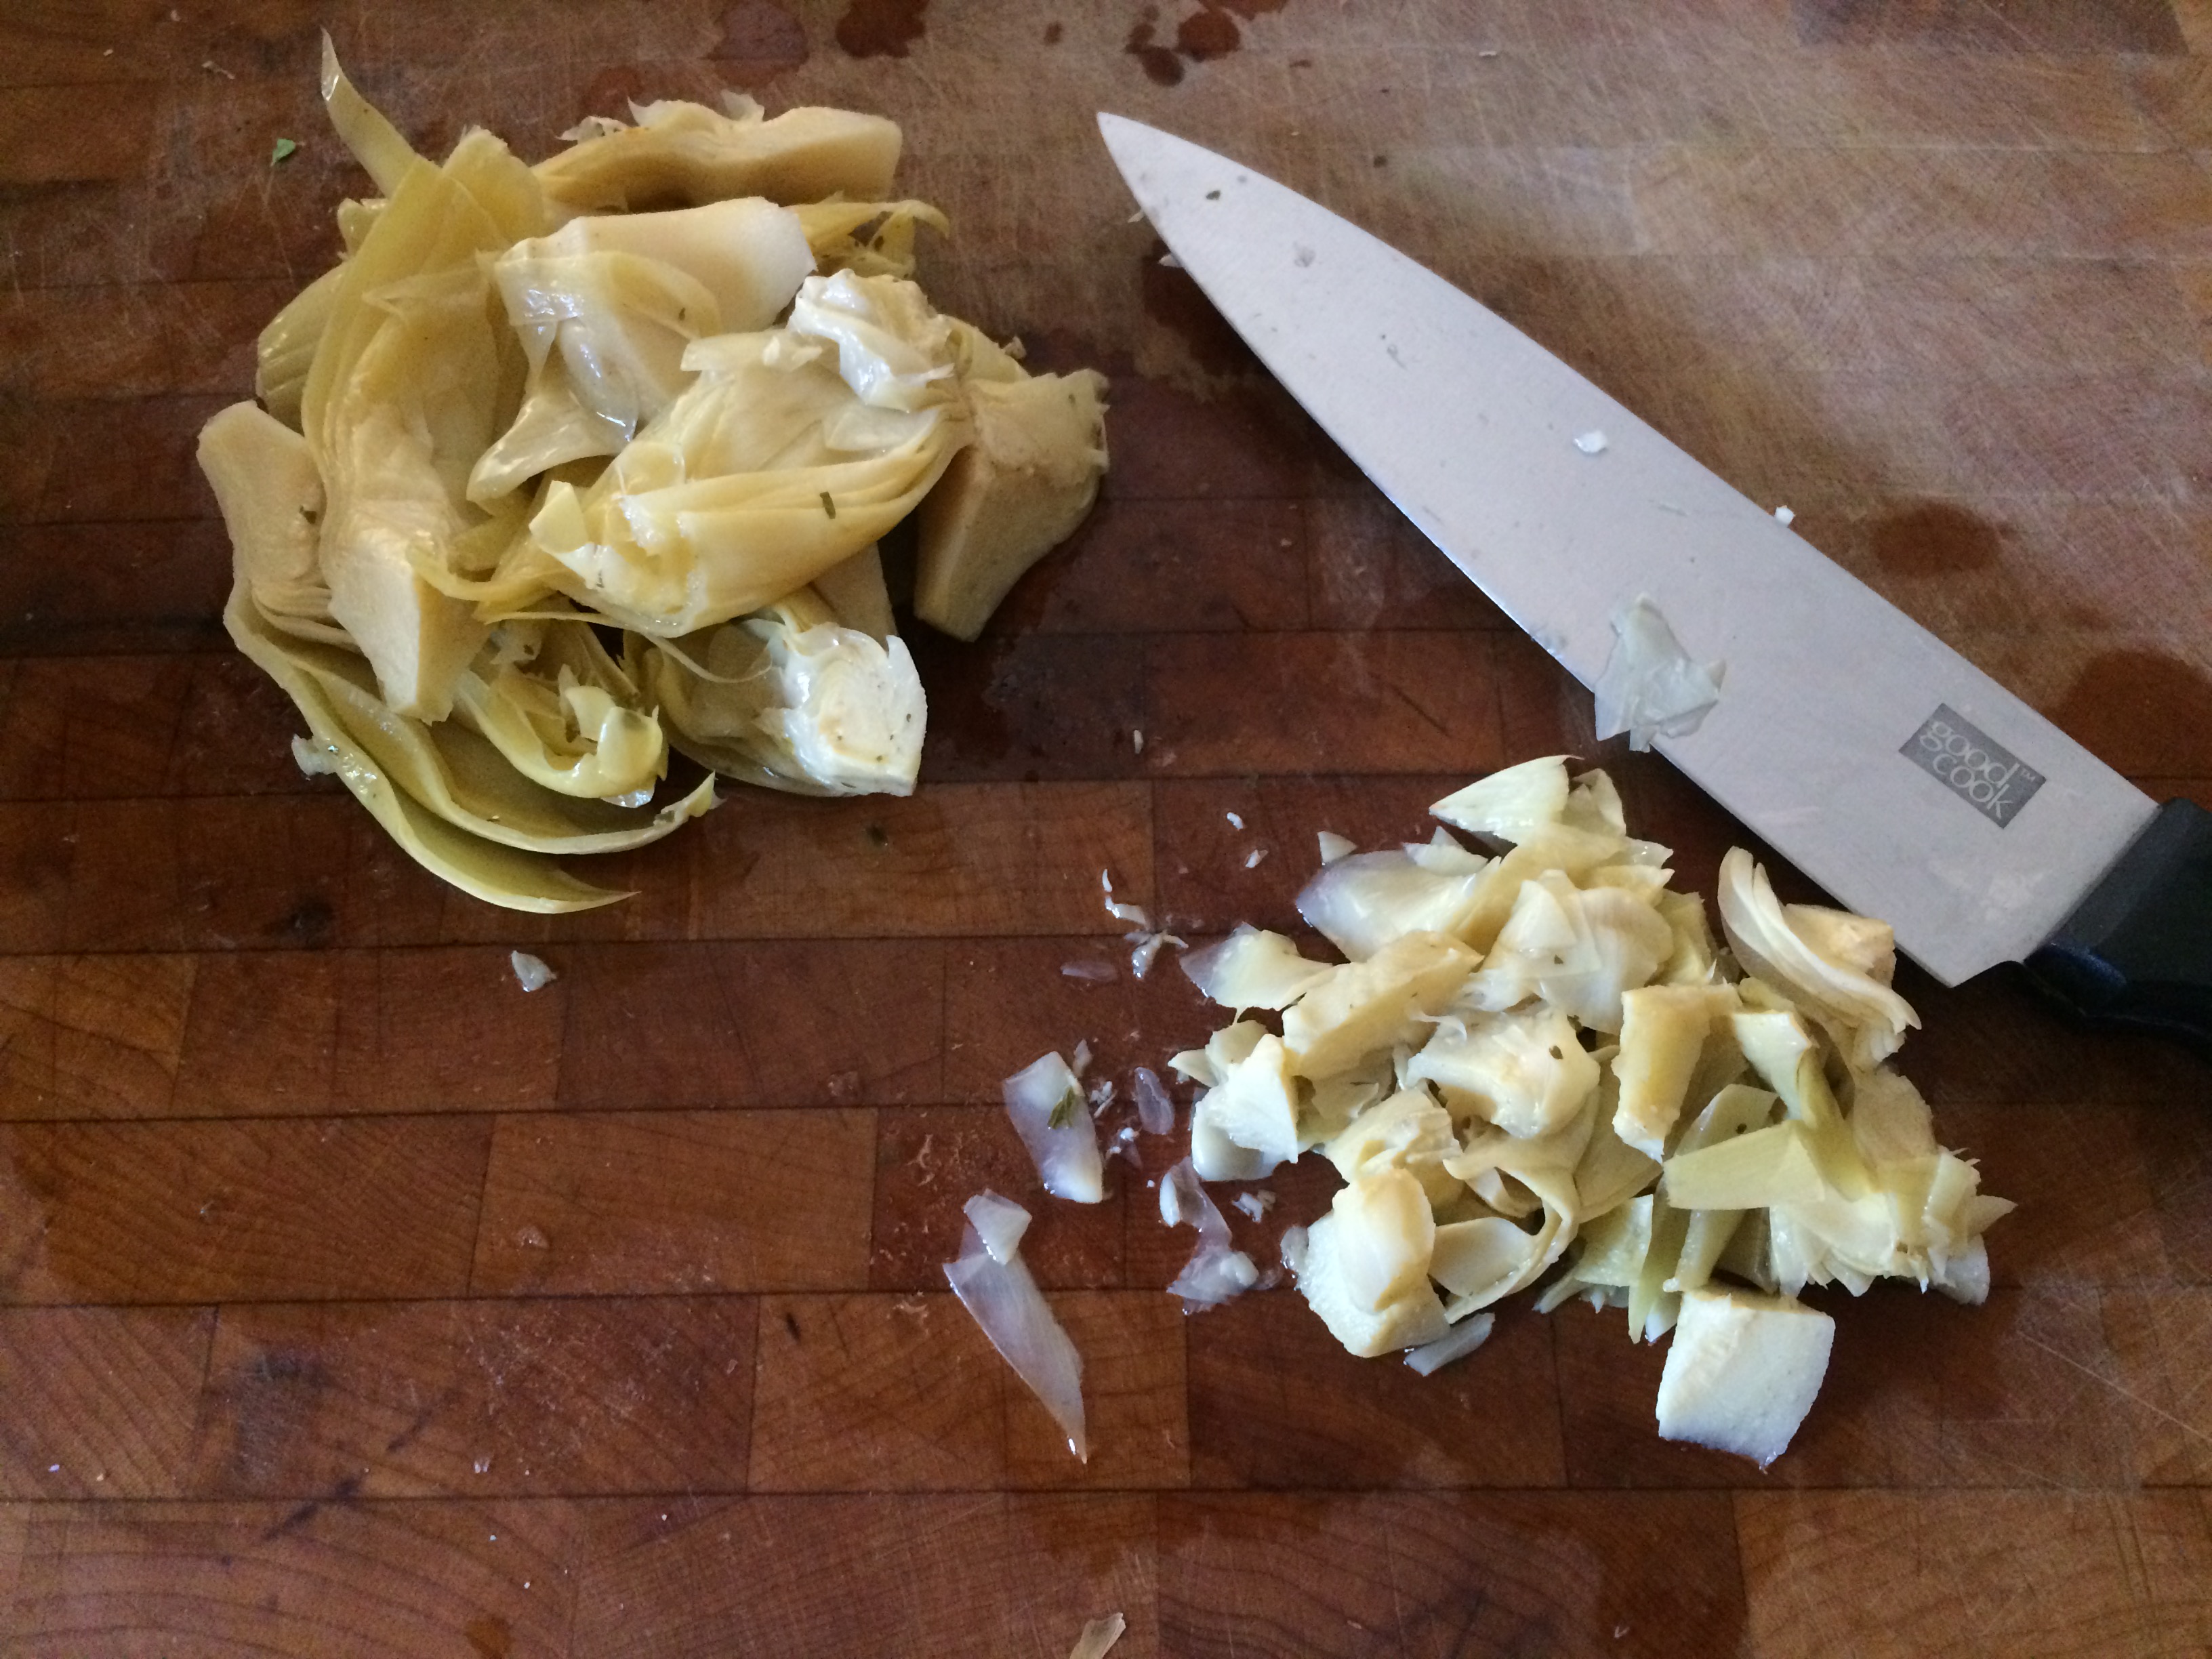
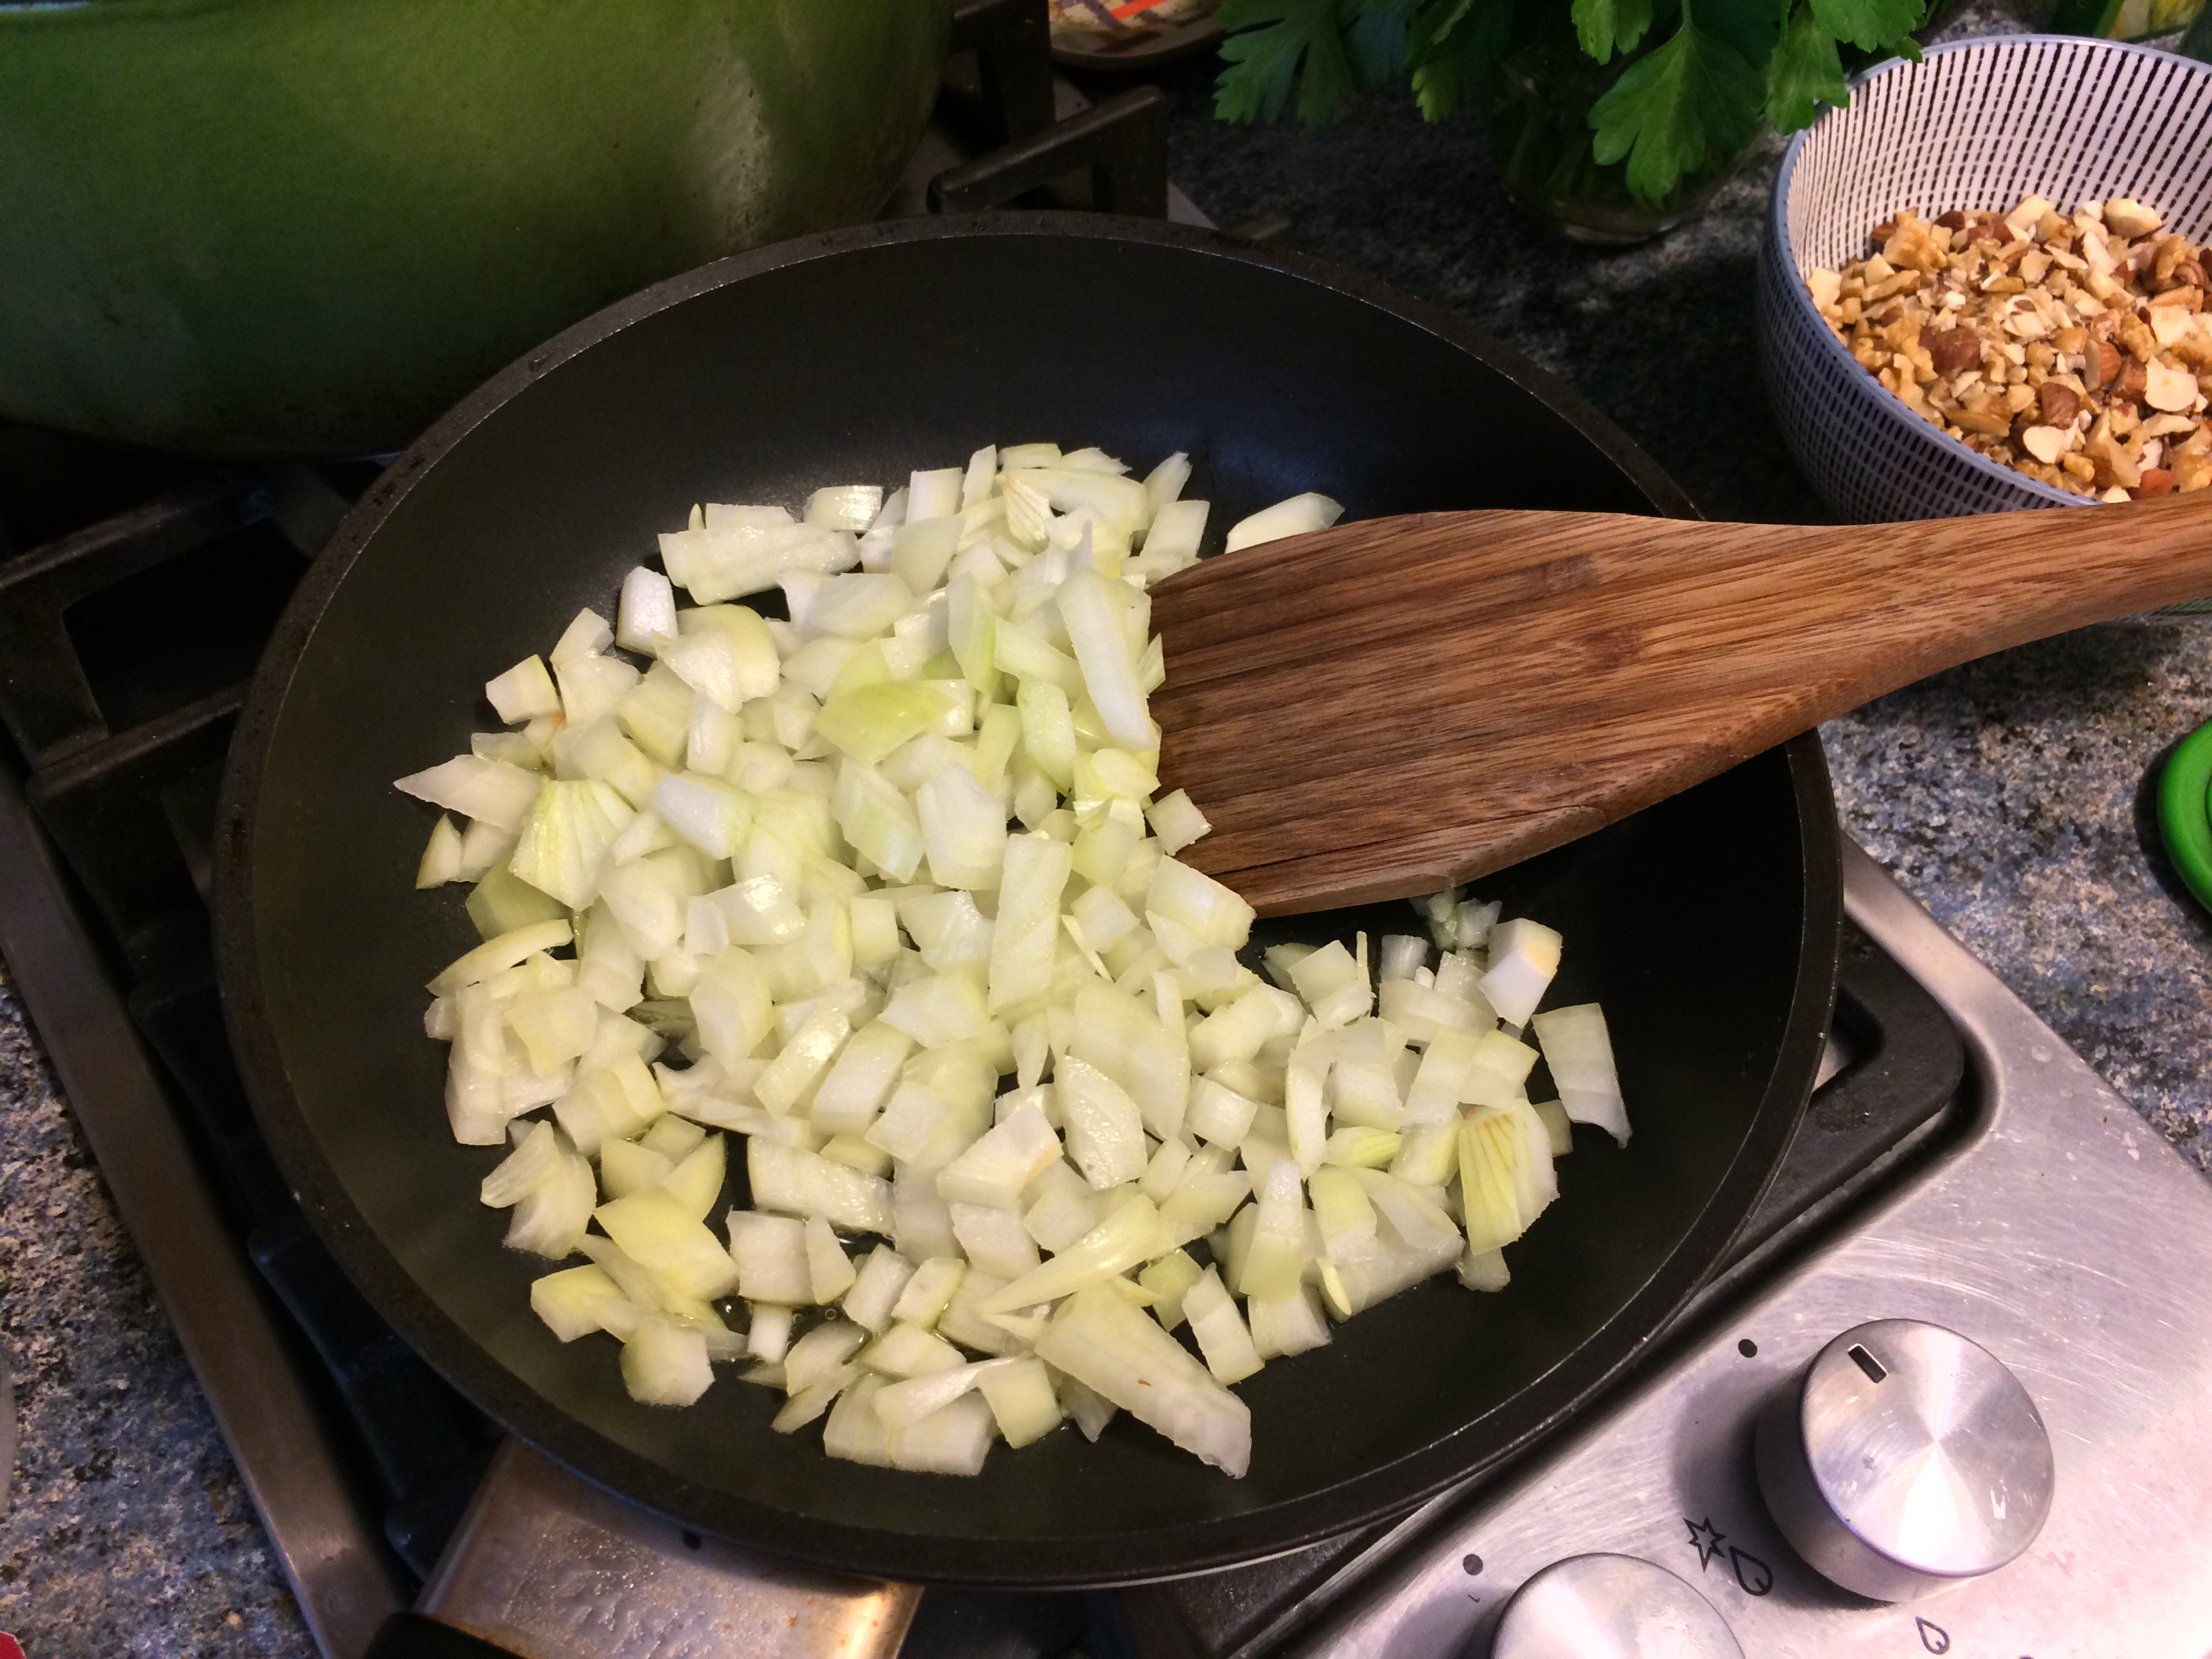
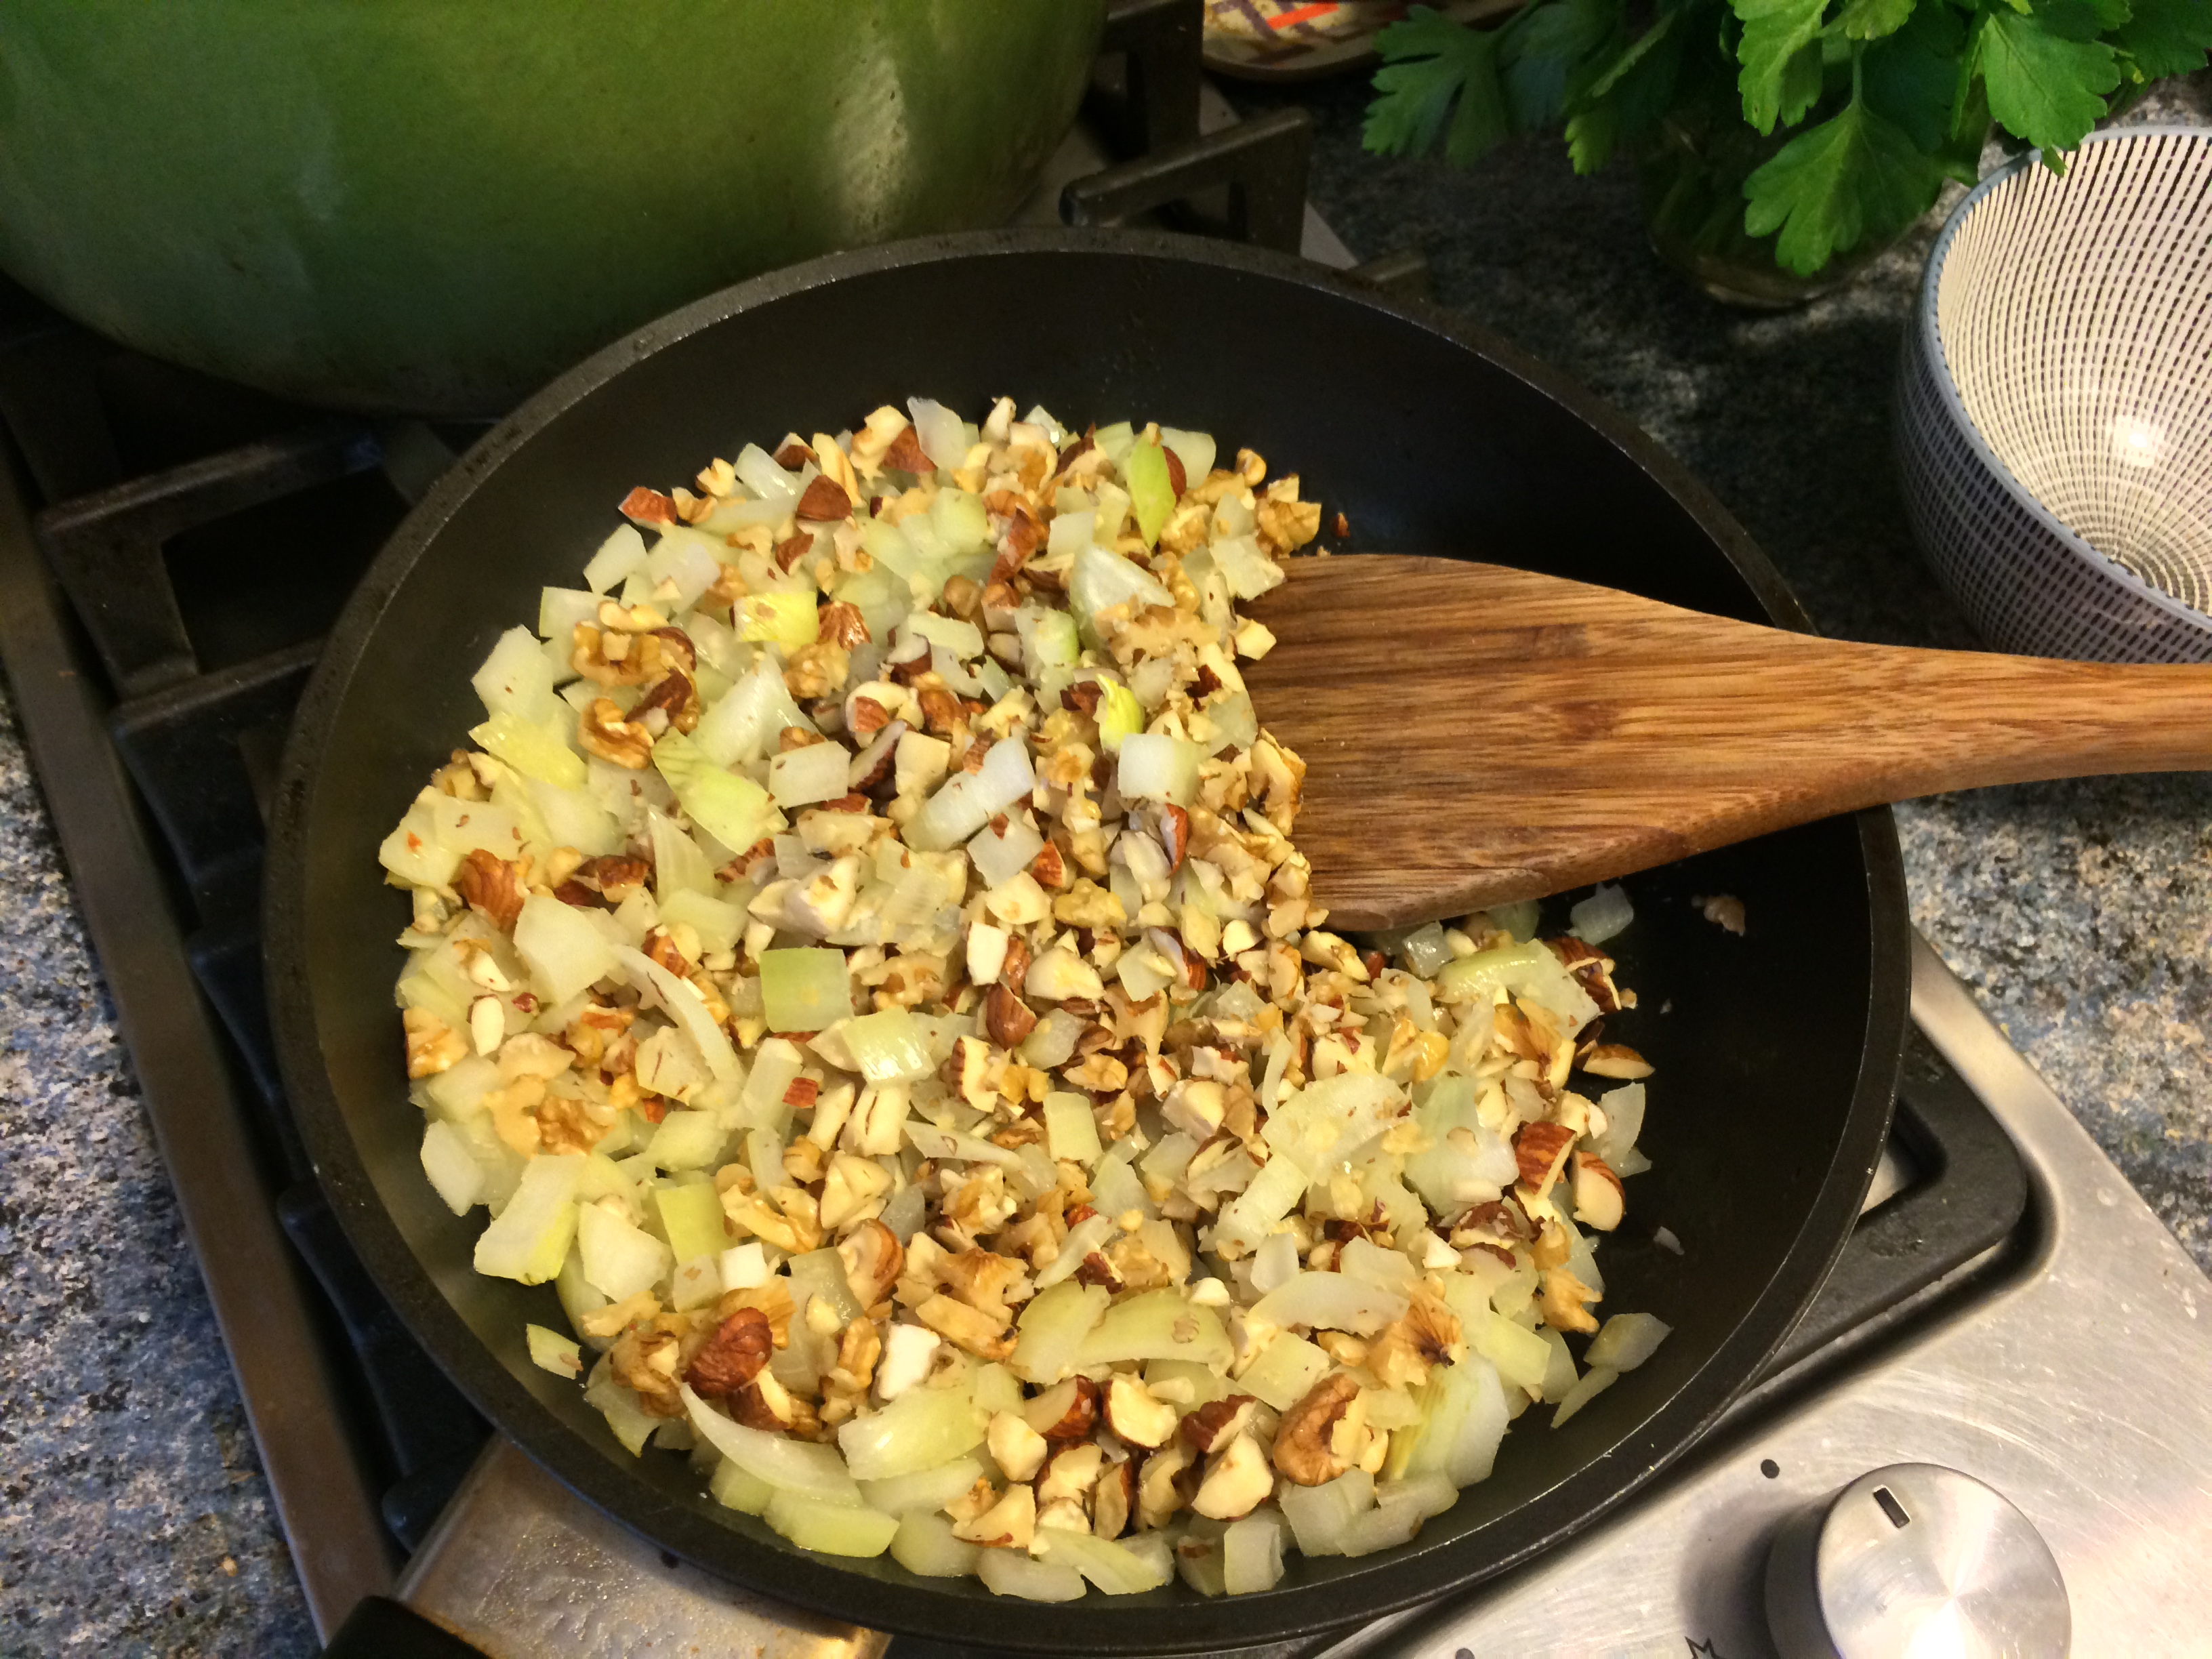
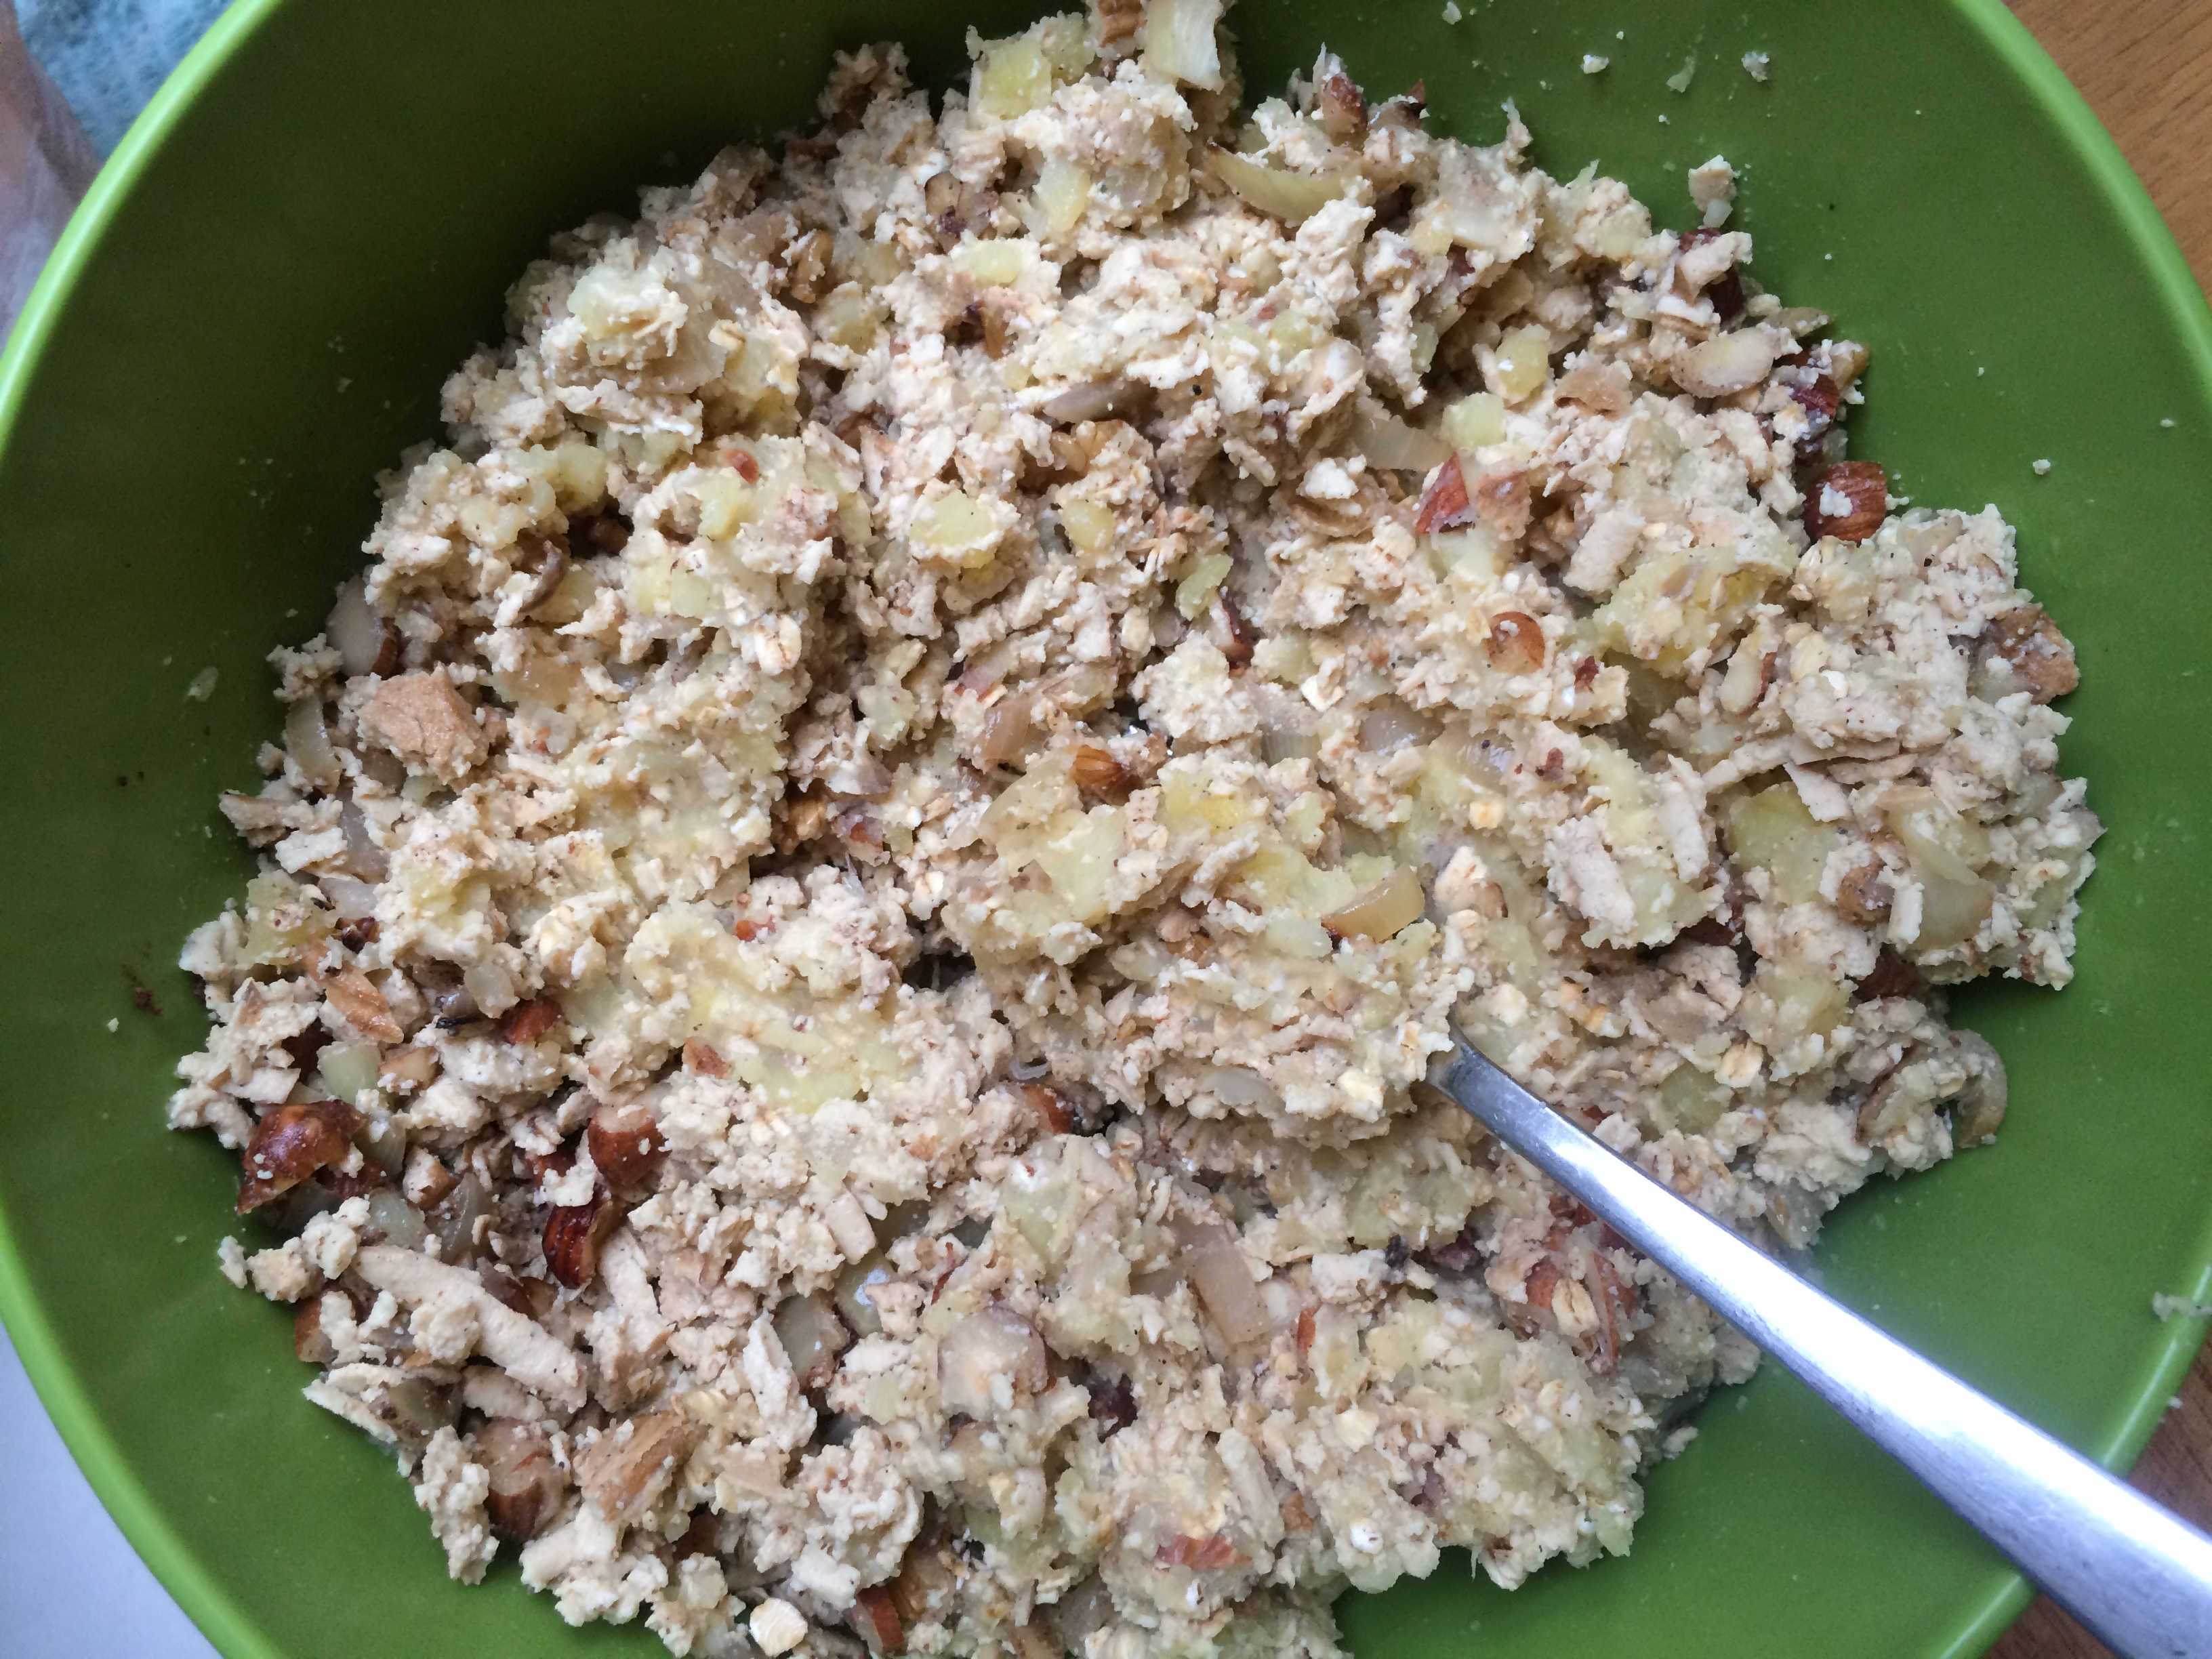
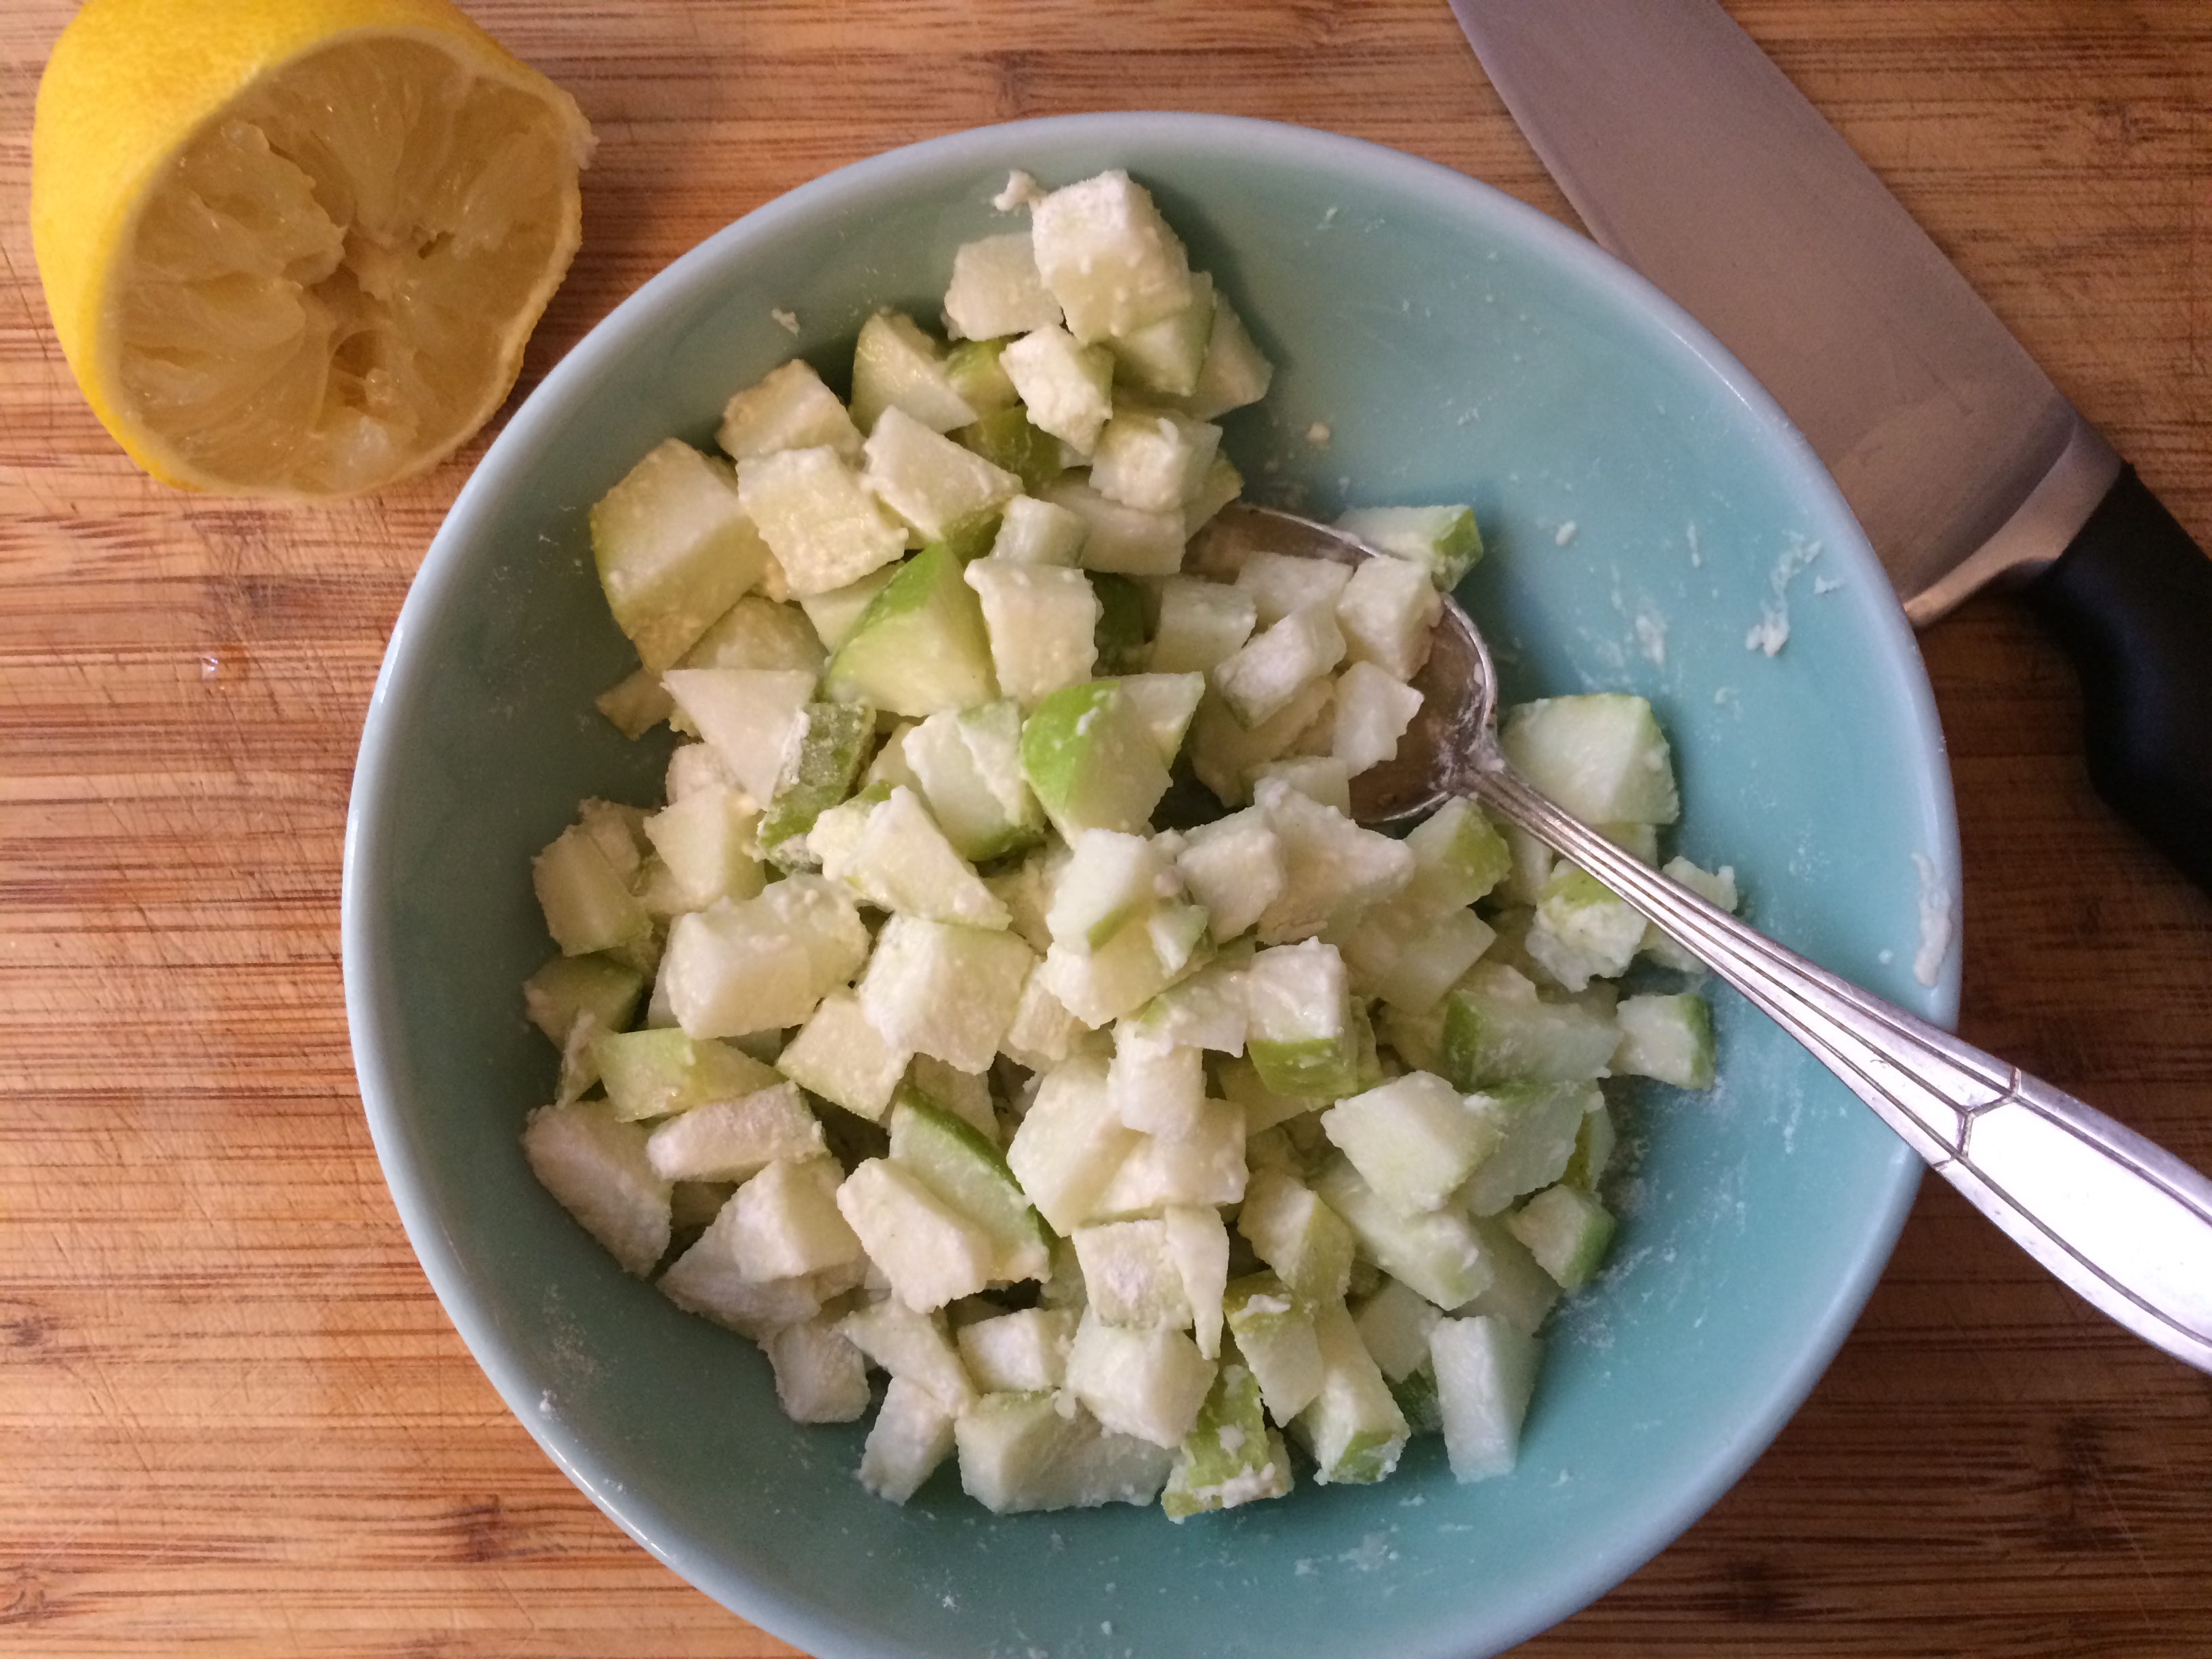
Dice the onion, mince the garlic and roughly chop the artichoke hearts, then place in a medium mixing bowl.

IMG_2528

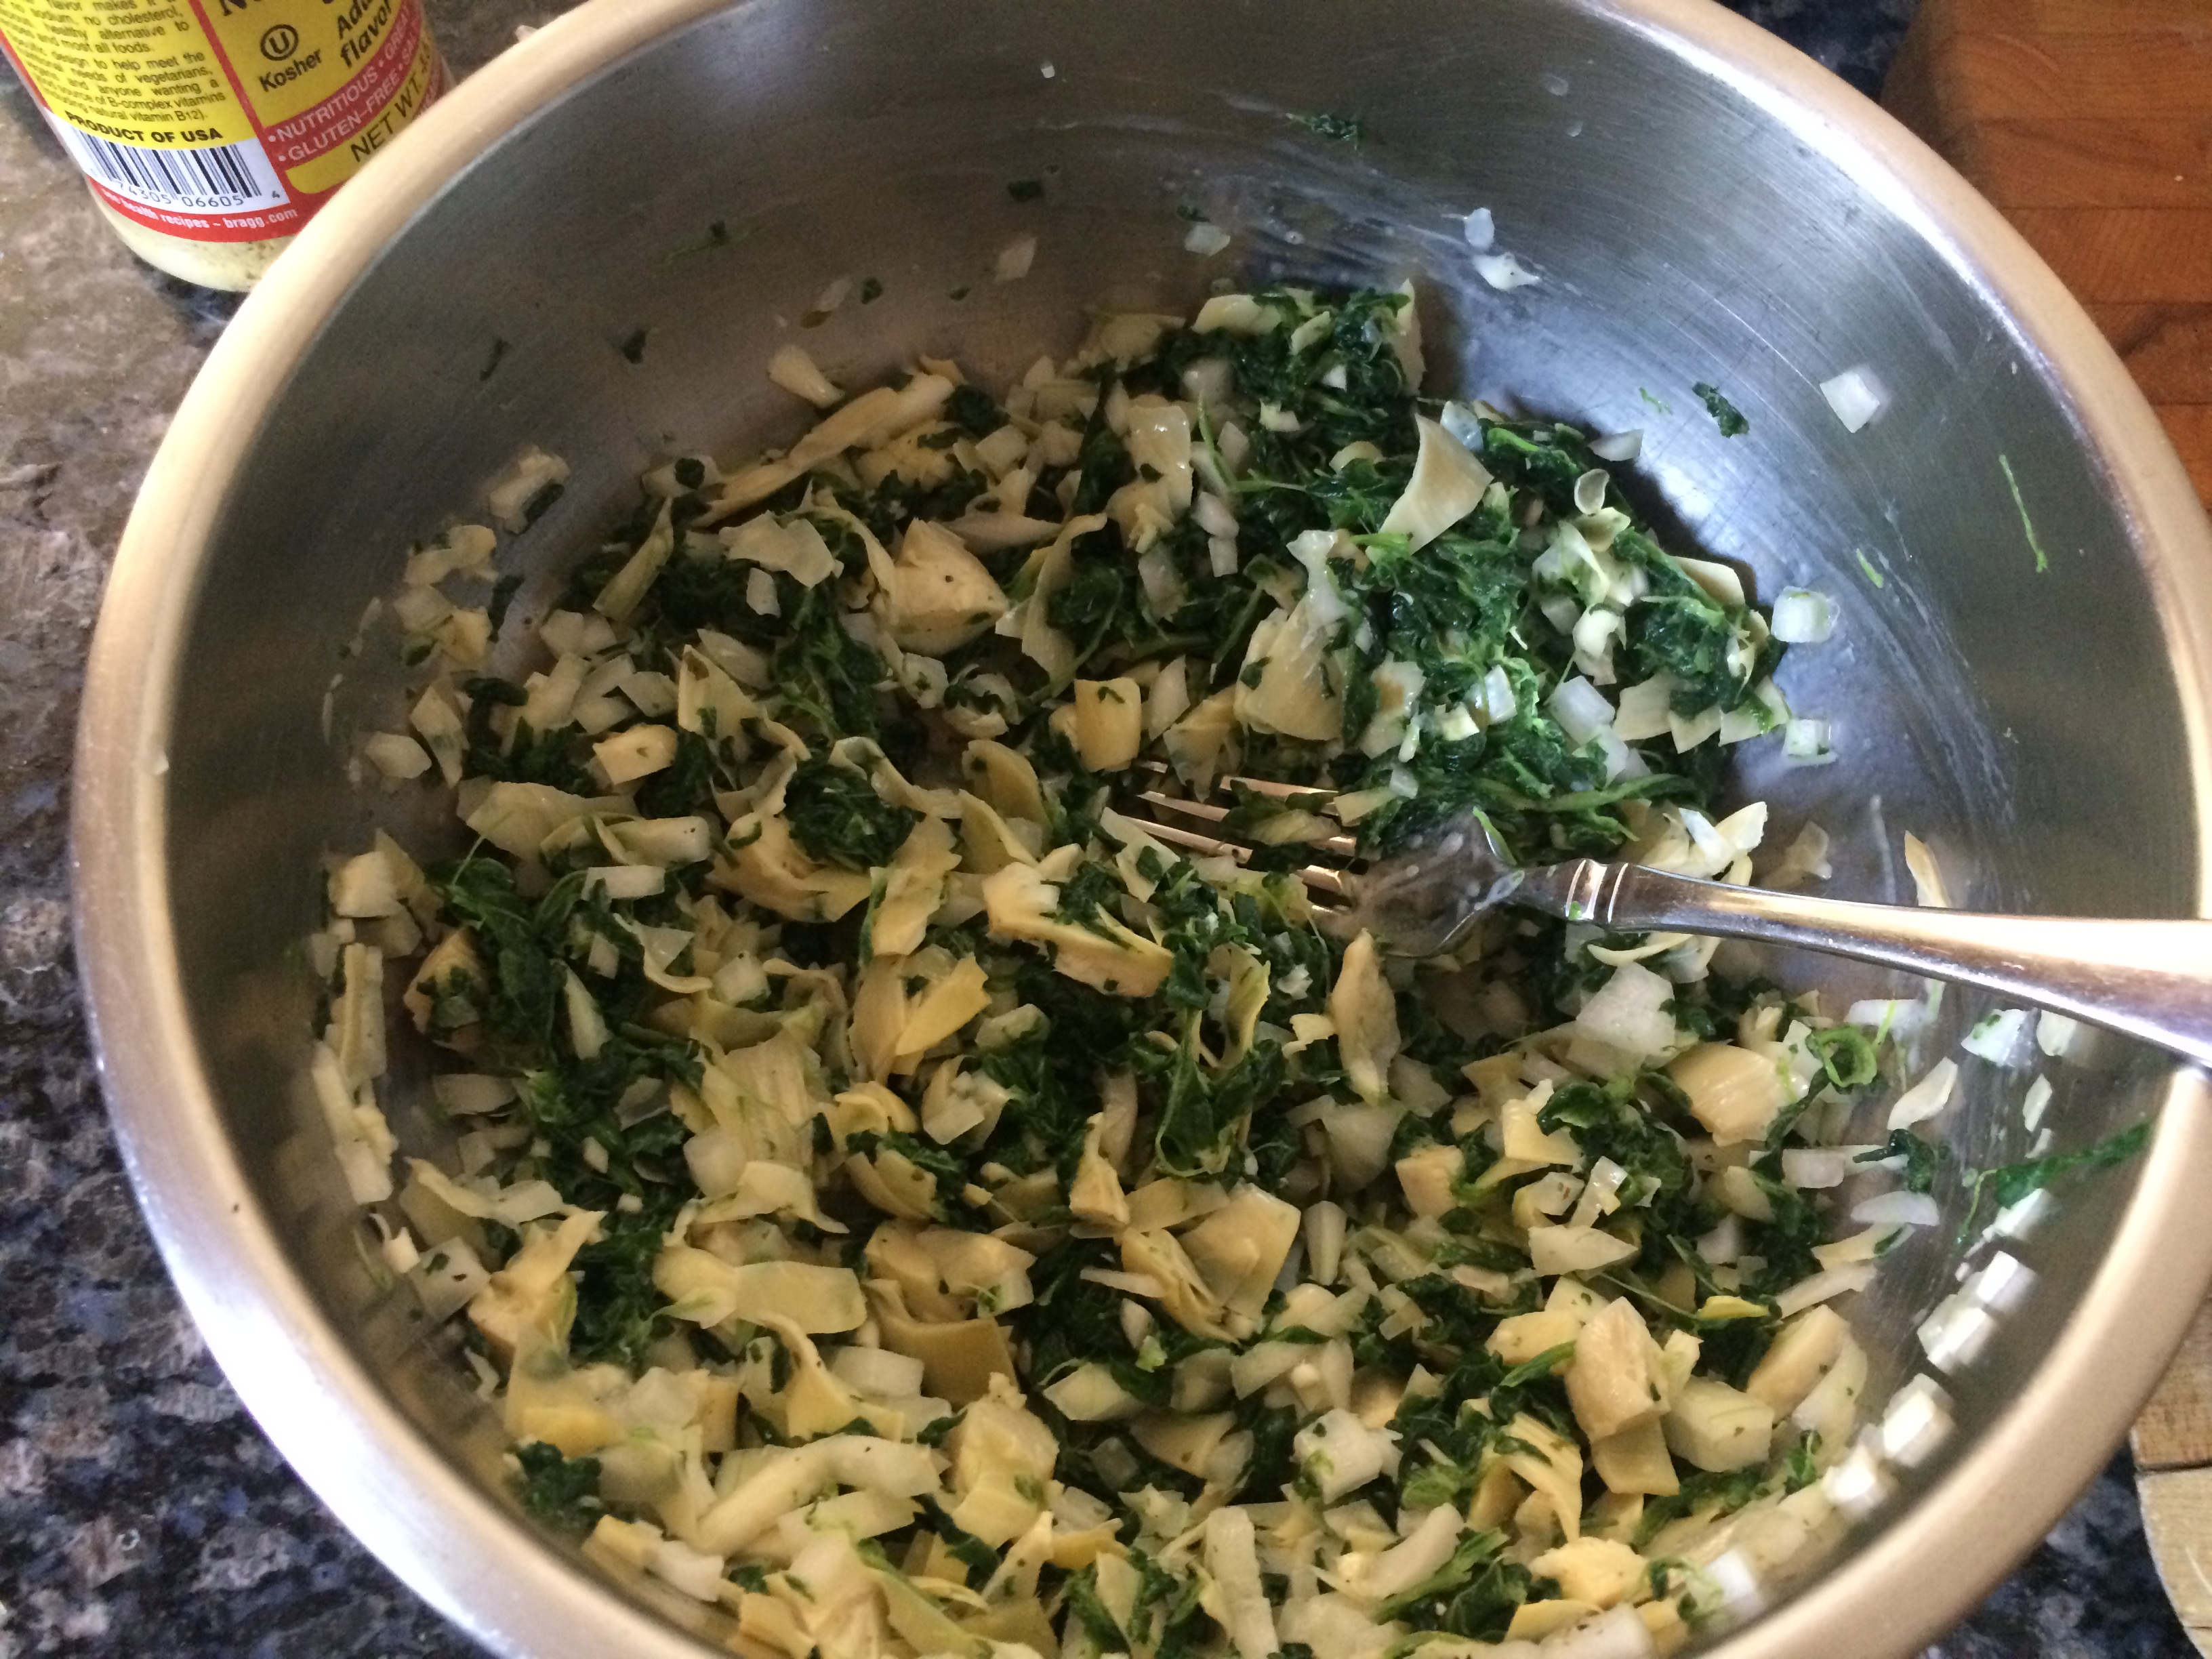
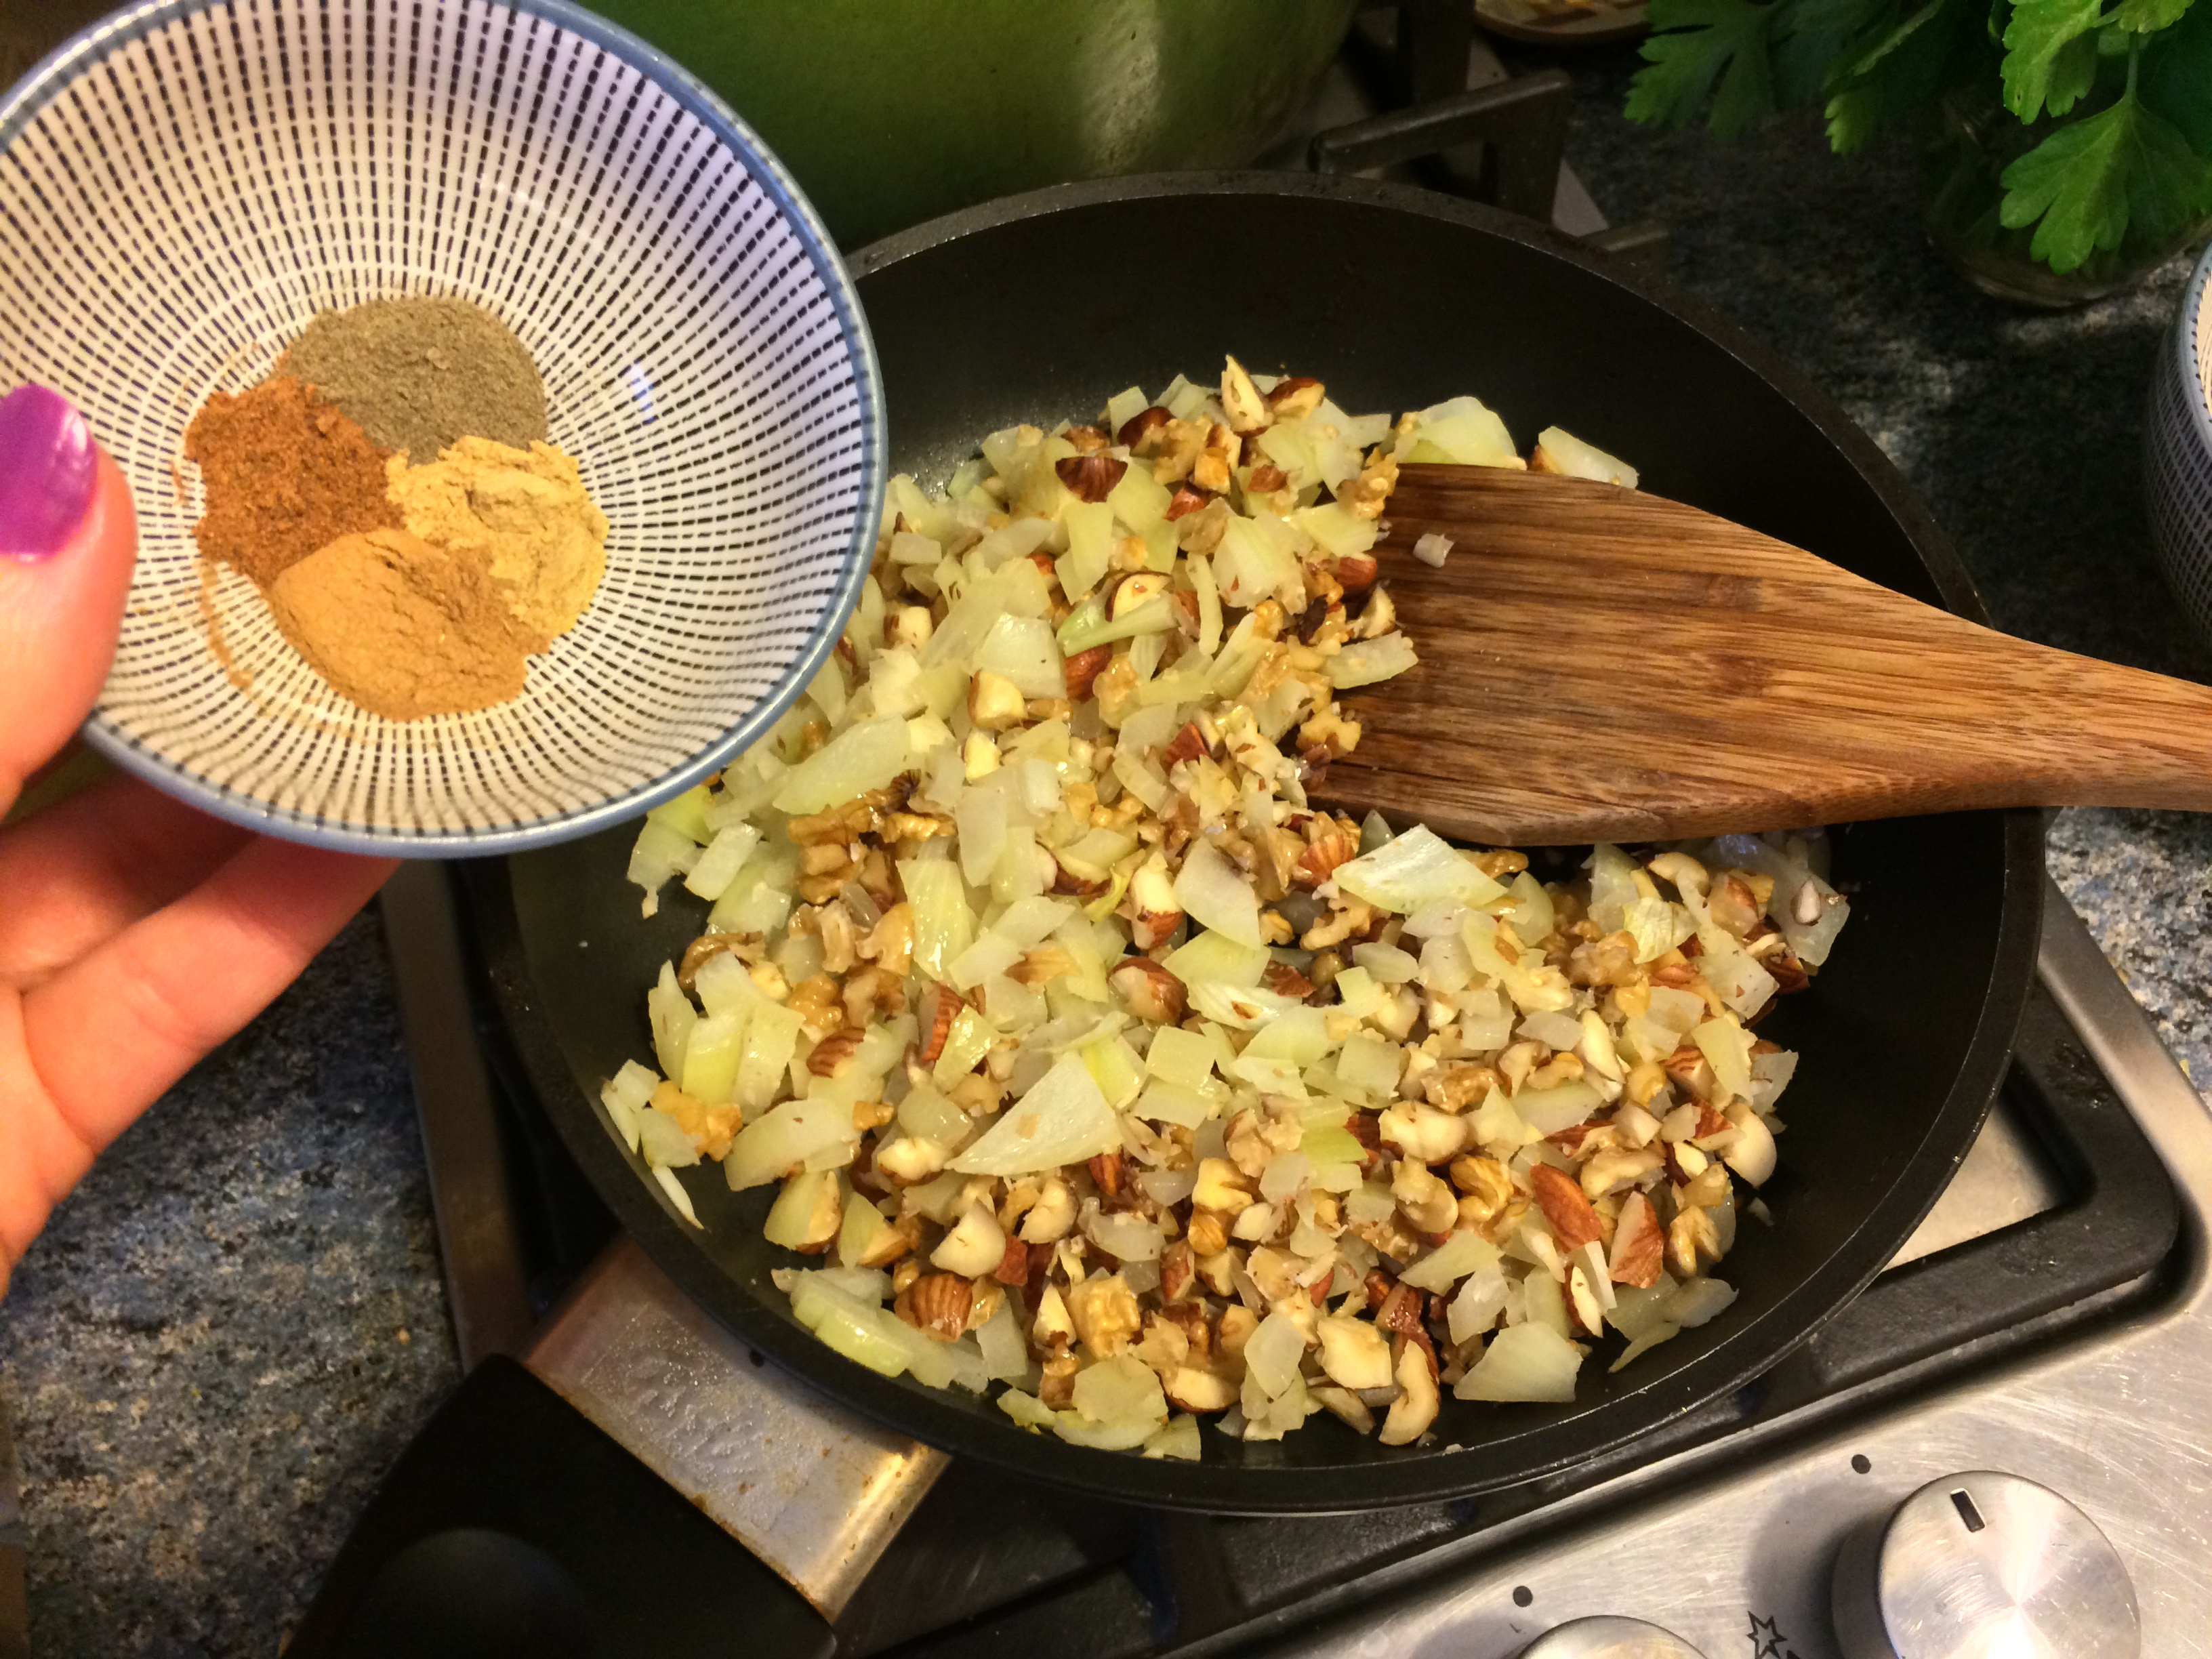
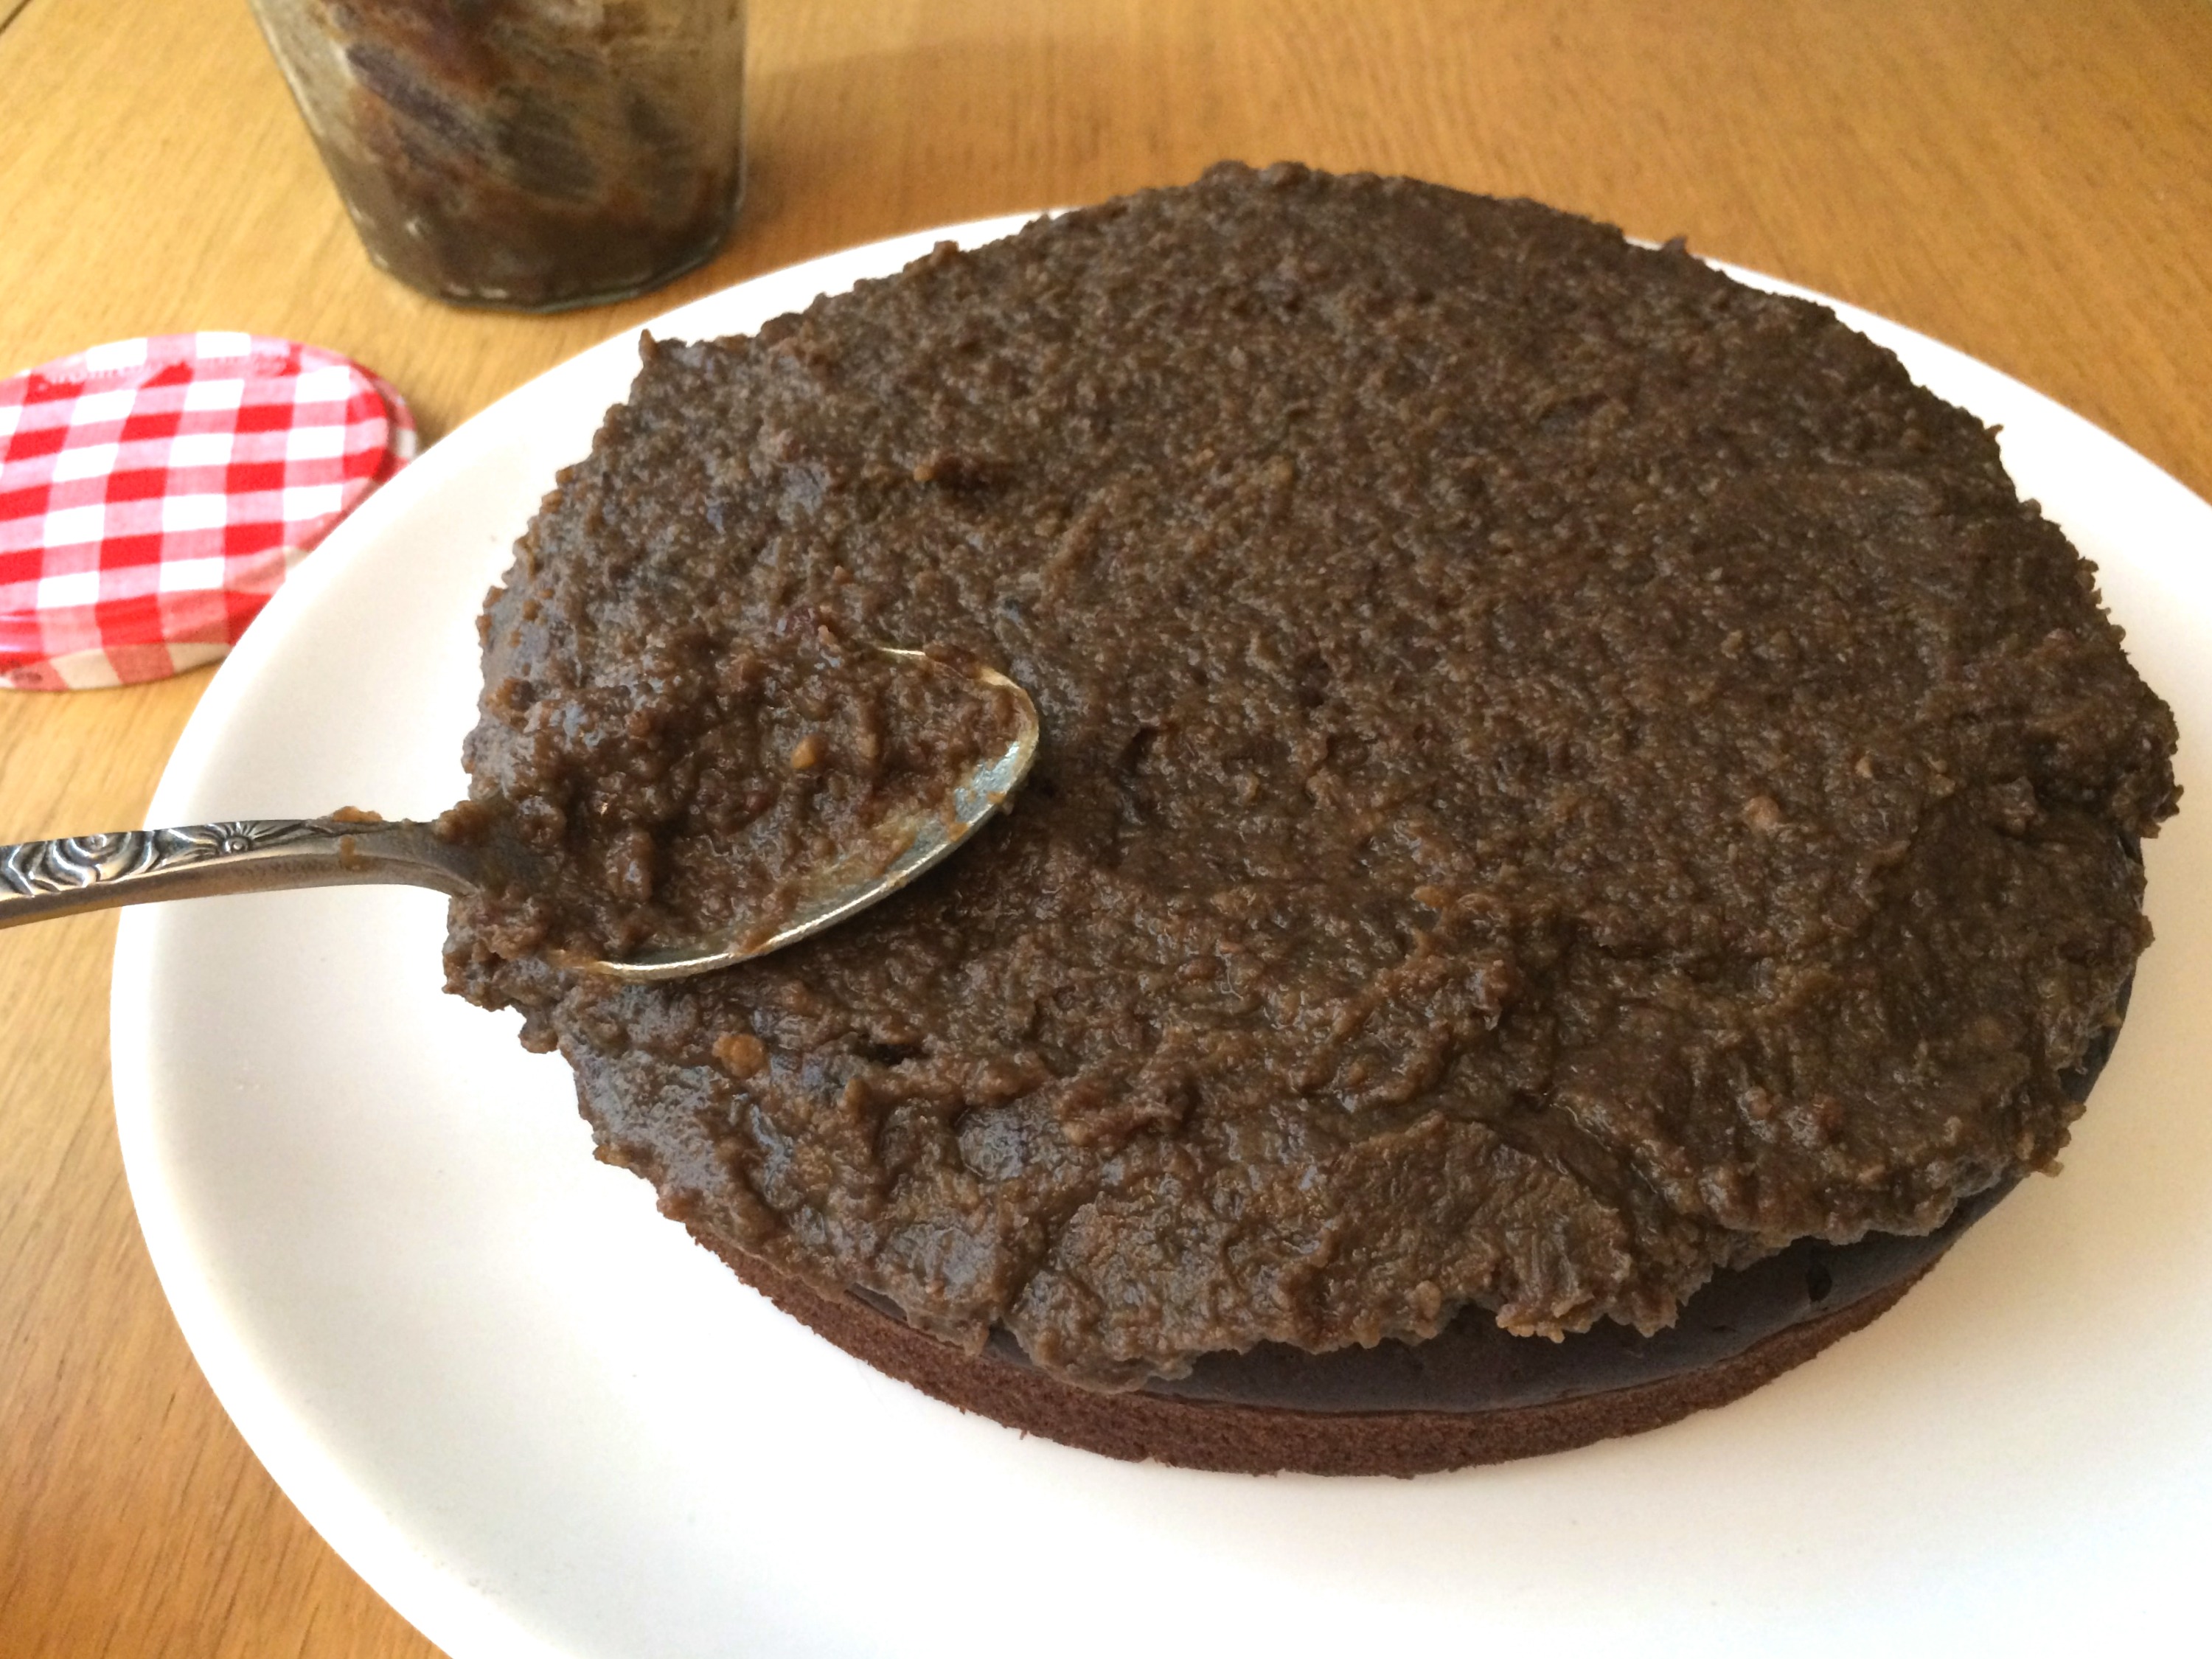
Defrost the spinach a bit and squeeze to remove most of the moisture. “Fluff” it and place it in your measuring cup to ensure you have the right amount, then add to the mixing bowl. Add the non-dairy milk, salt and white pepper and stir to combine. Set aside and make the mozzarella cheese, which will be added to this mixture in the same bowl.

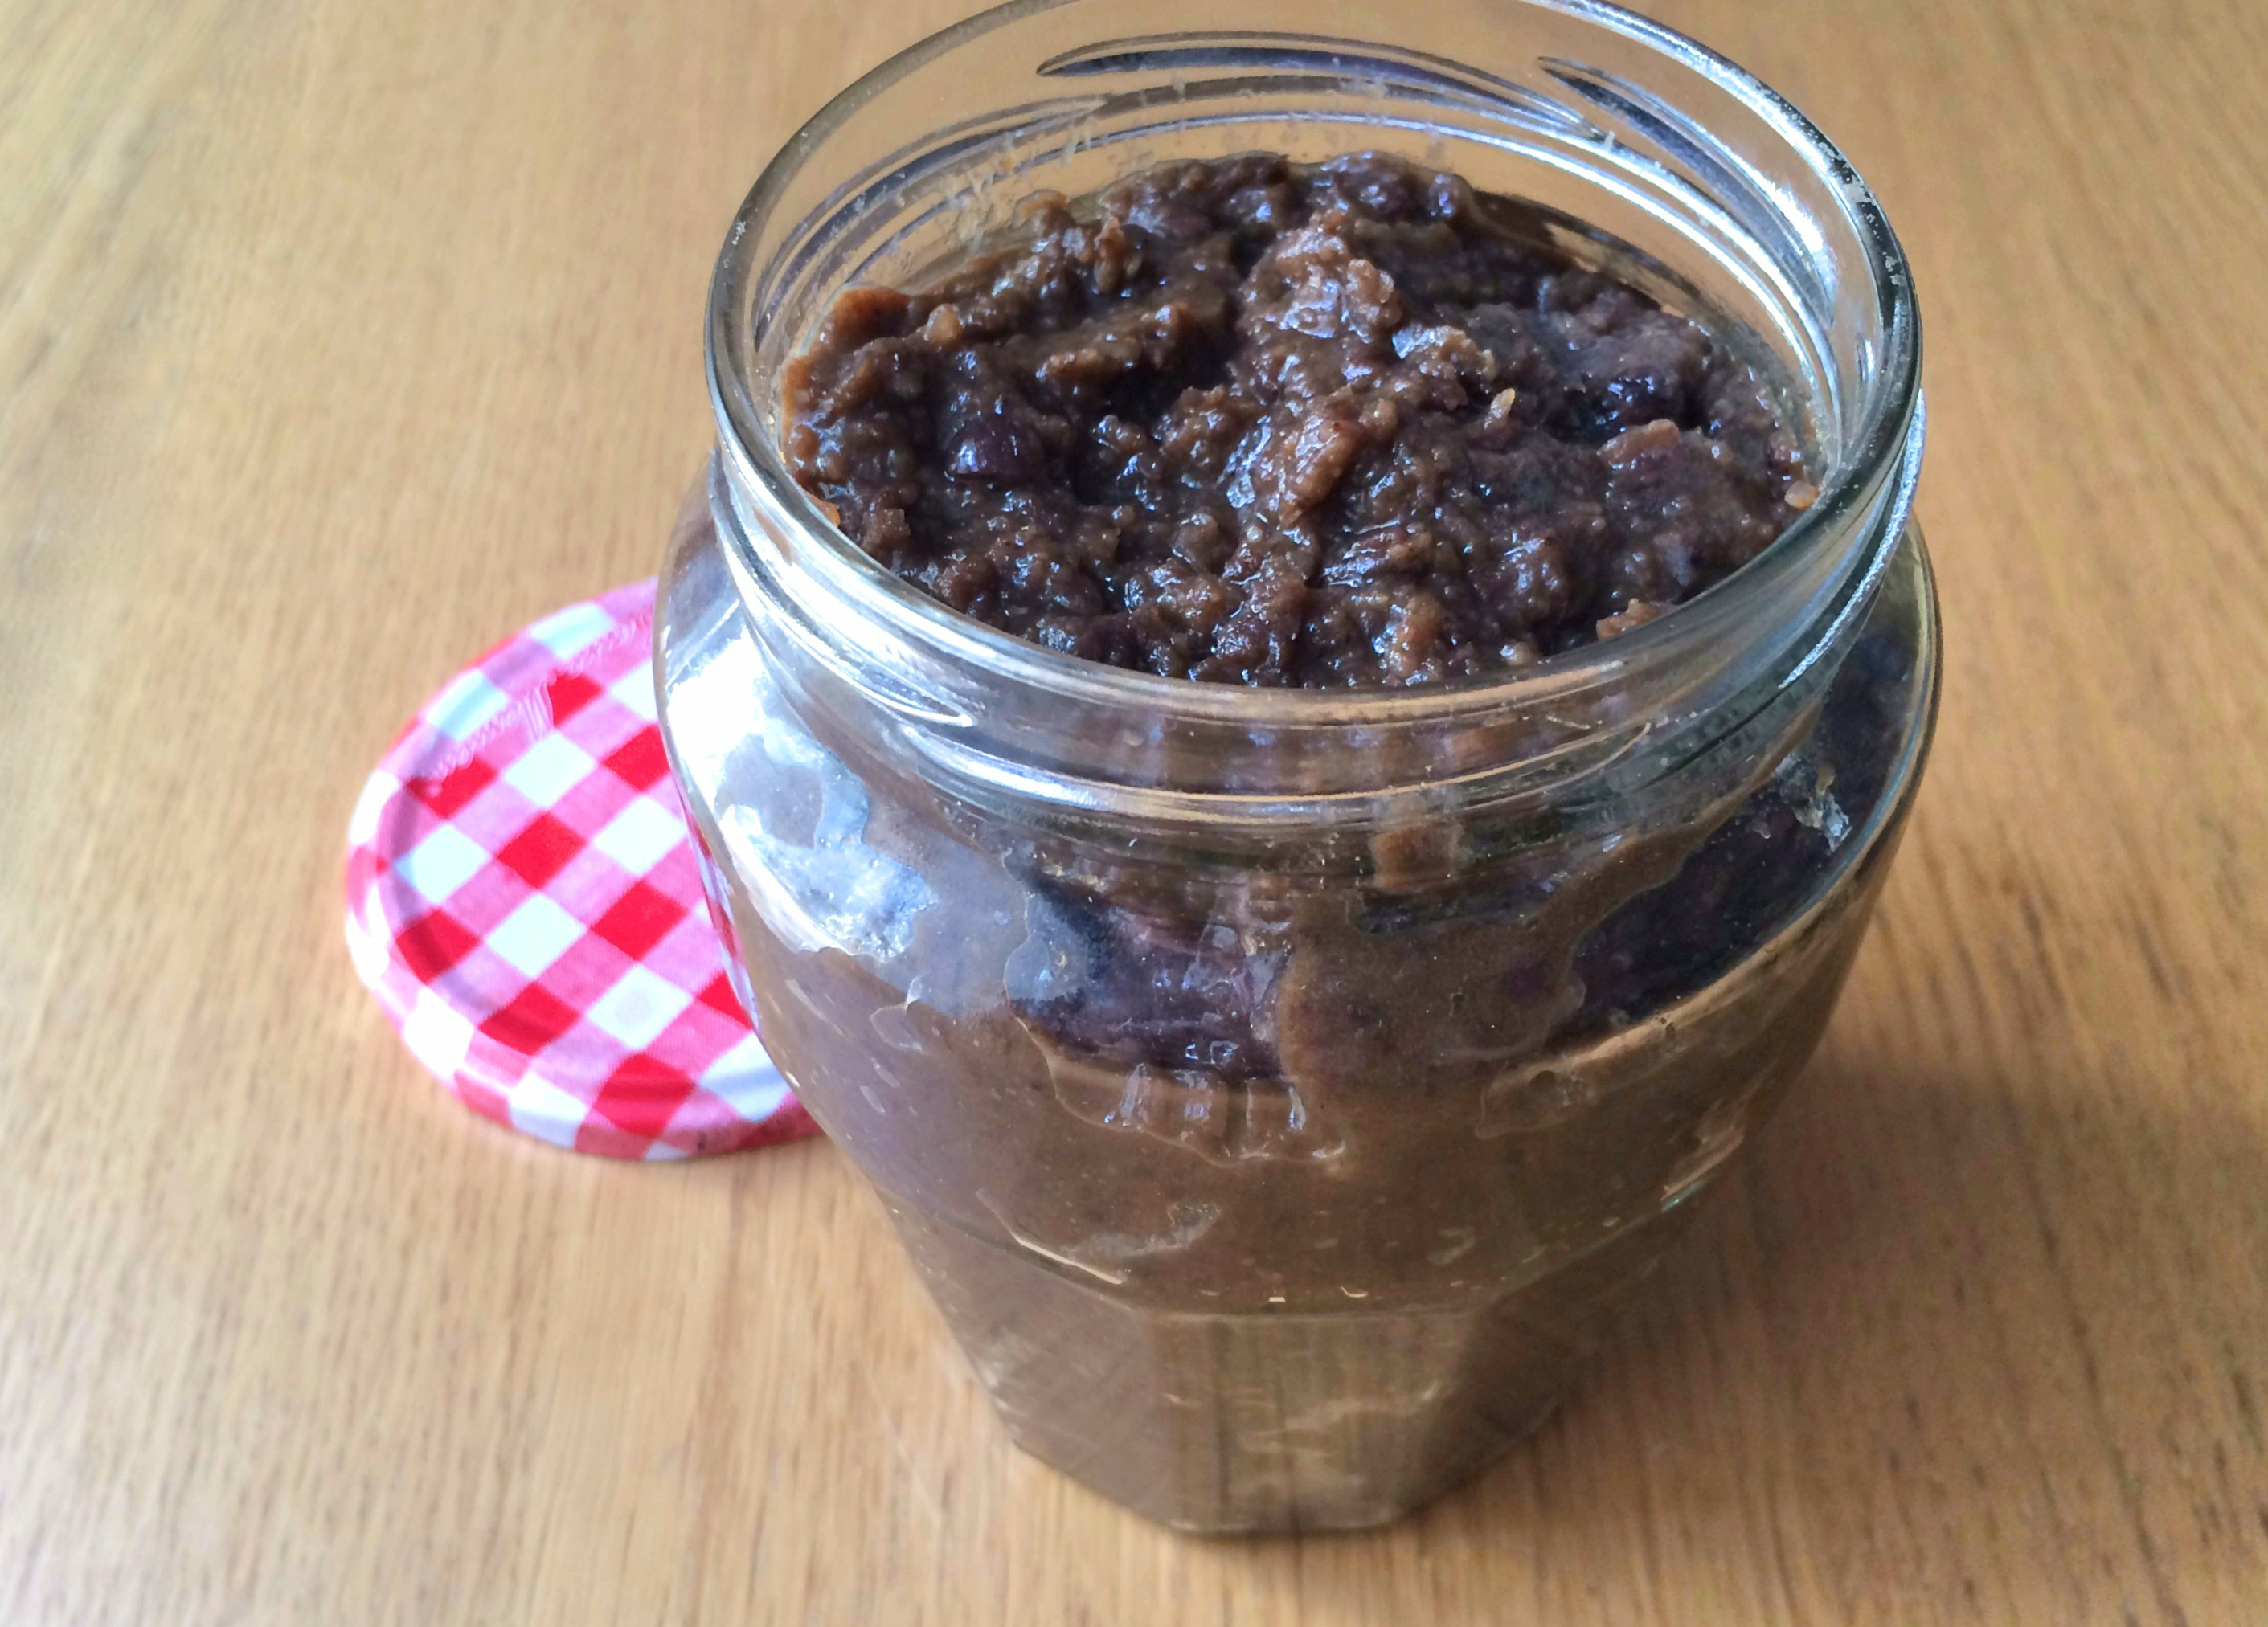
Stretchy mozzarella-style cashew cheese
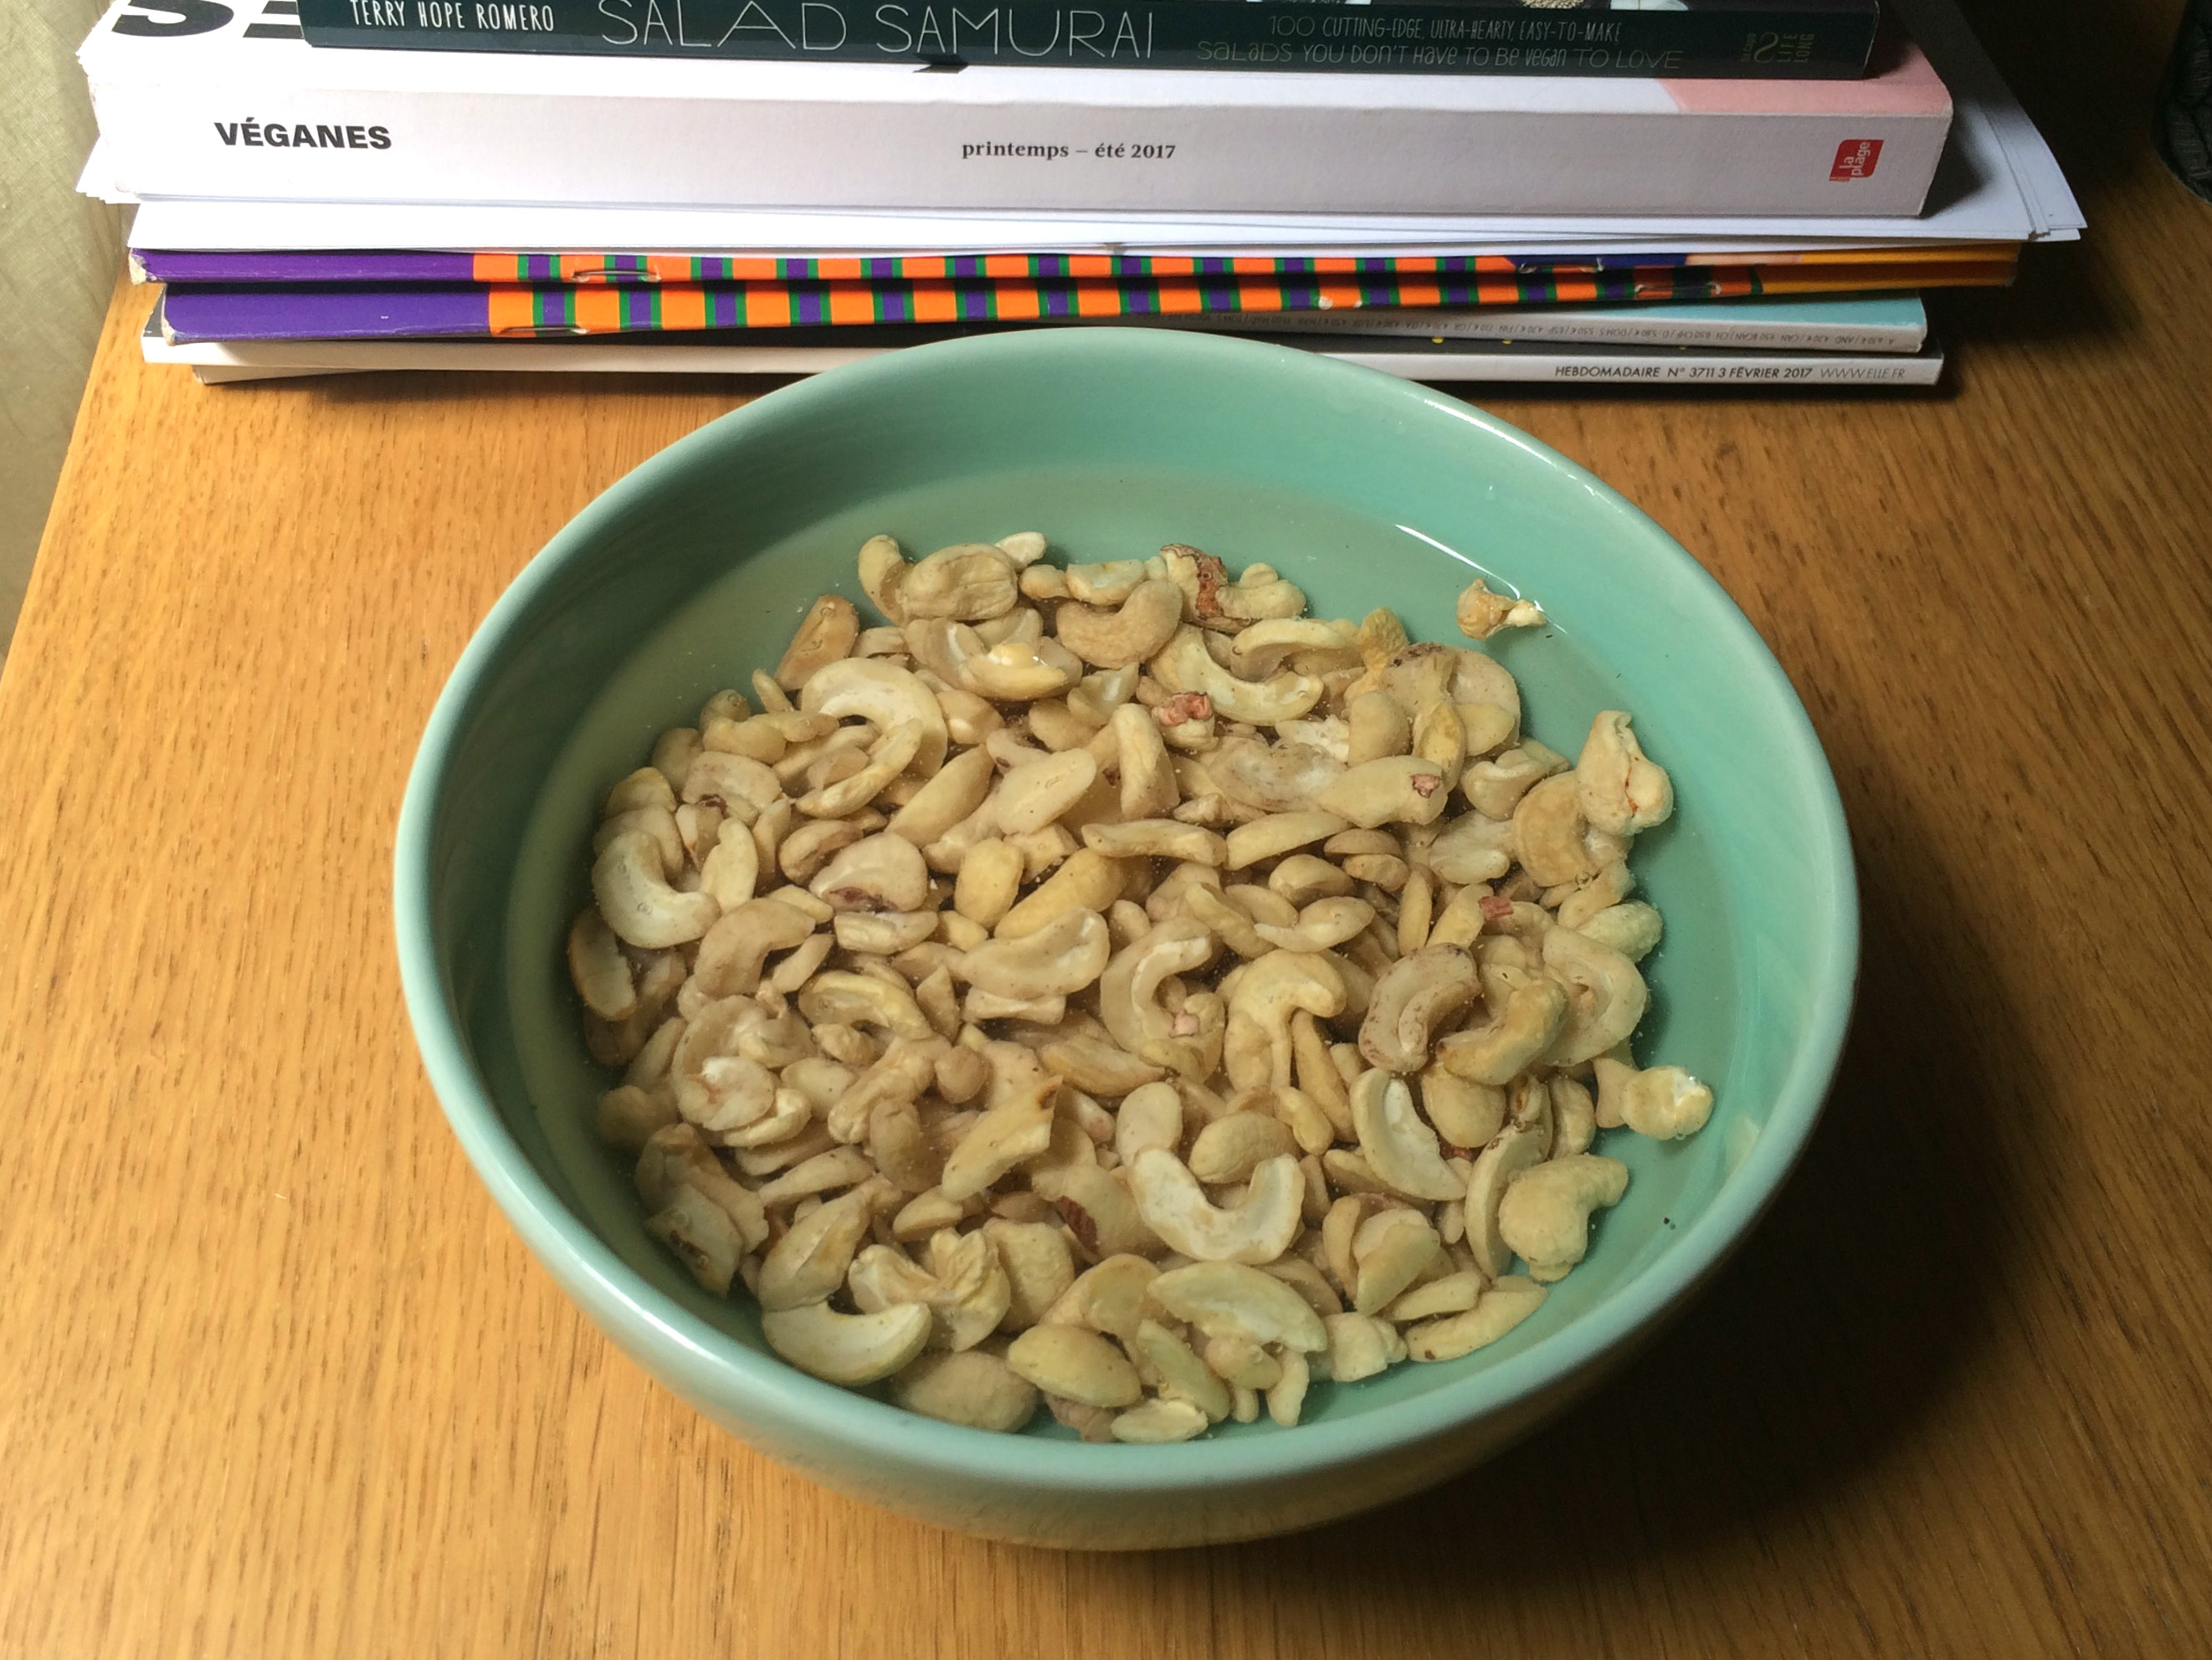
  • ½ cup raw cashews
  • 1 cup (236 ml) water
  • 3 tablespoons + 2 teaspoons tapioca starch
  • 2 tablespoons nutritional yeast
  • 1 teaspoon apple cider vinegar
  • ½ teaspoon salt or more to taste
  • ¼ teaspoon garlic powder

Equipment needed: food processor or high-power blender

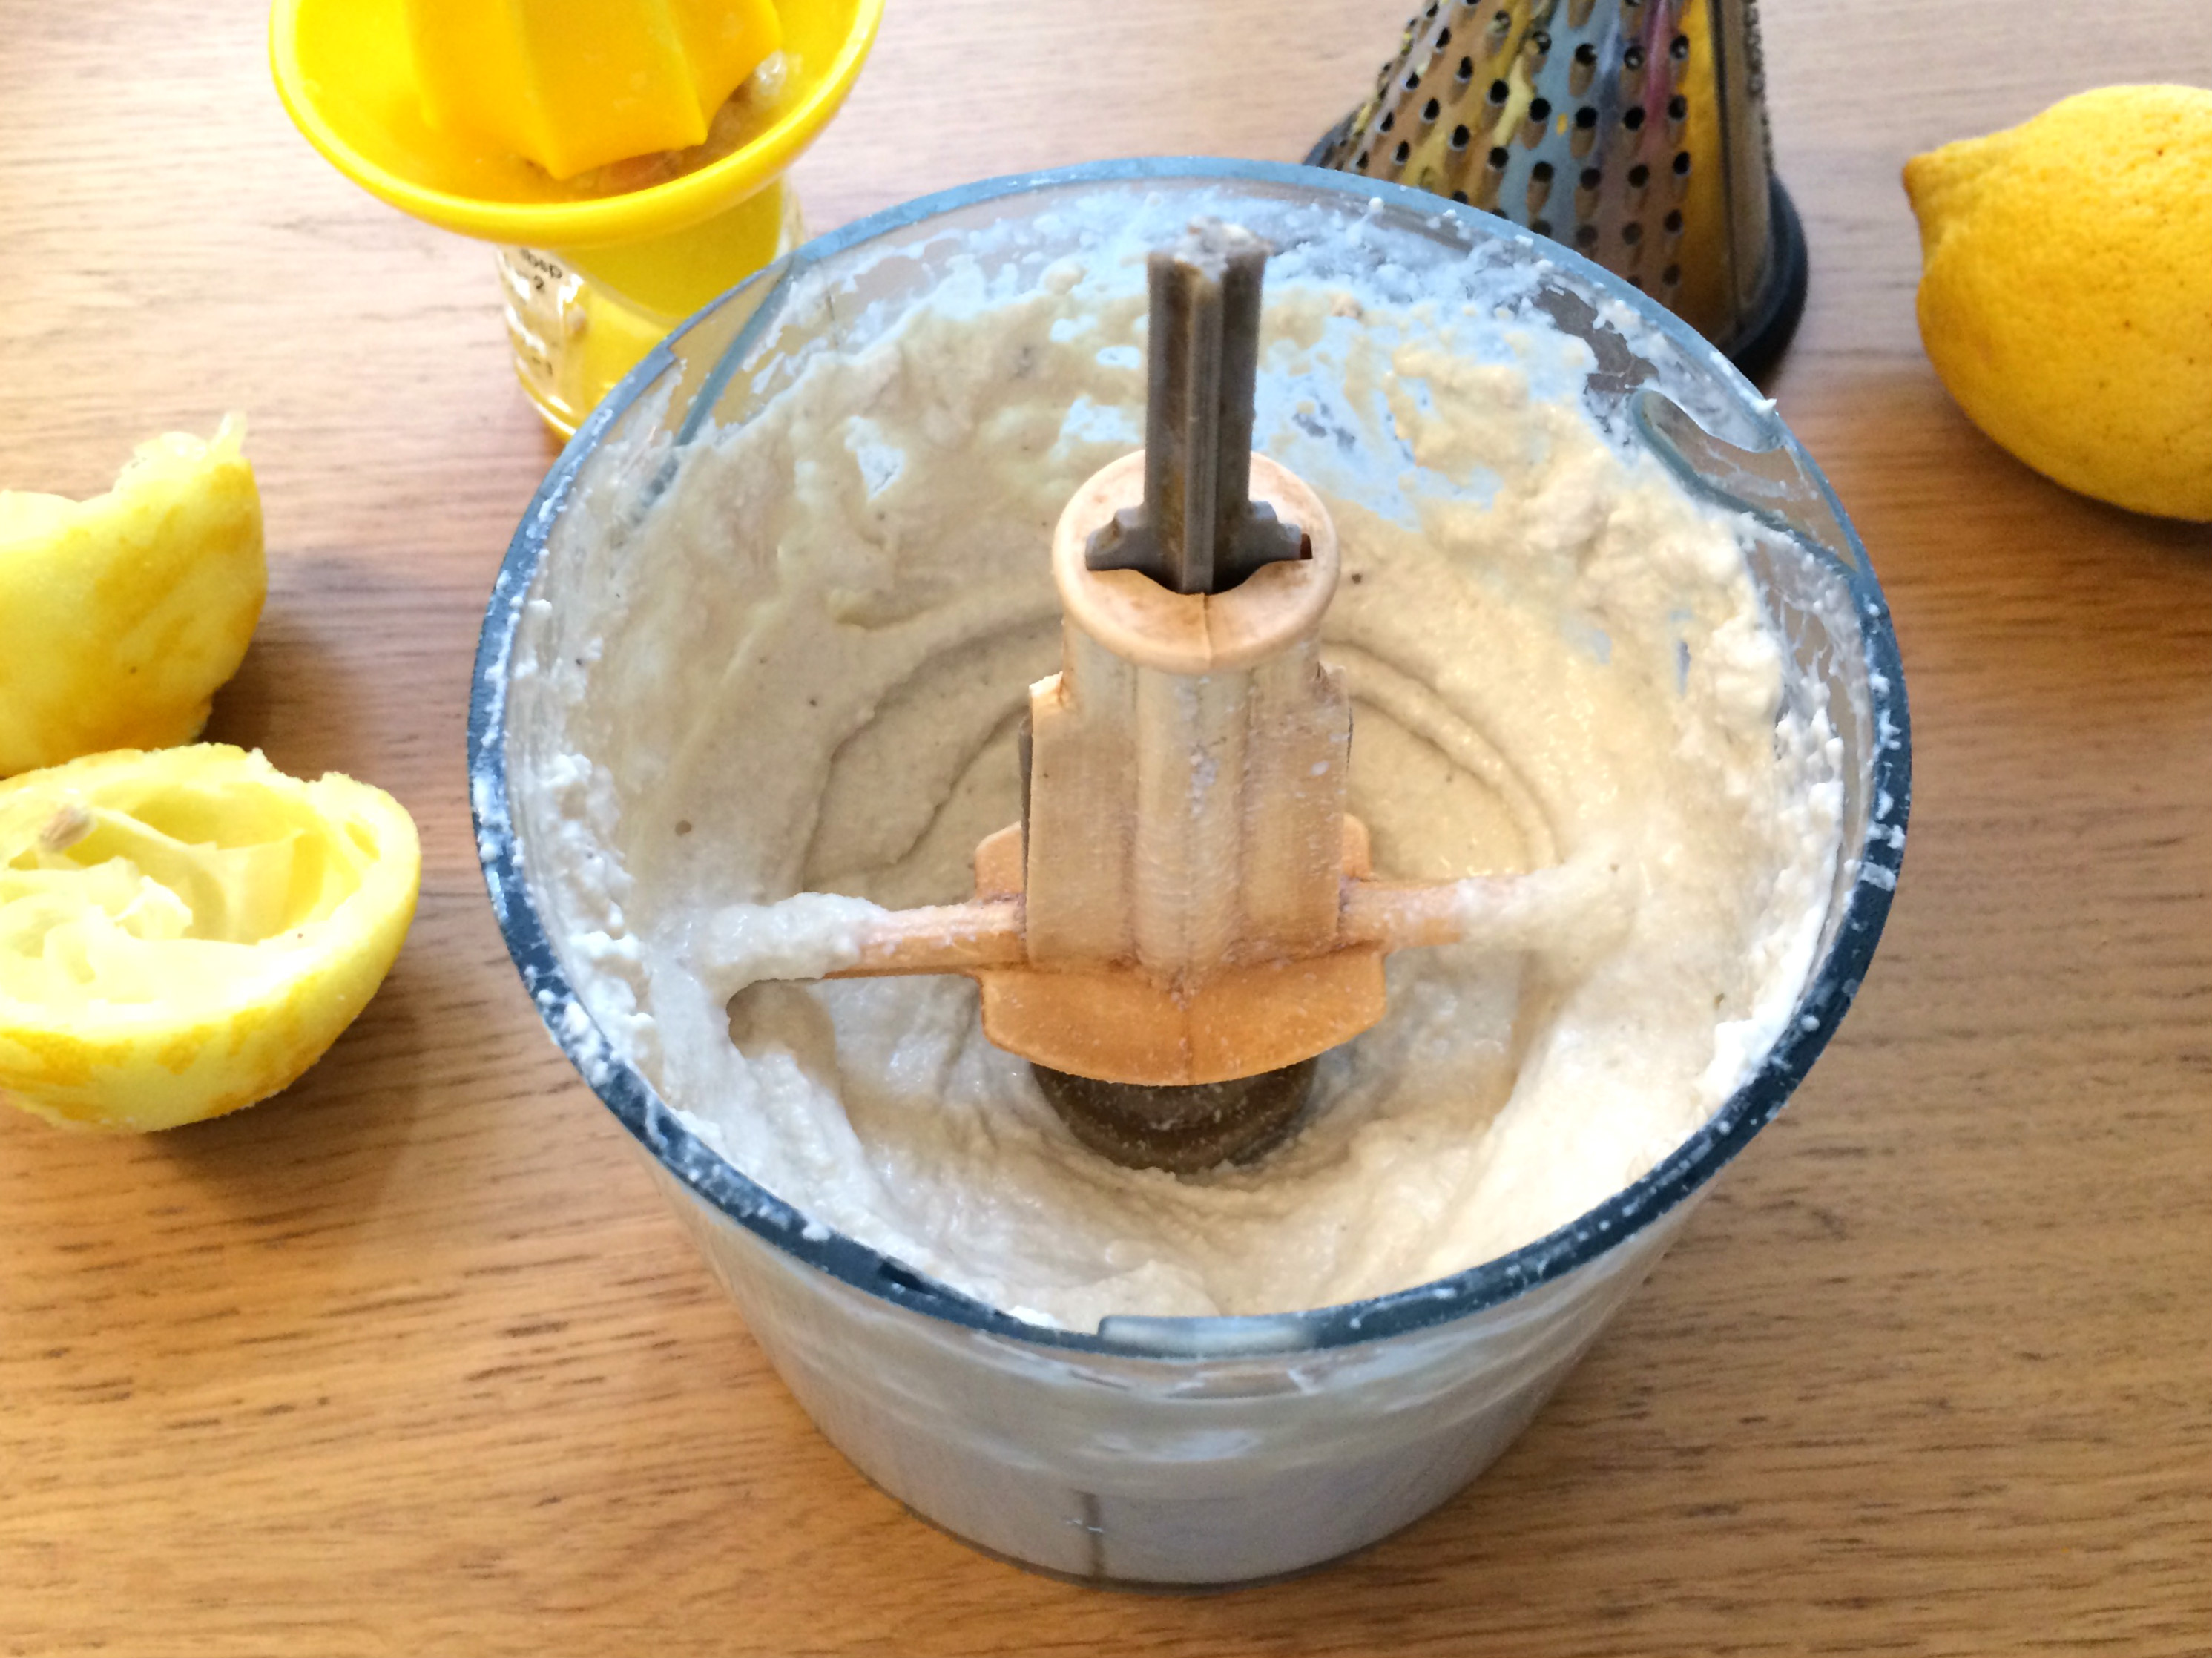
Place the raw cashews in a small saucepan and fill with enough water to cover the cashews. Bring to a boil, then reduce heat and simmer for about 15 minutes until the cashews are soft.

Drain the cashews, place in a food processor or high-power blender along with the cup of water and process until smooth. Add the remaining ingredients and process again until everything is fully incorporated.

IMG_2518IMG_2520


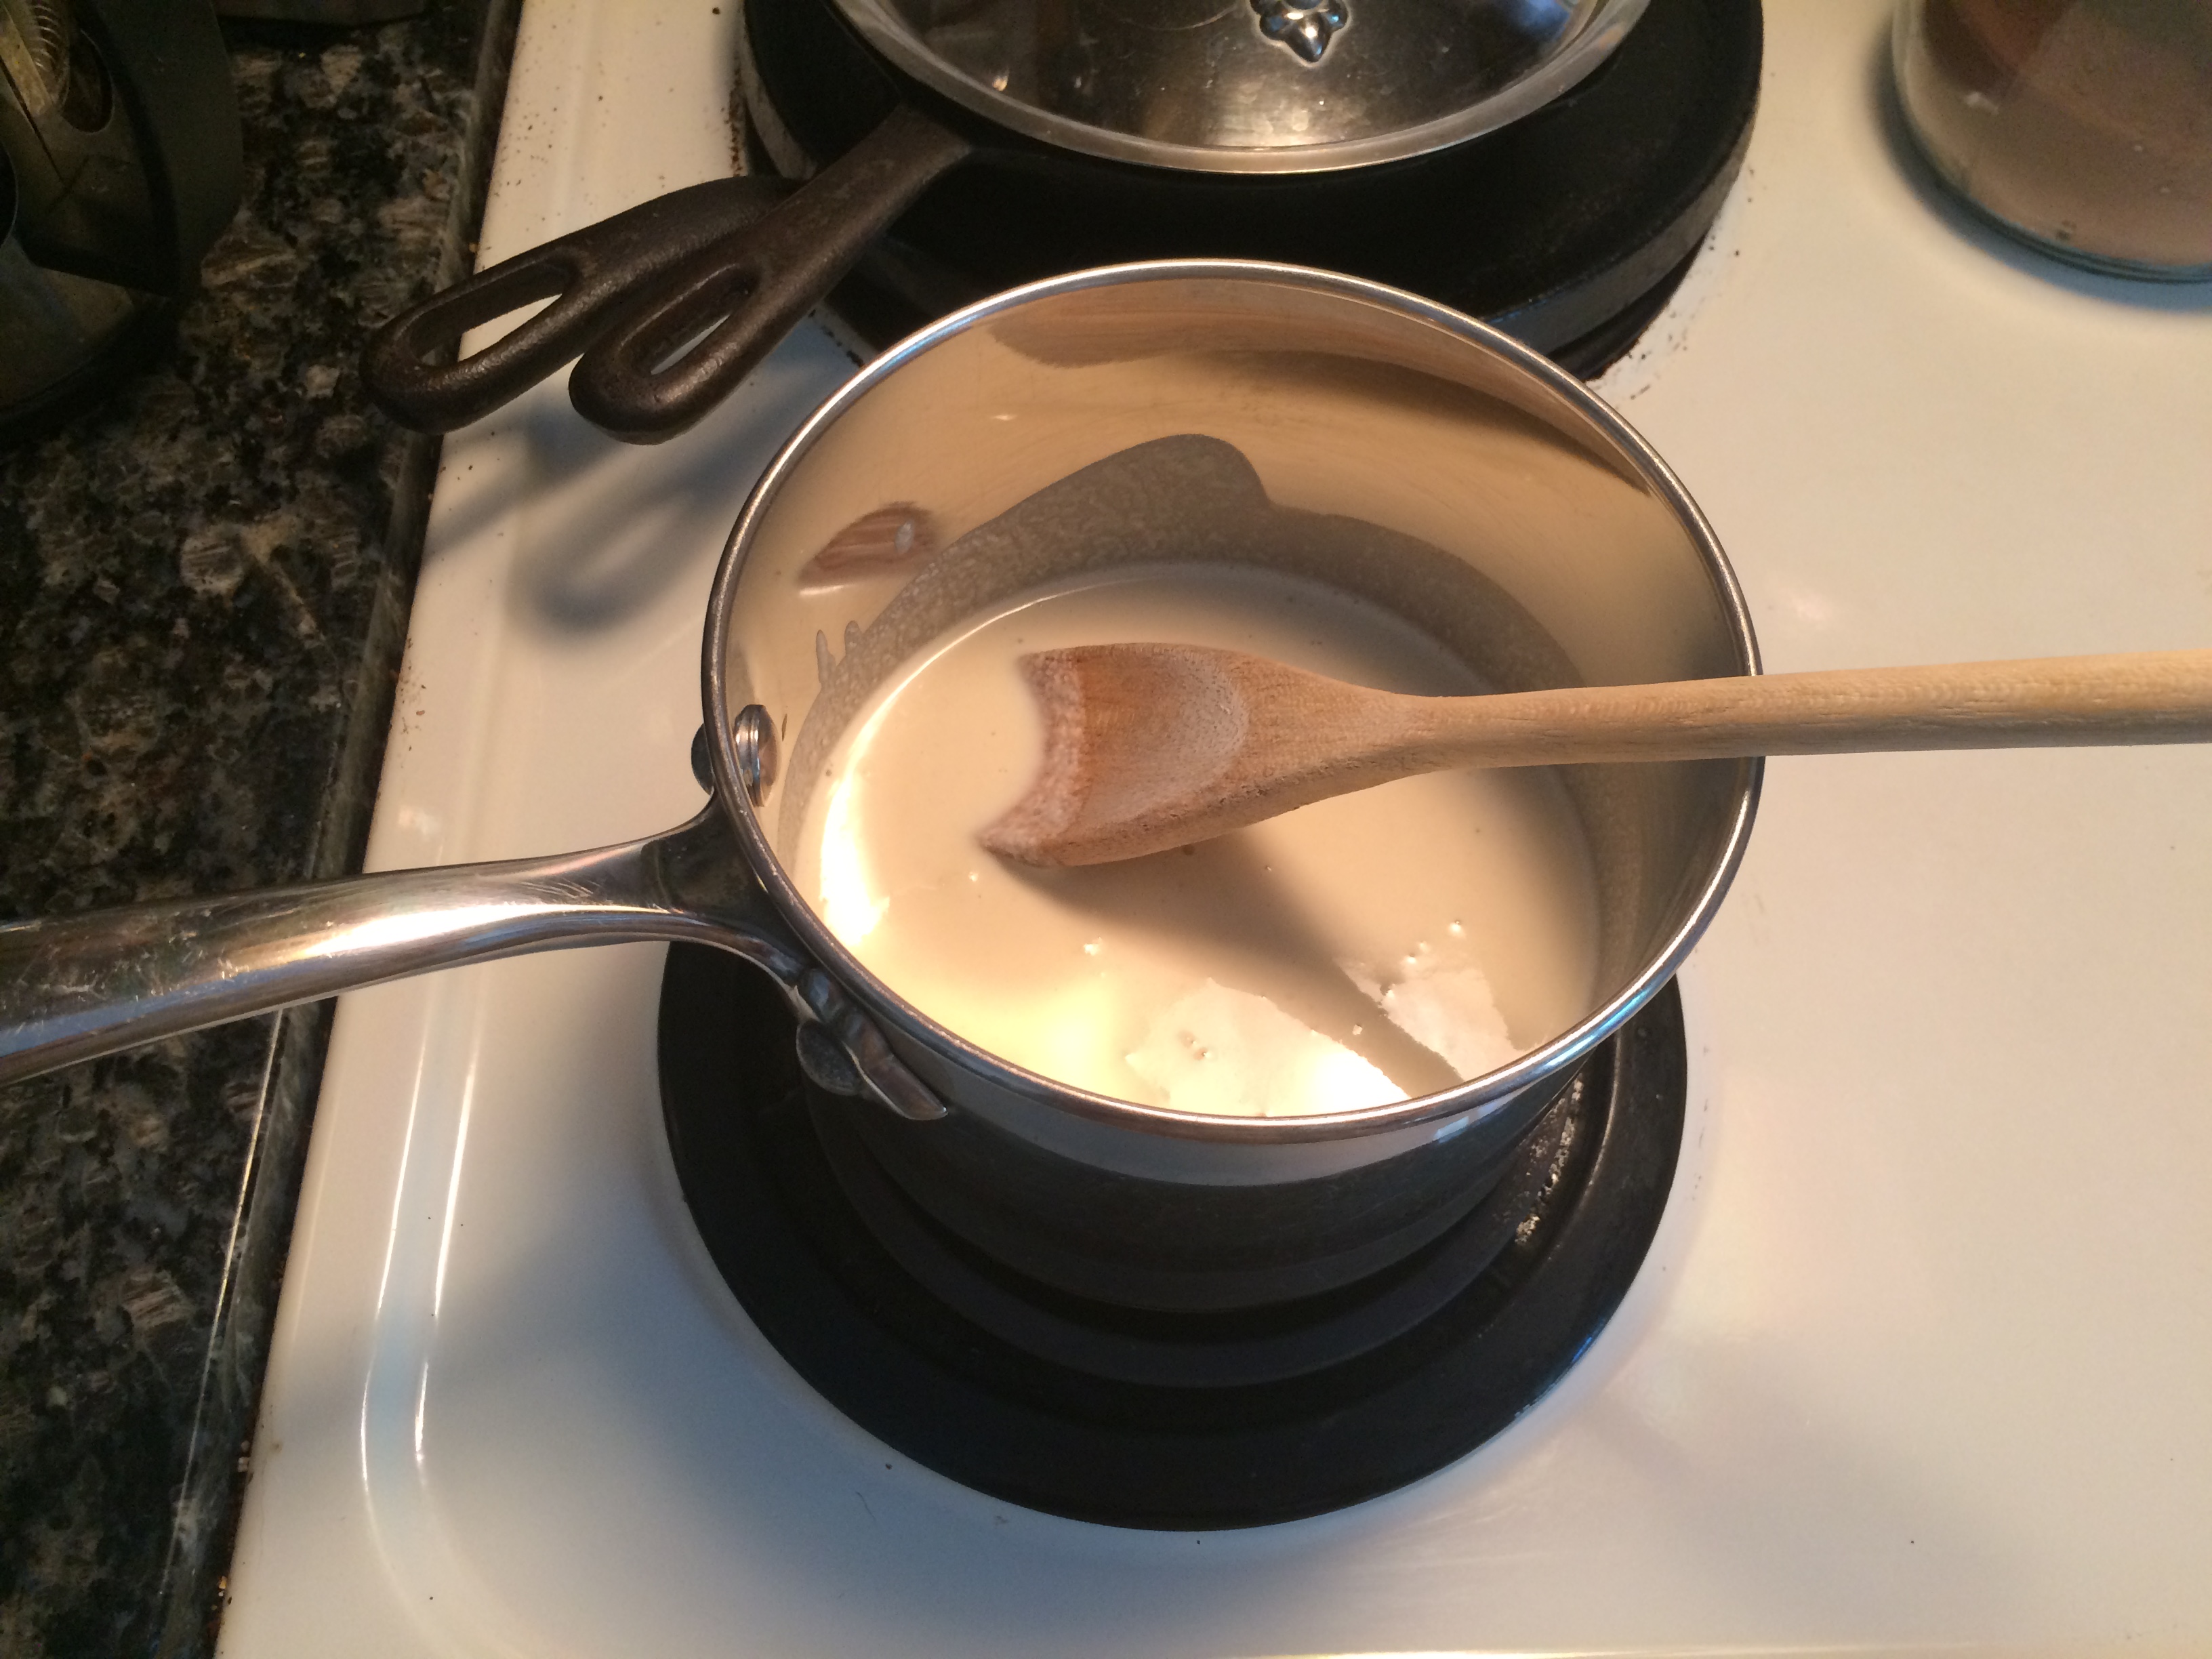
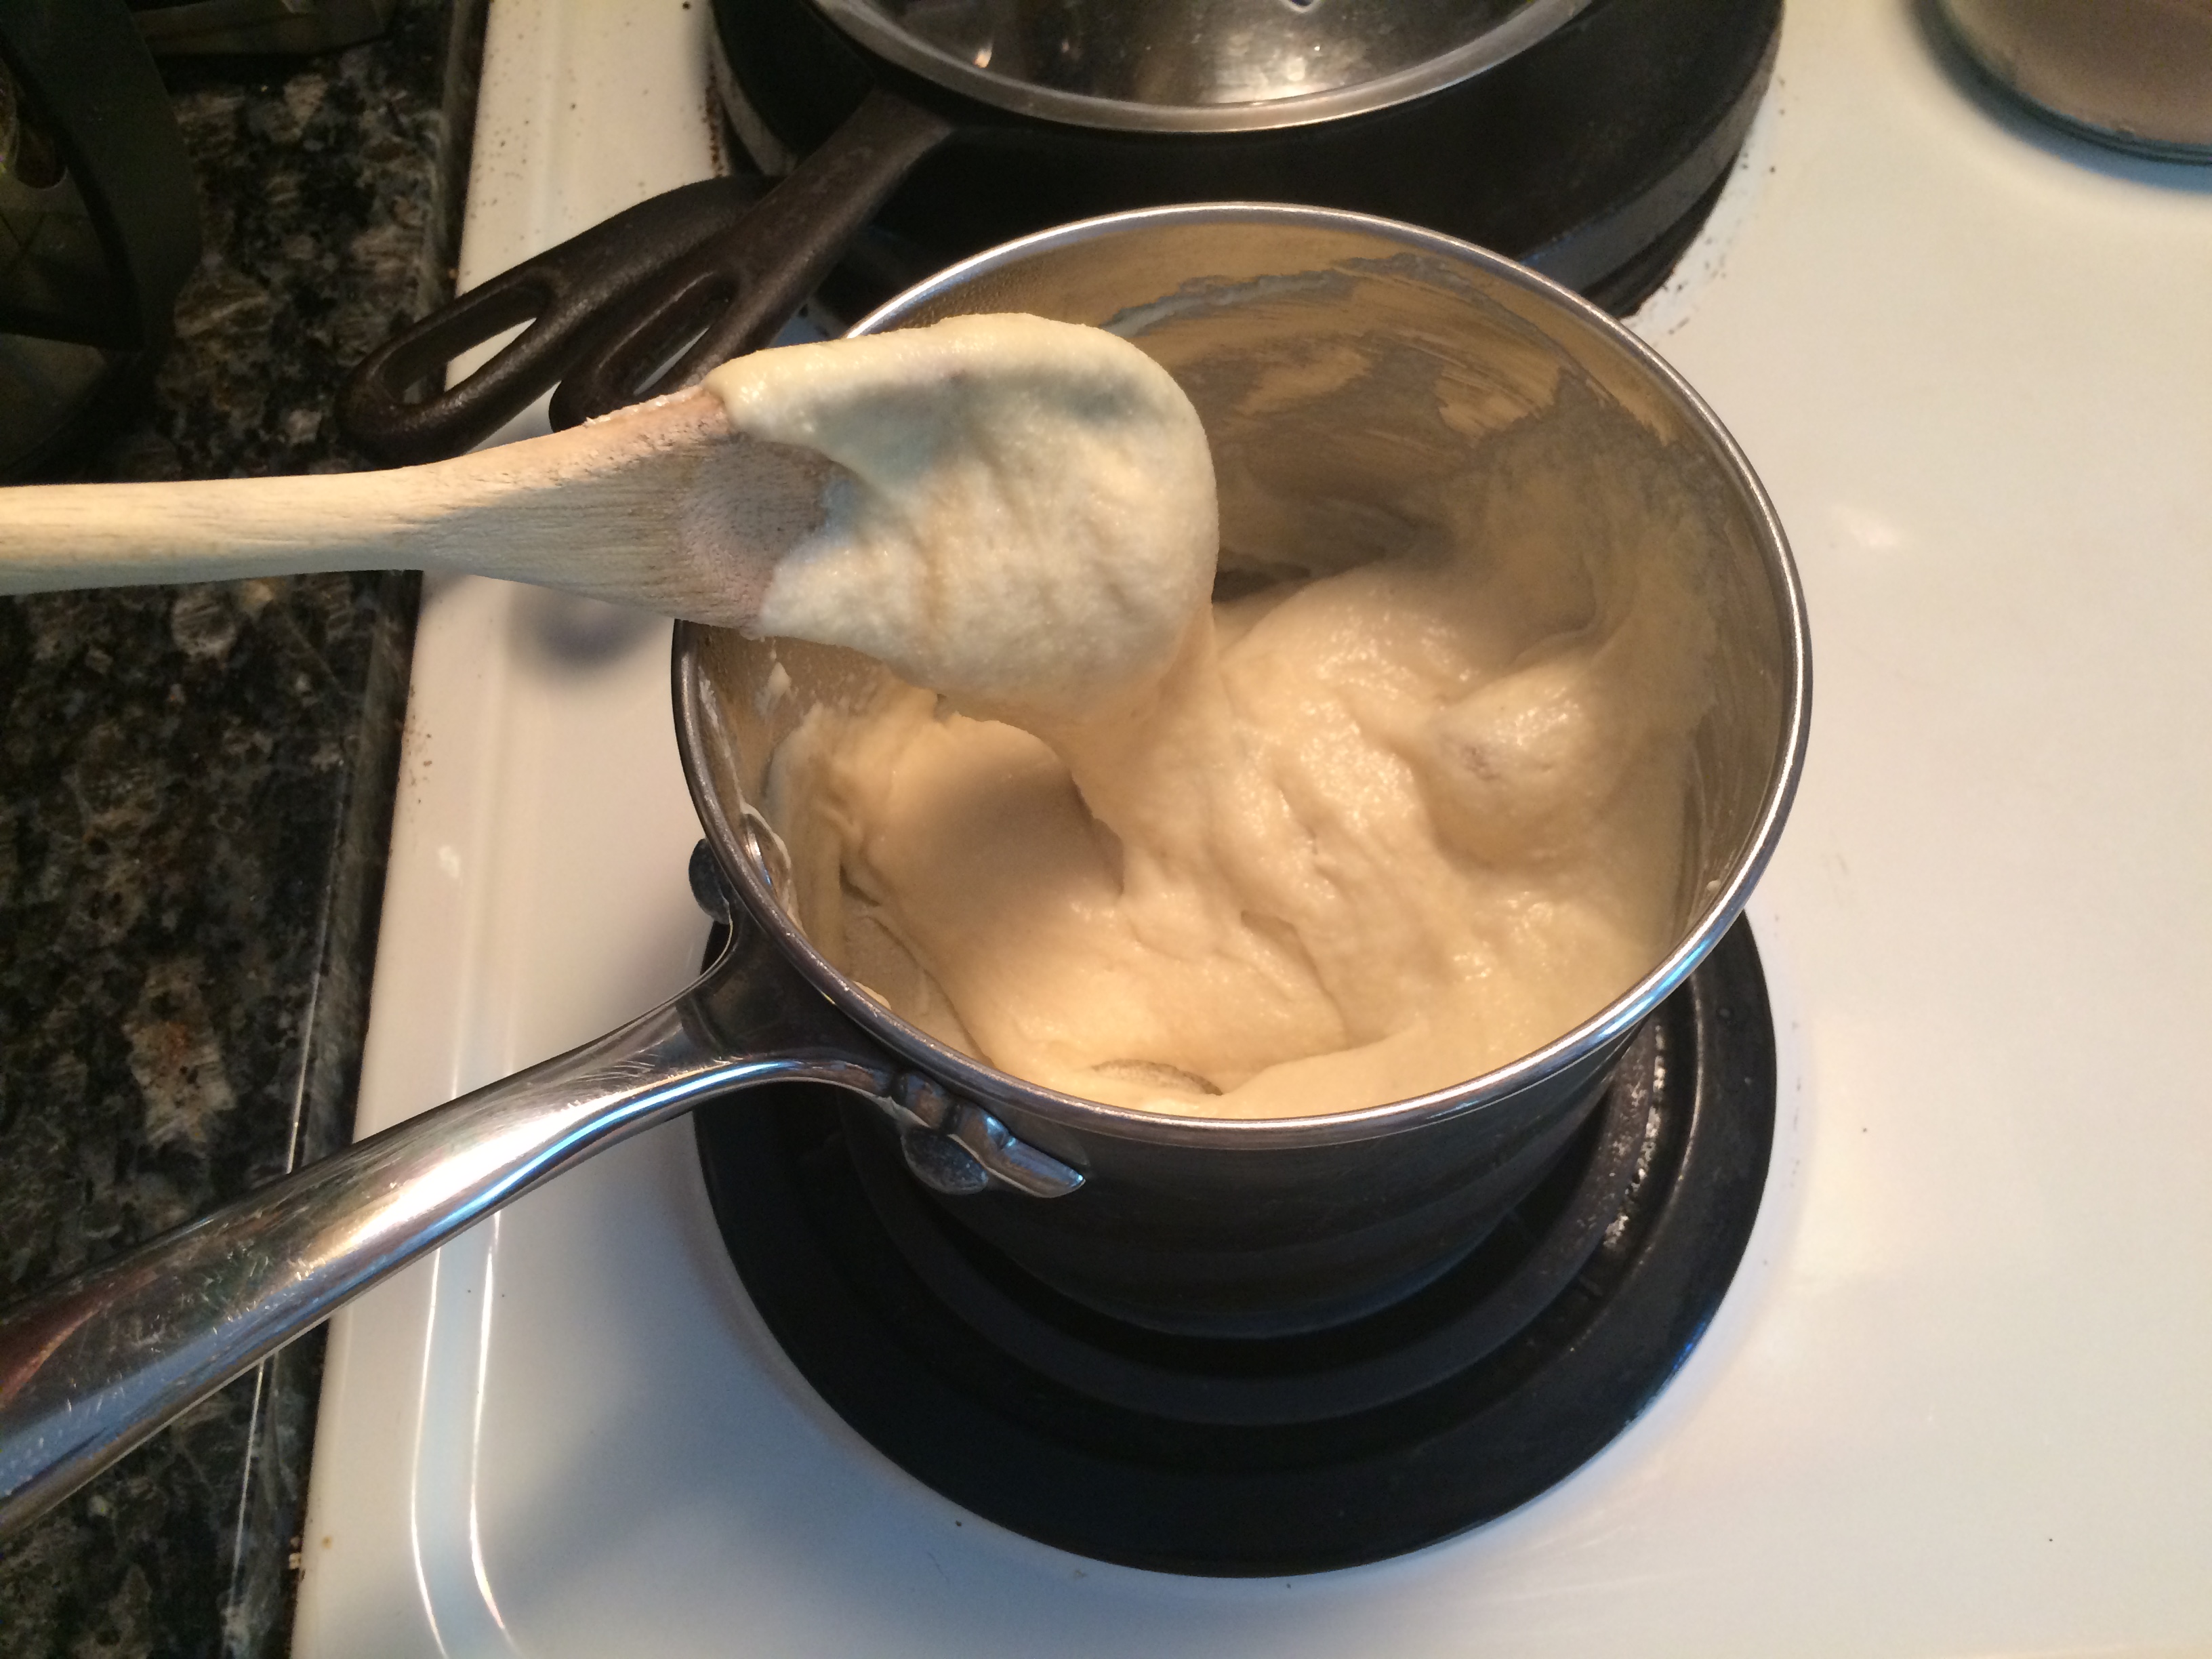
Transfer the mixture to a medium saucepan and heat on medium-high, stirring constantly. After just a minute or two, clumps will begin to form, and then after a minute more it will become stretchy, gooey cheese.

Remove from heat and incorporate into the spinach-artichoke mixture. Set aside while you make the biscuit dough; if you end up making the mozzarella last for some reason, ensure that the mixture is somewhat cool before you spread it on the dough.
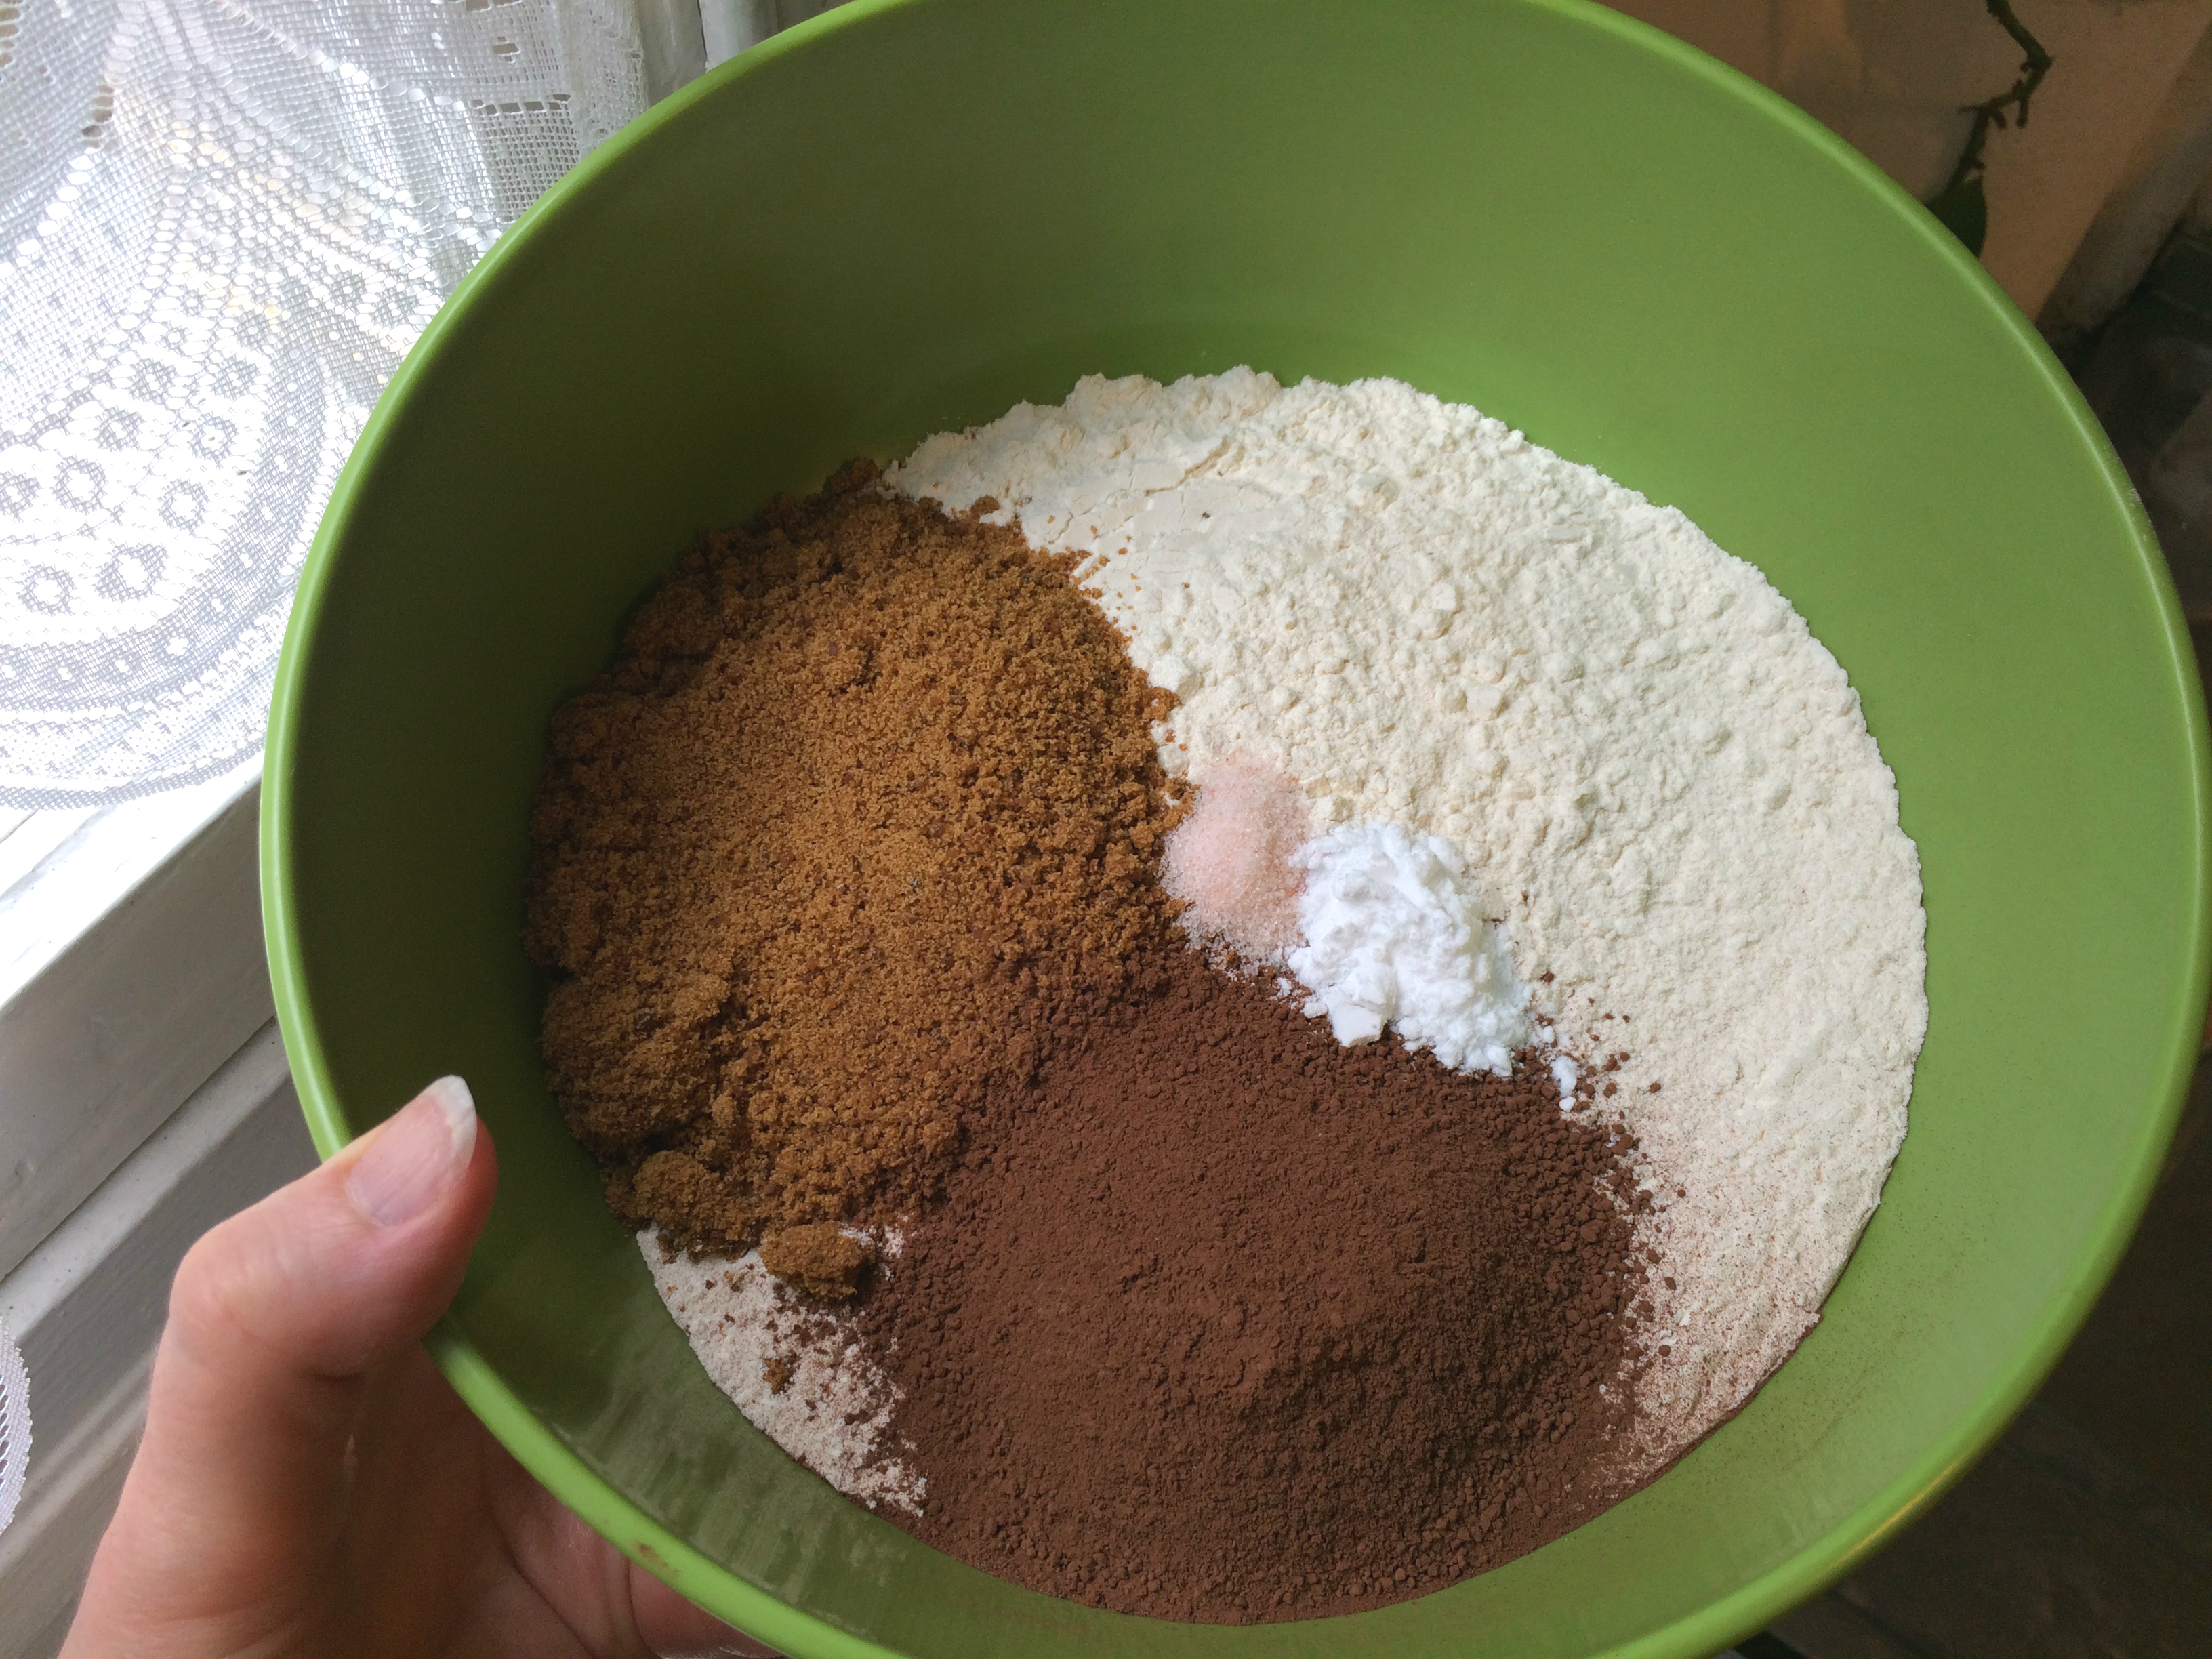
Biscuit dough

  • 2¼ cups (288 g) all-purpose flour
  • 4 teaspoons baking powder
  • ¼ teaspoon baking soda
  • ½ teaspoon salt
  • 5 tablespoons (71 g) margarine
  • 1 cup (236 ml) unsweetened soy milk
  • 1 teaspoon apple cider vinegar

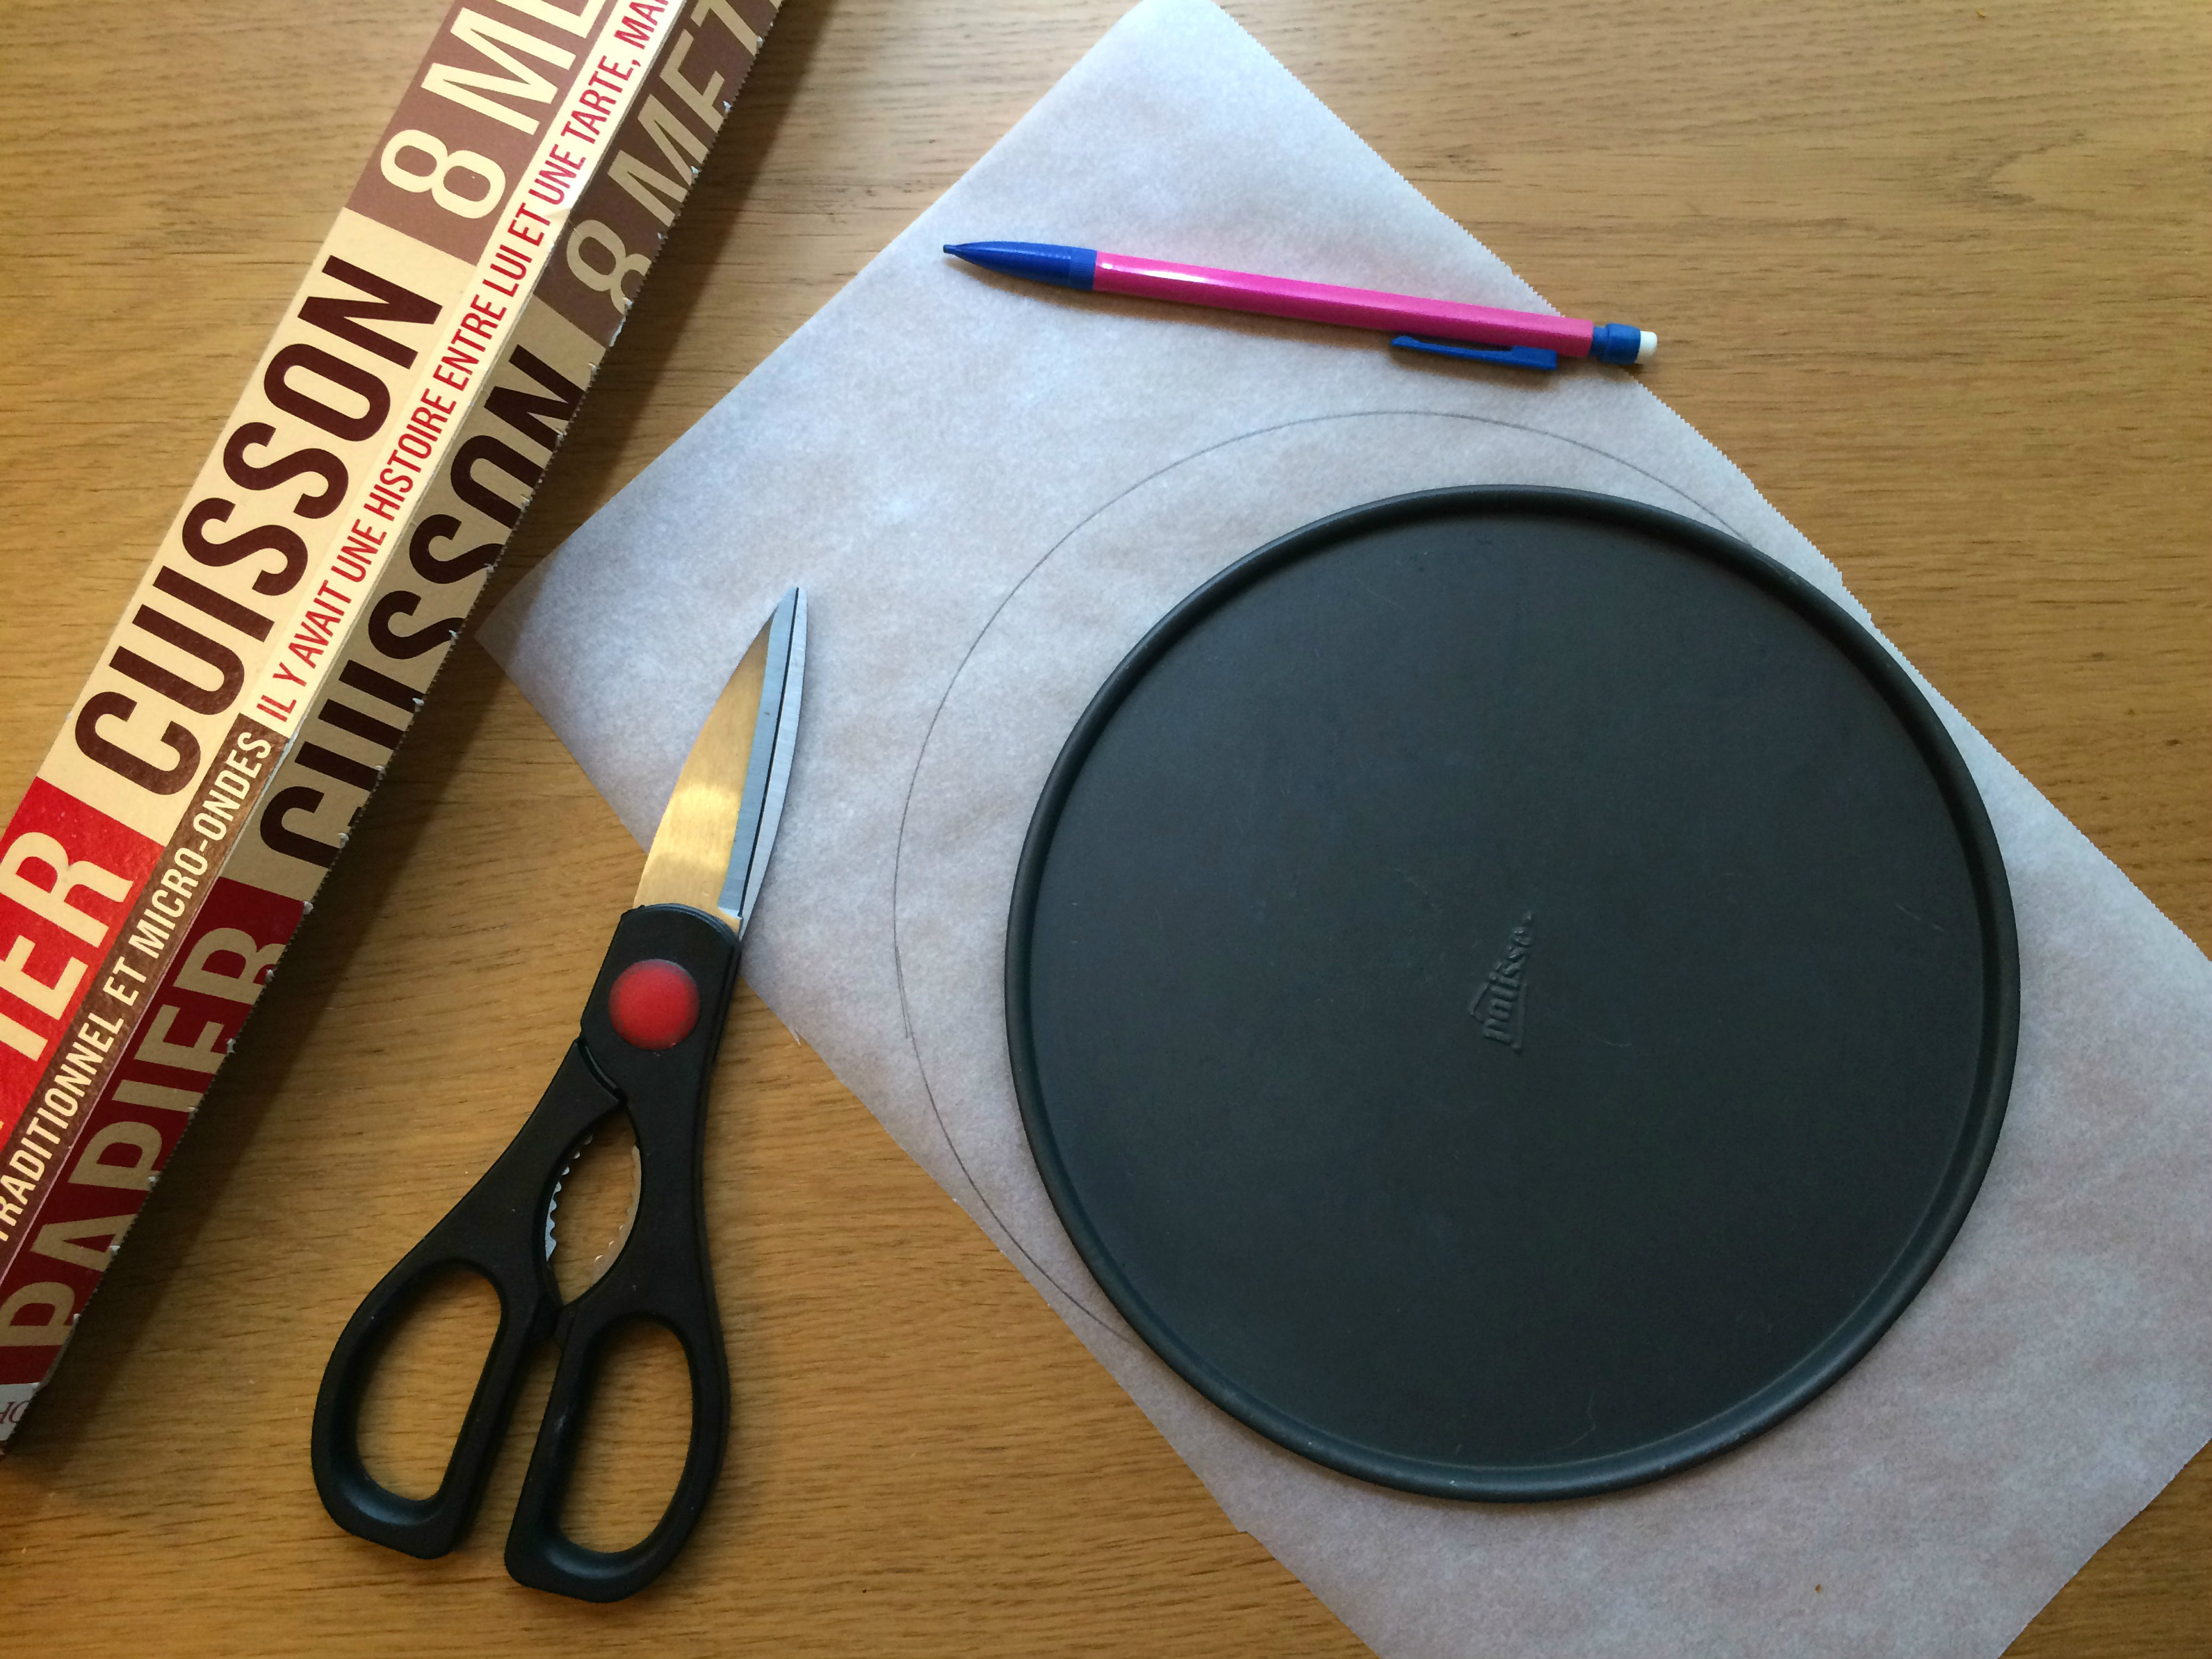
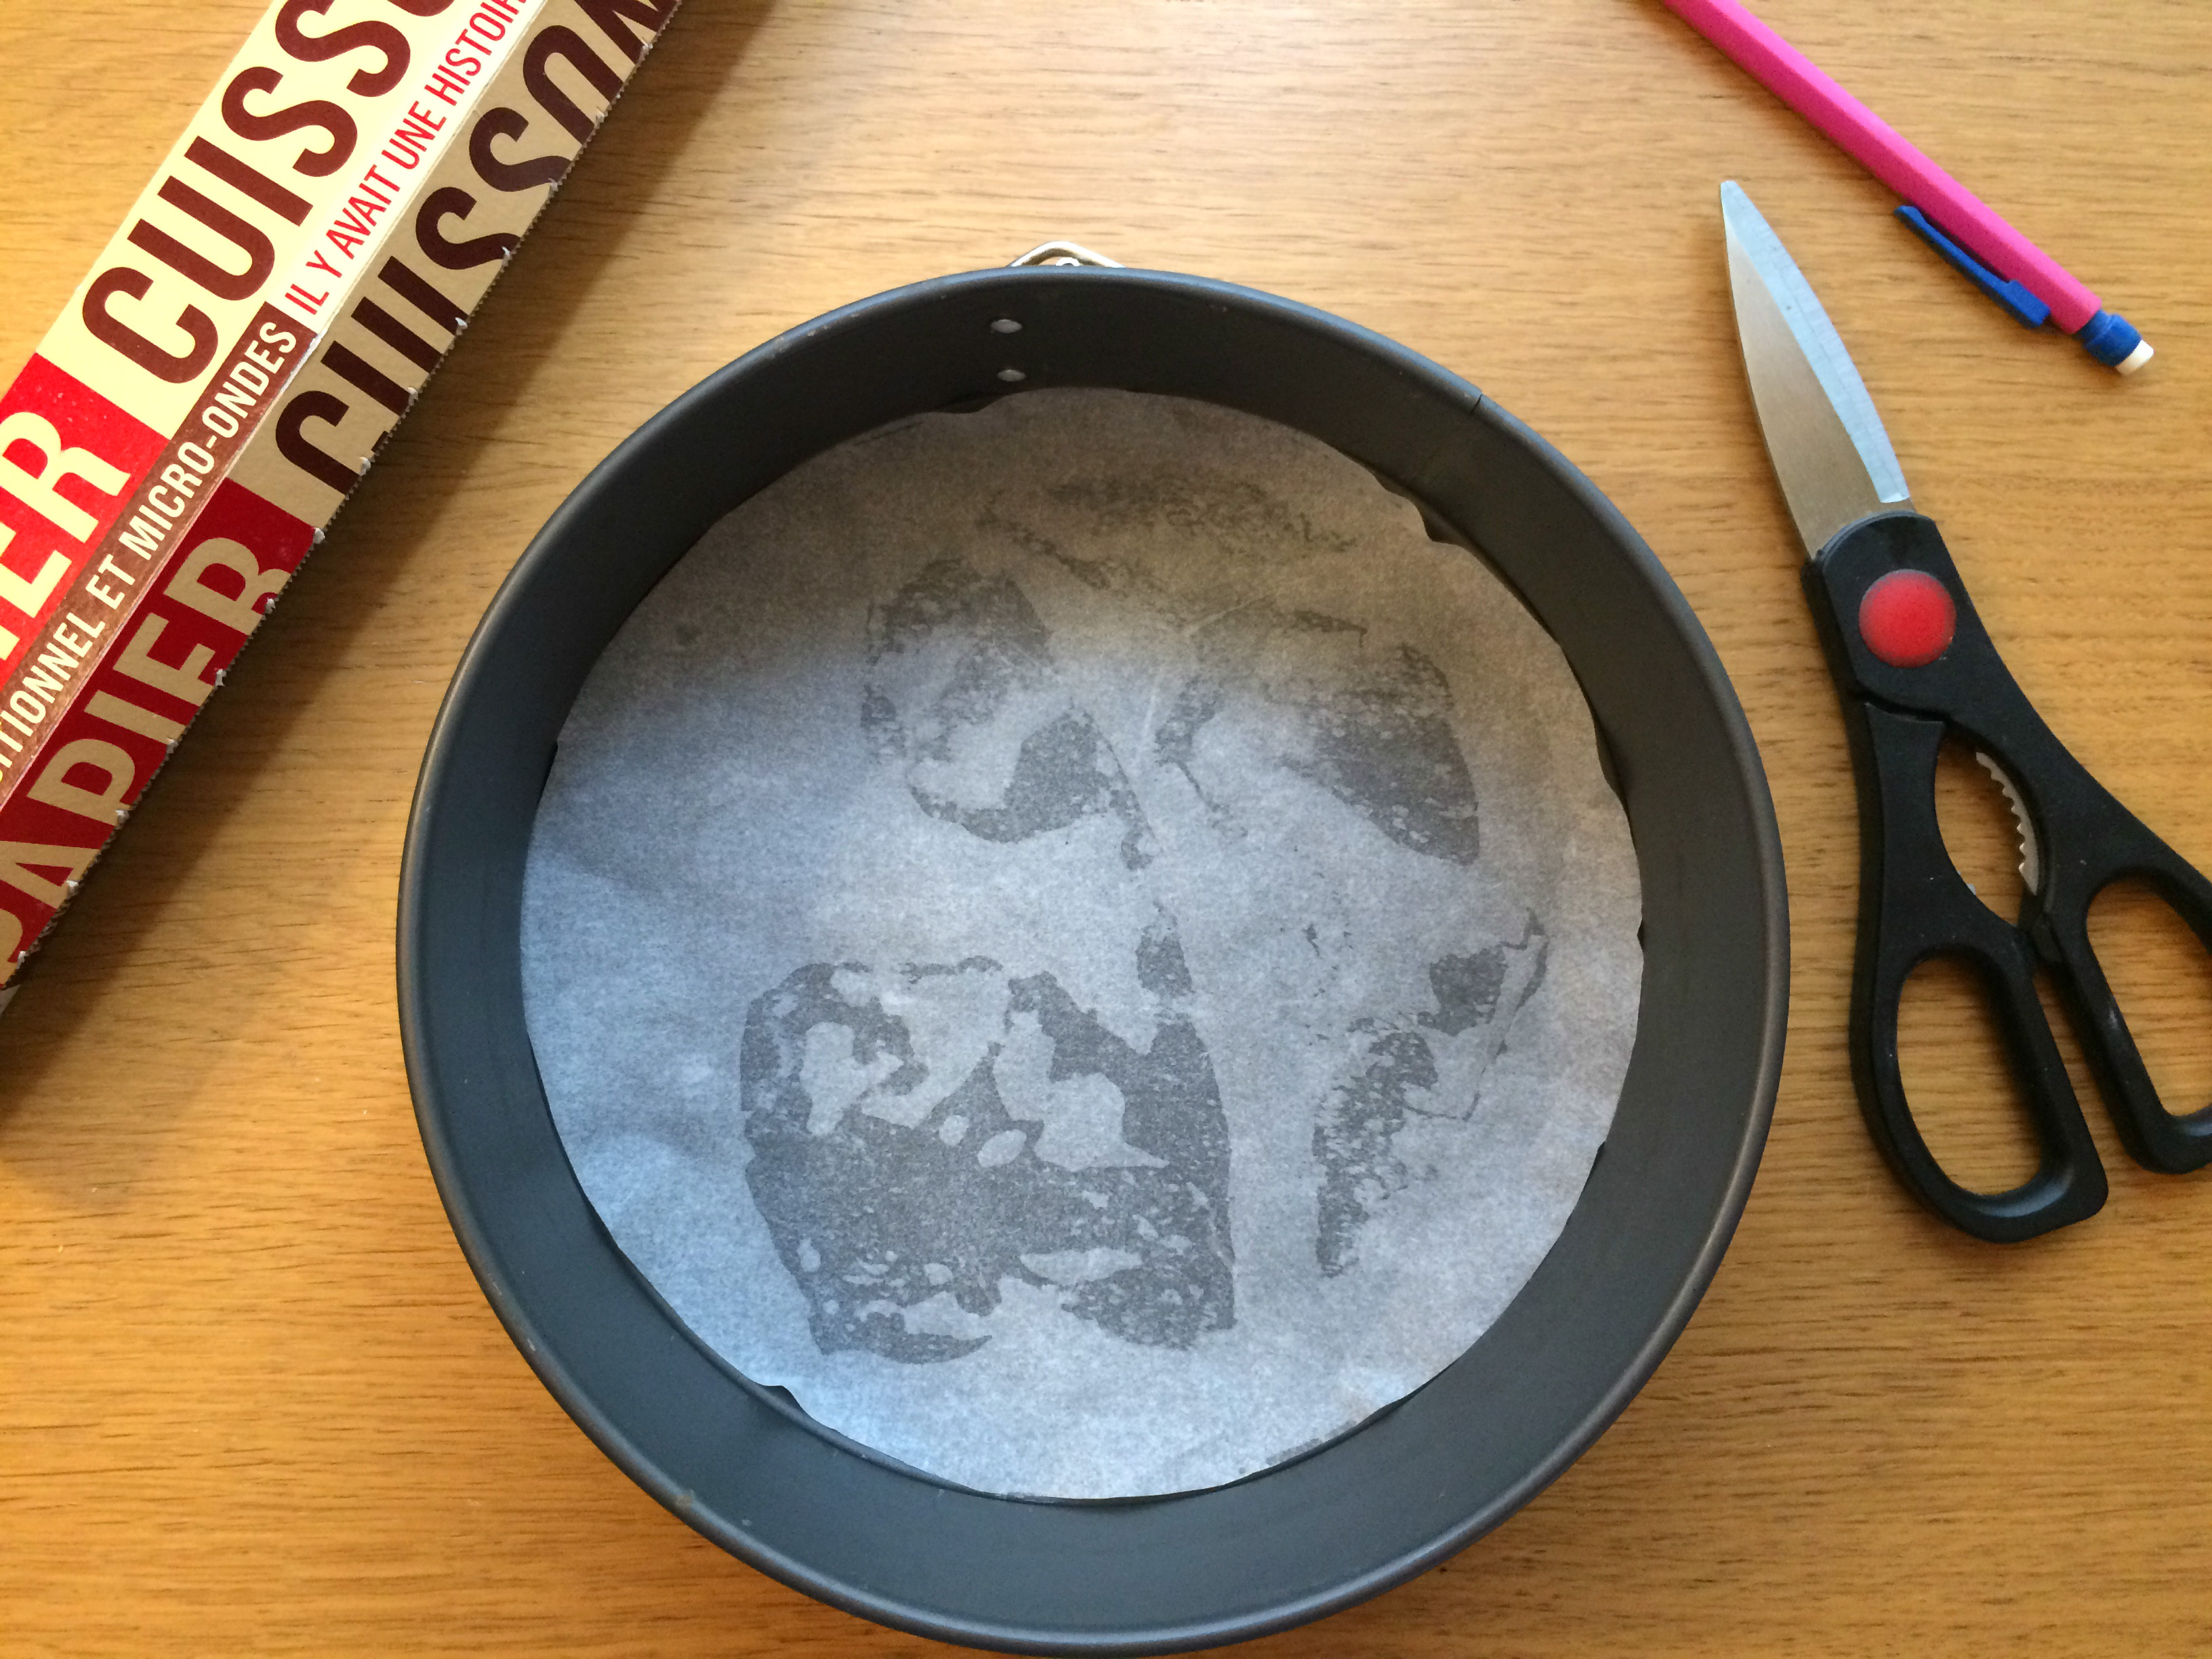
Equipment needed: pastry cutter (ideally) or fork, rolling pin, parchment paper, baking sheet.

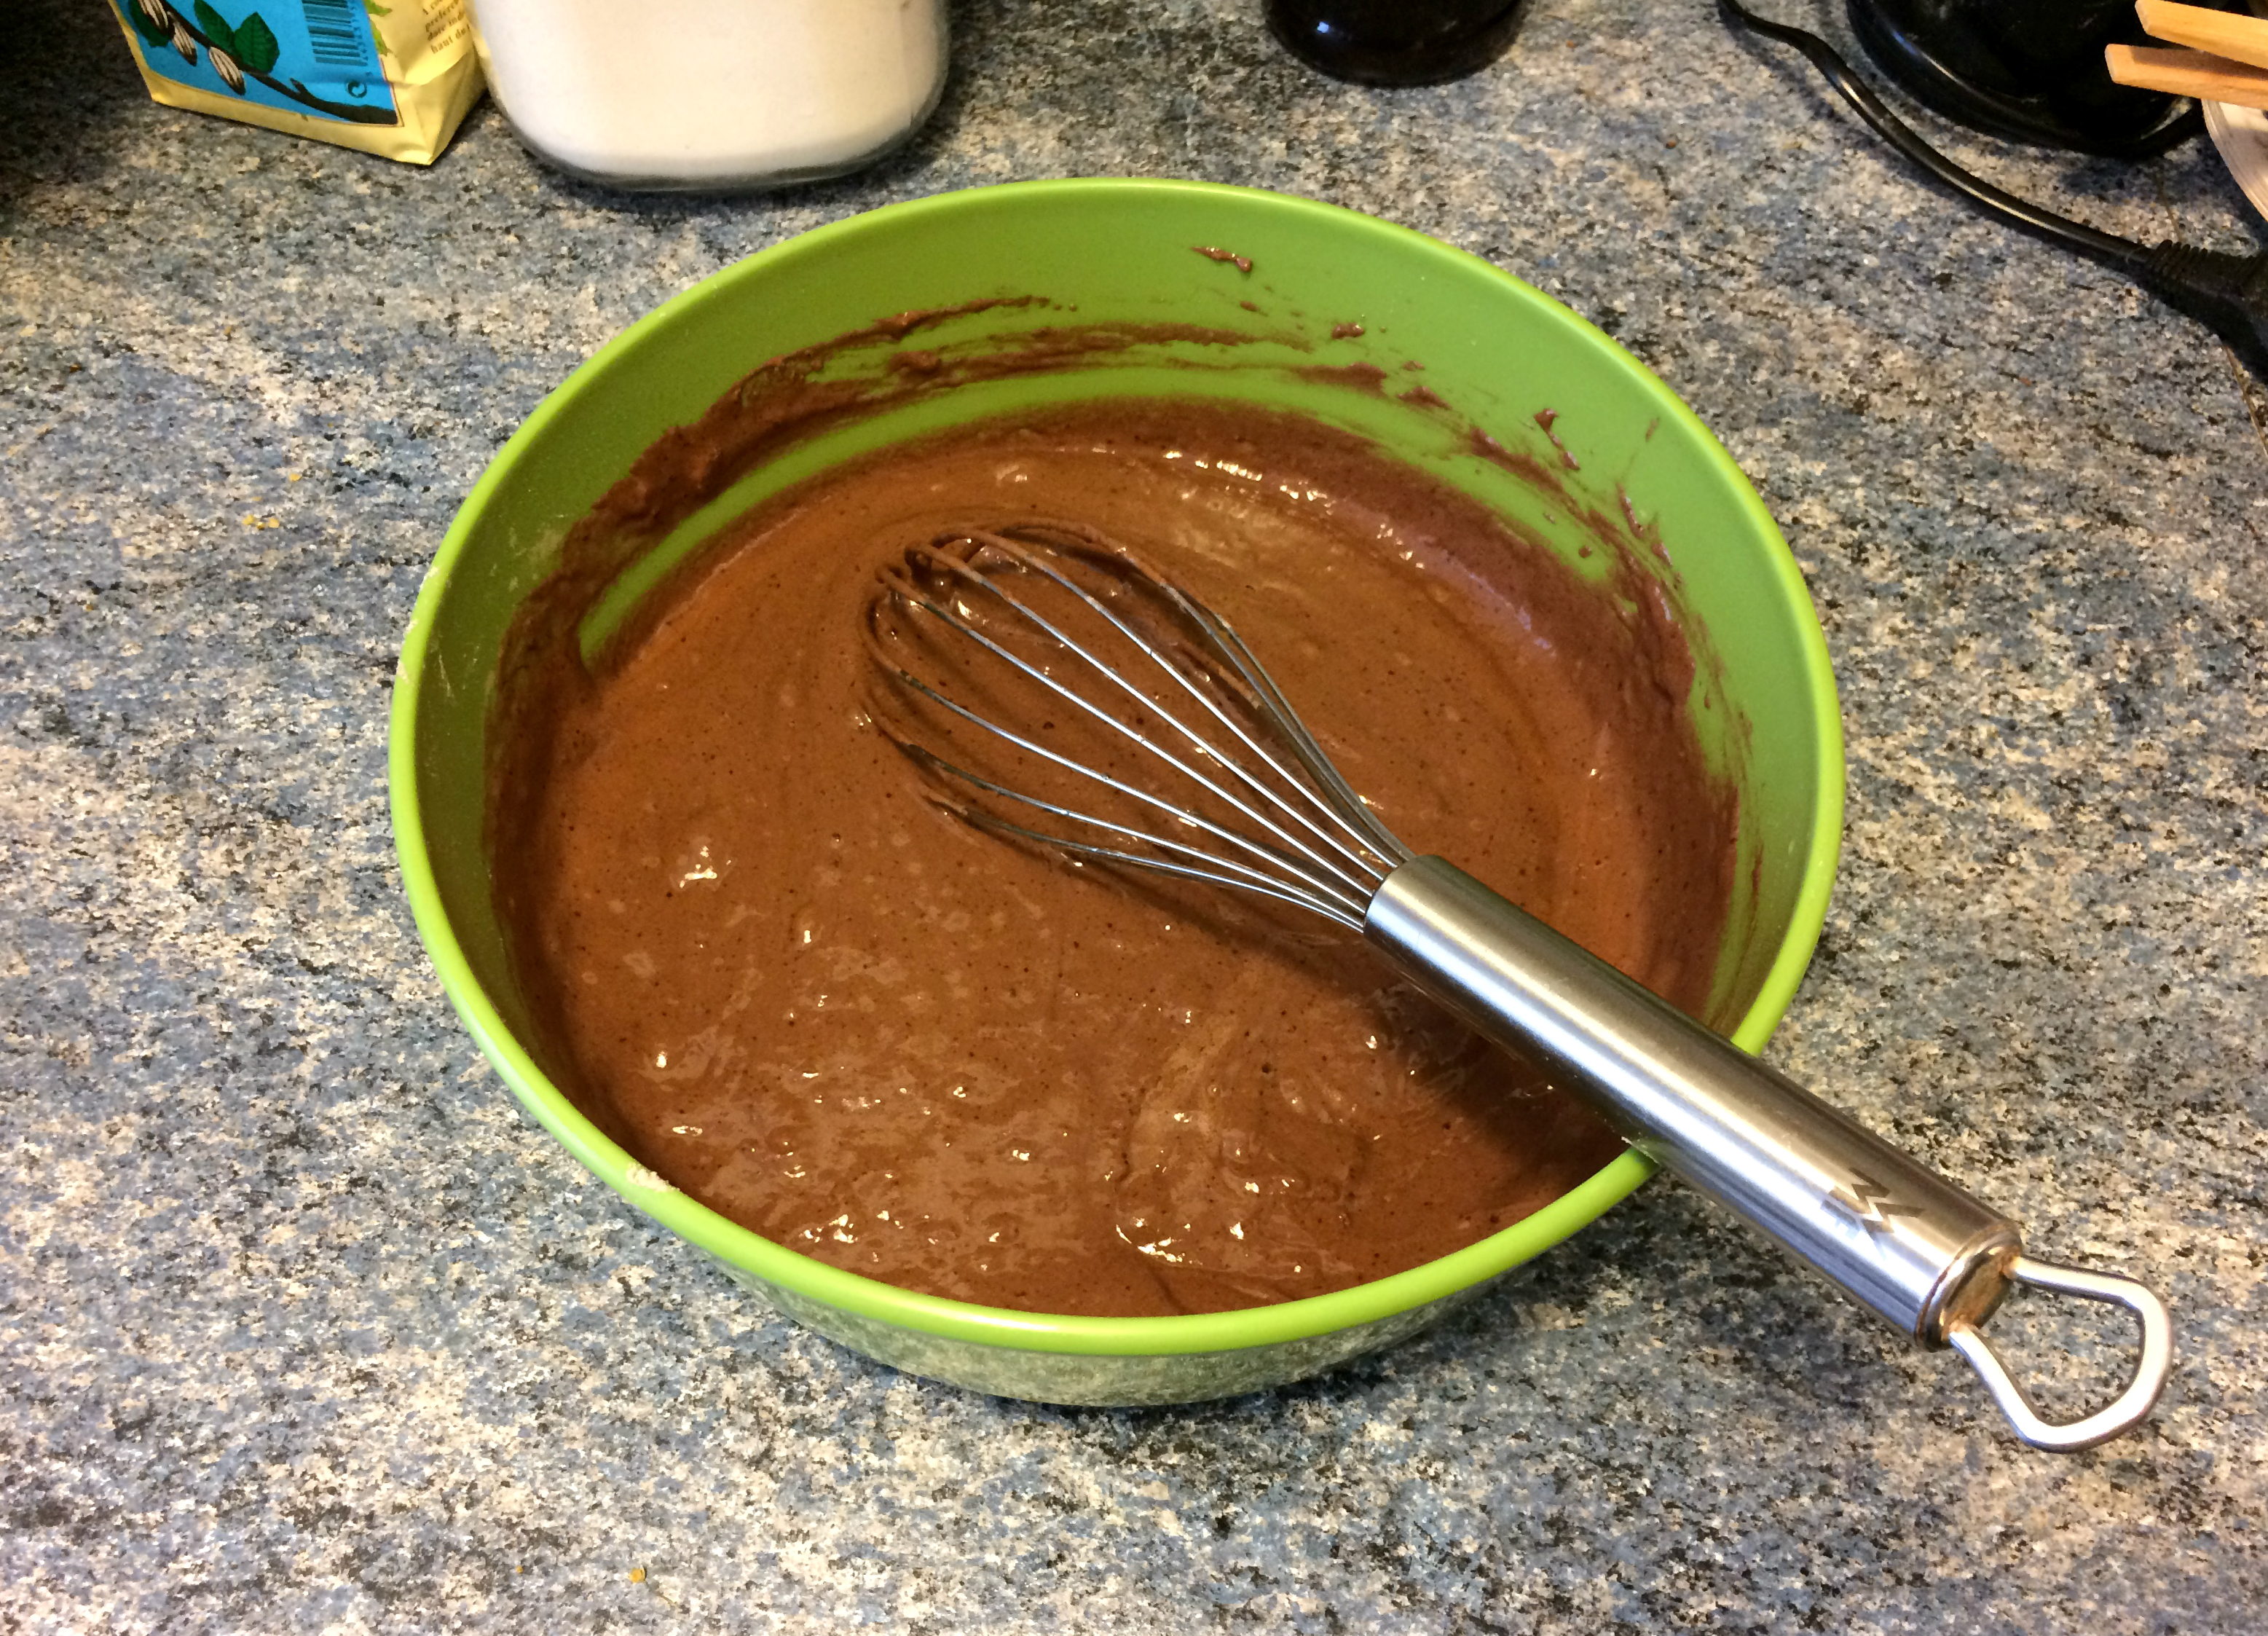
Begin by mixing the soy milk with the apple cider vinegar in a small bowl. Set aside; mixture will thicken.

IMG_2532

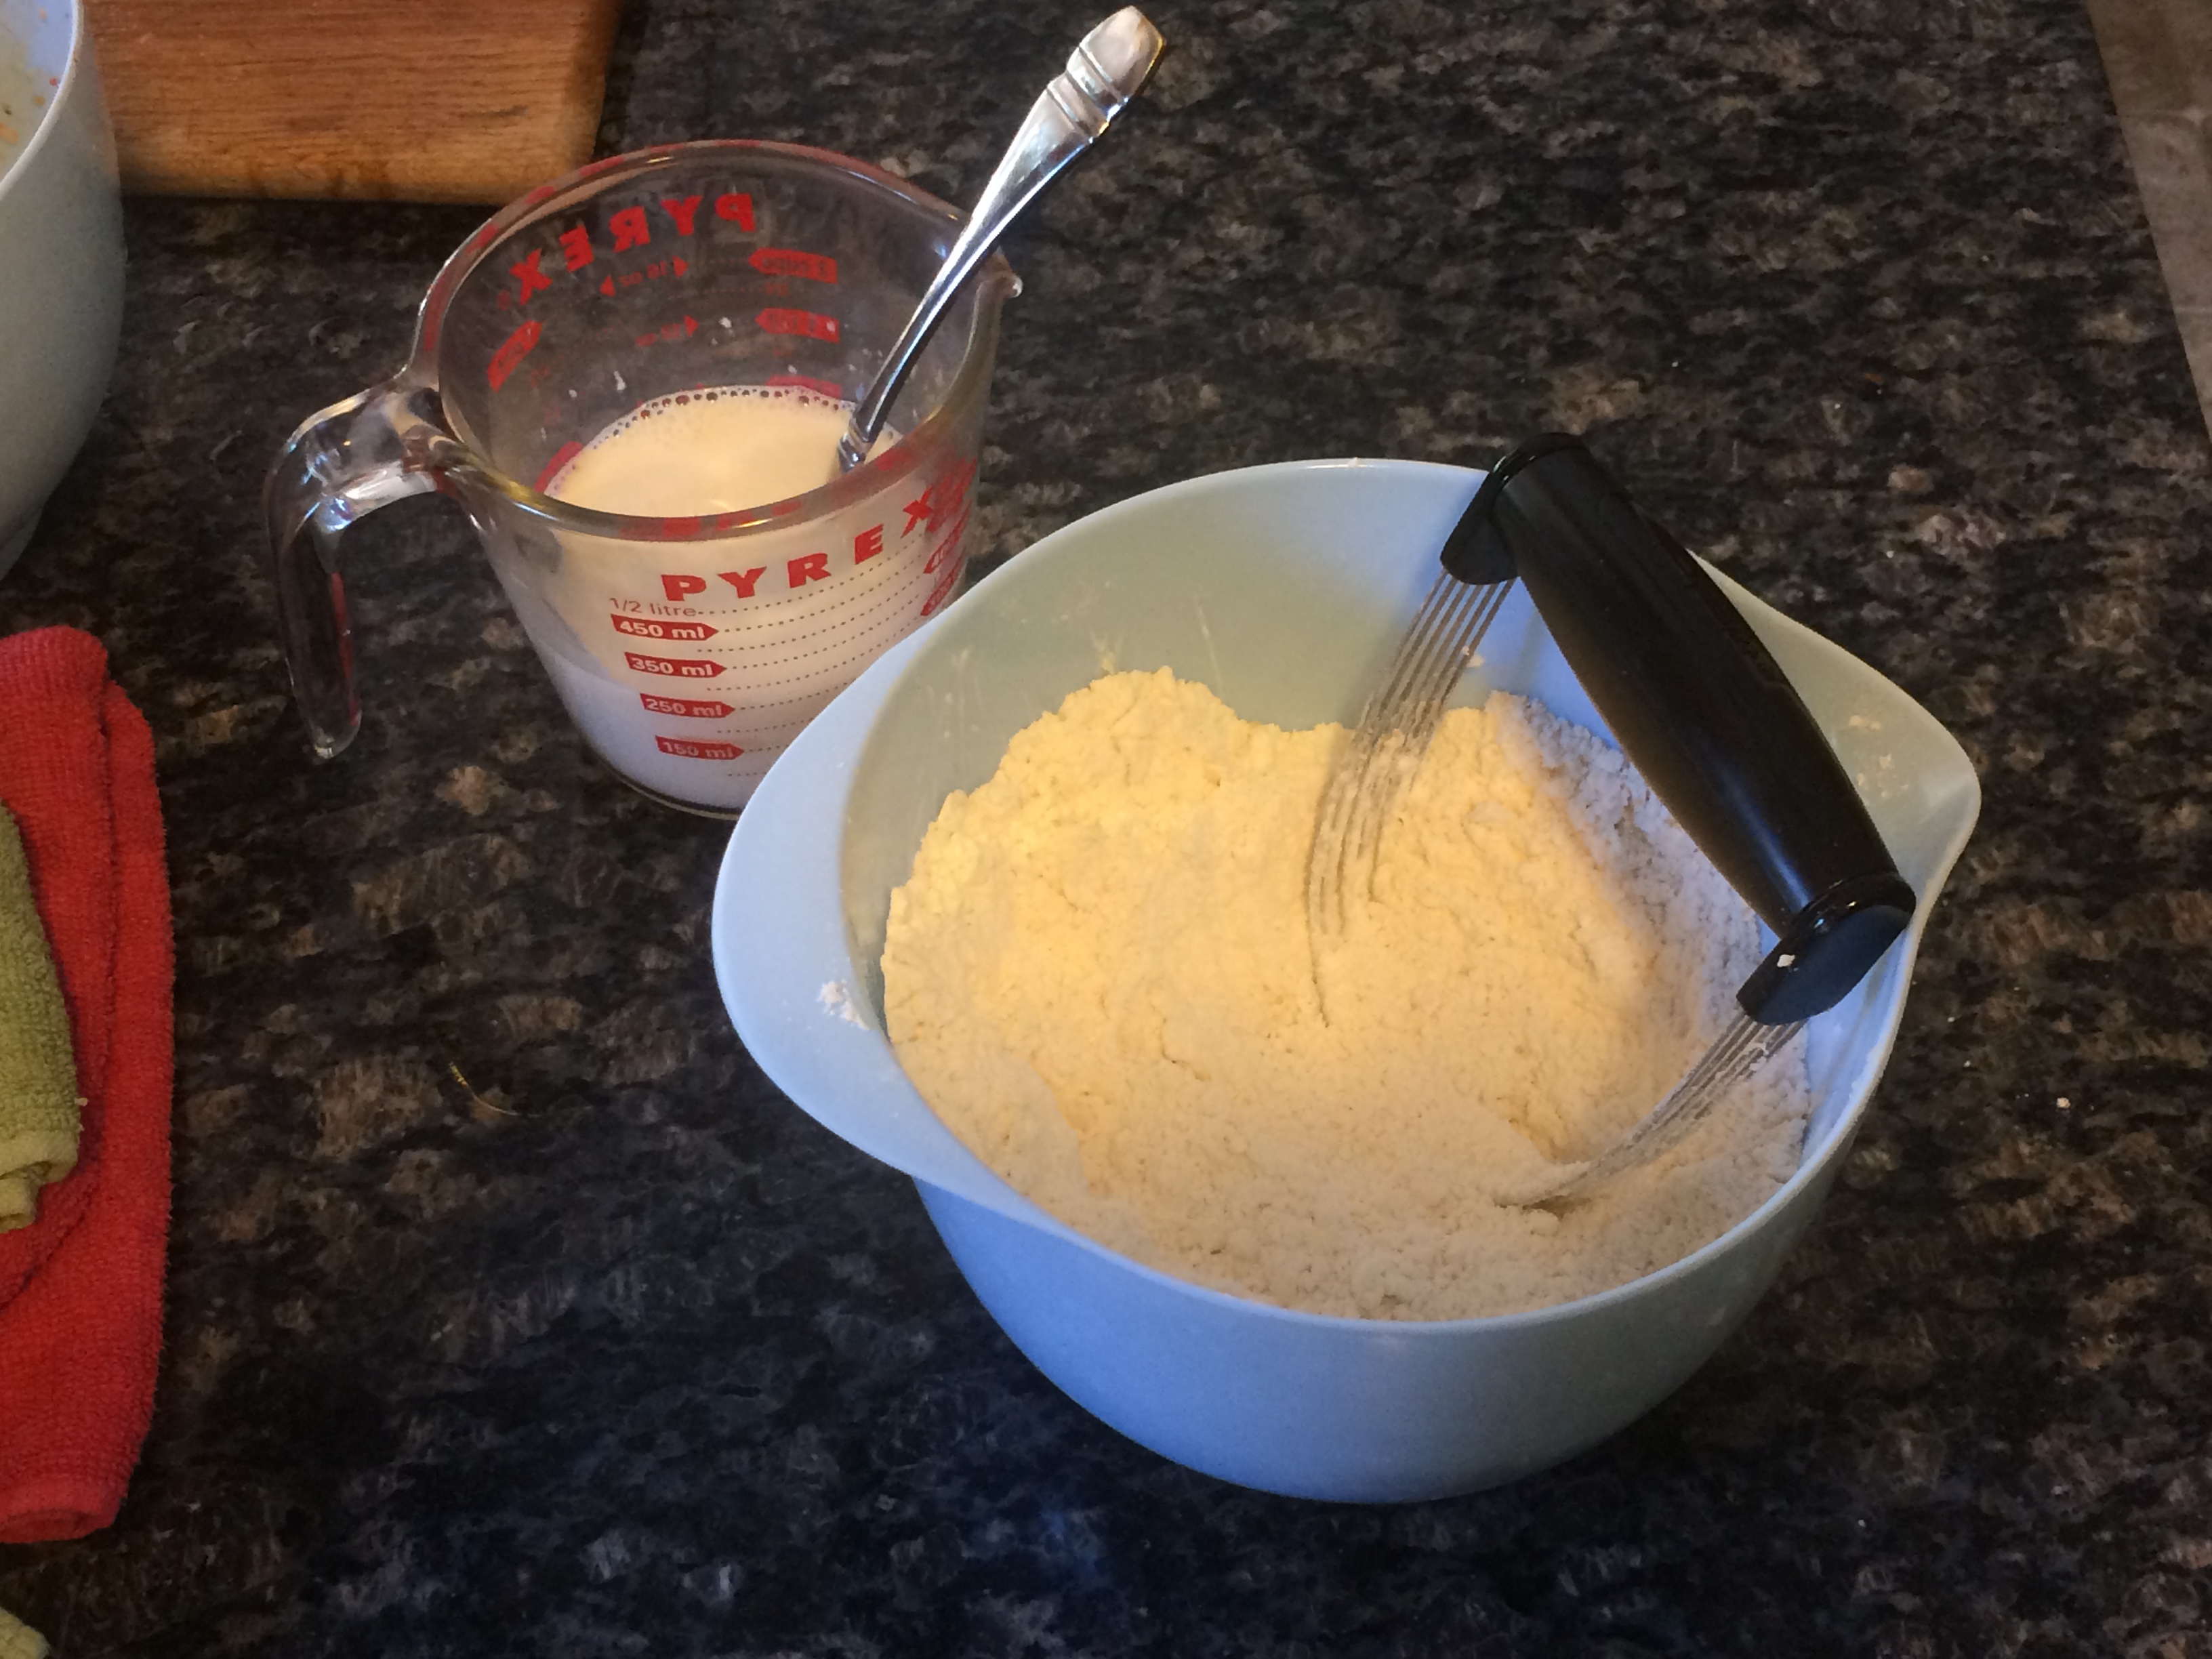
Combine all the dry ingredients in a medium-sized mixing bowl. Then, with a pastry cutter or fork, work the margarine into the flour just until you have a crumbly texture. Be careful not to handle it too much as this can make the dough tough.

IMG_2536

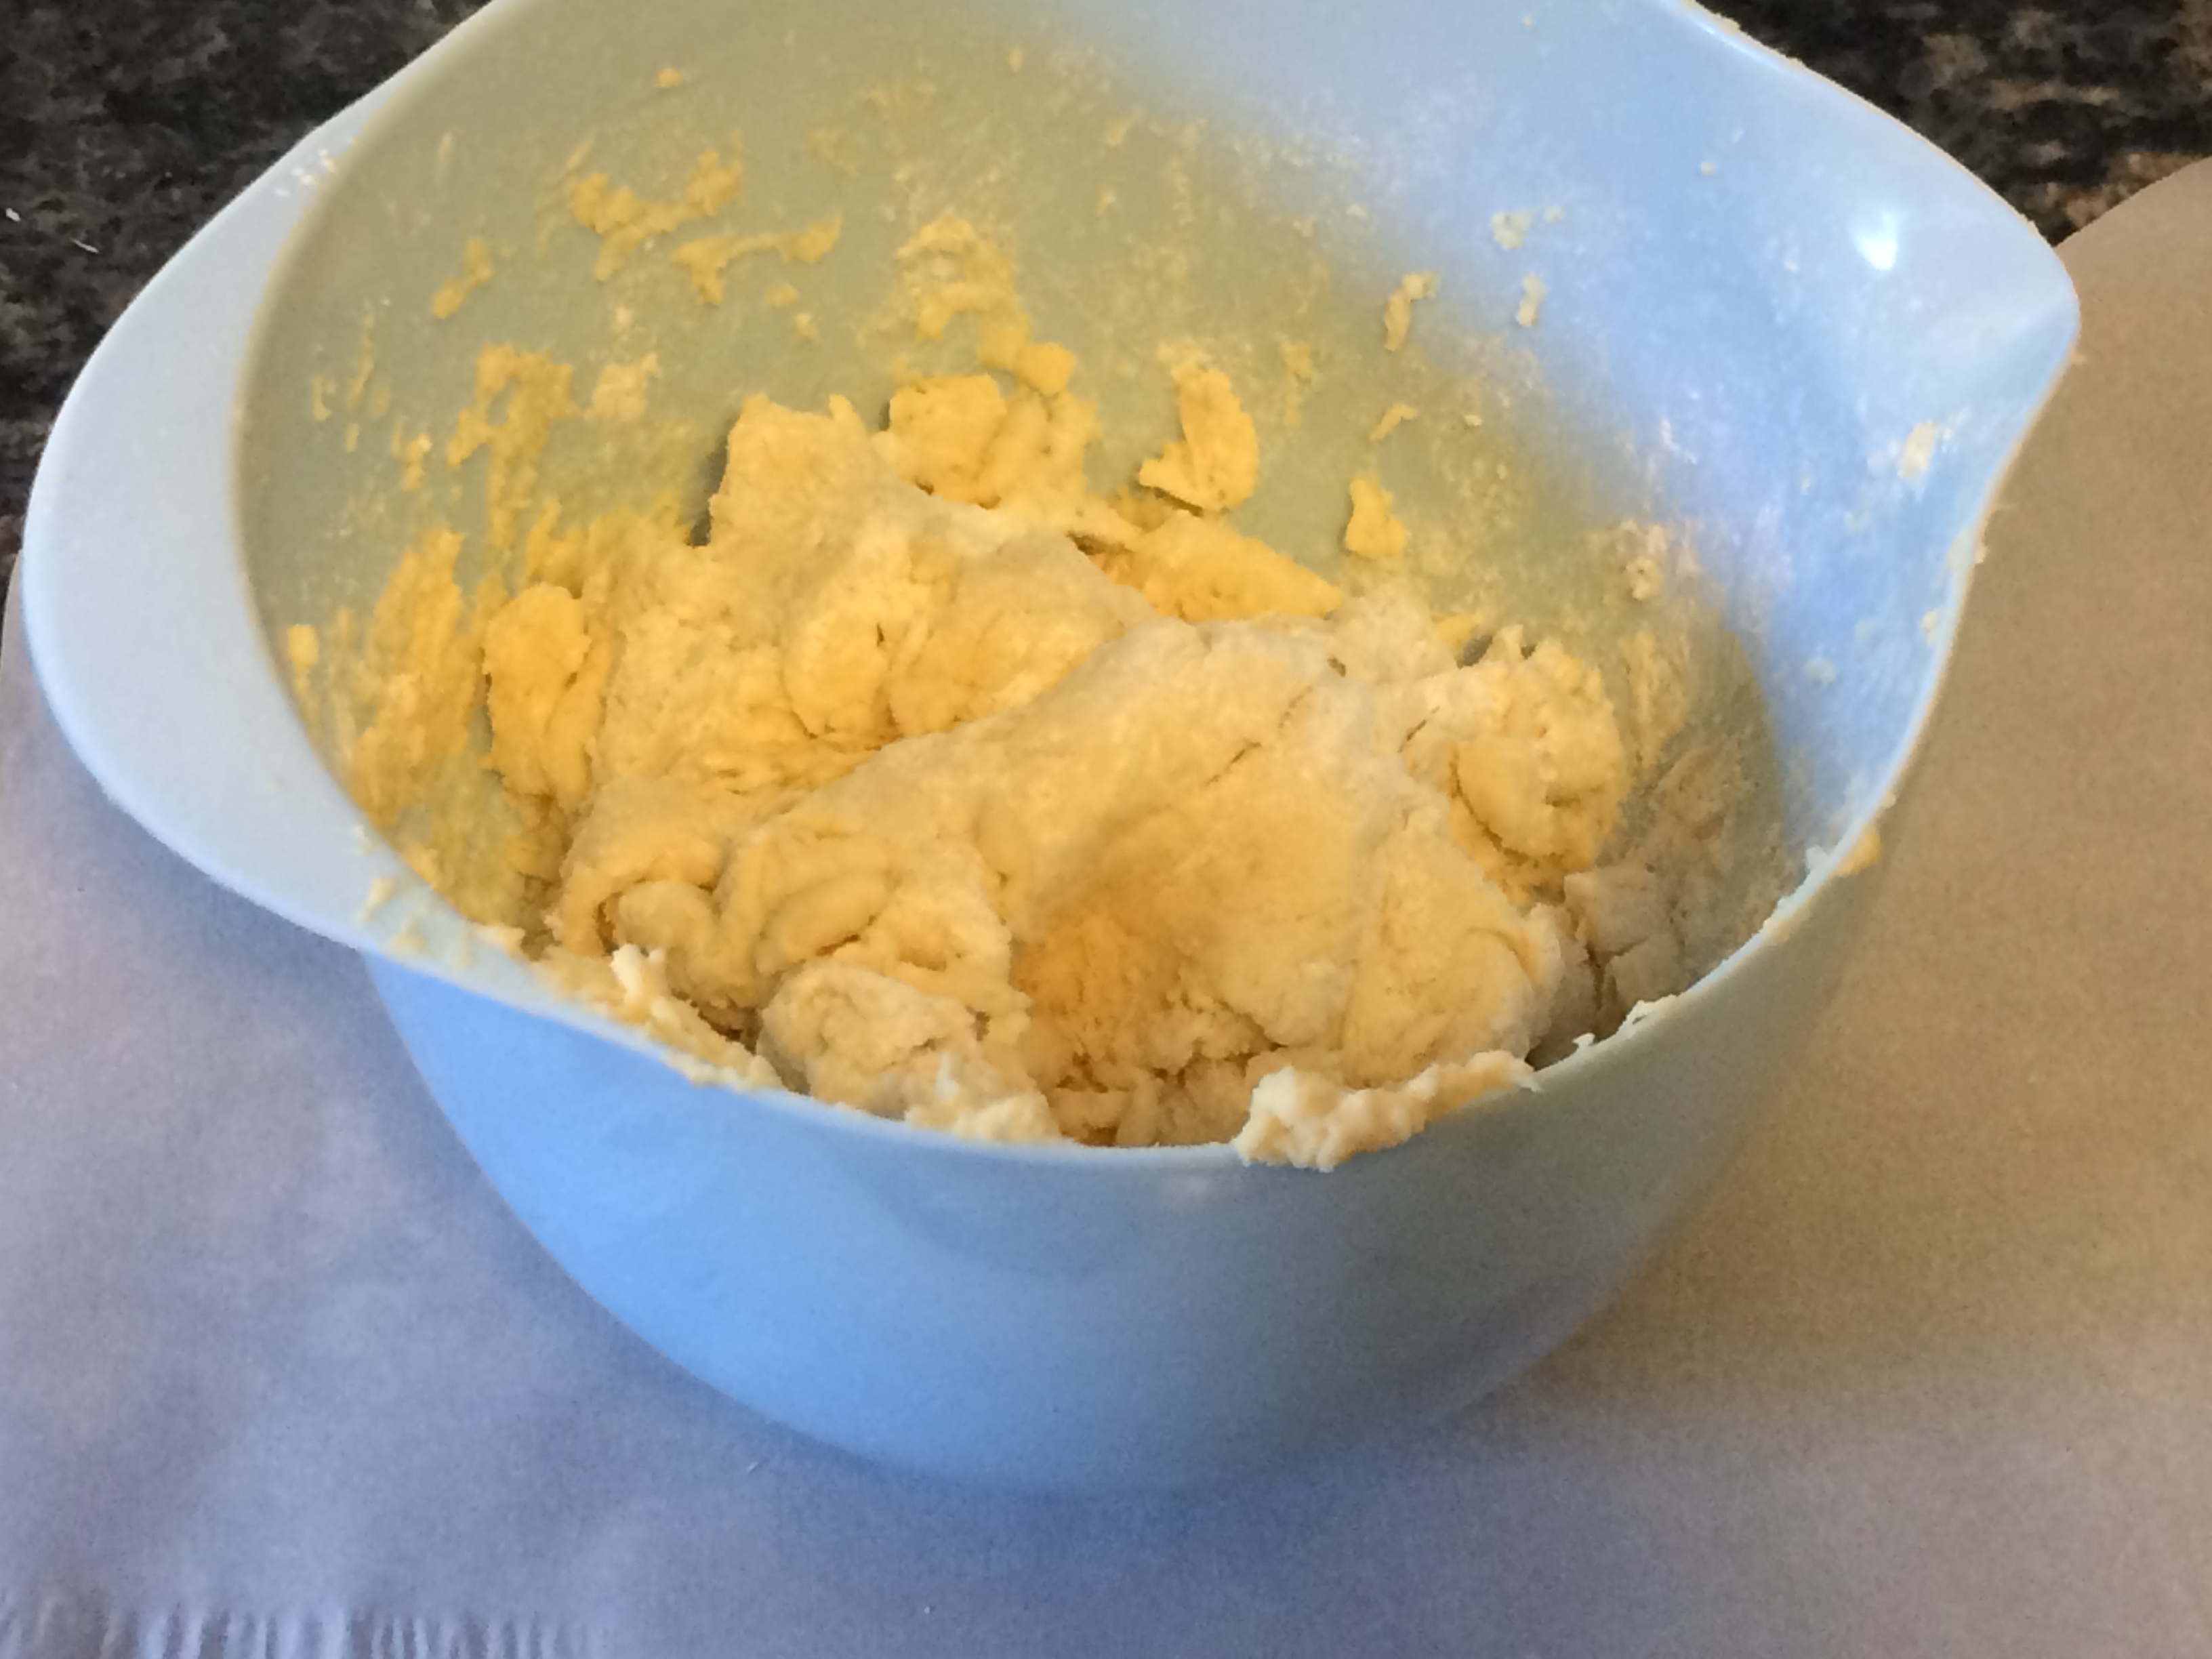
Add the soy milk and stir a bit to incorporate. Knead with your hands briefly until you have a somewhat sticky dough. Again, avoid overmixing.

IMG_2539IMG_2544

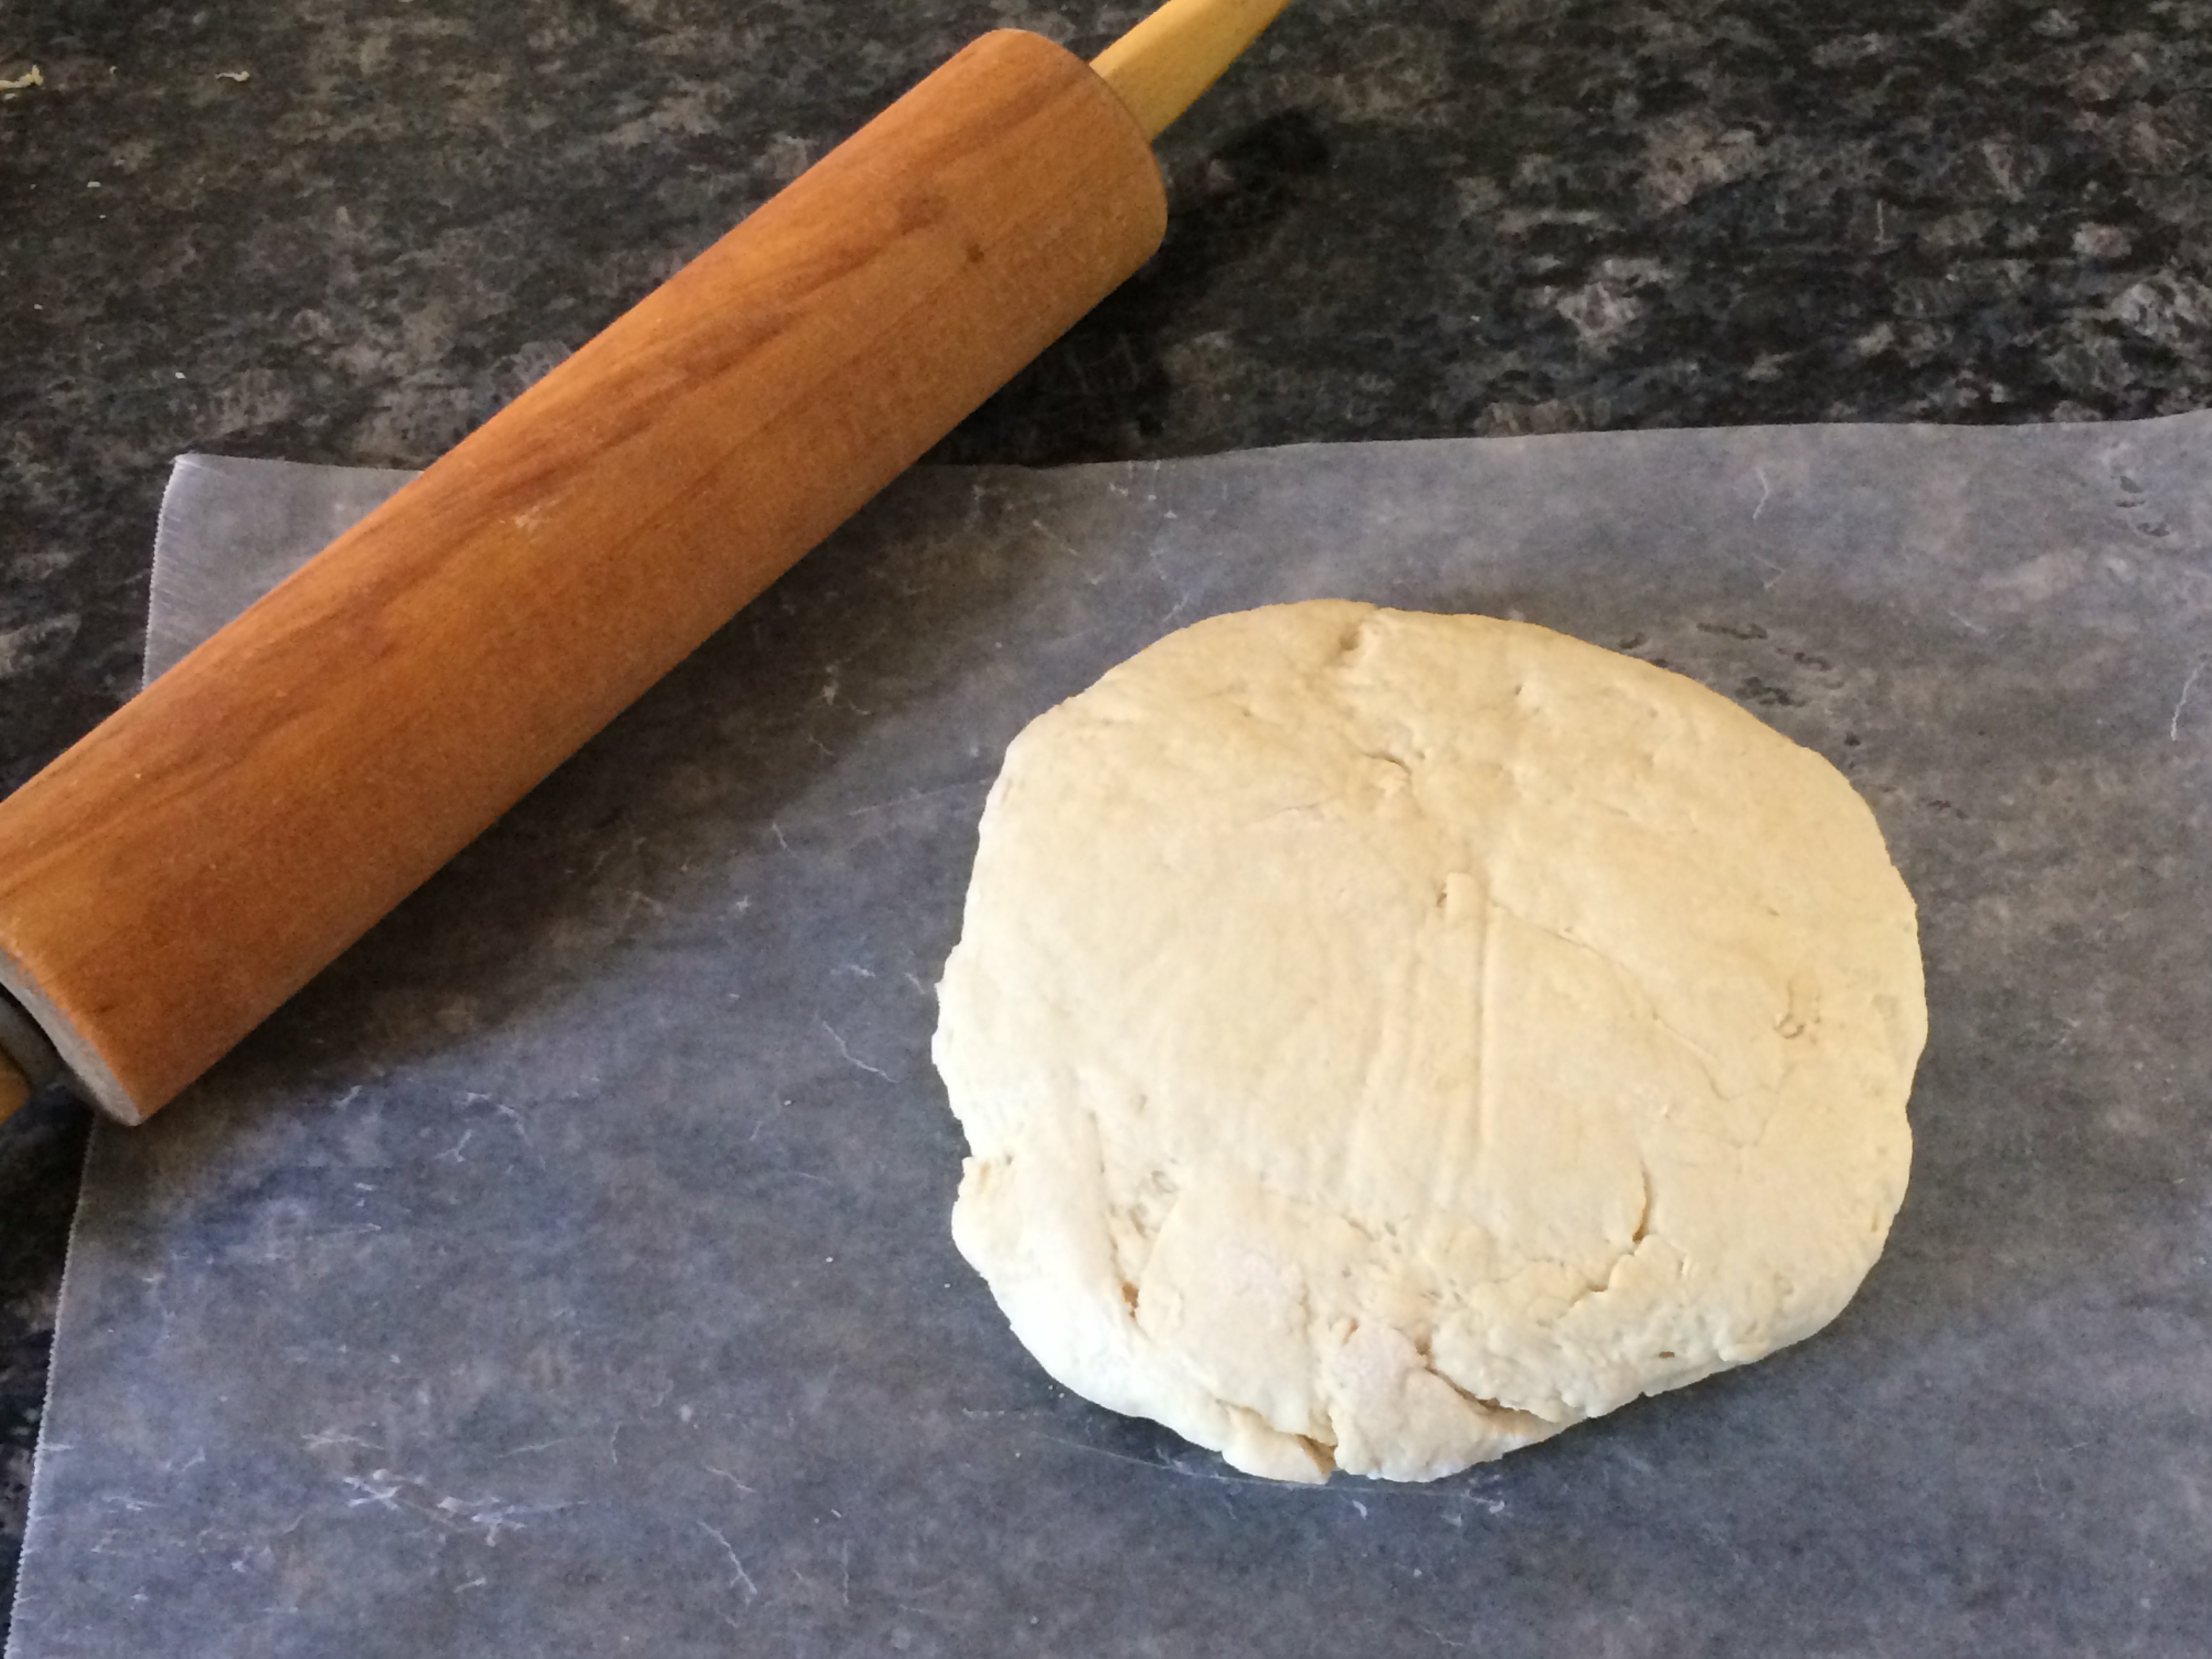
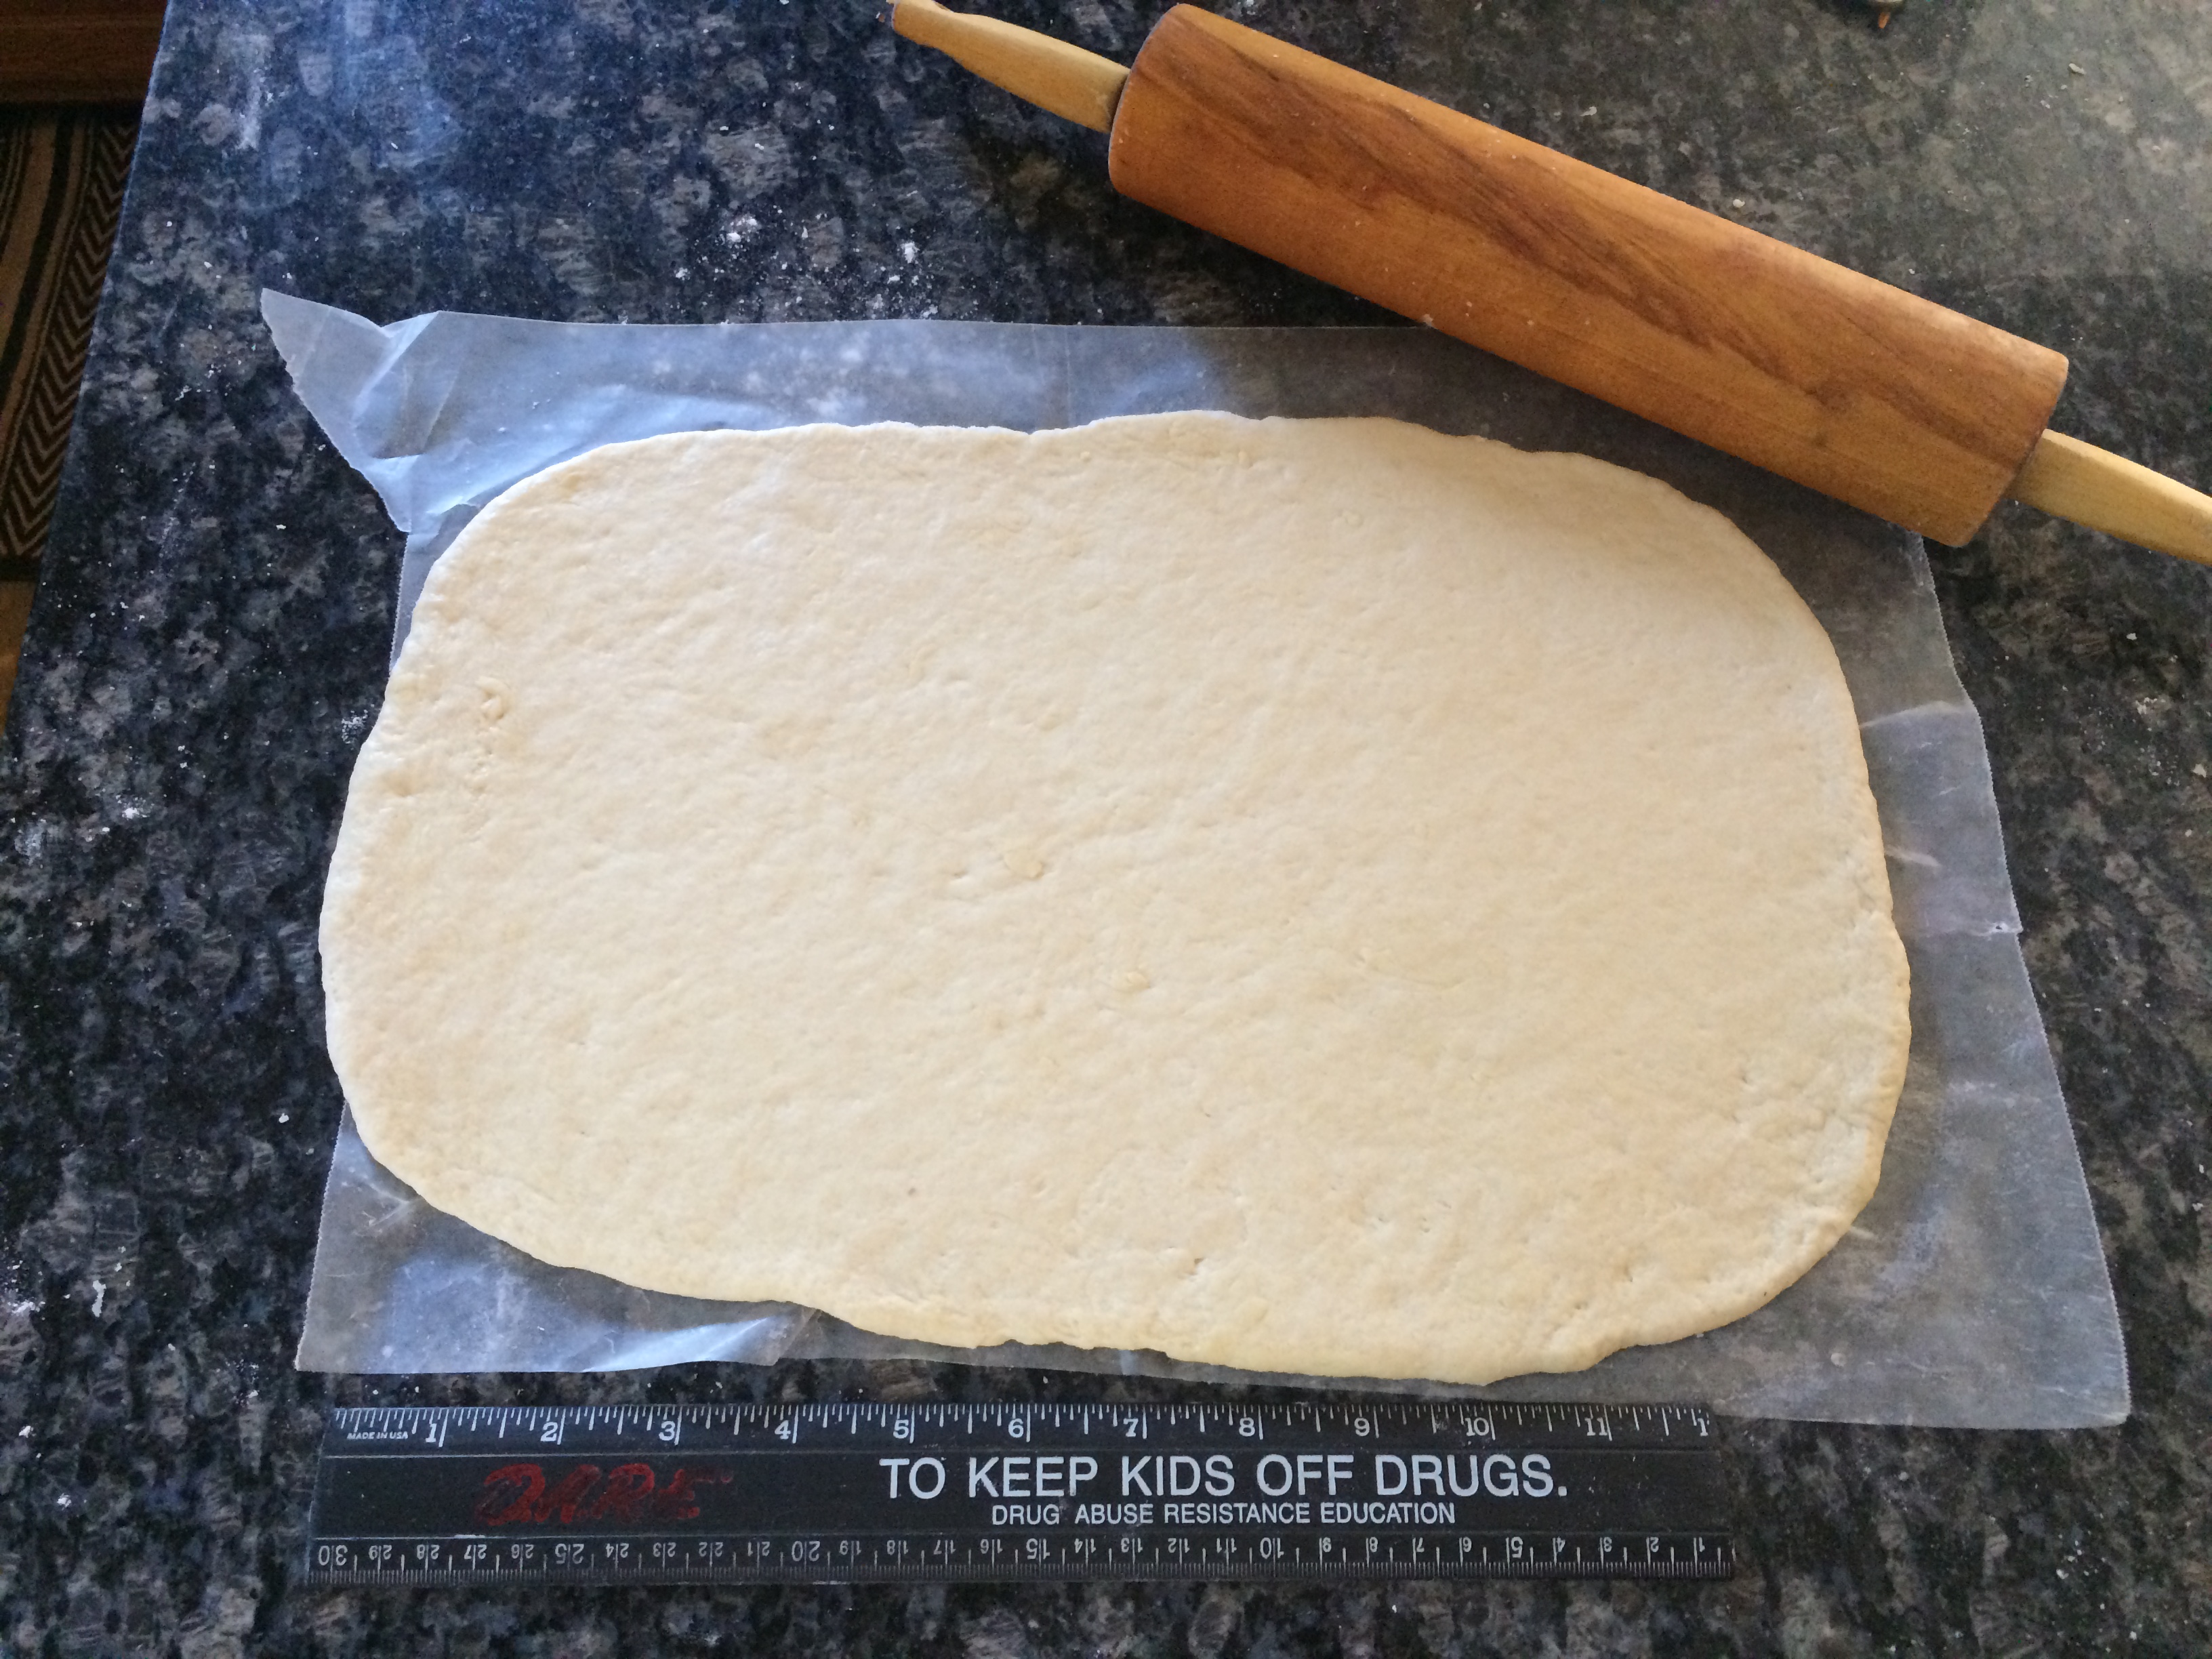
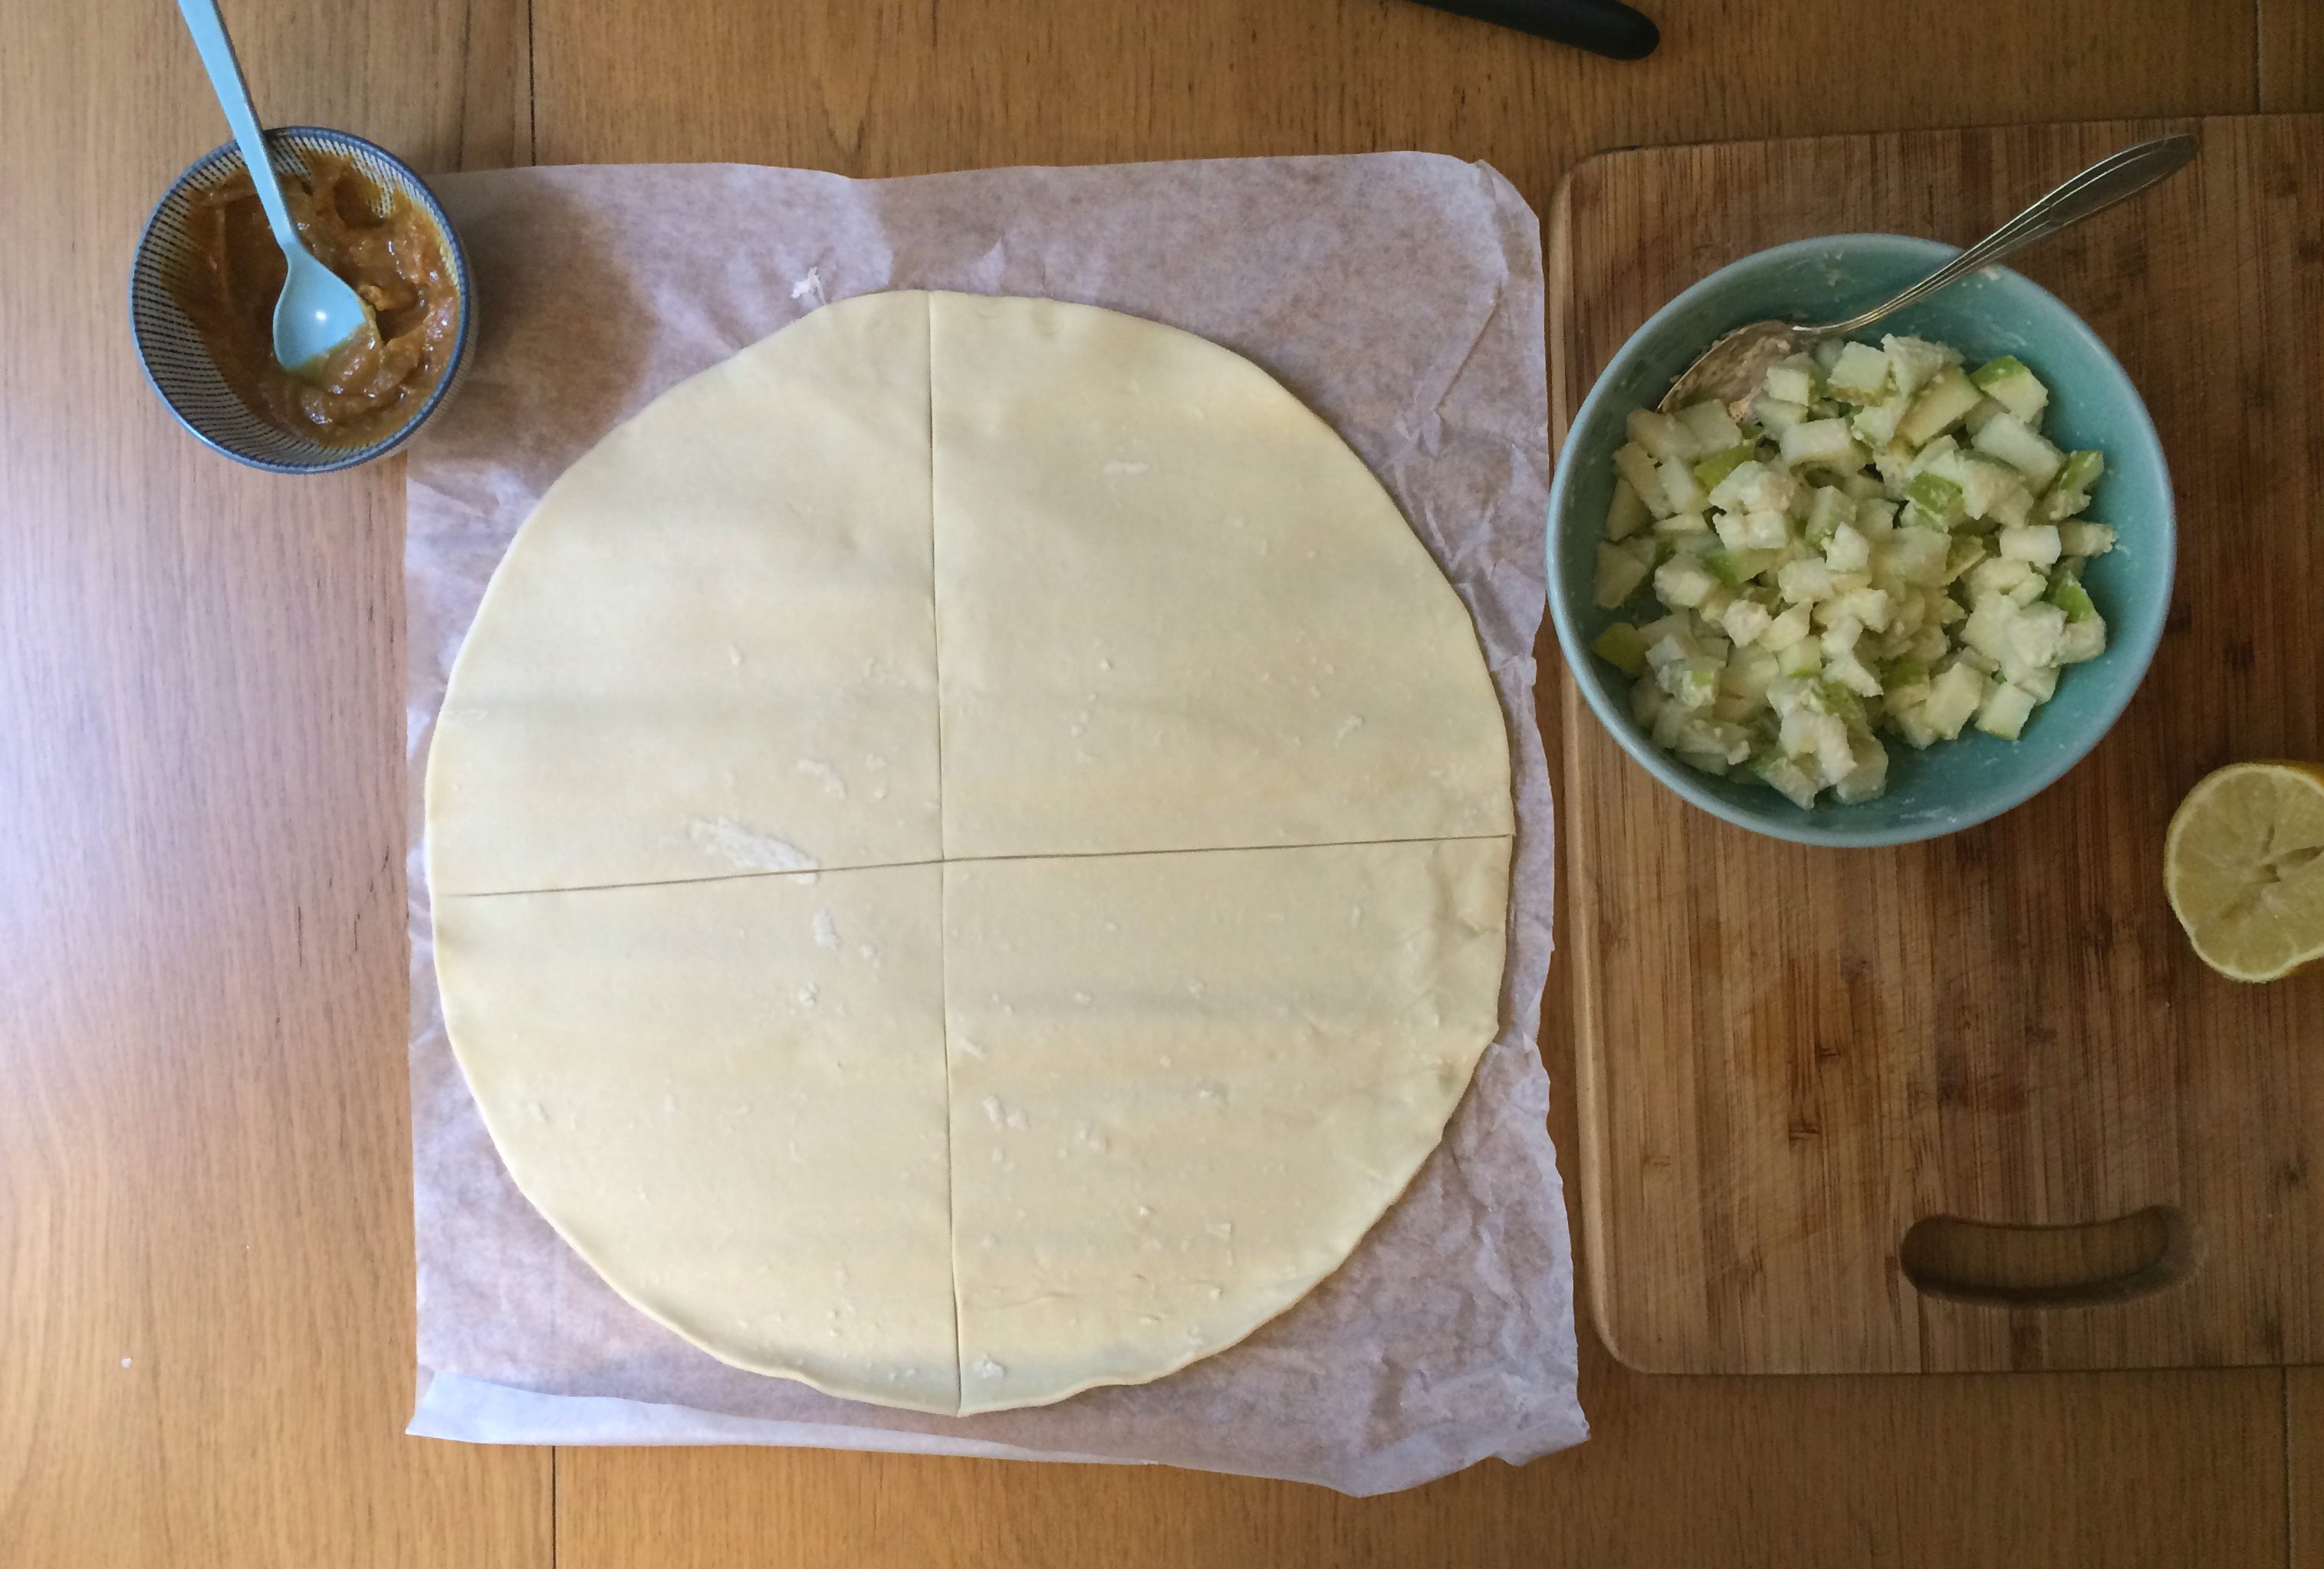
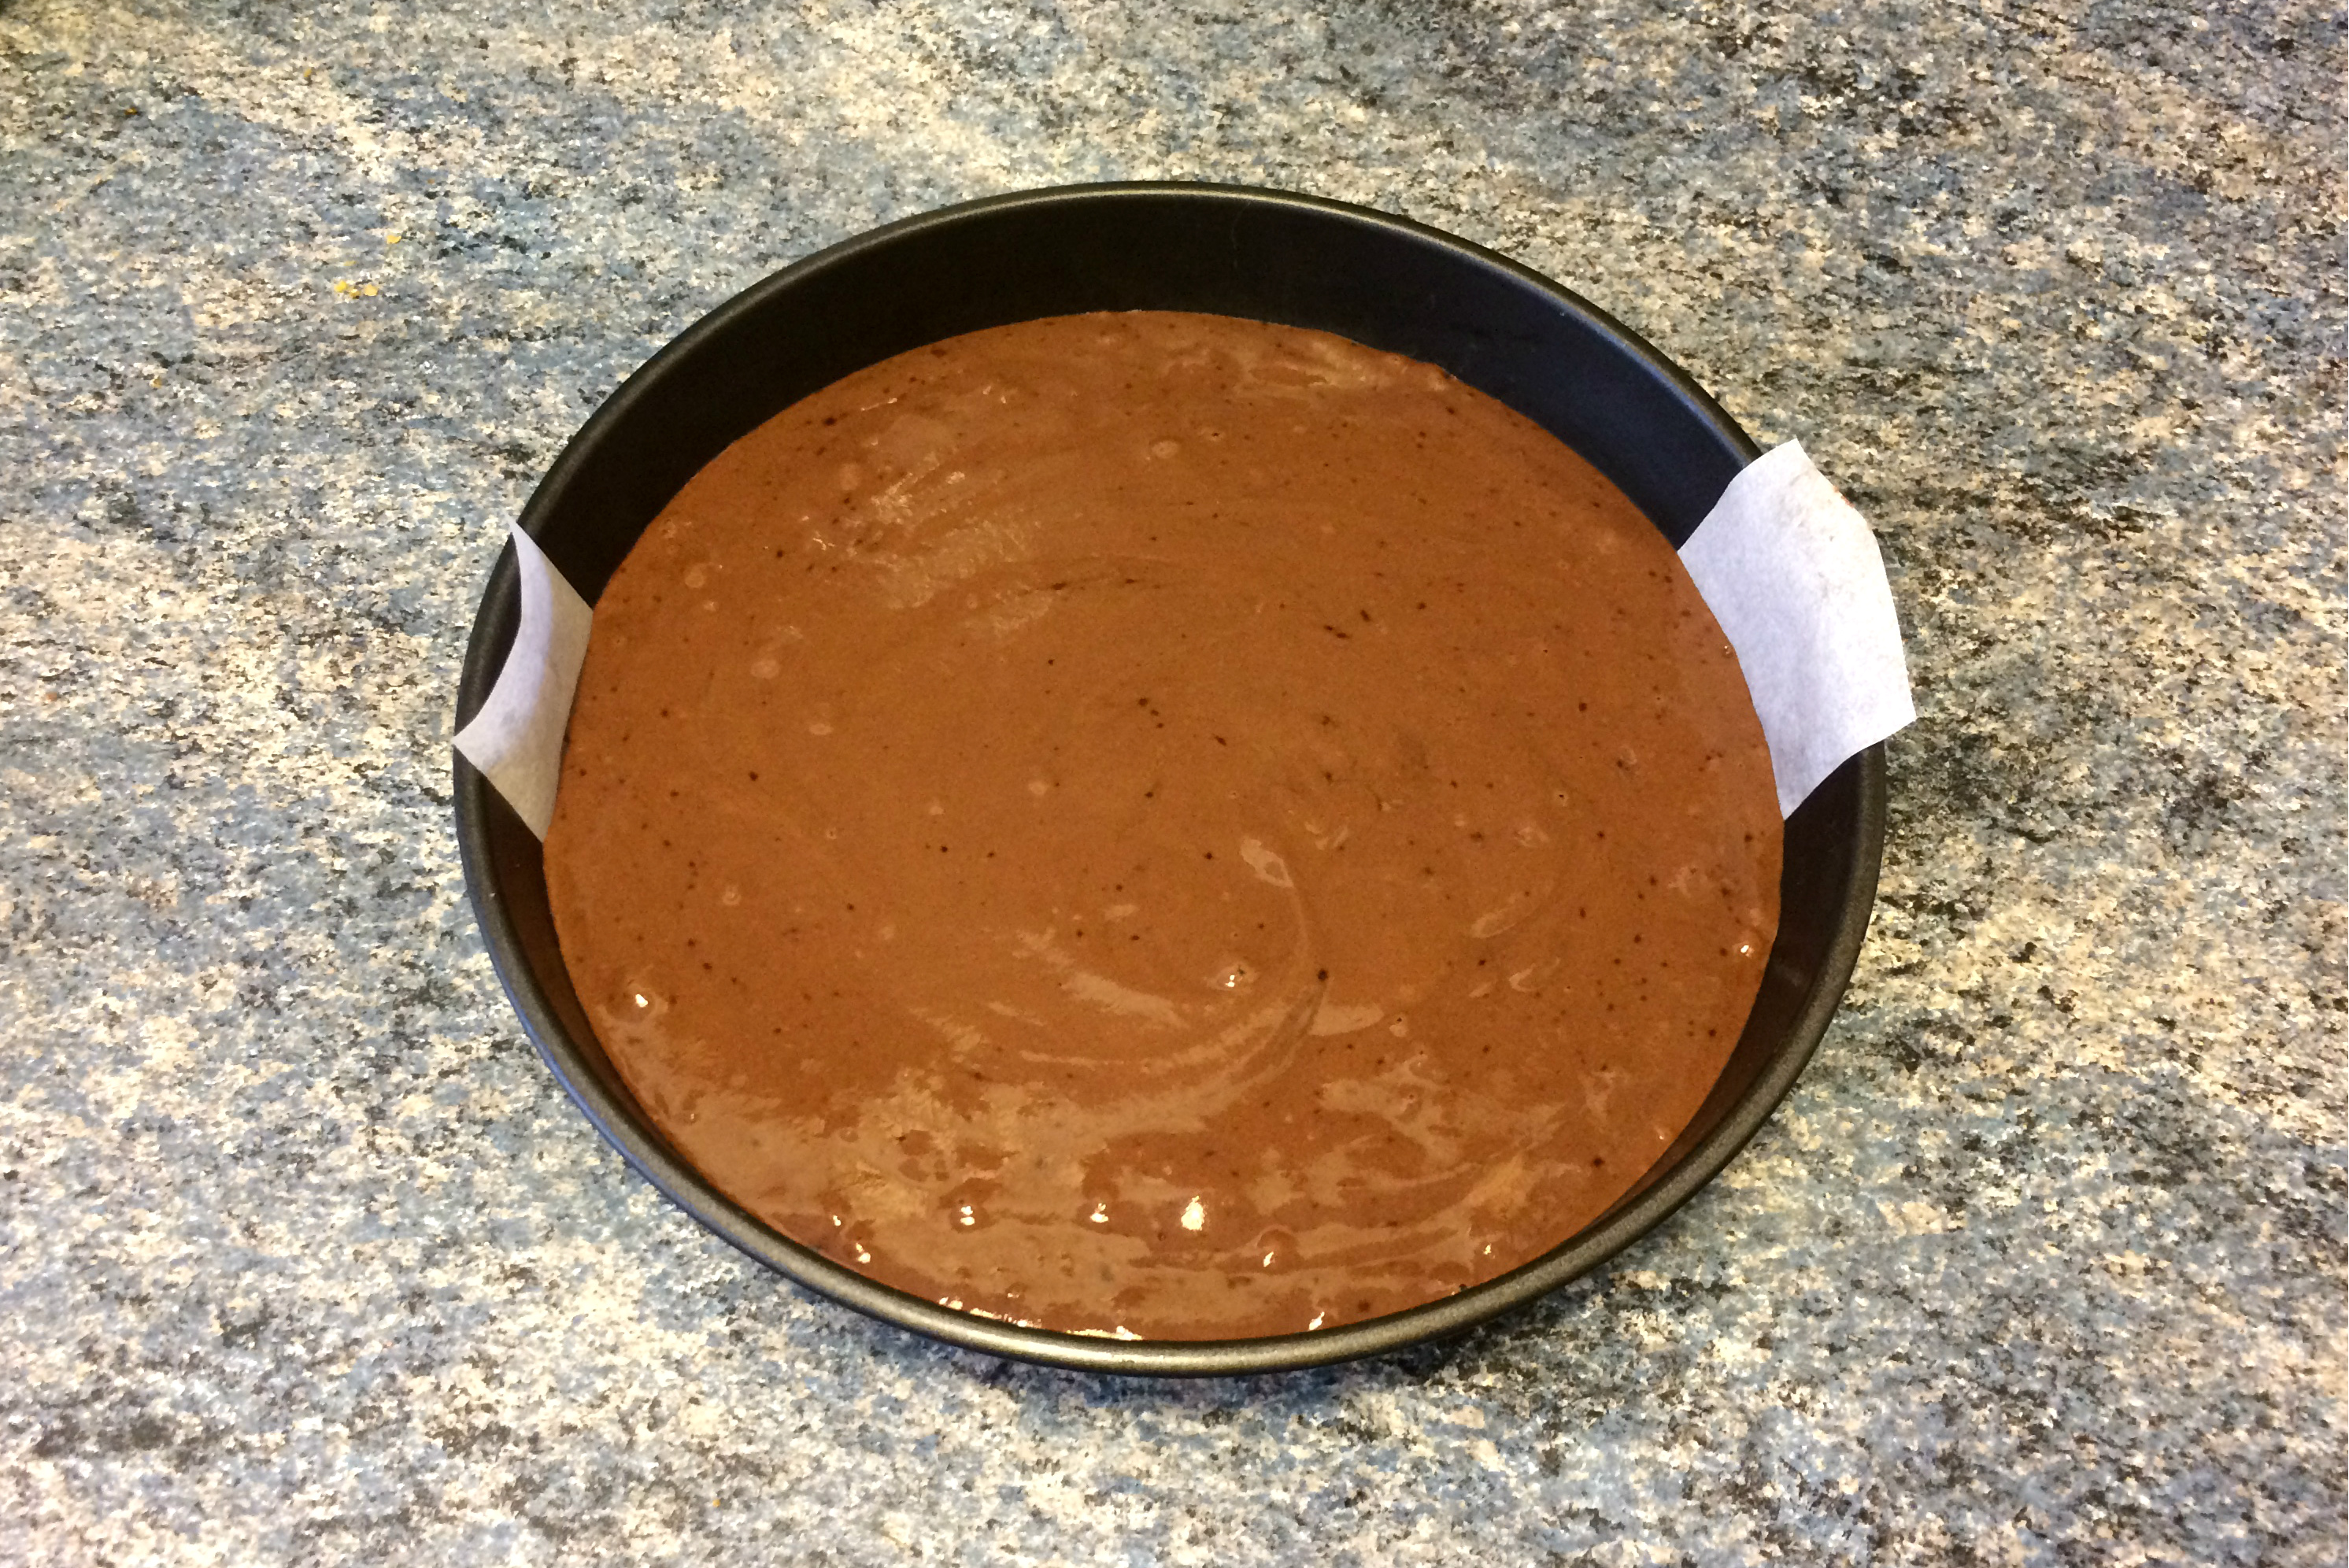
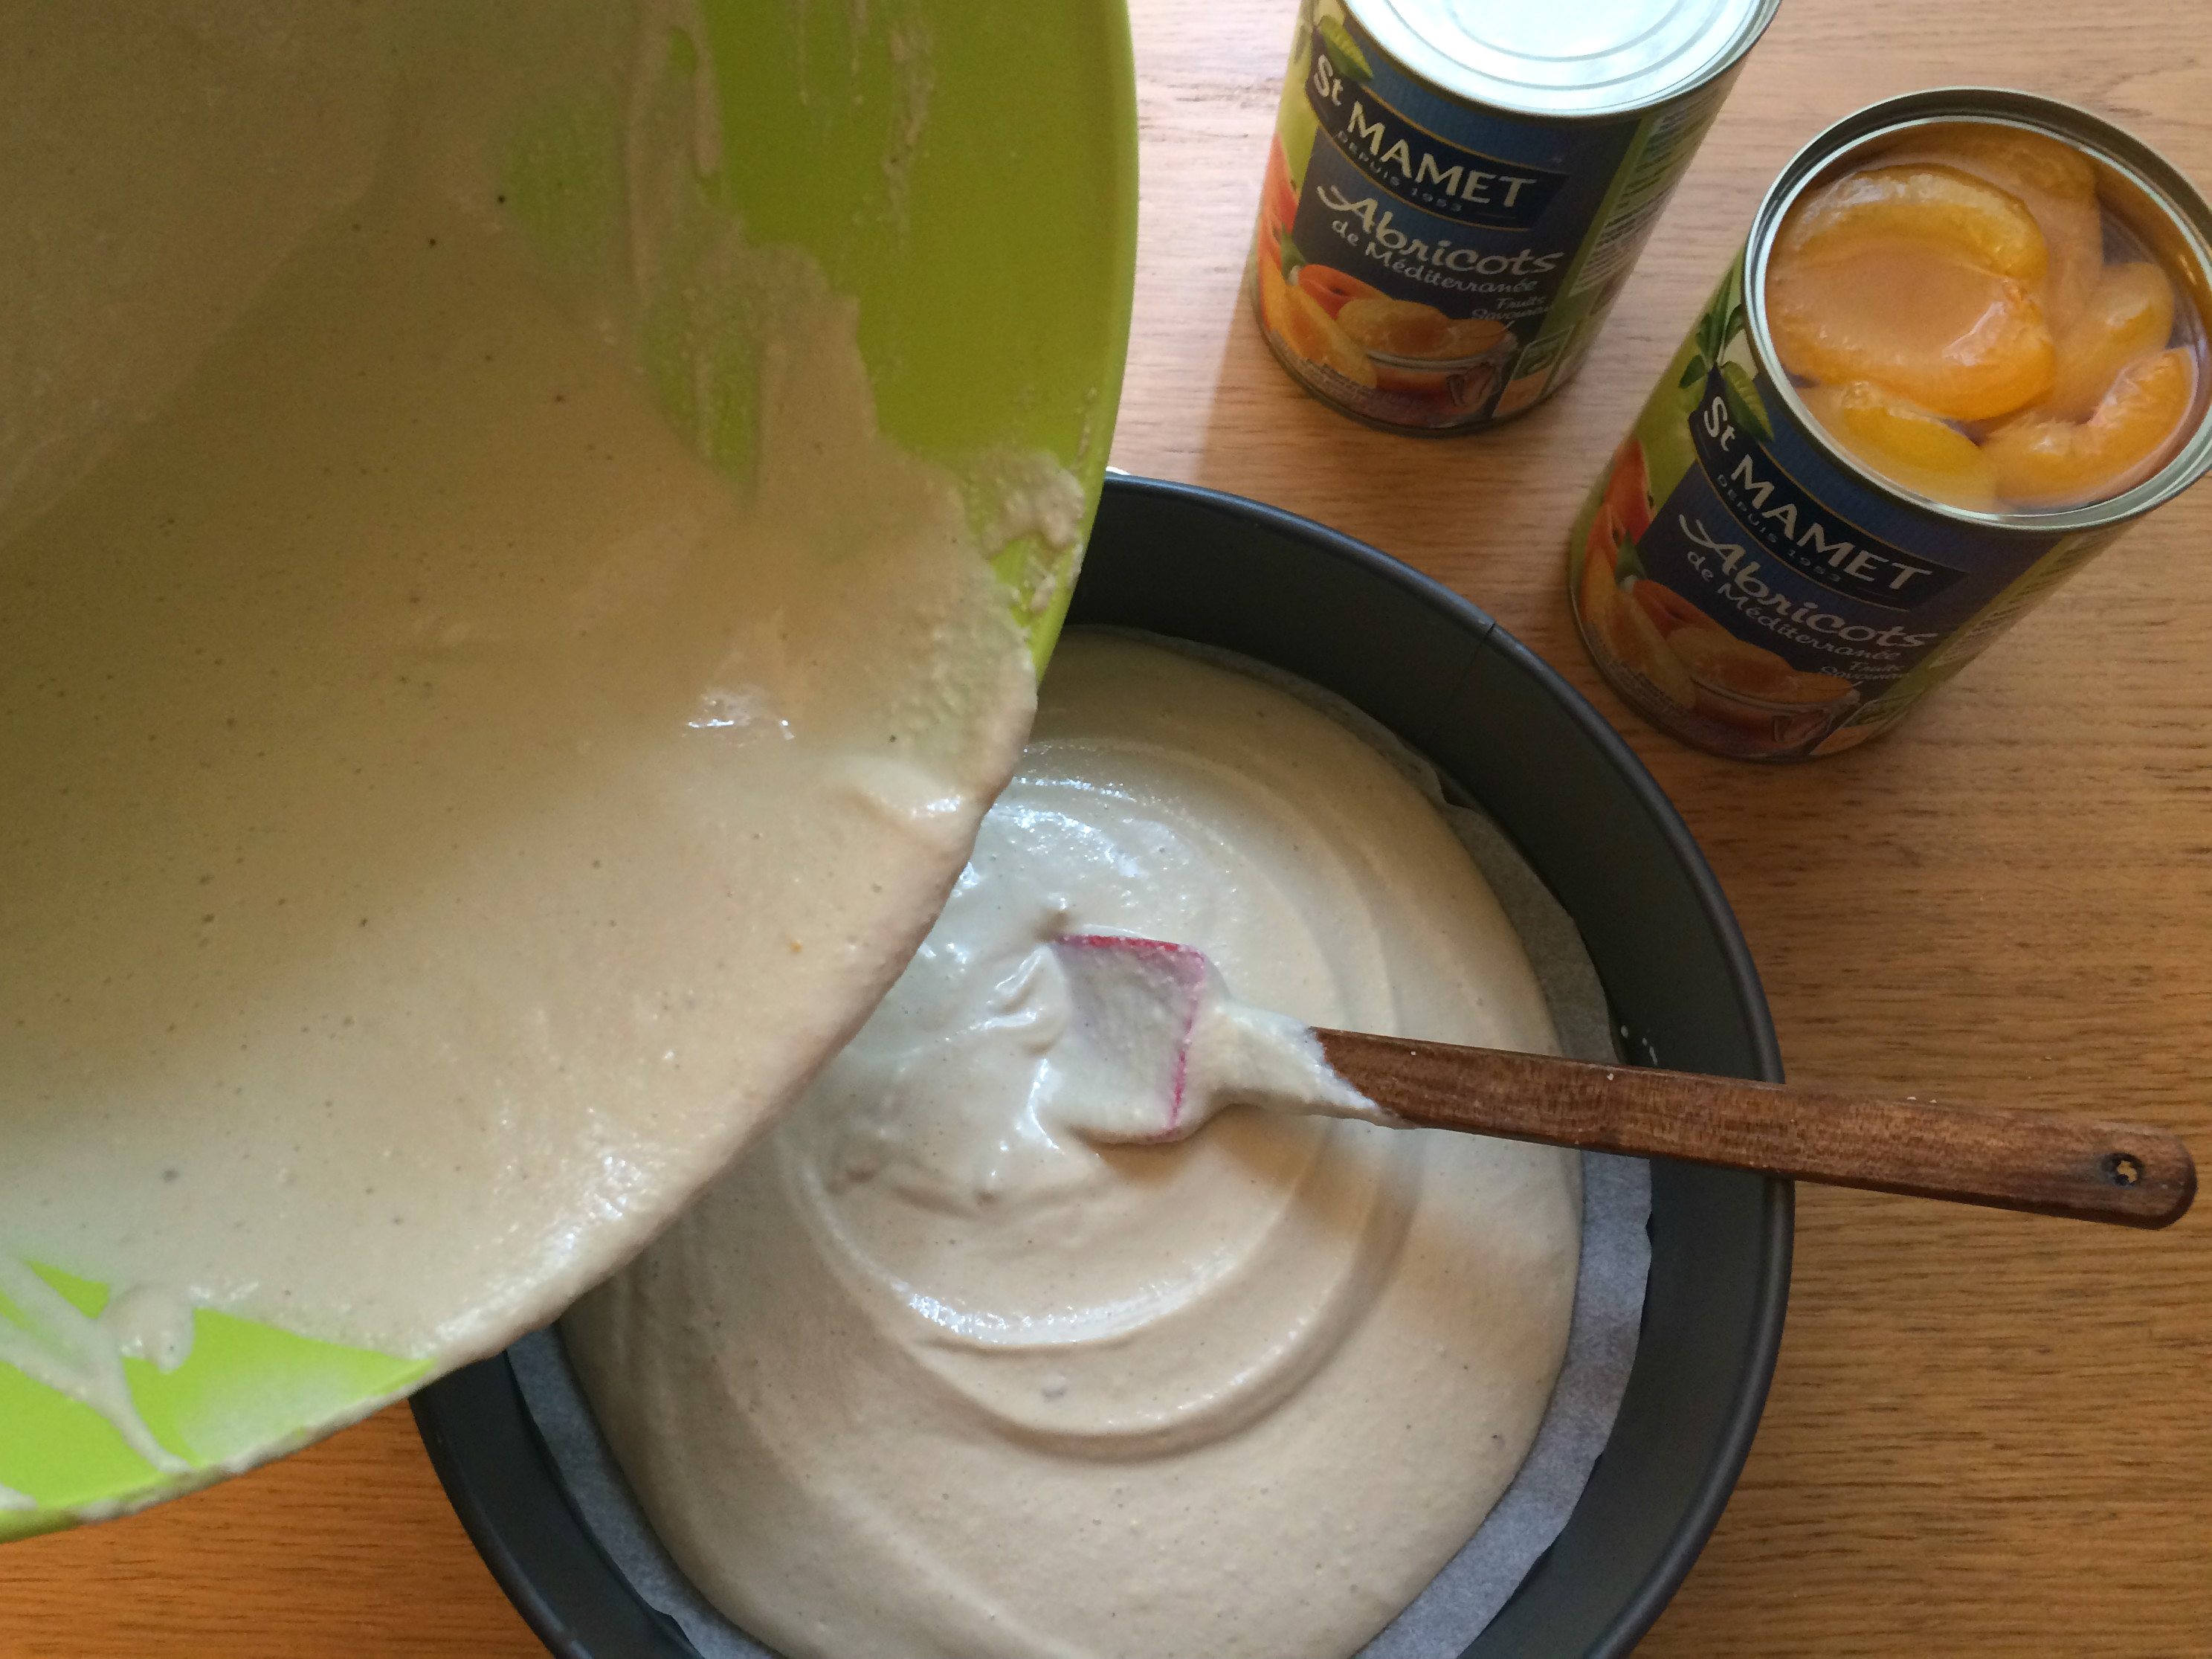
Place a large sheet of baking paper or waxed paper on your countertop and sprinkle it with a bit of flour. Put the dough in the center of the paper and gently roll it out using a rolling pin until you have an approximately 15 x 10 inch (38 x 25 cm) rectangle. Since I was making this at my parents’ house, I got to measure mine using a Reagan-era D.A.R.E ruler that one of us kids had gotten at school.

IMG_2549

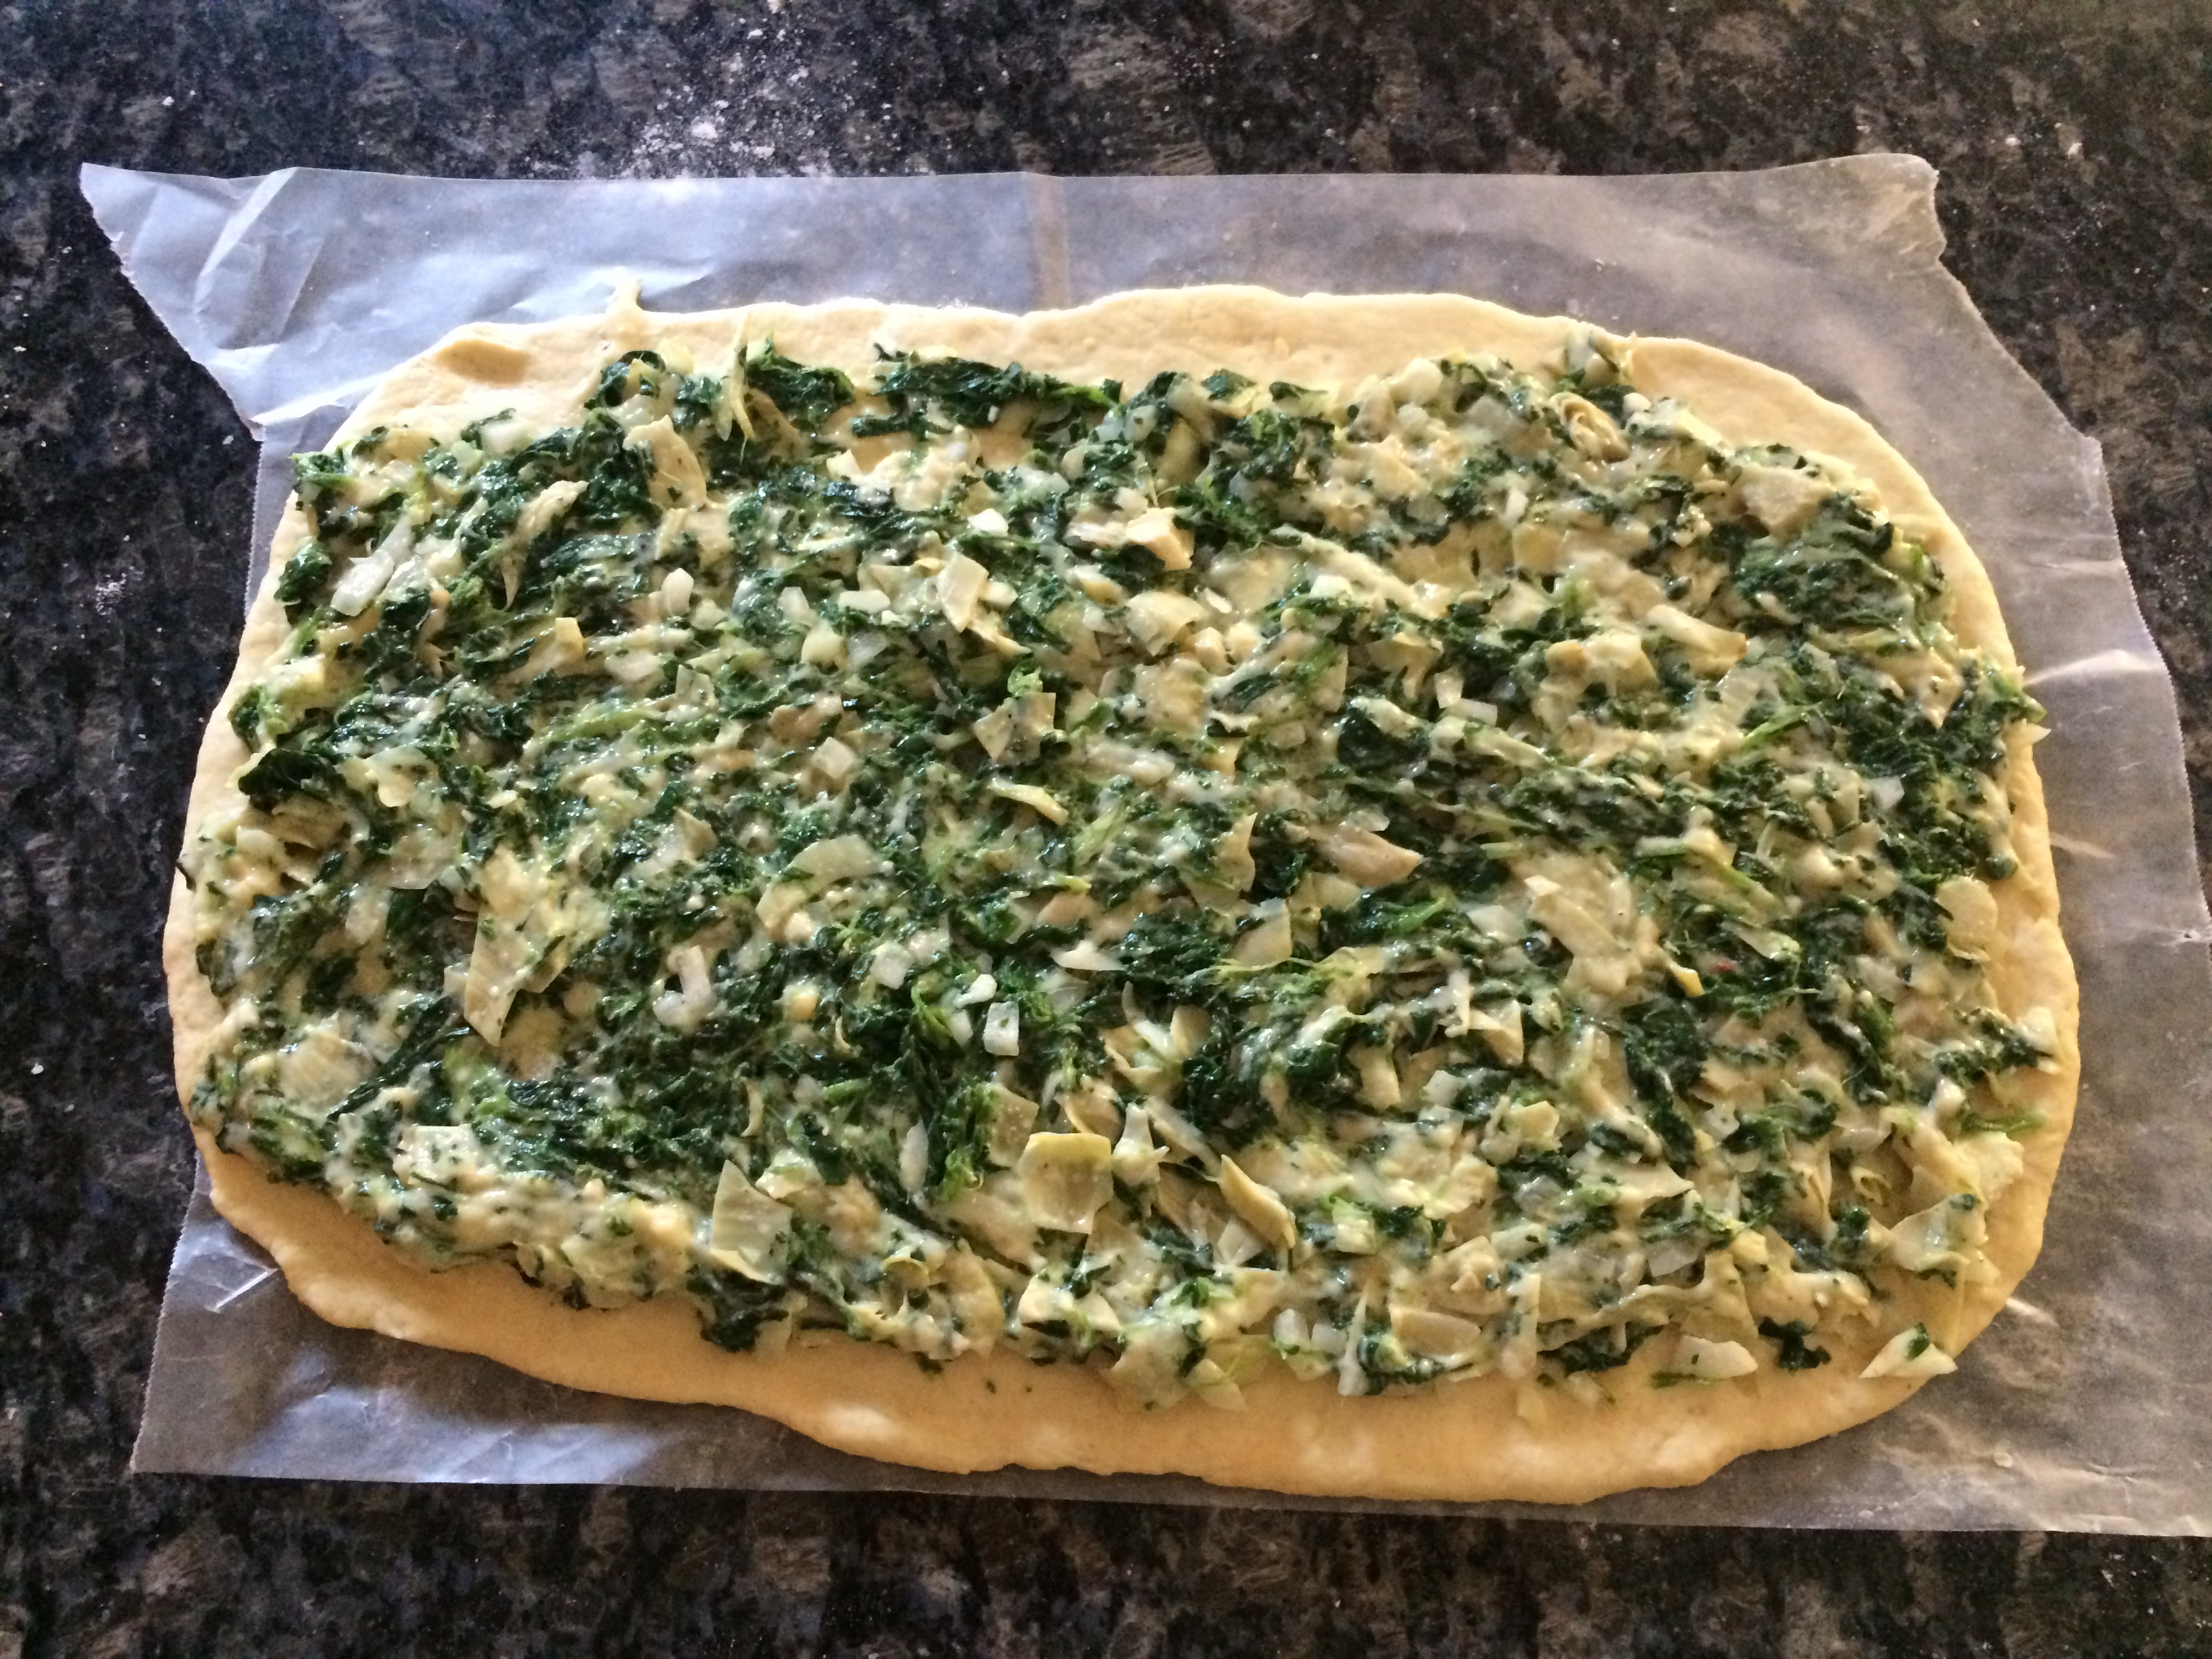
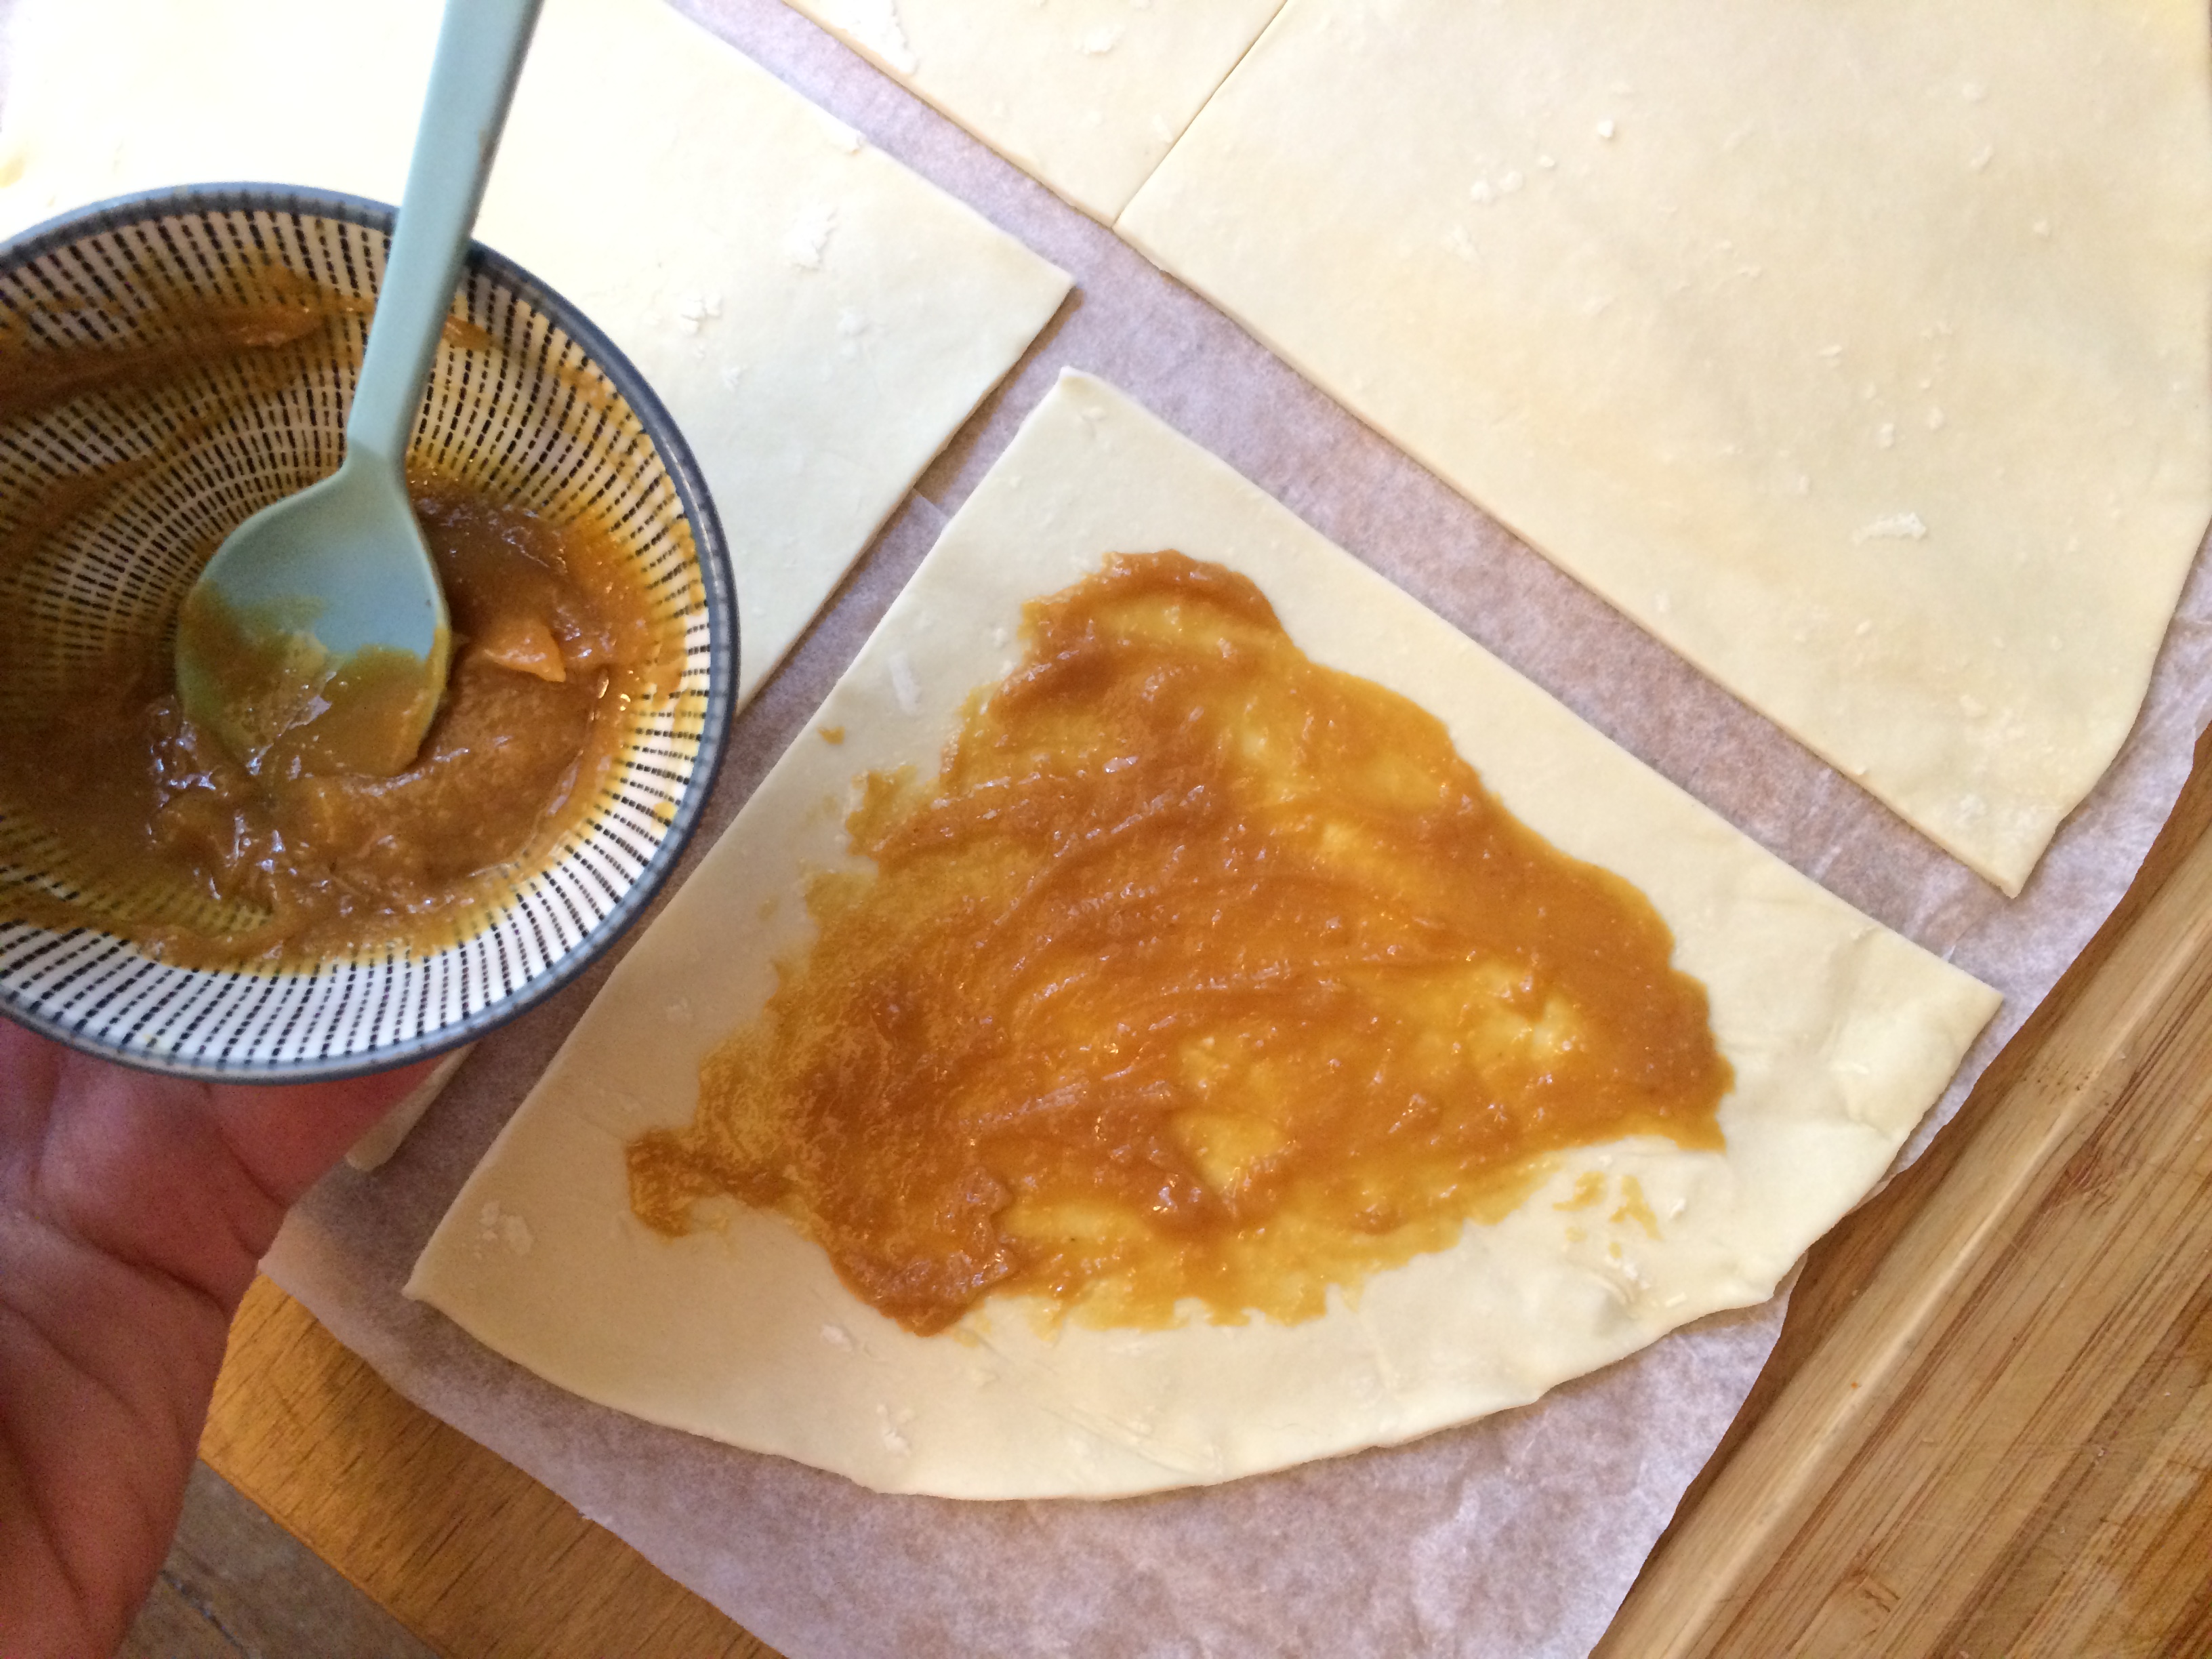
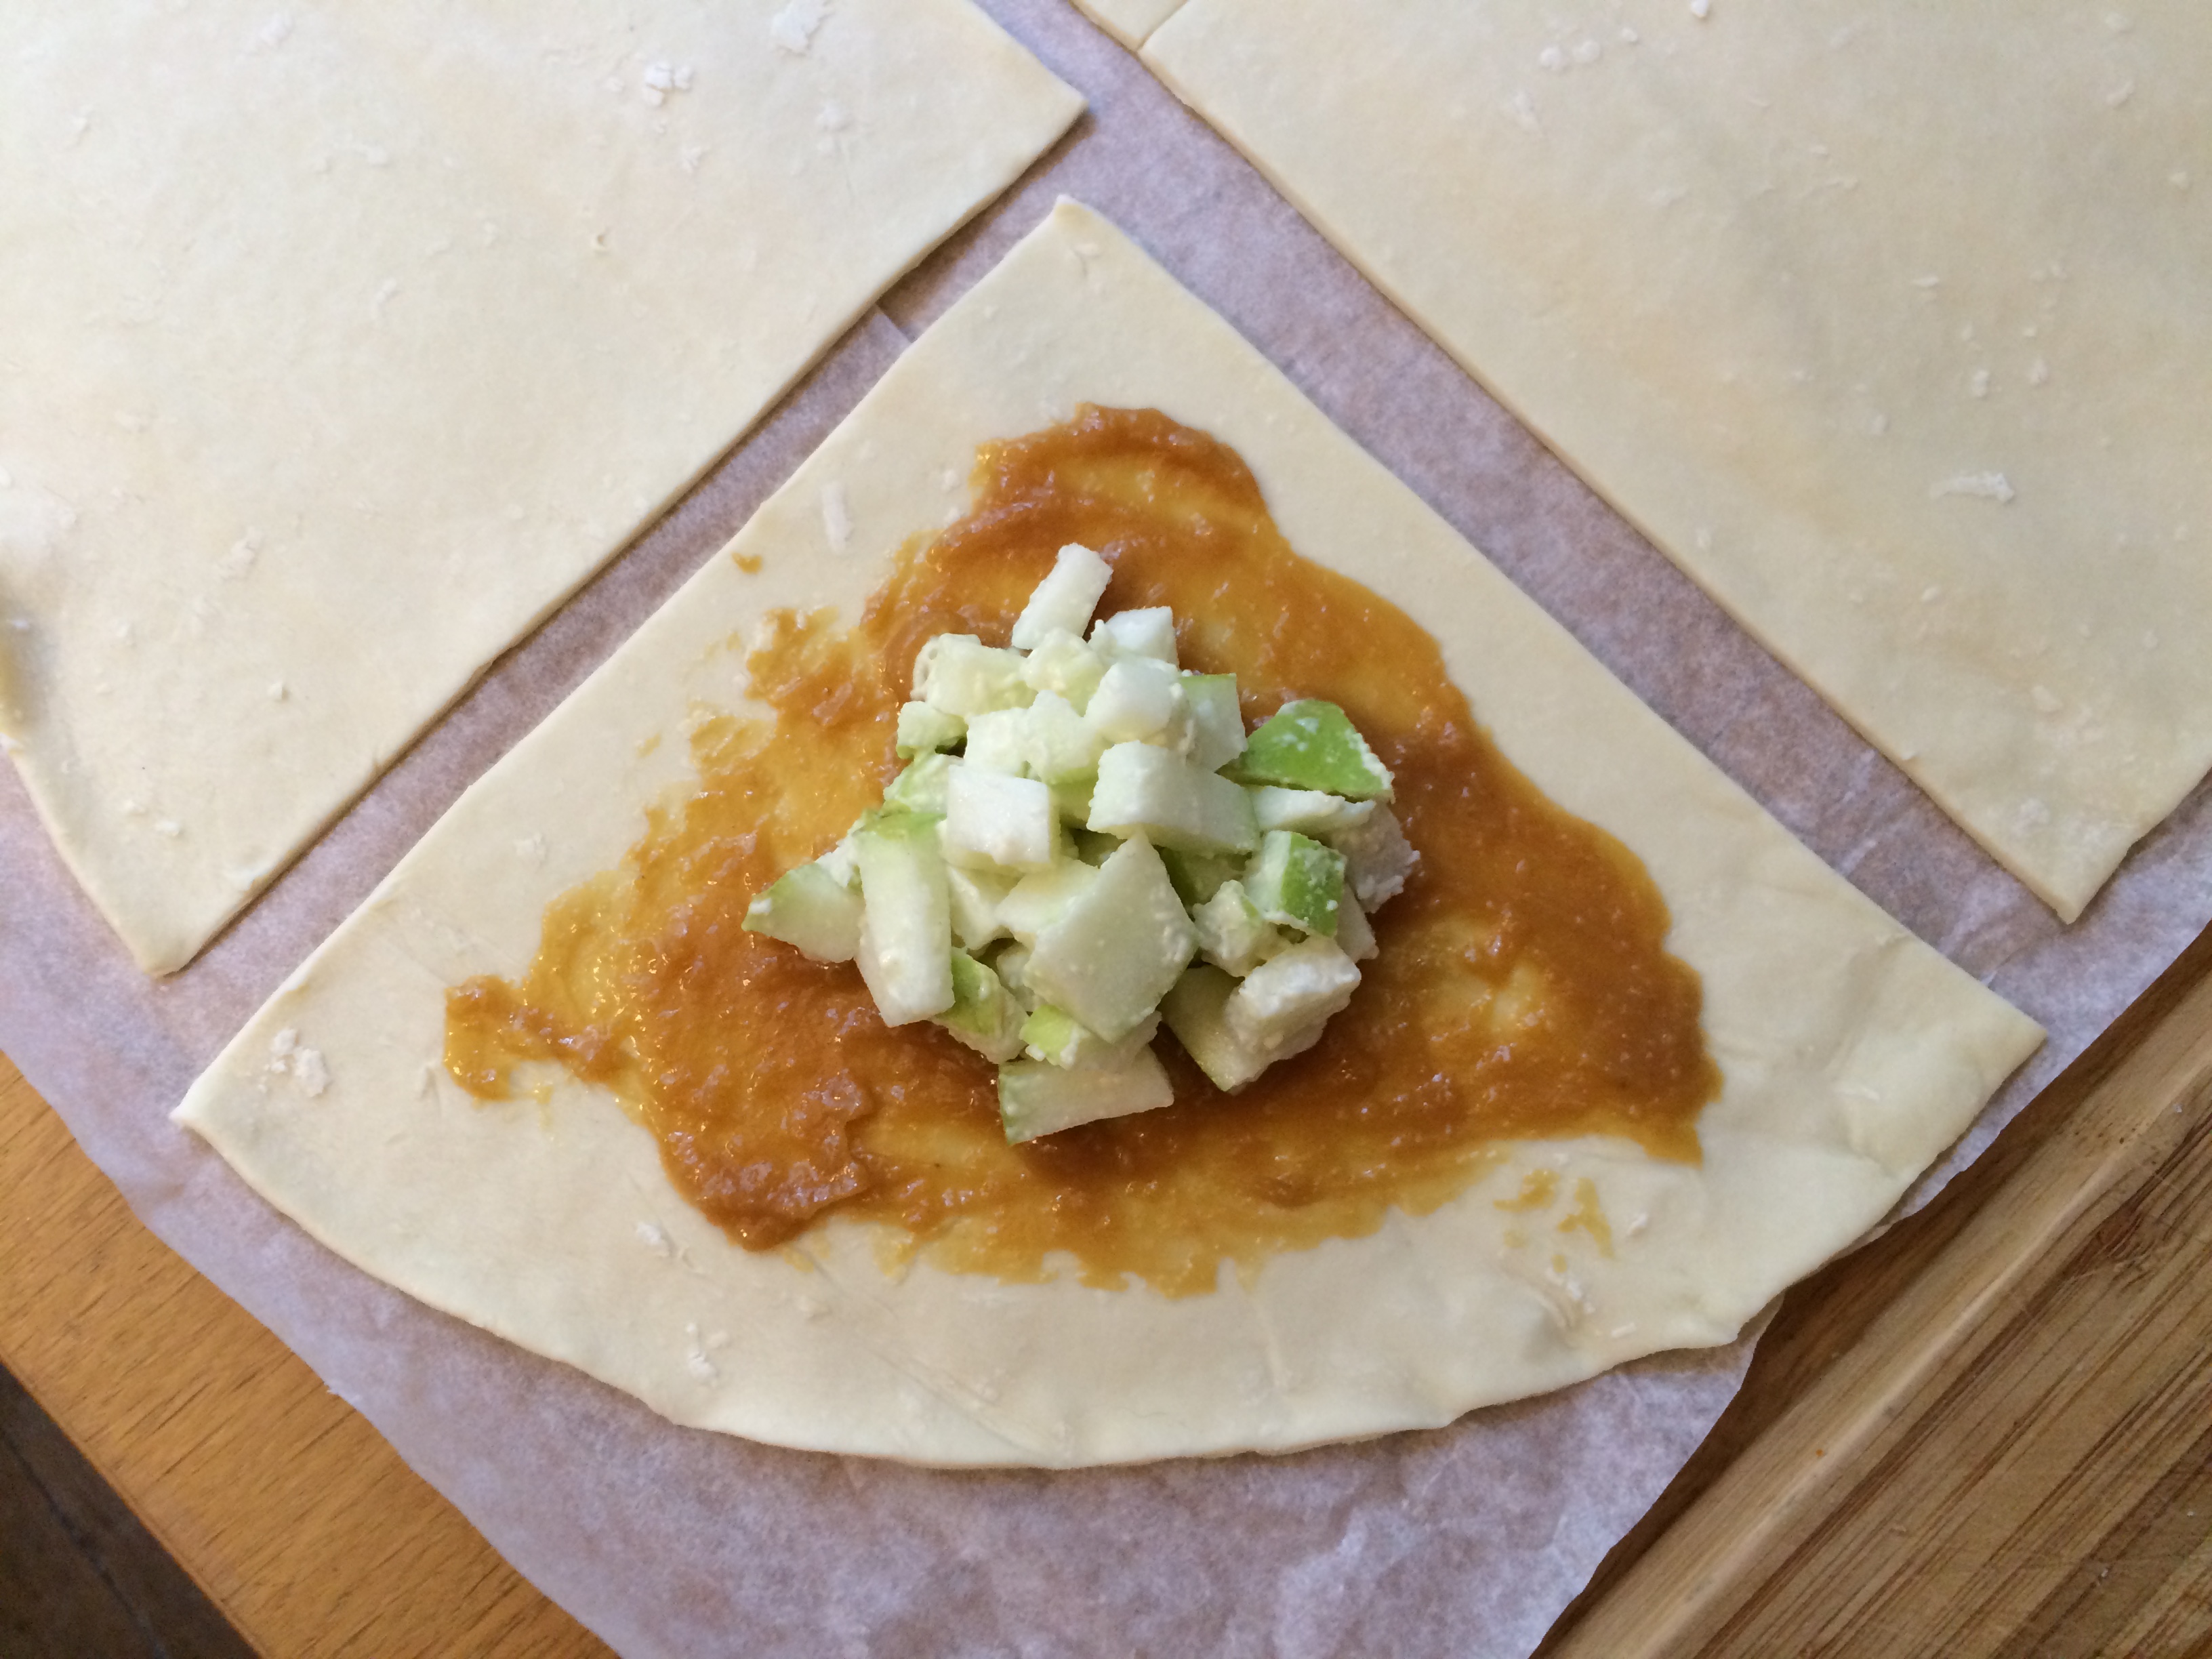
Spread the dough evenly with the spinach-artichoke mixture, leaving a margin free around the edges. The longer edges should have a wider margin, and the short ends a smaller margin.

IMG_2550IMG_2553IMG_2555

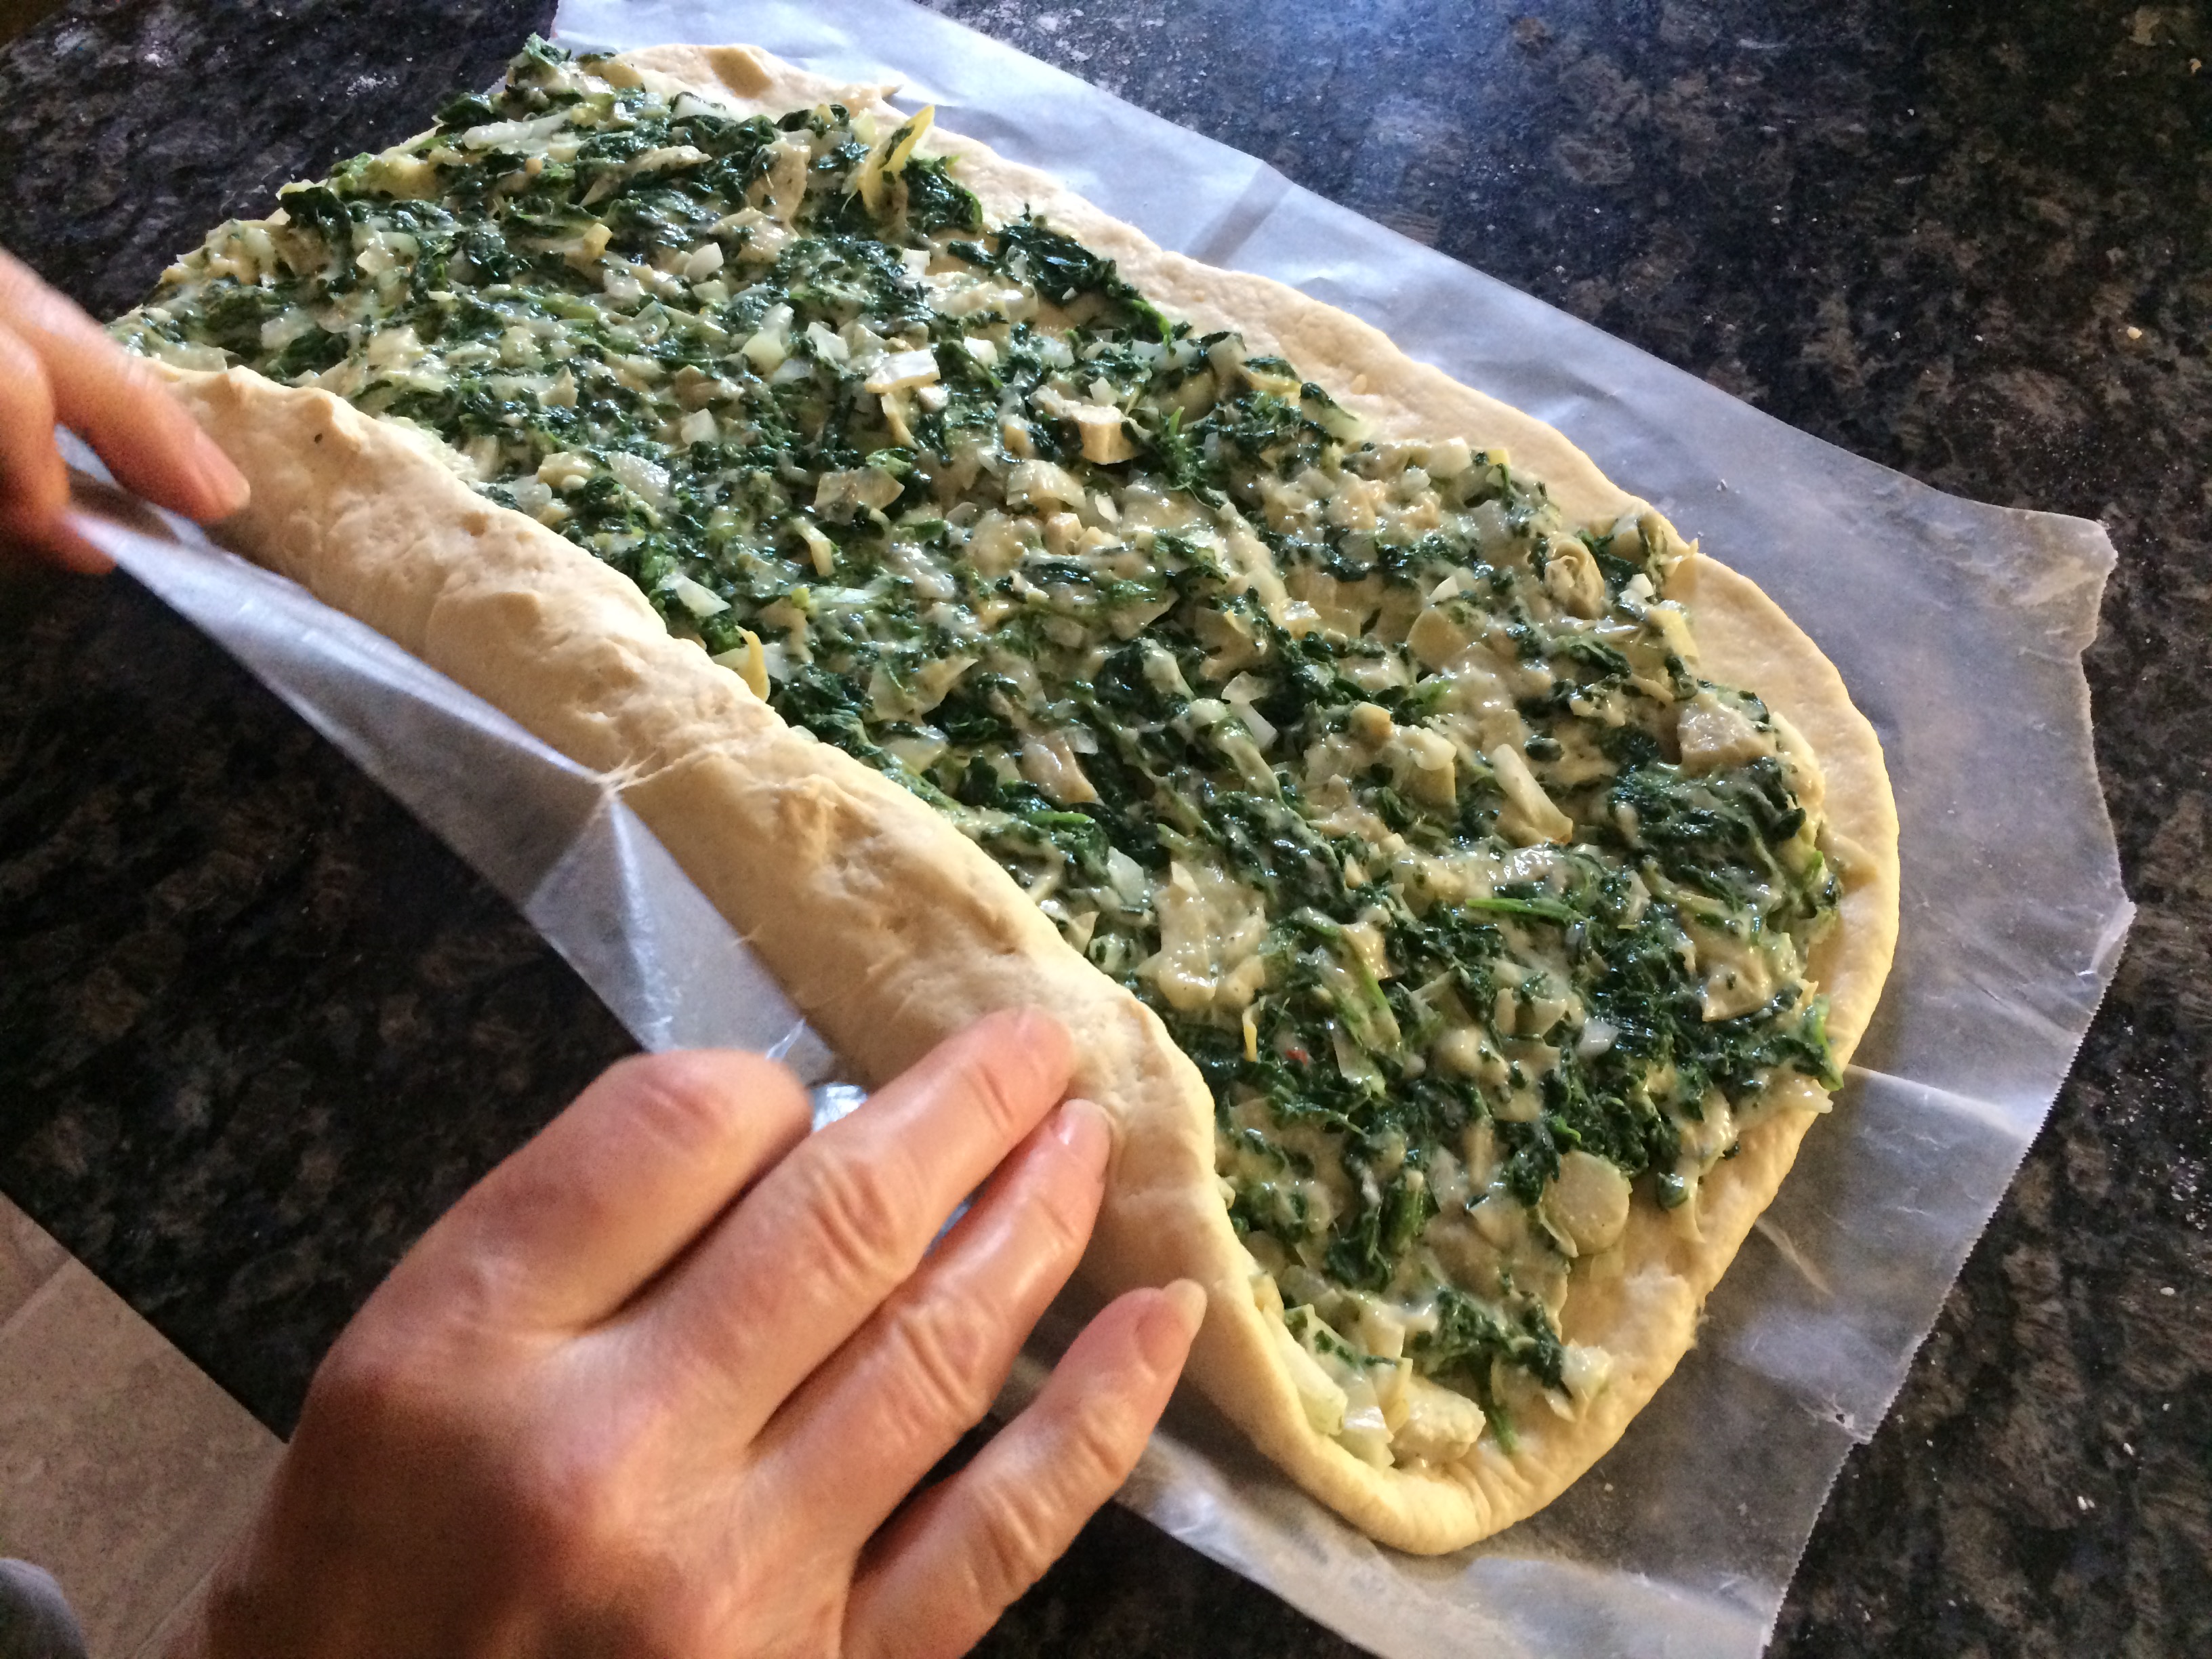
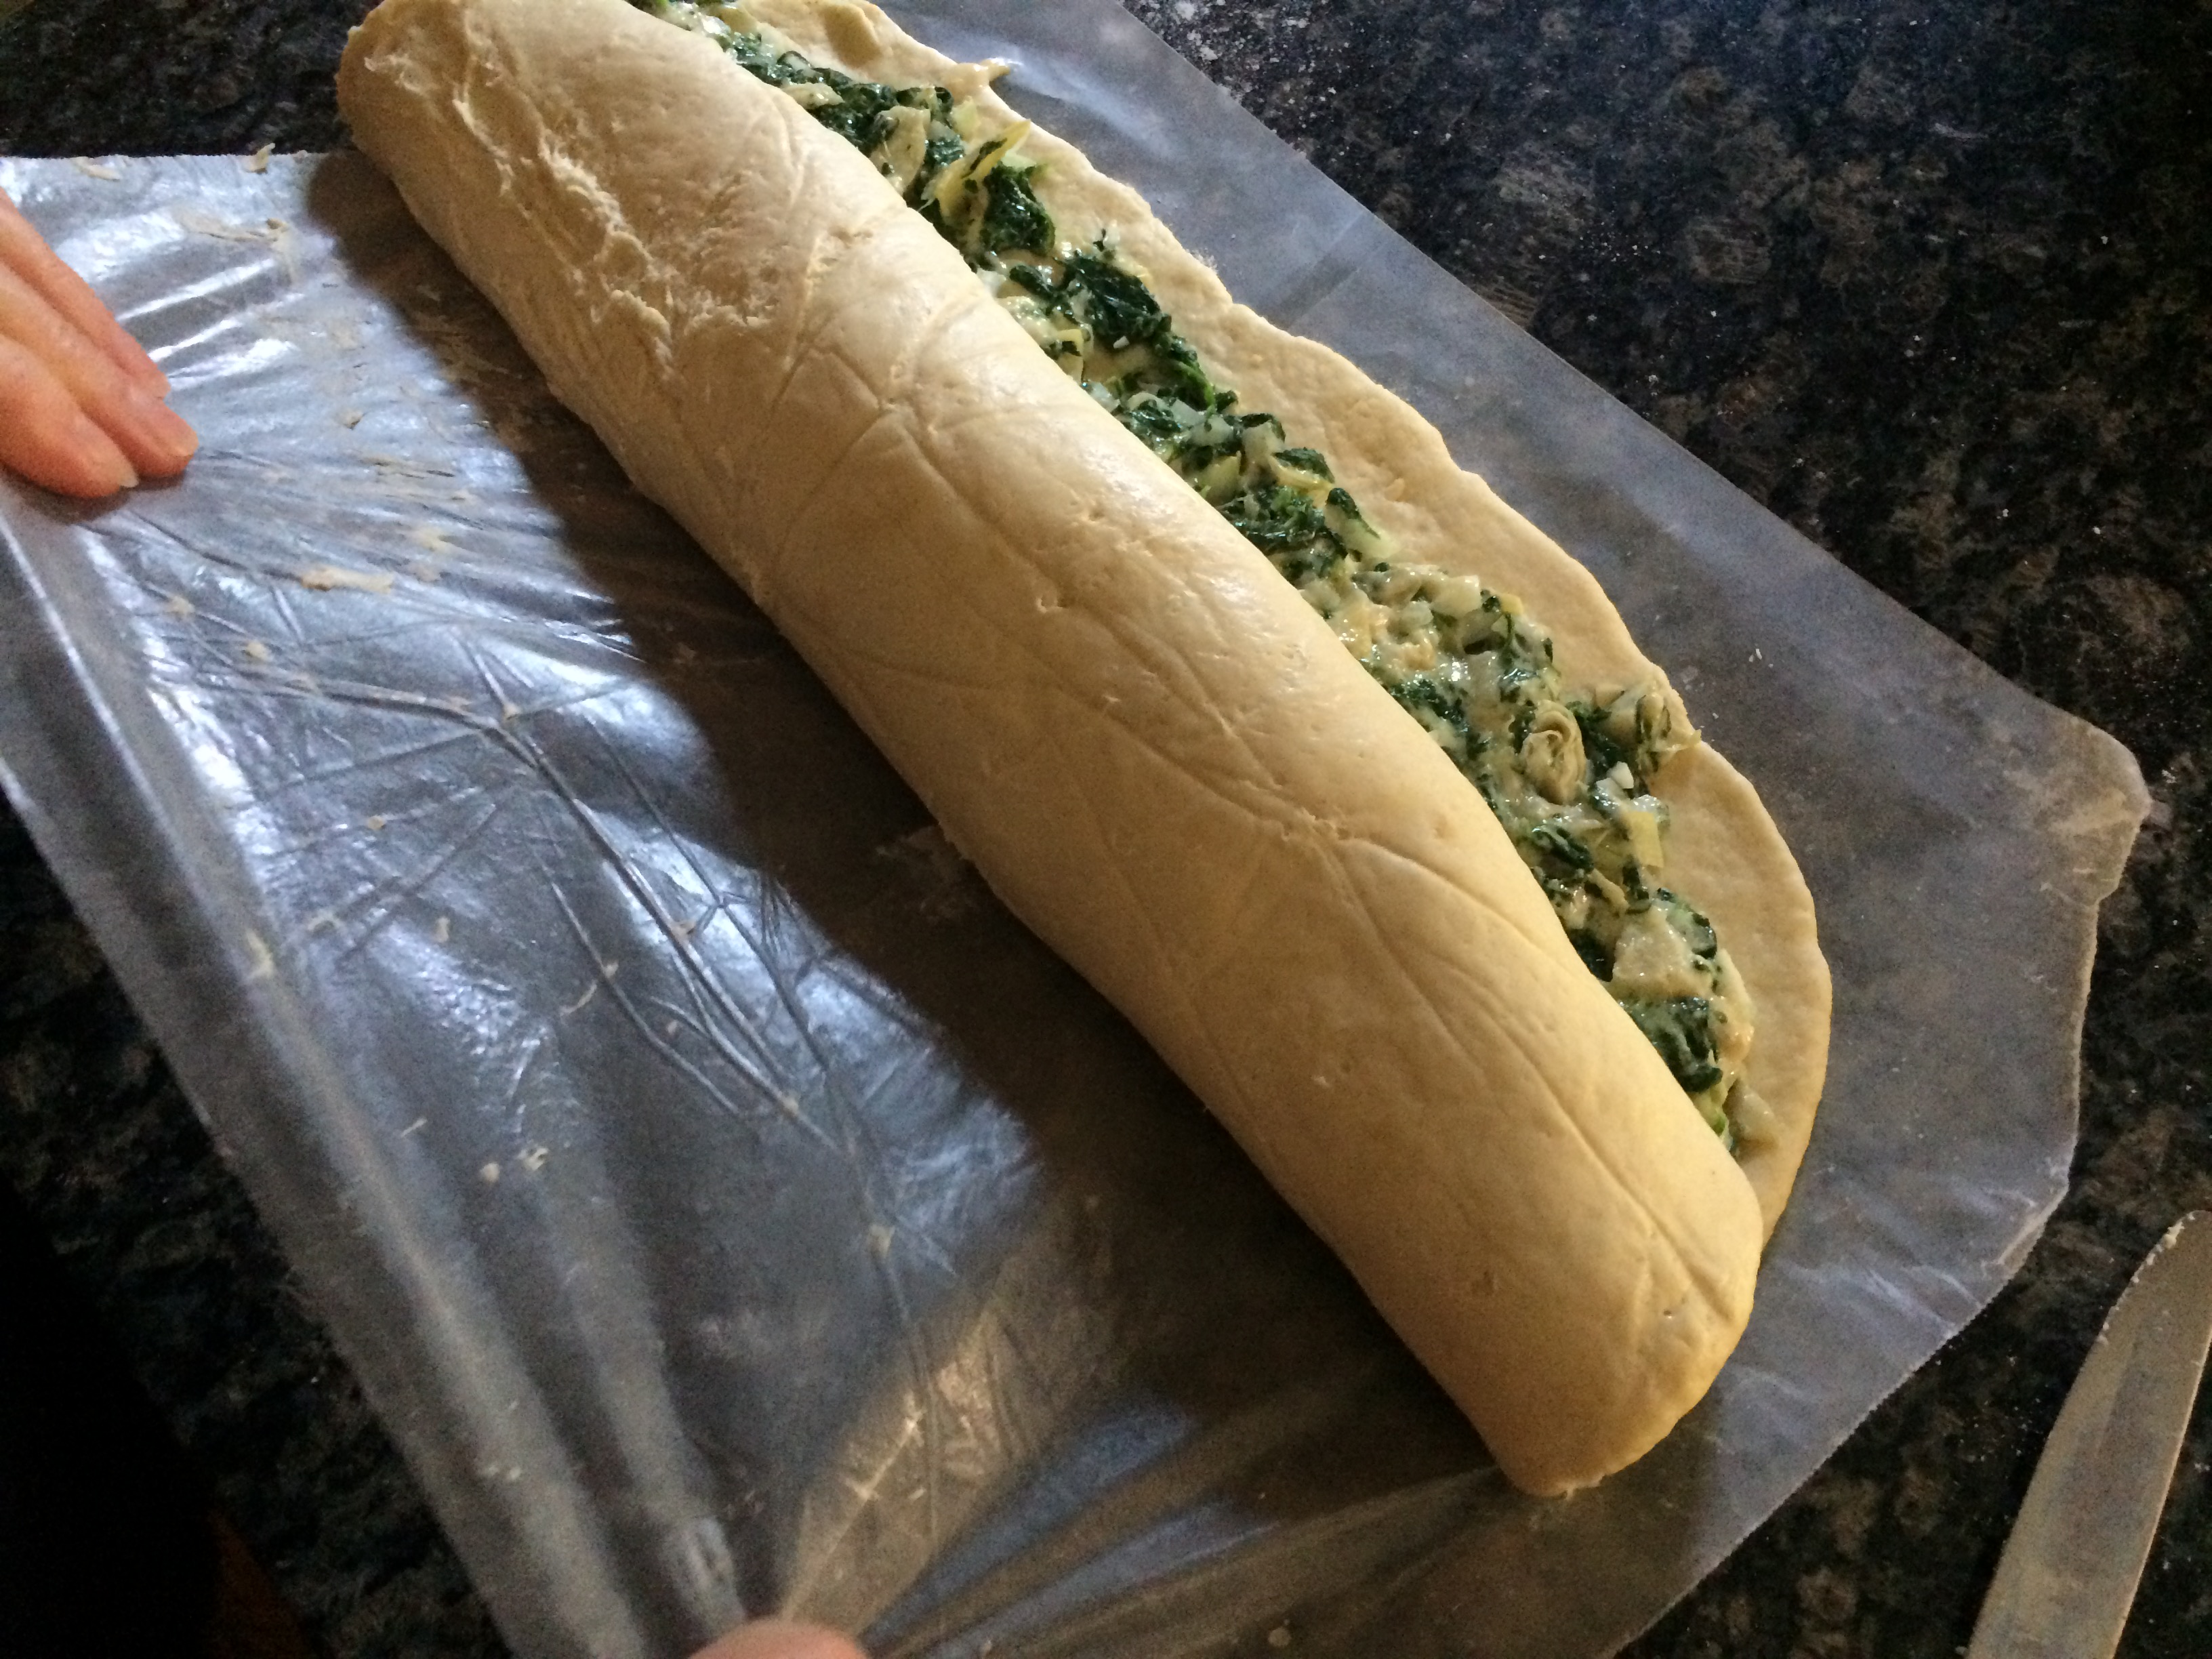
Starting at one of the longer sides, roll the dough in one direction to make a log (do not roll the paper up with it). If using waxed paper, transfer to baking paper or, if you don’t have baking paper, directly to a greased baking sheet or pizza pan.

IMG_2556

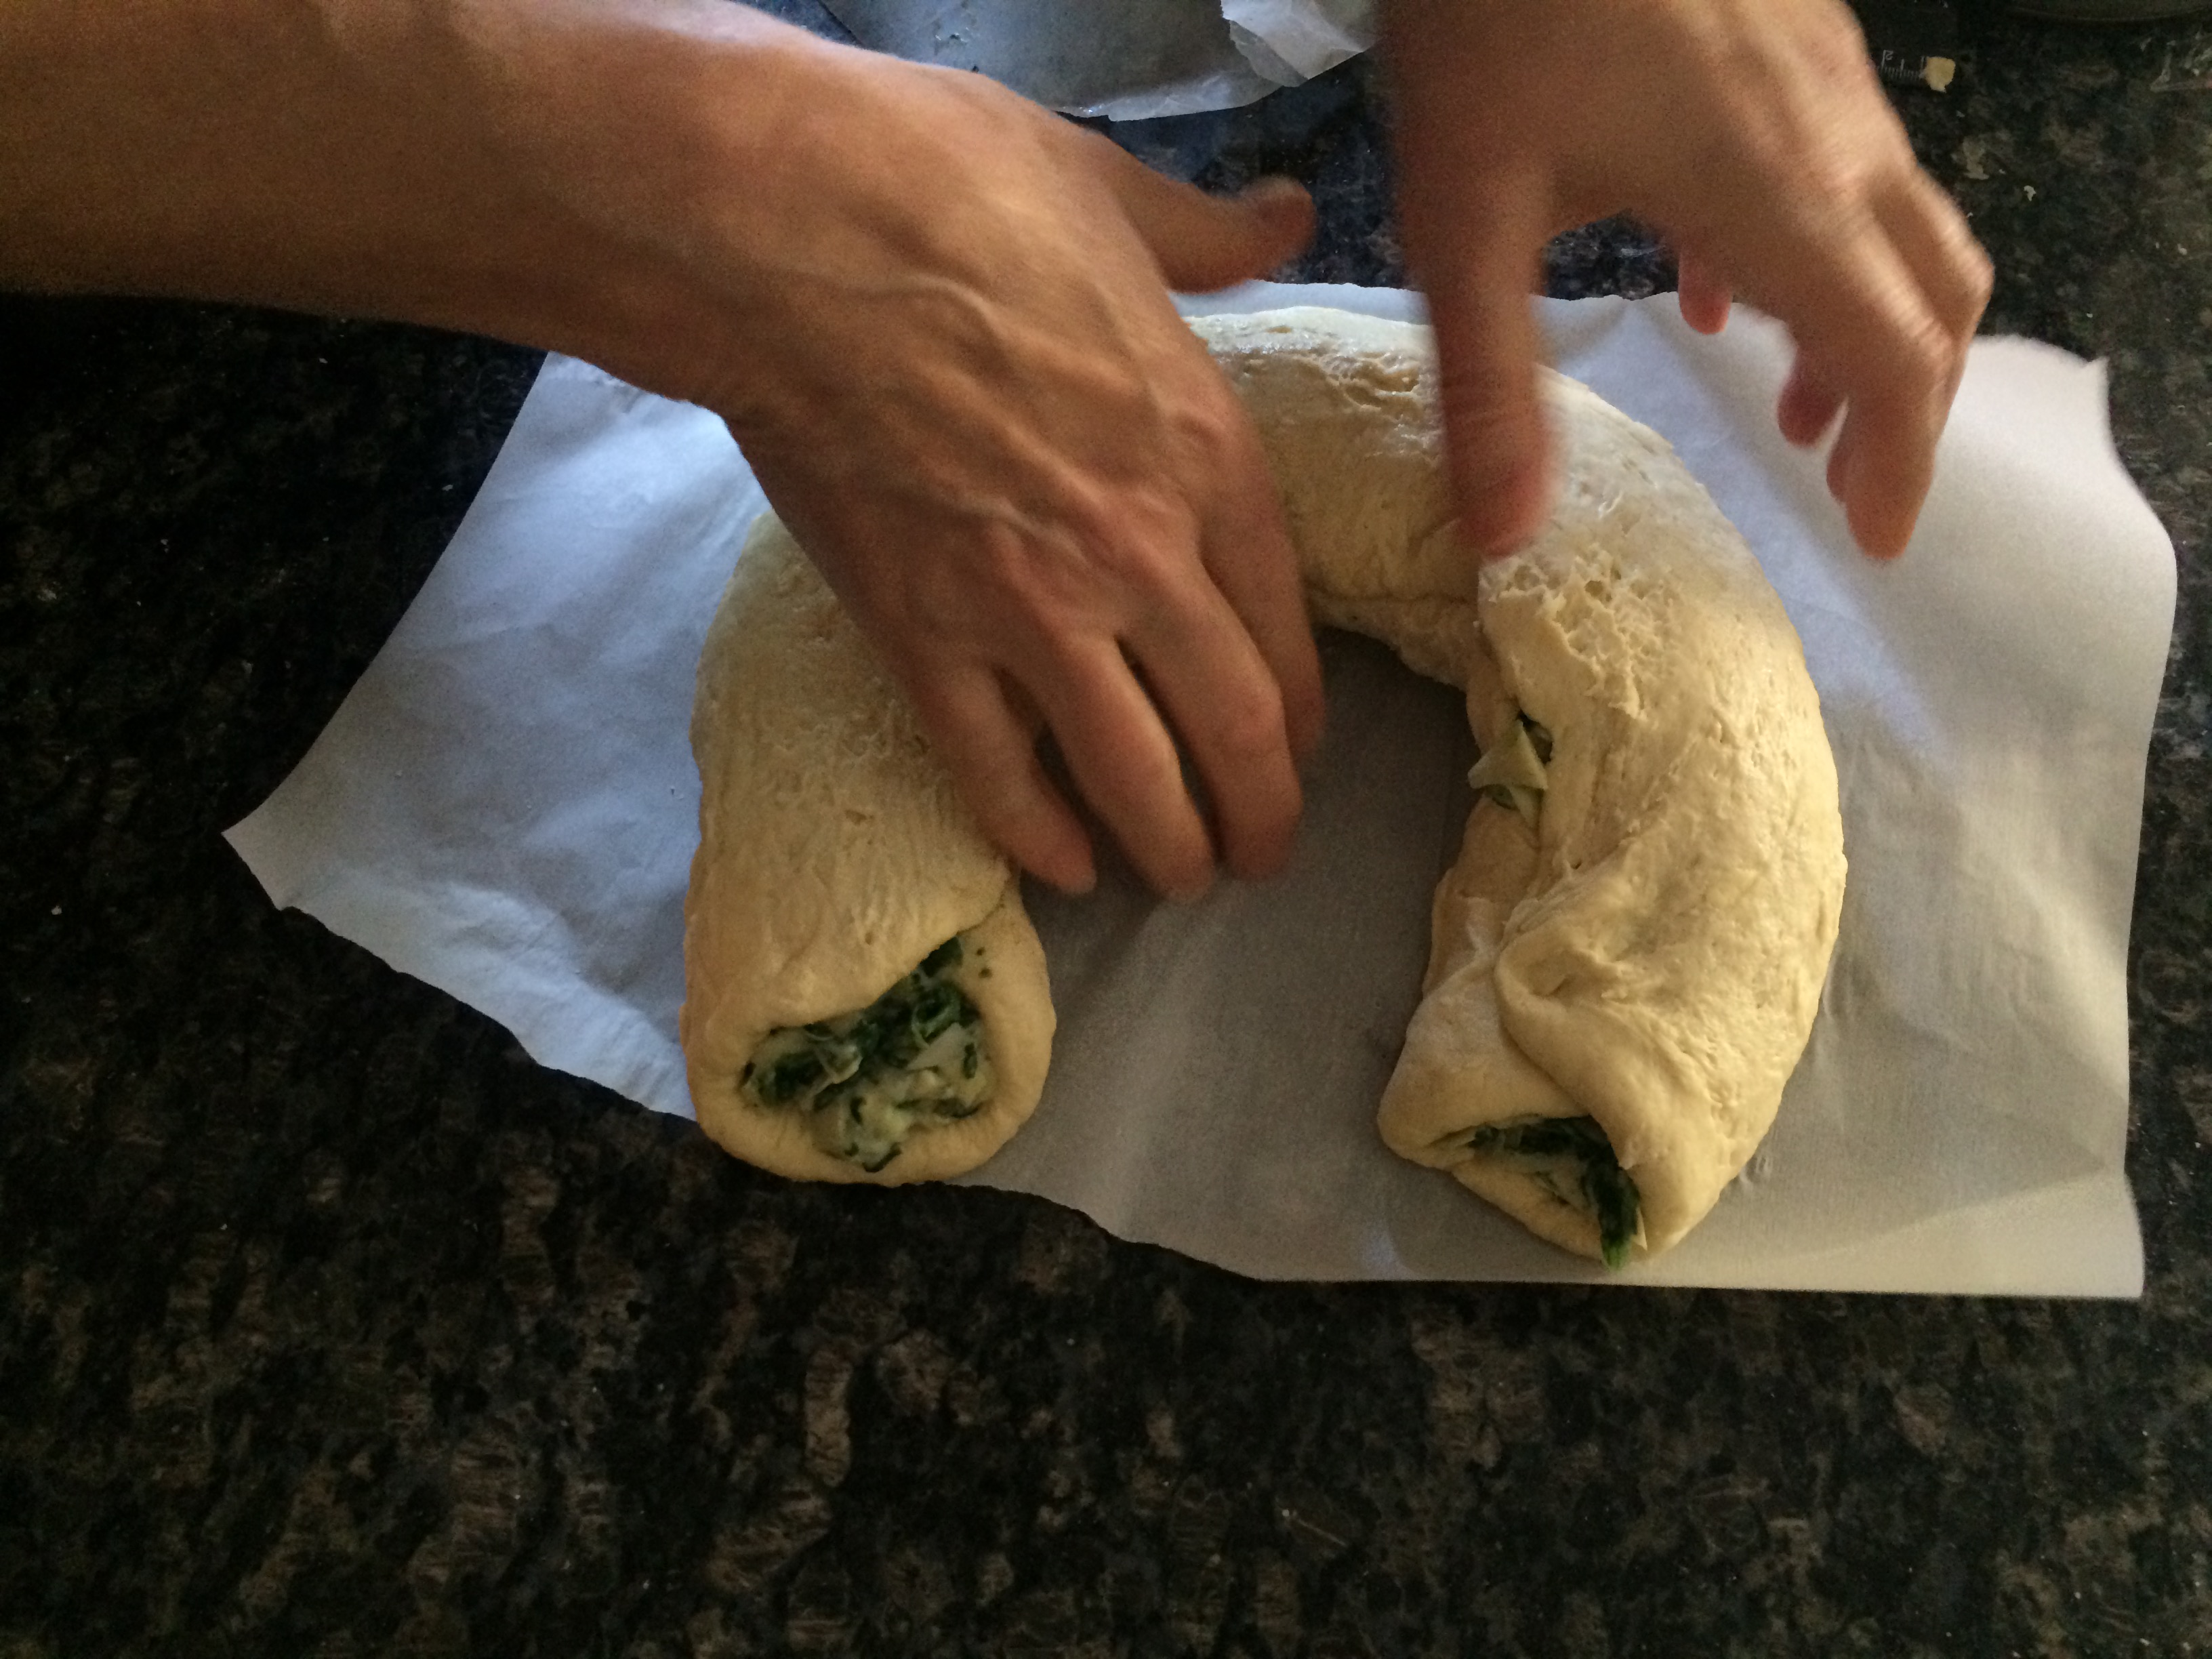
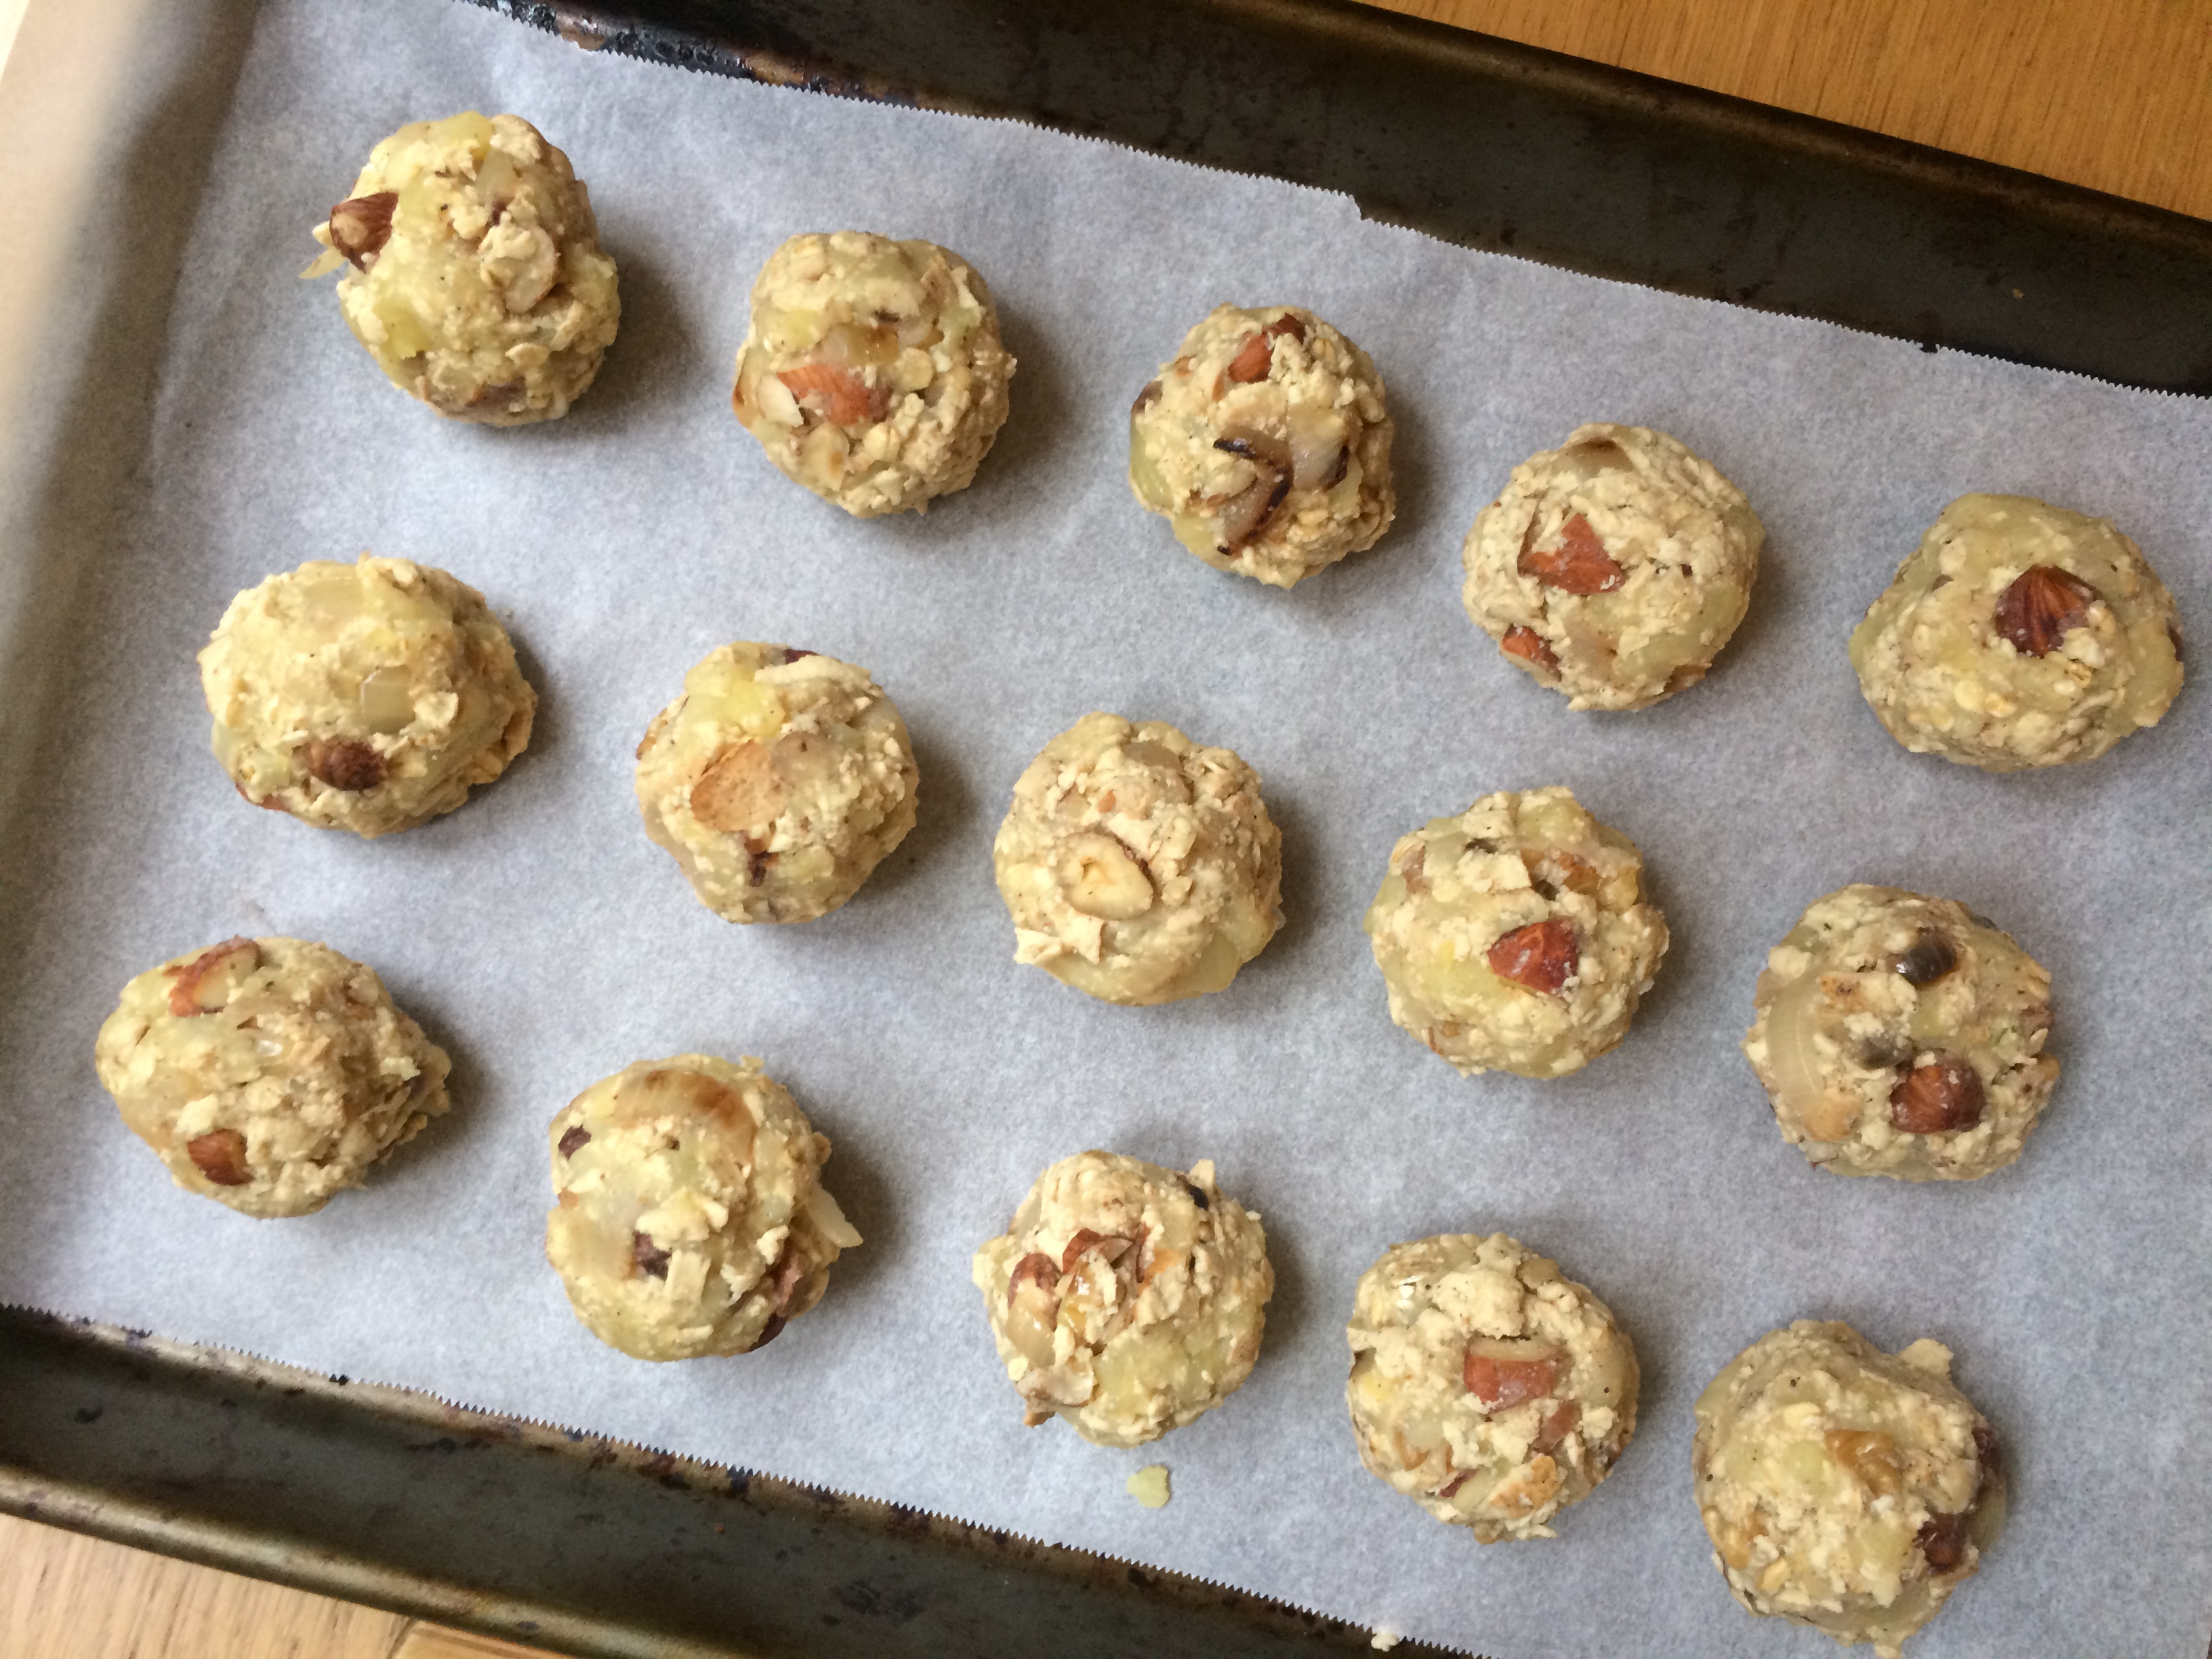
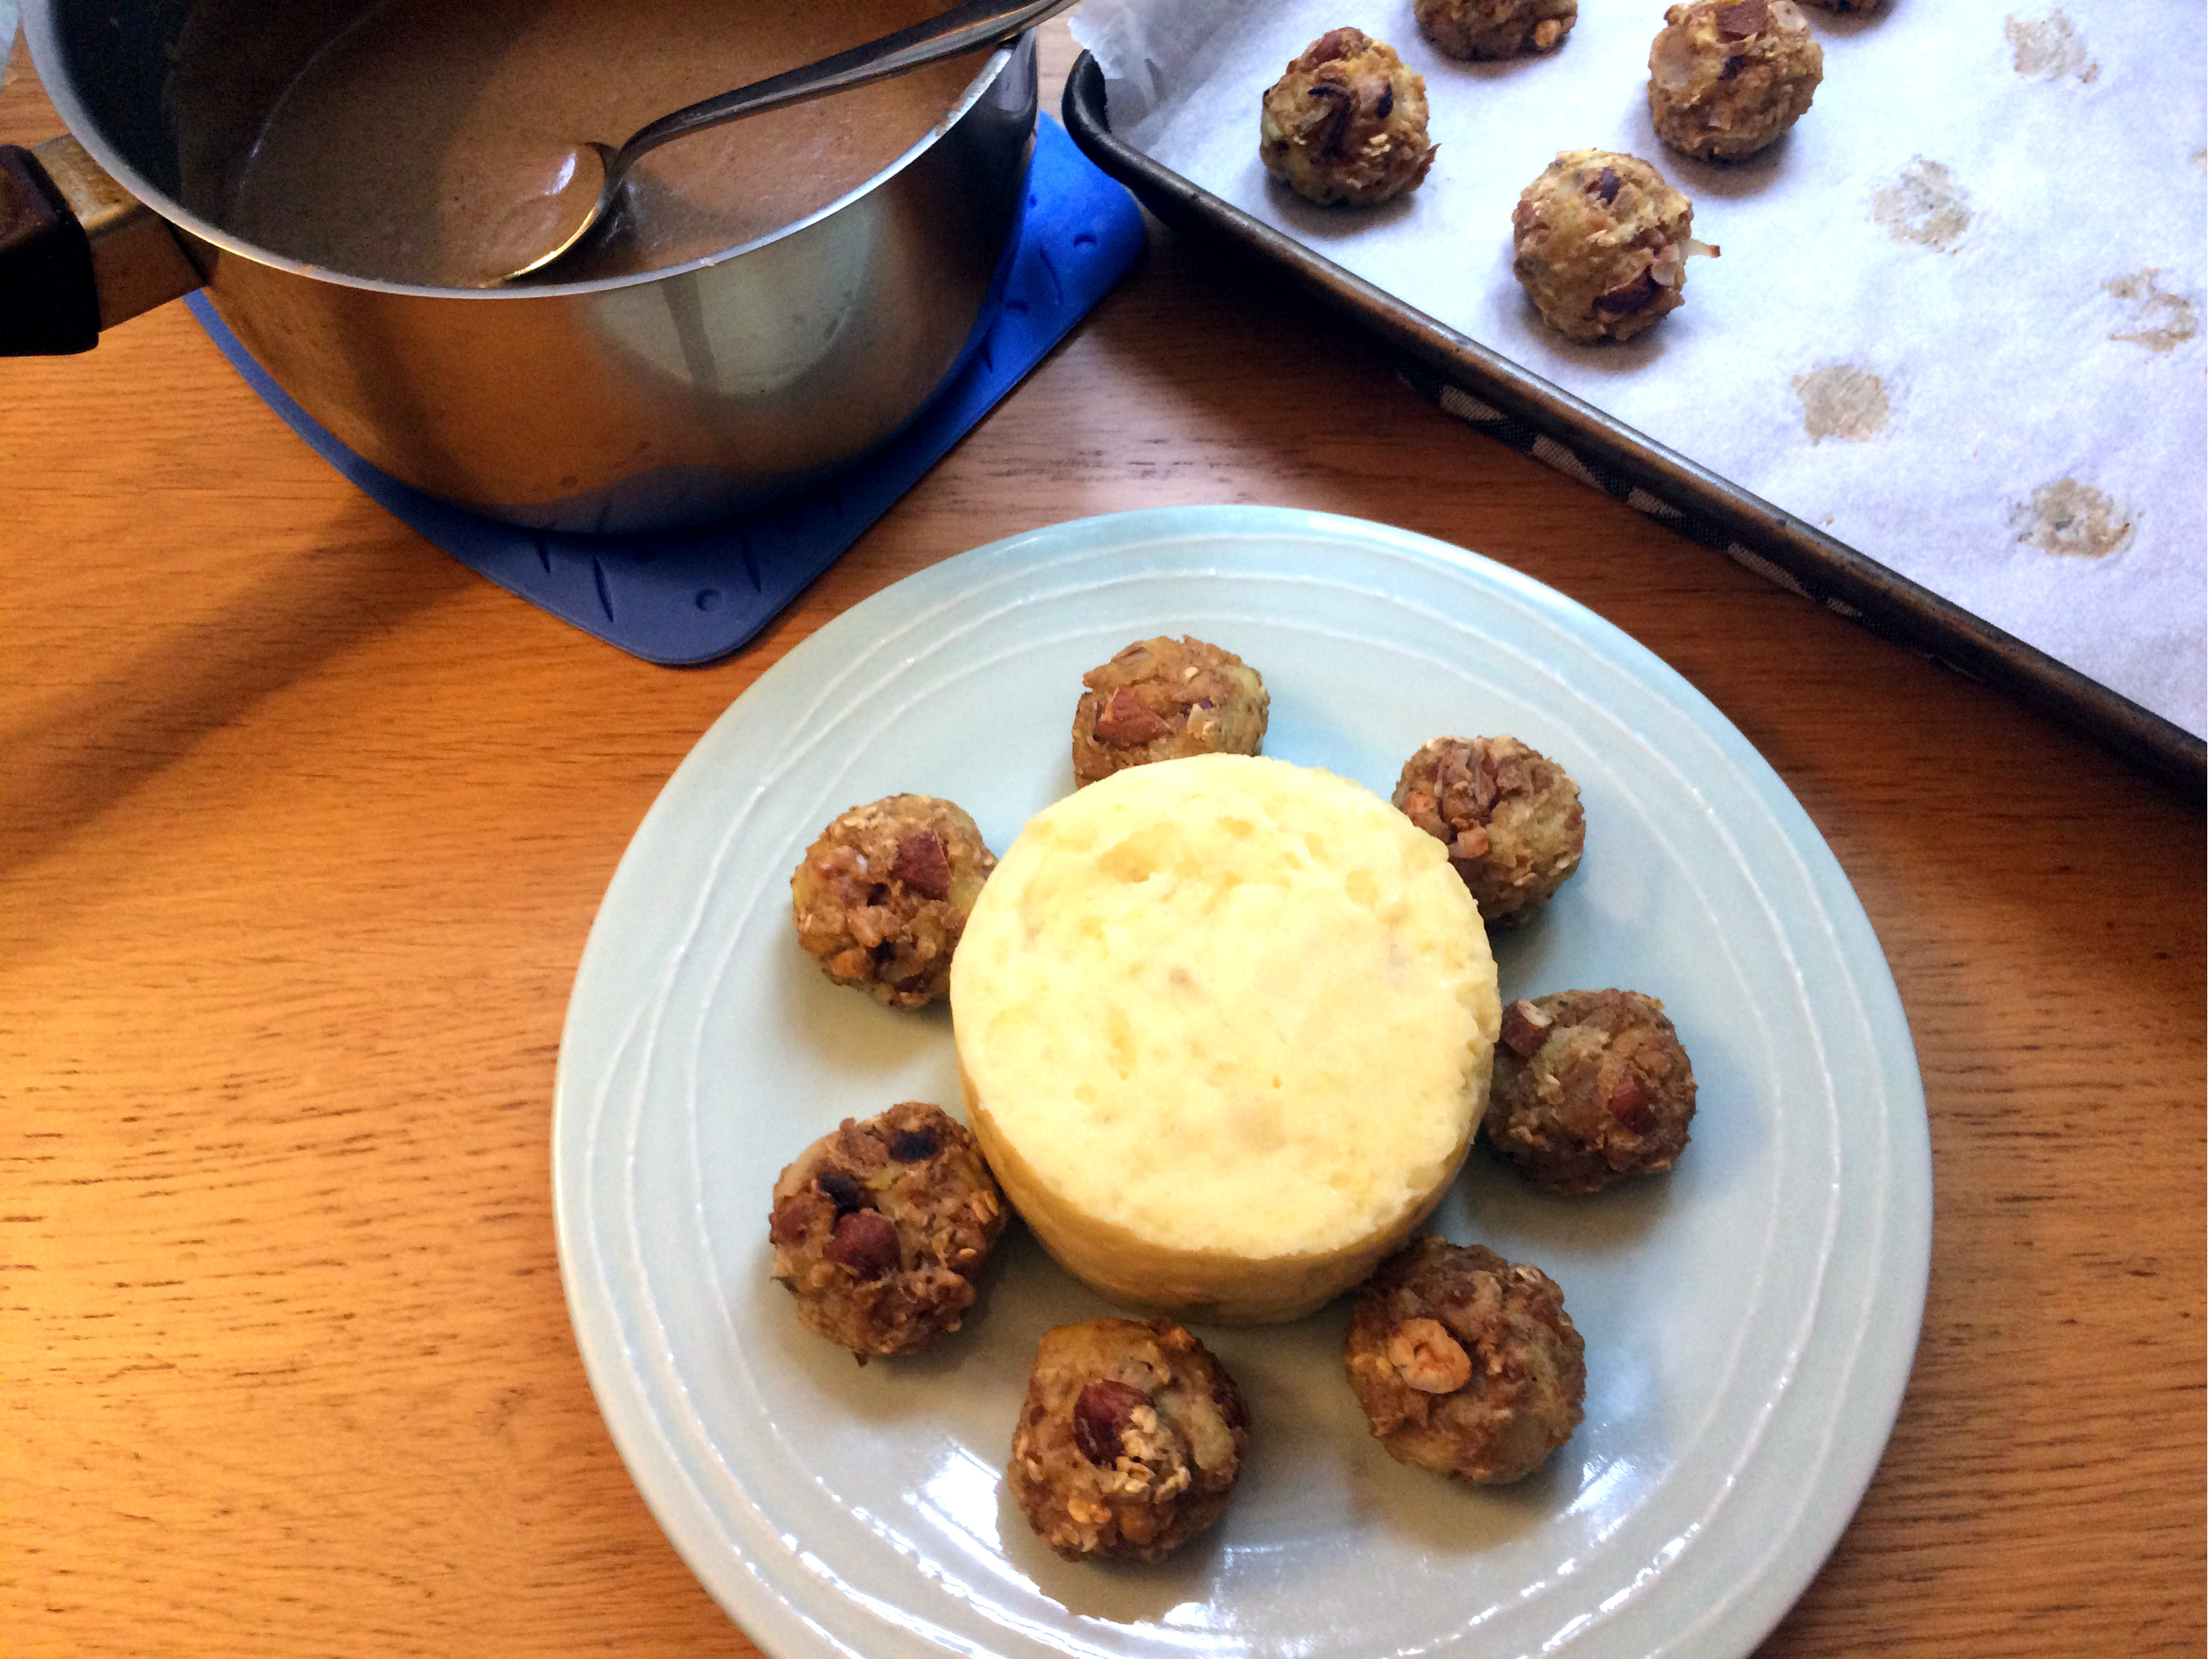
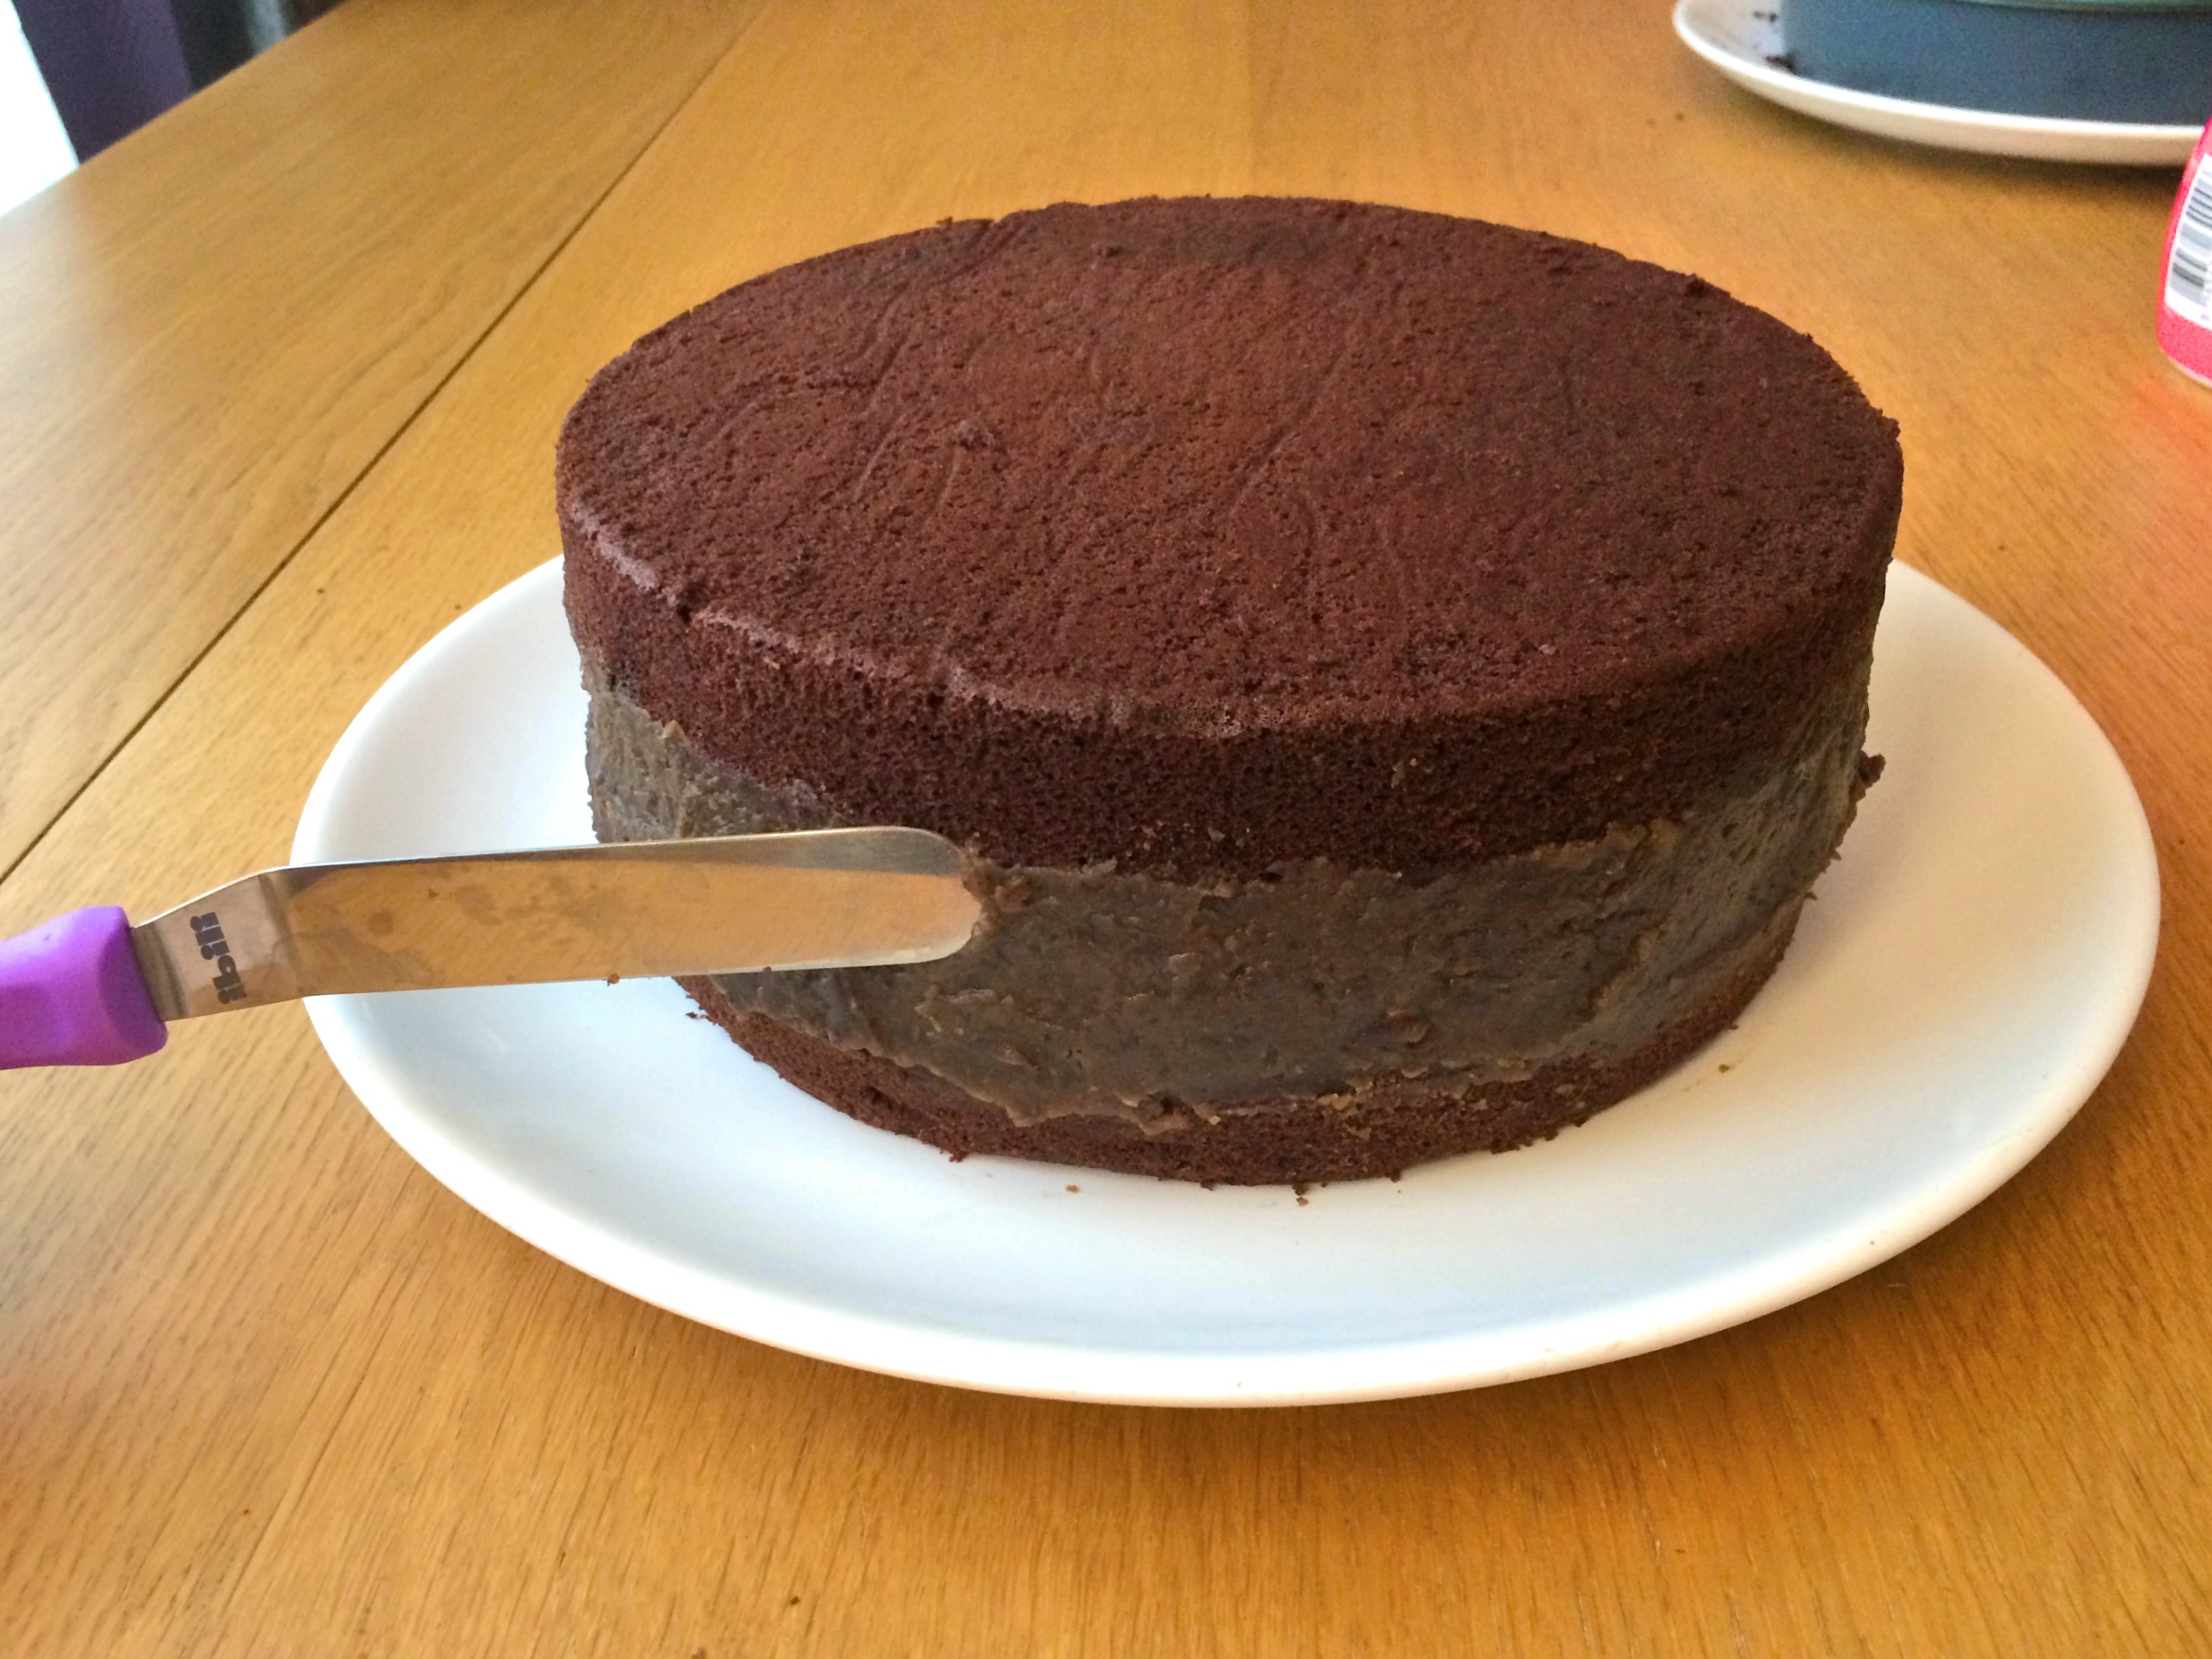
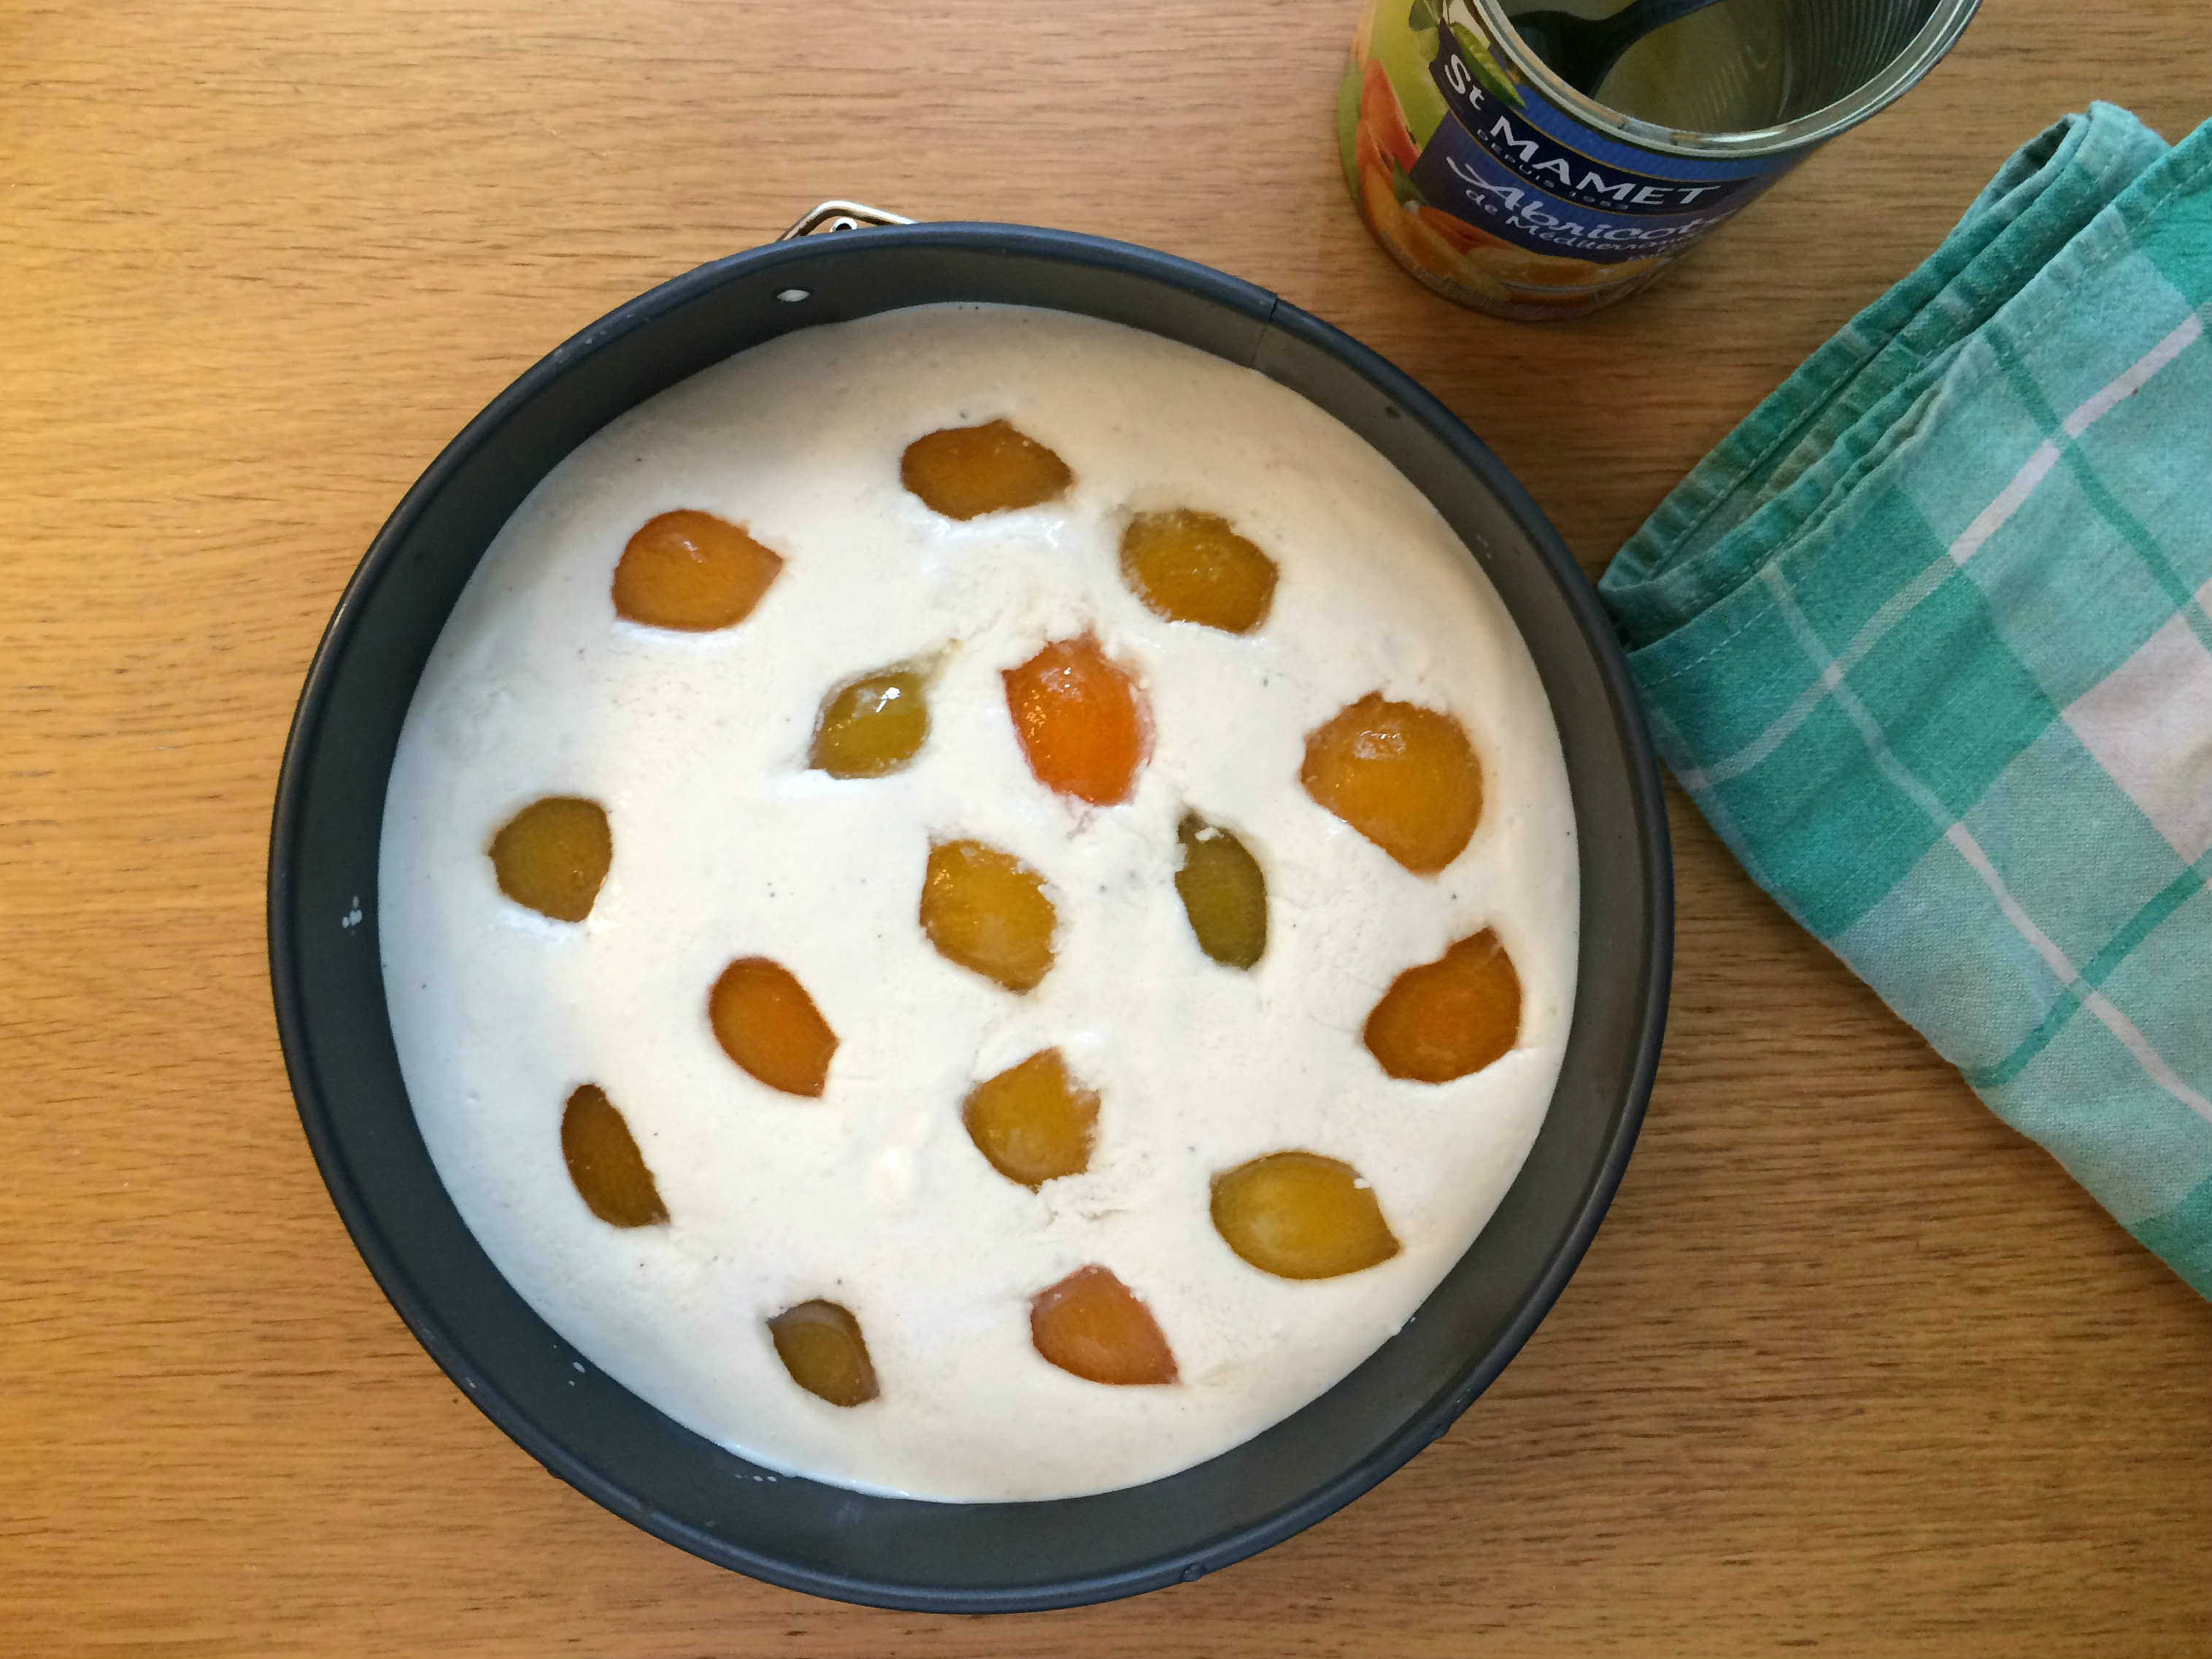
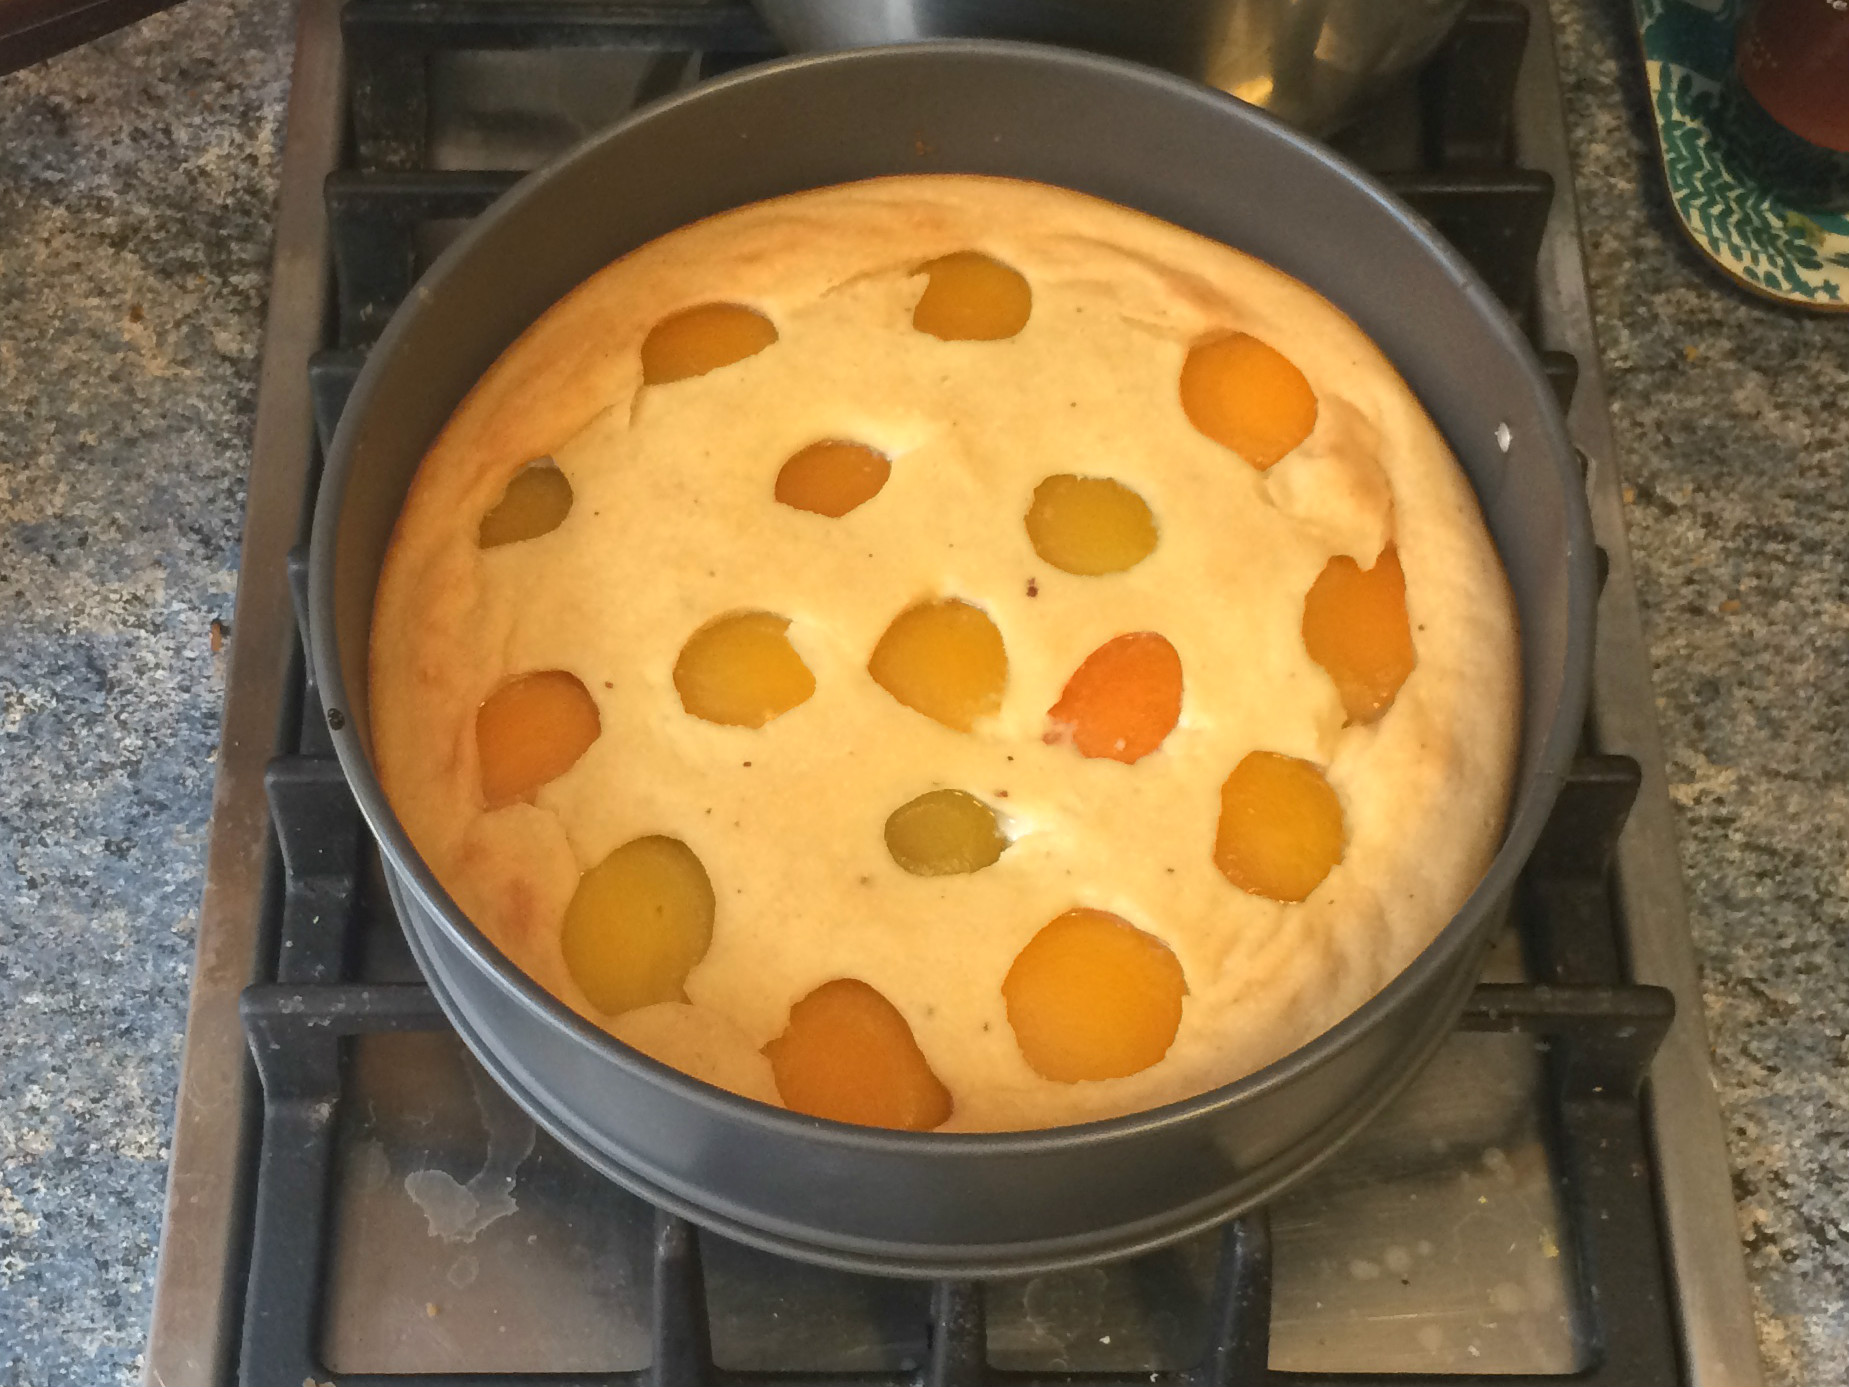
Press along the long edge to seal the log, and bring the ends together to form a ring. Try to keep the center hole large enough to hold the ramekin you’re planning to serve the cheese sauce from.

IMG_2560b


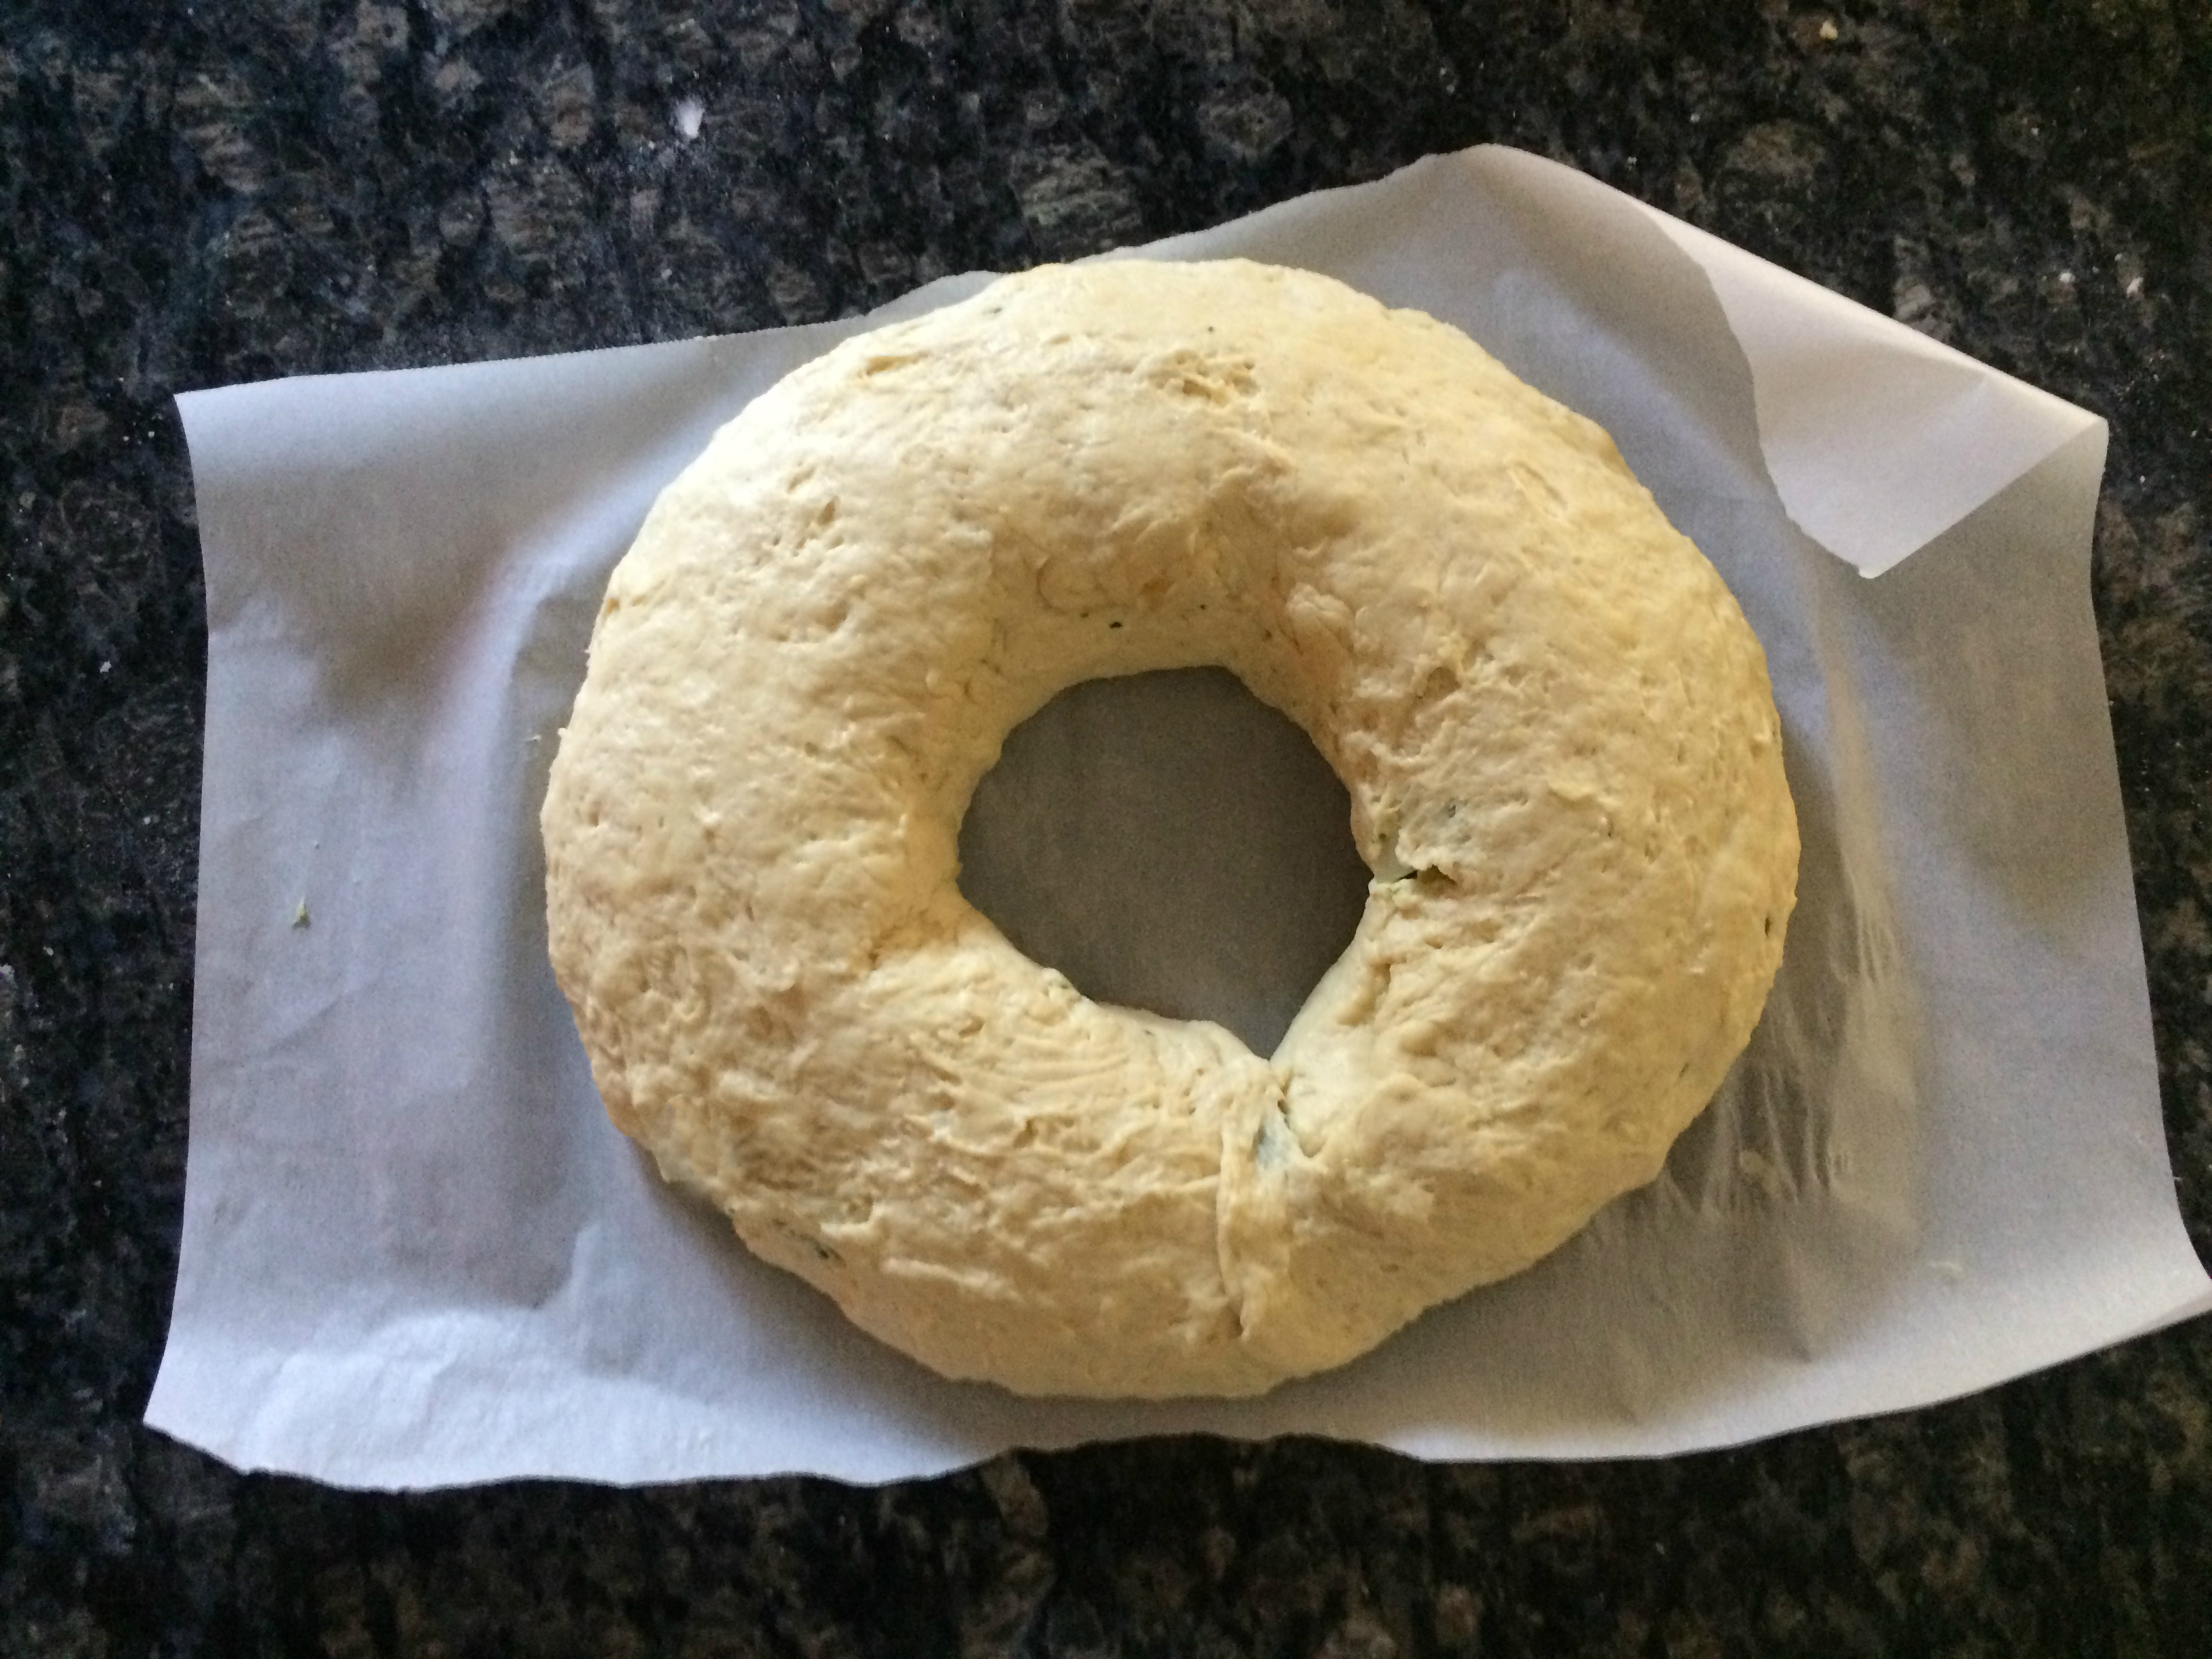
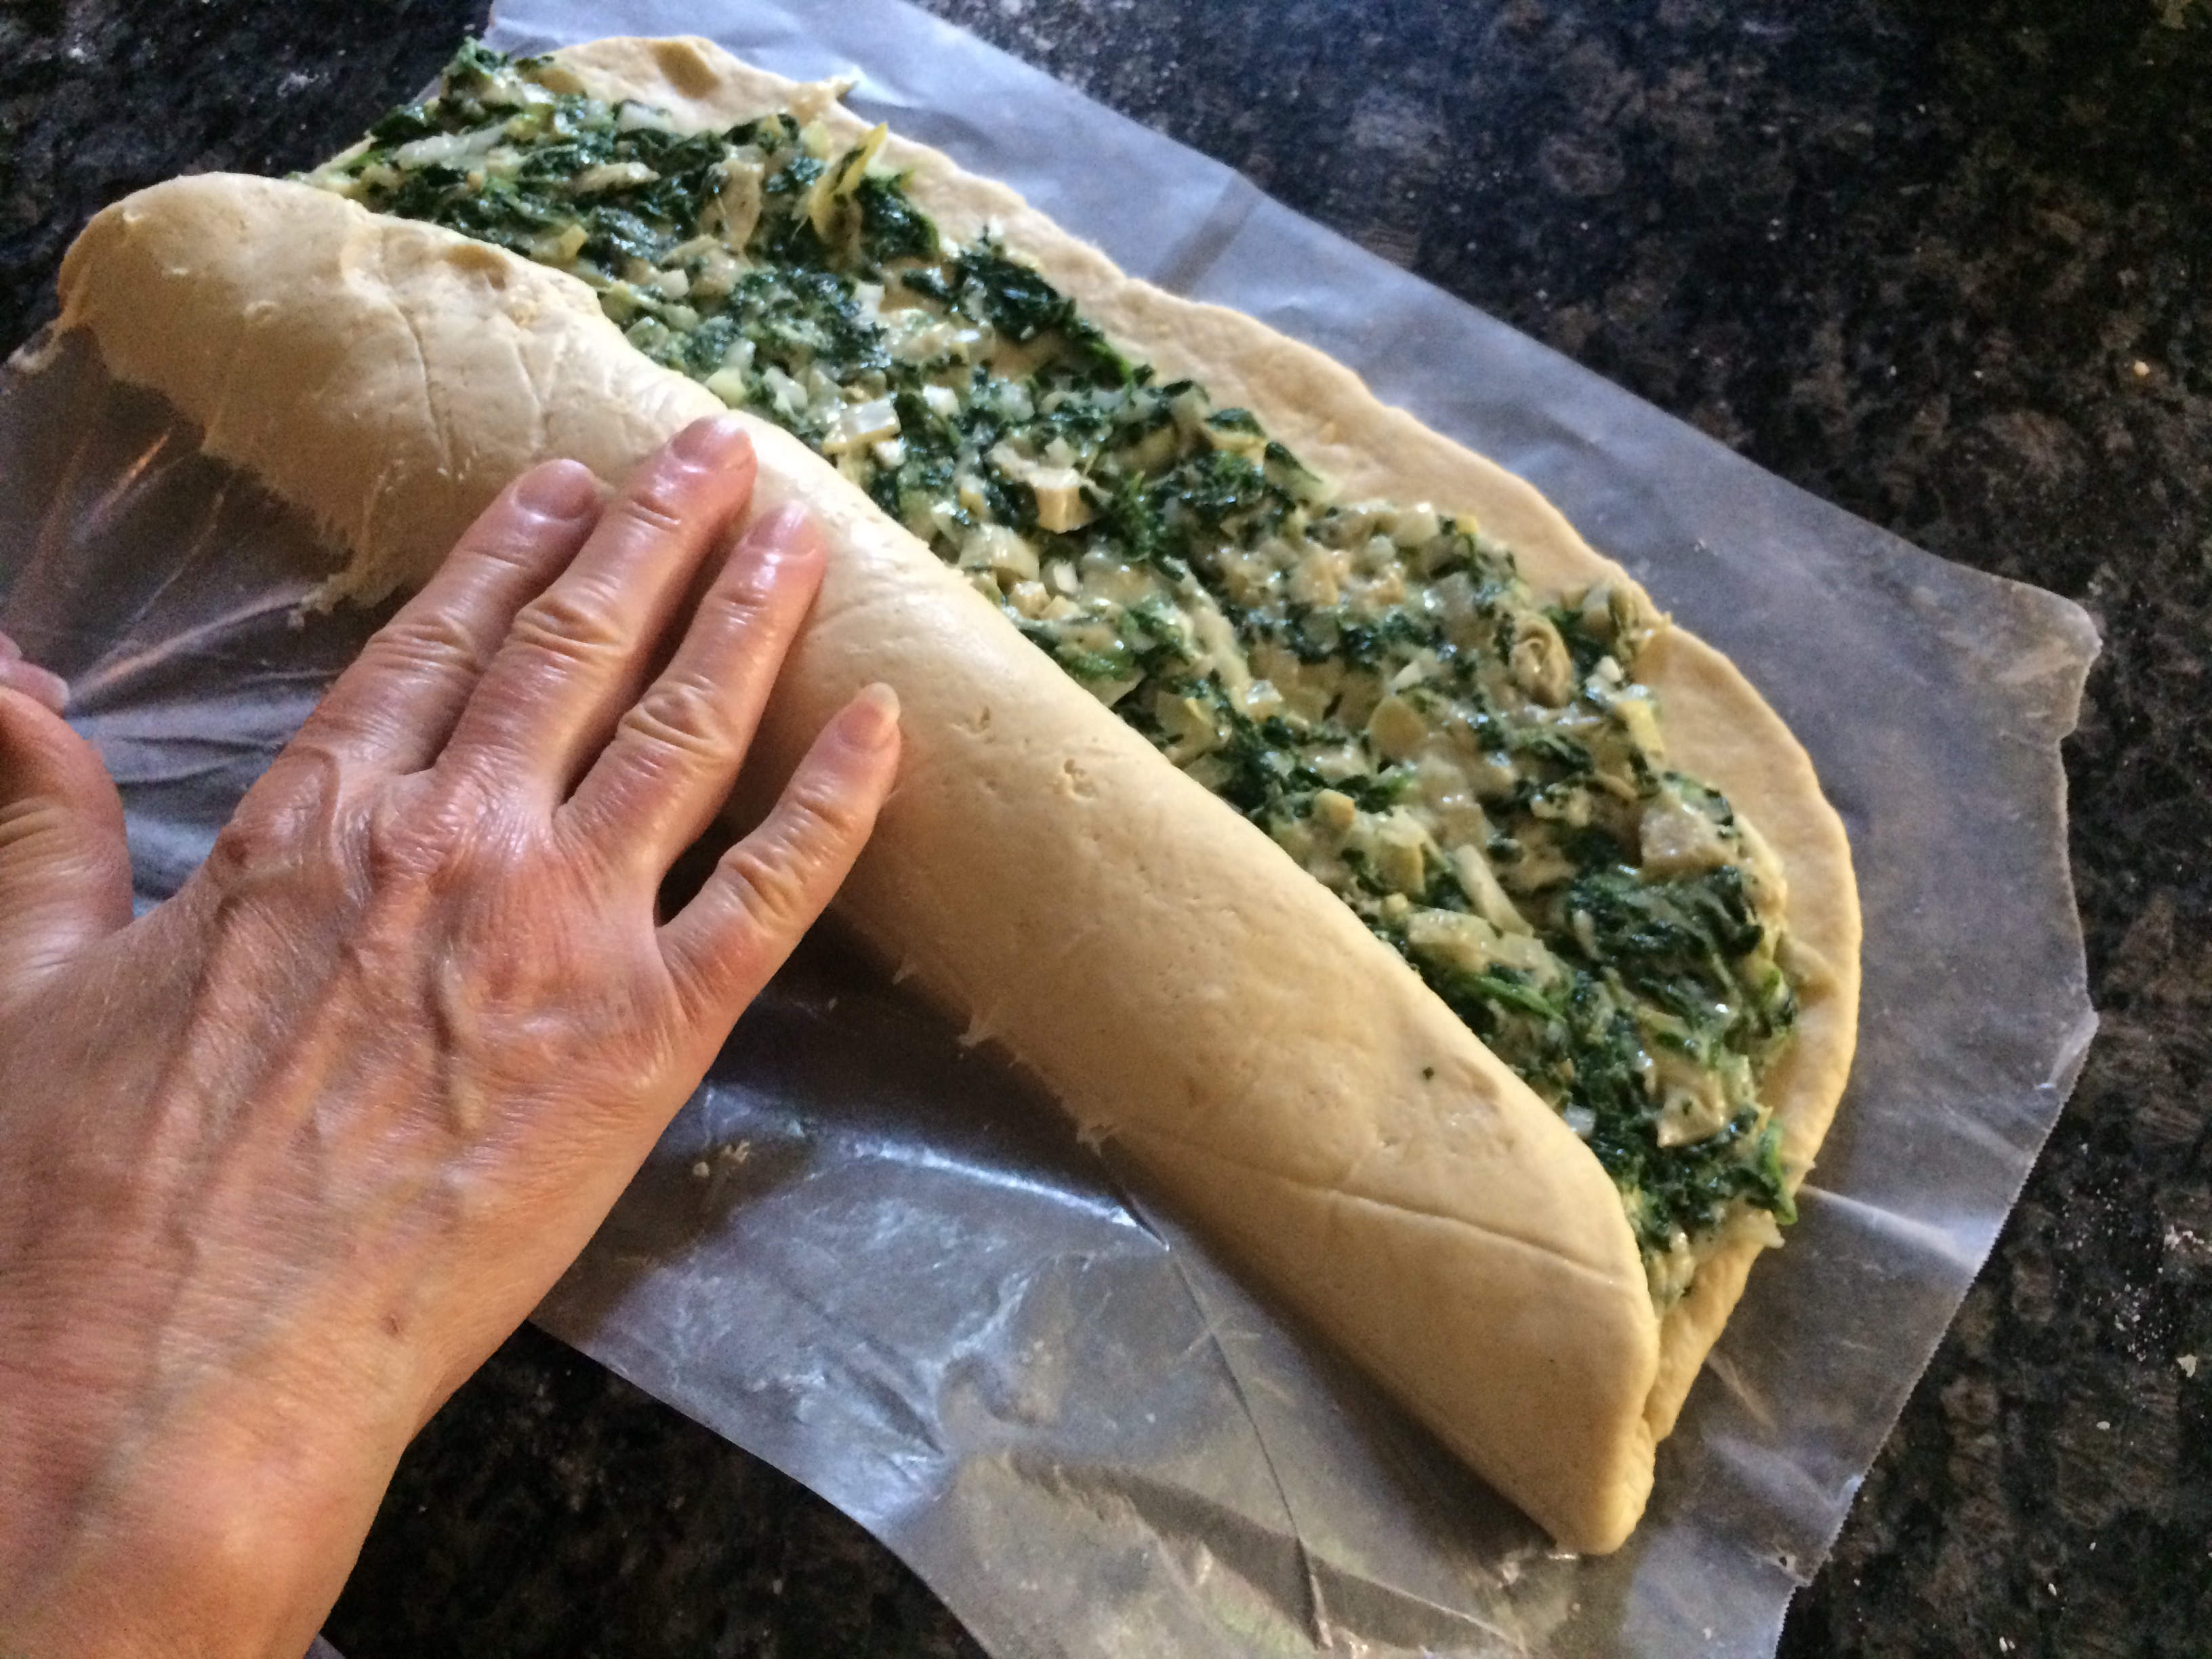
Transfer the baking paper with the log on it to your baking sheet (I forgot to do this until the next step) and press the ends together to seal the ring, trying not to pinch it too much and make it too narrow. Don’t stress too much if the dough stretches and breaks in some places; it will be less obvious once the ring has baked.

IMG_2564b


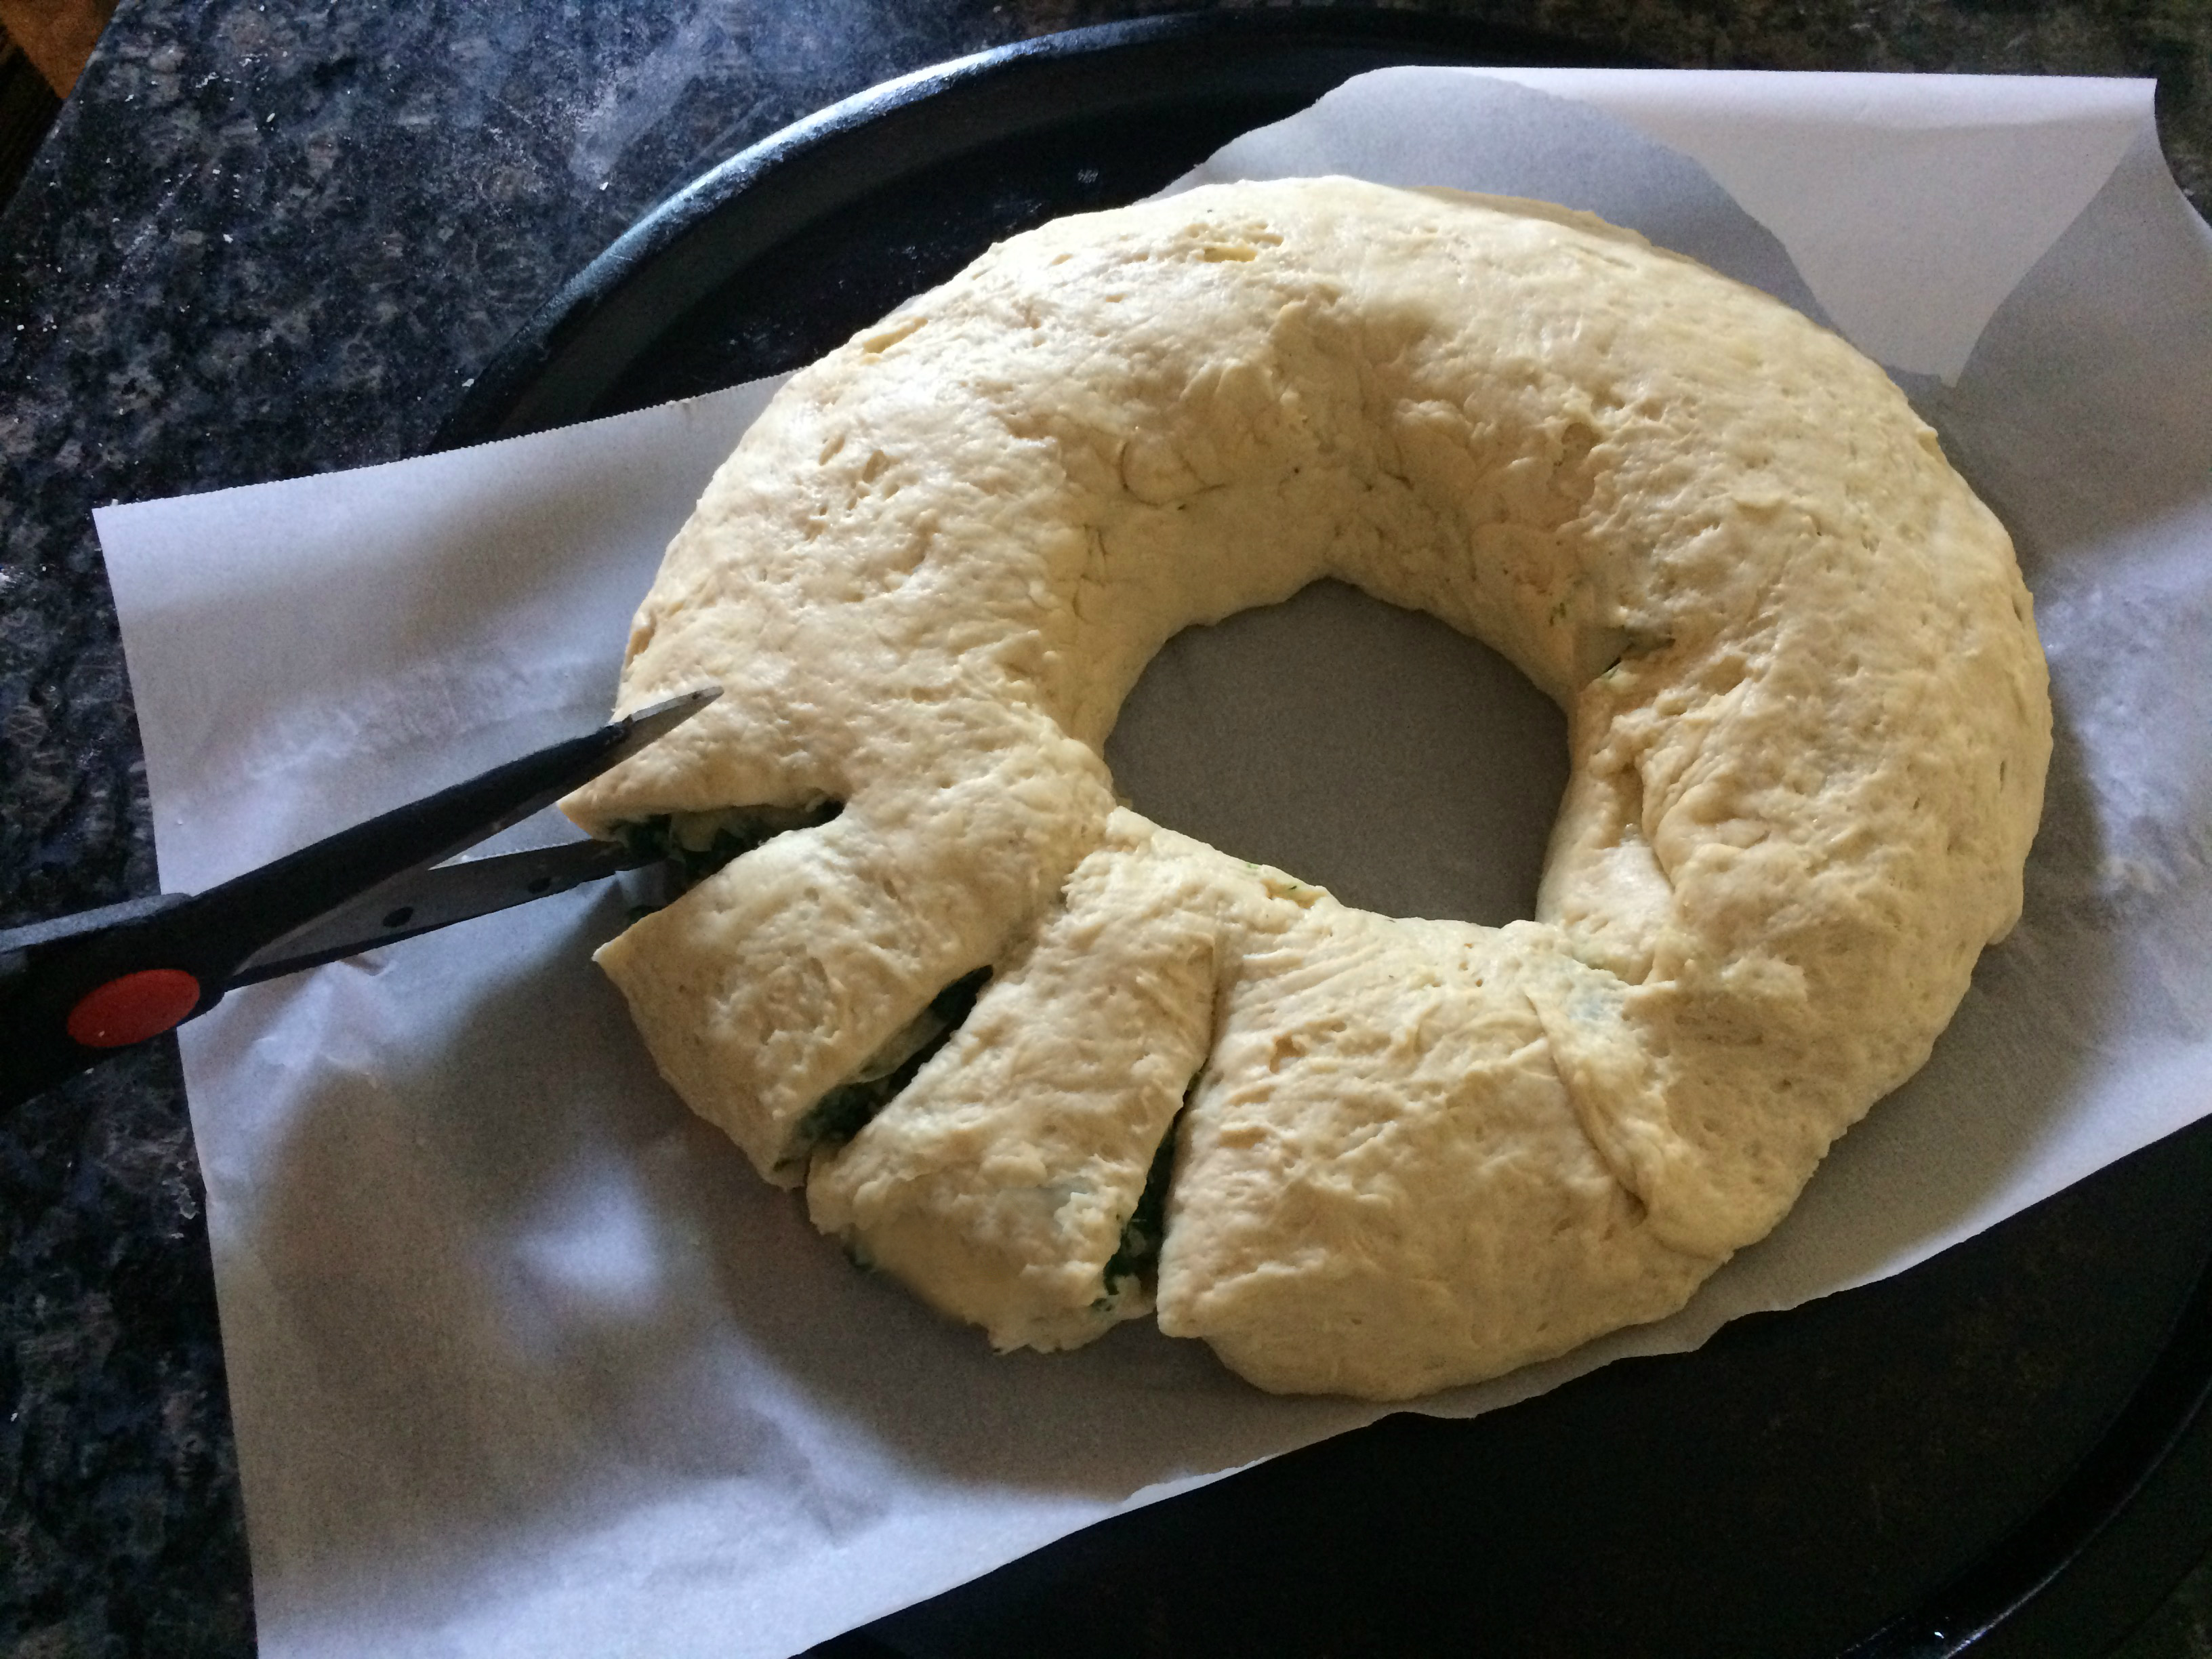
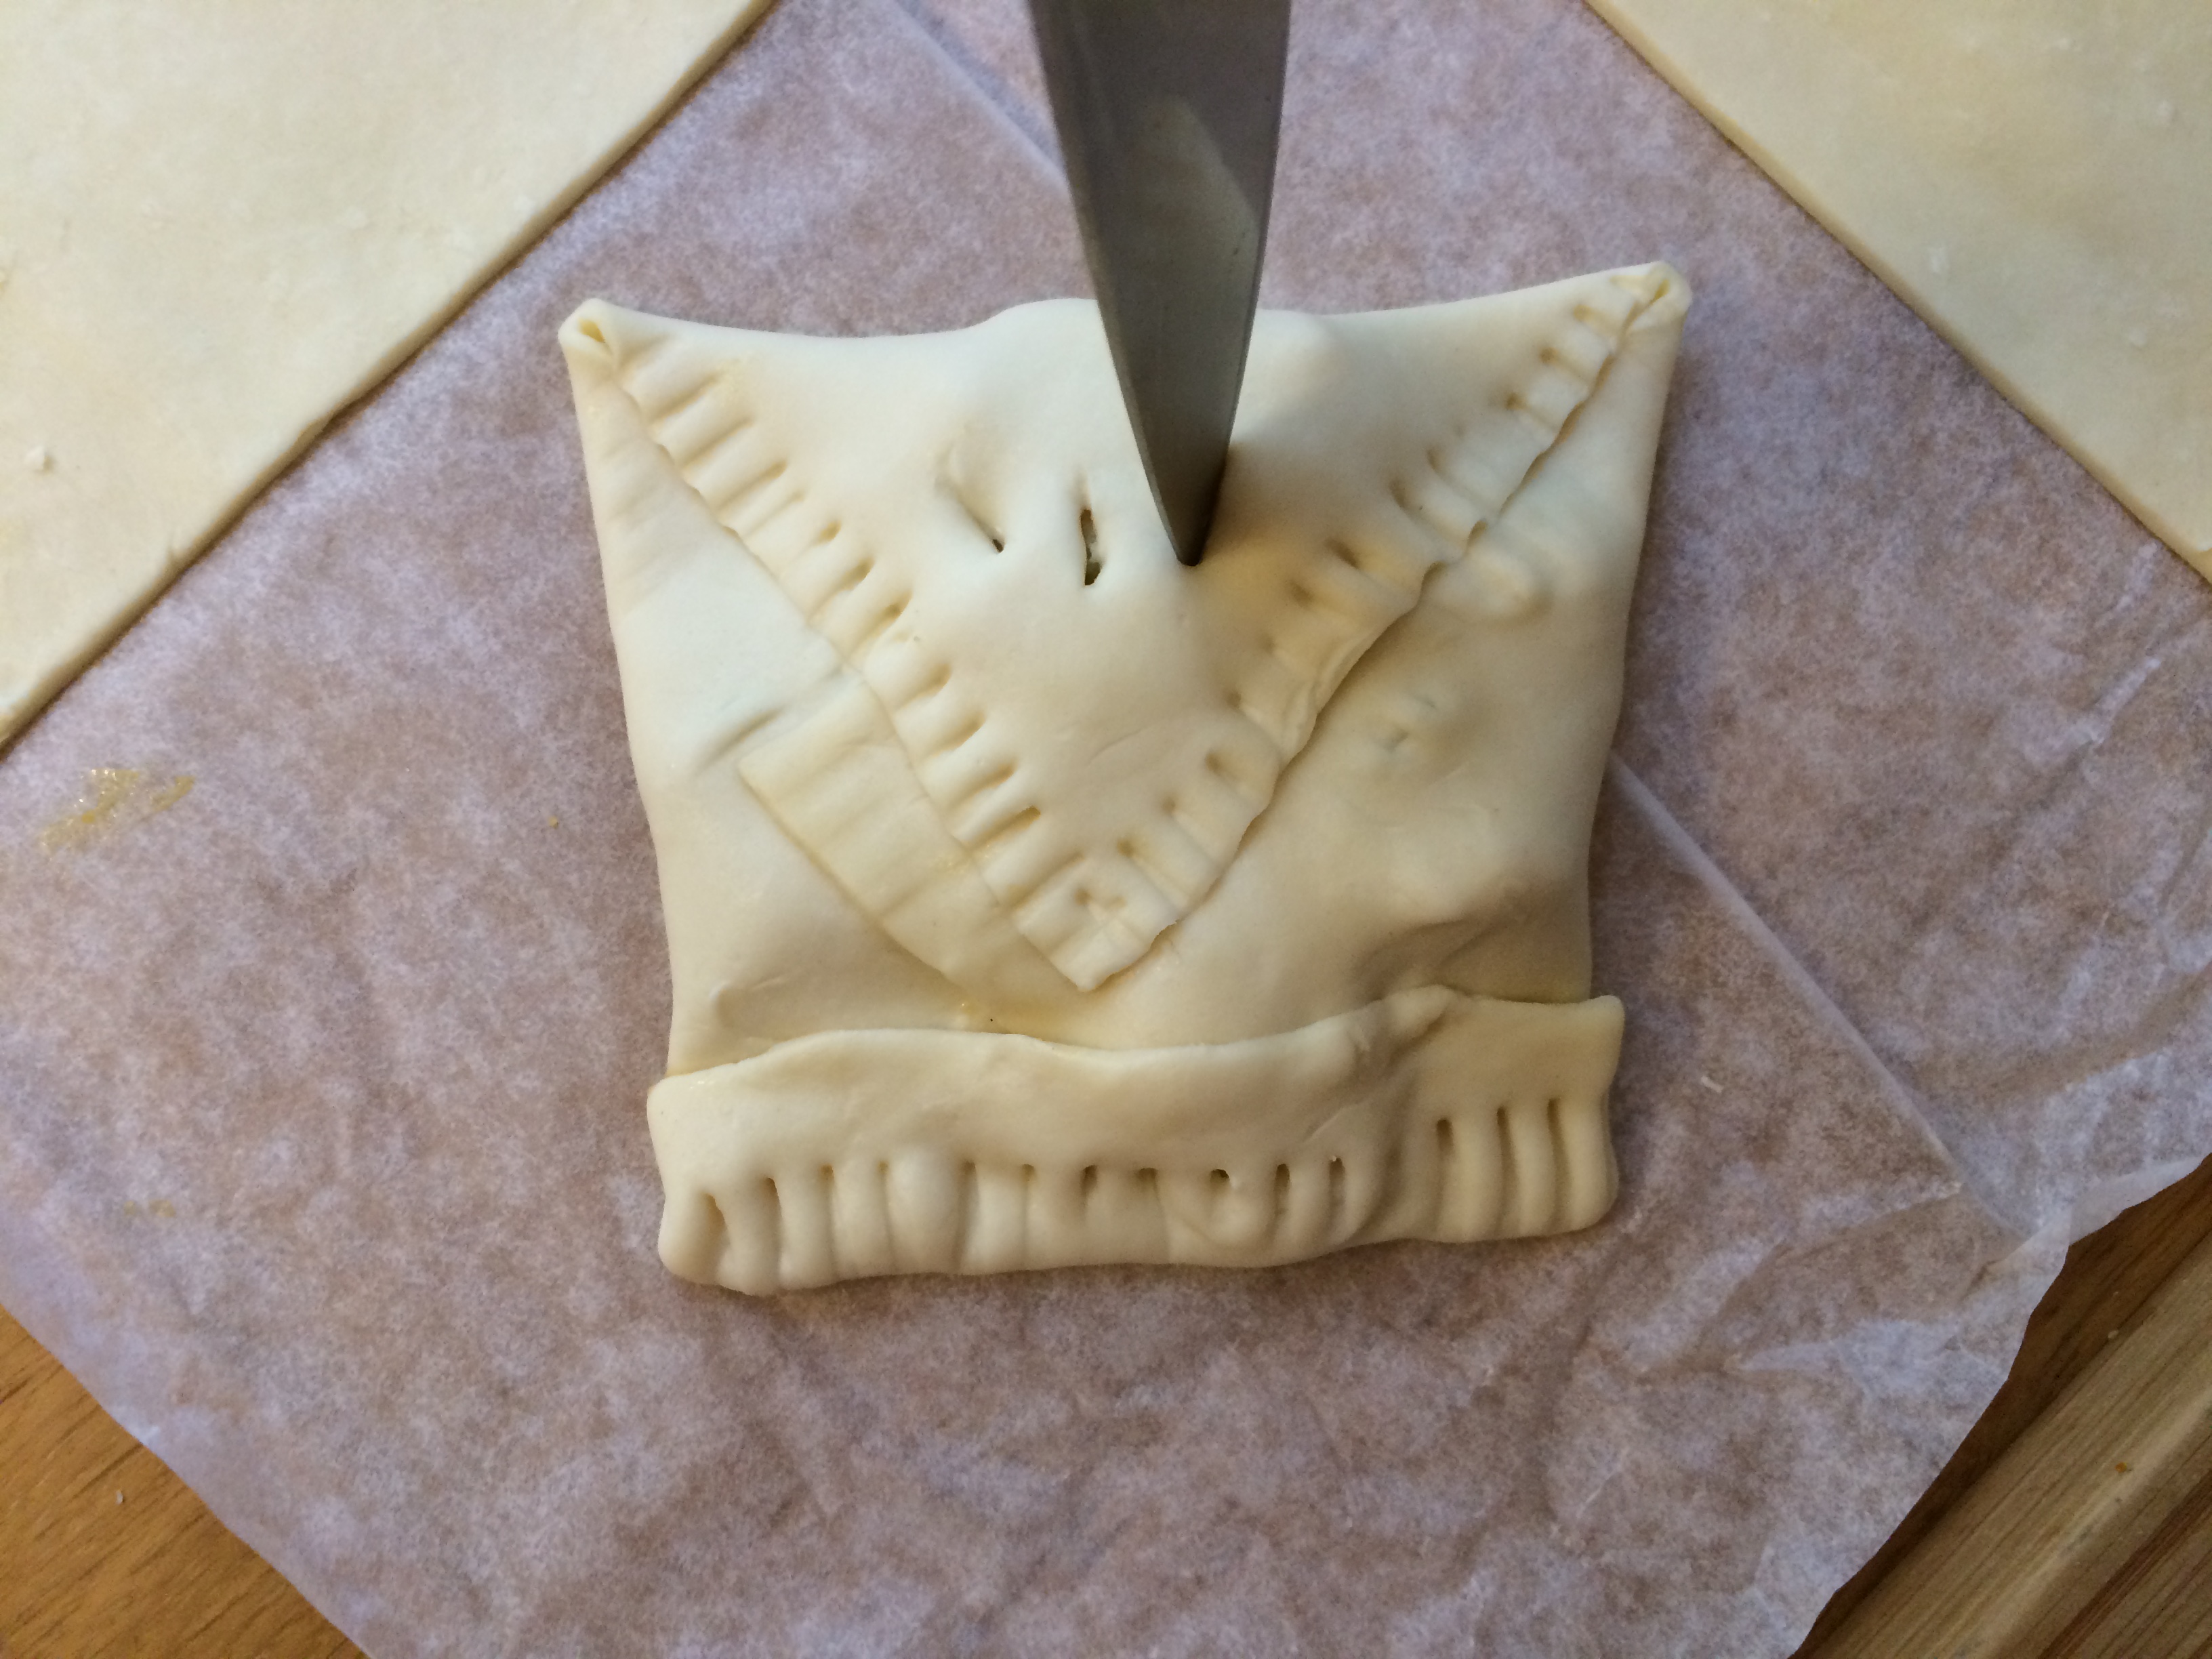
With clean kitchen scissors, make cuts two-thirds of the way straight through the log at one-inch (three-centimeter) intervals all the way around the ring.

IMG_2565b.jpg


IMG_2569b


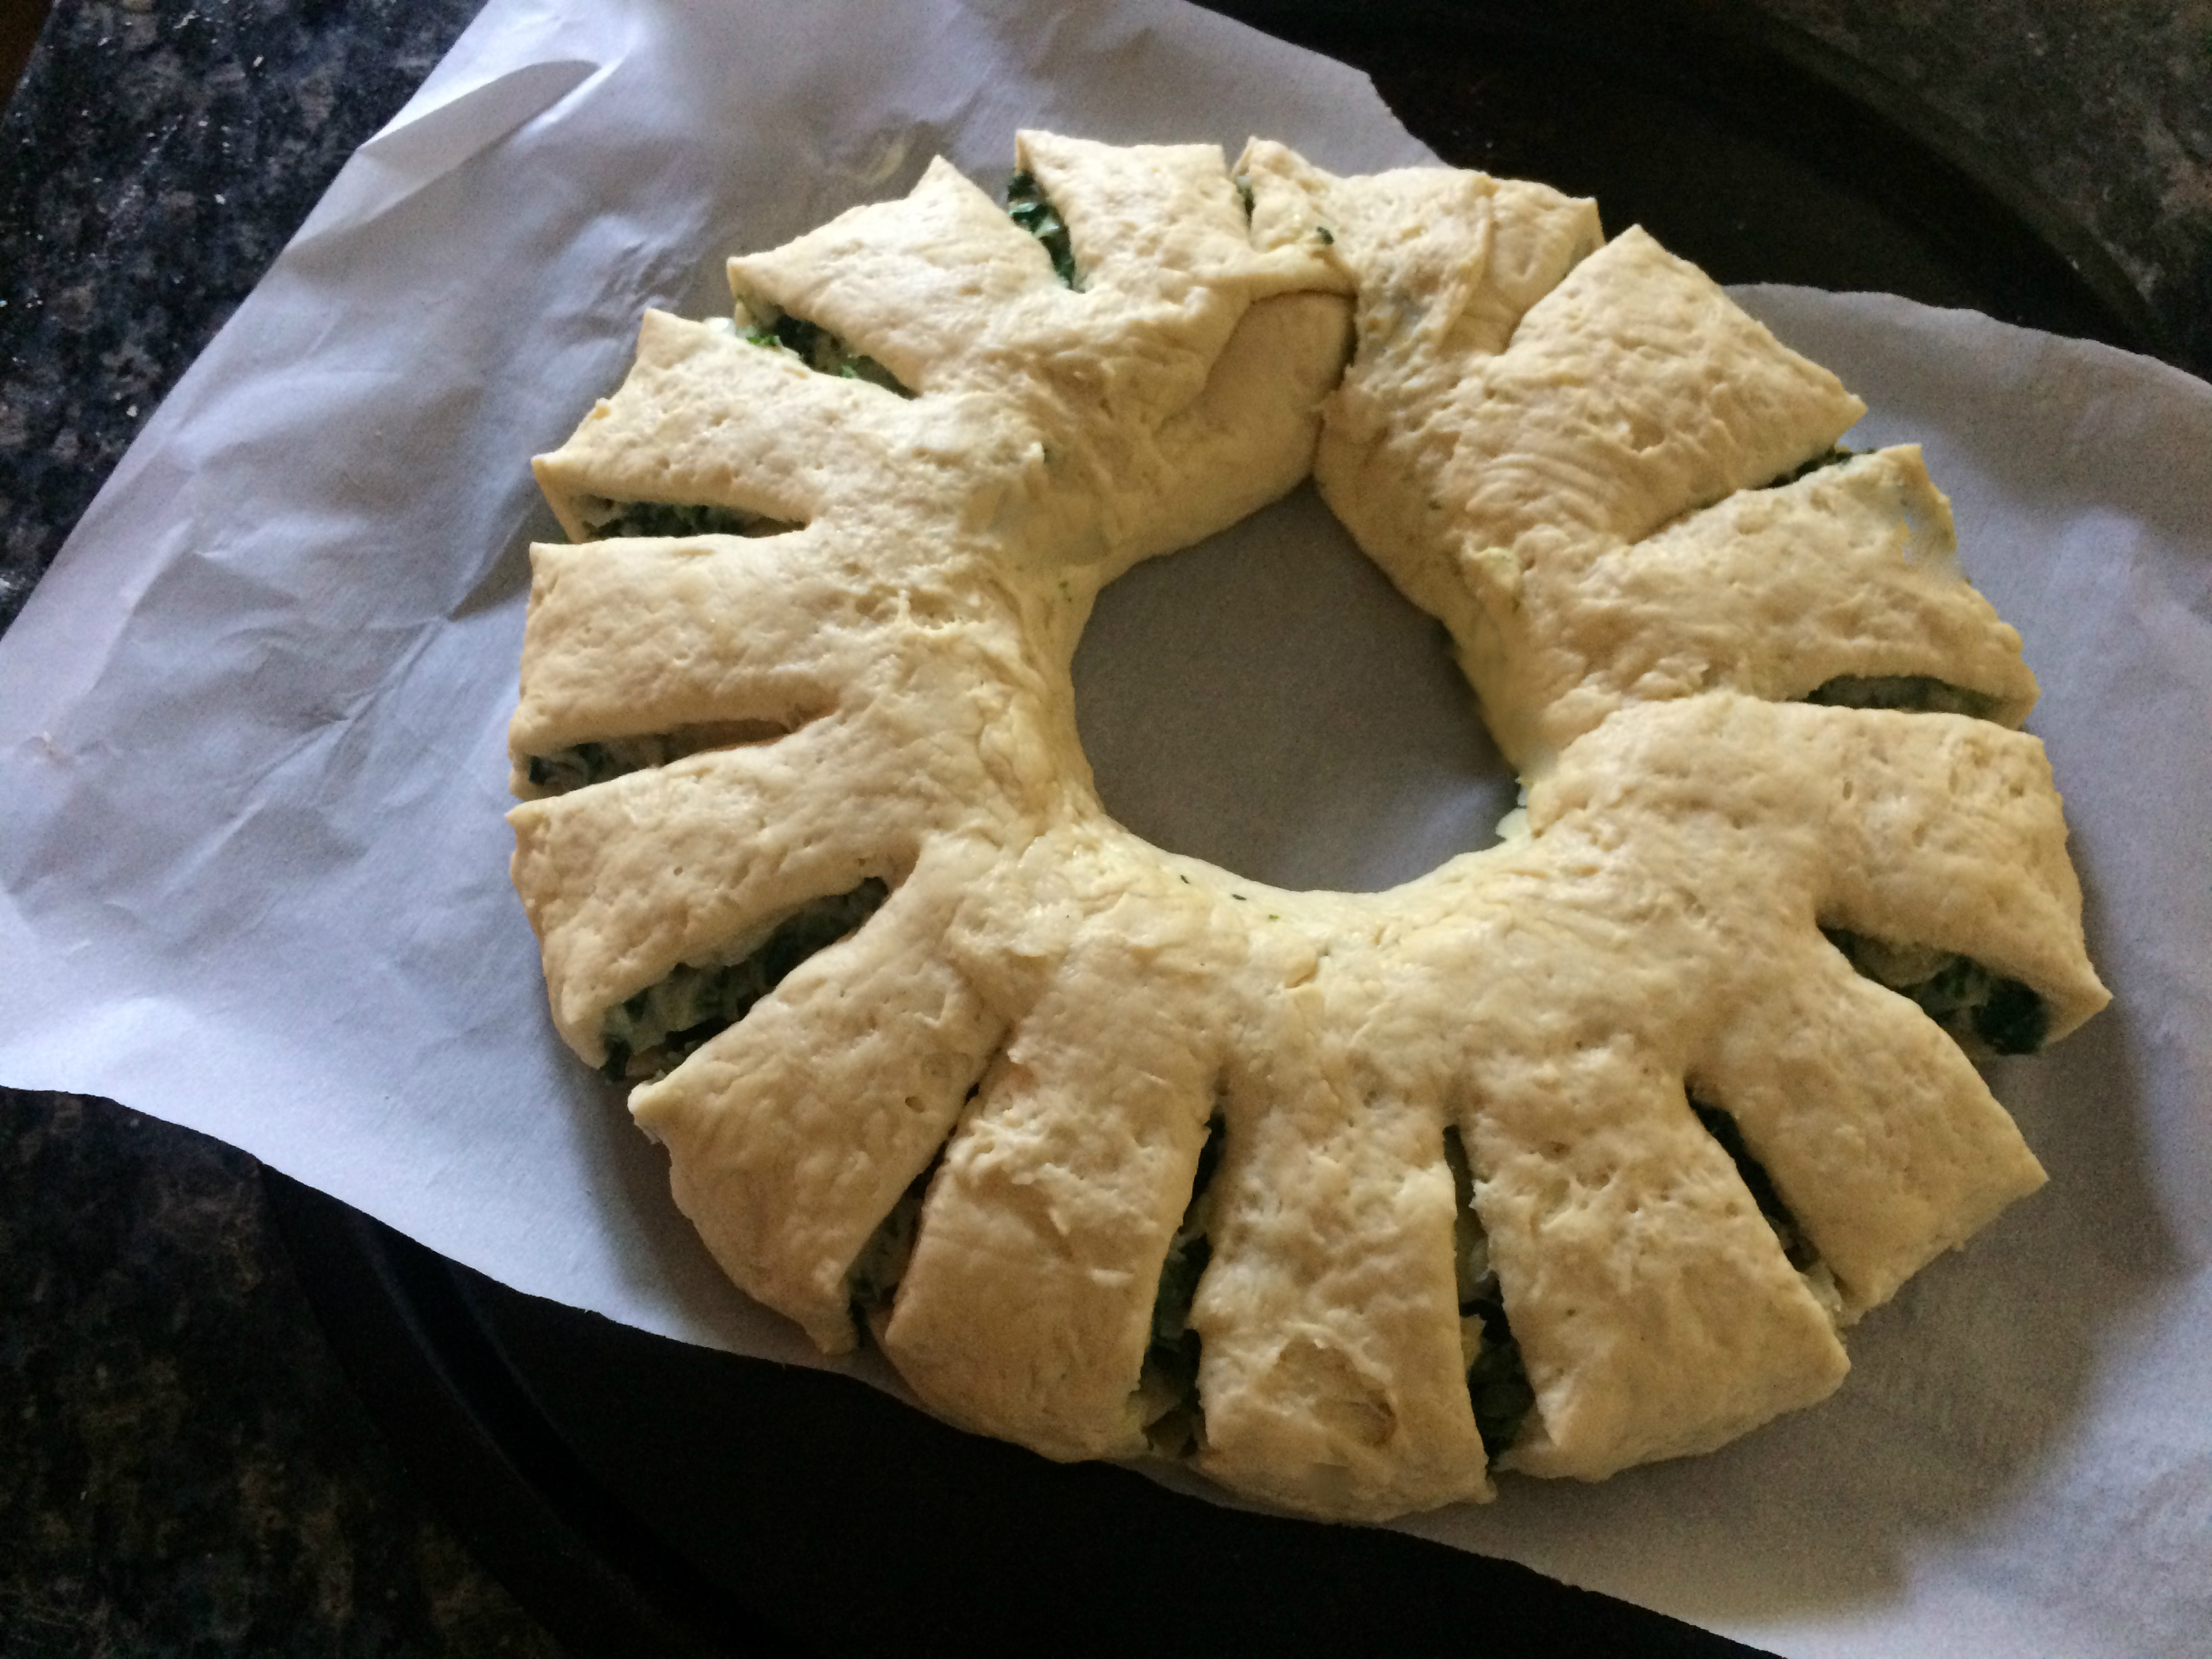
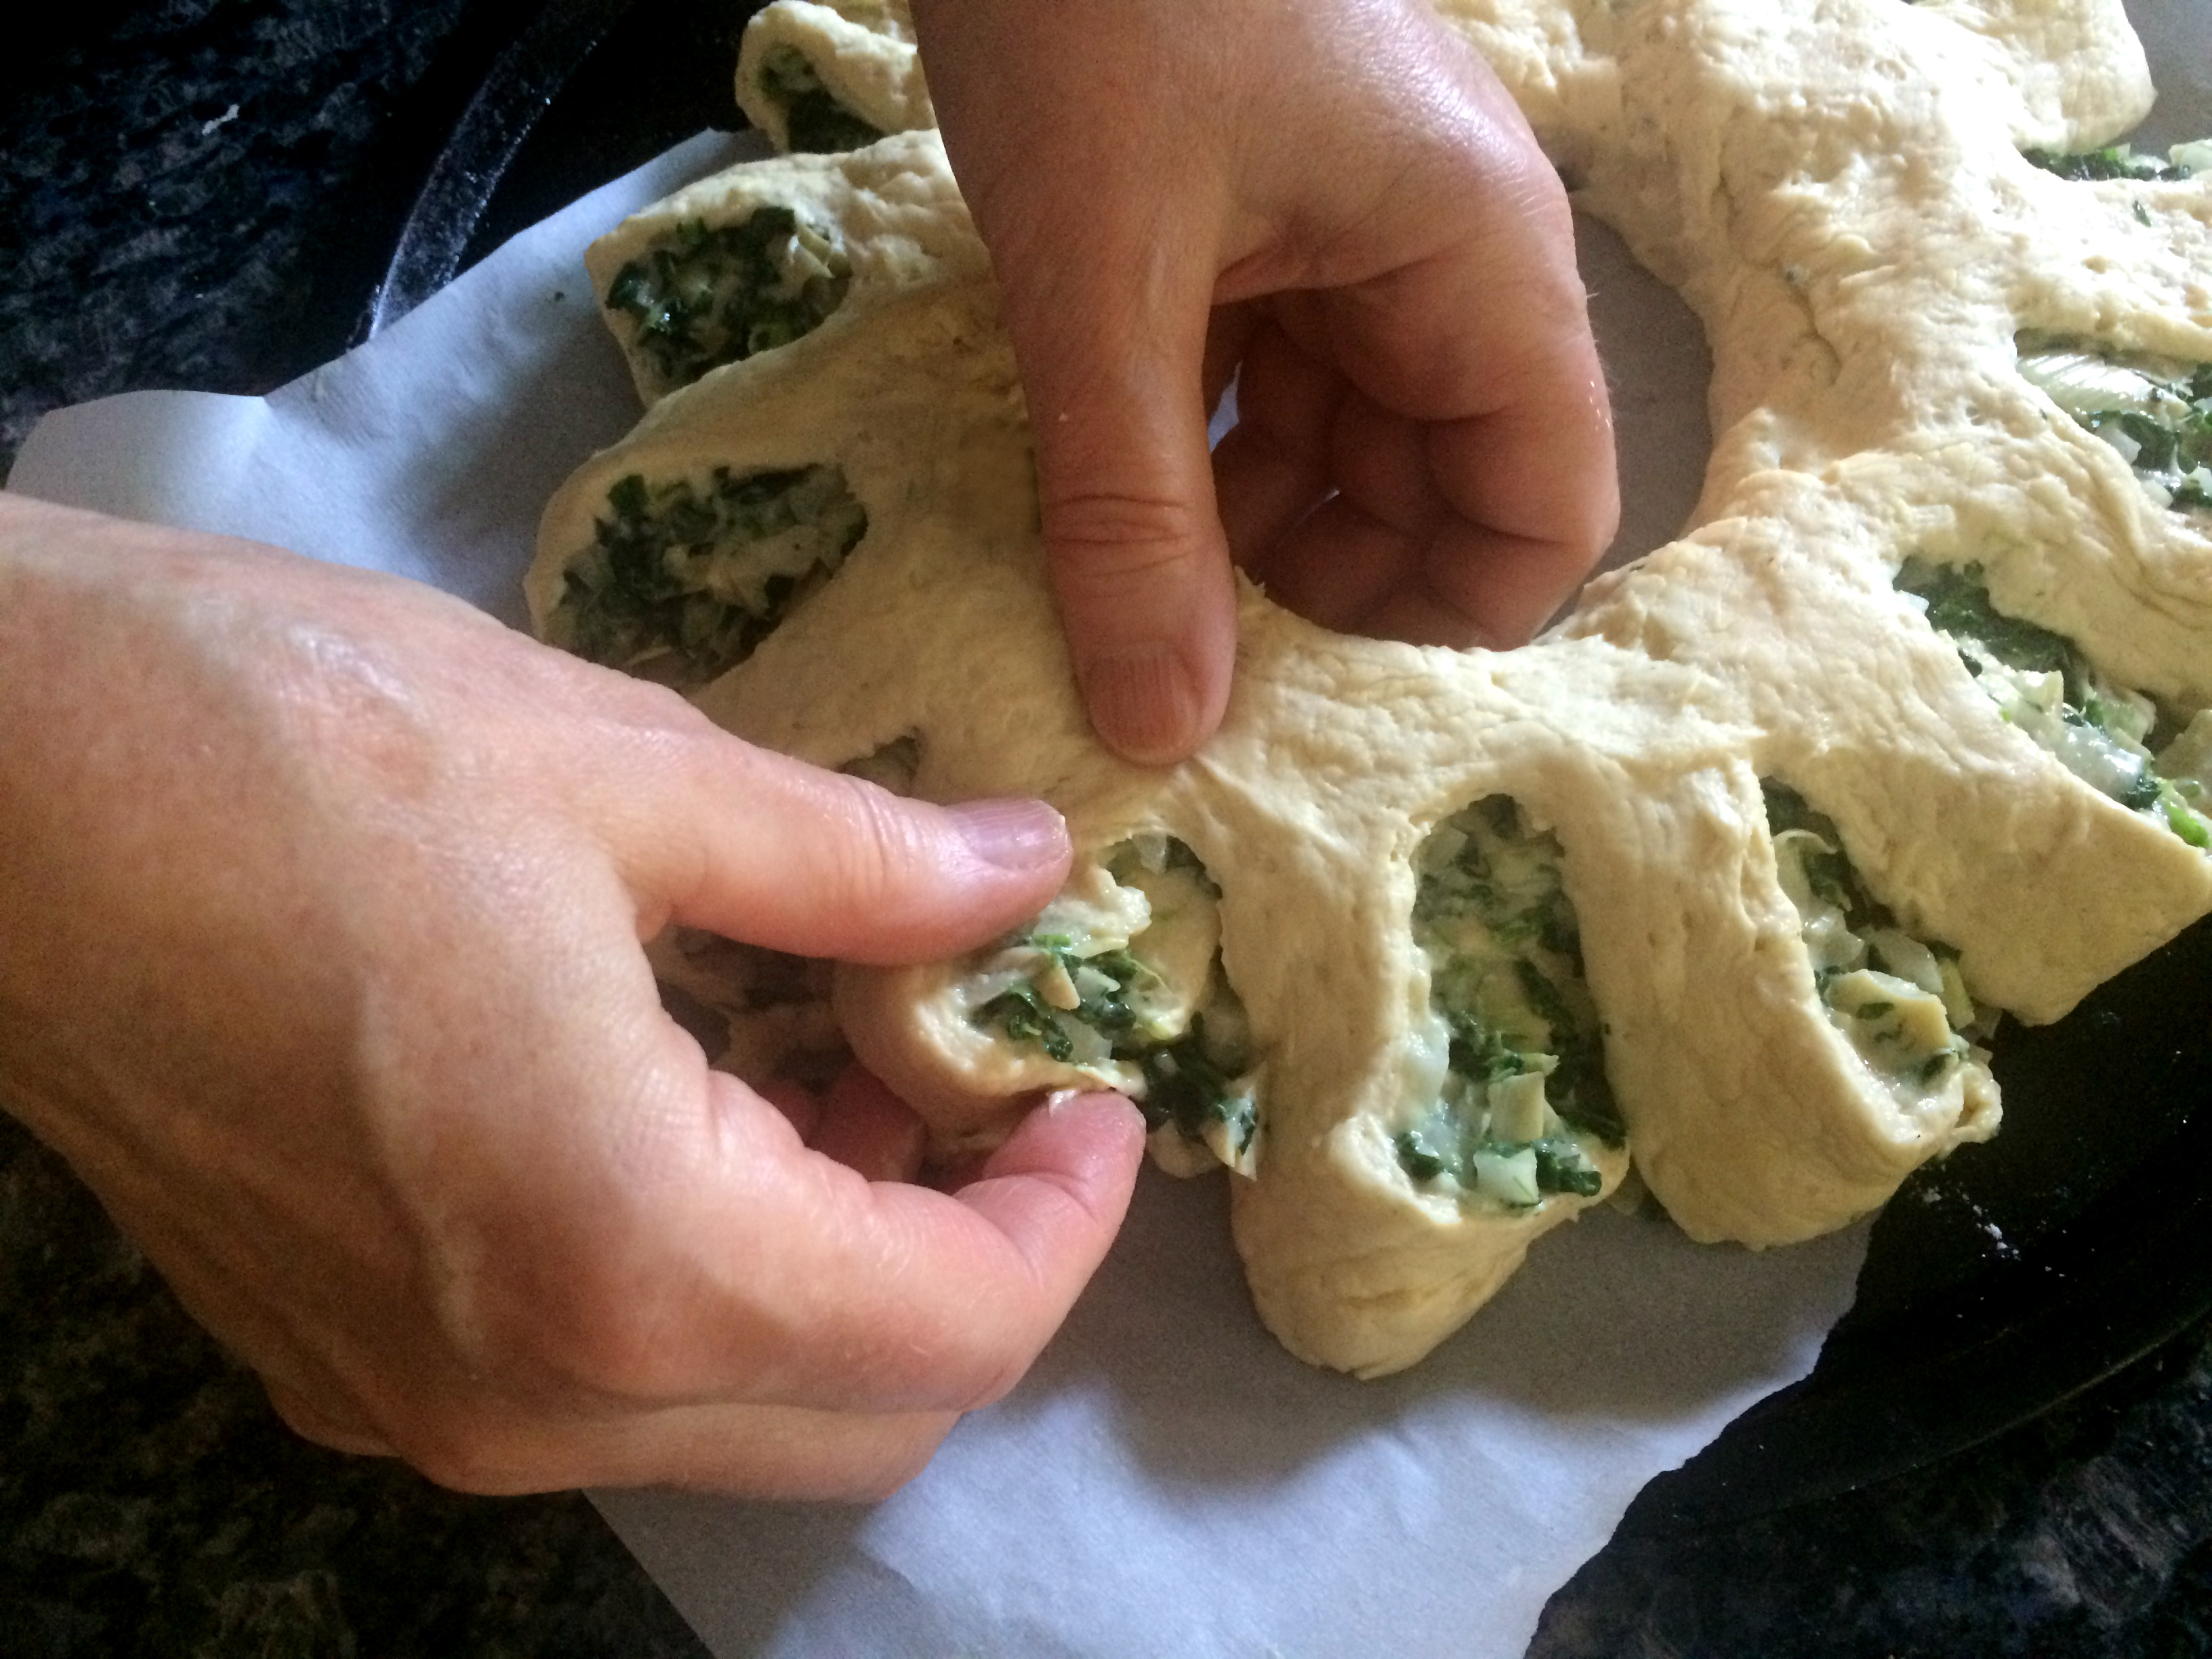
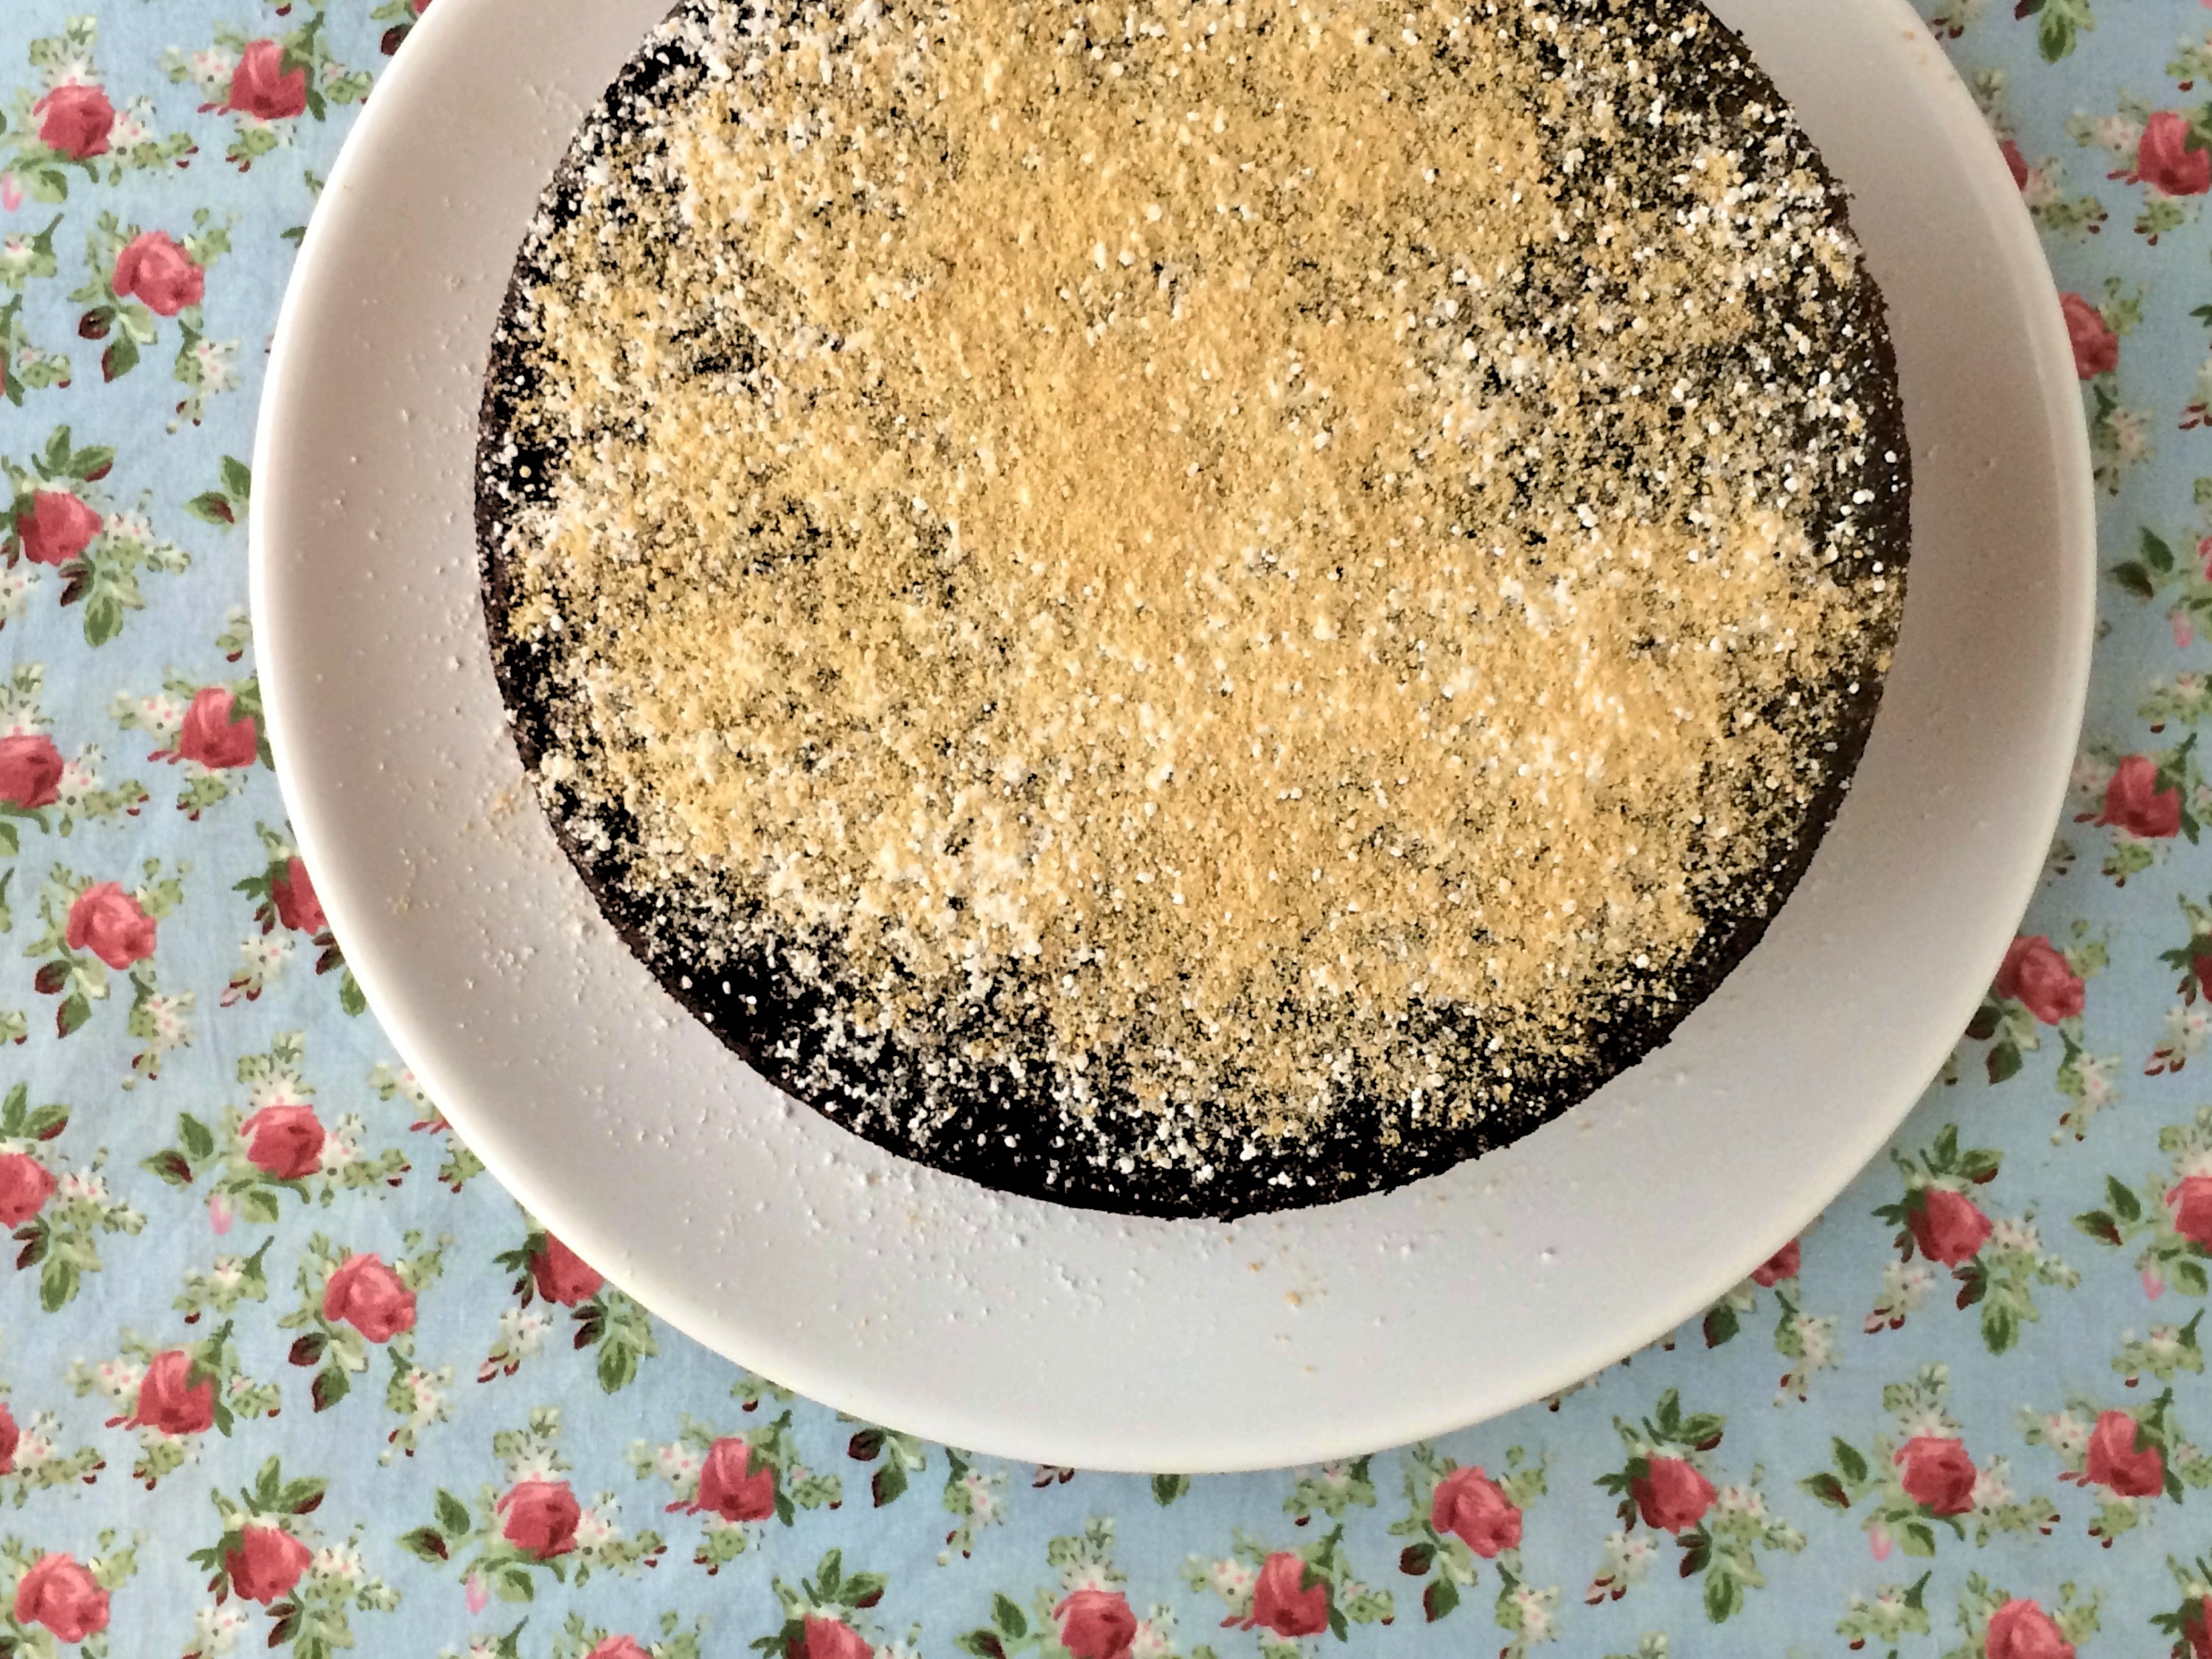
Now, lifting each part of the log from both sides, gently turn each cut section slightly so that it rests partly on its side and the filling is partly exposed.

IMG_2572b


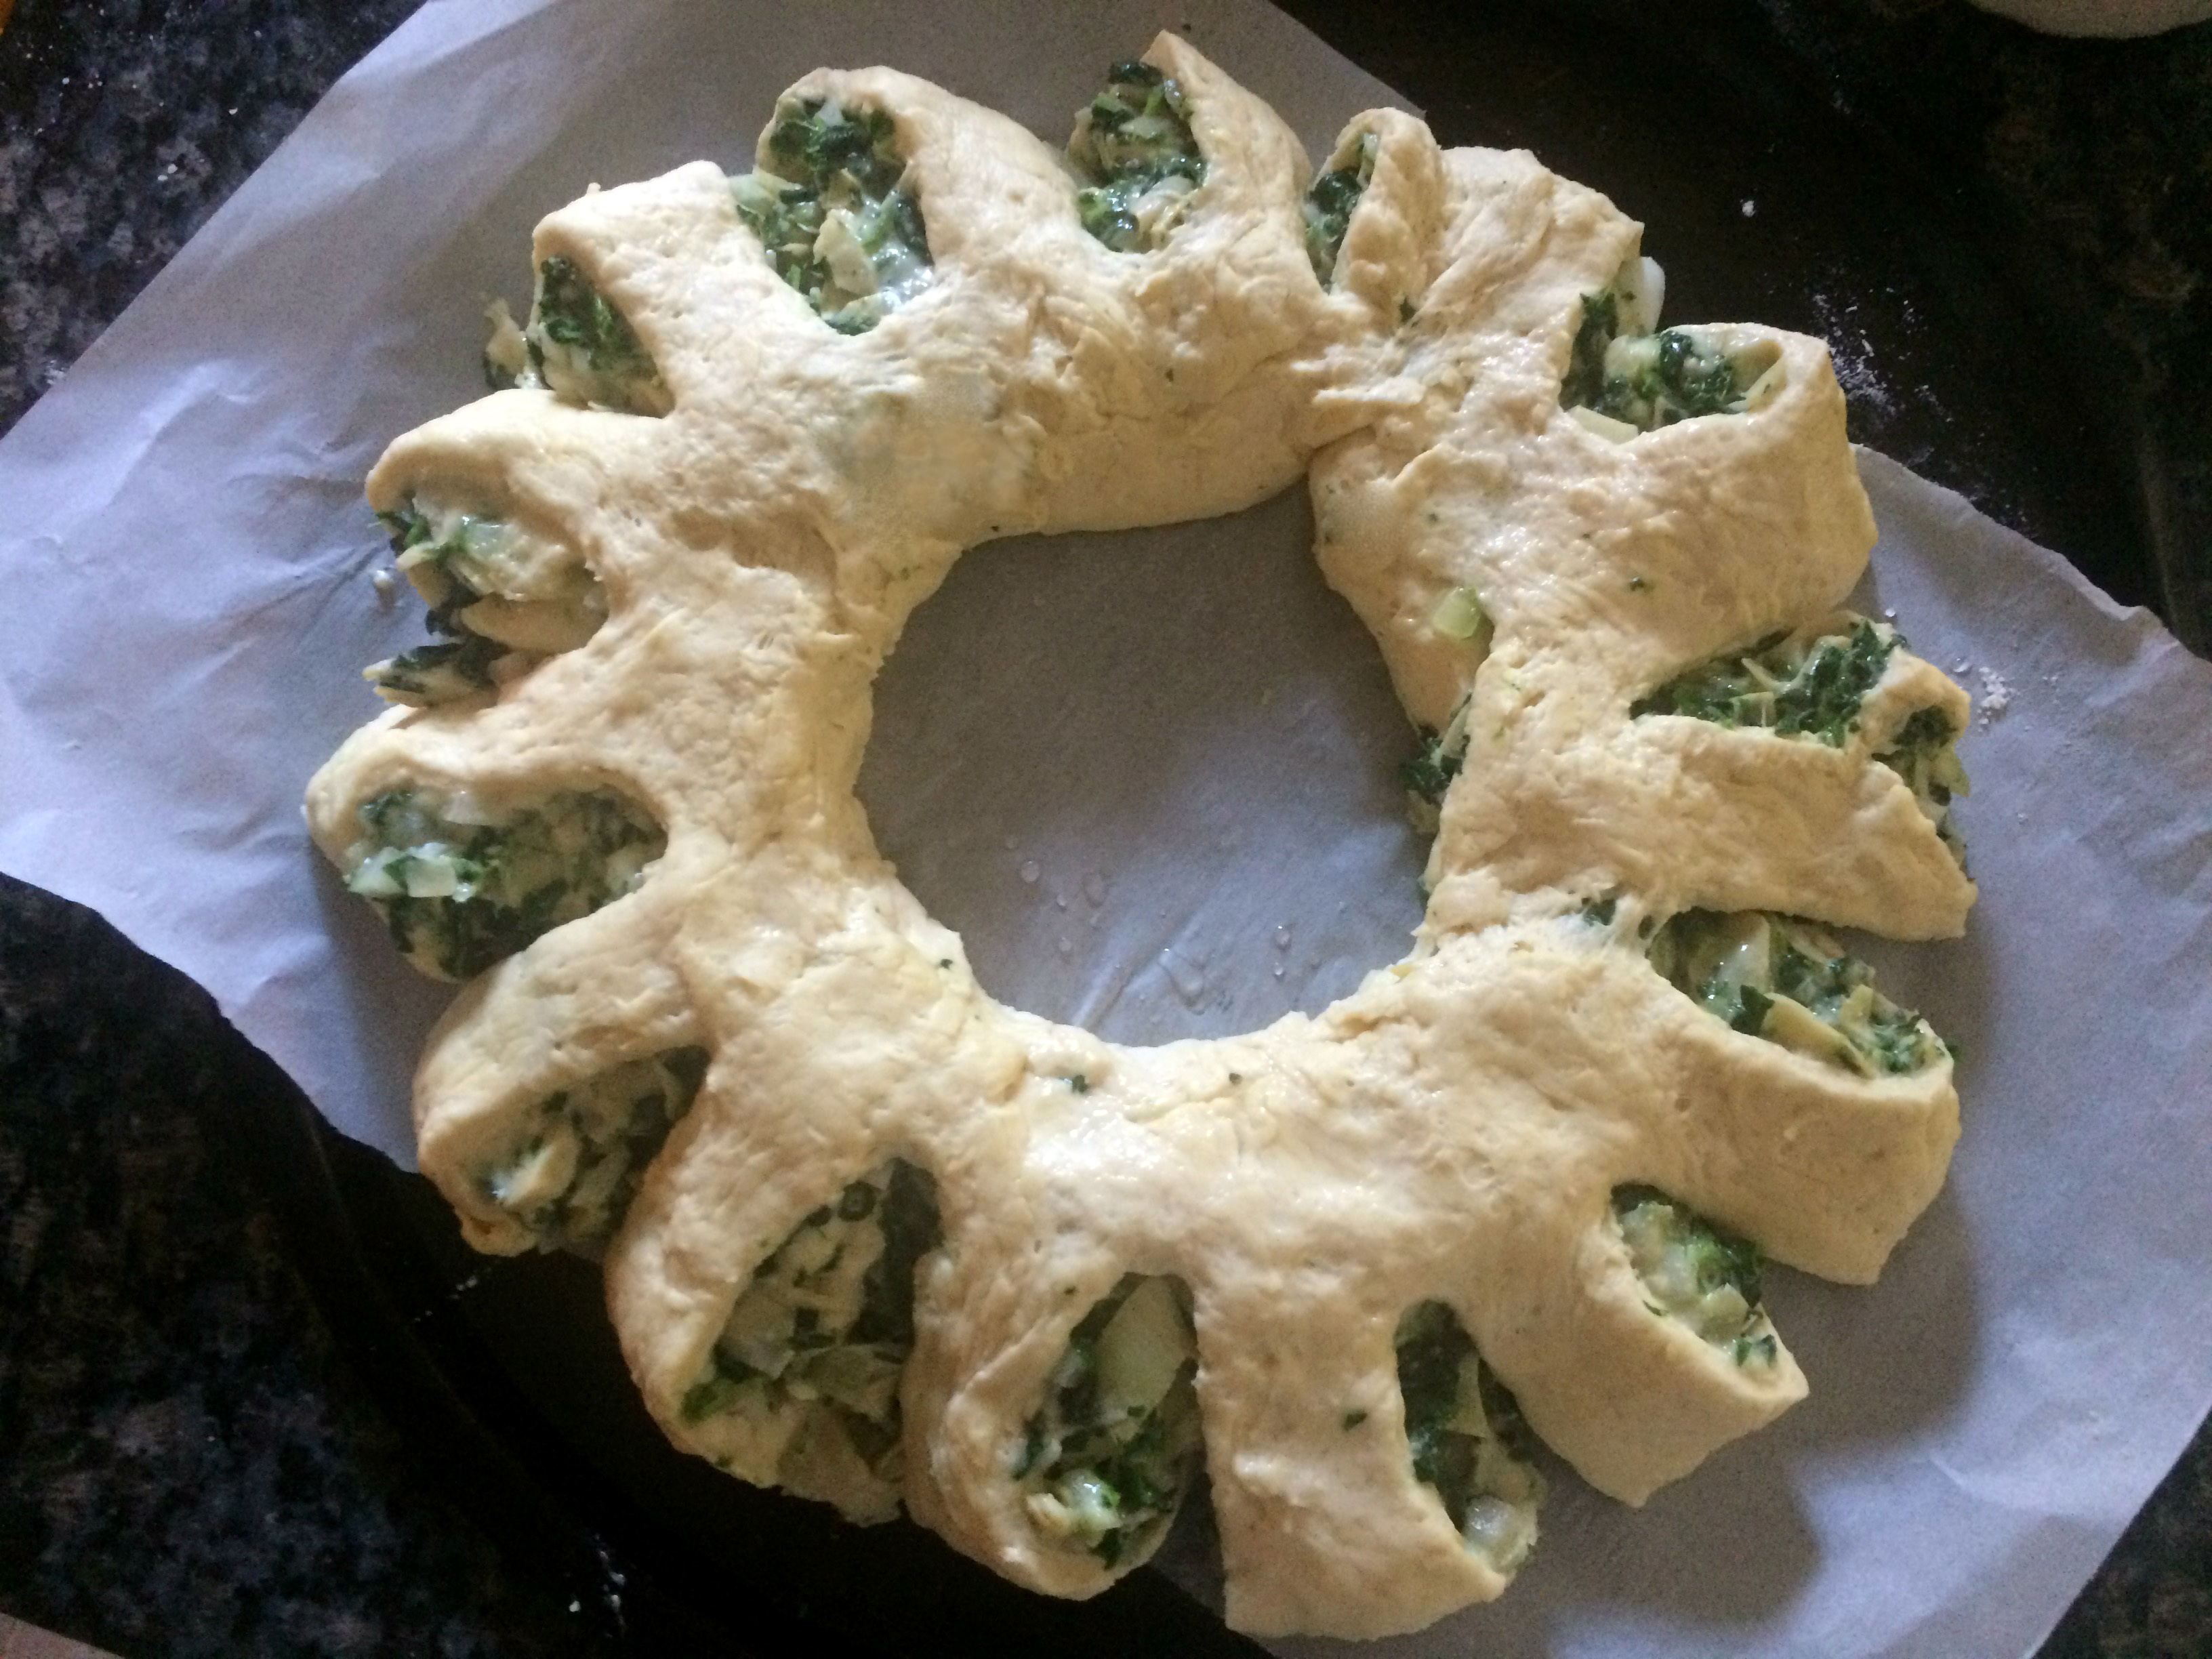
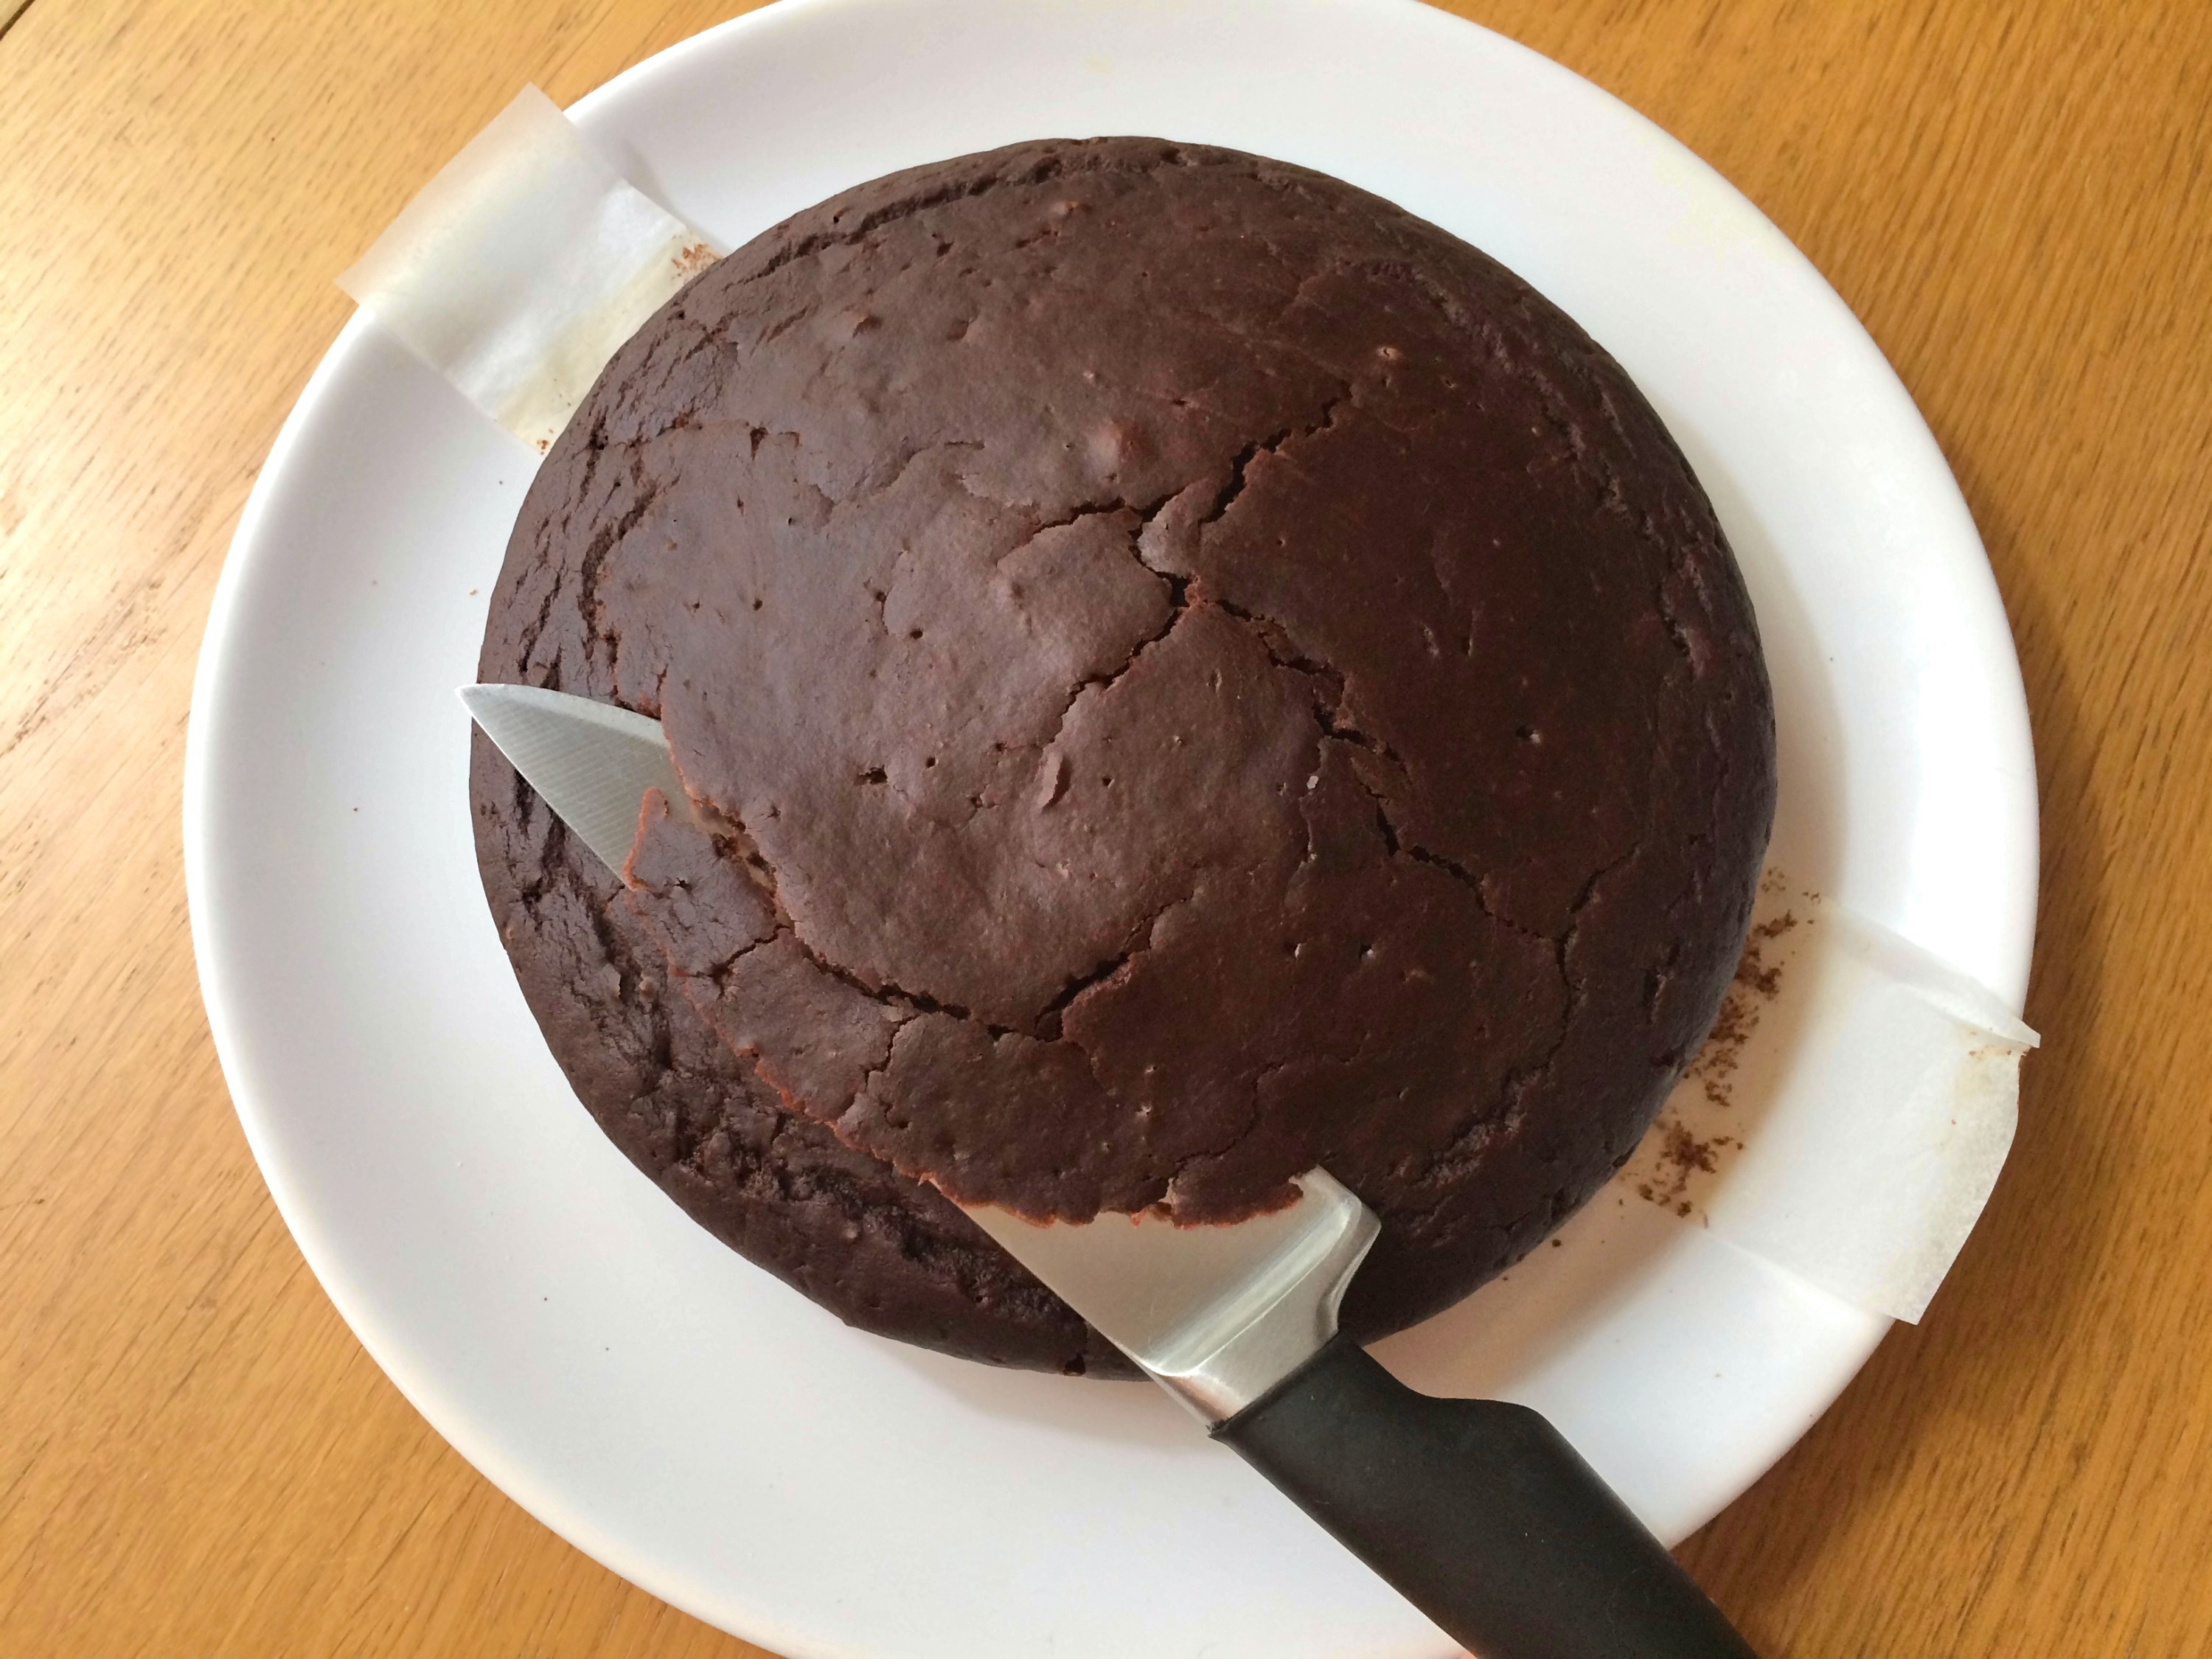
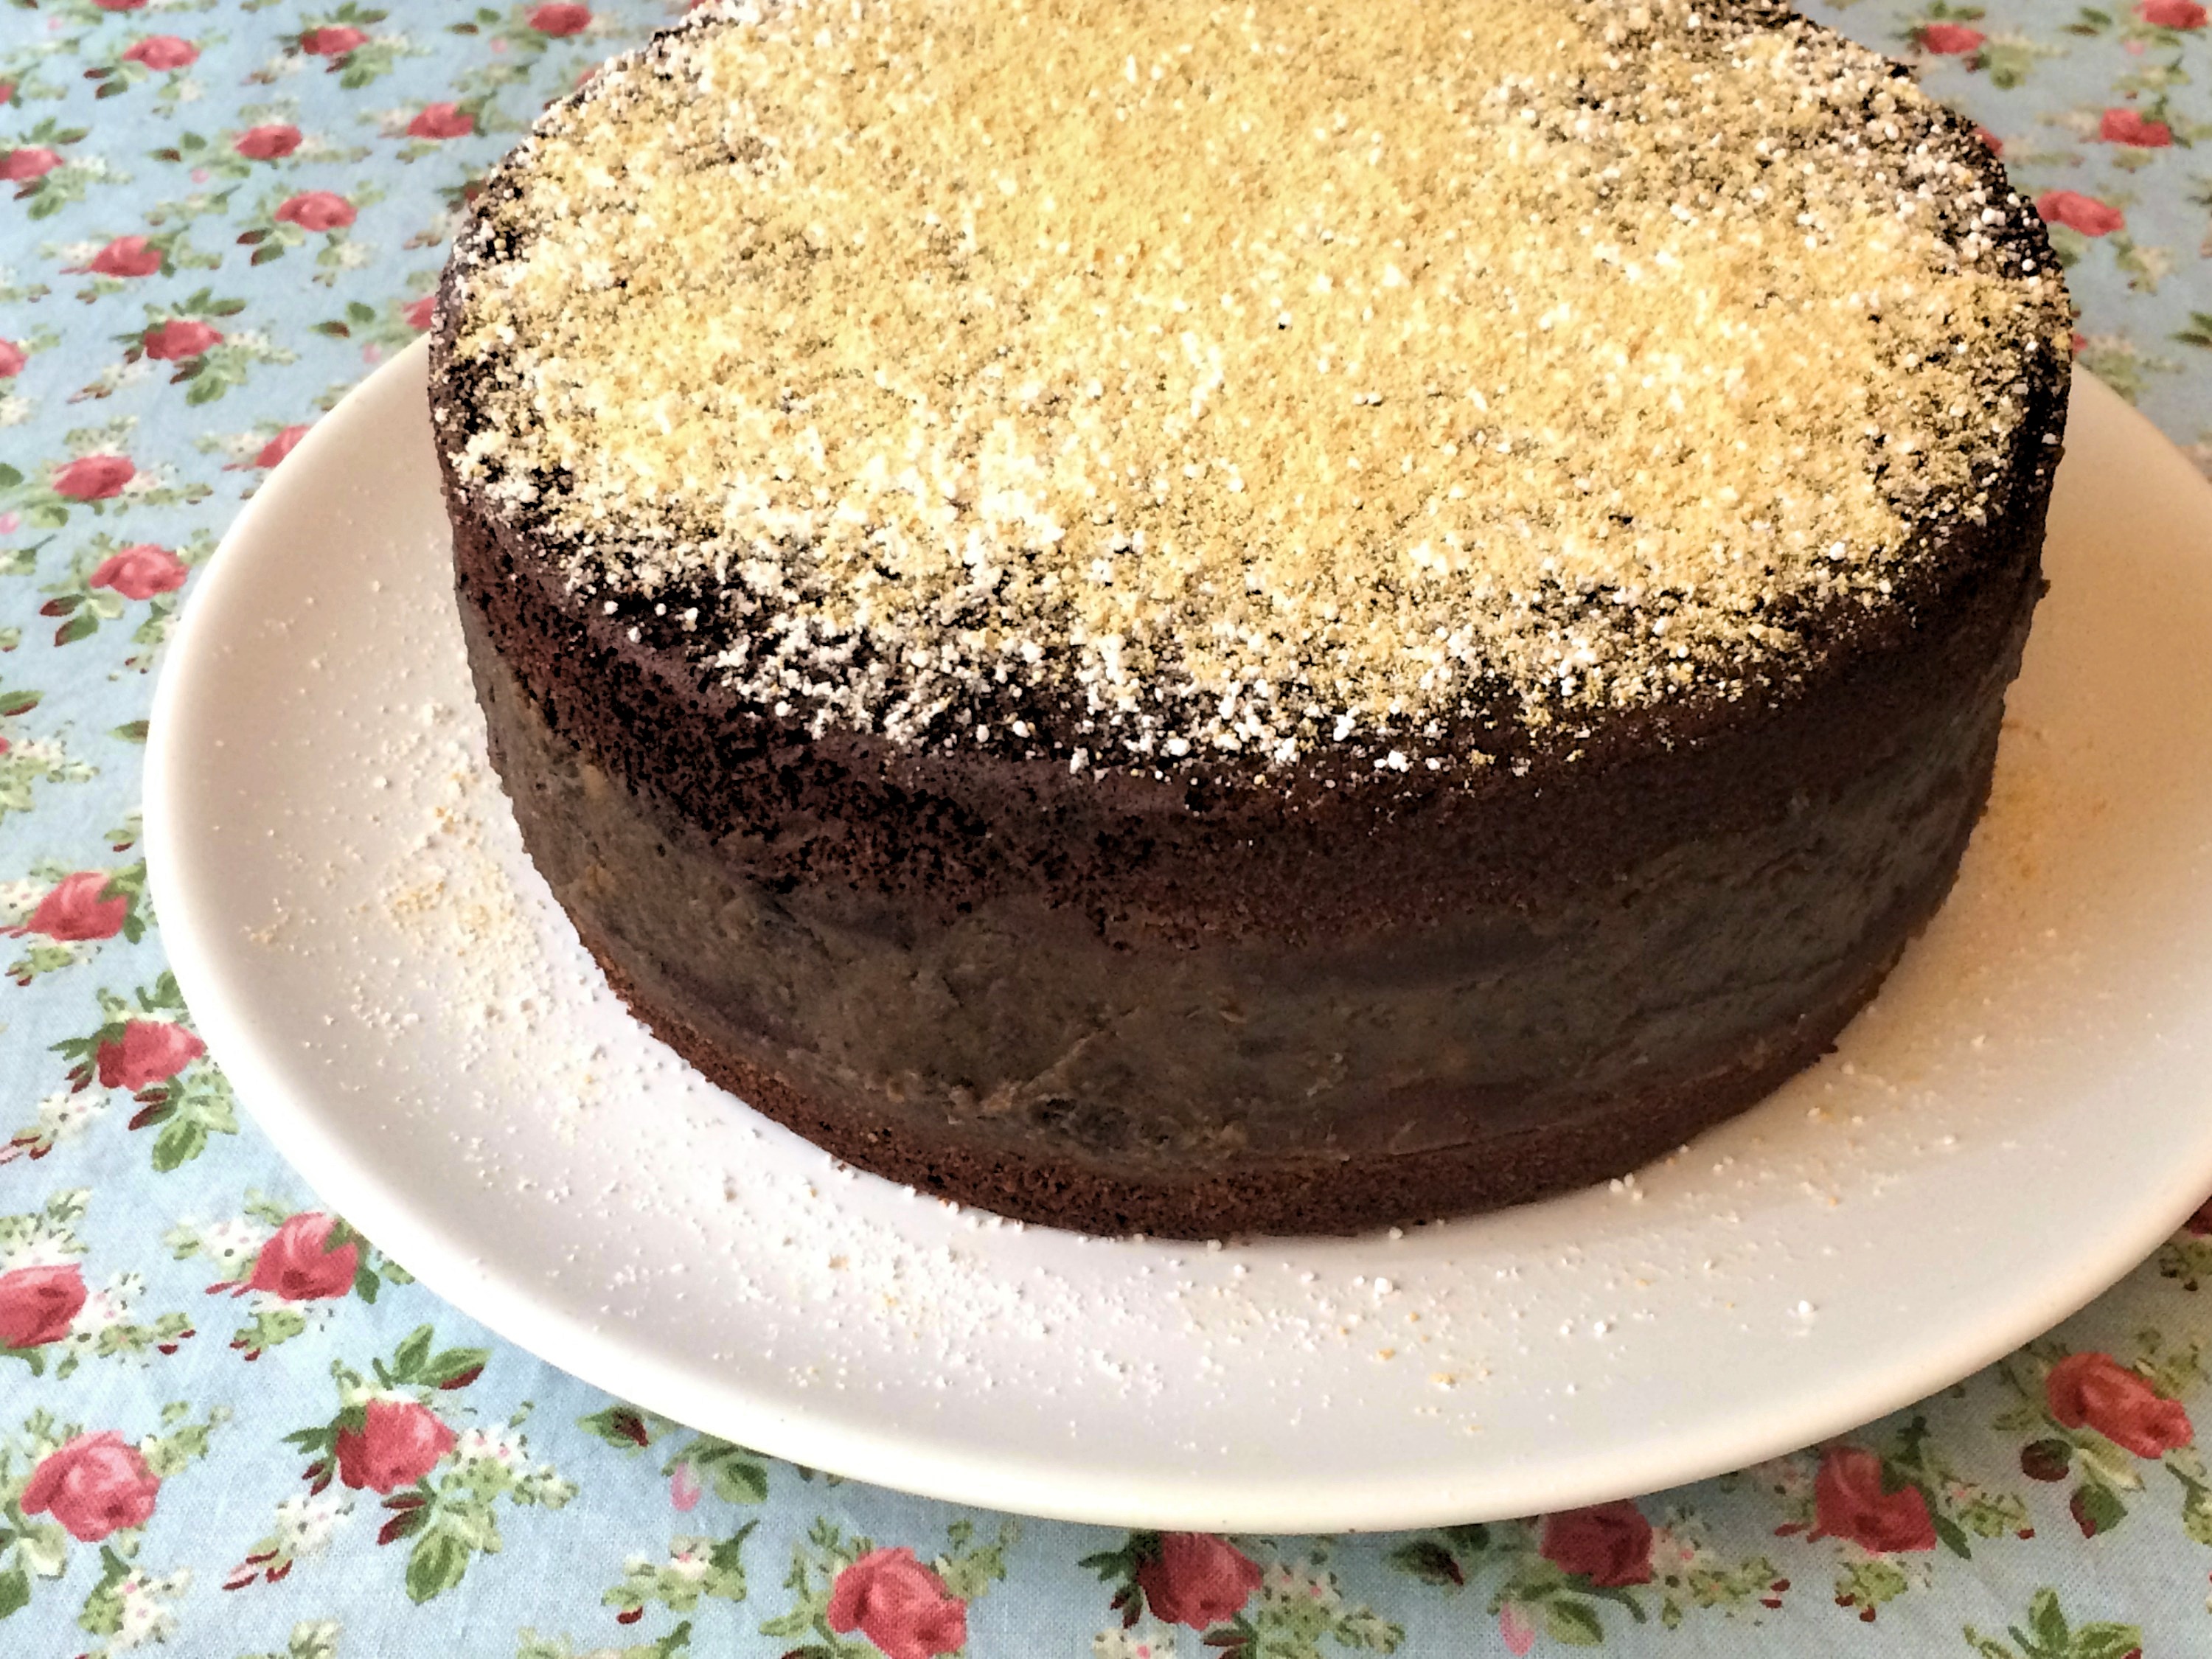
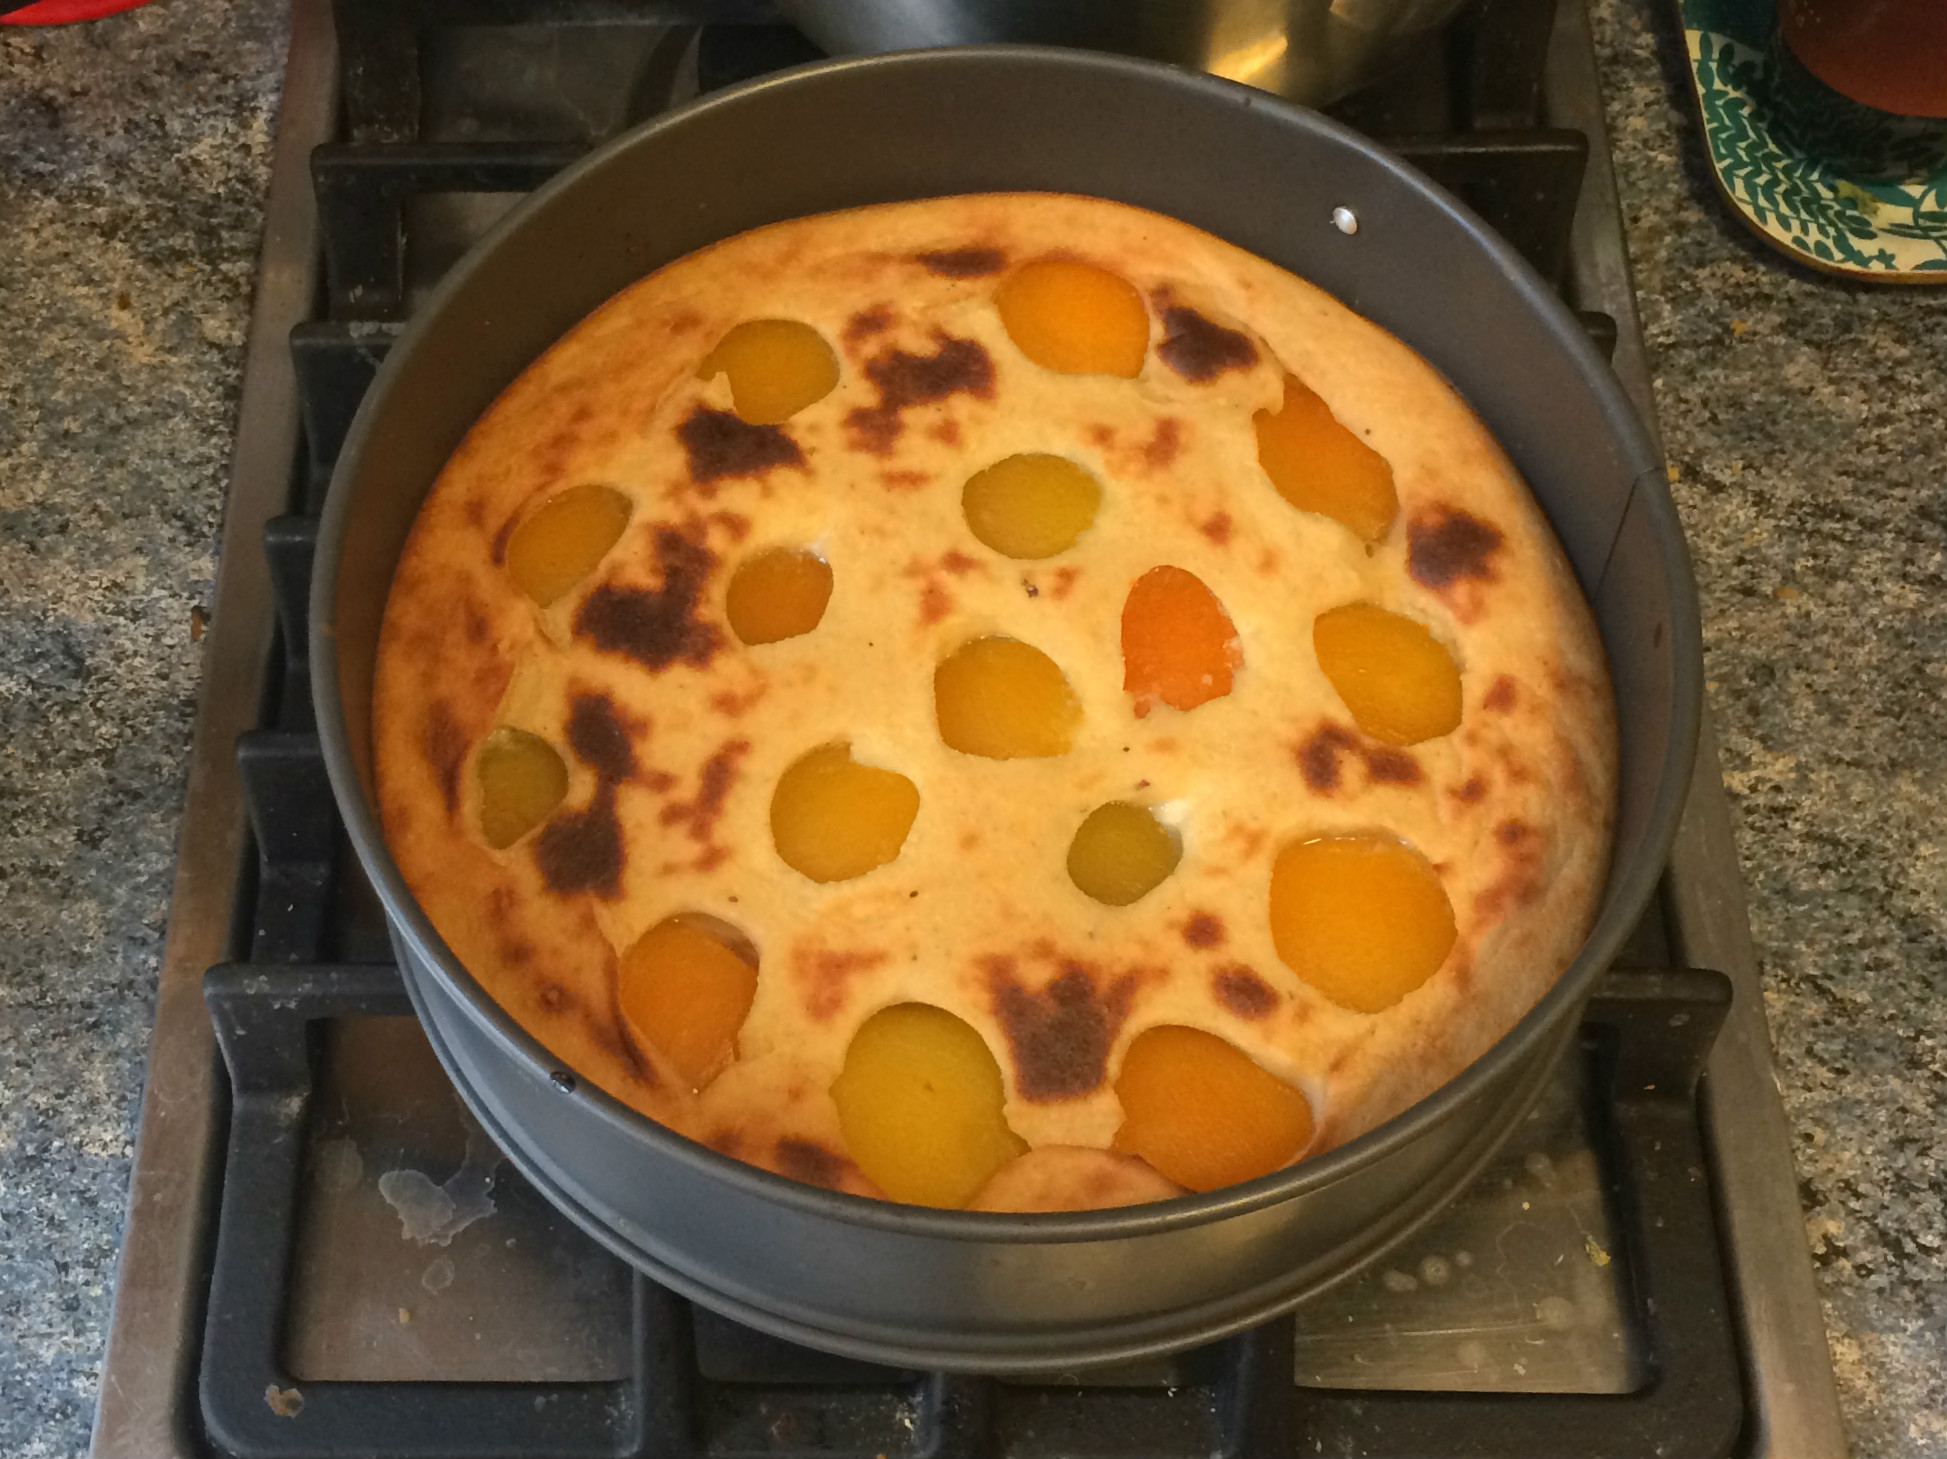
Bake for 25 to 30 minutes in an oven preheated to 375°F (190°C). While it’s baking, prepare the cheese sauce.

Cheese sauce

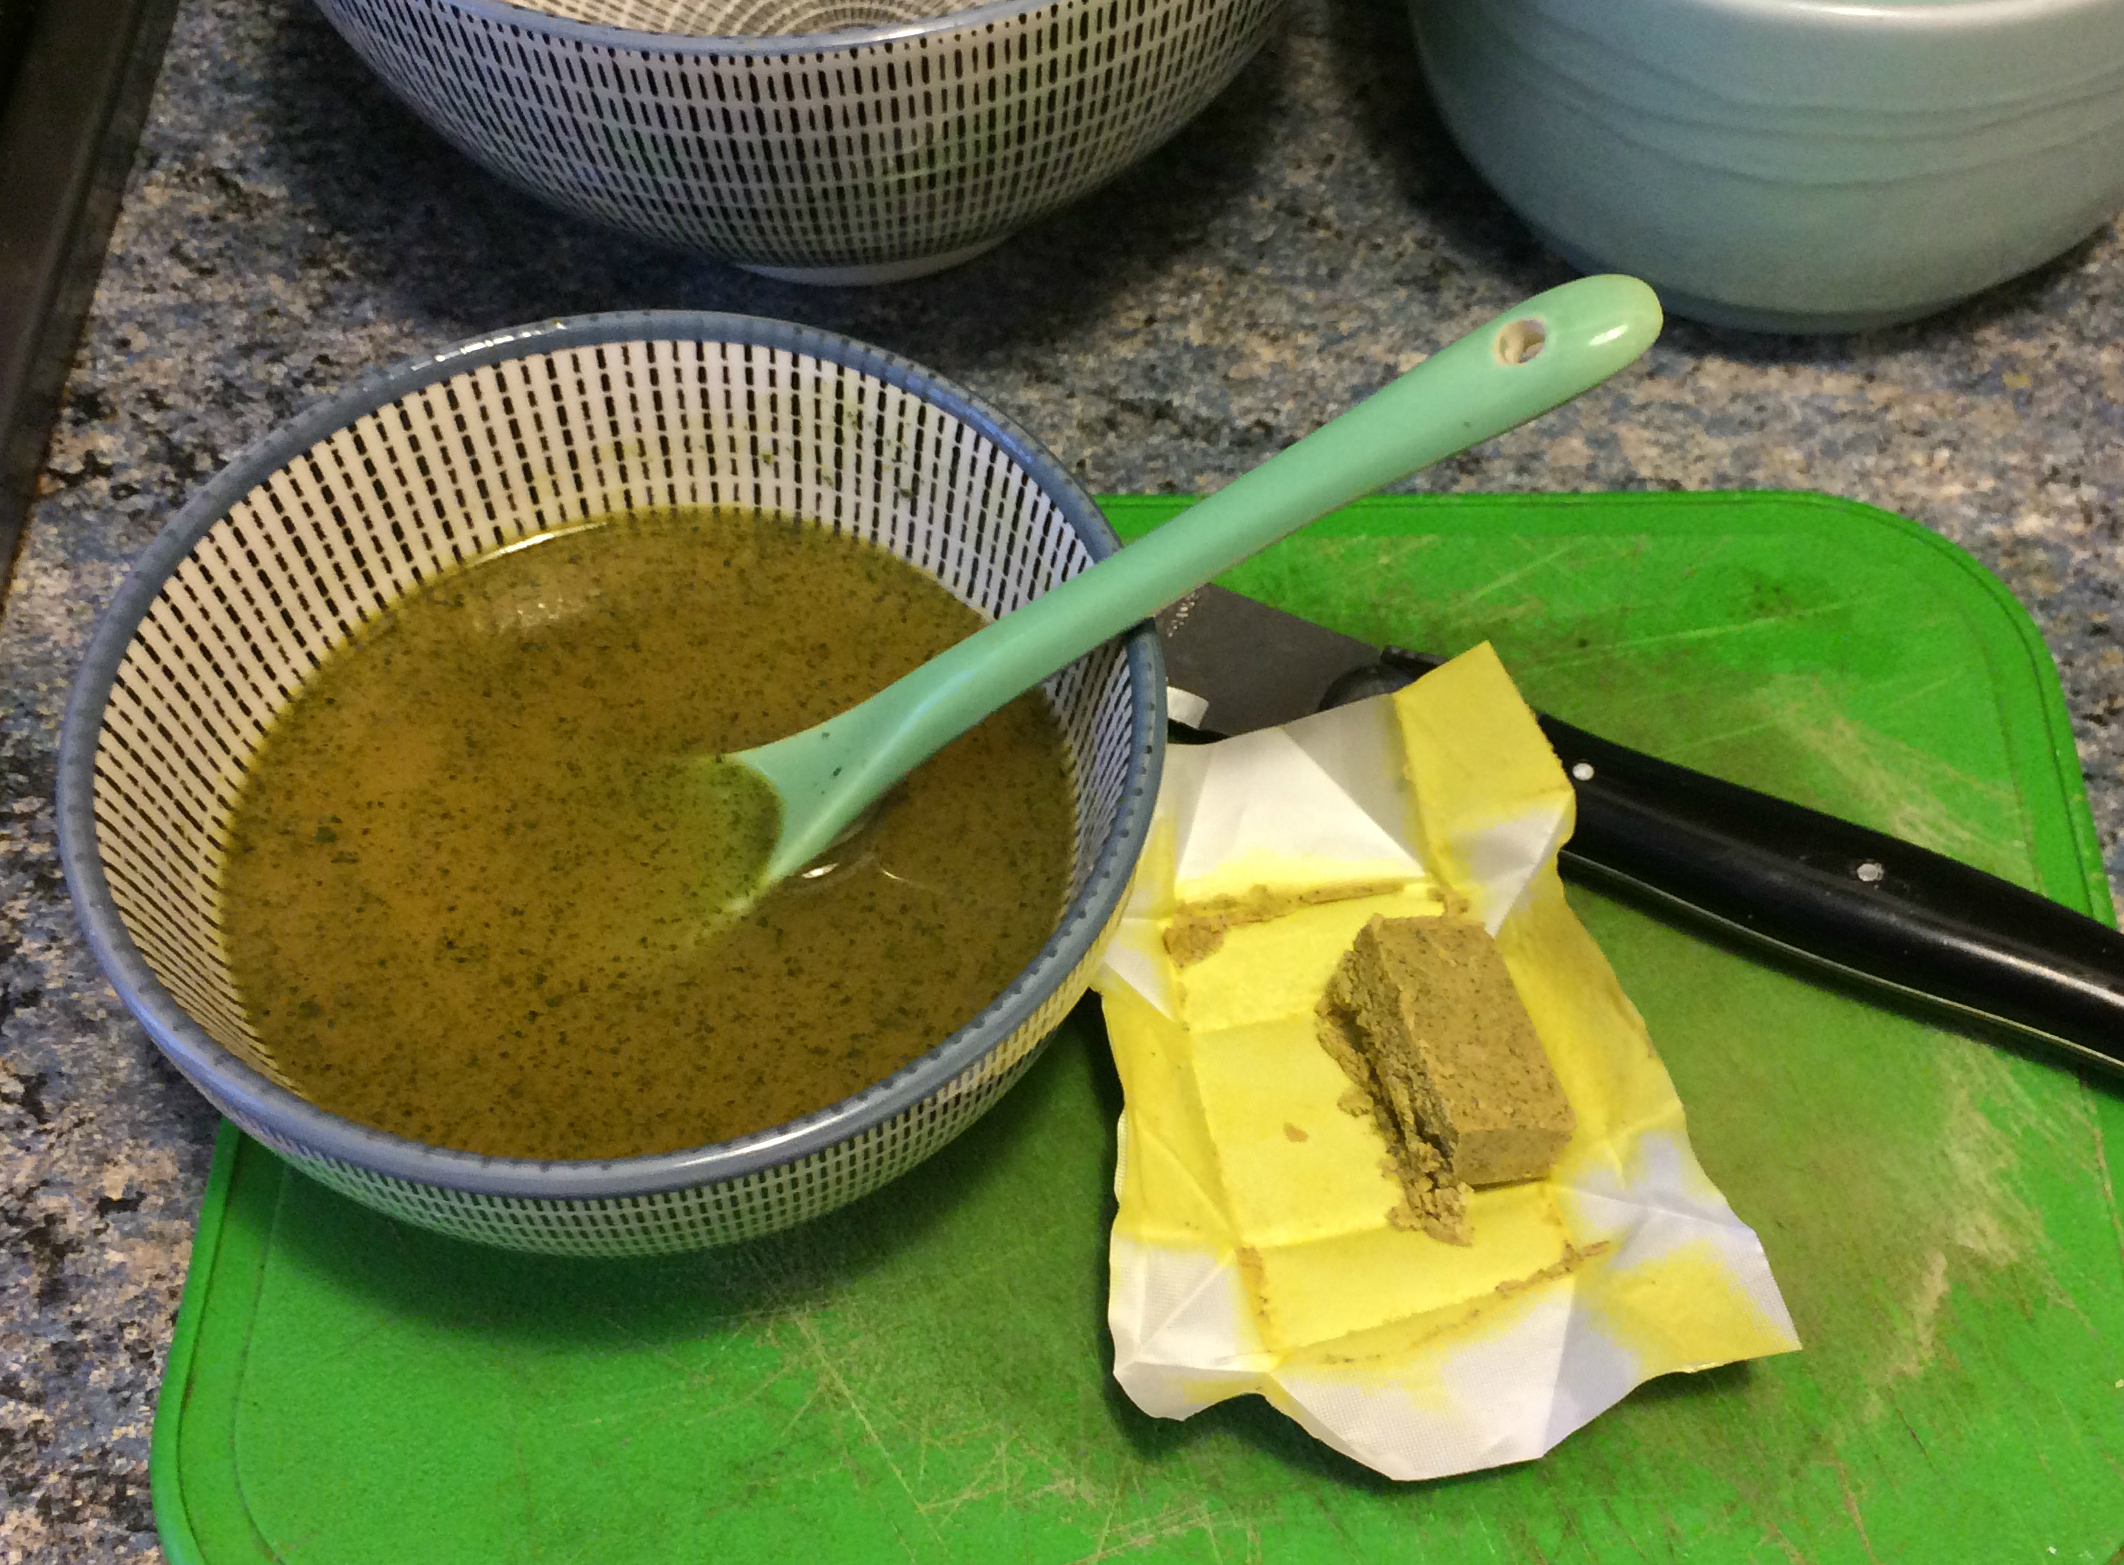
  • 1¼ cups (295 ml) soy milk
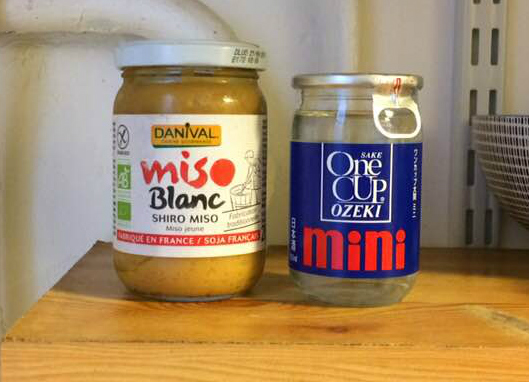
  • 1 tablespoon miso (preferably red)
  • 1 tablespoon regular tahini (sesame paste)
  • 1 tablespoon soy sauce
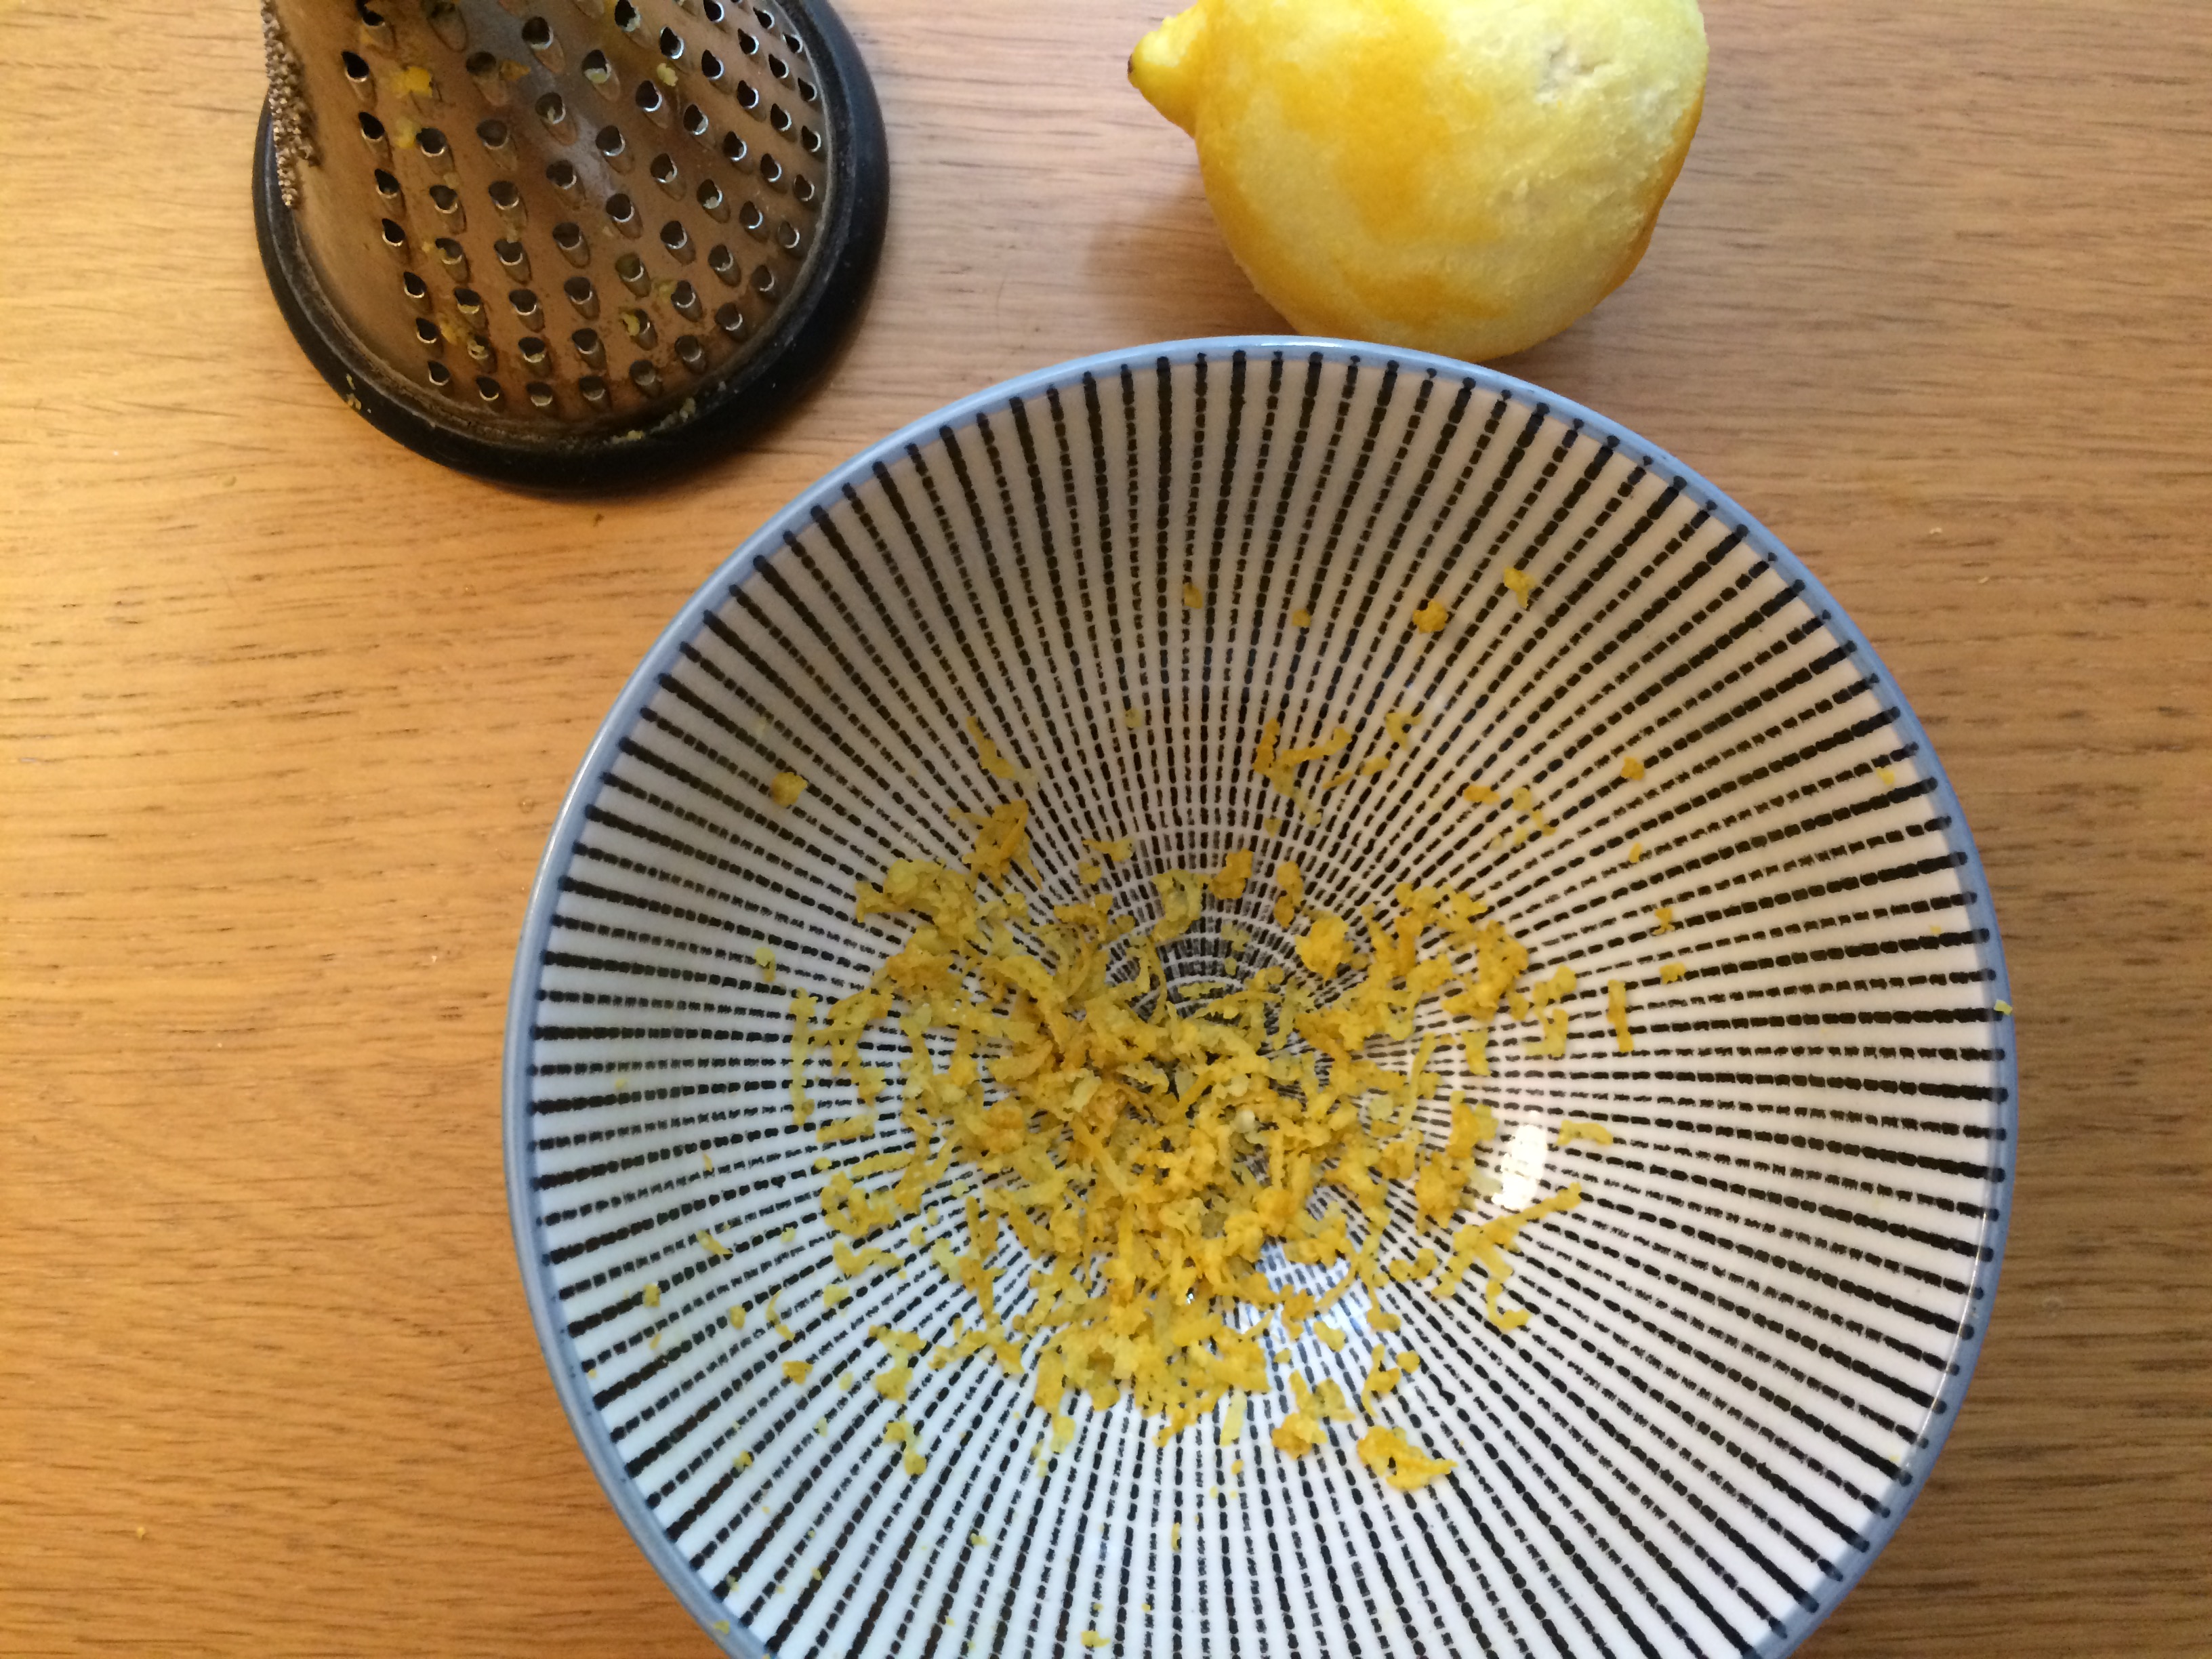
  • 1 tablespoon lemon juice
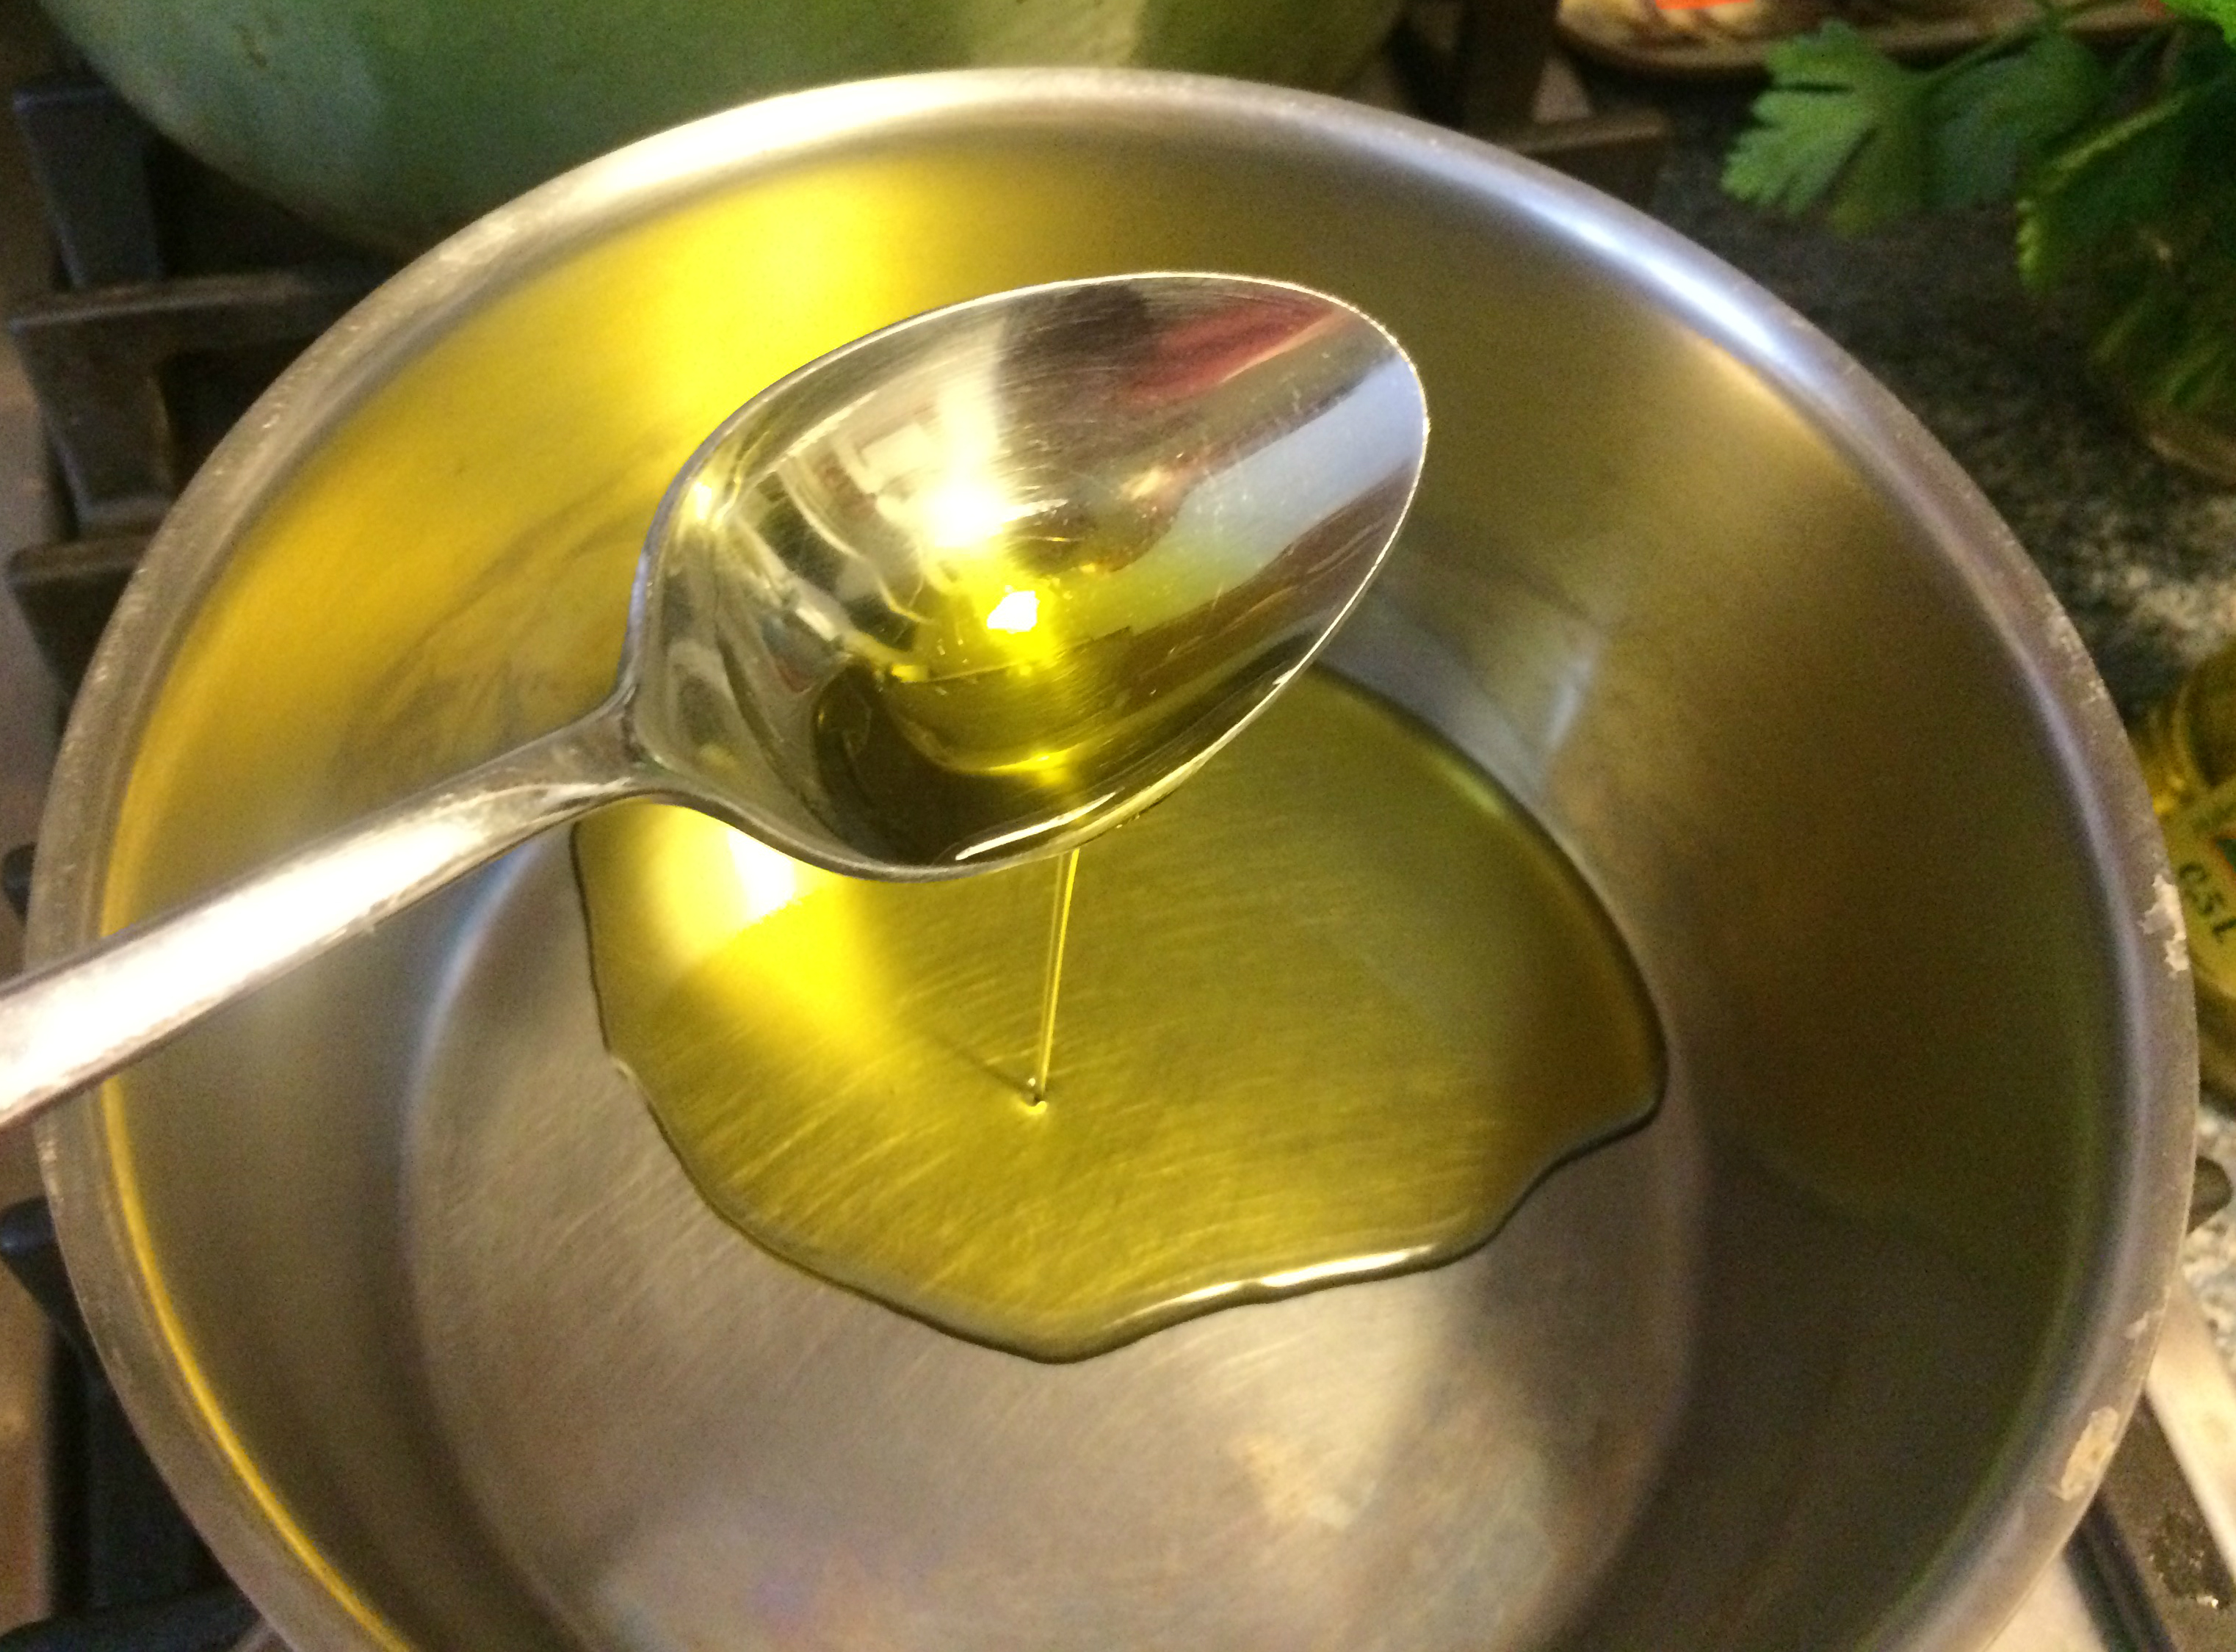
  • ¼ cup (57 g) margarine
  • ¼ cup (30 g) all-purpose flour
  • 4 tablespoons nutritional yeast
  • ¼ teaspoon ground white pepper

Equipment needed: wire whisk

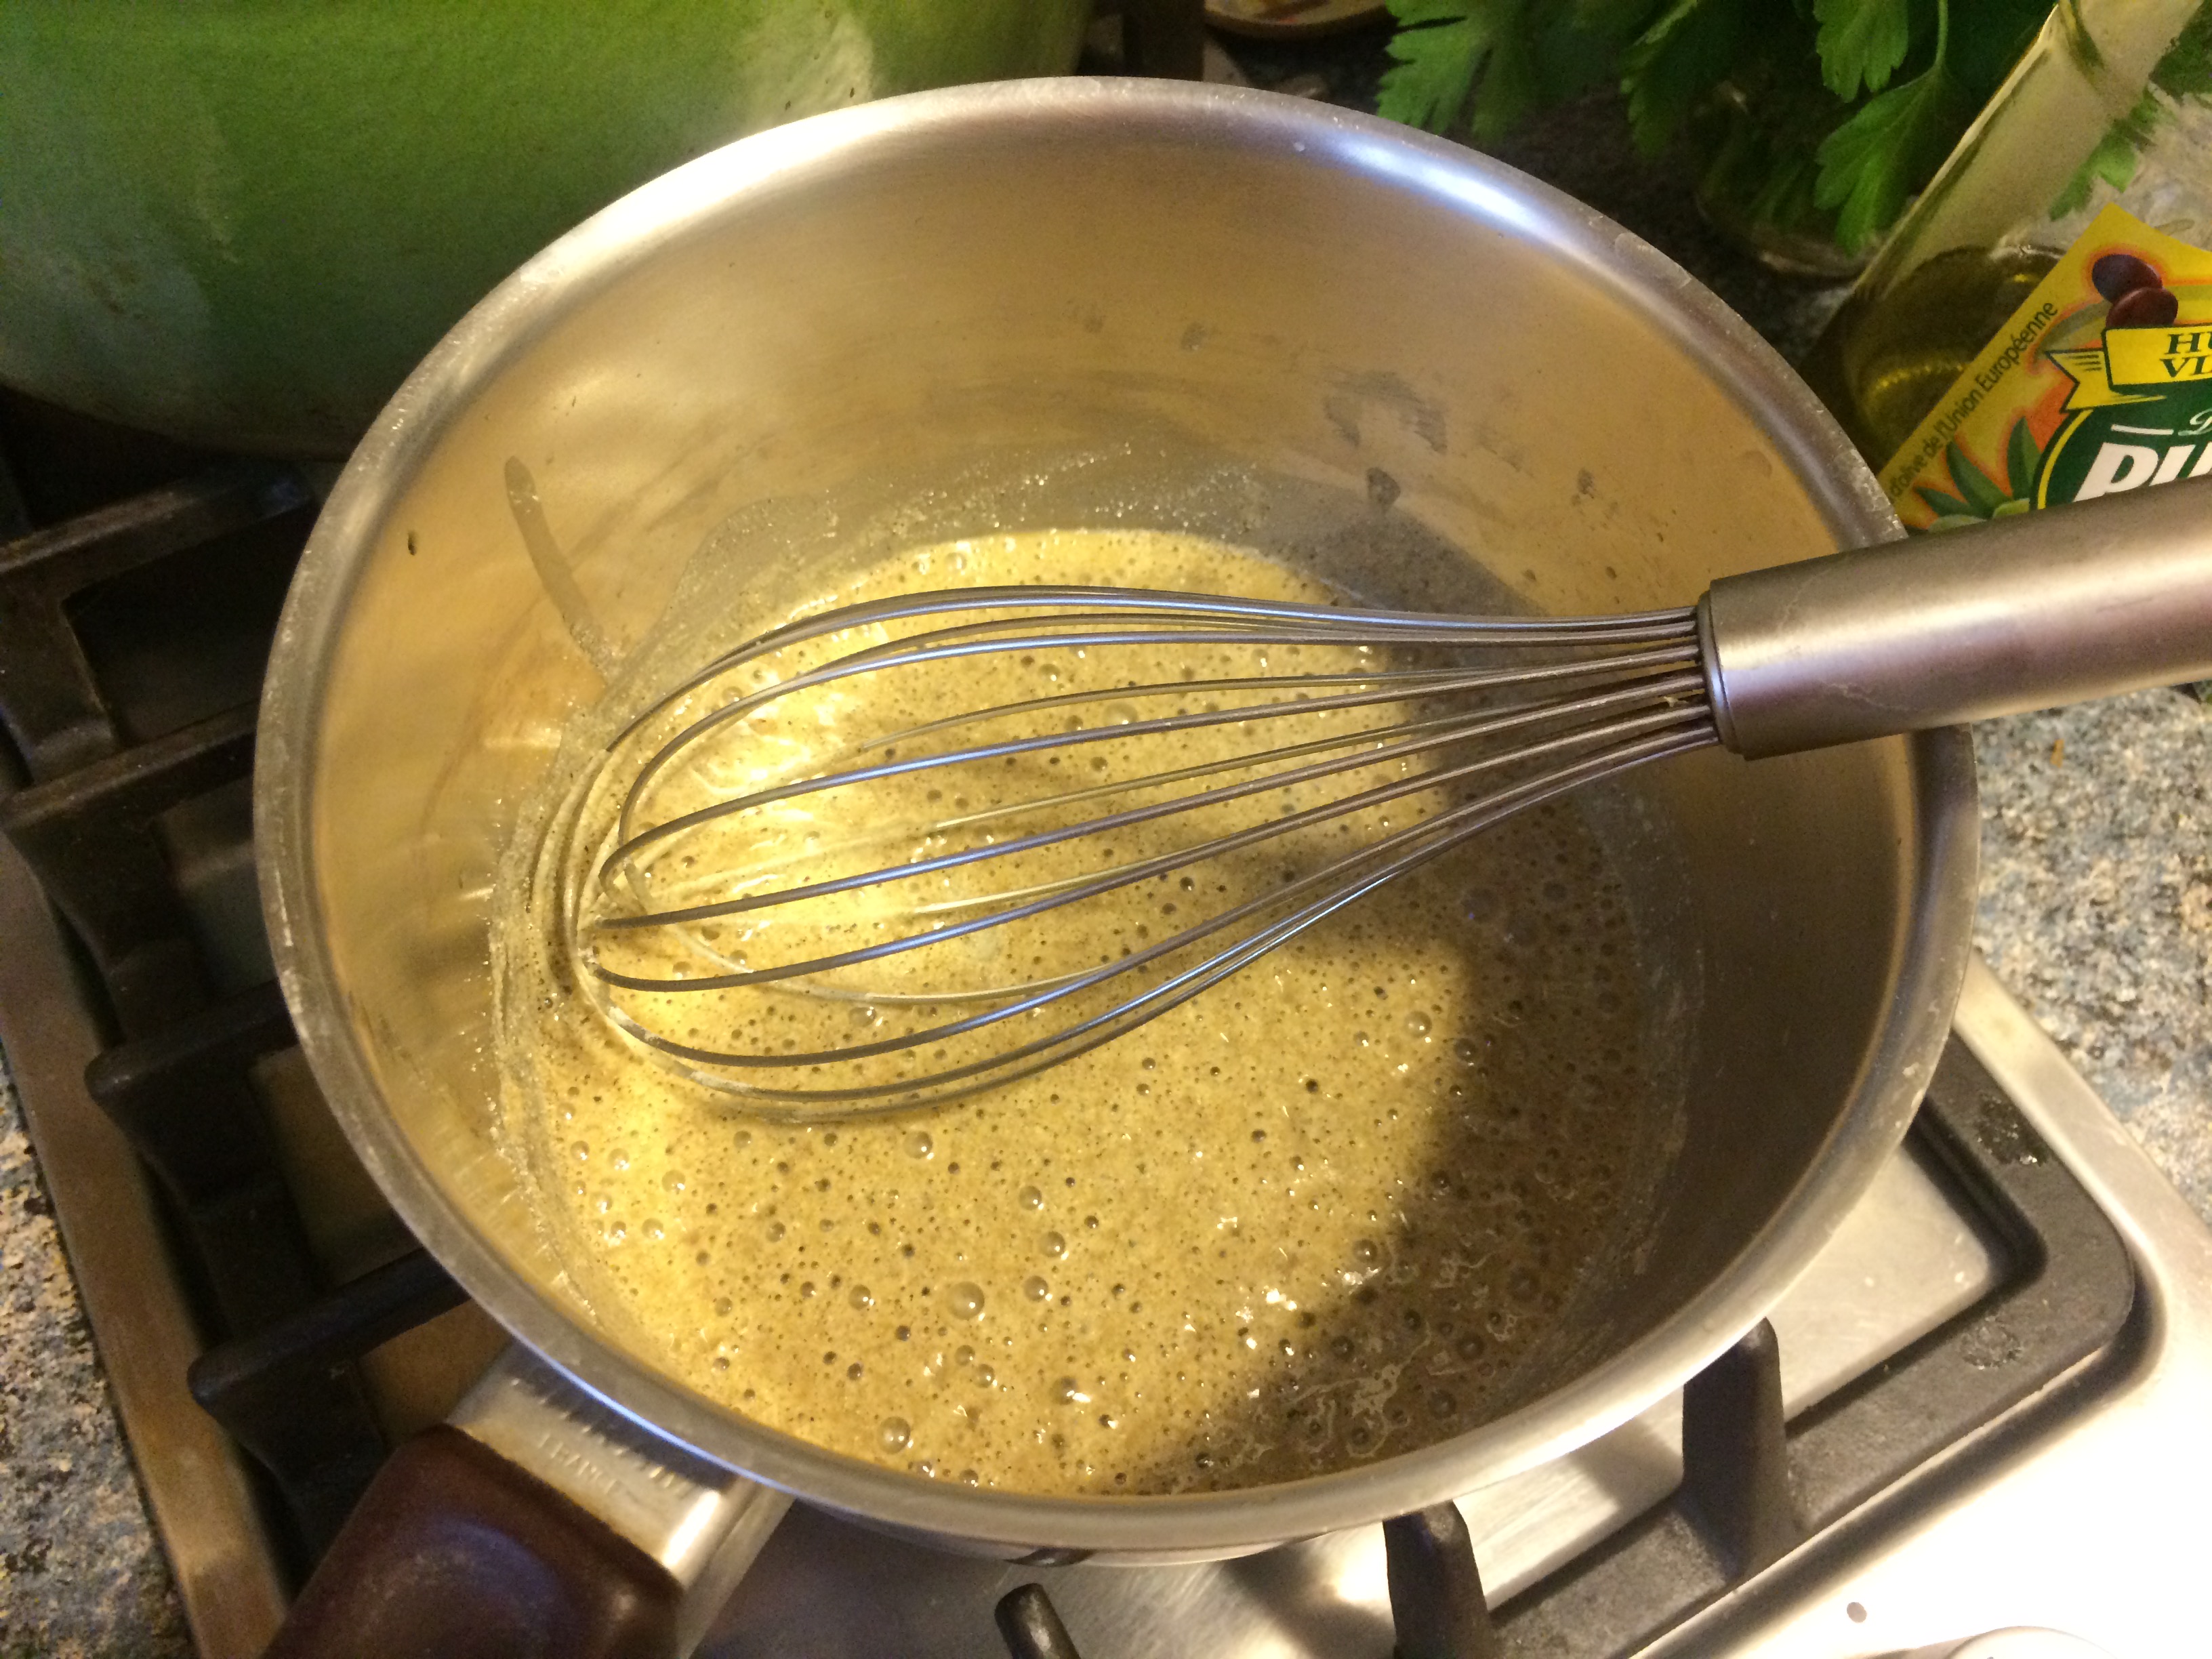
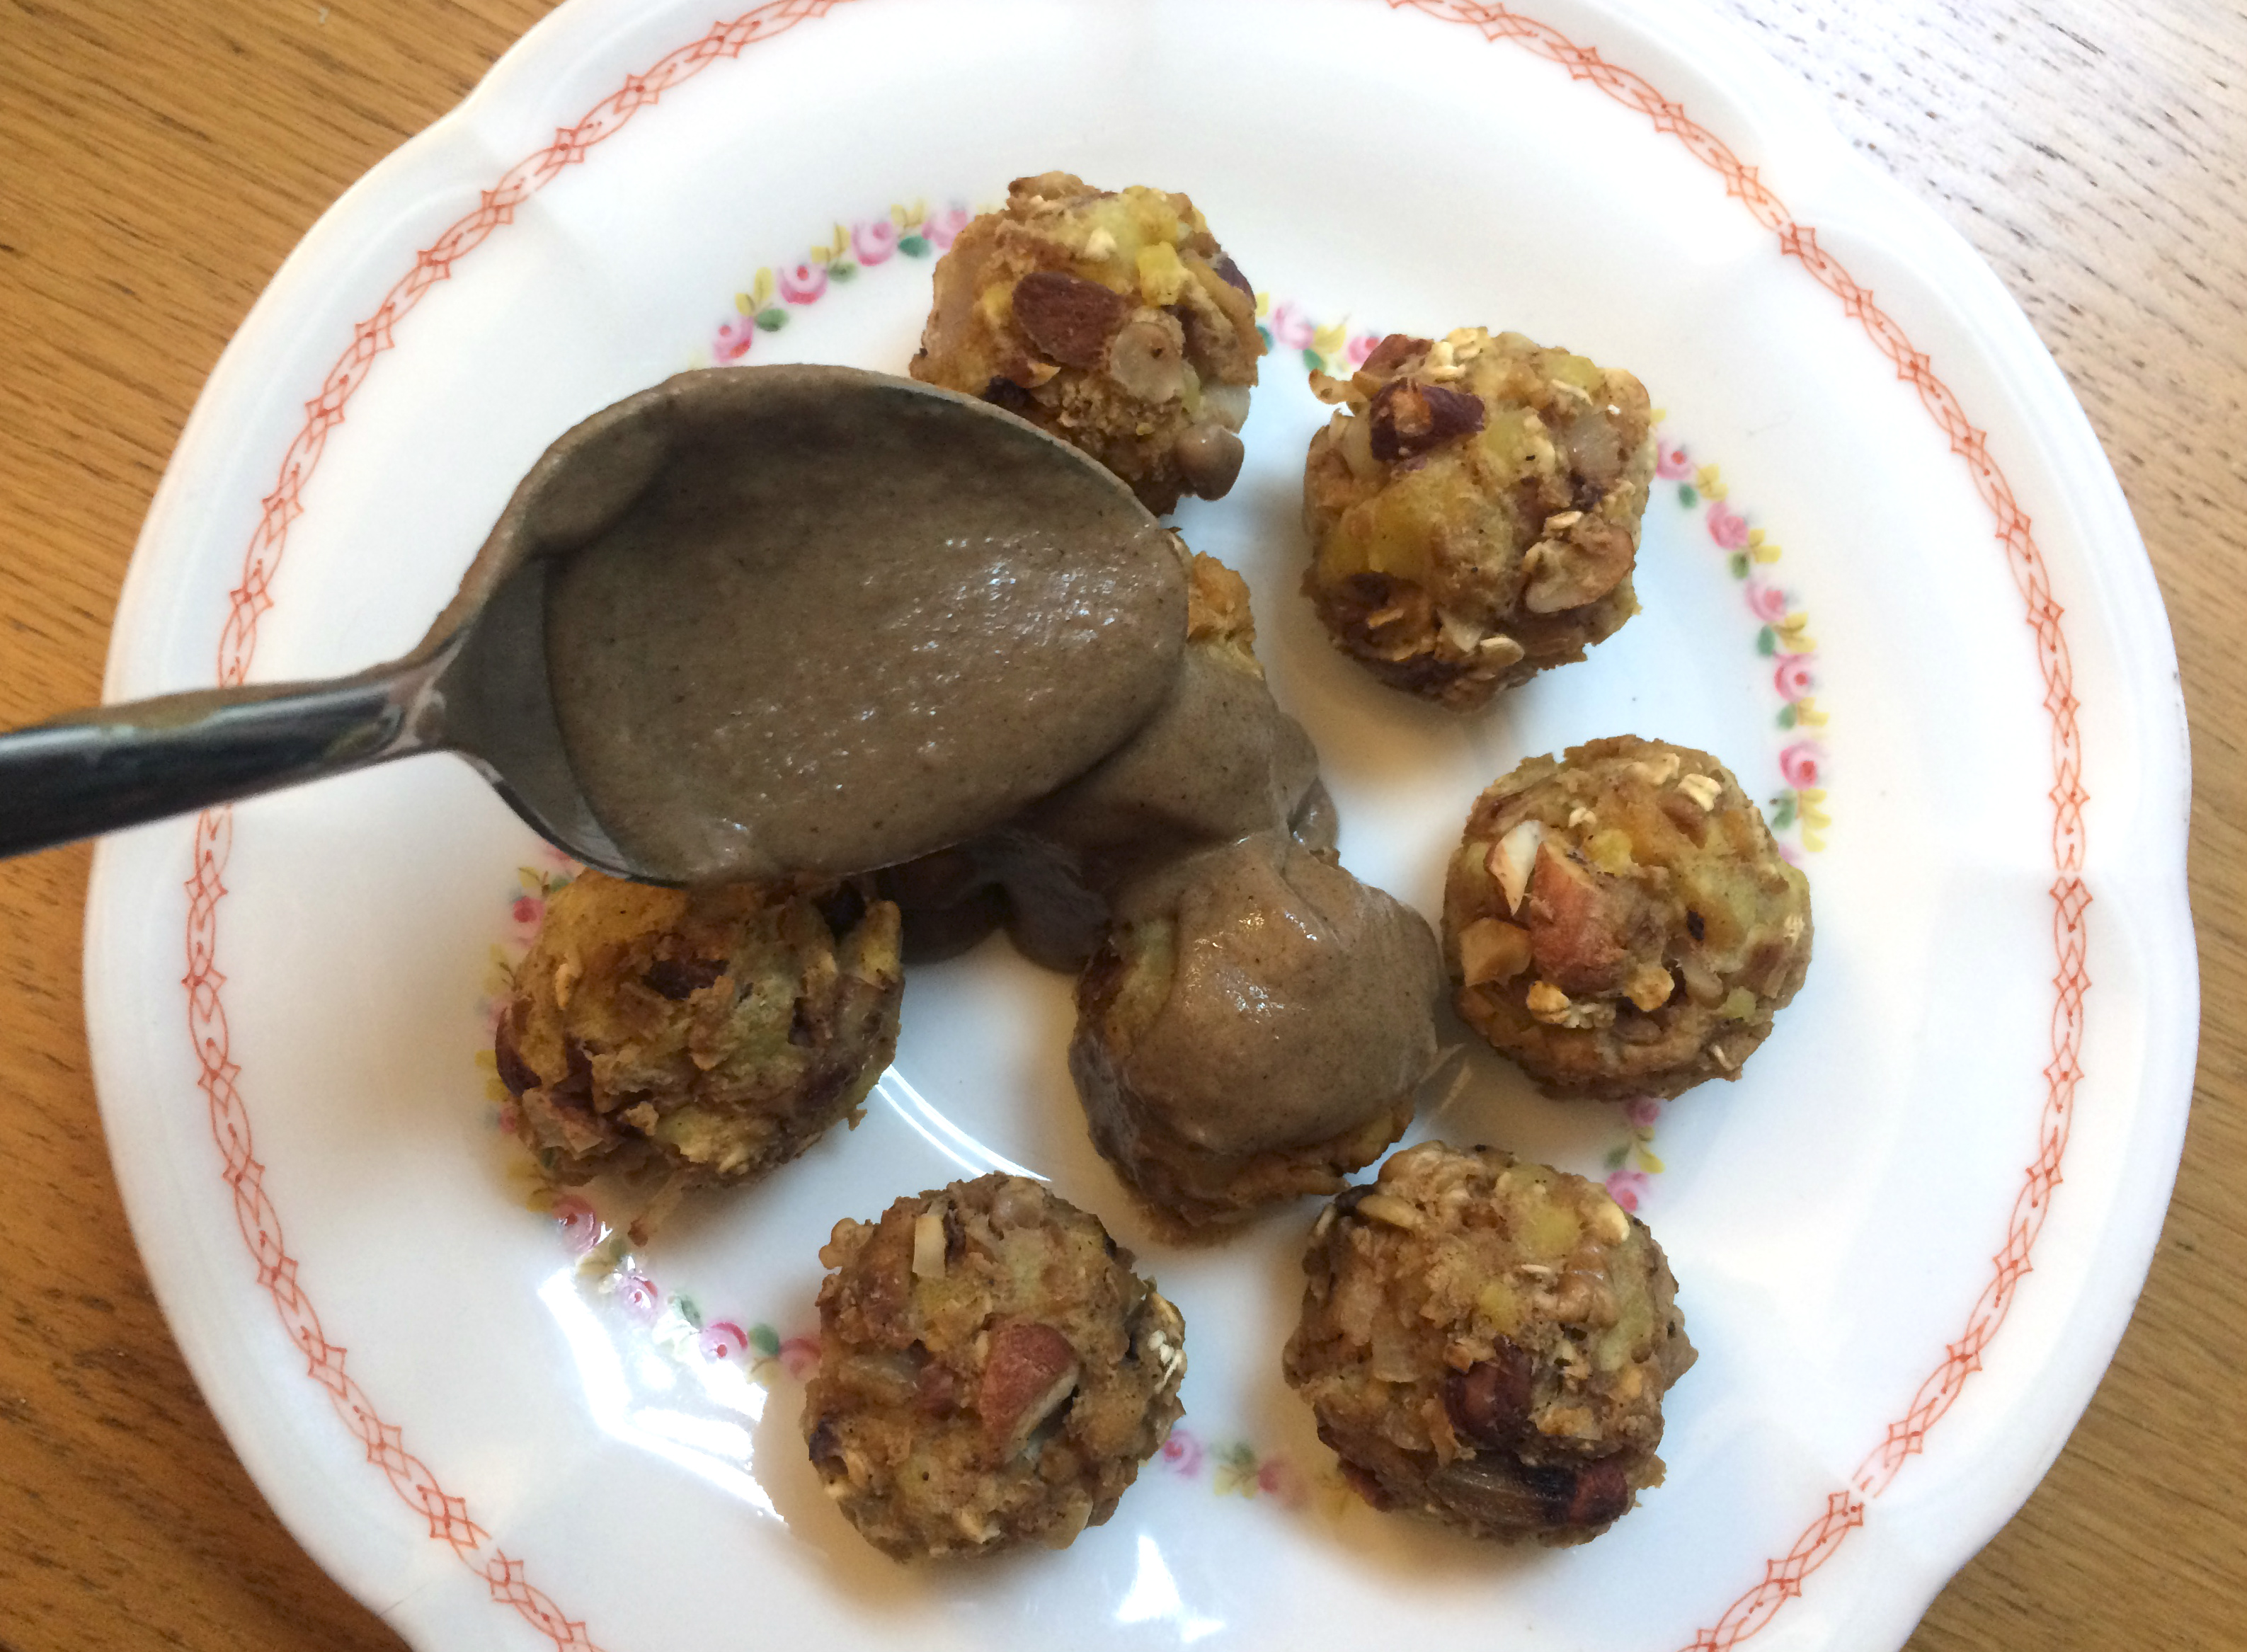
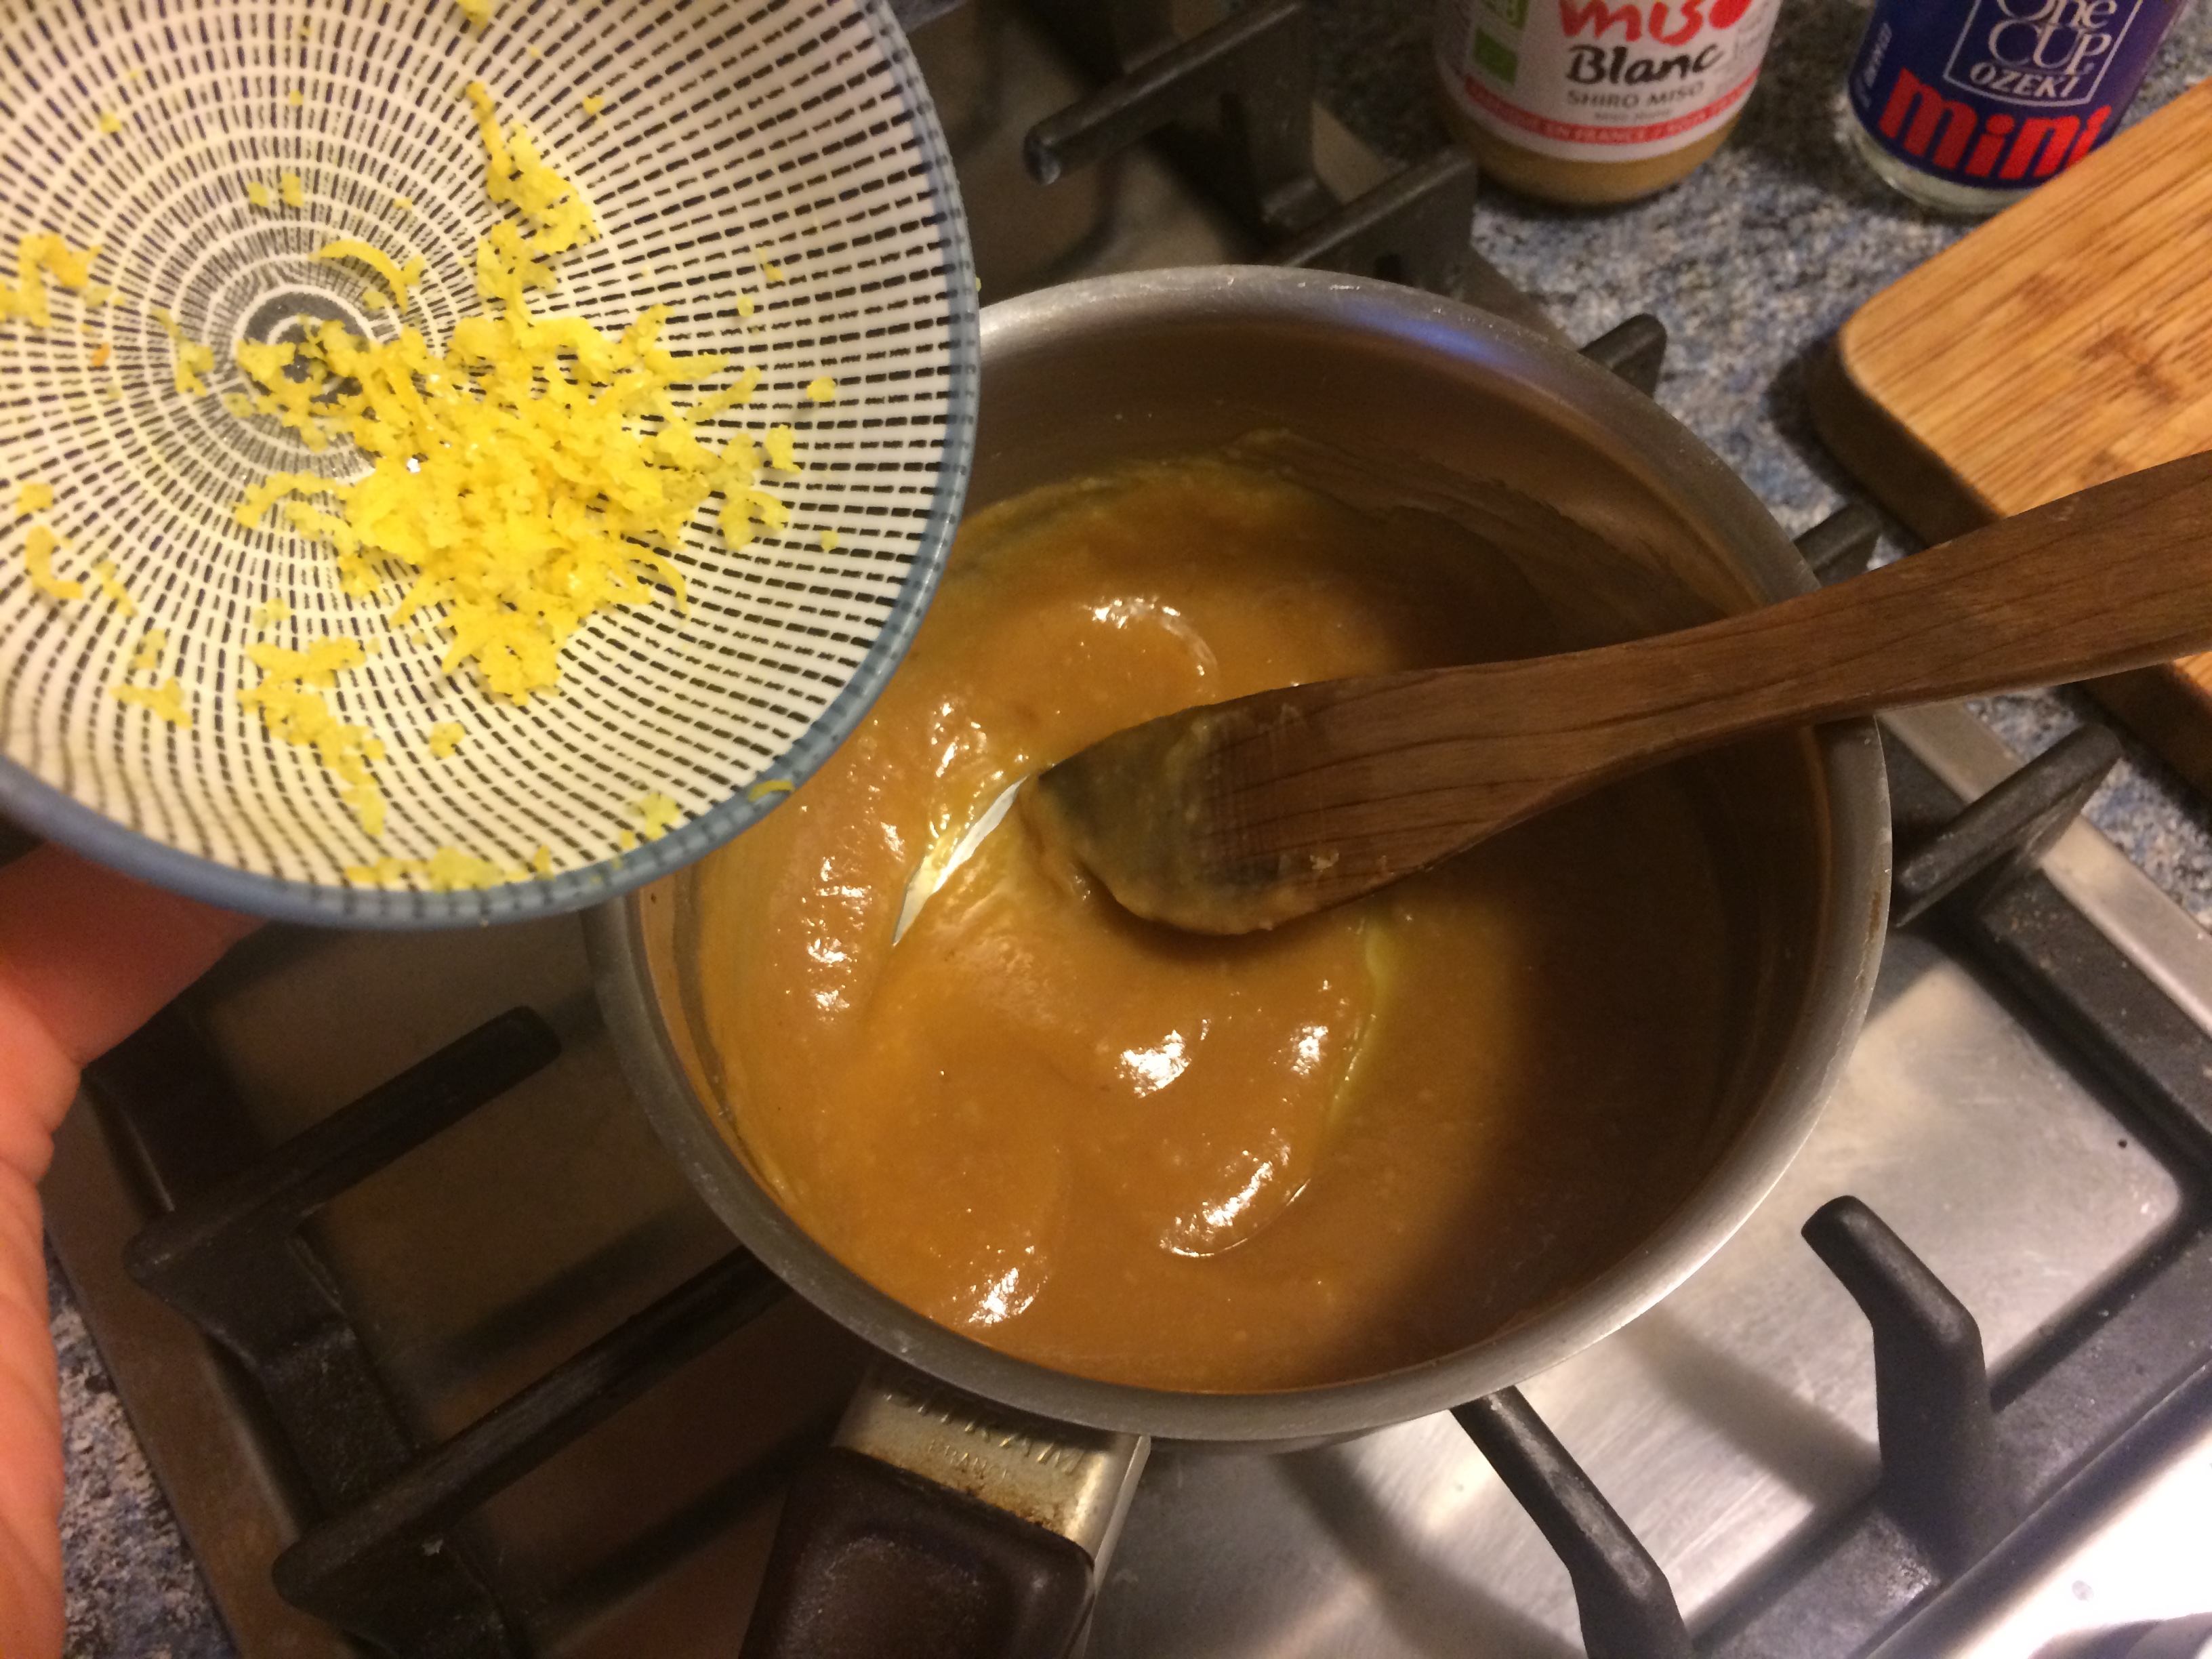
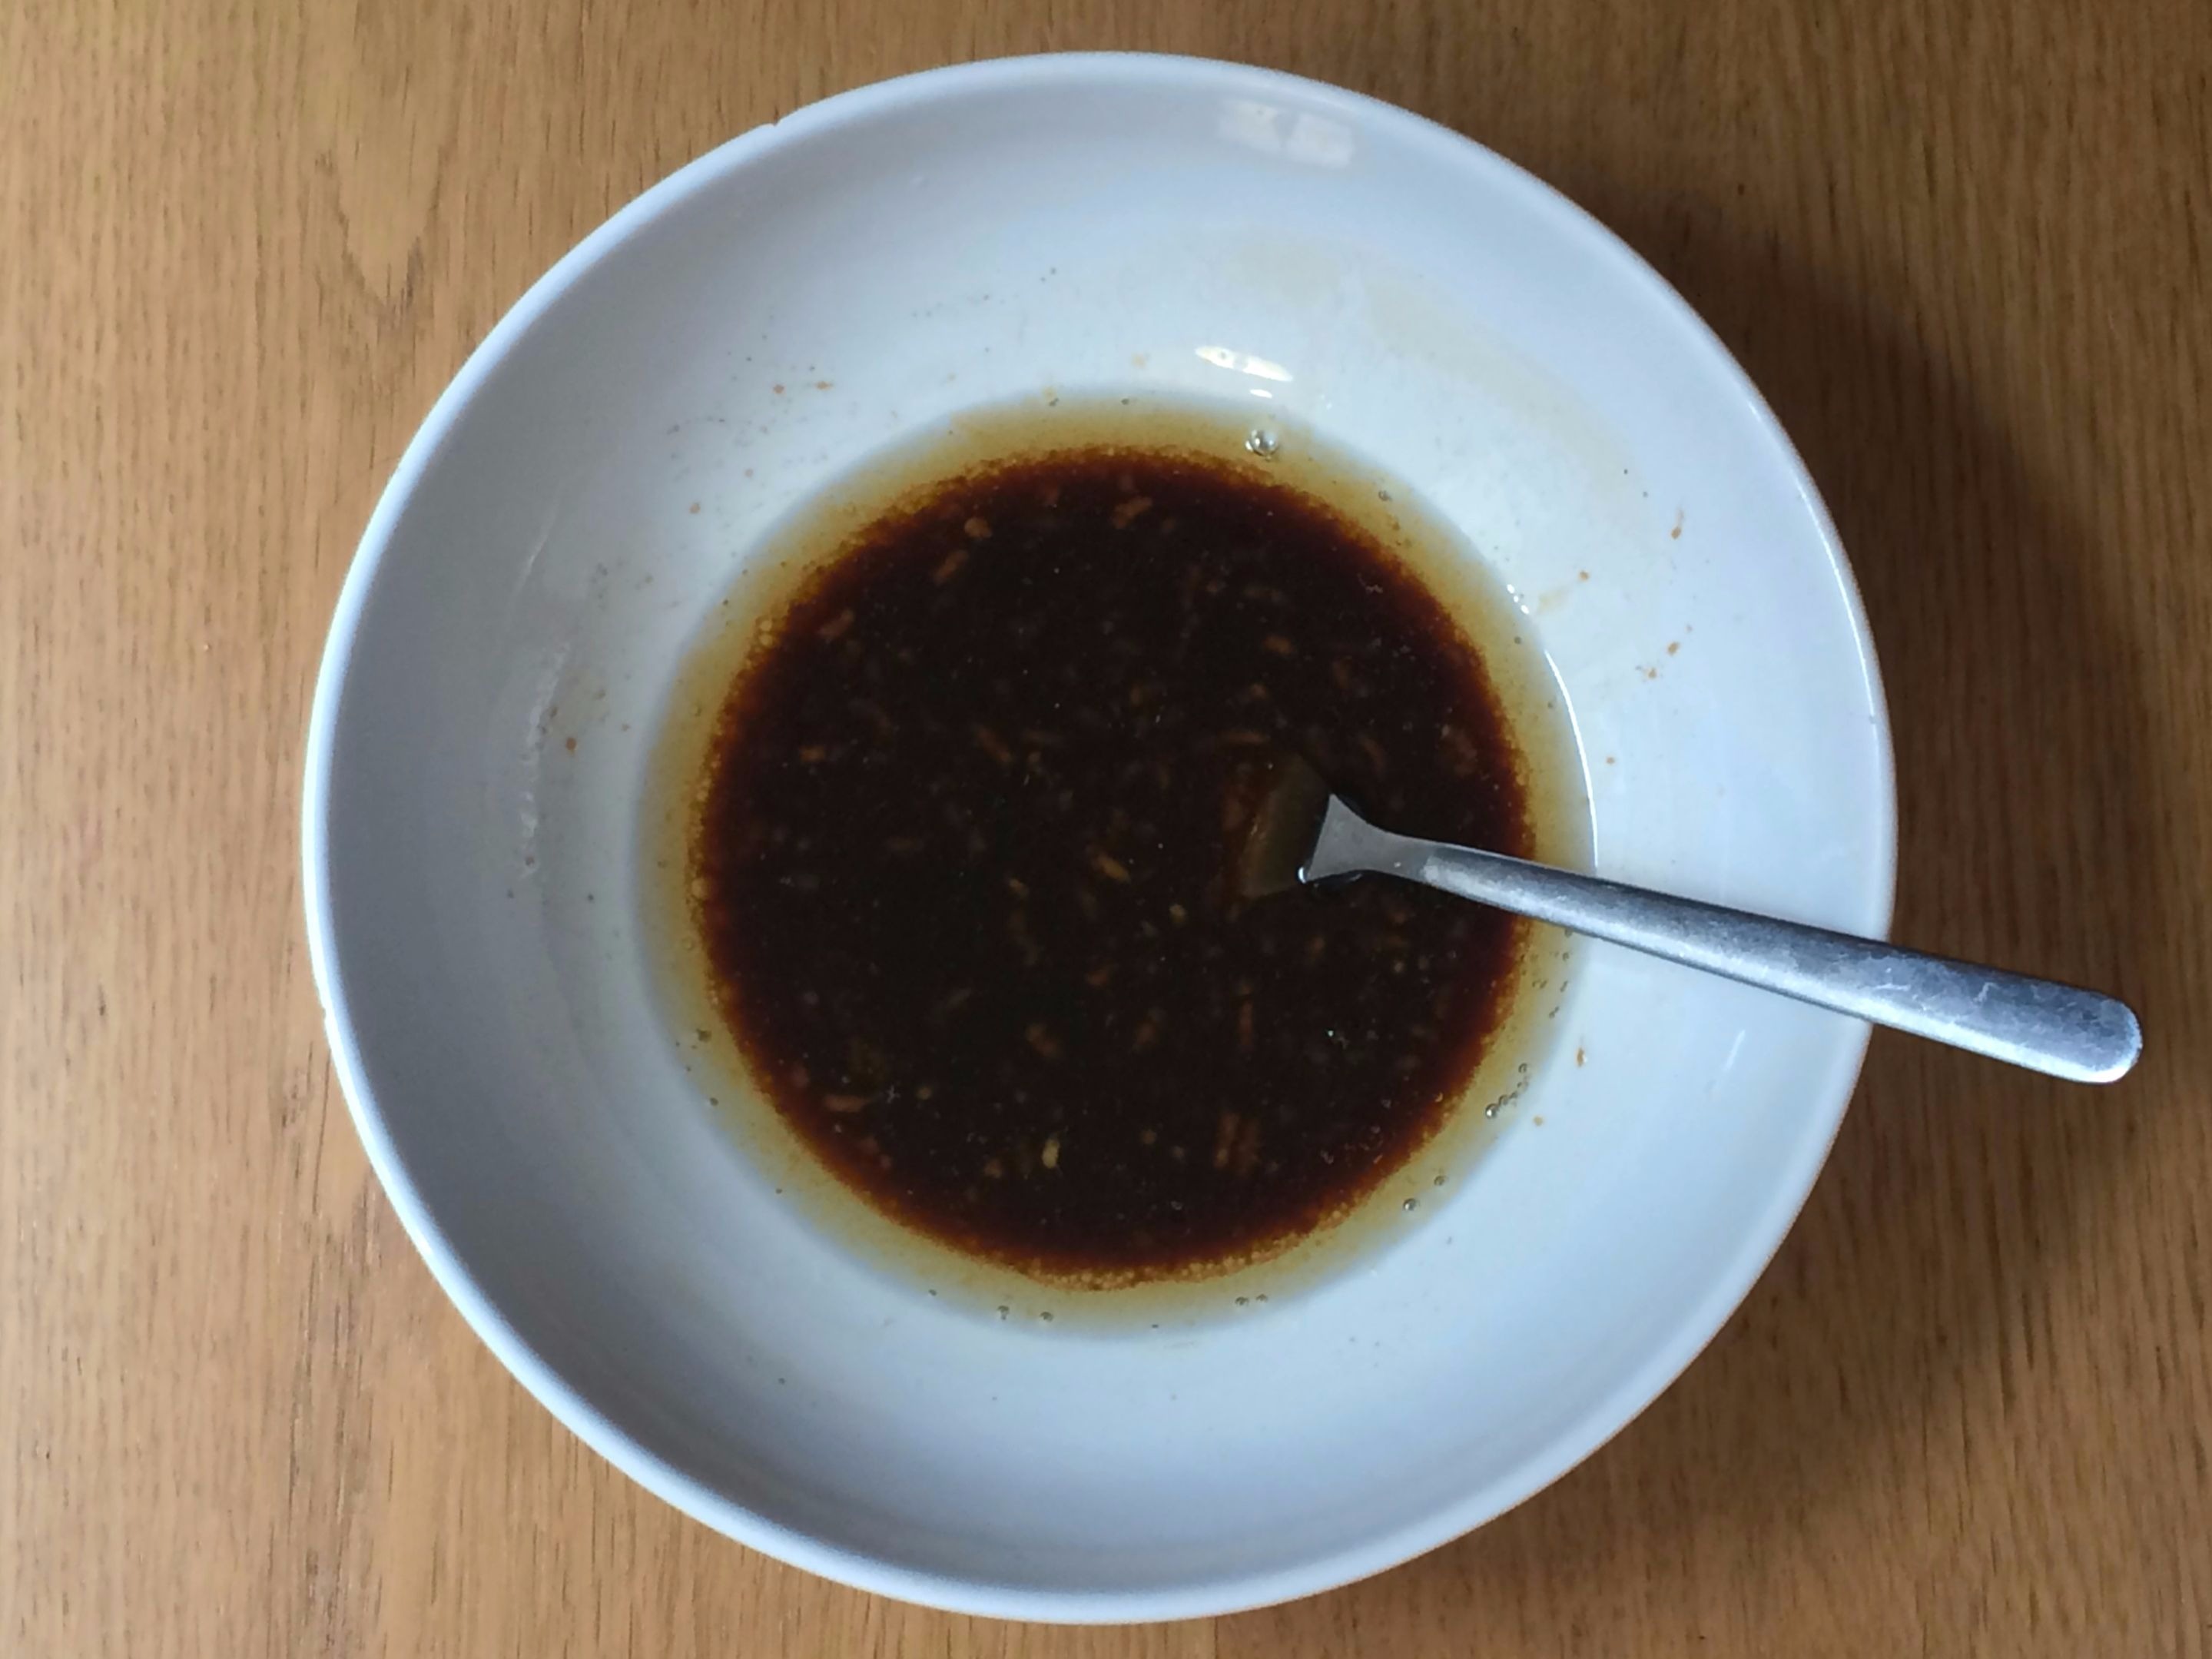
First, combine the soy milk with the miso, tahini, soy sauce, lemon juice and optional tomato paste and whisk to combine thoroughly.

Heat the margarine over medium-low heat in a saucepan until it melts. Add the flour and whisk; it will form what is called a roux. Add the soy milk mixture and whisk thoroughly to prevent any clumps from forming. Add the nutritional yeast and white pepper, combine thoroughly, and taste to see if you want to make it saltier (add a splash more of soy sauce or a pinch of salt).

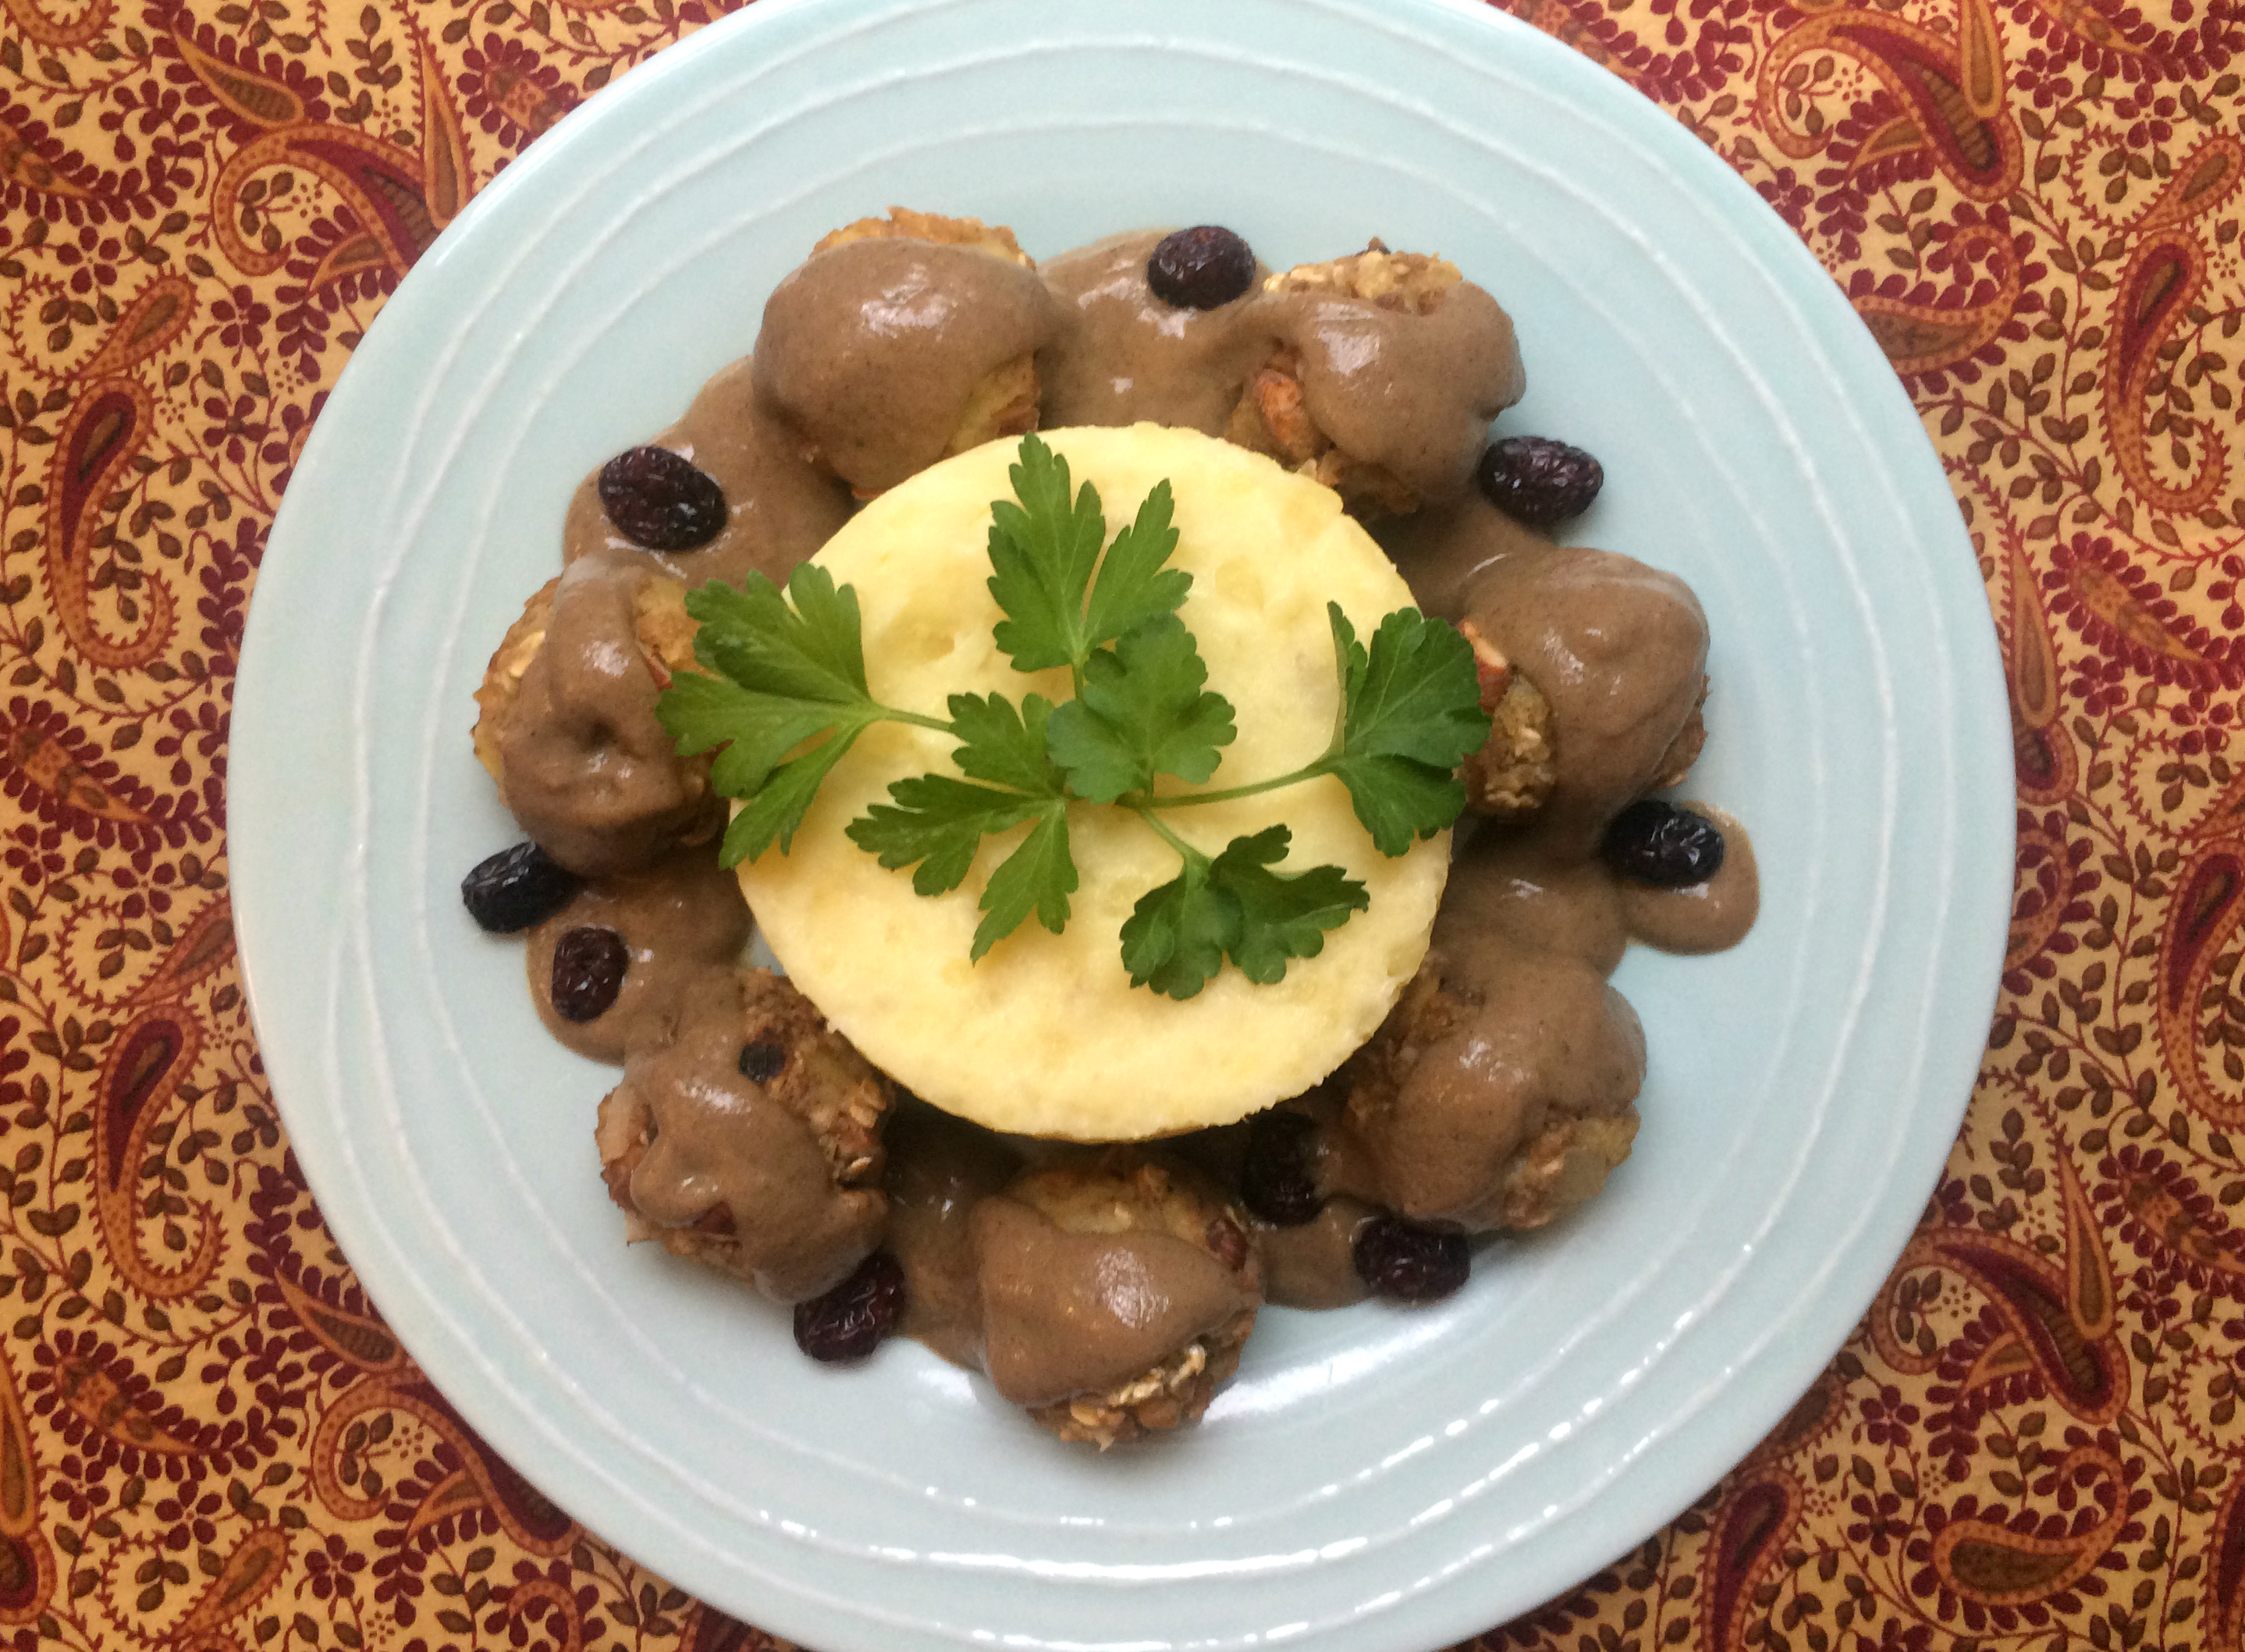
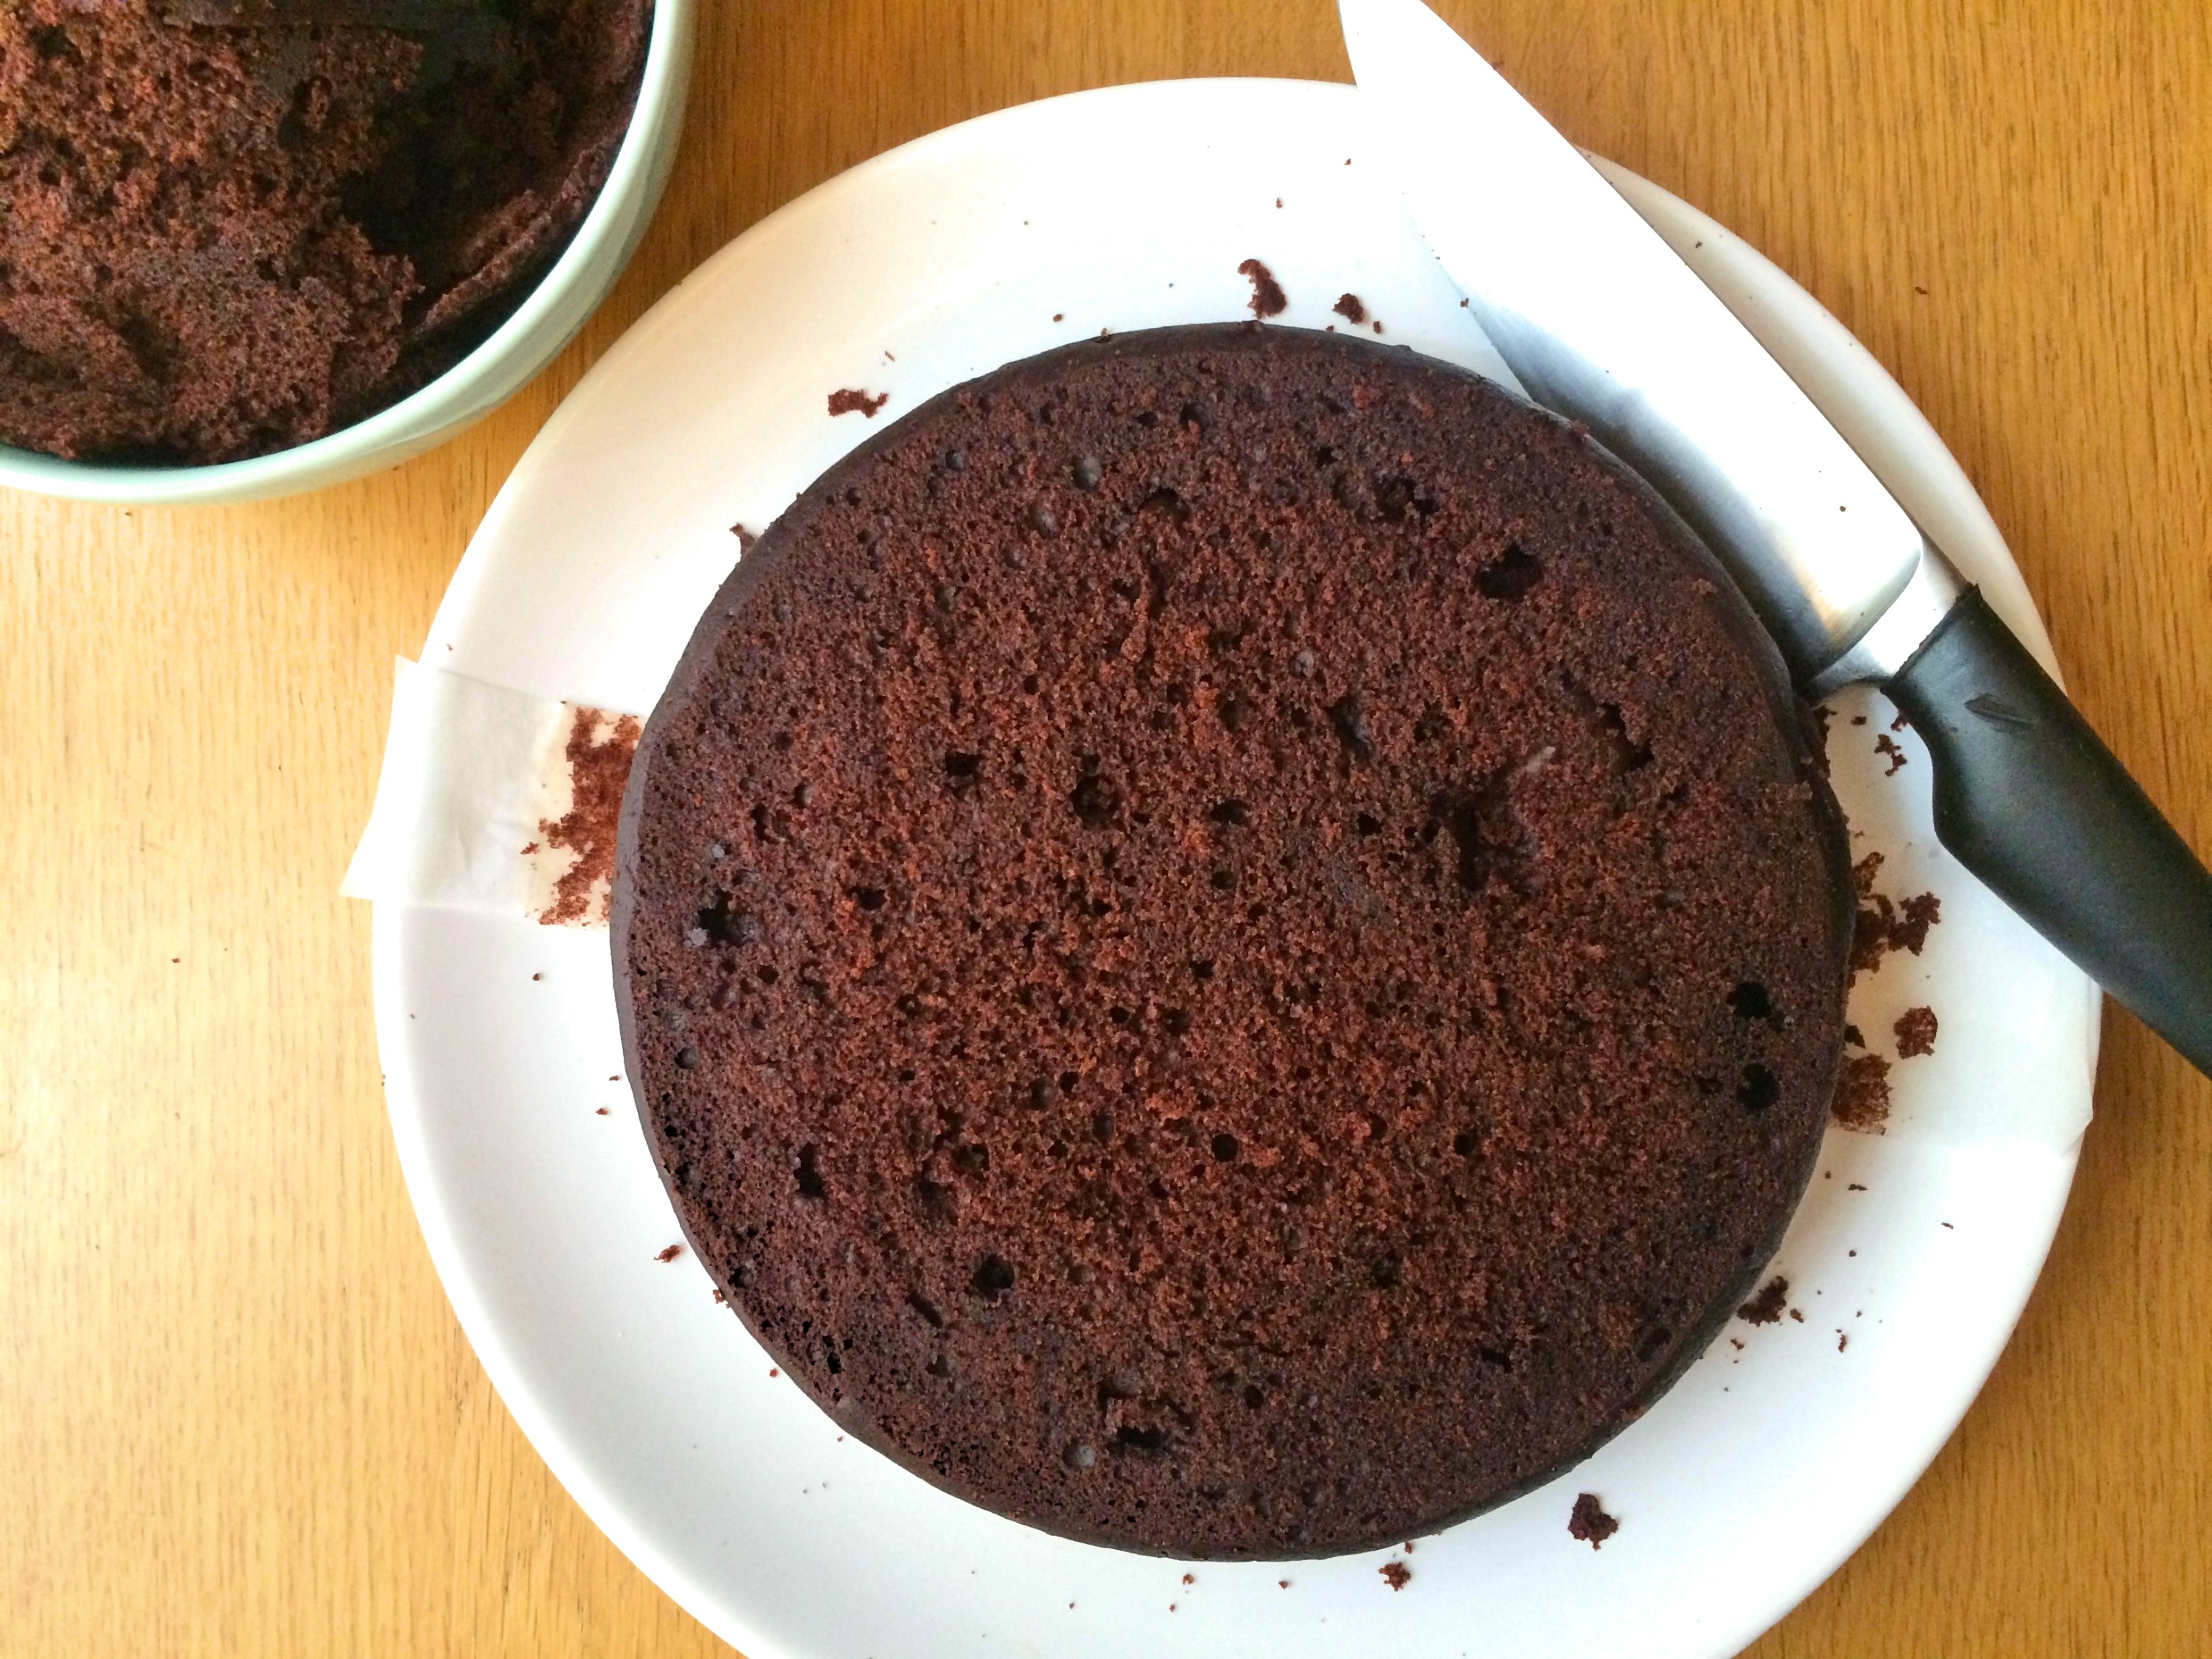
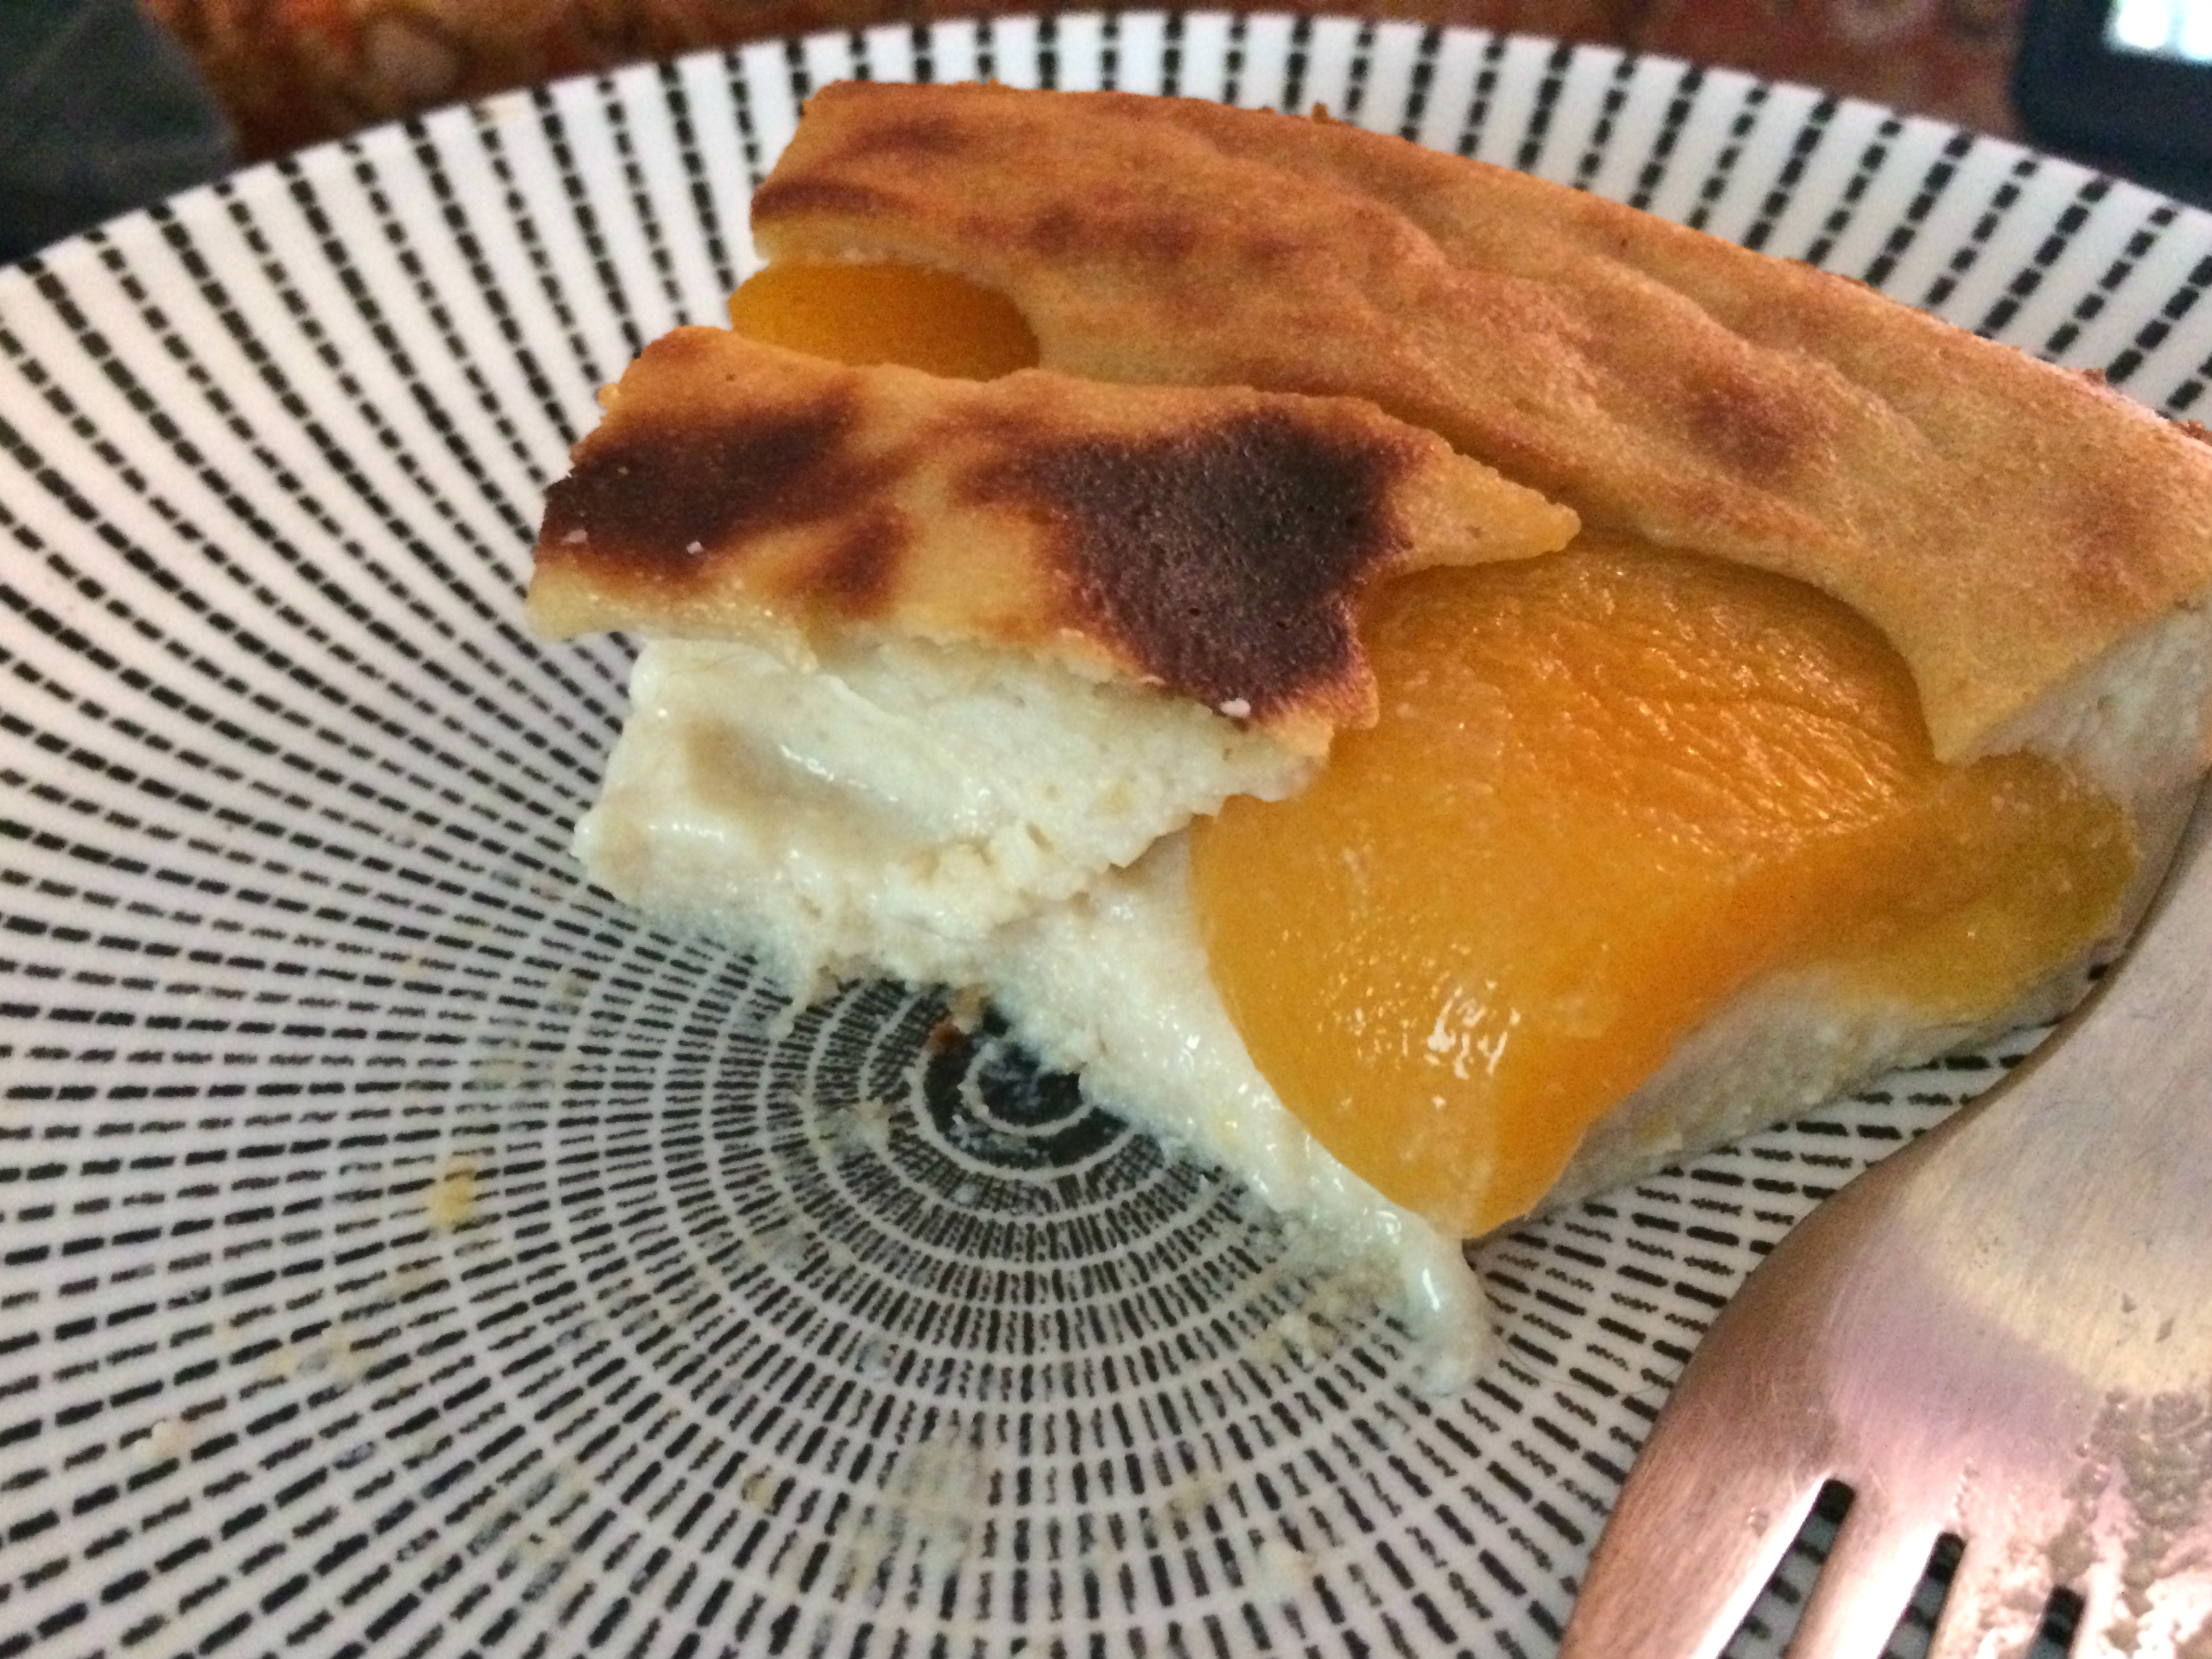
When the ring is done baking and the cheese sauce is ready, place a ramekin or small bowl in the center of the ring and fill with sauce. To serve, place a spoonful of sauce on each plate and top with a slice of the spinach-artichoke ring.

IMG_2583cIMG_2615dIMG_2629b

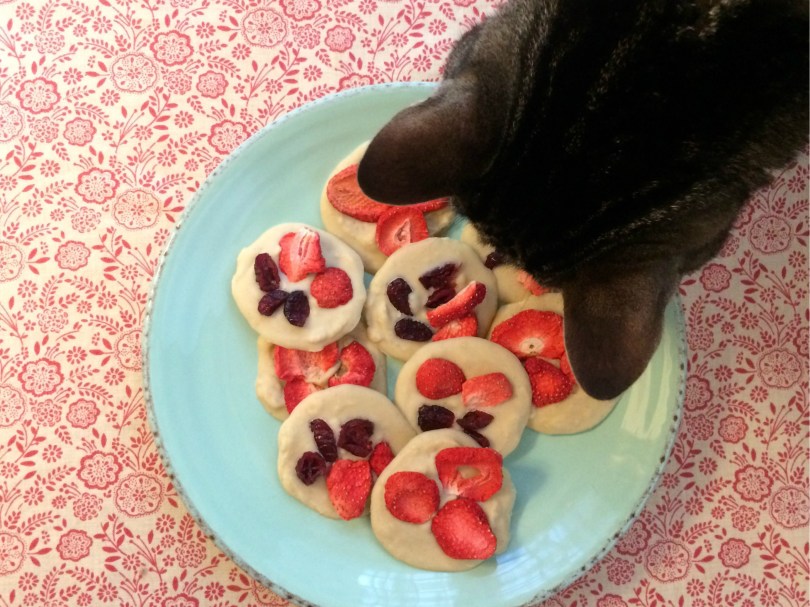
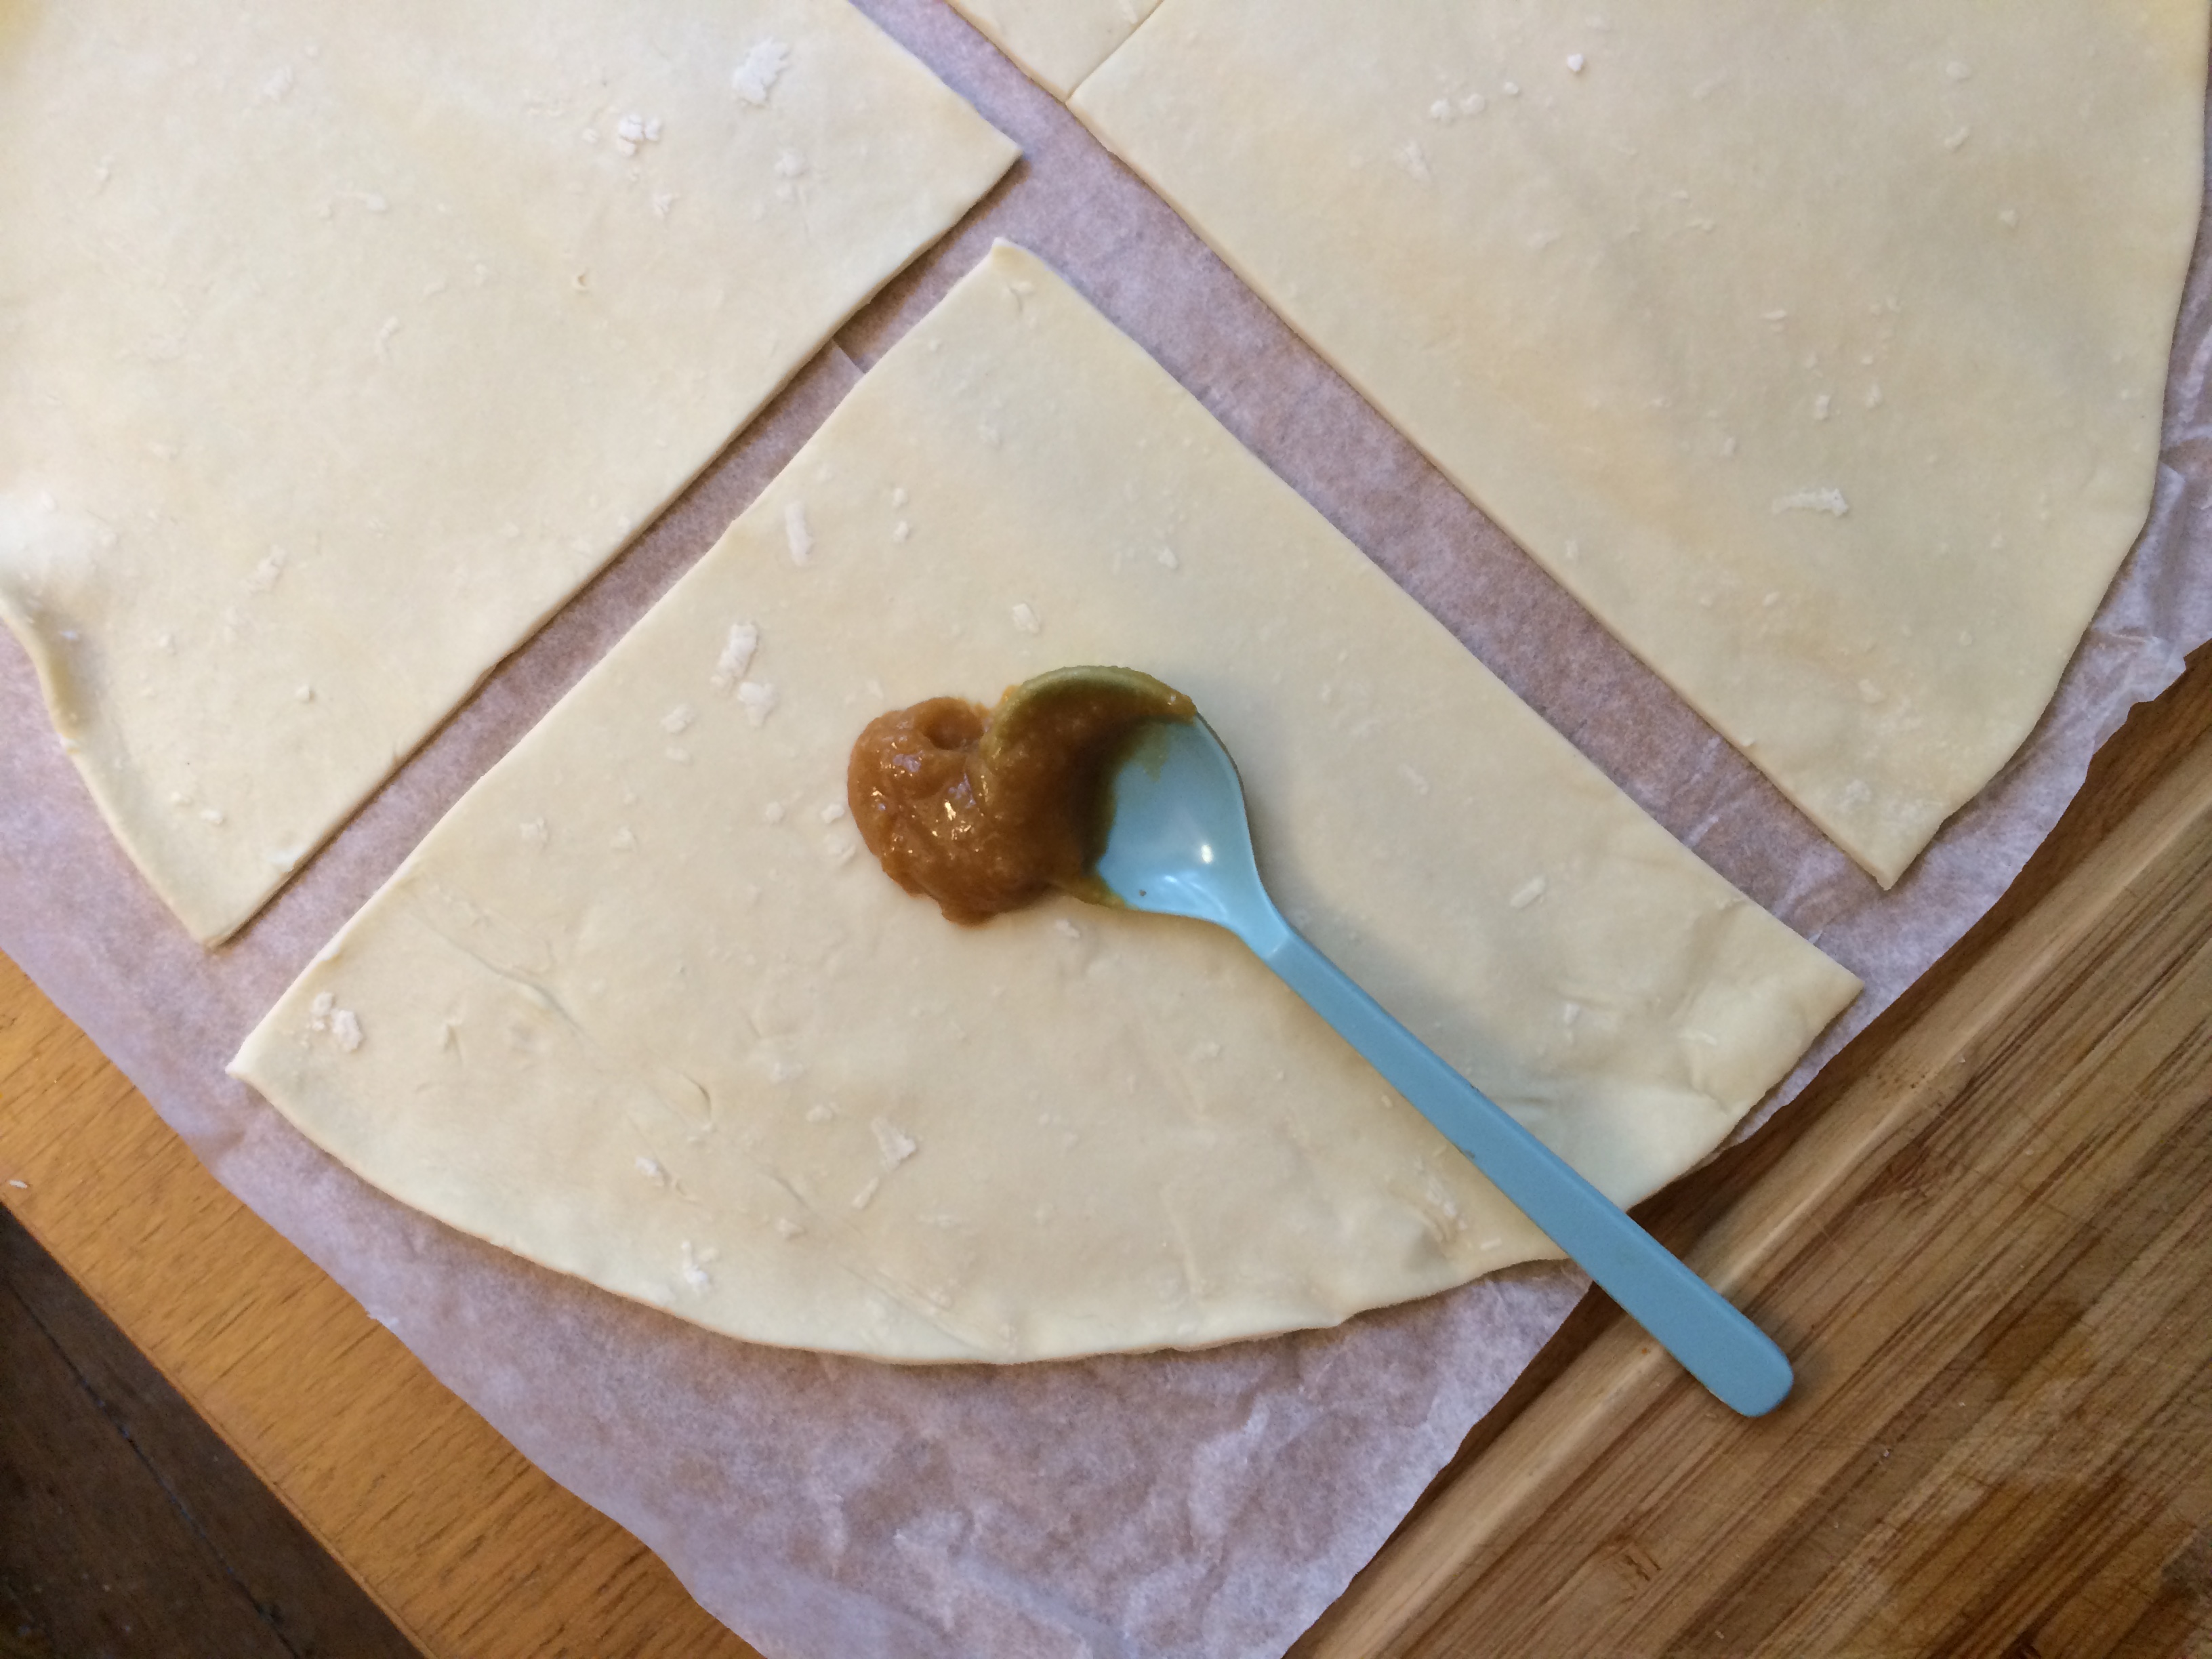
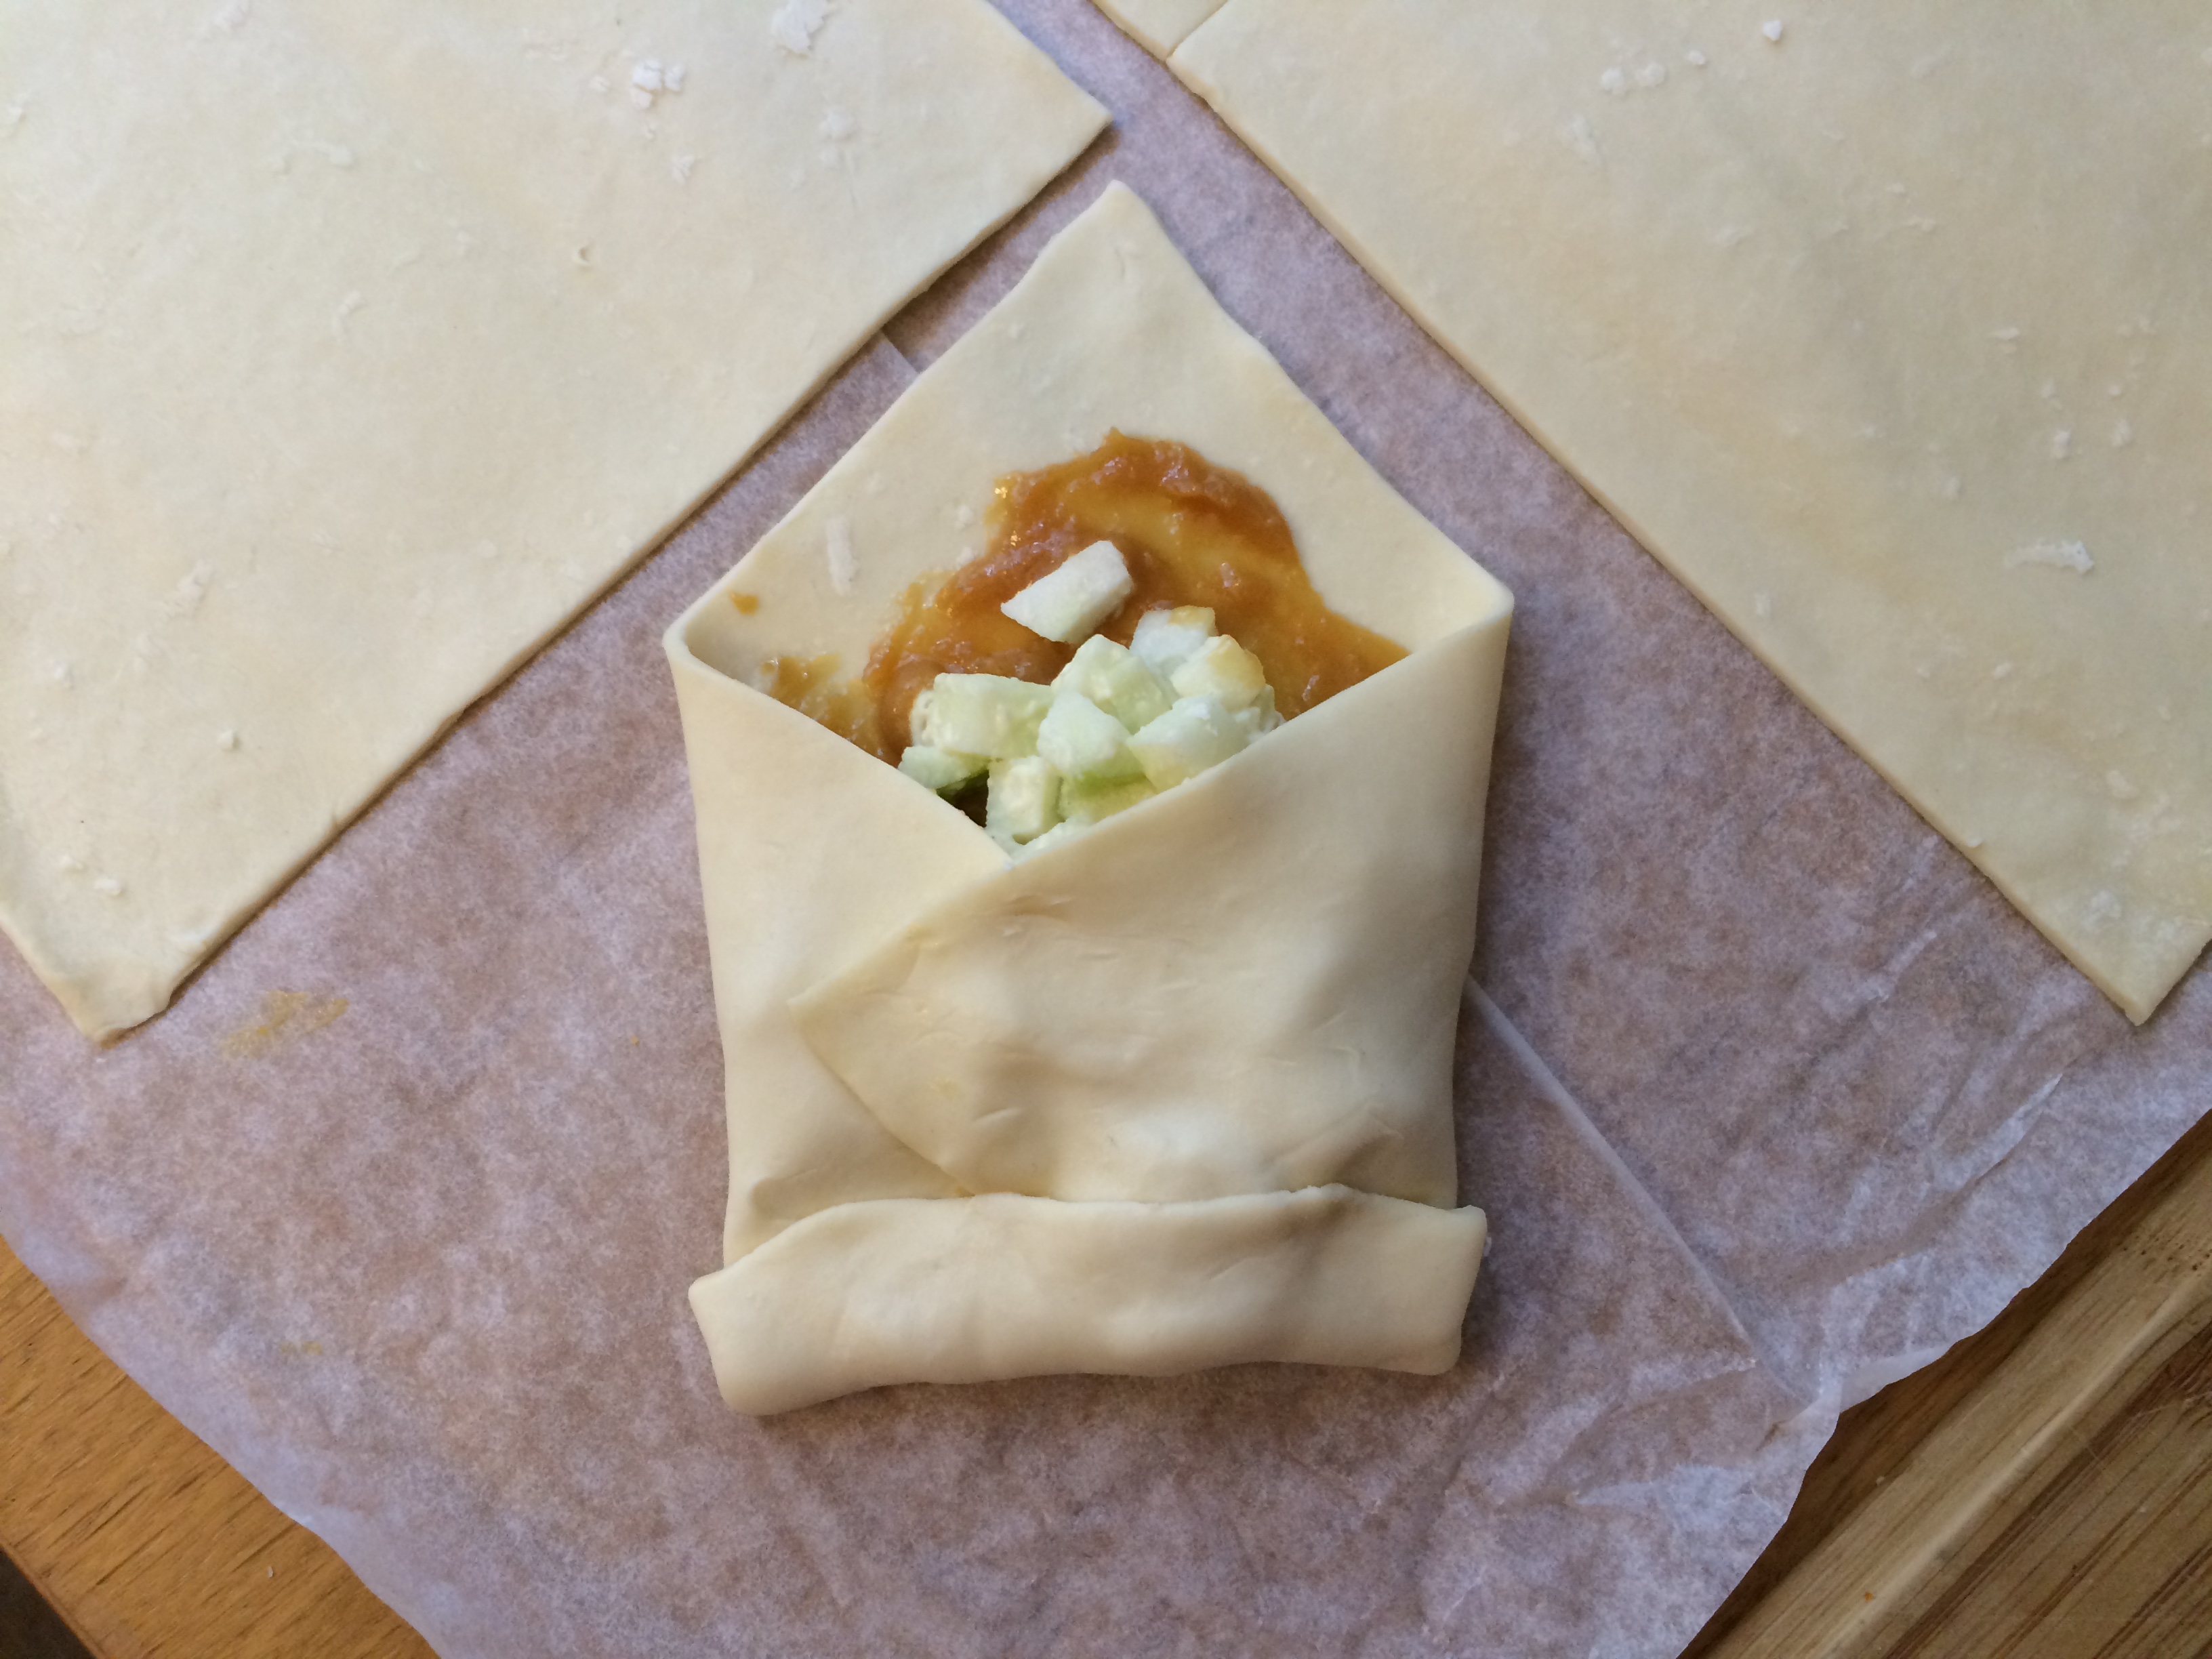
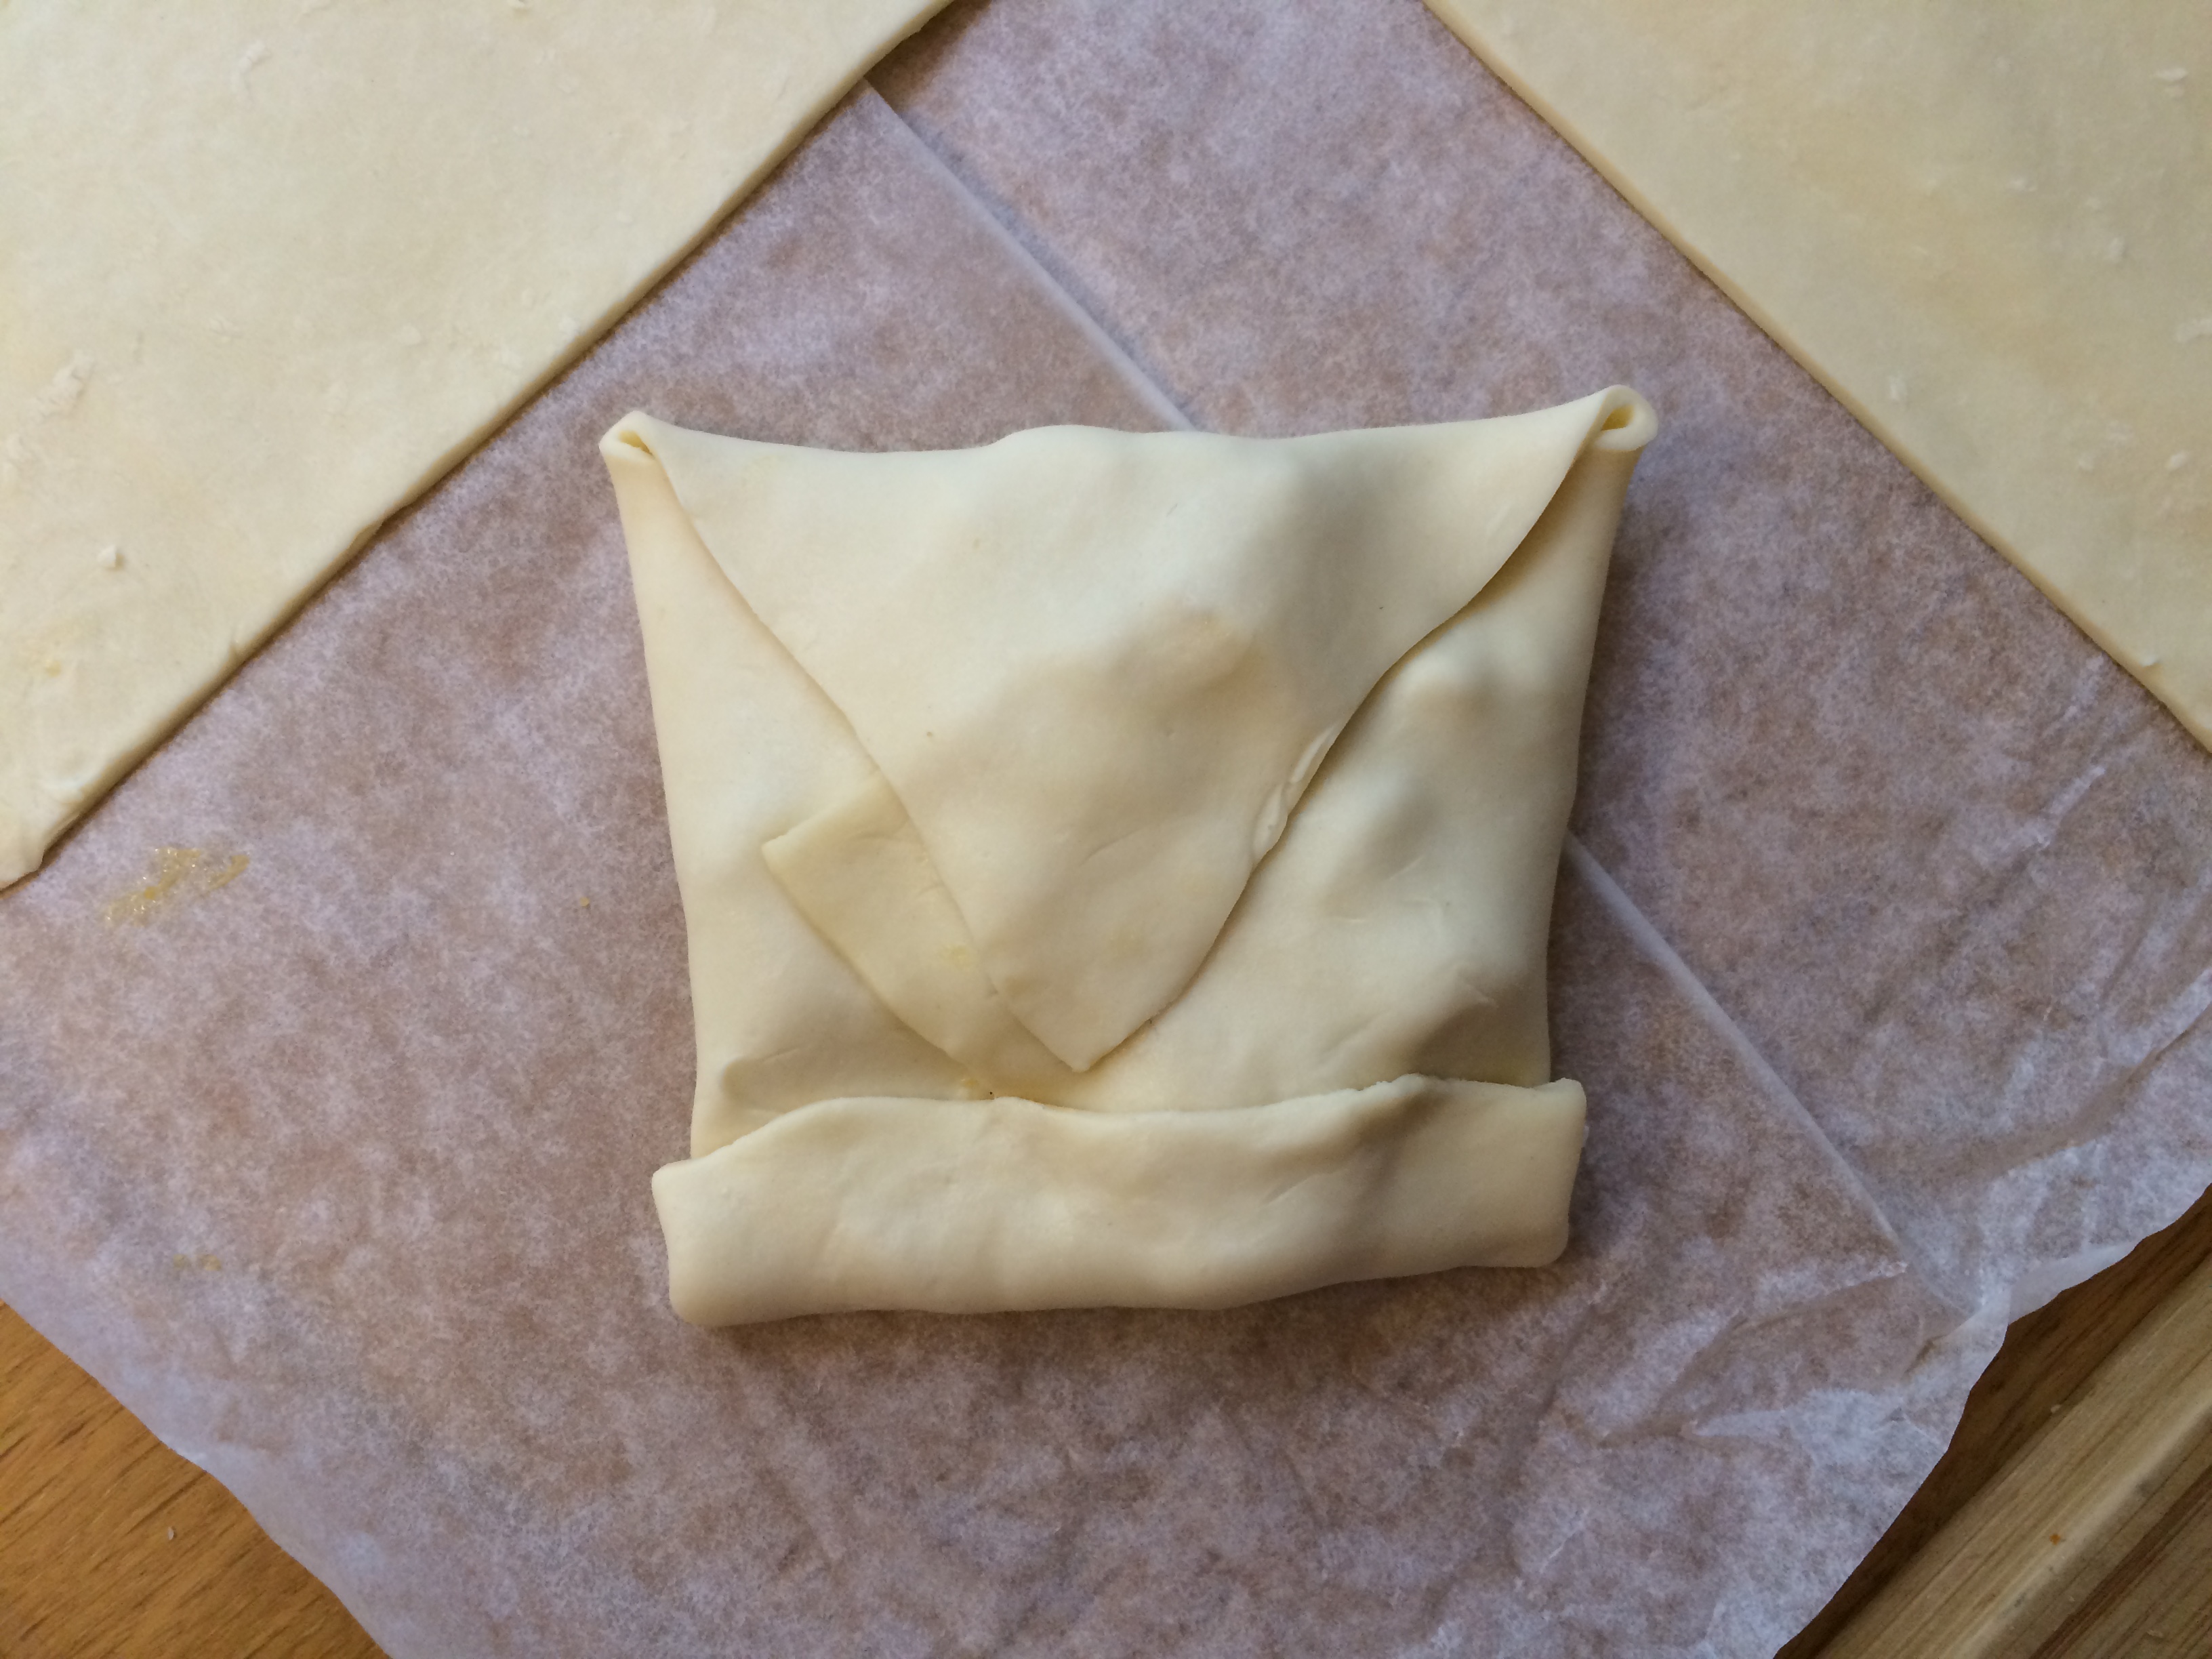
Variations: Rather than making a log formed into a ring, cut the dough into four squares, divide the filling among them and fold each one over to make savory turnovers. Cut slits on the top for the air to escape, and bake for 20-25 minutes.

Ideas for other 1970s dishes you could serve with this can be found here.

For your dinner playlist, look no further than the Billboard Hot 100 list for 1971. Consider Donny Osmond’s “Go Away Little Girl” (no. 7), John Denver’s “Take Me Home, Country Roads” (no. 8) or Al Green’s “Tired of Being Alone” (no. 12).

After dinner, relax with a Grasshopper and an episode of Mary Tyler Moore, The Partridge Family or The Odd Couple.

And if, after reading this post, you want some vintage Betty Crocker recipe cards of your own, check eBay, where several sets are for sale. Alternatively, someone has scanned the fronts and backs of all the cards and generously shared them with the world here.

For more fun, be sure to check out this collection of 1974 Weight Watcher recipe cards (don’t miss the commentary in the captions!). 🙂

If you make this dish, please comment and let us know how it was!

Cathedral spires and Jules Verne

A couple weeks ago, to celebrate a good friend’s birthday, I took him on a surprise day trip to the town of Amiens, just an hour north of Paris by train. Actually, it was only a partial surprise as I’d told him we were going on a day trip, but hadn’t said where to… only that it would take under two hours to get there by train (to throw him off the track a bit, since that encompasses a lot of destinations). He was pleased when he heard the train conductor announce that we were headed for Amiens, since (as I knew) he had never yet been there.

IMG_7839

Luck was mainly on our side, this day. The weather was nice—suitably sunny and warm. We got out of the train station and began heading toward the city center. As we walked, I took a few shots of some cute old-timey building façades. On the white building, in beautiful Art Nouveau lettering, it says North Train Station Seed Company.

IMG_7840

As soon as we started heading toward the river, we began to see the spires of the cathedral appear above the rooftops. A block or two later, after a turn around a corner, the enormous building emerged as a whole.

But before visiting it, arriving as we had at 1 pm, the first order of business was to have lunch. After the Lebanese restaurant I’d planned for us to go to disappointingly turned out to be closed during its normal business hours (the one thing that went wrong on this day, so I can’t really complain), we headed for another one on my list. Fuji Yama, listed on Happy Cow as an especially vegan-friendly eatery, turned out to be a good source of tasty maki, temaki and glazed mushroom skewers. As we savored our postprandial pot of green tea, my friend speculated as to the rest of the activities I had up my sleeve.

IMG_7859

One of the sites we would see was nevertheless easy enough to guess: the cathedral. We paid our check and made our way to it through some narrow streets full of old houses that were very charming indeed—especially to me, the non-European who is still in awe of such things even after eight years here.

IMG_7844IMG_7845

A network of narrow canals criss-crossing a section of town connects to the River Somme, which divides Amiens in half. Here, a canal flows along a street near the cathedral. It made me think of the film version of Girl with a Pearl Earring.

IMG_7874

IMG_7877

IMG_7882

Built remarkably quickly between 1220 and 1270, the Amiens Cathedral is the tallest complete cathedral in France (at 112 m/369 ft)  and the 19th largest cathedral in the world. It has been listed as a UNESCO World Heritage site since 1981.

A documentary about this cathedral can be seen here.

IMG_7903

I didn’t take many photos inside (to see the interior, check the documentary linked to just above), but this enchanting play of stained-glass-filtered light and shadow deserved to be remembered.

IMG_7897

I also happened upon these three gilded feathers, which took my imagination to some fanciful places as I imagined cherub statues coming to life and flying around under the vaulted ceilings at night. Perhaps they soared a bit too enthusiastically and lost some plumage along the way.

IMG_7905

I am not overly fond of either heights or very narrow, endless stone stairs in a spiral configuration, but Birthday Guy is, so I indulged him and we went up the tower for some panoramic views of the city.

IMG_7910

There are about 300 steps up, in total. But don’t look down before you reach the top!

IMG_7907

Some people from bygone days (to whom the cathedral was already ancient) left names and dates on the staircase walls.

IMG_7912

IMG_7914

Views from the first level. Already quite high enough for me… but there were still more steps to climb.

IMG_7931

IMG_7933

At the very top, we walked around among the tower’s uppermost stone encrustations under the watchful eye of a guide. In any case, it would have been harder to fall from this level than from the lower (but still lethal) one.

IMG_7939

A view of Amiens and the River Somme.

IMG_7926

I had to admit the views were rather worth the stomach-fluttering climb up those steps (and the seemingly interminable descent).

Next, we moved on to what I knew would be the highlight of our visit to Amiens: Jules Verne‘s house! Although born in Nantes, the prolific and visionary proto-sci-fi author lived in this house with his family for eight years just before the turn of the century. Today, it is a museum honoring his life’s work.

IMG_7950

IMG_7954

A globe structure sits atop the building’s tower in homage to his most famous work, Around the World in 80 Days (1873). In front of the home’s winter garden, an elegant Art Nouveau verrière stretches out to shield visitors from the elements.

IMG_7951

IMG_8045

Beautiful tiles on the house’s façade featuring the typical colors and organic floral shapes of the art movement.

IMG_7967

The music room.

IMG_7961

An imposing fireplace in the dining room.

IMG_7962

Jules Verne’s own personal shoebutton hooks, nail buffer and… toothbrush?

IMG_7970

Another impossibly elegant room.

IMG_7975

A parlor with sofas that were graced by the bottoms of many famous Victorians, back in the day. George Sand was one of them, but I have forgotten the others.

IMG_7985

Copies of Verne’s writings on his desk.

IMG_7979

A recreation of the interior of one of Verne’s boats, which may have inspired the vessel featured in Twenty Thousand Leagues Under the Sea (1871).

IMG_7978

An undated letter accompanying the gift of a gold-handled walking stick from the Boys’ Empire League in England. My favorite part, from a description of how the funds to buy the gift were raised: “Boys are not much burdened with pocket money, as you know…”.

IMG_7988

IMG_7986

A set of Around the World in 80 Days dessert plates! What I wouldn’t give to have one of these.

IMG_7994

IMG_8006

Period Around the World in 80 Days and Twenty Thousand Leagues Under the Sea board games.

IMG_8002

IMG_8016

Around the World in 80 Days trading cards.

IMG_8001

I couldn’t help taking a moment to admire these embroidery-upholstered chairs!

IMG_8004

Here, we have a framed section of some Around the World in 80 Days wallpaper from the time of the book’s first success. Who wouldn’t like to have a room papered with this?

IMG_7977

An 1881 essay titled Ten Hour Hunt, in which Verne describes the trials and tribulations of his first and only experience hunting. “There are some who do not care for hunters,” it begins, “and perhaps they are not totally wrong.” Verne was a visionary in the realm of science; perhaps his forward-thinking extended to other areas as well.

IMG_8035

A wheeled lobster with bat wings… or, alternatively, a model of one of Verne’s imagined flying machinges.

IMG_8036

Cross-section of a model of the rocket used to travel through the heavens in From the Earth to the Moon (1865). A top hat is a must when exploring space—especially if you expect to meet with high-ranking representatives of moon people. You’ll also be glad of the table lamps, wallpaper and velvet-upholstered chairs when they come round for tea.

IMG_8025

A poster advertising an 1892 theatrical production of From the Earth to the Moon in Reims. Those moon women look suspiciously corseted.

Voyage-dans-la-lune

Ten years later, cinematography pioneer Georges Méliès would make a silent film adaptation of the story. You can watch it here in a restored version with a wonderfully otherworldly 2012 soundtrack by French band Air.

Visiting this house made me realize I haven’t yet read much Jules Vernes at all. Only Journey to the Center of the Earth, ages ago, and in English! This lamentable oversight is something I hope to correct in the very near future. One book that I’m especially eager to read is Paris in the Twentieth Century. Written in 1863, its depiction of the dystopian world of 1960 was deemed too unbelievable by Verne’s publisher and so was never published during his life. It was finally released for the first time in 1994 and the predictions apparently proved remarkably prescient. Still waiting for the monorail at Bastille though…

IMG_8033

The end of the house tour. Time to head home!

IMG_8049

On our way back to the train station, I noticed this decidedly modern building, which provided a curious kind of contrast to all the 19th-century (and Victorian retrofuture) images I had just been steeping in. Also, it strangely reminded me of a cute United Nude shoe, which has nothing to do with anything else I’ve been talking about. 😉

But I digress. What I wanted to say, to conclude this post, is that Amiens is well worth a visit if you ever find yourself in Paris for a longer stay or are just a huge fan of cathedrals, Jules Verne, or both! If you reserve your ticket a couple of weeks ahead of time, train fare is only 10 euros each way.

French fruit cheesecake

Here’s a light dessert for the springtime—a vegan version of gâteau au fromage blanc, a traditional French recipe. Fromage blanc (literally “white cheese”) is a soft cheese that we don’t have in the US, so it’s hard to describe, but it’s said to be something between sour cream and cream cheese. The soft texture of silken tofu, with some structure from blended cashews, recreates this consistency for a 100% plant-based version. Lemon zest and juice add to the tartness of the fromage blanc, while the vanilla and almond extracts balance the overall flavor.

This crustless cheesecake is sometimes made with fruit (cherries, raspberries, apple, pear or stonefruit). Here, I have used canned apricots.

I used a springform cheesecake mold that measures 8 in. (20 cm) in diameter, and the cake was 1 in. (2.5 cm) high. A larger mold could be used, for a lower cake, or a smaller mold for a higher cake.

French fruit cheesecake

Ingredients

  • 14 oz (400 g) silken tofu
  • 1 cup (125 g) raw cashews, soaked for at least 2 hours
  • zest of one lemon (about 1 tablespoon, loosely filled)
  • juice of one lemon (about 3½ tablespoons)
  • 6 tablespoons (55 g) arrowroot powder or cornstarch
  • 6 tablespoons agave syrup, rice syrup or maple syrup
  • 3 teaspoons vanilla extract
  • ½ teaspoon almond extract
  • 14 oz (410 g) can apricots (8 oz/235 g after draining), or other fruit

Equipment needed: food processor or high-power blender, springform cake mold or pie dish

FullSizeRender

The first thing to do is begin soaking your cashews—at least two hours before you plan to start making the cake. If you have a high-power blender or food processor, the soaking time can be shorter.

IMG_8289

When the cashews have finished soaking, zest your lemon and then juice it. Be sure to zest it before cutting it open!

IMG_8304

Drain and rinse the cashews, then blend them in your food processor/blender together with the lemon zest and juice until smooth. Add the silken tofu and blend until it is fully incorporated.

IMG_8305

Add the remaining ingredients (arrowroot powder, agave syrup, vanilla and almond extracts) and combine well, either in the food processor/blender or whisking in a bowl.

IMG_8313

To keep the cake from sticking to the cake pan, cut a circle of baking paper to fit into the bottom.

IMG_8315

Spread a bit of vegetable oil on the bottom of the pan to get the baking paper to stick.

IMG_8317

Fill the pan with the batter.

IMG_8321IMG_8323

Add the apricot halves, cut side down, pressing down gently to partially submerge. Avoid getting batter onto the exposed part of the fruit.

IMG_8330

Bake at 347°F (175°C) for 40 minutes. It will look something something like this, with a solid, dry surface and a golden-brown color around the edges.

IMG_8331

if you’d like to brown the top a bit more, move the cake to the top-most oven rack and broil for about 3 minutes—but stay close to the oven and check every minute or so to avoid over-browning. Given my oven’s small size, I did not increase the temperature for the broiling step, but if you have a standard-size oven you might need to.

Allow the cake to cool fully before unmolding. You will notice that the height reduces as the cake settles. Gently slide a knife with a thin blade around the edges before releasing the spring mold. To remove the cake from the metal cake bottom, first gently slide a thin spatula around the edges between the cake bottom and the paper, then using another spatula, cake server or flat, wide knife (or similar—I used a long wooden crêpe flipper) on the other side, carefully lift the cake from the bottom and transfer to a serving plate.

IMG_8347IMG_8463

IMG_8506b

When slicing the cake, be sure to remove the paper from the bottom.

IMG_8522b

IMG_8524IMG_8578

new01b

If you have some powdered sugar, you can dust the top with it for a pretty effect. Do this just before serving as the sugar tends to melt into the top after a little while.

new05b

supervisor

Finally, please enjoy this behind-the-scenes shot of Sésame supervising the photo shoot. 🙂

Variations: Use a combination of fruits in different colors for a range of flavors and a more colorful appearance. Serve with a fruit sauce and/or whipped coconut cream.